5. Using ActionScript and Components to Load Content
Lesson overview
In this lesson, you will learn to do the following:
• Work with Flash CS5 User Interface components.
• Create an instance of the List component and customize its parameters.
• Trigger an ActionScript event listener when the selected item in a List component instance changes.
• Use the UILoader component to control SWF file and bitmap image loading and display.
• Change the source file of the UILoader component with ActionScript.
• Work with the URLLoader class to load text data from an external file into a Flash movie.
• Add an event listener to respond to the successful completion of a data load operation.
• Set the properties of a text field with ActionScript.
• Use the UIScrollBar component to create a scrolling text field.
This lesson will take approximately 2.5 hours.
![]()
If you have been proceeding through the lessons sequentially, you now have a collection of ActionScript 3.0 techniques in your repertoire to add functionality to your Flash files. Most large Flash projects, however, are not made up of just a single Flash file, but instead consist of a number of SWF files plus supporting content and data that is loaded at runtime.
In this lesson, you will create a simple image gallery and integrate it into a larger Flash project.
Since one of the main goals of this lesson is to integrate multiple files into a single Flash project, the materials for this lesson are more varied than in previous lessons.
Take a minute to examine the contents of the Lessons > Lesson05 folder. This folder contains an Images folder with JPG files and a Text folder with plain text files, all of which you will load into your Flash project using ActionScript.
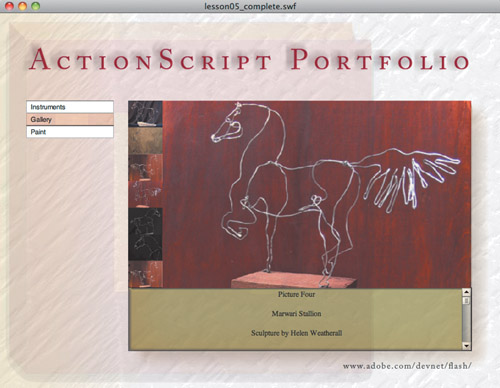
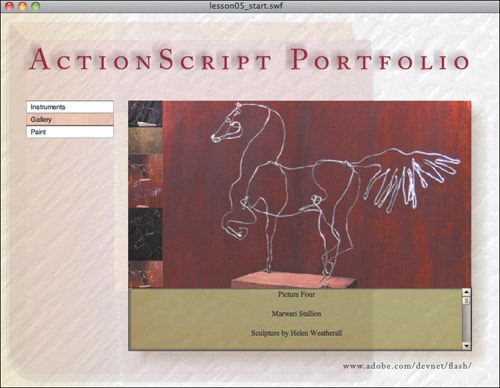
The Start folder has a lesson05_start.fla file that you will work with in this lesson. It also has an instruments.swf file and a paint.swf file. These files are completed versions of the Lesson 3 and Lesson 4 projects, respectively. You will begin the lesson by learning to load these two SWF files into the lesson05_start.fla file using instances of the List and UILoader components. After that, you will create a new gallery file that lets the user select from a list of thumbnails to display larger loaded images. Each image will have a text caption. The captions will each be loaded from separate text files. The finished gallery file will then be added to the list of files that can be loaded into the lesson05_start.fla file.
Creating a List component instance and setting its parameters
The List component that ships with Flash CS5 makes it easy to create lists of objects for users to choose from. The List component has parameters that can be set in the Flash interface or in ActionScript for adding labels and associating data with the items in the list. The component also has built-in events that occur automatically when the user makes a selection from the list.
Begin the lesson by opening the lesson05_start.fla file in the Lessons > Lesson05 > Start folder. In this lesson, you will begin to create working interface elements for the project.
- In the Timeline, above the
textlayer, add a new layer and name it components. - Open the Components panel (Window > Components).
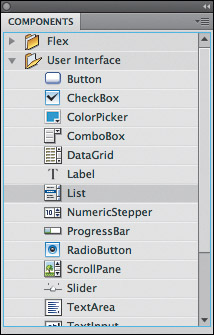
- In the Components panel, open the User Interface group and choose the List component.
- With Frame 1 of the new
componentslayer selected, drag an instance of the List component to the Stage. You will use this component to create a list of files that the user can select and load into this project. - With the Properties panel visible (Window > Properties), select the new List component instance onstage.
- In the Properties panel, name the List instance loadList.
- Also in the Properties panel, set the
Xproperty forloadListto 30 (X = 30) and theYproperty to 150 (Y = 150).
Note
A copy of the List component with some color adjustments to match the interface has been added to the library of the Lesson05_start.fla file. When you drag the List component from the Components panel to the Stage, a dialog box will ask you if you wish to use or replace the component in the library. Choose Use Existing Component.
- Set the width and height properties of
loadListas follows: W = 140 and H = 60. - With the List component still selected onstage, go to the Component Parameters section of the Properties panel. Select the
dataProviderparameter, and then click the pencil icon that appears to the right of the parameter.

The Values dialog box opens. You use this dialog box to populate the list with labels and data values.
- Add three items to the list by clicking the Plus button (+) three times.
- Select the
labelparameter of the first item, and in the field on the right, type Instruments.
This will be the label for the first item in the list.
- Select the
dataparameter for the first item, and give it the value instruments.swf.
You will use the data associated with each item in the list to store the name of the file that you want to load when that item in the list is selected.
- Give the second item the label Paint and the data value paint.swf.
You will add code to the file so that selecting this item in the list loads a finished version of the painting application that was created in Lesson 4, “Creating ActionScript in External Files.”
- Give the third item in the list the label Gallery and the data value gallery.swf.
You will create the gallery file later in this lesson.

- Click OK to exit the Values dialog box.
Adding an instance of the UILoader component
Later in this lesson, you will learn to load content into Flash using just ActionScript. But if you want to load SWF, JPG, PNG, or GIF files, then using the UILoader component can save you several steps. Here you will use the UILoader component to load SWF files into the lesson05_start.fla file. Later in your project, you will use the same component to load JPG images into a gallery file. Finally, you will load text into the gallery file using ActionScript only, since text files cannot be loaded with the UILoader component.
You’ll start by adding an instance of the UILoader to the Stage.
- With Frame 1 of the
componentslayer selected and the Components panel visible, select the UILoader component from the User Interface folder. - Drag an instance of the UILoader component to the Stage.
- With the UILoader instance selected onstage, in the Properties panel name the instance loadWindow.
- Also in the Properties panel, set the following values for the
loadWindowinstance: X = 205, Y = 140, W = 550, and H = 400.
You will be loading a series of SWF files that have a Stage size of 550 × 400 pixels into this UILoader.
Adding a CHANGE event listener to the List component
When the user selects an item in an instance of the List component, an event named CHANGE automatically fires. You respond to the CHANGE event with ActionScript very similarly to the way you have responded to other events in earlier lessons.
- With the Actions panel visible (Window > Actions), on the Timeline select Frame 1 of the
actionslayer. - Insert the following code at the top of the Actions panel:
loadList.addEventListener(Event.CHANGE, loadFile);
function loadFile(e:Event):void {
}
This syntax should be starting to look familiar to you. The listener for the CHANGE event is added in the same way that listeners were added for mouse events and frame events in earlier lessons.
Your loadFile() function will be called whenever the user makes a selection from the list.
Next, you will add code so that each selection from the list loads a different SWF file into the UILoader instance.
Loading SWF files into a UILoader component
You can load any SWF, JPG, PNG, or GIF file into the UILoader component with ActionScript by setting the source property of the UILoader. The basic syntax is:
UILoaderInstanceName.source = "Path file to be loaded goes here";
For example, if you want to load the instruments.swf file into the loadWindow component instance, you enter this code:
loadWindow.source = "instruments.swf";
In this exercise, you want to write a single function that determines which file to load by using the data that you stored in each item of the list. Remember setting the dataProvider parameters a little while ago? You will use those parameters each time the user selects an item from the list. For example, if the user selects the item labeled Paint in the list, then the paint.swf file will be loaded into the UILoader instance, because paint.swf is what you set as data for that particular item.
- In the
loadFile()function that you just created, add code between the curly braces so that the function now reads:
function loadFile(e:Event):void {
loadWindow.source = e.target.selectedItem.data;
}The term target in this case (
e.target) refers to the list, theselectedItemproperty is the item that the user chose from the list, and thedataproperty is the data that you added to that particular item in the list.Your completed code in Frame 1 should look like this:

- Save and test the movie.
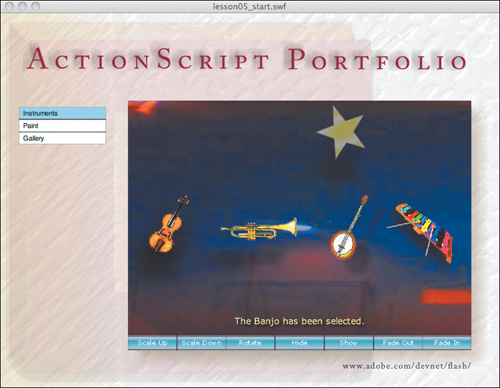
- In the testing environment, select the Paint item in the list. The paint.swf file will seamlessly load into the interface with its full functionality.
- Select the Instruments item in the list. The instruments.swf file will load.
- Select the Gallery item in the list. This will cause an error, because the gallery.swf file has not yet been created. You will create that file next.
In Lesson 11, “Using ActionScript to Control Video,” you will learn how to respond to error events at runtime so that the user does not have a confusing experience if a problem occurs when a file should be loading.
- Close the Lesson05_start.swf file to leave the testing environment and return to the authoring environment.
Creating the gallery file
Now you will create the gallery file that you referred to in the List component. This file will let the user select from a set of thumbnails to load and display JPG images in a UILoader instance. When a thumbnail image is clicked, text from an external text file that describes the selected image will also load. The text will be displayed in a text field on the Flash Stage.
The starting point for this file is provided for you as gallery.fla in the Lesson05 > Start folder. You will add quite a bit of ActionScript to this file to create its functionality, but first you will take a look at the content already in the file.
Examining the gallery.fla file
The basic layout and graphics for the gallery file have been prepared for you. You will add ActionScript to the file to control the loading of text and images.
- From the Lessons > Lesson05 > Start folder, open the gallery.fla file.
There are four layers on the Timeline and three items on the Stage. There are no actions yet. You will add code to the
actionslayer soon. Theloaderlayer contains an instance of the UILoader component. - With the Properties panel visible, select the UILoader component instance. It has been given the instance name
ldr. - In the
textlayer, select the text field. It has been given the instance nameinfo. - In the
thumbslayer, select the movie clip that contains a series of thumbnail images. You will see in the Properties panel that it has been given the instance namethumbs_mc. - Double-click the
thumbs_mcmovie clip.
The seven thumbnails are each individual buttons. If you select these buttons, you’ll see that they have the instance names
btn1throughbtn7. Because these buttons are inside a movie clip namedthumbs_mc, you describe the path from the main Timeline to these buttons in ActionScript as thumbs_mc.btn1, thumbs_mc.btn2, and so on. - Go back to the main Timeline by choosing Edit > Edit Document.
Adding event listeners to the thumbnails
In earlier lessons, you used the addEventListener() method to create buttons that respond to user clicks. Now you will do the same for the seven buttons in the thumbs_mc clip. In this situation, however, you will need to indicate the path for each of the buttons so that your ActionScript targets objects that are within the thumbs_mc clip.
- With Frame 1 of the
actionslayer selected and the Actions panel visible, place the insertion point in the first line of the Actions panel. - Keeping in mind the path to the seven thumbnail buttons, add the following code to create an
addEventListener()method for each button:
thumbs_mc.btn1.addEventListener(MouseEvent.CLICK, ldr1);
thumbs_mc.btn2.addEventListener(MouseEvent.CLICK, ldr2);
thumbs_mc.btn3.addEventListener(MouseEvent.CLICK, ldr3);
thumbs_mc.btn4.addEventListener(MouseEvent.CLICK, ldr4);
thumbs_mc.btn5.addEventListener(MouseEvent.CLICK, ldr5);
thumbs_mc.btn6.addEventListener(MouseEvent.CLICK, ldr6);
thumbs_mc.btn7.addEventListener(MouseEvent.CLICK, ldr7);The buttons will now call functions named
ldr1,ldr2, and so on. Next, you will create these functions. - In a line below the
addEventListener()calls, create theldr1()function to respond to the first button:
function ldr1(e:Event):void {
ldr.source = "../images/image1.jpg";
}When the first button is clicked, it will load an image called image1.jpg into the UILoader instance onstage. Notice the syntax for describing the path to the JPG file. The characters “../” tell ActionScript to go up one level from the location of the current Flash file and then to look in a folder named images for a file named image1.jpg. If this method of describing a path is unfamiliar to you, compare the syntax to the location of the files in the Lessons > Lesson05 folder.
- Add one more line to this function so that it reads:
function ldr1(e:Event):void {
ldr.source = "../images/image1.jpg";
textLoad("../text/picture1.txt", 0xFFE59A);
}When each button is clicked, it will load an image into the UILoader. The line you just added calls a function named
textLoad()that will load text files into the text field onstage. This function does not exist yet; if you test the movie before you create the function, you will get an error message.Notice that the call to the
textLoad()function includes two parameters. The first one passes the path to a text file. The second passes a numeric color value that will be used to set the background color of the text field. You will create thetextLoad()function soon, but first you’ll add the functions for the remaining buttons. - Create functions similar to the
ldr1()function for the other six buttons.
Note that in earlier lessons, each
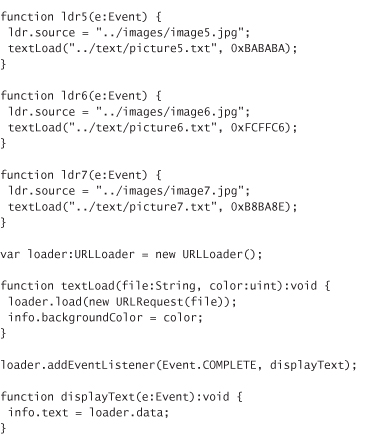
addEventListener()method you created was followed by its corresponding function. In this exercise, all theaddEventListener()calls are grouped together, followed by all the functions. The order in which you arrange the listeners is up to you.Your Actions panel should look like this:

Loading text from an external file
Now you will create the code to load a different text file into the info text field for each button. The UILoader component that you have been using to load SWF and image files makes use of an ActionScript class called the Loader. Because the UILoader component was used, you didn’t need to write ActionScript to load any files—the component took care of this process in the background. To load text or data into Flash, you use a class called URLLoader. Because you will not be using a component to help with the loading of the text, you will write ActionScript to create an instance of the URLLoader class to load text.
- In the Actions panel, below the existing code, add a new
URLLoaderinstance:
var loader:URLLoader = new URLLoader();
Next, you will create the
textLoad()function to load text from an external file. This is the function that the button listeners that you created earlier refer to. - Add the following code below the code in the Actions panel:
function textLoad(file:String, color:uint):void {
loader.load(new URLRequest(file));
info.backgroundColor = color;
}Note
You will learn much more about formatting text fields with ActionScript in Lesson 8, “Controlling Text in ActionScript 3.0.”
The
textLoad()function is called when any one of the seven thumbnail buttons is clicked. If you review the button functions, you’ll see that when thetextLoad()function is called two parameters are sent:fileandcolor. Thefileparameter is a string that describes a path to a text file, and thecolorparameter is a numeric color value that will be used to set the background color of the info text field onstage.When the
textLoad()function is called, it loads the text file into Flash and changes the color of the text field, but the text will not yet be displayed. To display the text, you need to set the data that has been loaded so that it is thetextproperty of the text field.Before you display data that is loaded from the external text files, however, you always should confirm that the data that you asked to load has actually arrived. For this, you use the
COMPLETEevent.
Using the COMPLETE event to confirm the loading of external text before displaying the text
The COMPLETE event uses a listener, just like the other events you have used. Add the COMPLETE event to listen for the successful loading of the requested data before the data is displayed.
- Below the existing code in the Actions panel, add the following line:
loader.addEventListener(Event.COMPLETE, displayText);
- Add the following lines to display the text:
function displayText(e:Event):void {
info.text = loader.data;
}When the loader object successfully completes the loading of one of the text files, it will display the text from that file in the info text field instance.
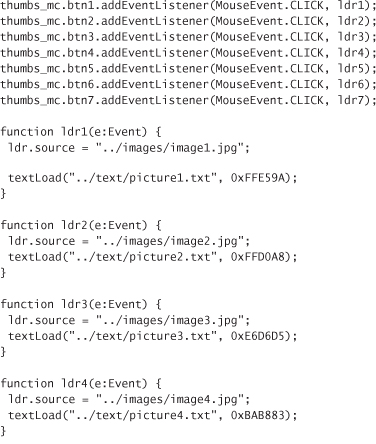
The completed code for this file should look like this:
Adding a scroll bar to the text field
The text files that you will be loading contain more text than will fit visibly in the onstage text field. Fortunately, a built-in component called UIScrollBar lets you easily create a working scroll bar for that field.
Scrolling text is an important feature in many interfaces when space is limited. Because the info text field onstage is not large enough to display all the text in the text files that may be loaded into it, you will create a scroll bar for that field.
- Select the info text field onstage.
- Open the Text menu and ensure that the text field has been set to Scrollable.

- With the Components panel open (Window > Components), select the UIScrollBar component from the list of User Interface components.
- Drag a UIScrollBar instance to the Stage so that it lines up with the upper-right corner of the info text field.
Depending on your “Snapping” settings (View > Snapping) you may need to use your arrow keys or type numeric settings in the Property inspector to place the UIScrollBar exactly where you wish.
- With the new UIScrollBar instance selected onstage, make the Property inspector visible (Window > Properties).
- In the component parameters section of the Property inspector, locate the
scrollTargetNameproperty. Flash CS5 will automatically associate an instance of the UIScrollBar with an abutting text field. Confirm thatscrollTargetNameis set toinfo;if it is not, then type info in the field for this property.

- Save and test the movie. When you click any of the thumbnail buttons, a new image loads and appears in the UILoader, and text appears in the info field, with its background color changed. A working scroll bar is available for the text field.
- Save this file and return to the lesson05_start.fla file.
- Test the lesson05_start.fla file. Pressing the Gallery item in the list now opens your new gallery file in the file’s UILoader instance. The gallery’s buttons should still perform their functions in the movie’s interface.
Some suggestions to try on your own
Experimenting on your own will help you solidify your knowledge of the techniques in this lesson. Here are a few suggestions to get you started:
- Create a new Flash movie, and add another item to the list in lesson05_start.fla to load your new movie.
- Replace the JPG files in the gallery.fla file with your own JPG files. Try getting files to load from a different path.
- Experiment with some of the other User Interface components that ship with Flash CS5. Refer to Flash Help for information about their parameters.
In the next lesson, you will learn how to create preloaders to monitor the loading progress of your Flash files.
Review questions
1 Name the file types that you can load into a Flash project with the UILoader component.
2 Name an event that is available for the List component that can respond when the user makes a selection from a List instance.
3 Name an event associated with the URLLoader class that you can use to confirm that data has finished loading.
Review answers
1 The UILoader component can be used to load SWF, JPG, PNG, and GIF files into a Flash file.
2 You can use the CHANGE event to keep track of when a user makes a new selection from a List component instance.
3 You can use the COMPLETE event to confirm the successful loading of data into a URLLoader instance.
