1. Using Code Snippets and Navigating the Flash Timeline
Lesson overview
In this lesson, you’ll learn to do the following:
• Use the Code Snippet panel in Flash CS5.
• Navigate to a URL using a code snippet.
• Add ActionScript to the Timeline via the Actions panel.
• Add labels to frames on a timeline.
• Control playback with ActionScript you’ve added to the Timeline.
• Preview your Flash project as a SWF file in the testing environment.
• Change the content of a dynamic text field in ActionScript.
• Use an ActionScript variable to keep track of a changing number.
• Use a conditional statement to respond to the looping of an animation.
This lesson will take approximately 2 hours.
![]()
The Flash Timeline is an extremely useful tool for creating animations. It is also a great environment for setting up a website or simple application that requires navigation between different sections of content. This lesson introduces the techniques for adding code to the Flash Timeline to control playback; it also introduces a few essential ActionScript 3.0 programming concepts.
First, though, this chapter introduces you to a great new feature in Flash CS5 called code snippets. Code snippets are designed to help new programmers learn ActionScript 3.0 and to speed up the workflow for experienced ActionScript 3.0 developers.

Coordinating the Flash CS5 Stage, Timeline, and Actions panel.
Getting started
To begin this lesson, from the Lessons > Lesson01 > Start folder, open the lesson01_start.fla file in Flash CS5. This file has layers, graphics, and animation. If you scrub (that is, click the playback head and drag to the left or right) through the Flash Timeline, you’ll see that the first 30 frames contain an animation and that Frame 50 contains the background for an interactive interface.

If you ran the movie at this point, it would just play through the whole Timeline from start to end, showing a brief glimpse of the interface before returning to the beginning. You will soon add ActionScript directly to this file to alter the playback of the Timeline, but first you will make use of the Code Snippets panel to add a link to a URL when a button is clicked.
Adding ActionScript using code snippets
You can create ActionScript on any keyframe in the main timeline of a Flash movie. You can also create it on any keyframe within a movie clip symbol. During playback of the compiled Flash project, the code on each frame will execute when that frame plays.
All timeline code in Flash is written in the Actions panel, accessible in Flash from the Window menu or by pressing F9 (Windows) or Option+F9 (Mac).

Later, you will see that you can also write ActionScript in external ActionScript files, but for now, you will create code exclusively in the Actions panel.
In addition to typing code directly in the Actions panel, you can add code to this panel using the new Code Snippets panel. Code snippets, as their name implies, are prebuilt chunks of ActionScript 3.0 code that can easily be added to your projects and modified to suit your purposes. Code snippets provide a wonderful way to begin working with ActionScript and can be very useful for increasing the range of tasks that you can accomplish.
Adding a code snippet to navigate to a URL
The Code Snippets panel is found on the Window menu in Flash CS5. When you add a code snippet to your project, the code snippet is written in the Actions panel, saving you the trouble of typing it yourself. After the code snippet is placed in the Actions panel, it is fully editable, allowing you to customize and modify that code.
To see how code snippets work, you will add some code that will link to the Flash support page at www.Adobe.com when a button is clicked.
Begin by adding a button to the Stage:
- With the lesson01_start.fla file open and the Stage and Timeline visible, select the first frame in the
buttonslayer. - If it is not already visible, open the Library panel (Window > Library).
- From the Library panel, drag an instance of the item named Button to the lower-right area of the Stage.
- If it is not already visible, open the Property inspector (Window > Properties).
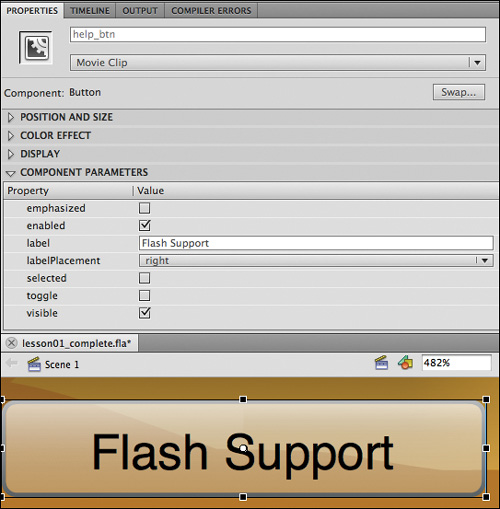
- Give your new button instance an instance name by selecting the button onstage and typing help_btn in the instance name field in the Property inspector. In Flash, it is essential that all objects onstage that will be controlled with ActionScript be given instance names.
- With your button instance still selected, give it a label by typing the label Flash Support in the Label Name field of the Property inspector, found in the Component Parameters area.
Note
The button that you are working with is a component that ships with Flash CS5. In previous versions of Flash, component parameters, such as the label property of the button that you just modified, could be modified in a panel called the Component inspector. This panel has been deprecated in Flash CS5, and component parameters are now modified in the Property inspector instead. You will learn more about components in coming chapters and will see that component parameters can also be controlled using ActionScript.
Applying a code snippet
Depending on the functionality needed, code snippets can be applied in a few different ways. For a code snippet that is intended to execute when the user interacts with a button, as is the case here, you apply the snippet by first selecting the button onstage and then applying the code snippet. You will do this now with help_btn:
- If they are not already visible, open the Code Snippets panel (Window > Code Snippets) and the Actions panel (Window > Actions).
- Select the
help_btninstance onstage. - In the Code Snippets panel, open the Actions folder.

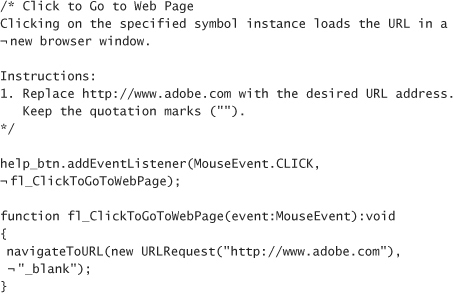
- In the Code Snippets panel, double-click the snippet named Click to Go to Web Page. Notice that the keyframe in Frame 1 of the
actionslayer of the Timeline now has a lowercase a in it. This indicates that the ActionScript written by the code snippet has been stored in this frame. You should also see the following code appear in the Actions panel:
- Test the movie by choosing Control > Test Movie > in Flash Professional.

Note
If you are used to playing the Flash Timeline by pressing Enter (Windows) or Return (Mac) or choosing Control > Play, then you should switch to Control > Test Movie > in Flash Professional or Control+Enter (Windows) or Command+Return (Mac). When you preview in this manner, your files will play in the same way as they will for your end users, with all of the ActionScript executing. From this point on, the instruction to test your movie refers to this method of previewing Flash files.
- In the testing environment, click
help_btn. The code should cause the Adobe home page to open in the computer’s default browser when the button is clicked.
Modifying the code snippet
Because code snippets are pure ActionScript code, they can easily be modified to change their functionality. If you examine the code snippet that was written in the Actions panel, you will notice that the first section of code is gray and contains a description of the code that was written and some instructions for modifying it. All of the code snippets that ship with Flash CS5 come with comments like this that help you understand the ActionScript written by the code snippet. Comments will be discussed in more detail soon and are good elements to add to your own code as notes for yourself and others.
For now, follow the instructions in the code snippet to modify the URL in the ActionScript:
- Locate the line that reads:
navigateToURL(new URLRequest("http://www.adobe.com"), "_blank");
- Modify the URL between the quotation marks to read:
http://www.adobe.com/support/flash
- Test the movie by choosing Control > Test Movie > in Flash. This time when you click the button, you should be taken to the support section for Flash on the Adobe website. You can substitute any URL in this code, and clicking the button will cause the browser to navigate to that location.
By the end of these lessons, you will know the ActionScript necessary to write all of this code from scratch, and that knowledge will open infinite creative possibilities. In the meantime, you can use the actions available in the Code Snippets panel to immediately start adding interactivity to your projects. Using this panel will also aid in your learning process by giving you insight into how to create working code and how to modify it to suit your needs.
You will work with the Code Snippets panel again in the next lesson, but now you will begin to write your own ActionScript code.
Placing code on the Flash Timeline
Working with frame labels
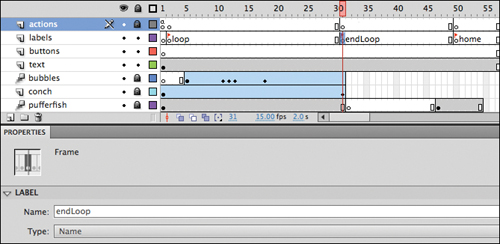
Before you start adding ActionScript, notice that among the layers in the Timeline is one called labels. In this layer, Frame 2 has the label loop and Frame 50 has the label home. You can add labels to any keyframe on any timeline in Flash—labels can be very useful for identifying significant locations. ActionScript can reference labels to control navigation. If you haven’t worked with labels before, you may want to practice adding an additional label to the Timeline on Frame 30:
- In the
labelslayer of the Timeline, select Frame 30. - Add a keyframe to this frame by pressing F6 or choosing Insert > Timeline > Keyframe.
- With the new keyframe selected, find the Label section in the upper-left corner of the Properties panel, and in the Name field, type endLoop. (If the Properties panel is not visible, open it by choosing Window > Properties.)
- Press Enter (Windows) or Return (Mac). You will see the label name appear in the Timeline on Frame 30.
Looping playback with ActionScript
There are many situations in which you may want to play a section of the Timeline repeatedly. For example, an animation might loop while waiting for additional content to load or while the user is deciding which section of a website to go to next.
Creating looping animation
For your first foray into writing your own ActionScript, you will loop the animation that plays from Frame 2 to Frame 30. At first, you will write ActionScript that loops this section indefinitely, and then you will add code that controls the number of times that this section repeats before jumping to the home interface on Frame 50:
- Arrange your work area so that both the Timeline and the Actions panel (Window > Actions) are visible.
- In the
actionslayer, select Frame 30 and press F6 to add a new keyframe in that layer.
- Select the new keyframe in the
actionslayer in Frame 30. - Click in the Actions panel so that the insertion point appears in Line 1 of the panel. If you do not see line numbers, you can turn them on by choosing Line Numbers from the Actions panel menu in the upper-right corner of the panel.
- In the Actions panel, type the following code:
gotoAndPlay("loop");
- Save your work and test your movie (Control+Enter in Windows or Command+Enter in Mac). Notice that the movie no longer reaches the
homeframe but instead plays the opening animation over and over. This behavior occurs because every time the playhead reaches Frame 30, the action you just wrote sends it back to Frame 2.
Keeping track of the number of loops
In the next section, you will program your file to jump to the home frame after a specific number of loops, but first you’ll add some code to keep track of the number of times that the animation has played. You will do this by storing the value for the number of loops in a variable.
Creating a count variable
The purpose of a variable is to store a reference to data. ActionScript 3.0 can store references to many different types of data in variables, and you will create many of these in the coming lessons. In this lesson, you will create a variable to store a numeric value to keep track of the number of times the animation in Frames 2 through 30 repeats.
To create a variable in ActionScript 3.0, you type var and then the name you want to give to your new variable:
- On the
actionslayer, select Frame 1 and then click in the Actions panel. - On a line below the existing code snippet, type the following code:
var count:Number = 1;
In the next task, you will add some code that changes that value every time the animation loops.
Updating the count variable
To change the value of the count variable on each loop, you add some code to change the value each time the animation finishes:
- On the
actionslayer, select the keyframe on Frame 30. - Click in the Actions panel.
- On a new line below the existing code, type the following code:
count++;
The characters ++ are a shorthand way in ActionScript to increase a value by 1. The code you just wrote loosely translates to “take the current value of the count variable and add 1 to it.” The result is that the second time the animation plays, count will equal 2, the third time it plays, count will equal 3, and so on.
Displaying the count in a text field
At this point, you have a variable keeping track of the number of loops, but when the movie runs, you have no visual feedback telling you how many times the animation has looped. You will now add that feedback in a text field:
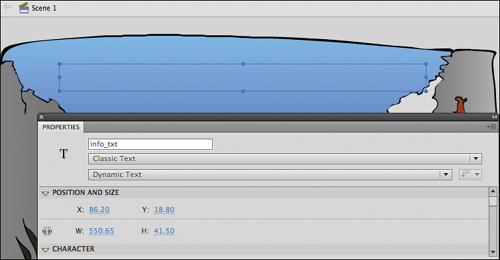
- Select the text field that is onstage in the
textlayer. Notice in the Properties panel that this text field has been given the instance nameinfo_txt. Again, it is essential that all objects onstage that will be controlled with ActionScript be given instance names.
- On the
actionslayer, select Frame 2, and add a keyframe by pressing F6. - With the new keyframe selected in the Timeline, click in the Actions panel.
- Type the following code:
info_txt.text = String(count);
- Save your work and test your movie. The text field should start by displaying the number 1, and this value should increase by 1 each time the animation loops.

Using a conditional statement to control the Timeline
A project that just plays its introduction over and over is not ideal, so let’s limit the number of times the introduction loops before jumping to the home frame. For a web project, you might want to set up an introduction that plays over and over until the next section is fully downloaded. You will learn how to create this type of preloader in Lesson 6, “Creating Preloaders in ActionScript 3.0.” In this lesson, you will limit the number of times that the introduction plays by making the Timeline jump to the frame with the label home (Frame 50) when the count variable reaches a certain number.
You will accomplish this by adding a conditional statement to your code. A conditional statement in ActionScript checks to see if a condition is true. In this case, if the count variable is more than 4, then code will execute that goes to the home frame.
- Make sure that both the Timeline and the Actions panel are visible and then select Frame 30 on the
actionslayer. - With Frame 30 selected, switch to the Actions panel. Place the insertion point before the code that is already in this window and press Enter (Windows) or Return (Mac).
- Select and delete the line of code that reads:
gotoAndPlay("loop");
Then above the line that says
count++;add the following code:if(count>4) {
- After typing this line, press Enter (Windows) or Return (Mac). Notice that when you do, Flash automatically adds a new line with a closing bracket for you. This code completion feature is new to Flash CS5 and is a convenience that helps you avoid the common mistake of forgetting to close the brackets of a block of code that needs to be contained within a pair of brackets.
- Complete the conditional statement so that it reads as shown in the following screen.
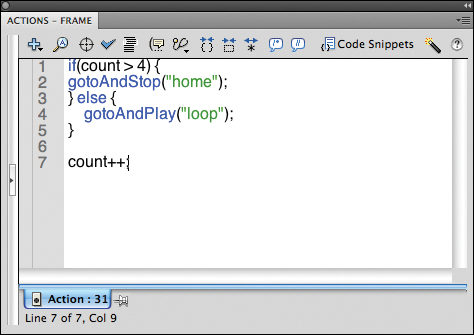
Now each time the animation finishes, the conditional statement checks to see if
counthas become greater than 4. On the first four loops, when the condition was not true, the playhead goes back to Frame 2 and replays the animation. After the fifth time the animation plays, the condition is true, so the playhead goes to, and stops on, thehomeframe. - Save your work and test your movie. The count should increase to 5 in the text field, and then the Timeline should jump to the
homeframe.
Updating the text on the home frame
Now you will change the text on the home frame. Since the user is no longer watching the animation loop on this frame, there is no reason anymore to display the count number. Instead, you will add a message to welcome the user to the home frame.
- Make sure that both the Timeline and the Actions panel are visible and then select Frame 50 on the
actionslayer. - In the
actionslayer, add a keyframe to Frame 50 by pressing F6.
- Add the following code to the Actions panel for this frame:
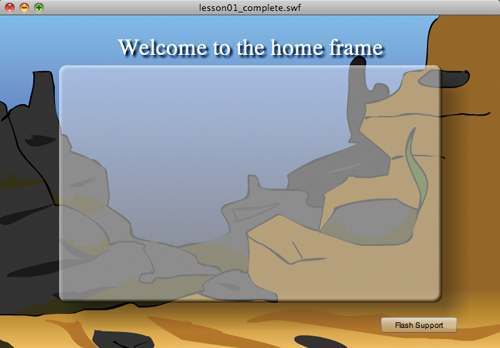
info_txt.text = "Welcome to the home frame";
This code uses the same text field that you used before, but instead of using the
countvariable to populate the text field, you use the literal words “Welcome to the home frame.” When you want to set thetextproperty of a text field to literal words, you enclose the characters you want to use in quotation marks. - Test your movie once more; you should see the updated text on the
homeframe.
Although the application you just created is very simple, it introduced a number of essential ActionScript concepts. Storing and passing data with variables and responding to changing circumstances by using conditional statements are both critical elements in the creation of rich interactivity with ActionScript 3.0. You will be working with these techniques often in the lessons to come.
In the next lesson, you will learn how to respond to events in ActionScript 3.0 by using buttons to add some functionality to the file you created in this lesson.
Some suggestions to try on your own
To get comfortable with the techniques introduced in this chapter, you can try some of the following techniques:
• Change the number of times that the opening animation repeats by altering the conditional statement.
• Change the code on Frame 50 to display different text in the info_txt field.
• Add a new text field to the Stage. Give it an instance name and try to write some ActionScript that will place text in that field.
• In a new file, explore some of the other ActionScript that can be created with the Code Snippets panel. Experiment with modifying this code. Remember that if you cause the code to stop functioning, you can always reset the code snippet.
Review questions
1 What ActionScript code would you use to navigate to a specific frame of the Timeline?
gotoAndPlay(1);
gotoAndPlay("home");
2 What is the keyword that you use to create a new ActionScript variable?
3 What is the purpose of a conditional statement in ActionScript?
Review answers
1 To navigate to a specific frame of the Timeline, you would use gotoAndPlay() or gotoAndStop(). The value between the parentheses describes the specific frame to which you want to navigate. For example:
2 A line of ActionScript that creates a variable begins with the keyword var.
3 A conditional statement lets you check to see if a condition or conditions are true and, if so, execute blocks of code. If the condition is false, you can execute an alternative block of code.