
7. Using Arrays and Loops in ActionScript 3.0
Lesson overview
In this lesson, you will learn to do the following:
• Associate a movie clip symbol in the library with an ActionScript class.
• Create ActionScript arrays to store, manipulate, and reference lists of data from a single variable.
• Use methods of the Array class to store and remove references to MovieClip instances and their properties.
• Create for loops to control the repetition of ActionScript.
• Add MovieClip instances to the Stage from the library using ActionScript.
• Use ActionScript to drag and drop movie clips.
• Use the hitTestObject() method to detect when two movie clips are overlapping.
• Use a for loop to cycle through an array and check the properties of its elements.
• Create a simple game with scoring and outcome feedback given in text fields.
This lesson will take approximately 3 hours.
![]()
This lesson introduces two very important ActionScript tools: the array and the for loop. These are common tools in many programming languages; once you have gained a level of comfort with them, you’ll find that they make a great many tasks possible.
ActionScript that places library items onstage and makes them interactive.
As with many other programming concepts, the syntax for implementing these techniques can initially be confusing. But rest assured that with a little experience you’ll find the techniques actually very easy, and what seemed perplexing at first will soon seem straightforward and quickly become a useful part of your ActionScript repertoire.
In the exercise for this lesson, you’ll learn to create a simple game that makes extensive use of arrays and for loops.
Examining the starting file
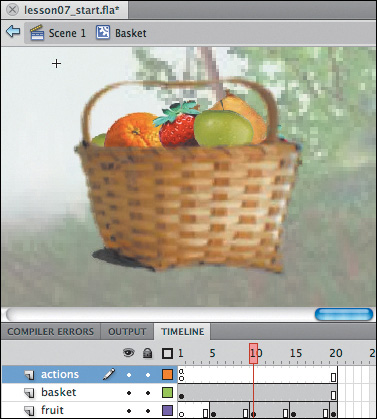
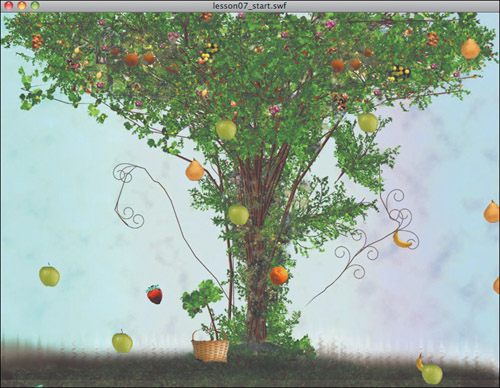
To begin this project, open the Lessons > Lesson07 > Start > lesson07_start.fla file. The main Timeline of the lesson07_start.fla file has four layers. The bottom background layer contains a static background graphic created using Flash CS5 Professional’s new and improved Deco tool. The basket layer contains an instance of a movie clip symbol that contains a graphic of a basket. This has been given the instance name of basket_mc. The text layer has two text fields with the instance names of field1_txt and field2_txt. The actions layer is empty. You will place all the code for this lesson in Frame 1 of this top layer. Before that, however, let’s take a closer look at the movie clips that will be used in this project.
- With the Properties panel visible, select the
basket_mcmovie clip in thebasketlayer. - Double-click the
basket_mcclip on the Stage to view the clip’s Timeline. Notice that the clip’s Timeline has three layers and 20 frames. Thebasketlayer contains the static image of the basket. Thefruitlayer has a new keyframe every five frames. The first frame of thefruitlayer contains no content. Each subsequent keyframe in this layer contains increasing amounts of fruit.
- The
actionslayer of the Basket clip has an action on the first frame. With the Actions panel visible, select Frame 1 of the clip’sactionslayer.
Notice that there is a
stop()action on Frame 1. When the Flash project is played, this action will prevent the movie clip from going beyond its first frame. This means that at the beginning of the game, there will be no fruit in the basket. As your user collects fruit in the basket, ActionScript that you will create later in this lesson will send the user to the later frames in this Timeline to create the illusion that the basket is being filled with fruit. - In the upper-left corner above the Stage, click the tab labeled Scene 1 to return to the main Timeline. The remaining graphics and functionality for this project will be added using ActionScript in Frame 1 of the main Timeline.
Adding MovieClip instances to the Stage from the Flash Library
One of the great benefits of Flash is that it gives you a strong set of design tools that you can control with a powerful programming language. One excellent use of this combination of design and programming tools in Flash is to create graphics and animations in movie clip symbols that can be stored in the Flash Library and added to or removed from the Stage at runtime using ActionScript.
Setting the linkage properties of a movie clip
If you plan to place instances of a movie clip from the library onto the Stage using ActionScript, you first need to set the linkage properties of that clip in the library.
The library is a convenient tool for storing and managing multiple elements. Objects in the library that are not placed onstage at authoring time are not, by default, included in published SWF files (which is generally a good thing, since including them would make SWF files unnecessarily large).
When an object is added to the Flash Stage from the library, it is automatically identified for inclusion in the compiled .swf file. However, when a movie clip in the library is not placed onstage in the Flash interface but is instead added to the Stage at runtime with ActionScript, it needs to be explicitly set to be included in the .swf file. This is accomplished in the clip’s linkage settings, which can be found in the Symbol Properties dialog box for each movie clip symbol in the library.
You will set these properties for the movie clips in the library that contain images of fruit so that you can place instances of these clips onstage and control them with ActionScript.
- Open the library for the lesson07_start.fla file (Window > Library).
- In the Library panel, select the Apple movie clip symbol.
- With the Apple clip selected, choose Properties from the menu found in the upper-right corner of the Library panel.

- If you don’t see the Linkage section of the Symbol Properties dialog box, click the Advanced button in the bottom-left corner.

- In the Linkage section, select the Export For ActionScript check box.
- Leave the Class field and all other settings as they are, and click OK.
- A dialog box will likely appear that indicates that a definition for the class cannot be found. This is normal and is telling you that Flash is creating a new class for your movie clip. Click OK, and Flash will create a new
Appleclass.

- Repeat steps 2 through 7 for the Banana, Orange, Pear, and Strawberry movie clip symbols.
When Export for ActionScript is selected as it is here, a new ActionScript class is created that references this movie clip. The name in the Class field defaults to the same name as the symbol (in this case, Apple, Banana, and so on). Of course, you have the option of changing the class name, but for this lesson, the defaults are fine.
Now that all of the fruit movie clips are available for ActionScript control, you will write ActionScript to add instances of them to the Stage.

Adding a new instance of the Apple class to the Stage
You will soon create many instances of all of the various fruit movie clips to the Stage using arrays and for loops, but first, just so you can see how easy it is to place a MovieClass instance on the Stage from the library, you will practice by adding a single Apple class instance to the Stage.
- With the Actions panel visible and Frame 1 of the
actionslayer selected, add the following code to the top of the Actions panel:
var testApple:Apple = new Apple();
addChild(testApple);This creates a variable named
testApplethat stores a new instance of theAppleclass and adds it to the Stage. - Test your movie. A single instance of the
Appleclass should appear at the upper-left corner of the Stage.

Your goal for this game, however, is not to generate a single
Appleinstance, but to create multiple random fruits. To do that, you will use aforloop. So delete the code you just wrote. - With the Actions panel visible and Frame 1 of the
actionslayer selected, select and delete all of the code that is there.
Now, starting with an empty Actions panel, you will begin to create the code to build the actual game.
Adding the initial variables
You will begin by adding to your game code a few variables that will be used to reference the information the game needs. To create the functionality that you saw in the completed game, you will need a list of all the fruit movie clips and another list of all the fruit instances that are currently onstage. These two lists will be stored as arrays.
Also, to keep track of the user’s score, you will need to keep track of the number of fruits that the user has caught in the basket and the number of fruits that the user has let fall. In the coming tasks, you will create four new variables to store all of this numeric data, starting with the two that will contain arrays.
Introducing the array
An array is a Flash data type that allows a list of values to be stored in a single variable. Methods and properties of the Array class let you add to and remove elements from an array, sort the contents of an array alphabetically or numerically, and keep track of the number of items that are in an array at any given time. You can store lists of objects with multiple properties, and even store lists of lists.
There are infinite uses for Array objects in a Flash project: An array can store a list of high scorers in a game, a list of contacts for an address book, a list of products that have been bought at an e-commerce site, and countless other lists. As mentioned, in this project you will use one array to store a list of all the fruit movie clips and a second array to store a list of the fruit instances that are currently onstage.
You create an array as you do any other variable. Here’s the basic syntax:
var listOfThings:Array = new Array();
When you create a new array, you can populate it with a list of elements, or you can create it as an empty array and add elements to it later. You will name the array for storing the list of all fruit fruitArray. It will be populated when you create it. The list of fruit instances currently onstage will be called fruitsOnstage. It will start out empty and be populated as fruit is added to and removed from the Stage.
You will start by creating the new arrays.
- With Frame 1 of the
actionslayer selected, add a newArrayinstance:
var fruitArray:Array = new Array(Apple,Strawberry,Pear,Banana, Orange);
- On the next line in the Actions panel, add the following code to create the second array:
var fruitsOnstage:Array = new Array();
Adding variables to track the user’s score
As mentioned, you will also need variables to keep track of the number of fruits the user has collected and the number the user has lost. You will add those now.
- With Frame 1 of the
actionslayer selected, add two new variables on lines below your existing code:
var fruitsCollected:int = 0;
var fruitsLost:int = 0;Both of these variables start with an initial value of 0. Later you will add code that will change the value of these variables as the user plays the game.
The next task is to create a script that will place 20 instances of the various fruit clips at random locations above the Stage and give them random speeds at which to fall. To accomplish this, you will use a for loop.
Generating multiple instances with a for loop
There are a number of ways to make ActionScript repeat code a specific number of times. Probably the most convenient and commonly used means is the for loop. The basic syntax of a for loop looks like this:
for(var i:int = 0; i < someCondition; i++) {
repeatSomething();
}
The code starts with the keyword for, which is followed by statements within parentheses; the first statement within the parentheses creates a variable with an initial numeric value, the second statement sets a condition that will be checked each time the code loops, and the third statement increases or decreases the variable from the first statement each time the loop is repeated. Code between the curly braces is executed each time the loop repeats until the condition in the second statement is no longer true.
Seeing how for loops work
For the game, you will create a for loop that repeats 20 times, adding a new fruit instance each time. But first try a simpler example of a for loop, to see how for loops work.
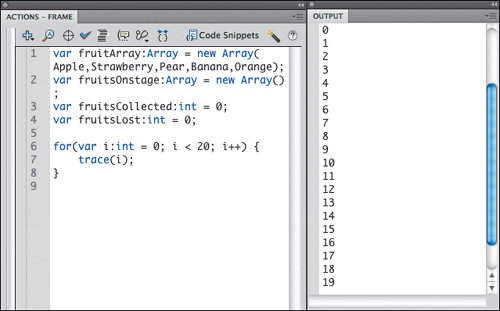
- To display the numbers 0 through 19 in the Output panel, add a
forloop below the existing code in the timeline:
for(var i:int = 0; i < 20; i++) {
trace(i);
} - Test the movie. The
forloop should execute the code in between the braces 20 times, and display the numbers 0 though 19 in the Output panel.
- Close the lesson07start.swf file to leave the testing environment.
Creating a for loop
For the game you are creating, instead of displaying numbers in the Output panel, you want the for loop to create 20 elements at random from the fruitArray array you created and place instances of the movie clips with those names onstage.
- Between the curly braces of the
forstatement you wrote in the previous task, change the code so that it reads:
for (var i:int = 0; i < 20; i++) {
var pickFruit = fruitArray[int(Math.random() * fruitArray.length)];
var fruit:MovieClip = new pickFruit();
addChild(fruit);
}Each time the
forloop repeats, it will select a different random fruit from the list. Remember that to refer to an element in an array, you use the instance name of the array followed by the element’s index number between square brackets. By referring tofruitArray[int(Math.random() * fruitArray.length)], you will reference a random element from the items infruitArrayeach time theforloop repeats. These references will be temporarily stored in a local variable namedpickFruit, in the line that reads:var fruit:MovieClip = new pickFruit();
The variable
fruitis used to store the randomly selected item fromfruitArrayas aMovieClipinstance. This instance is then placed onstage usingaddChild(fruit);.If you tested the file now, all 20 randomly selected fruits would appear onstage, but they would all appear at the default location in the upper-left corner (0,0). Instead, each time a fruit instance is created, you want it to appear in its own separate position.
- Change the
forstatement so that it reads:
for (var i:int = 0; i < 20; i++) {
var pickFruit = fruitArray[int(Math.random() * 5)];
var fruit:MovieClip = new pickFruit();
addChild(fruit);
fruit.x = Math.random() * stage.stageWidth;
fruit.y = Math.random() * -500;
}Each fruit is given a random horizontal location somewhere within the bounds of the Stage (
fruit.x = Math.random() * stage.stageWidth;) and a vertical position somewhere randomly within the 500 pixels above the Stage. Using these initial properties, your fruits are positioned and ready to begin falling from above the Stage.To determine how fast each individual fruit moves when you animate the fruit later in this lesson, you will give each fruit a speed property with a random value.
- Below the line that reads:
fruit.y = Math.random() * -500;
add the following code:
fruit.speed = Math.random() * 15 + 5;
This will give each piece of fruit a random speed property that ranges from 5 to 20. You will soon use this value to make each piece of fruit fall at its assigned speed.
Adding items dynamically to an array with push()
To be able to keep track of and manipulate each fruit that is added to the Stage, you need to add it to the fruitsOnstage array. To add an element to an array, you use the push() method of the Array class. When data is pushed into an array, it is stored at the first open index location in the array.
In our example, each time the for loop repeats and fruit is created with initial properties, that fruit needs to be pushed into the fruitsOnstage array.
- Add the following code above the closing curly brace of the
forloop:
fruitsOnstage.push(fruit);
- Review your code. The full
forloop should now read:
for (var i:int = 0; i<20; i++) {
var pickFruit = fruitArray[int(Math.random() * 5)];
var fruit:MovieClip = new pickFruit();
addChild(fruit);
fruit.x = Math.random() * stage.stageWidth;
fruit.y = Math.random() * -500;
fruit.speed = Math.random() * 15 + 5;
fruitsOnstage.push(fruit);
}
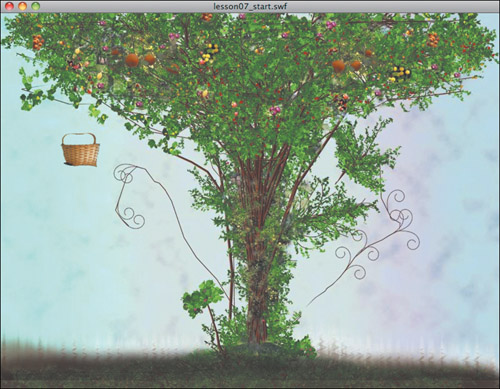
If you tested the movie at this point, all 20 fruits would be added to the display list, but most of them would not be visible in the Stage area because you have deliberately added them above the Stage so that they can fall into view. Before you make them fall, you will give the user the capability to catch them by giving the user interactive control over the basket_mc clip using the drag-and-drop functionality built into ActionScript.
Generating drag-and-drop functionality
You can easily turn movie clips into draggable objects in ActionScript using two built-in methods called startDrag() and stopDrag(). You will use these methods to give your user drag-and-drop control of the basket_mc clip.
Using the startDrag() and stopDrag() methods
You can call the startDrag() method to make any MovieClip instance (or sprite) draggable and the stopDrag() method to make it no longer draggable. For instance, you may want to make an object draggable when the user presses the mouse button on it, and to make the dragging stop when the mouse button is released. This behavior is what most people think of as dragging and dropping an object. You will add event listeners for the MOUSE_DOWN and MOUSE_UP events to add this functionality to the basket_mc clip.
Add the event listeners to your code that will be used to add drag-and-drop functionality to the basket.
- Below the existing code in the Actions panel, add the following code:
basket_mc.addEventListener(MouseEvent.MOUSE_DOWN, dragBasket);
stage.addEventListener(MouseEvent.MOUSE_UP, dragStop);
function dragBasket(e:Event):void {
basket_mc.startDrag();
}
function dragStop(e:Event):void {
basket_mc.stopDrag();
}Notice that instead of using the
CLICKevent as you have done in the past, you use theMOUSE_DOWNandMOUSE_UPevents so that you can respond separately to each part of the click. This approach allows you to makebasket_mcdraggable when the user presses the mouse button, and to stop the dragging when the user releases the mouse button.Also notice that whereas you added the
MOUSE_DOWNevent tobasket_mcto make it draggable, you added theMOUSE_UPevent to the Stage to stop the dragging. If instead you had added theMOUSE_UPevent to thebasket_mcclip, if the user drags the basket very quickly, the user sometimes may not be over the basket when the user releases the mouse, causing a problem. Experiment if you like by changing the wordstagein the code you just wrote tobasket_mcand see if you can spot the problem. You should see that for your users, it is better to apply theMOUSE_UPlistener to the Stage. - Test your movie. Click the basket. You should be able to drag it around the entire Stage area. Release the mouse button, and the basket should stay where you dragged it.
- Close the lesson07_start.swf file to return to the authoring environment.
Creating the game play in an ENTER_FRAME listener
Once the game is actually running, you want fruit to be constantly falling while the user tries to catch it. At the same time, you want to constantly keep track of the number of fruits that have been caught and missed. You will add all of this functionality in a single function that will repeat on every frame, using an ENTER_FRAME listener.
- With Frame 1 still selected in your Timeline, add the following code on lines below your existing code:
stage.addEventListener(Event.ENTER_FRAME, catchFruit);
function catchFruit(e:Event):void {
}Within the
ENTER_FRAMEfunction that you just created, you want to move every fruit that is onstage down by adding itsspeedproperty to its currentyvalue. To do this for each fruit in every frame, you will create anotherforloop that will cycle though all of the items in thefruitsOnstagearray. - Between the curly braces of the
catchFruit()function, add the following code:
for (var i:int = fruitsOnstage.length-1; i > -1; i--) {
var currentFruit:MovieClip = fruitsOnstage[i];
currentFruit.y += currentFruit.speed;
}Notice that in the previous
forloop that you wrote, the first statement within the parentheses set the variableito 0 and the last statement increased the value until the middle condition was met. This is a very common way to use aforloop. This time, however, the initial value of theivariable is set to 1 less than the total number of items in thefruitsOnstagearray (fruitsOnstage.length-1), and the third statement subtracts from that value untiliequals 0. You will see the logic behind this approach soon when you add code to remove items from the array using thesplice()method.In the
forloop you just wrote, you cycled through each fruit in thefruitsOnstagearray and changed theyvalue of each fruit in succession. Theforloop was made to work on a different fruit each time by using the variableito access sequential elements in the array:var currentFruit:MovieClip = fruitsOnstage[i];
You will frequently find that the easiest way to modify the behavior of the code in a
forloop is to work with the variable whose value changes each time the loop repeats. In our example file, that variable isiand its value decreases by 1 on each repeat. You will access the final element in thefruitsOnstagearray on the first loop, and each incremental loop will work back until the first element in the array is accessed. - Test the movie. You should now have 20 random pieces of fruit falling from the sky until they disappear below the Stage. At this point, there is no way to stop their fall, but you will soon change this.
- Close the lesson07_start.swf file to return to the authoring environment.
Keeping track of the movie clips that leave the Stage
As things now stand, each time a piece of fruit leaves the bottom of the Stage, it is gone forever. This is bad for two reasons: It makes the game short and not very satisfying, and even though those pieces of fruit are no longer visible or useful, they are still using a lot of processor cycles as they move farther and farther below the viewable area.
One way to solve this problem is to remove any fruit clips that go below the Stage and then generate new clips at the top of the Stage. However, a more efficient way to achieve the same effect is to take any clip that has left the bottom of the Stage and shuttle it back to the top using ActionScript. To the user, clips moved in this way will appear to be new objects, but in terms of performance you will be working with just the same 20 clips over and over.
- Locate the line in your code that reads:
currentFruit.y += currentFruit.speed;
and below this line, add the following code:
if (currentFruit.y > stage.stageHeight - currentFruit.height) {
currentFruit.y = 0 - currentFruit.height;
}Now each time a fruit has moved entirely off the bottom of the Stage, it is placed directly above the Stage to fall again. The reason that the
currentFruitheight is subtracted from the top and bottom of the Stage in this code is because a movie clip’s position is measured from its registration point, which for the fruit clips is in their upper-left corner. By subtracting the clip’s height, we are assured that the clip is entirely below the Stage before we place it entirely above the Stage.The conditional statement that you just wrote checks to see when a fruit object has left the Stage. This is the event that will cause the user to lose points in the game, so this is a good time to add to the value of the
fruitsLostvariable and to update one of the text fields onstage to inform the user that a piece of fruit has been lost. - In the conditional statement you just created, below the line that reads:
currentFruit.y = 0 - currentFruit.height;
add the following code:
fruitsLost++;
field2_txt.text = "Total Fruit Lost: " + fruitsLost;Now the full
catchFruit()function should read:
- Test the movie.
At this point you have reached the nadir of fun as far as the game play goes, but you are making a lot of progress with your ActionScript. The fruit should fall in an eternal fruit shower, and the text field should show an ever-increasing loss of fruit. Now is the time to give the user some way of collecting the fruit in the basket.

- Close the lesson07_start.swf file to return to the authoring environment.
Using hitTestObject() to check for collisions
The key interactivity in this game is the user’s catching pieces of fruit in the basket. So far you have added code that allows the user to move the basket and code that makes the fruit fall, so now all you need to do is detect when fruit has made contact with the basket.
You will do this using a method called hitTestObject(), which checks to see if the boundary of one displayed object is intersecting the boundary of another displayed object. Often this type of collision detection is performed within a conditional statement, like this:
if (object1.hitTestObject(object2)) {
doSomething();
}
You will add a statement like this in the for loop that is moving the fruit so that, in each frame, each fruit will be checked to see if it has made contact with the basket.
- In the
catchFruit()function, locate the conditional statement that reads:
if (currentFruit.y > stage.stageHeight - currentFruit.height) {
currentFruit.y = 0 - currentFruit.height;
fruitsLost++;
field2_txt.text = "Total Fruit Lost: " + fruitsLost;
} - On the line below this code (and above the final two closing braces), add another conditional statement to perform collision testing with the following code:
if (currentFruit.hitTestObject(basket_mc)) {
fruitsCollected++;
removeChild(currentFruit);
field1_txt.text = "Total Fruit Collected: " + fruitsCollected;
fruitsOnstage.splice(i,1);
}Remember that the code that you just created is still within the for loop, so it will run once for each object in the
fruitsOnstagearray.Each time this statement runs, it will check to see whether the fruit being checked is in contact with the basket, and if it is, the code will increment the
fruitsCollectedvariable. It will also remove the fruit from the Stage so it will no longer continue falling. This will partially create the illusion that the caught fruit has landed in the basket. We will enhance this illusion soon.After this, the text field named
field1_txtis updated to show the total number of fruits that have been collected based on the new value of thefruitsCollectedvariable.Last, a method of the Array class called
splice()is used.fruitsOnstage.splice(i,1);
This method is used to remove elements from an array. The first parameter of the
splice()method indicates at what point in the array elements should start to be removed; by using the value ofihere, you are telling ActionScript to begin removing from the element that is currently being checked. The second parameter indicates the number of elements that should be removed. By setting that parameter to1, you ensure that only one element is removed: in this case, the element that has hit the basket. - Test your movie.
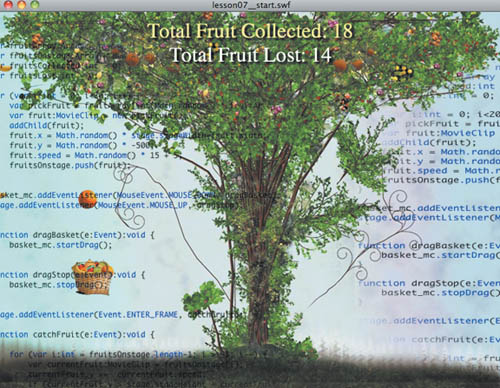
You now have a game that can be played. As the fruits fall, you can move the basket around to collect them. The ones that you catch are removed from the Stage, and the total number caught is reflected in the upper text field. The ones you missed are recycled and continue to fall until they are caught. This behavior will continue until you have caught all 20 of the original fruits, at which point there is no more fruit to catch.

- Close the lesson07_start.swf file to leave the testing environment.
Your
catchFruit()function should now read:
You can have a working game. However, it is still missing one feature—an outcome—so within the catchFruit() function, you will add two more conditional statements: one that will let users know that they have won the game when they have caught all 20 pieces of fruit, and one that will give them the sad news that they have lost when they have missed 20 pieces of fruit. If either of these conditions is true, the game will end, so the catchFruit() function will be turned off with either outcome. First you will add the conditional statement that checks for a winning outcome.
Adding conditional statements to determine the game’s outcome
In the code that you have written so far, fruits are removed from the fruitsOnstage array whenever they make contact with the basket. Therefore, if there are no elements left in the fruitsOnstage array, you know that the user has caught all 20 fruits in the basket and you can declare the user the winner.
- Above the final closing brace of the
catchFruit()function, add the following code:
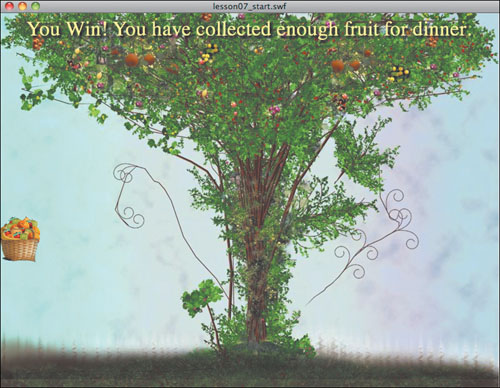
if (fruitsOnstage.length <= 0) {
field1_txt.text = "You Win! You have collected enough fruit for dinner.";
field2_txt.text = "";
stage.removeEventListener(Event.ENTER_FRAME, catchFruit);
}This conditional statement checks to see whether there are any items in the
fruitsOnstagearray. If there are none, then the upper text field on the Stage lets the user know that the user has won the game, and the lower text field is cleared. TheENTER_FRAMEevent is then removed so that thecatchFruit()function stops being called. In a more complex game, you might at this point give the user the option of replaying the game or advancing to the next level.Now add a second conditional statement to check for a loss. Since the
fruitsLostvariable is keeping track of the number of fruit that have fallen below the Stage, you can use its value to check whether more than 20 fruits—and the game—have been lost. - Below the code you just wrote and above the closing brace of the
catchFruit()function, add the following code:
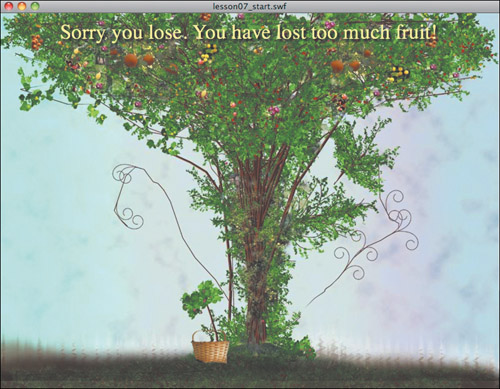
if (fruitsLost >= 20) {
field1_txt.text = "Sorry, you lose. You have lost too much fruit!";
field2_txt.text = "";
stage.removeEventListener(Event.ENTER_FRAME, catchFruit);
}Like the previous conditional statement that you wrote, this one updates the text fields to let the user know the outcome and removes the event listener. When the user wins, it is because the user has collected all the fruit so there is no fruit still onstage at that point. However, if the user loses, multiple fruits may still be in play. If you tested the movie and let yourself lose, you would see this.
To remove all of the remaining fruit from the Stage in case of a loss, you will add one more
forloop inside the conditional statement you just wrote. - Add code to the conditional statement that you just created so that it reads:

The code you just added should start to seem familiar. The only difference between this and the other
forloops that you have added is that the variable is namedj. This is because the nameihas been used within thecatchFruit()function already. Because you are again using this loop to splice items out of thefruitsOnstagearray, this loop also counts backwards as it cycles through that array. Any fruits remaining in this array after the user has lost the game will now be removed from the Stage and from the array. - Test the movie.
If you collect 20 fruits in your basket before losing 20, you should get winning feedback in the text field. If you lose 20 fruits below the Stage, you should get losing feedback and the remaining fruit should disappear. The functionality of the game is complete.
To make the play more realistic, you will add one final step to make it appear that fruits are being gathered in the basket as they are caught.
- Close the lesson07_start.swf file to return to the authoring environment.
Giving visual feedback by navigating to MovieClip frames
If you recall, the Basket movie clip symbol has a series of frames with graphics showing increasing amounts of fruit in the basket. You will now add code to sequentially navigate to those frames as the user collects more fruit. First reacquaint yourself with the frames in the Basket movie clip.
- In the Library panel, double-click the Basket movie clip.
- Notice that the graphics in Frame 1 show an empty basket onstage. The first frame of the Actions layer has a
stop()method. This means that the basket instance onstage will appear empty until ActionScript is used to send it to this Timeline’s later frames. - Scrub across the Timeline and notice that every frame shows increasing amounts of fruit in the basket. This is because in the
fruitlayer a new keyframe is added every five frames with additional fruit clips onstage. - From the Edit menu, choose Edit Document to leave the Timeline of the Basket clip and return to Scene 1.
You will now add ActionScript that advances the frames of the
basket_mcinstance as the user collects fruit. - In the main Timeline, select Frame 1 of the Actions layer to return to the code you have written for this file.
- In the
catchFruit()function, locate the code that reads:
if (currentFruit.hitTestObject(basket_mc)) {
fruitsCollected++;
removeChild(currentFruit);
fruitsOnstage.splice(i,1);
field1_txt.text = "Total Fruit Collected: " + fruitsCollected;
}
}Recall that this is the code that checks whether a piece of fruit has made contact with the
basket_mcand then responds. This is where you will add a long conditional statement that advances through the frames of the Basket movie clip as more and more fruit is collected (as tracked in the variablefruitsCollected). - Modify the conditional statement in step 6 so that it reads:

Note
After an
ifconditional statement checks for and responds to an initial condition, you can check for other conditions by addingelse ifstatements at the end of the conditional statement, as in:if (this == true) {
doSomething();
} else if (anotherThis == true) {
doSomethingElse();
}You can add as many
else ifstatements as you wish.In the code you just added, the first condition checks to see if 20 fruits have been collected; if so, the
basket_mcclip is sent to its twentieth frame and displays a full basket. A series ofelse ifstatements after this check for lesser quantities of fruit, working back in multiples of five and navigating to the other frames in the Basket clip that have keyframes. - Test the movie. Notice now that as you catch increasing amounts of fruit in your basket, the basket appears to gradually fill up.
One of the really satisfying things about working with Flash and ActionScript is the power of connecting graphics and animation in movie clips with interactive responses created with code.
The full code for Frame 1 of this file should read:


If you have problems with your code, review any error messages in the Output or Compiler Errors panels. Especially keep track of the number and placement of curly braces, as this lesson has numerous conditional statements and for loops inside of functions. Go through the steps in the lesson as many times as you need to, and remember that you can compare your file to the completed version of the file found at Lessons > Lesson07 > Complete > lesson07_complete.fla.
If you have succeeded in getting your game to work, congratulations! Although this is a relatively simple game, it contains numerous techniques used to create many types of games, and you now have the foundation that will allow you to take on more advanced ActionScript challenges.
Some suggestions to try on your own
If you have successfully completed this lesson and are comfortable with the materials covered so far, you can consider yourself a serious student of ActionScript with some formidable capabilities already in your toolkit. This might be a good time to reward yourself with a break before proceeding. Go for a walk in a beautiful place, watch a movie, do something fun with people you like—get away from the computer for awhile.
After that, you may want to try a few techniques for review before proceeding to the next lesson:
- Add an item to the List component in the completed file from Lesson 6, “Creating Preloaders in ActionScript 3.0.” Use the list to load your finished file from this lesson into the UILoader component in that file.
- In this lesson’s file, create a button that allows the user to replay the game. This will involve creating a function that resets the initial values of the
fruitsCollected,fruitsLost, andfruitsOnstagevariables and re-executing theforloop that initially places the fruits onstage. - Add graphics in movie clips that are triggered when the user wins or loses the game.
- Create additional levels of the game that work with larger numbers of items to be caught or faster-moving items.
- Create a new movie clip on the Stage that the user needs to avoid. Using
hitTestObject(), write ActionScript that takes away points when the user touches this new clip.
Review questions
1 What needs to be done to a movie clip symbol in the library before it can be controlled from ActionScript?
2 What is the basic syntax to use a for loop in ActionScript 3.0?
3 In an if conditional statement, what is the syntax to add more conditions?
4 What method is used to check whether one display object is intersecting another display object?
5 Name an ActionScript class that can be used to store a list of objects.
6 What method can be used to add a new element to the next available location in an Array instance?
7 In ActionScript, how might you identify the first element in an array named cars?
Review answers
1 To indicate that a symbol from the library can be controlled with ActionScript, you need to set its linkage properties to Export For ActionScript.
2 The basic syntax to use a for loop is:
for (var i:int = 0; i< someNumber; i++) {
doSomething();
}
3 To check for more than one condition in an if statement, you can use the syntax else if with additional conditions after the closing brace of the first condition, as in this example:
if (a == true) {
doSomething();
} else if (b == true) {
doSomethingElse();
}
4 The hitTestObject() method is used to determine if the bounding box of one object is intersecting with another. For example, to see whether a MovieClip instance named ship1 had contact with a MovieClip instance named baseStation, you could write:
if(ship1.hitTestObject(baseStation){
doSomething();
}
5 Array is a class that can be used to store a list of objects. An instance of an array can be created and stored in a variable like any other ActionScript data type, as in this example:
var employeeList:Array = new Array();
6 The push() method of the Array class can be used to add a new element to the next available location in an array, as in this example:
employeeList.push("John Smith");
7 Keeping in mind that the elements in an array are counted beginning with 0, the first element in an array named cars can be identified as cars[0].