8. Creating and Formatting Text with ActionScript
Lesson overview
In this lesson, you will learn to do the following:
• Create a text field with ActionScript using the new TLFTextField class.
• Set TLFTextField properties with ActionScript.
• Use methods and events of the URLLoader class to load text into a TLFTextField instance.
• Use the TextFormat class to control the color, font, and size of a TLFTextField instance.
• Load a MovieClip asset from the library at runtime that contains multiple user interface components that allow the user to format text.
• Create an event listener for a keyboard event to show and hide the loaded movie clip.
• Create a UIScrollBar instance using ActionScript.
• Use ActionScript to hide and show a text field scroll bar as needed.
This lesson will take approximately 2.5 hours.
![]()
One of the most exciting new features in Flash CS5 is the powerful text engine that uses Adobe’s Text Layout Format (TLF). The TLF format is the default text engine in Flash, and it offers a lot of new capabilities for working with Flash in the authoring environment. For instance, it provides the capability to work with more than 30 writing systems, including Arabic, Hebrew, Chinese, Korean, and Japanese.

In this lesson, you will use ActionScript to create and format a TLFTextField instance.
Text in Flash can now be threaded or automatically flow from one text box to the next. You can add multicolumn text and control the use of kerning, ligatures, typographic case, digit width, and discretionary hyphens.
Of course, as with all other features in the Flash interface, TLF text can be completely controlled with ActionScript. In fact, the entire TLF API is built on an open source text engine also created by Adobe that gives advanced programmers powerful tools for working with text. There are also a number of ActionScript classes with methods and properties for easily creating and formatting TLF text fields. This lesson just scratches the surface of the possibilities for using ActionScript and the TLF format, but this will be enough to give you some powerful capabilities for dynamically creating and formatting text fields.
Examining the starting file
You will start by examining the starting file for this lesson.
- Open the starting file for this lesson: Lessons > Lesson 08 > Start folder > lesson08_start.fla.
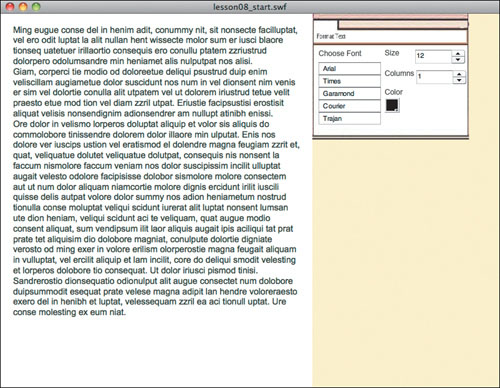
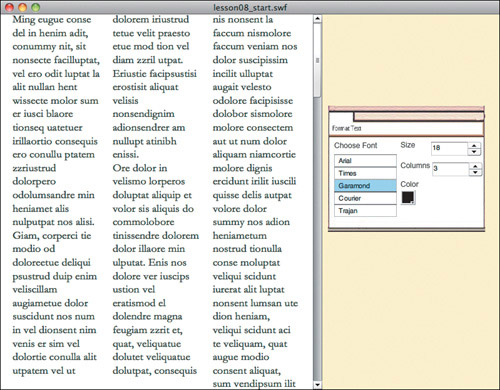
Notice that there is nothing on the Stage or in the main Timeline. The text field for this lesson will be created with code, and the text it contains will be loaded using ActionScript. The only prebuilt graphical item that will be used for this lesson is a movie clip in the library that contains the text formatting panel that you saw in the completed file.
- If the Library panel is not visible, open it (Window > Library).
The items in the library for this file are the pieces that make up the movie clip called Formatter. These pieces include a background JPEG image and a number of user interface (UI) components. Notice that the
Linkageproperty for the Formatter clip has been set and has an ID ofFormatter. In Lesson 7, “Using Arrays and Loops in ActionScript 3.0,” you set this property yourself so that new instances of the pieces of the fruit could be created using ActionScript. Here it has been done for you.
- Double-click the icon for the Formatter movie clip in the library to view its contents.
Notice that this clip has two layers: one with a background image and one with instances of the UI components. It also has a few read-only text fields that describe how the layers will be used.
- If it is not already visible, open the Property inspector and then select the List component onstage in the Choose Font section.
Notice that this List component has been given an instance name of
fontListand that it has been given five labels that correspond to common font names. You will soon write ActionScript that will set the text in a text field to the font that is selected from this list.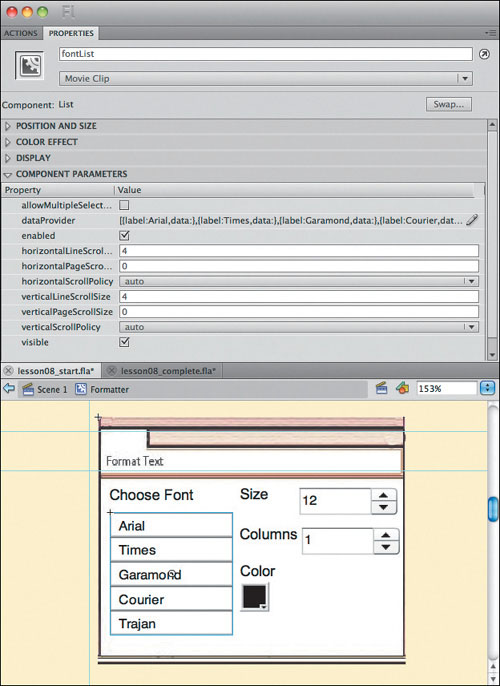
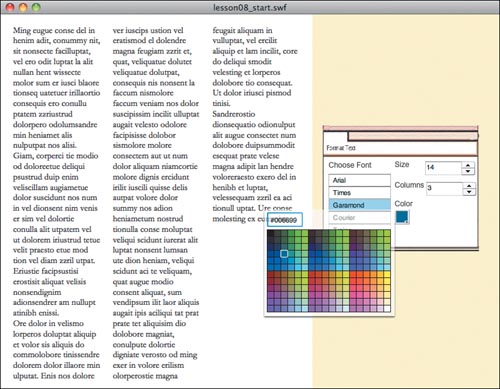
- Select the color chip under Color.
This is an instance of a component called ColorPicker. Notice in the Property inspector that it has been given the instance name
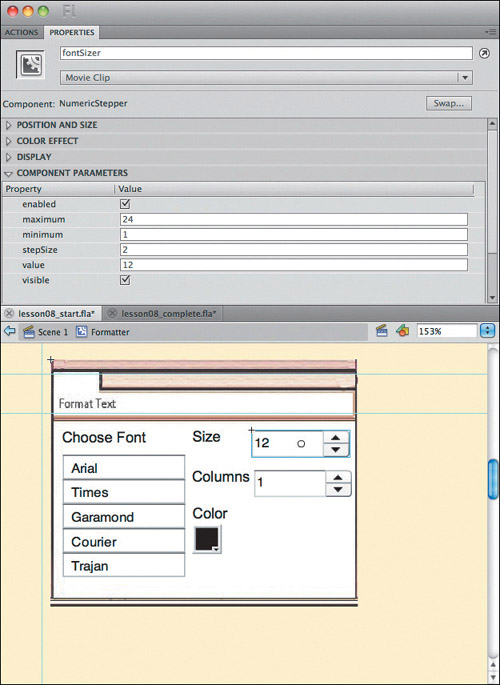
colorPicker. This component is used to select a color from a provided palette and is familiar to most computer users. You will add ActionScript so that users can use this component instance to choose the color of the text in a text field. - Select the component to the right of Size.
This is an instance of a component called NumericStepper. The user can click the up and down arrows to select a number. The initial number that is selected and the available range that can be chosen are properties that can be set in the Property inspector.
- With the NumericStepper component still selected, in the Property inspector notice that this component has been given the instance name
fontSizer. - In the Component Parameters section of the Property inspector, notice that the range of numbers available for the
fontSizerinstance is set to a minimum of 1 and a maximum of 24. The initial value is set to 12, and it is set to change its value in increments of 2 when it is clicked.
You will use ActionScript to let the user set the font size of a text field with this NumericStepper instance.
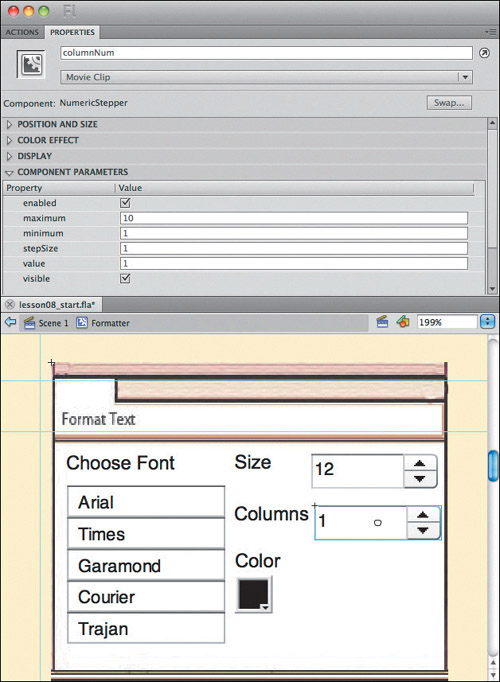
- Below the NumericStepper component that will be used for font size is another one that will be used to set the number of columns in a text field. Select this component, and in the Property inspector notice that this component has been given the instance name
columnNum. In the Component Parameters section you will see that this instance has been given a range from 1 to 10, with an initial value of 1.
You will write ActionScript that makes the number that is chosen with this instance determine the number of columns in a text field.
- From the Edit menu, choose Edit Document to close the Formatter component and return to the main Timeline. Now you will begin adding the ActionScript for this lesson, starting with the code to create a TLF text field.
Creating a TLF text field with ActionScript
In previous versions of Flash, you could create a new text field with ActionScript 3.0 by creating a new instance of the class named TextField. This class is still available in Flash CS5; however, a new class named TLFTextField has been added to the language and offers a number of advanced options for working with text. This is the class you will use to create the text field for this lesson. The first step will be to import the TLFTextField class.
- Select Frame 1 of the
actionslayer and open the Actions panel if it is not visible already. - On the first line of the Actions panel, type the
importstatement for theTLFTextFieldclass:
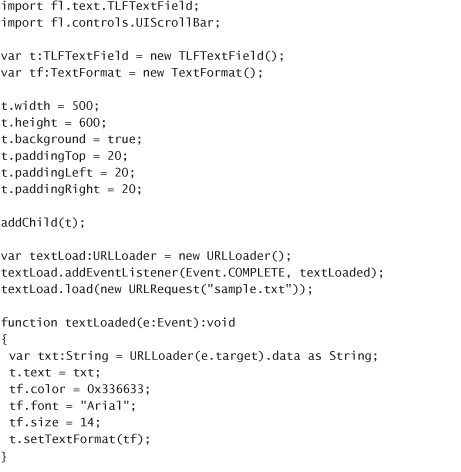
import fl.text.TLFTextField;
Later in this lesson you will be using the
UIScrollBarclass, which also requires an import statement, so add that now as well. - Below the line you just typed, add this line:
import fl.controls.UIScrollBar;
Flash CS5 may automatically add other import statements as you work, but the two statements you just created are the only ones that are required for this project to work when the code is written in the Flash Timeline.
Next you will create a new instance of the
TLFTextFieldclass. - Below the code you already typed, add the following line:
var t:TLFTextField = new TLFTextField();
Tip
For a full list of the available properties for the
TLFTextFieldclass, see the Flash CS5 ActionScript 3.0 reference.The
TLFTextFieldclass has a large number of properties that can be set in ActionScript in the same way that you have set properties for other classes in previous lessons. You will set a few of those properties now. - To the code you have already typed, add the following lines:
t.width = 500;
t.height = 600;
t.background = true;
t.paddingTop = 20;
t.paddingLeft = 20;
t.paddingRight = 20;Most of these properties are intuitive. The width of the text field is set to 500 pixels, the height to 600 pixels. The background of the text field is set to visible, which will create an opaque white background behind any text added to this field. The three padding properties will create 20 pixels of space around the top, left, and right of the text field when text is displayed in it. You will soon load some text from an external file into this field, but first you will place the field onto the Stage using
addChild(). - Below the existing code, add this line:
addChild(t);
- Test the movie. An empty white 500 × 600–pixel text field will appear onstage.
You will not be able to see the results of the padding properties until some text is added to the Stage, so close the lesson08_start.swf file and return to the authoring environment, where you will use the
URLLoaderclass to load text into this field.
Loading an external text file into a TLF text field
In Lesson 5, “Using ActionScript and Components to Load Content,” you loaded text into a text field that was created on the Stage in Flash using the URLLoader class. The process for loading a text file into a dynamically generated text field is exactly the same.
- On the line below the existing code in the Actions panel, add a new instance of the
URLLoaderclass:
var textLoad:URLLoader = new URLLoader();
Remember that before you display any data that is loaded into a Flash project, you should make sure that the data has successfully loaded. As you did in Lesson 5, “Using ActionScript and Components to Load Content,” you will add an event listener for the
URLLoader COMPLETEevent that will respond when the requested data has successfully loaded. - On the next line in the Actions panel, add this code:
textLoad.addEventListener(Event.COMPLETE, textLoaded);
Now that you are listening for anything that is loaded, you can call the
load()method to load a text file that is included in the lesson08 > Start folder. - Below the line you just typed, add this code:
textLoad.load(new URLRequest("sample.txt"));
When the sample.txt file has completed loading, the event listener you add will call a function named
textLoaded()that you will create now. - On the next line in the Actions panel, add the shell for the
textLoaded()function:
function textLoaded(e:Event):void
{
}The
textLoaded()function will store the text data from the loaded file as a string and set that string as thetextproperty of the text field namedt. - Add code to the
textLoaded()function so that it reads as shown here:
function textLoaded(e:Event):void
{
var txt:String = URLLoader(e.target).data as String;
t.text = txt;
} - Test the movie. The text from the external file should appear in the text field. Notice that there are 20 pixels of white space around the text field on the top, left, and right sides.

- Close the lesson08_start.swf file to return to the authoring environment.
Using the TextFormat class
As mentioned, the TLFTextField class offers many methods and properties for controlling the appearance of text with ActionScript. In addition, ActionScript has many other classes that offer precise control over the text in your projects.
One of the easiest classes to work with for formatting a text field is the TextFormat class. You can simply create an instance of the TextFormat class, set a few properties, and assign the instance to a text field. You will use an instance of the TextFormat class to set the font, color, and size of the TLFTextField instance that you created. You will do this now by creating a new TextFormat instance.
- It makes sense to place the code that creates the
TextFormatinstance near the code in the Actions panel that creates theTLFTextFieldinstance, so locate this line:
var t:TLFTextField = new TLFTextField();
Then, on the line below this code, create a
TextFormatinstance:var tf:TextFormat = new TextFormat();
Since you cannot apply formatting to text that isn’t loaded, you will add code to set properties for font, size, and color within the
textLoaded()function. - Locate the
textLoaded()function and on the line above its closing brace add the following code:
tf.color = 0x003300;
tf.font = "Arial";
tf.size = 14; - On a line below the code you just added, set the
TextFormatproperty of theTLFTextFieldinstance by adding this code:
t.setTextFormat(tf);
- Test your movie.
The text field should now display Arial 14-point dark green text. Soon you will give your user control over these and other properties.

- Close the lesson08_start.swf file to return to the authoring environment.
Giving the user a custom panel to format text
One of the benefits of controlling the appearance of text with ActionScript is that you can give your user tools to format text at runtime. At the start of this lesson you examined a movie clip in the library that included a number of UI components. You will now add an instance of that movie clip to the project and add ActionScript to allow it to control the appearance of the text field. You will also add ActionScript to allow the user to show and hide this panel with a keyboard shortcut and drag it around the Stage. The movie clip in the library has already been set to export for ActionScript and has been given the Linkage identifier Formatter. You will start by creating an instance of the Formatter clip.
Tip
If you need to review the process of adding clips from the library to the Stage using ActionScript, see Lesson 7.
- On a new line below all of the existing code in the Actions panel, add this line:
var formatClip:Formatter = new Formatter();
If you wanted to place the Formatter clip onstage automatically, you would simply write
addChild(formatClip). In this lesson, however, you will flex your ActionScript skills by letting the user show and hide this panel using a keyboard shortcut. Typically, computer applications use a single keyboard shortcut to toggle the showing and hiding of interface elements. To create toggle functionality like this, you will write ActionScript to keep track of whether the panel is shown or hidden. You can then write a conditional statement to see whether the appropriate key has been pressed and, within this conditional statement, you can write another conditional statement to determine whether the panel is hidden or shown.First create a new variable that will be used to keep track of whether the Formatter panel is visible.
- On the line in the Actions panel below the existing code, add the following:
var showFormat:Boolean = true;
The
Booleandata type is used when a variable is going to store only one of two possibilities: true or false. In this case, the value ofshowFormatwill be toggled betweentrueandfalseas the panel is added and removed. Because the panel should be added the first time the user presses the required keyboard shortcut, the initial value of this variable is set totrue. In the next task, you will create theKeyboardEventlistener that will contain the functionality to make this keyboard shortcut work.
Toggling the Formatter panel with a keyboard shortcut
An event listener for a keyboard event works the same way as the other event listeners that you have already used. You can use the addEventListener() method to listen for either a KEY_DOWN event or a KEY_UP event and respond with a function. Now that you have worked with a number of different types of events, the process should be familiar to you. A keyboard event will respond when any key is pressed, so if you want to respond to specific keys, you write a conditional statement inside the event-handling function that checks to see whether those keys were pressed.
To listen for the user’s key press, add an event listener to the Stage.
- In the Actions panel of the lesson08_start.fla file, add this line below all of the existing code:
stage.addEventListener(KeyboardEvent.KEY_DOWN, showFormatter);
- On a line below this code, create the shell for the
showFormatter()function:
function showFormatter(e:KeyboardEvent):void
{
} - Within the curly braces of the
showFormatter()function, add a conditional statement that checks to see whether the F key has been pressed. Remember that the letter F has a key code of 70. The function should now read as follows:
function showFormatter(e:KeyboardEvent):void
{
if (e.keyCode == 70)
{
}
}The Boolean variable
showFormatyou created will be used to determine whether to show or hide theformatClippanel. IfshowFormatistrue, the panel will be shown, and if it isfalsethe panel will be hidden. Each time theshowFormatter()function is called, theshowFormatvariable will be set to its opposite. Since theshowFormatvariable is initially set to true, the first time the function is called it will reveal theformatClippanel and set theshowFormatvariable tofalse.To make this happen within the conditional statement that checks the
keyCodeproperty, add another conditional statement to check the value of theshowFormatvariable and add theformatClipinstance to the Stage. At the same time, giveformatClipan x position that aligns with the right side of the text field. - Add code to the
showFormatter()function so that it reads as follows:
function showFormatter(e:KeyboardEvent):void
{
if (e.keyCode == 70)
{
if (showFormat)
{
addChild(formatClip);
formatClip.x = t.width;
showFormat = false;
}
}
}Next you will add an
elsestatement to the conditional statement. When the value ofshowFormatisfalse, theformatClippanel should be removed from the Stage and theshowFormatvariable should be set totrueagain. - Add code to
the showFormatter()function so that it reads as follows:
function showFormatter(e:KeyboardEvent):void
{
if (e.keyCode == 70)
{
if (showFormat)
{
addChild(formatClip);
formatClip.x = t.width;
showFormat = false;
}
else
{
removeChild(formatClip);
showFormat = true;
}
}
} - Test the movie. Press the F key on the keyboard. The
formatClippanel should appear to the right of the text field. Press F again, and the panel will disappear.
- Close the lesson08_start.swf file to return to the Flash authoring environment.
Making the formatting panel draggable
A common feature of interface elements like the formatting panel you added to this project is their ability to be dragged. In Lesson 7, you saw how to make a movie clip draggable.
To make the formatClip panel draggable, you will add a MOUSE_DOWN event listener when the panel is shown and remove the listener when the panel is hidden.
- Within the
showFormatter()function, add aMOUSE_DOWNlistener within the secondifstatement; within theelsestatement, remove the same listener. The completed function should look like this:

Next add the
drag()function that will make the panel draggable. - Below all of the existing code, add this new function:
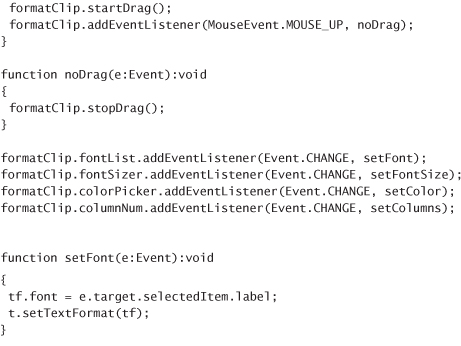
function drag(e:Event):void
{
formatClip.startDrag();
formatClip.addEventListener(MouseEvent.MOUSE_UP, noDrag);
}Notice that this function adds a listener that will run when the mouse button is released. This listener will be used to stop that panel from being dragged.
- Add the
noDrag()function below the code you just added.
function noDrag(e:Event):void
{
formatClip.stopDrag();
} - Test the movie. Press the F key to reveal the panel and now use the mouse to drag the panel around the Stage. When you release the panel, it stays where it was dragged.
You now have a very handy panel that does nothing at all. You will fix that in the next task. The next ActionScript you write will control the formatting of the text field using the components within this panel.
Controlling text formatting using components and ActionScript
You will create an event listener for each of the four components in formatClip to format the font, size, and color of the text in the text field as well as the number of columns in the field.
- Below all of the code in the project, create
addEventListener()methods that listen forCHANGEevents on each of the components informatClip:
formatClip.fontList.addEventListener(Event.CHANGE, setFont);
formatClip.fontSizer.addEventListener(Event.CHANGE, setFontSize);
formatClip.colorPicker.addEventListener(Event.CHANGE, setColor);
formatClip.columnNum.addEventListener(Event.CHANGE, setColumns);Now you will add the functions that format the text. Each of the first three functions will set a property of the
textFormatinstance you created, calledtf, and then reapplytextFormatto thettext field.The
fontproperty will be determined when a change is made to the selected item in the FontList component. The text size will be determined by the value chosen in thefontSizerinstance of the NumericStepper component, and the text color will be determined by the color selected in thecolorPickerinstance. - Below the
addEventListener()methods you just added, write the following three functions:
function setFont(e:Event):void
{
tf.font = e.target.selectedItem.label;
t.setTextFormat(tf);
}
function setFontSize(e:Event):void
{
tf.size = e.target.value;
t.setTextFormat(tf);
}
function setColor(e:Event):void
{
tf.color = e.target.selectedColor;
t.setTextFormat(tf);
}In each of these functions,
e.targetrepresents the component that has had a change made to it. The user’s selection is set as the value of aTextFormatproperty.For the
setColumns()function, which will be called when a change is made to the fourth component, you will set a property of the newTLFTextFieldclass that allows you to add columns to a text field. When thecolumnCountproperty of aTLFTextFieldinstance changes, any text in that field will rewrap to flow across the new columns. - Add the
setColumns()function below your existing code:
function setColumns(e:Event):void
{
t.columnCount = e.target.value;
} - Test the movie. Press the F key to display the
formatClippanel. Choose a font from the list and notice that the font in the text field changes. Pick a new color from the color picker, and the text in the field changes to the selected color. Click to set the column number to 2 or more, and try increasing the font size.
If you have been successful with the code up to this point, you should now have a working formatting panel. One issue you may have noticed as you change settings is that if the text is too large to fit into the text field with the current settings, part of the text is not viewable. To solve this problem, you will add a scroll bar to the text field using ActionScript and add code so that the scroll bar appears and disappears automatically as needed.
- Close the lesson08_start.swf file to return to the authoring environment
Creating a scroll bar using ActionScript
In Lesson 5, you added an instance of the UIScrollBar component and set some of its properties in the Flash authoring environment to create a scroll bar for a text field. In this lesson you will use the same UIScrollBar component, but you will add it, set its properties, and remove it dynamically with ActionScript.
If you have made it this far, you probably can guess how to write the code that will create an ActionScript instance of the UIScrollBar component.
- Below all of the code in the Actions panel, type the following:
var scroller:UIScrollBar = new UIScrollBar();
- On all of the UI components in Flash CS5, a
move()method is available that allows you to pass x and y values to a component to position it. Call this method for the new scroller instance on a new line:
scroller.move(t.x + t.width, t.y );
The first parameter of the
move()method sets the x position of scroller so that it lines up with the right side of the text field, and the second parameter sets the y value ofscrollerto match the text field. - On a new line, set the height of
scrollerso that it matches the height of the text field:
scroller.height = t.height;
- To tell an instance of the UIScrollBar component which text field it should control, you set its
scrollTargetproperty. Do this on the next available line:
scroller.scrollTarget = t;
- On a new line, add
scrollerto the Stage:
addChild(scroller);
- On the next line, set the initial
visibleproperty ofscrollertofalseso that the scroll bar does not appear until needed:
scroller.visible = false;
Showing and hiding the scroll bar
Now you will write a function that shows and hides the scroll bar based on the amount of text in the text field. Since the content of the text field in this project changes only based on settings that are made in formatClip, you will use an event listener to check the content of the text field to determine whether a scroll bar is needed each time the user clicks the formatClip panel.
- Below the existing code in the Actions panel, add an event listener for
formatClip:
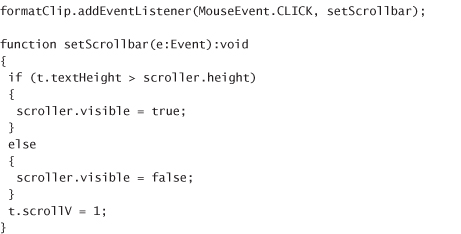
formatClip.addEventListener(MouseEvent.CLICK, setScrollbar);
- The scroll bar will be needed when the height of the text in the text field exceeds the height of the field itself. Create this functionality by adding the following function below the rest of the code in the Actions panel:
function setScrollbar(e:Event):void
{
if (t.textHeight > scroller.height)
{
scroller.visible = true;
}
else
{
scroller.visible = false;
}
}Before you test your movie, add one final line to the
setScrollbar()function. ThescrollVproperty of aTextFieldorTLFTextFieldinstance determines which line of text will be the first to appear in the field. By setting this property to a value of 1 when thesetScrollbar()function is called, you can make sure that when text is reformatted, the text is reset to the top of the page. - Above the final closing brace of the
setScrollbar()function, add this line:
t.scrollV = 1;
- Test the movie. Try increasing the size of the text until it no longer all fits in the field, and notice that the scroll bar appears. Reduce the size of the text, and notice that the scroll bar disappears. Notice that the text field always starts at the top of the page when you reset it.
To get a clearer sense of what the
scrollVproperty does, go back to your code and comment out or remove the last line you added and then test the movie again. You will see how much better the user’s experience will be with this property set.Here is the complete code you created for this lesson:


Bear in mind that what you did here demonstrates just a tiny fraction of the functionality that is available for working with text in ActionScript and that entire volumes could be dedicated to additional capabilities. What you learned in this lesson should give you plenty of tools to work with as well as a good launching point for your continued exploration of the many ActionScript classes, methods, and properties connected with text.
Some suggestions to try on your own
A deeper study of the two text classes covered in this lesson, the TLFTextField and TextFormat classes, would reveal many other useful capabilities. In addition, many other classes associated with text in general and TLF text specifically can be found in the Flash Help files. Particularly useful is the TextFlow class. Flash also supports the use of HTML tags and Cascading Style Sheets (CSS) for formatting text. Also, an understanding of XML, which is introduced in Chapters 10 and 11, can be helpful when loading text content into Flash projects.
Here are a few suggestions you may want to try right away with this lesson’s project:
- Add a few more components to an expanded formatting panel and use them to modify additional
TLFTextFieldandTextFormatproperties. - Create multiple panels and give each panel a set of related features such as font formatting and page layout.
- Create a list or menu to load additional text files.
- Complete the project in Lesson 13 and then add printing capabilities to this project.
- Complete the project in Lesson 14 and turn this project into an AIR application that can save a copy of the text field as a file to the user’s machine.
- Explore the
TextFlowclass and other TLF features for controlling the flow of text; then add fields to the project and load a single text file across multiple fields.
Review questions
1 Name three properties of the TLFTextField class.
2 Name three properties of the TextFormat class.
3 What two values can be stored in a variable with a data type of Boolean?
4 How can you use ActionScript to determine which key was pressed on the keyboard?
Review answers
1 The TLFTextField class has many properties, including the following that were used in this lesson: text, width, height, background, paddingTop, paddingLeft, paddingRight, and columnCount.
2 Among the many properties of the TextFormat class are the following that were used in this lesson: font, color, and size.
3 A Boolean data type can store one of two values: true or false.
4 One way to use ActionScript to determine which key has been pressed is to create a KeyboardEvent listener and then use the keyCode property of that event, as in this example:
stage.addEventListener(KeyboardEvent.KEY_DOWN, keyCheck);
function keyCheck(e:KeyboardEvent):void
{
trace("Key number " + e.keyCode + " was pressed");
}