
2. Creating a Print Layout
Lesson Overview
In this lesson you’ll learn the skills and techniques you need to put together a sophisticated print magazine:
• Using Mini Bridge and Adobe Bridge to preview and select files
• Creating a document in InDesign
• Working with layer comps in Photoshop files
• Adjusting raw images
• Importing and styling text
• Laying out graphics efficiently
• Working with transparency

You’ll probably need between one and two hours to complete this lesson.

Quickly identify and import files using Adobe Bridge and Mini Bridge. Add text and graphics in a variety of file formats and take advantage of advanced layout tools. Then prepare your documents for high-quality printed output.
Inspecting and Selecting Documents with Adobe Bridge
If you’ve ever looked at a folder full of files and were unsure about which one you should open, take advantage of Adobe Bridge. Using Adobe Bridge to find the right document is often easier than using the standard Open dialog box, because Adobe Bridge gives you tools to inspect documents without opening them. Adobe Bridge can preview many file types produced in Design Premium. For InDesign files, Adobe Bridge can display the fonts and links in an InDesign document, and you can preview the document’s pages.
Before you start working on this lesson, make sure that you’ve installed the Creative Suite 6 software on your computer and that you have correctly copied the Lessons folder from the DVD in the back of this book onto your computer’s hard drive (see “Copying the Classroom in a Book files” on page 3).
You’ll use Adobe Bridge to locate a partially completed InDesign document that you will use for the exercises in this lesson. The document represents the latest issue of a printed magazine.
1. Start Adobe Bridge, and make sure the Essentials workspace is selected at the top of the Adobe Bridge window.
2. Navigate to the Lesson02 folder on your hard drive. Within that folder, select, but don’t open, the file Magazine_Start.indt.
3. In the Preview panel, click the arrow buttons under the document preview to see the other page in the InDesign document. Using Adobe Bridge to page through InDesign documents without opening them can save you a lot of time.
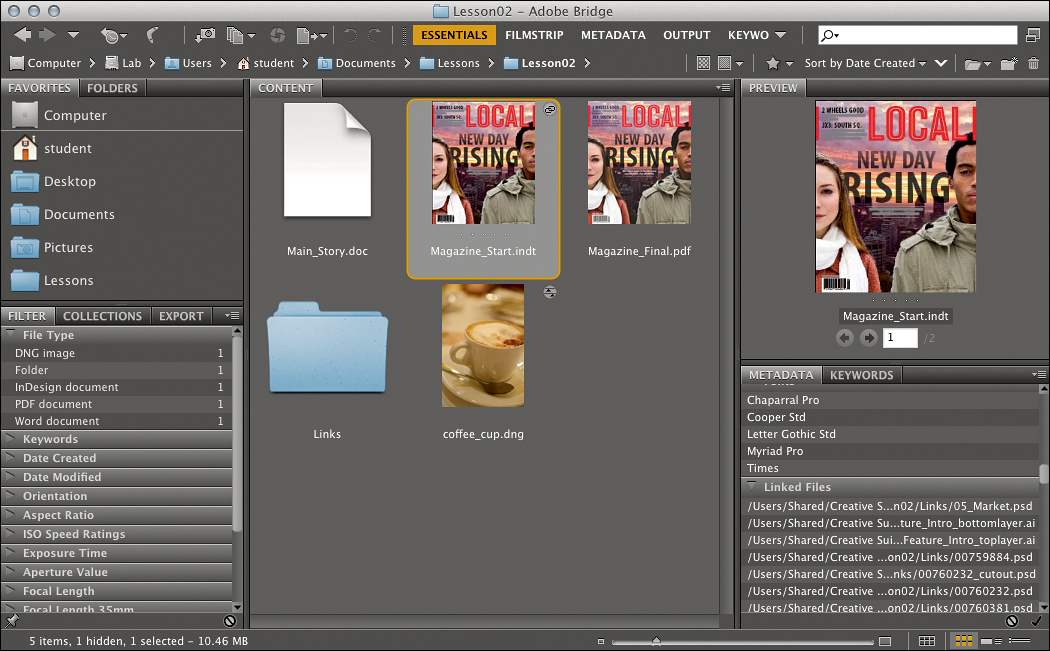
4. Notice the chain-link badge at the top-right corner of the selected InDesign document icon in the Content panel. This badge indicates that you can inspect the links in the InDesign document. You’ll do that next.
5. Scroll the Metadata panel until you find the Linked Files pane, where you can view a list of the files linked to this InDesign document. Click the disclosure triangle to reveal the list.
Above the Linked Files pane is the Fonts pane, where you can see which fonts are used in the InDesign document.
6. Select the file Magazine_Start.indt, and then choose File > Open With > Adobe InDesign CS6 (default).
Magazine_Start.indt is a template—it opens as a new, untitled document (see the sidebar “Jump-starting design and production using templates”). You’ll save this document under a new name; the template file will remain unchanged so that you can always go back to it if you need to start over.
7. In InDesign, choose File > Save. In the Save As dialog box, navigate to the Lesson02 folder, name the document Magazine.indd, choose InDesign CS6 document from the Save As Type/Format menu, and then click Save.

Modifying an InDesign Document
Now that you have created a document from the InDesign template, you can adjust it just as you can any other InDesign document. You can replace illustrations and photos, add and stylize text, and even change the document layout settings you’ve acquired from the template.
Navigating through the document
Before making any changes to the document, navigate through its pages so you can plan which elements you’d like to customize.
The visibility of menu items can be customized in InDesign. Selecting a predefined workspace may result in some menu items being hidden. If you can’t find the menu item you’re looking for, choose Show All Menu Items at the bottom of the menu, when available.
1. Choose Window > Workspace > [Advanced] to lay out all the panels you’ll need for this lesson and make all menu commands visible.
If graphics on the layout display at a low resolution, you can display them with greater detail (as in the figure for step 2) by choosing View > Display Performance > High Quality Display. Note that High Quality Display takes longer to redraw.
2. Use the navigation buttons in the lower-left corner of your document window to navigate through the pages of the magazine. Then use the menu next to the current page number to return to the first page.

3. Click the Pages button in the right panel bin to open the Pages panel. If necessary, enlarge the Pages panel by dragging its lower-right corner downward so you can see preview images of all pages. Double-clicking a page in the Pages panel will open that page in the main document window. Double-clicking the page number under the preview image will center the page spread in the main document window.

4. Click the Pages button in the right panel bin again to close the Pages panel.
Viewing the reference document
In the Lesson02 folder is a PDF version of the completed magazine that you can use as a reference as you work through this lesson. This time we’ll use Mini Bridge, a version of Adobe Bridge that you can use as a panel inside InDesign for easier access to the assets you want to bring into an InDesign document.

1. In InDesign, choose Window > Mini Bridge. If you see a Launch Bridge button, click it now.
2. Navigate to the Lesson02 folder, and select the file Magazine_Final.pdf.
3. Right-click/Control-click Magazine_Final.pdf, and choose Open.
4. In Acrobat choose View > Page Display > Two Page View and View > Zoom > Fit Width. Then use the arrow keys on your keyboard to navigate through the spreads.
5. When you’re done, return to InDesign. You can leave the PDF document open for reference.
6. Close the Mini Bridge panel.
Working with multiple page sizes
The magazine cover looks good, but to give it a little more interest, the client wants to extend the right side of the cover using a foldover flap. You’ll create this by adding a page to the cover to create a spread. In addition, the page you add to the spread will use a smaller, narrower page size.
1. In the Pages panel, double-click page 1, right-click/Control-click the Page 1 thumbnail, choose Insert Pages, and in the dialog box that appears, click OK.
Because you created the new page from Page 1, it’s part of the Page 1 spread.

2. In the Tools panel, click the Page tool (![]() ), and then click the new page you created. As you do this, the Control panel displays options for the selected page.
), and then click the new page you created. As you do this, the Control panel displays options for the selected page.

To adjust the bleed and slug areas, choose File > Document Setup. If you don’t see the Bleed and Slug options, click the More Options button.
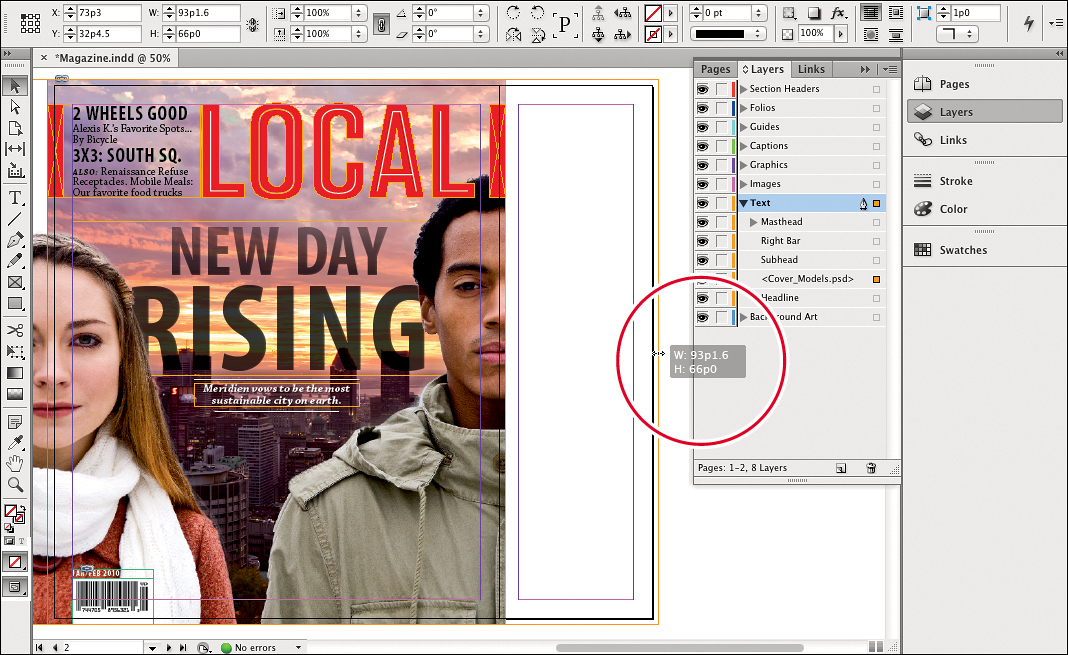
3. In the Control panel, change the page width (W) to 18p6.
4. In the Layers panel, click the disclosure triangles to the left of the Text layer and Background Art layer to reveal sublayers and the objects on those layers.
5. Click the square icon to the right of the <Cover_Models.psd> object label to select it.
6. In the Tools panel, click the Selection tool (![]() ). Drag the handle in the middle of the right edge to extend the graphic across the new page until the graphic is 93p1.6 wide, all the way to the right edge of the bleed area. The Control panel and the tool tip display the width as you drag.
). Drag the handle in the middle of the right edge to extend the graphic across the new page until the graphic is 93p1.6 wide, all the way to the right edge of the bleed area. The Control panel and the tool tip display the width as you drag.
7. Choose Edit > Deselect All.
You could have also selected the graphic by clicking it with the Selection tool, but on a busy layout like this one, using the Layers panel can be a more direct way of ensuring that you select exactly the object you want.
Selecting and editing frames that are stacked behind other frames
The sunrise image should also be extended across the new page, but you can’t select it by clicking because it’s completely behind the Cover_Models.psd image. Fortunately, there’s more than one way to select it.
1. With the Selection tool, hold down the Ctrl/Command key, and then click the sunrise image. The first time you click, the bounding box for the Cover_Models.psd image may activate. Keep the Ctrl/Command key pressed and click again until the blue outline of the sunrise image activates. You can confirm this by noting which object in the Layers panel has a selected square to the right of it.
With multiple overlapping frames, you may need to Ctrl/Command-click repeatedly through the stack until the correct frame is selected.
2. Once the sunrise image’s frame is selected, you can drag the handle in the middle of the right edge until it is 74 picas wide. Of course, this works only when the image is larger than the frame that crops it in InDesign.

3. Save your changes.
The second way to select the sunrise image would be to locate it in the Layers panel and click the square to the right of it, as you did with the Cover_Models.psd image.
Placing a Photoshop file with layer comps
Navigate to the last page, the back cover. Currently, the back cover is blank. You will first place the back page photo into the frame provided for it, and then make adjustments to the image in Photoshop.
1. Use the Selection tool to select the frame on the last page.
If your placed graphic does not look as smooth as shown in the illustration on this page, choose View > Display Performance > High Quality Display.
2. Choose File > Place. Navigate to the Links folder inside the Lesson02 folder. Select the file wifi_laptop.psd, select both Show Import Options and Replace Selected Items, and then click Open.

3. In the Image Import Options (wifi_laptop.psd) dialog box, and make sure the Show Preview option is selected. In the Layers tab, notice that all of the layers are turned on. Choose Sponsor On from the Layer Comp menu; the preview thumbnail updates to show the Local logo in the bottom-right corner. Click OK.

Because you enabled Replace Selected Item in the Place dialog box, the imported Photoshop file fills the frame you selected instead of being placed independently on the layout.
You can hide or show each layer independently. Layer comps are just a convenient way to hide or show preselected groups of layers.
4. To view the cover without page frames and guide lines, click and hold the Screen Mode button at the bottom of the Tools panel and choose Preview. When you’re done previewing, choose Normal from the same menu. You can also toggle between Normal and Preview by pressing the W key.

The sunset would look better if it was a little more intense, so you will now use Photoshop to alter the color balance of the sky.
5. Use the Selection tool to select the frame containing the image and choose Edit > Edit With > Adobe Photoshop CS6 (default).
6. In the Layers panel in Photoshop, click the disclosure triangle next to the Background layer group to reveal its contents. Select the Background Image layer at the bottom of the Layers panel.

7. In the Adjustments panel, click the Color Balance icon to add a new Color Balance adjustment layer immediately above the selected layer.
8. In the Color Balance panel, make sure Midtones is selected, and then enter 25 for the Cyan/Red slider, 0 for the Magenta/Green slider, and -12 for the Red/Blue slider. Leave Preserve Luminosity selected.

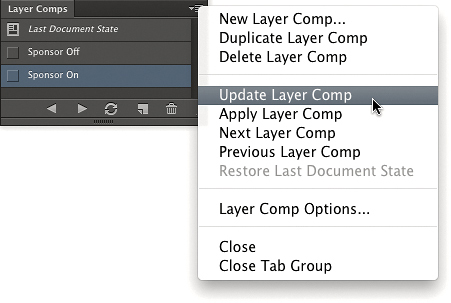
Because the document now contains a layer that wasn’t included in the original layer comps, you’ll learn how to update the layer comps so they’re properly preserved when you return to InDesign.
9. Open the Layer Comps panel (Window > Layer Comps). Two layer comps have already been defined, named Sponsor Off and Sponsor On. Click the box to the left of the Sponsor On layer name to enable that layer comp, and notice the effect it has on the visibility of the layers in the Layers panel and in the image.

A layer comp is simply a snapshot of the visibility, position, and layer style settings for various layers in the Layers panel. You may notice that the Color Balance layer you created was turned off when you turned on the Sponsor On layer comp. The reason is that that layer didn’t exist when the layer comp was originally saved.
10. Turn on the Color Balance layer, make sure Sponsor On is highlighted in the Layer Comps panel (but don’t turn it on), and then choose Update Layer Comp from the Layer Comps panel menu. Now the Sponsor On layer comp includes the Color Balance adjustment layer. You can repeat this process for the Sponsor Off layer comp: Turn on the layer comp, turn on the Color Balance adjustment layer, and update the layer comp.
When placing a Photoshop file containing layer comps in InDesign, you can choose which version—or layer comp—you want to use in your publication without having to reopen and adjust the file in Photoshop.
11. Save changes, close the document, and then switch back to InDesign. An alert may appear, letting you know that the graphic has changed; click OK.
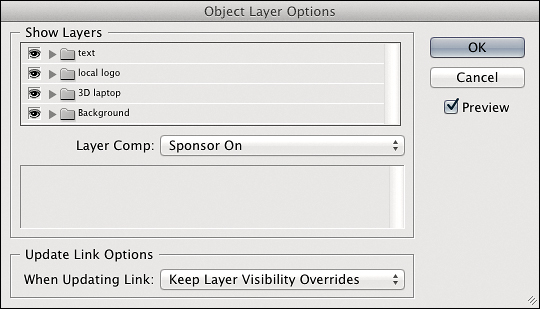
12. With the back cover image still selected in InDesign, choose Object > Object Layer Options. From the Layer Comp menu in the Object Layer Options dialog box, choose Sponsor On, select the Preview check box to see the effect, and then click OK.
13. Choose File > Save.
Camera raw is not a single format. Each camera sensor model may have a different raw format and filename extension. Most camera raw formats can be converted to the DNG (Adobe Digital Negative) format.
Working with camera raw images
Camera raw format files are now common for high-quality digital photographs. The Camera Raw plug-in for Adobe Photoshop enables you to adjust a raw image and to then save it in a file format that can be placed in InDesign.
1. In InDesign navigate to page 17. If not already selected, choose View > Screen Mode > Normal. If you don’t see guidelines on the page, choose View > Grids & Guides > Show Guides.
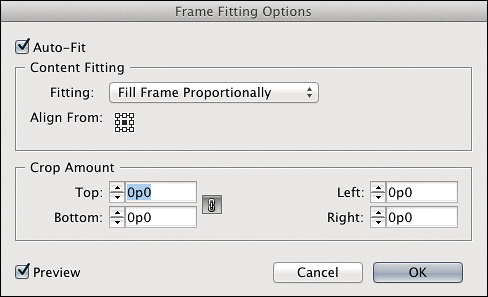
2. Select the empty graphics frame on page 17 and choose Object > Fitting > Frame Fitting Options. Select Auto-Fit, choose Fill Frame Proportionally, and click the center of the Align From proxy. These options ensure that no matter the size of the image, it will be sized to fit the frame and centered within it, saving you time in fitting the image to the frame.

3. Click OK.
4. Switch to Adobe Bridge, and in the Lesson02 folder double-click the raw image file named coffee_cup.dng. The image will open in Photoshop in the Camera Raw dialog box.

The reason you need to switch to Adobe Bridge is that Mini Bridge displays only the file formats its host program can import directly, and InDesign can’t import DNG files.
5. To adjust the white balance in a camera raw image, you can choose from a predefined setting or pick a reference area within the image. Explore the different settings in the White Balance menu in the Basic panel and note the effect on the image colors. To adjust the color relative to an area in the image that should be a neutral mid-gray, select the White Balance tool (![]() ) from the Tools panel and then click inside the reference area. Clicking the White Balance tool on the coffee cup neutralizes the image colors. However, this photo is intended to convey a warm coffee-shop atmosphere, so restore the original white balance by choosing As Shot from the White Balance menu.
) from the Tools panel and then click inside the reference area. Clicking the White Balance tool on the coffee cup neutralizes the image colors. However, this photo is intended to convey a warm coffee-shop atmosphere, so restore the original white balance by choosing As Shot from the White Balance menu.

6. The image is a little flat, so it could use more contrast. To have Camera Raw determine a starting point for correction, click the underlined Auto text. From this point you can refine the automatic correction by dragging the sliders. The image is a little dark now, so increase the Exposure value to about 0.15.
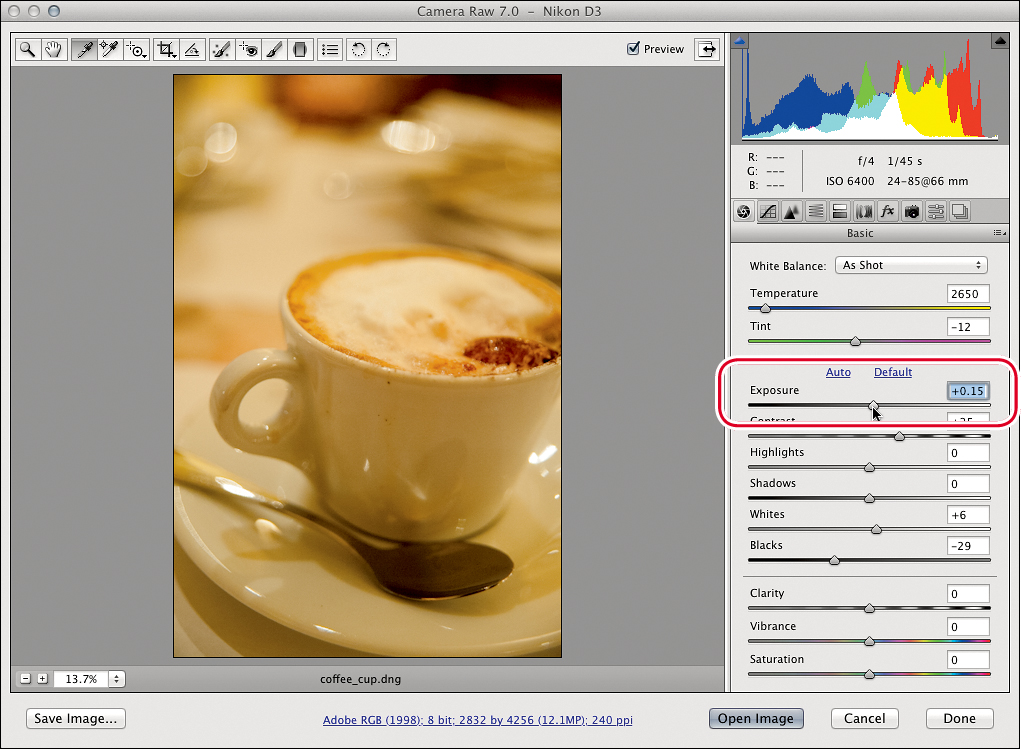
7. To specify a fixed aspect ratio for the Crop tool, click and hold the Crop tool button in the toolbar, and then select an aspect ratio from the menu. We chose 4 to 5 to approximate the proportions of the frame in the InDesign layout, with a little room to spare.
8. Using the Crop tool, drag across the image to create a crop rectangle, as shown in the illustration.

At this point you could click Open Image to open the image in Photoshop and make further adjustments if necessary. For this exercise, you’ll just save the file in a format that can be used in InDesign.
9. Click the Save Image button in the lower-left corner of the Camera Raw dialog box. In the Save Options dialog box, choose Save in New Location from the Destination menu, and select the Links folder inside the Lesson02 folder as the destination for the saved file. Type _cropped to add it to the document name, select Photoshop for the file format, and then click Save.

10. Click Done to close the Camera Raw dialog box and return to InDesign.
11. In InDesign use Mini Bridge to navigate to the Links folder inside the Lesson02 folder.
12. Click the Sort icon, choose By Date Modified, and deselect Ascending Order. This brings the coffee cup image to the top of the list because it’s the most recent file you modified.
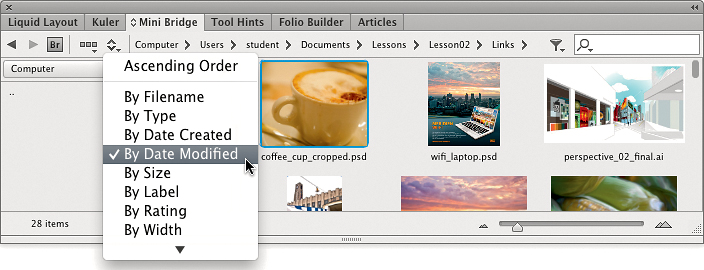
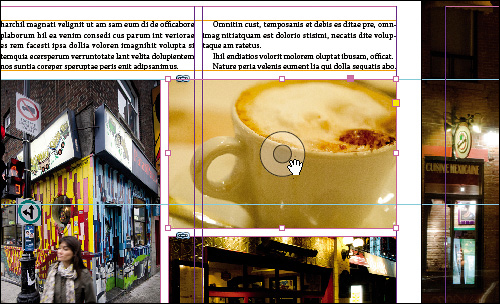
13. Drag the file coffee_cup_cropped.psd and drop it into the empty frame on page 17. The coffee cup image is automatically sized within and centered in the frame because of the Auto Fit settings you applied in step 2.
14. Move the mouse over the coffee cup image you just placed. Notice the Content Grabber in the middle of the image. Drag this indicator to move the image within the frame. The Content Grabber lets you adjust the position of the image within the frame without having to select a separate tool.
15. Save your changes.
Importing and styling text
You can enter text directly into an InDesign document by typing into the text frames. For longer text passages, however, it is more common to import text from an external text document. You can style the text as part of the import process or manually change the text appearance later.
1. In InDesign navigate to page 12 of the magazine document.
The text columns of the feature story are filled with placeholder text. You’ll replace the placeholder text with text from a Word document.
2. Select the Type tool in the Tools panel and place the cursor anywhere in the text in the two main text columns on page 12. Choose Edit > Select All. The text in both columns is selected because the text columns are linked. These text frames are also linked with the text frames on the next few pages.
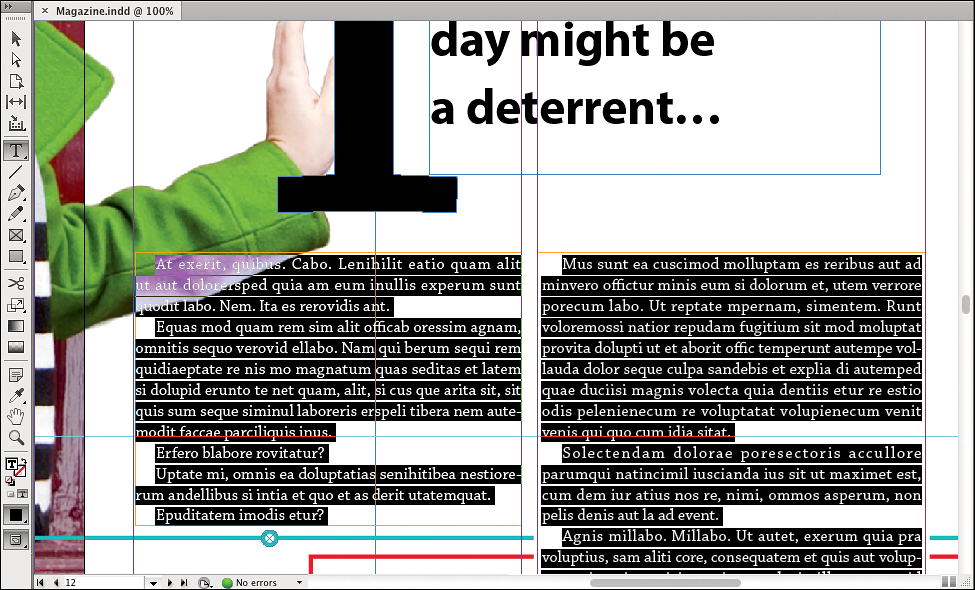
3. Choose File > Place. In the Place dialog box navigate to the Lesson02 folder, select the file Main_Story.doc, select both Show Import Options and Replace Selected Item, and click Open.
4. Under Formatting in the Microsoft Word Import Options (Main_Story.doc) dialog box, select Preserve Styles And Formatting From Text And Tables and Customize Style Import. Click the Style Mapping button.
The Style Mapping dialog box enables you to match type styles defined in the Word document to type styles defined in the InDesign document. If you set up the styles with identical names, InDesign can perform the mapping automatically.
In this case, the Style Mapping dialog box shows that the Microsoft Word style Sidebar Bullet List doesn’t match up with any style names in InDesign, so you’ll have to map this style manually.
5. In the InDesign Style column in the Style Mapping dialog box, click [New Paragraph Style] to the right of the Microsoft Word style Sidebar Bullet List, and choose Sidebar Bulleted List. This maps the Word style to the InDesign style, which in this case is correct because the two styles are actually the same but were named slightly differently in the two programs.
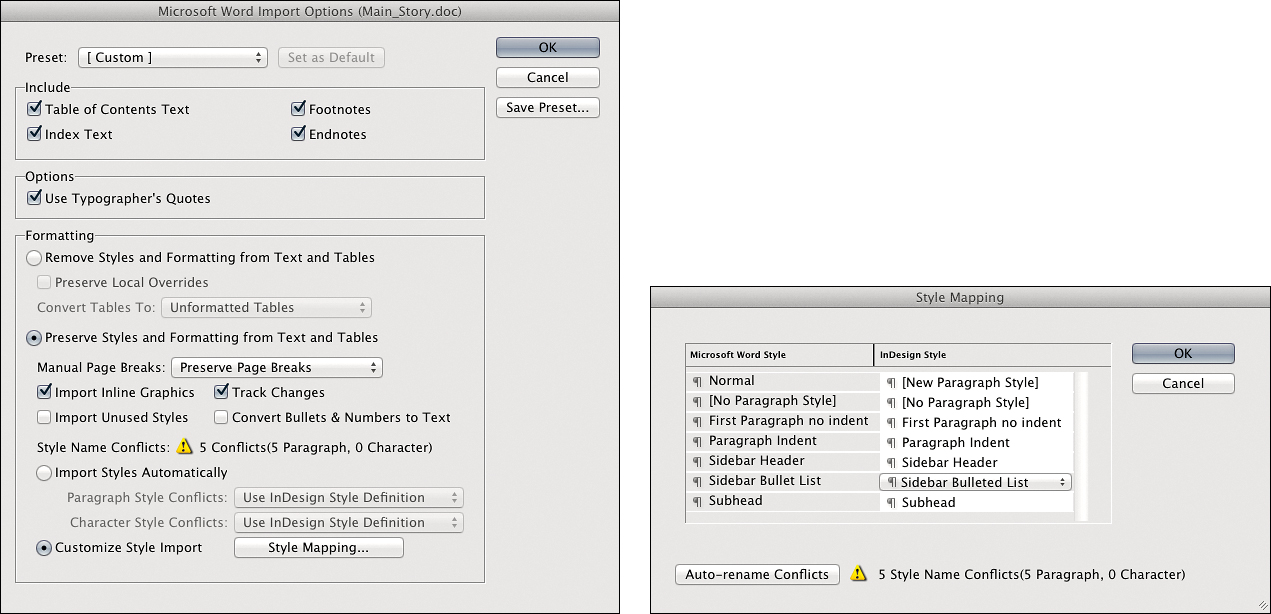
6. Click OK to close the Style Mapping dialog box, and then click OK to close the Import Options dialog box.
The imported text replaces the text in the two text frames and in the threaded text frames in the pages that follow, and the styles in the text take on the formatting defined by the same style names in InDesign. The text on page 12 overlaps the woman’s arm; you’ll fix that a little later.
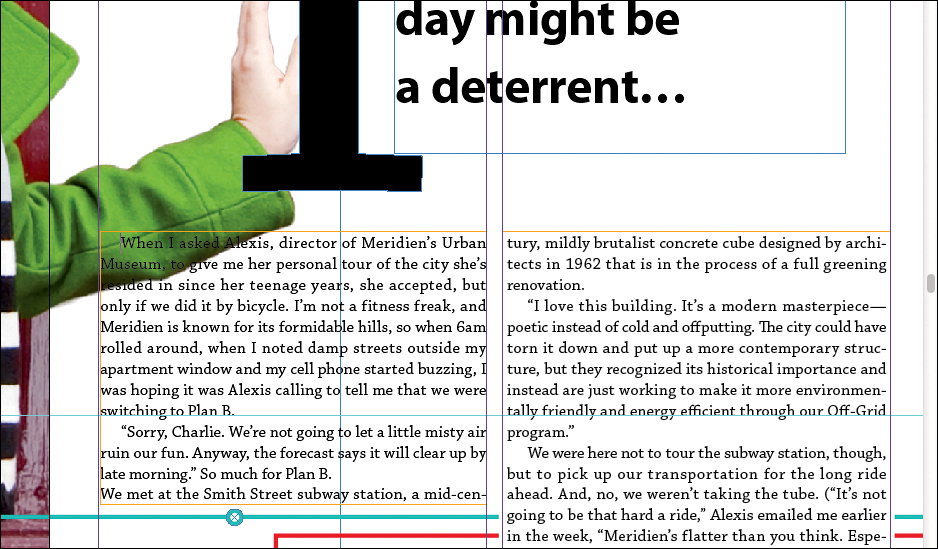
7. Navigate to page 13 to see how the story continues through the threaded frames to the next spread.
Applying paragraph styles
In the story you just imported, one of the headings has the wrong style applied. It’s body text, but it should be a heading. You’ll fix this by applying the correct paragraph style.
1. While viewing page 13, open the Paragraph Styles panel (Window > Styles > Paragraph Styles).
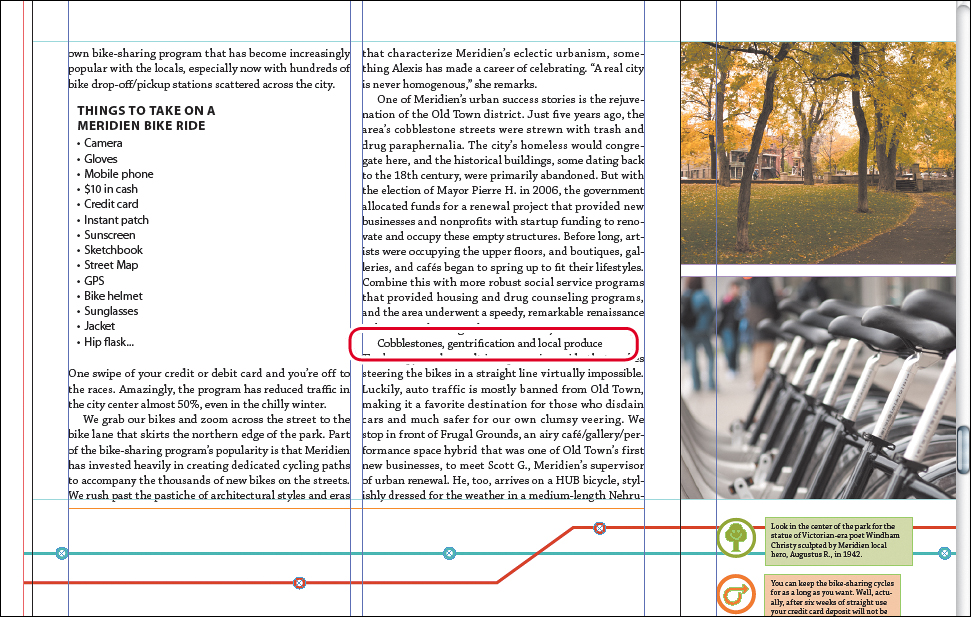
2. Select the Text tool from the Tools panel, and click to place the flashing cursor inside the heading “Cobblestones, gentrification and local produce” almost two-thirds of the way down the second column. For a paragraph style, it is not necessary to select the entire paragraph.
3. In the Paragraph Styles panel, select the Subhead paragraph style. Notice the change in the text in the document window.

4. Save your changes.
Wrapping text around frames
Now that the text is formatted properly, it’s time to take care of the text overlapping the woman’s arm on page 12.
1. With the Selection tool, click the woman’s arm.
Although not currently visible, this image contains a clipping path that was drawn in Adobe Photoshop to cut the image out of its red background. You can also use this path as a text wrap boundary.
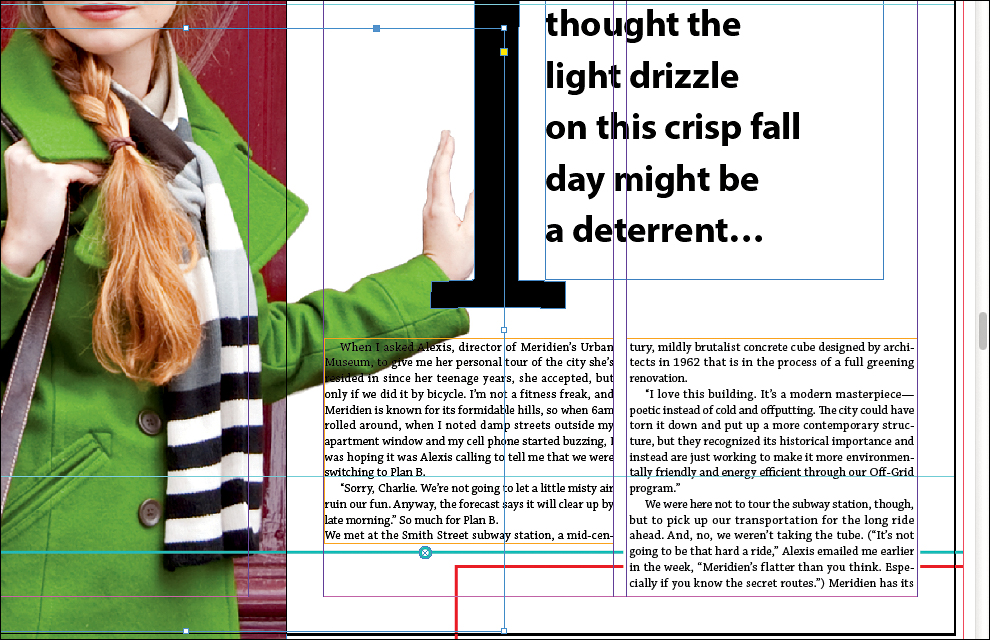
2. In the Text Wrap panel (Window > Text Wrap), click the third button from the left in the top row. This button wraps text around the shape of the object’s frame.
3. In the Text Wrap panel, choose Photoshop Path from the Contour Options: Type menu. There is only one clipping path stored in the document, Path 1, which appears in the Path menu. The clipping path is now used as the frame for the image, hiding all parts of the image that lie outside the frame path.

Note that a 9-point wrap offset distance is specified in the Text Wrap panel. You can adjust this number to control the distance of the text wrap from the object frame, but you don’t need to make an adjustment here.
If you wanted to edit the shape of the object frame, you could select the Direct Selection tool to move the points on the frame.
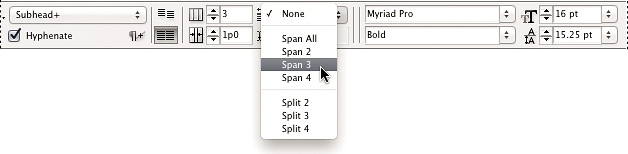
Splitting paragraphs within columns and spanning paragraphs across columns
There’s some additional layout work to be done on page 13. To improve the composition of the page, you’ll change the two columns on the page to three columns, and you’ll convert some of the text into a sidebar. Fortunately, this will be as simple as selecting text and choosing options in the Control panel.
1. Go to page 13, and with the Selection tool, click the two-column text frame.

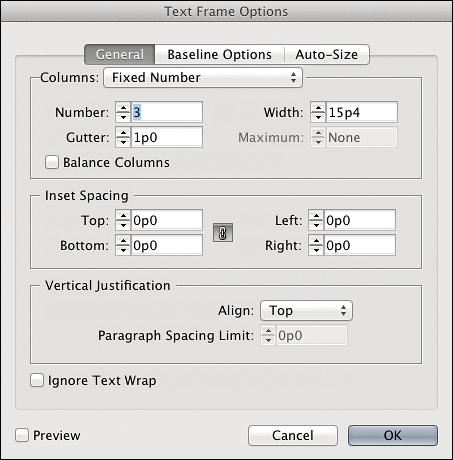
2. Choose Object > Text Frame Options, change the Number of columns to 3, and click OK.
3. With the Type tool, select the bullet list in the first column. (Don’t select the heading.)
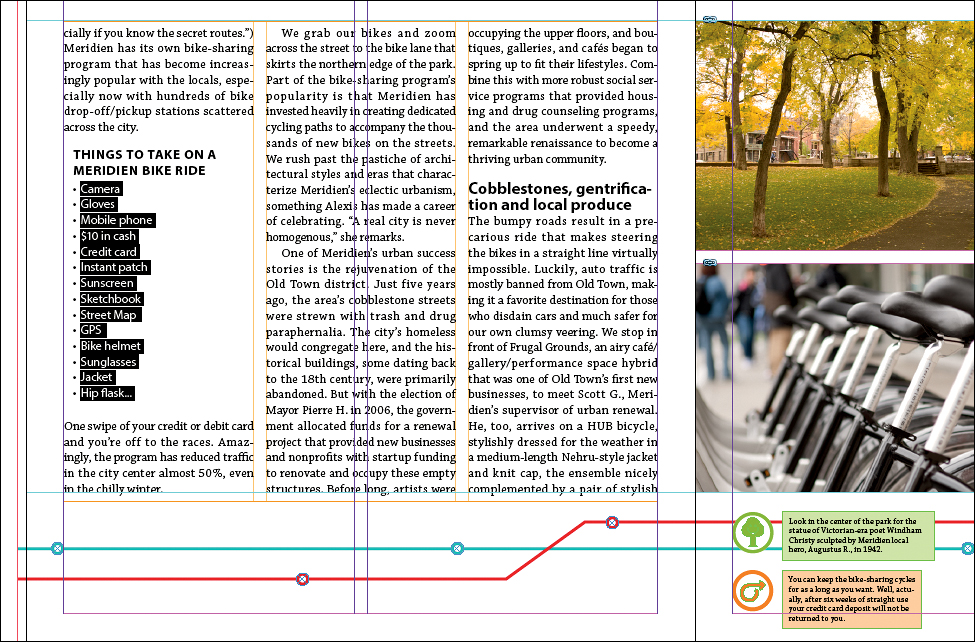
4. Make sure the Control panel is in Paragraph Formatting mode (the paragraph symbol is selected at the left edge), and choose Split 2 from the Span Columns menu in the Control panel.
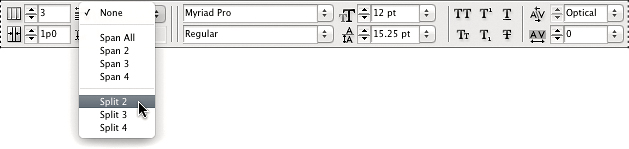
5. Click the Type tool in the “Cobblestones, gentrification...” heading and choose Span 3 from the same Span Columns menu in the Control panel.
6. In the Layers panel, if necessary click the disclosure triangle next to the Text layer to expand it. Then click in the eye column for the Blue Box object to make it visible behind the sidebar. The box was added by the designer to accommodate the sidebar.

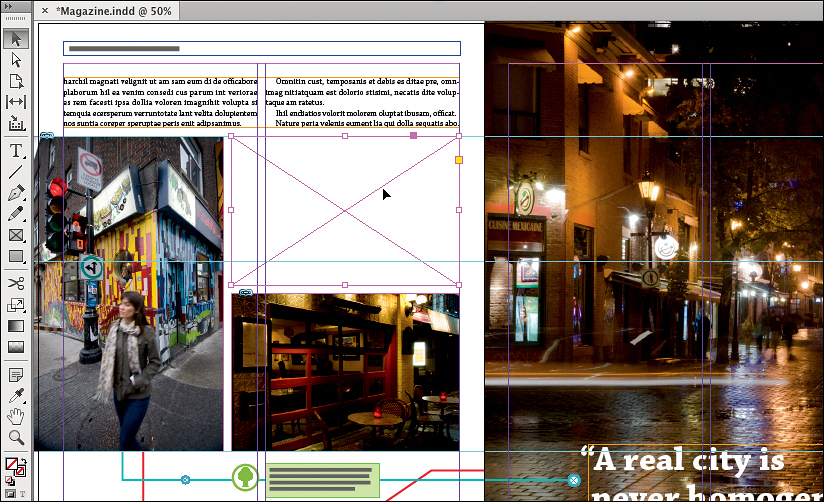
Laying out multiple photos in a grid
You can quickly and easily lay out many photos at once for publications such as catalogs and yearbooks. InDesign simplifies and accelerates this process by letting you place multiple photos into a grid you create as you import the images and by using metadata inside images to generate automatic image captions on the layout.
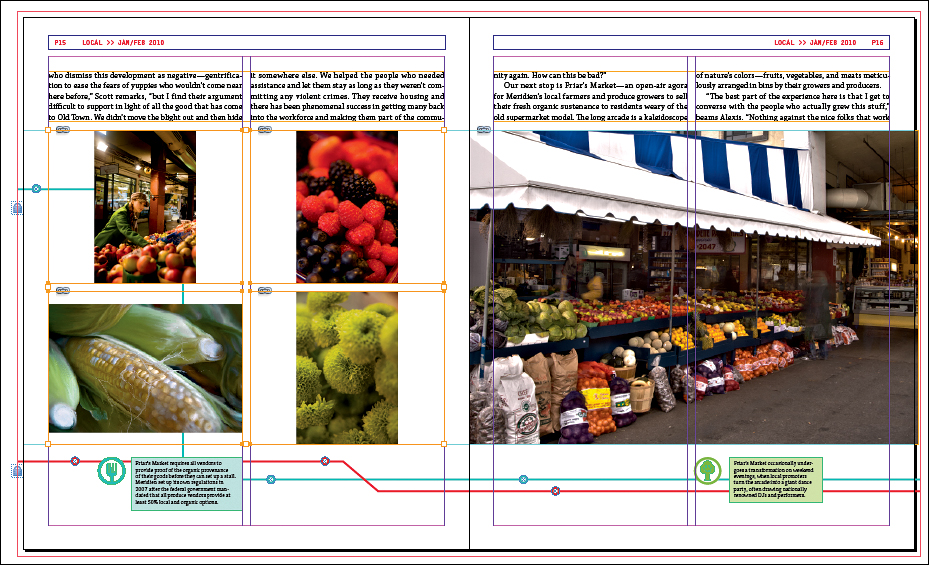
1. Go to page 15, and in the Layers panel, select the layer Graphics. This ensures that images you import into InDesign will be placed on the Graphics layer.
The four files are easiest to select together if the sort icon in Mini Bridge is set to sort by filename, because the numbers in the filenames are sequential.
2. In Mini Bridge, navigate to the Links folder. Select the four files 01_Fruitstand.psd, 02_Berries.psd, 03_Corn.psd, and 04_Flowers.psd, and drag all four selected items to page 15 of the InDesign layout.

3. Position the loaded Place cursor at the intersection of the left margin and the cyan guide below the text frame on page 15. Begin dragging, and while the mouse button is still down, press the right arrow key once and then the up arrow once to create a 2 x 2 grid. Continue dragging to the bottom-right corner of the page to the intersection of the lower ruler guide and the right margin guide, and then release the mouse. Leave the images selected.
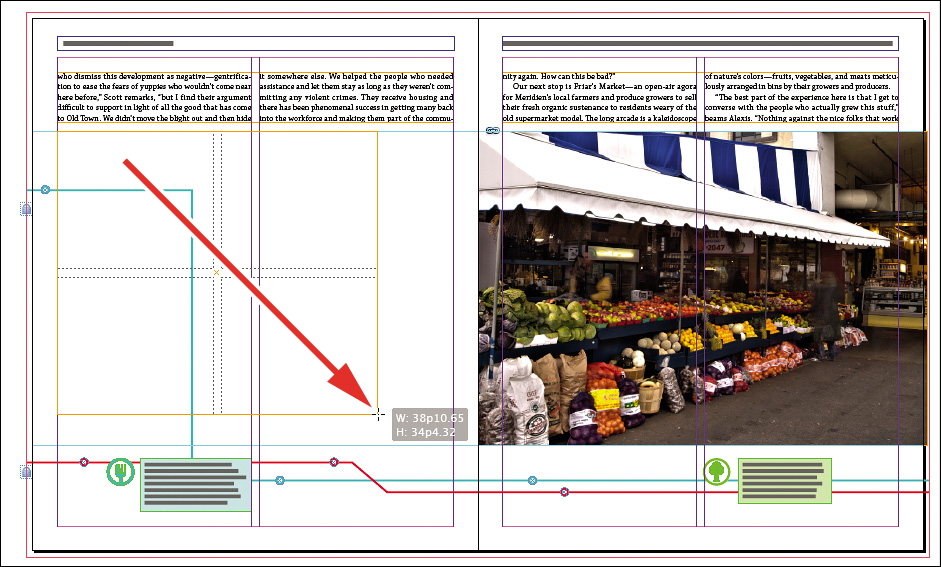
The images are set to fit within their frames, but you want these images to fill their frames while maintaining their proportions.
4. Choose Object > Fitting > Frame Fitting Options. In the dialog box, select Fill Frame Proportionally in the Fitting menu, check the Auto-Fit option, then select the center point in the Align From proxy. Click OK.
Creating live captions
Keywords, captions, and other metadata are becoming increasingly critical to print and online publishing. One way you can use metadata to enhance your publishing workflow is to automatically generate captions next to photos on the layout.
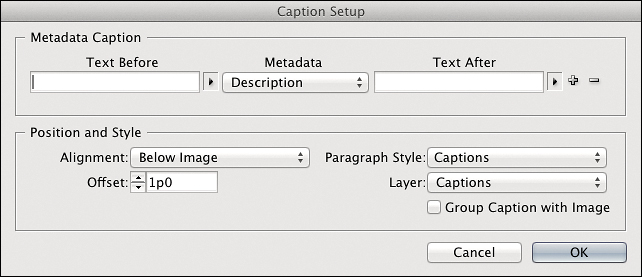
1. Choose Object > Captions > Caption Setup.
2. In the Caption Setup dialog box, set the first Metadata menu to Description. The other items in the menu are all forms of metadata that can potentially be included in an image by entering it using an application such as Adobe Bridge or as shot data added by a camera.
3. If you see a second Metadata Caption line, click the minus sign after the end of the line to remove it.
4. In the Position and Style section, set the Offset to 1p0 (one pica, zero points), choose Captions from the Paragraph Style menu, and then choose Captions from the Layer menu. Click OK.
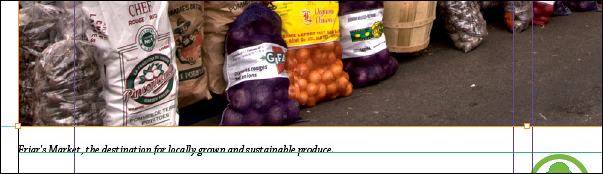
5. Use the Selection tool to select the image of the market on page 16. Zoom in to the bottom-left corner of the market image.
If the caption displays an error, such as <No intersecting link>, make sure the caption text frame touches the graphics text frame.
6. Choose Object > Captions > Generate Live Caption, and watch a caption appear to the specifications you set up in the Caption Setup dialog box.
This is a live caption because if the image description is changed (for example, using the Metadata panel in Adobe Bridge or Photoshop) when the image is updated in InDesign, the caption will update automatically. A live caption aligns with the left edge of the selected image by default; in this case that puts the caption in the gutter. You’ll now move the caption’s left edge so that it will be readable in the bound magazine.
7. With the caption’s text frame selected, drag the bottom-left handle of the text frame horizontally so that it snaps to the page margin.
Shortcuts for editing objects
Repetitive layout tasks, such as aligning and distributing objects or customizing frame corners, are easy and quick in InDesign CS6. You saw an example of this earlier when you used the Content Grabber to recompose an image inside a frame. You can take advantage of other layout tricks in InDesign CS6.
1. Select the coffee cup image on page 17, and drag a corner of its frame to make the frame smaller. Notice that the image inside the frame resizes as well.
2. With the image still selected, deselect the Auto Fit check box in the Control panel, and drag the corner of the image frame to enlarge it. This time the image doesn’t scale with the frame. Choose Edit > Undo Resize Item, select Auto Fit, and drag the corner to enlarge the frame back to its original size. Then deselect the image.
You control how Auto Fit works in the same Frame Fitting Options dialog box you worked with earlier.
3. On page 15, hold down the Shift key as you click to select all of the four images you placed into a grid. Make sure Auto Fit is selected in the Control panel.
4. In the Layers panel, click in the eye column to hide the Background Art layer.
5. Select the Gap tool in the Tools panel, and then position it in the gap between any two of the four images. You may want to zoom in so that the gaps are larger.
6. Drag the Gap tool to control the space between the frames.
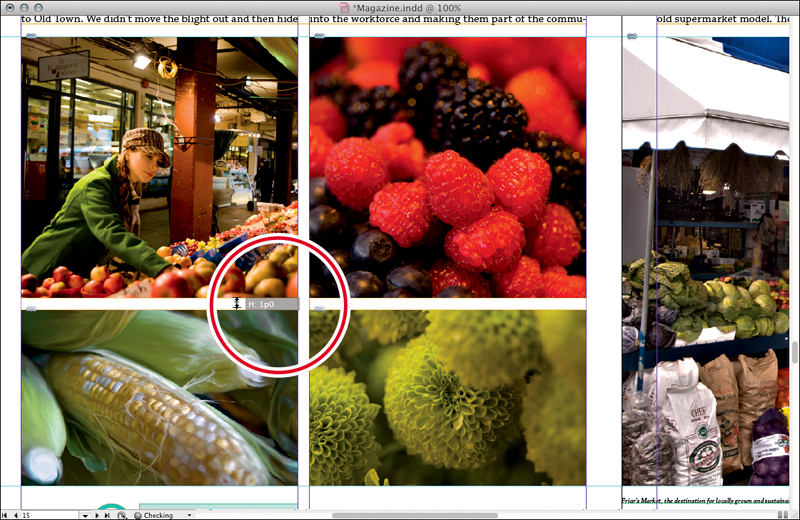
7. Shift-drag the Gap tool to adjust only the gap nearest the cursor. Each modifier key changes how the Gap tool works, so experiment with holding down the Alt/Option and Ctrl/Command keys as you drag the Gap tool.
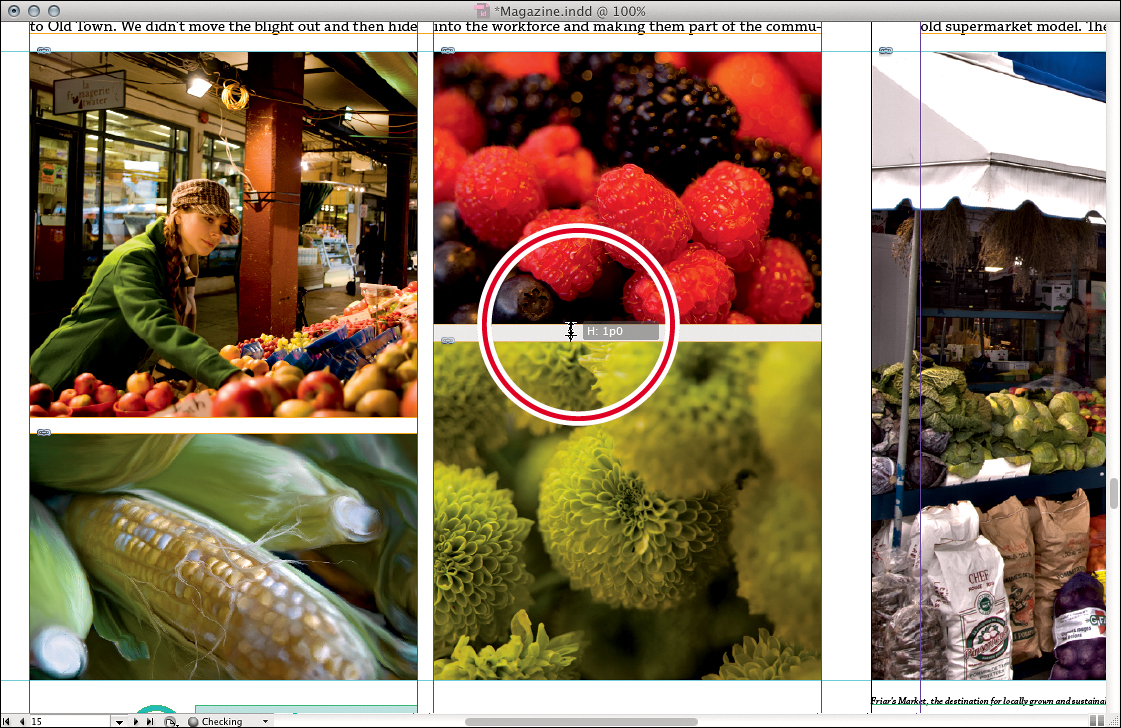
Now you’ll use the Gap tool temporarily, using a feature called spring-loaded cursors. It’s a quick way to use different tools with fewer trips to the Tools panel. Spring-loaded cursors take advantage of another time-saver: shortcut keys for tools. U is the shortcut key for the Gap tool.
8. Click the Selection tool in the Tools panel. This is the tool you’ll probably be using most of the time.
When releasing a spring-loaded tool you’re dragging, release the mouse button first and then the tool key.
9. Position the Selection tool over a gap between images, and then press and hold the U key. Notice that the cursor changes to the Gap tool; continue to hold down the U key as you drag to adjust the gap between the images. Release the mouse and then the U key; the cursor returns to the Selection tool.
To learn the shortcut keys, hold the cursor over various tools in the Tools panel until their tool tips appear; shortcut keys are listed in the tool tips.
Normally, pressing a shortcut key permanently switches tools. Spring-loading the cursor lets the new tool snap back to the old tool as soon as you release a shortcut key. Think of the difference this way: To use a shortcut key, briefly tap it; to use a shortcut key as a spring-loaded shortcut, hold it down until you’re done.
If you don’t see the yellow handles, choose View > Extras > Show Live Corners. Also, make sure View > Screen Mode is set to Normal.
10. With the Selection tool, click the image of berries, and then click the yellow control near the top-right corner of the image. The frame handles at the corners turn into diamond handles. These diamond handles let you customize the shapes of the frame corners.
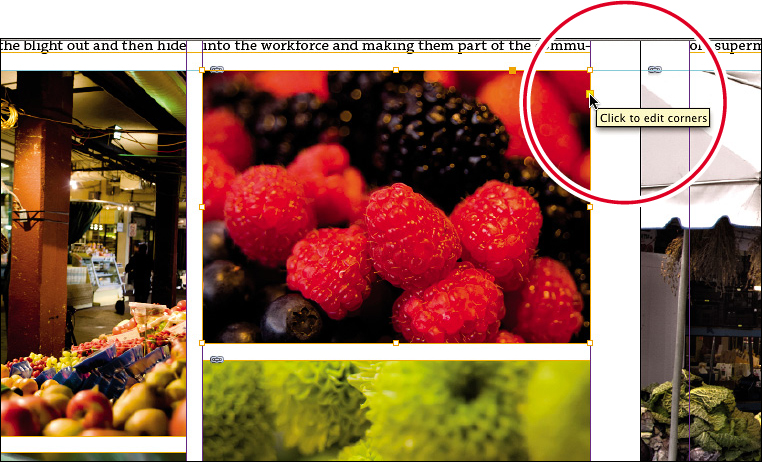
11. Drag any of the yellow diamond handles to adjust the corner radius of all corners. The corner radius value appears in the Corner Options section of the Control panel; choose a corner shape from the Corner Shape menu below the radius value. Shift-drag a diamond handle to adjust just one corner, or Alt/Option-click a diamond handle to change the corner shape.
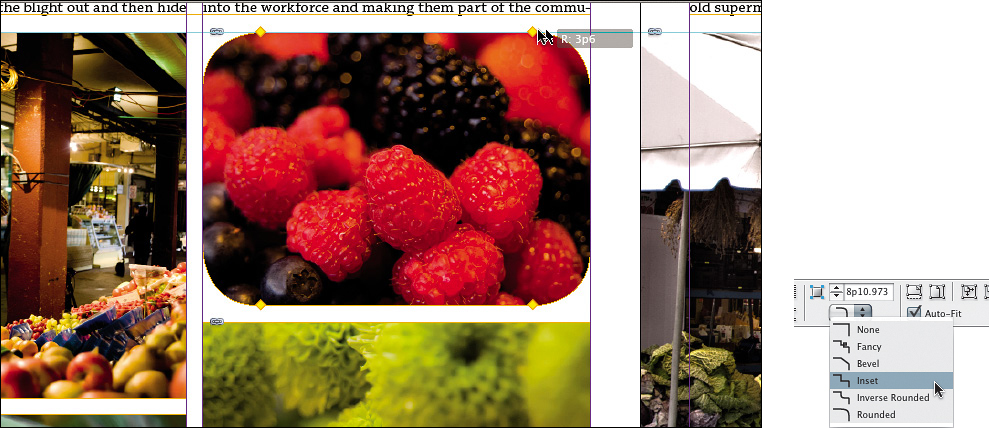
Alt/Option-click the Corner Options icon in the Control panel to open the Corner Options dialog box.
12. In the Layers panel, click in the eye column for the Background Art layer to make that layer visible again.
Tracking text changes
Get to final copy faster by tracking text changes directly in your InDesign document. You can write, edit, and mark up text in InDesign CS6 without needing to import separate text files and remap styles every time there are copy changes.
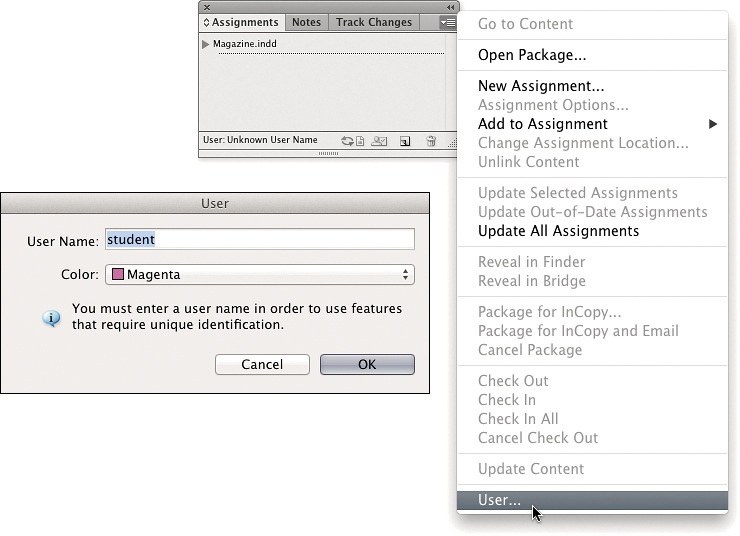
1. Navigate to page 13. Choose Window > Editorial > Assignments, and then choose User from the Assignments panel menu. Enter a User Name, choose a Color, and click OK.
2. With the Type tool, click to place an insertion point inside the text story. Choose Window > Editorial > Track Changes. The top-left button in the Track Changes panel controls whether change tracking is enabled, and the next button controls whether changes are visible. Make sure both buttons are on.
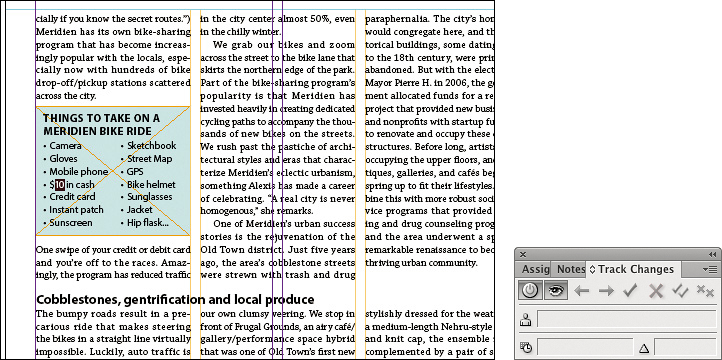
3. In the “Things to Take on a Meridien Bike Ride” sidebar, select the text 10 and type 25.
4. Choose Edit > Edit in Story Editor to open the Story Editor window and note the highlight color. Click in the highlighted text and notice that the Track Changes panel indicates that you are the user who edited the text.
If you see text highlighted in other colors, that’s text edited by other users whom you can identify in the Track Changes panel.

5. Click inside the highlighted text you edited, and click the Accept Change button in the Track Changes panel.
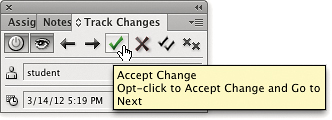
6. When you’re done, close the Story Editor window and the Track Changes panel.
Preparing for Printing
You’ve completed the design of the magazine. Because the document contains transparency effects, there are a few more adjustments necessary to get the best print results.
Transparent areas in a document need to be flattened—or rasterized—when printed. For best results, flattening should be done as the last possible step in your print workflow—normally, it is performed by your print service provider. To keep transparency effects live until they need to be flattened, preserve the layers by saving your InDesign documents (or placed Illustrator or Photoshop files) in a native format.
You can help minimize the effects of flattening if you send your document output to devices that support the latest versions of PDF. To preserve transparency effects rather than flattening them when exporting a document as a PDF intended for printing, save your file in a format compatible with Adobe PDF 1.5 (Acrobat 5.0) or later by selecting the PDF/X-4 PDF export preset, for example. The Adobe PDF Print Engine (APPE)—widely embraced by OEM partners and print service providers since first released in 2006 and updated to version 2 in 2008—uses native rasterizing for PDF documents, ensuring file integrity from start to finish in a PDF-based design workflow. To learn more about the APPE, go to www.adobe.com/products/pdfprintengine.
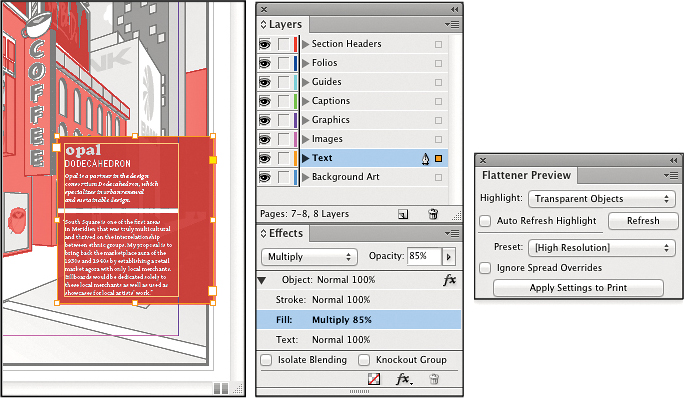
In InDesign the Flattener Preview panel helps you identify which areas will be most affected by the flattening process. You’ll look at how that works next.
Previewing how transparency will affect output
1. In InDesign navigate to page 8 of the magazine document.
If the background art looks chunky, choose View > Display Performance > High Quality Display. The Display Performance setting has no effect on how transparency is rendered when exported or printed.
2. To see which areas of your document are affected by transparency effects, open the Flattener Preview panel (Window > Output > Flattener Preview), select Transparent Objects from the Highlight menu, and choose [High Resolution] from the Preset menu. Then in the Highlight menu, select these commands in turn: All Affected Objects, Affected Graphics, and All Rasterized Regions. When you’re done, choose Transparent Objects.
The areas affected by each Highlight option are highlighted in red, such as the text frame in the lower-right corner of the page. You can use the Effects panel to find out why that object is highlighted. Specifically, you’re looking for a blend mode other than Normal in the menu at the top of the Effects panel, an Opacity lower than 100%, or an applied effect.
3. Using the Selection tool, click the text frame.
4. If the Effects panel is not visible, choose Window > Effects.
5. Double-click the group to select the frame inside the group. Now that the text frame is selected, the Effects panel reveals that the Fill uses the Multiply blend mode and is set to 85% Opacity. These are the options that create transparency in this object.
If the Flattener Preview panel reveals potential issues with how transparency will affect part of your document during output, you can decide what to do about those issues. For example, if you see that type or highly detailed vector graphics will become rasterized, you might decide to change the design to avoid the problem by moving critical objects so that they don’t overlap objects that use transparency or by avoiding the use of transparency in that area.
One thing to watch out for is text placed behind objects with transparency effects. Transparency affects all objects placed lower—or farther back—in the display stacking order. Printed text might not look as crisp as it should if it was converted to outlines and rasterized behind an object with a transparency effect, so when possible, it’s best to keep text in front of transparent objects in the layer order.
If you need to flatten your document as part of the export or print process, for best results set the document’s transparency blend space (Edit > Transparency Blend Space) to the color space (CMYK or RGB) of the target output device. For more information about working with transparency see “Best practices when creating transparency” in InDesign Help.
Checking the effective resolution of linked images
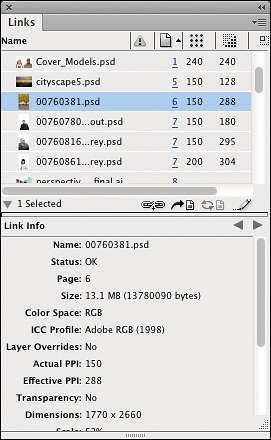
You can use the Links panel to verify that the linked images have a high enough resolution for your intended mode of output. The effective resolution of a placed image is defined by the resolution of the original image and the scale factor at which it is placed in InDesign. For example, an image with a 300 ppi (pixels per inch) resolution only has an effective resolution of 150 ppi when it’s scaled to 200%.
For images to be viewed at screen resolution—published on a website or in a low-resolution PDF document, for example—an effective resolution of 72 ppi is sufficient. For general office printing, the effective resolution should be between 72 ppi and 150 ppi. For commercial printing, your images should have an effective resolution between 150 ppi and 300 ppi (or higher), depending on the requirements of your prepress service provider.
1. In InDesign open the Links panel. Choose Panel Options from the Links panel menu. In the Panel Options dialog box, select the Actual PPI, Effective PPI, and Scale options in the Show column. Click OK to close the Panel Options dialog box. If necessary, resize the Links panel so that you can see the additional columns.

2. For each image placed in your document, check the actual resolution, the effective resolution, and the scale factor. For example, the cover image on page 1 has an actual resolution of 150 ppi but an effective resolution of 153 ppi because it was scaled by 98.2%. If a higher effective resolution is required for your print job, you could reduce the scale factor, which would show more of the image background, reduce the dimensions of the placed image—not really an option for the cover photo, which needs to cover the entire page—or select an image with a higher actual resolution—perhaps a close-up photo of the face rather than the wider shot that is used in this example.
3. Close the Links panel.
Performing a preflight check
Rather than painstakingly checking through a list of possible problem areas each time you want to print or export a document, you can rely on InDesign to do all the work for you.
1. Choose Window > Output > Preflight. When the On check box is selected in the Preflight panel, InDesign continuously checks for possible problems while you’re working on your document.
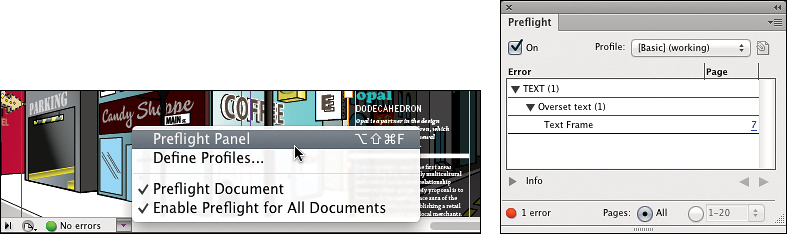
You can set up a preflight profile to specify which potential problems you want InDesign to look out for.
2. To define a preflight profile, choose Define Profiles from the Preflight panel options menu or from the Preflight menu located near the lower-left corner of the document window.
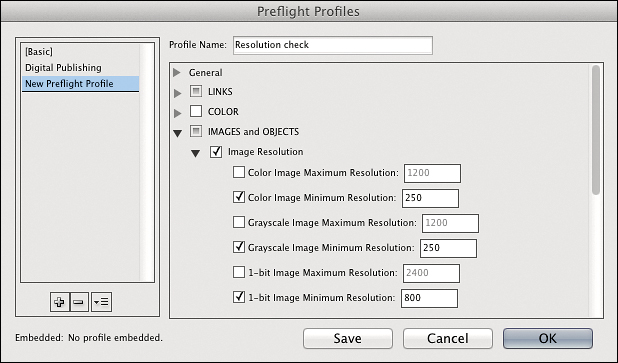
3. In the Preflight Profiles dialog box, click the Add button (![]() ) below the list of profiles to create a new profile. Name the new profile Resolution Check. Activate the Image Resolution option inside the IMAGES and OBJECTS folder. Leave the Image Color Minimal Resolution set at 250 ppi, and then click OK.
) below the list of profiles to create a new profile. Name the new profile Resolution Check. Activate the Image Resolution option inside the IMAGES and OBJECTS folder. Leave the Image Color Minimal Resolution set at 250 ppi, and then click OK.
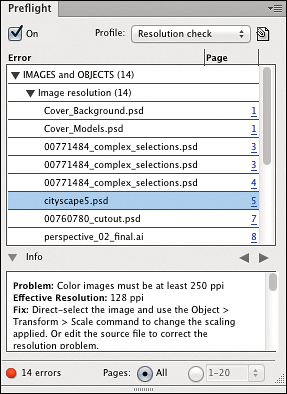
4. From the Profile menu in the Preflight panel, choose Resolution Check. If necessary, click the disclosure triangles next to the IMAGES and OBJECTS heading and the Info heading to expand their lists. InDesign finds several placed images that don’t meet the set requirements. To review an error found by the Preflight check, click the page link in the Preflight panel. InDesign selects and jumps to the object causing the error. A description of the error and suggestions on how to fix the problem are provided in the Info section of the Preflight panel.
5. Switch back to the previous preflight profile by choosing [Basic] from the Profile menu in the Preflight panel, and then close the Preflight panel.
6. Save your document.
Exporting to PDF
Exporting your document as a PDF file enables you to preserve the look and feel of your InDesign document in a device-independent format that can be viewed onscreen or printed on any printer. This can be particularly useful when you want to print a quick draft of your document on an inkjet printer at home or in your office. You can tweak the export settings, balancing quality and file size to create a PDF that is optimized to suit its intended purpose.
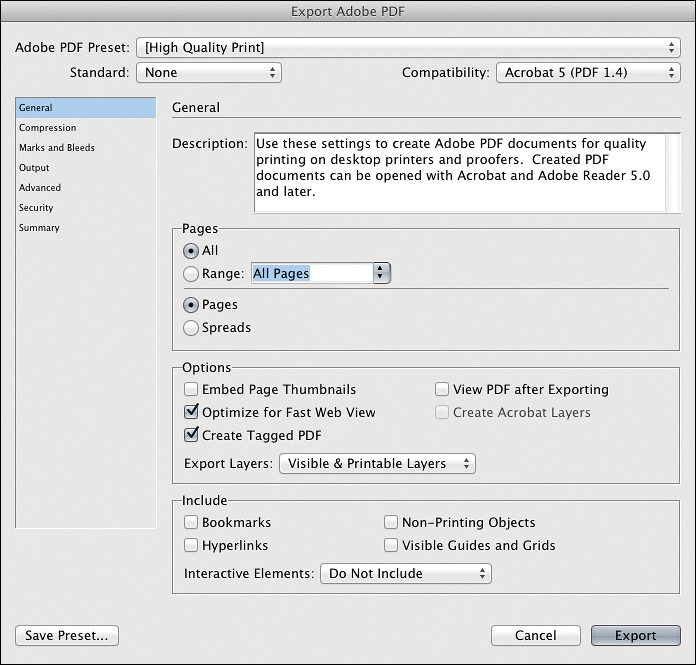
1. Choose File > Export. In the Export dialog box, navigate to the Lesson02 folder. From the Save As Type/Format menu, choose Adobe PDF Print; name the file Magazine_Print.pdf and click Save.
2. In the Export Adobe PDF dialog box, choose [High Quality Print] from the Adobe PDF Preset menu. Review—but don’t change—the settings for this export preset in the various panels of the dialog box, and then click Export.
3. Open the Lesson02 folder in Windows Explorer/the Finder. Right-click/Control-click the file Magazine_Print.pdf, and choose Open With > Adobe Acrobat Pro.
4. Use the page navigation controls in Acrobat to review the pages of the magazine. Pay special attention to the position and quality of the images you placed, the text styles you’ve adjusted, and the areas containing transparency effects.
5. When you’re done reviewing, close the document in Acrobat and switch back to InDesign.
6. Close the InDesign document, and if you’re asked if you want to save changes, click Save.
Review Questions
1. How can you select a frame that is stacked behind another in an InDesign document?
2. How do you edit a page so that it’s a different size than the rest of the document?
3. What is a layer comp?
4. What is the effective resolution of an image placed in InDesign?
5. What is the advantage of creating a preflight profile?
Review Answers
1. To select a frame that is stacked behind another frame, hold down the Ctrl/Command key, and then click inside the frame you want to select. With multiple overlapping frames, you may need to click repeatedly until the correct frame is selected. You can also select the topmost frame, and then choose Object > Select > Next Object Below.
2. With the Page tool, select the page you want to modify, and then edit the page dimensions in the Control panel.
3. A layer comp is a snapshot of the visibility settings of layers in a Photoshop document that can be used to organize multiple versions of a design in a single document. When placed in InDesign, you can quickly switch between the layer comps using the Object Layer Options dialog box.
4. The effective resolution of a placed image is defined by the actual resolution of the original image and the scale factor when placed in InDesign. For example, an image with a 300 ppi (pixels per inch) resolution has an effective resolution of only 150 ppi when scaled to 200%. Documents intended for print require images with a higher effective resolution than documents to be viewed only onscreen.
5. A preflight profile represents the output requirements of a specific job. When you create your own preflight profile that’s tailored to the requirements of your print service provider, InDesign can continuously check the state of the document and its assets, and alert you to any problems that may cause an issue at output time. Because problems at output time can be expensive to fix, catching problems early can save you time and money.