1. A Quick Tour of Photoshop Elements
This lesson introduces the tools and the interface of Adobe Photoshop Elements 4.0. Future lessons provide more in-depth exercises and specific details as to how you can take advantage of the tools.
This lesson provides the overview of the concepts and procedures involved with capturing and editing digital images using Photoshop Elements. If you prefer to skip this overview, you can jump right into working with digital images in Lesson 2. However, we encourage you to review this lesson before you get too far along in the book.
In this lesson, you’ll learn how to do the following:
• Work with the Organizer and the Editor.
• Attach media.
• Use the Photo Downloader.
• Review and Compare Photos.
• Use Photo Compare.
• Make a greeting card from a template.
• Capture and export video.
• Use Help and the How To palette.
How Photoshop Elements works
Photoshop Elements has two primary workspaces: the Organizer for finding, organizing, and sharing photos and media files, and the Editor for creating, editing, and fixing your images.
When a photo is selected in the Organizer, clicking the Edit button and then choosing Go to Quick Fix or Go to Standard Edit moves the photo to the Editor workspace. When a photo is open in the Editor, clicking the Photo Browser or Date View button moves the photo to the Organizer workspace.
Use the buttons at the top of the work area to switch between the Organizer and the Editor.
![]() Once both the Organizer and the Editor are open in Photoshop Elements, you can also move between the two workspaces by clicking the corresponding button in the Windows task bar at the bottom of the screen.
Once both the Organizer and the Editor are open in Photoshop Elements, you can also move between the two workspaces by clicking the corresponding button in the Windows task bar at the bottom of the screen.
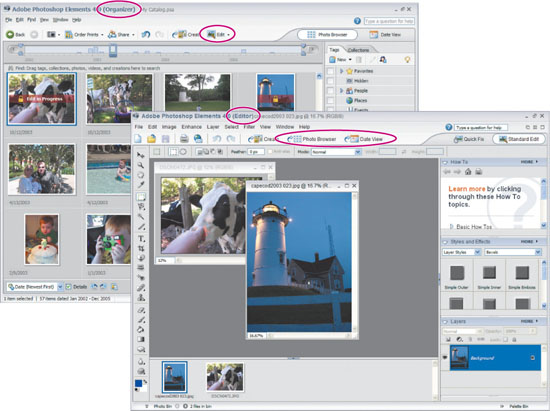
The Organizer workspace
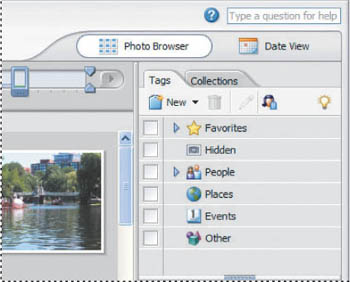
The Organizer lets you find, organize, and share your photos and media files in the Photo Browser. It can display a single photo or media file, or display thumbnails of all the photos and media files in your catalog. If you prefer viewing your photos and media files by date, the Organizer has a Date View workspace that lets you work with your files in a calendar format.
The Photo Browser lists all the photos and cataloged assets in one comprehensive window that you can easily browse through and filter. It can show previews of files stored remotely, such as files stored on a CD.
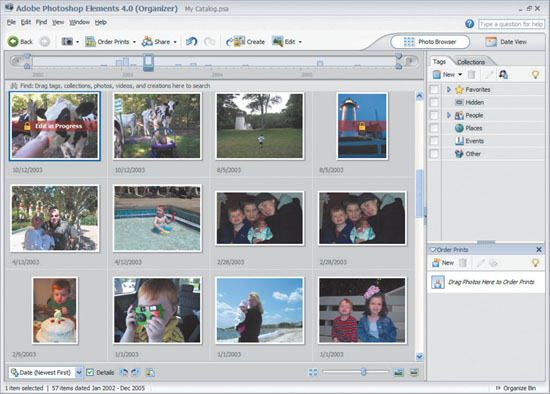
The Editor workspace
The Editor lets you focus on creating and editing images. The Standard Edit workspace has tools to correct color, create special effects, or enhance photos. There is also a Quick Fix workspace with simple tools and commands to quickly fix common problems.
If you are new to digital imaging, Quick Fix is a good place to start fixing photos. It has many basic tools for correcting color and lighting. See Lesson 4, “Adjusting Color in Images” for more detailed information.
If you’ve previously worked with image editing software, you’ll find that the Standard Edit workspace provides a more flexible and powerful image-editing environment. It has lighting and color-correction commands, tools to fix image imperfections, selection tools, text editing tools, and painting tools. You can arrange the Standard Edit workspace to best suit your needs by moving, hiding, and showing palettes, arranging palettes in the Palette Bin, zooming in or out of the photo, scrolling to a different area of the document window, and creating multiple windows and views.
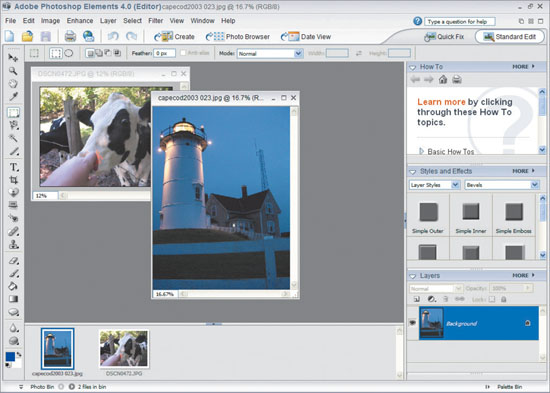
The Standard Edit workspace.
Workflow
The fundamental workflow for Adobe Photoshop Elements is to:
• Capture images and media into the Organizer from a digital camera, scanner, or digital video camera.
• Organize images and media using the Organizer, including tagging images.
• Edit images and media by color correcting or adding text, using the Editor.
• Sharing images and media by e-mailing, using a sharing service, or burning to CD/DVD ROM.
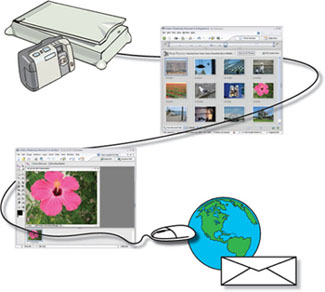
Attaching media
It’s easy to import digital files directly into Photoshop Elements.
Getting photos from cameras, card readers, and from files and folders
To view and organize your photos in Photoshop Elements 4.0, you first need to bring them into the program. You can get photos into Photoshop Elements in several ways:
• Bring photos from your camera or card reader directly into the Photoshop Elements Organizer using Adobe Photo Downloader. Getting photos directly will save you time and allow you to start working with your photos quickly.
• Use the software that came with your digital camera to download pictures to your computer, and then bring them into Photoshop Elements using the From Files and Folders command. If you prefer to work with other software to import your files to your computer, you’ll need to disable Adobe Photo Downloader to use the software that came with your camera. To disable the Adobe Photo Downloader, right-click the Adobe Photo Downloader icon in the system tray or task bar and then choose Disable. Only do this if you plan to use other software to bring images onto your computer.
• If your camera or card reader displays as a drive, e.g., in My Computer (Windows), you can drag the files to a folder on your hard drive, and then bring them into Photoshop Elements using the From Files and Folders command.
In most cases, you’ll need to install software drivers that came with your camera before you can download pictures to your computer. You may also need to set up the Photoshop Elements Camera or Card Reader Preferences. See “Getting photos” in Lesson 2, “Organizing and Sharing Photos.”
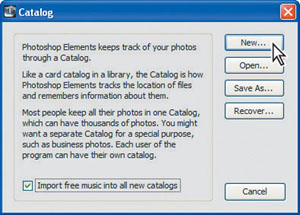
Creating a new catalog
You organize your photographs in catalogs, which manage the image files on your computer but are independent of the photo files themselves. You can include video and audio files along with digital photographs and scans in your catalogs. A single catalog can efficiently handle thousands of photos, but you can also create separate catalogs for different types of work to keep files independently.
1 Start Photoshop Elements, either by double-clicking the shortcut on your desktop or by choosing Start > Programs > Adobe Photoshop Elements 4.0.
2 Do one of the following:
• If the Welcome Screen appears, click View and Organize Photos in the row of shortcut buttons across the upper part of the Welcome window.
• If Photoshop Elements 4.0 (Editor) opens instead of the Welcome Screen, click the Photo Browser button (![]() ) in the middle of the shortcuts bar across the upper part of the window. It takes about 10 seconds for the Organizer component to load for the first time in a work session.
) in the middle of the shortcuts bar across the upper part of the window. It takes about 10 seconds for the Organizer component to load for the first time in a work session.
• When Photoshop Elements 4.0 (Organizer) opens, you don’t have to do anything more.
3 In Organizer mode, choose File > Catalog.
4 In the Catalog dialog box, click New.
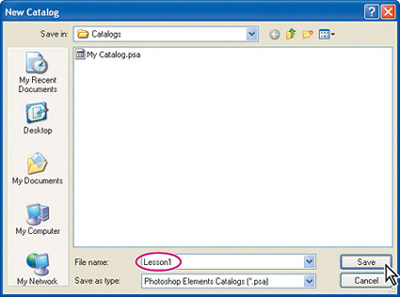
5 In the New Catalog dialog box, type Lesson1 for File Name, and click Save without making any other changes to the settings.
Now you have a special catalog that you’ll use just for this lesson. All you need is some pictures to put in it.
Using the Adobe Photo Downloader
For the rest of this lesson you will need to import images into the organizer. If you have a digital camera and images of your own, follow the steps in the next section. Otherwise, skip to the section, “To get photos from files and folders.”
To get photos from a digital camera or card reader
You can import files from your camera directly into Photoshop Elements.
1 Connect your camera or card reader to your computer. For instructions on connecting your device, see the documentation that came with it.
2 When the Adobe Photo Downloader appears, choose the name of the connected camera or card reader from the Get Photos from drop-down menu.
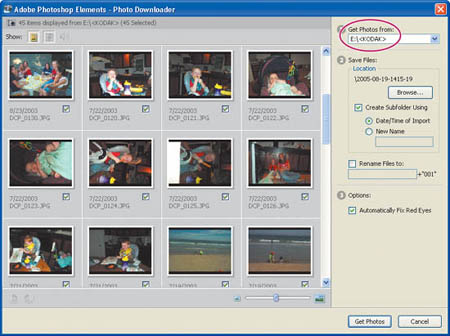
The connected device’s name typically appears, as Photoshop Elements automatically detects your camera.
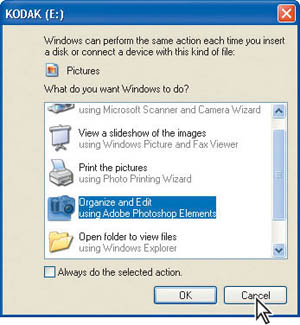
3 If the Windows Auto Play dialog box appears, click Cancel. If the Adobe Photo Downloader does not appear, click the Get Photos button in the shortcuts bar and then choose From Camera.

Thumbnail images of the photos in your camera’s memory card appear.
4 Click the check box (removing the green check mark), to remove photos from the import list. Unchecked images are not imported.
You can drag the slider left or right to change the size of the thumbnails. You can also rotate any photo you bring in from a digital camera.
5 Select one or more photos to rotate. Click the Rotate Left button or the Rotate Right button located in the lower left of the Photo Downloader window.
6 Under Save Files, accept the folder location listed, or click Browse to choose a new location for the files.
7 Choose “Create Subfolder Using Date/Time of Import” if you want the photos you’re getting to be stored in a folder whose name includes the date and time they were imported. You can also choose Create Subfolder Using > New Name to create a folder using a name you type in the text box.
8 Select “Rename Files to” and enter a file name in the text box to set the name for the imported photos. Each photo in the import batch will share the name, but each photo has a unique number after the name.
9 Click the Get Photos button.

A. Click box to download photo. B. Rotate buttons. C. Name of connected device. D. Options for saving files. E. Name for all files. F. Resize thumbnails in display. G. Gets the photos.
The photos are imported into Photoshop Elements and appear in the Photo Browser.
After your photos are imported, you’ll be asked if you’d like to delete those photos from the camera or card reader. Photos that you didn’t bring into Photoshop Elements aren’t deleted.
If the imported photos contain keyword metadata, the Import Attached Tags dialog box appears. Select the tags you want to import. The tags you select are added to the Tags palette when the photos are imported. If a tag has an asterisk (*), you already have a tag of the same name in your catalog, and that existing tag is attached to the photos.
To get photos from files and folders
Digital images stored on your computer can also be imported into Photoshop Elements.
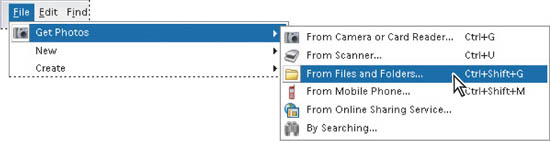
1 In the Organizer, click the Get Photos button in the shortcuts bar, or choose Get Photos from the File menu and then choose From Files and Folders from the available choices.
2 In the Get Photos dialog box, navigate to the Lesson01 folder and click once to select the Photos folder that contains sample images.
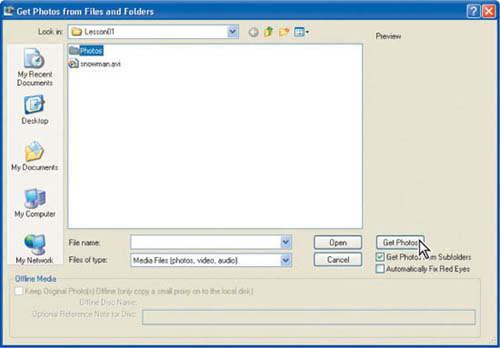
3 Click to uncheck the Automatically Fix Red Eyes checkbox. The photos being imported do not need red eye correction.
4 Click Get Photos. These images contain tags, which you’ll learn more about in Lesson 2. In the Import Attached Tags window, click Select All, then click OK. The imported photos appear in the Organizer.
About tags
Tags are personalized keywords, such as “House” or “Beach,” that you attach to photos, video clips, audio clips, and creations in the Photo Browser to easily organize and find them. When you use tags, there’s no need to manually organize your photos in subject-specific folders or rename files with content-specific names. Instead, you simply attach one or more tags to each photo. You can then easily retrieve the photos you want by clicking the appropriate tags in the Tags palette.
For example, you can create a tag called “Doreen” and attach it to every photo featuring your sister, Doreen. You can then instantly find all the photos with the Doreen tag by clicking the Find box next to the Doreen tag in the Tags palette, regardless of where the photos are stored on your computer.
You can create tags using any keywords you want. For instance, you can create tags for individual people, places, and events in your life. You can attach multiple tags to your photos. When photos have multiple tags, you can easily search on a combination of tags to find a particular person at a particular place or event. For example, you can search for all “Doreen” tags and all “Scott” tags to find all pictures of Doreen with her husband, Scott. Or search for all “Doreen” tags and all “Florida” tags to find all the pictures of Doreen vacationing in Florida.
Use tags to organize and find photos by their content. You specify names for your tags and choose the photos that fall into those categories. See Lesson 2, “Organizing and Sharing Photos” for more information.
Reviewing and comparing
Photoshop Elements provides several options to quickly and easily review and compare images.
Viewing photos at full screen or side-by-side
The Full Screen View and Side by Side View let you review your images without the distraction of other interface items such as windows, menus, and palettes.
In the Organizer, choose View > View Photos in Full Screen. Your photos are displayed as a full-screen slide show, making it a fun and efficient way to view a set of photos. You can customize the slide show—for example, you can play an audio file as you view the images. You can also choose to display thumbnails of the selected files in a filmstrip along the right side of the screen, or add a fade between pictures. Click OK to start the Slide Show.
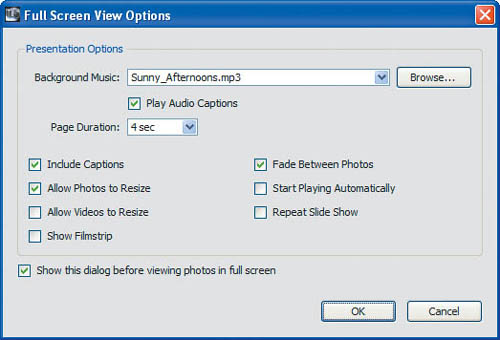
The control bar, which contains buttons for playing, rotating, and zooming disappears from view when you don’t move the mouse for a couple seconds. To make the control bar reappear, move the mouse.
![]()
When you’ve decided which photos you want in your slide show, and you’ve made necessary edits to them, you can send them directly from this view to the Slide Show Editor by clicking the Create Slide Show button in the control bar. You’ll work on one complete Slide Show project in Lesson 3, “Sharing Creations.”
Press the Esc key on your keyboard to return to the Organizer.
Choose View > Compare Photos Side by Side to display two photos simultaneously. Side by Side view is useful when you need to focus on details and differences between photos. You can select two or more photos to compare. When you click the Next Photo button (![]() ) in the control bar, the selected image changes to the next image in your catalog. By default, image # 1 (on the left or top) is selected. To select image #2 instead, click it.
) in the control bar, the selected image changes to the next image in your catalog. By default, image # 1 (on the left or top) is selected. To select image #2 instead, click it.
Note: The selected image has a blue border. If you have the filmstrip showing, you can click on any image in the filmstrip to view it in place of the selected image.
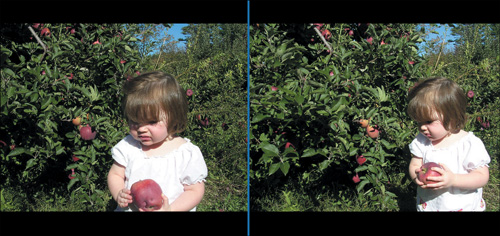
Use Side by Side View to analyze composition and details.
You can switch between views by clicking the Full Screen View button (![]() ) or the Side by Side View button (
) or the Side by Side View button (![]() ) in the control bar. While in either view, you can mark your favorites for printing, fix red eye, add a photo to a collection, zoom in, rotate, delete, and apply tags to a photo. Press the Esc key to return to the Organizer.
) in the control bar. While in either view, you can mark your favorites for printing, fix red eye, add a photo to a collection, zoom in, rotate, delete, and apply tags to a photo. Press the Esc key to return to the Organizer.
Choosing files
To select more than one photo in the Photo Browser, hold down the Ctrl key and click the photos you want to select. Holding down the Ctrl key allows you to select multiple, non-consecutive files. To select photos that are in a consecutive order, hold down the Shift key and click the first photo, then click the last photo you want. All the photos between the selected photos will be selected as well.
![]() Choose the photos to be compared in the Organizer by holding the Ctrl key and selecting the images. Then choose View > Compare Photos Side by Side.
Choose the photos to be compared in the Organizer by holding the Ctrl key and selecting the images. Then choose View > Compare Photos Side by Side.
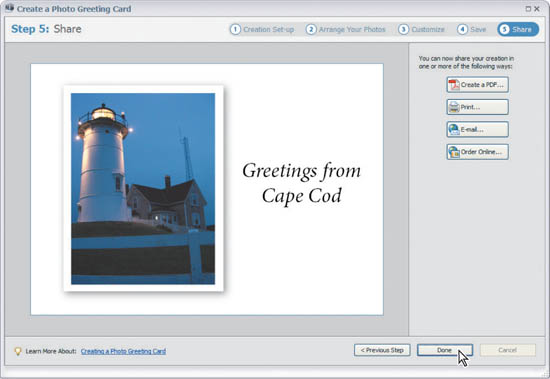
Making a greeting card
You can use a variety of templates to create cards that you can print on your home printer and then mail to others.
1 In the Photo Browser, select the photo you’d like to use for a postcard.
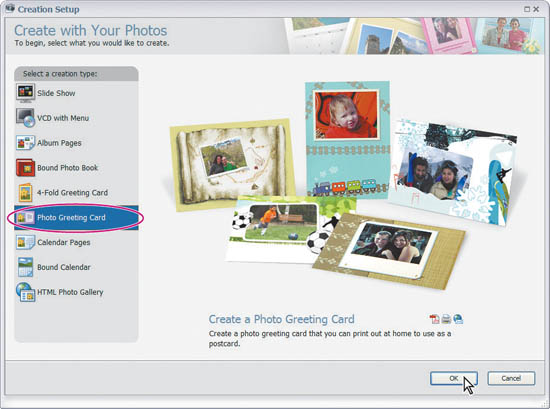
2 Click the Create button (![]() ) in the shortcuts bar to show the Creation Setup window.
) in the shortcuts bar to show the Creation Setup window.
3 Select Photo Greeting Card from the list of creation types, and then click OK.
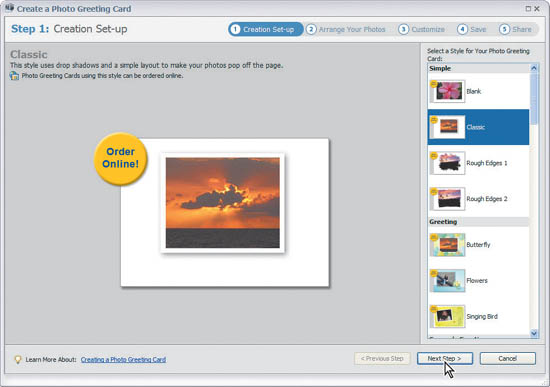
4 Select a style from the list on the right, and then click Next Step.
5 To use the displayed photo, click Next Step. To select a different picture, click Add Photos in the upper left corner, select a new photo, and then click Next Step.
6 Reposition or resize the photo as needed.
7 Double-click the sample text to customize it with your specific text. Use the Title dialog box to enter text and choose formatting options, then click Done.
8 Click Next Step.
9 Type a name for your card in the Photo Greeting Card Name text box, or select Use Title for Name.
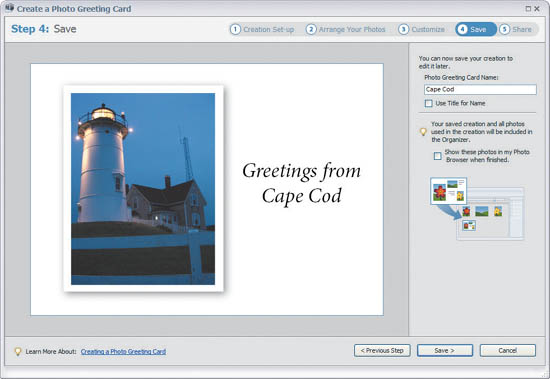
10 Click Save.
11 Choose how you’d like to share your card. You can create a PDF, print it on your home printer, e-mail the photo greeting card, or order it online. When you’re finished, click Done to close the Creations Wizard.
Video format support
If you record digital video from a camcorder, Photoshop Elements can import frames and manage them as graphic files.
To acquire still frames from a video
You can capture frames from your digital videos if they are saved in a file format that Photoshop Elements can open, including AVI, MPG, MPEG, WMV, ASF, and MLV. To capture frames from video, you’ll need to open the Editor.
1 Choose Edit > Deselect to deselect the card that was added to the Catalog in the previous exercise.
2 Select Edit > Go to Standard Edit in the shortcuts bar to open the Editor.

3 In the Editor, choose File > Import > Frame from Video.
4 In the Frame from Video dialog box, click the Browse button, navigate to the Lesson01 folder and choose snowman.avi, then click Open.
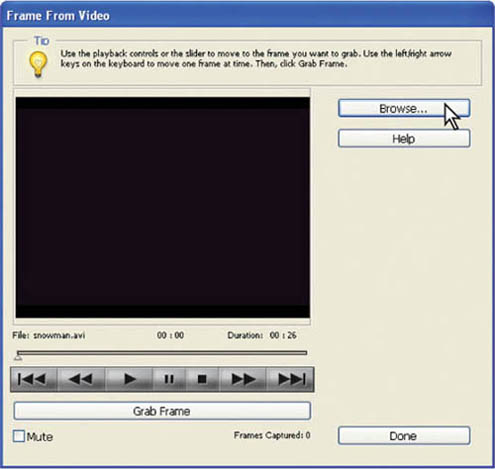
5 To start the video, click the Play button (![]() ).
).
6 To get a frame of the video as a still image, click the Grab Frame button or press the spacebar when the frame is visible on the screen. You can move forward and backward in the video to capture additional frames.
Note: Some video formats don’t support rewinding or fast-forwarding. In these cases, the Rewind (![]() ) and Fast Forward (
) and Fast Forward (![]() ) buttons are dimmed.
) buttons are dimmed.
7 When you have all the frames you want, click Done.
8 Save the still files in Photoshop Elements.
Using Help
The complete documentation for using Adobe Photoshop Elements is available by using Help.
Note: Adobe Help systems include all the information in the printed user guides, plus additional information.
To navigate Help
Choose Help > Photoshop Elements Help... to open the Help Center. Click Product Help, and do any of the following:
• To view Photoshop Elements Help, choose Adobe Photoshop Elements 4.0 from the Help For menu.
• To expand or collapse a section, click the blue triangle to the left of the section name.
• To display a topic, click its title.
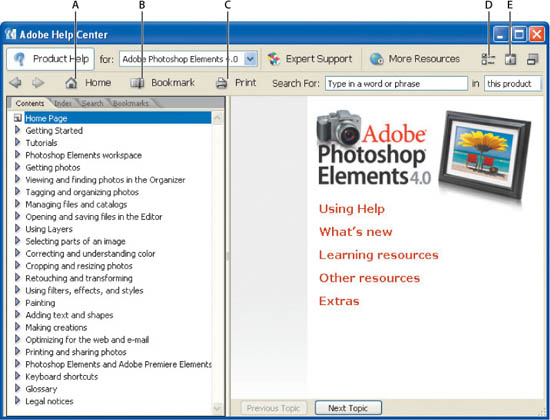
A. Returns you to Help home page. B. Adds bookmark for current topic.
C. Prints contents of right pane. D. Opens Preferences dialog box.
E. Opens About Adobe Help Center window.
To search Help topics
Search Help using words or phrases to quickly find topics. You can search Help for only Photoshop Elements or for all Adobe products you’ve installed. If you find a topic that you may want to view again, you can bookmark it for quick retrieval.
1 In Adobe Help Center, click Product Help. Type one or more words in the Search box. To search across Help for all Adobe products you have installed, click the black triangle to the left of the Search box and choose Search All Help.
2 Click Search. Topics matching the search words appear in the navigation pane.
3 To view a topic, click its title in the navigation pane.
4 To return to the navigation pane, do one of the following:
• Click the Home button (![]() ).
).
• Click the Back button (![]() ).
).
• Click the Next Topic button or Previous Topic button at the bottom.
5 Close the Help window.
Search tips
Adobe Help Search works by searching the entire Help text for topics that contain all the words typed in the Search box. These tips can help you improve your search results in Help:
• If you search using a phrase, such as “shape tool,” put quotation marks around the phrase. The search returns only those topics containing all words in the phrase.
• Make sure that the search terms are spelled correctly.
• If a search term doesn’t yield results, try using a synonym, such as “photo” instead of “picture.”
To use the How To palette
In the Standard Edit workspace, the How To palette provides activities that guide you through different image-editing tasks. For example, you can view instructions about restoring an old photograph. Photoshop Elements will even perform some of the steps for you.
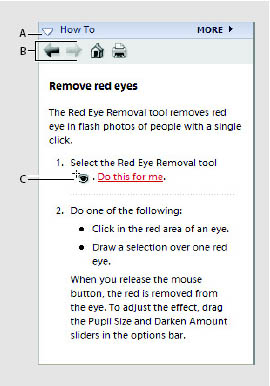
How To palette.
A. Click the triangle to open or close the palette.
B. Navigation and Print buttons.
C. Click Do this for me to have Photoshop
Elements perform the task.
1 Open the How To palette by clicking its triangle in the Palette Bin or by choosing Window > How To.
2 Choose a category and click the How To topic you want to use.
Note: You can use the navigation arrows to move between the How To topics. The Home button takes you back to the main menu.
3 Follow the How To instructions. When available, you can click Do this for me to have Photoshop Elements perform the task for you. If you want to print a set of instructions, click the Print button (![]() ).
).
Hot-linked tips
Hot-linked tips are available throughout Adobe Photoshop Elements 4. These tips display information in the form of a typical tip balloon, or they will link you to the appropriate topic in the help file.

You’ve reached the end of the first lesson. Now that you understand how to get photos and the essentials of the Photoshop Elements interface you are ready to start organizing and editing photos—which you’ll do in the next lesson.
• Review questions
1 What are the primary workspaces in Adobe Photoshop Elements 4.0?
2 Define the fundamental workflow of Adobe Photoshop Elements 4.0.
3 What are tags?
4 What digital video formats are supported by Adobe Photoshop Elements 4.0?
• Review answers
1 Photoshop Elements has two main workspaces: the Organizer workspace for finding, organizing, and sharing photos and media files, and the Editor workspace for creating, editing, and fixing your images.
2 The fundamental workflow in Adobe Photoshop Elements involves:
a Capturing media into the Organizer from a digital camera, scanner, digital video camera, or image created from scratch in the editing component.
b Categorize the media in the Organizer using the tag assignment features.
c Edit the media by color correcting or adding text, using the Editor.
d Share the media by e-mailing, using a sharing service or burning to CD/DVD ROM.
3 Tags are personalized keywords such as “House” or “Beach” that you attach to photos, video clips, audio clips, and creations in the Photo Browser so that you can easily organize and find them.
4 The digital video formats that are supported by Adobe Photoshop Elements 4.0 include: AVI, MPG, MPEG, WMV, ASF, and MLV.