
10. Rendering and Export
Lesson Overview
In this lesson, you’ll learn about the following:
• How to render media out of SpeedGrade
• How to set up the render of offline dailies
• How to export an EDL
This lesson will teach you how to render your final graded media. It should take approximately 30 minutes to complete.
Download the project files for this lesson from the Lesson & Update Files tab on your Account page at www.peachpit.com and store them on your computer in a convenient location, as described in the Getting Started section of this book. Your Accounts page is also where you’ll find any updates to the chapters or to the lesson files. Look on the Lesson & Update Files tab to access the most current content.

After you grade an entire program, the last step in the process is to render out the final graded media.
Getting started
As discussed in Lesson 2, the last stage of the SpeedGrade workflow after importing a project and grading it is to render the final output. This final lesson discusses different ways to render output using the controls in the Render tab.
![]() Note
Note
If you have not already downloaded the project files for this lesson to your computer from your Account page, make sure to do so now. See “Getting Started” at the beginning of the book.
For this lesson, you’ll use the project file located in the Lesson_10 folder.
1. Launch SpeedGrade (if necessary) and close the open project so the Timeline is empty.
2. Use the Desktop media browser’s hierarchical list at the left to find where you copied the SpeedGrade lesson media.
3. Open the Lesson_10 folder, and double-click the Lesson_10.ircp item to open that project.
4. If the clips in the Timeline appear brown, select the Tutorial_Media folder in the media browser to reveal its contents. Then open the Reels panel and click the Load From Desktop button to relink them to the clips in the open project.
5. Open the Monitor. If necessary, set the Zoom Level pop-up menu to Fit to see the entire frame, and then open the Look panel to prepare to work.
Rendering graded media
After you grade an entire program, the last step in the process is to render out the final graded media. You can do this in one of three ways:
• Render individual files with cloned filenames, reel numbers, and timecode metadata using one of the metadata options in the File Name menu. This workflow is typical for creating “digital dailies,” where you convert the high-bandwidth, camera-original media into a format that’s easier to edit and work with during postproduction. To display the File Name menu in the Render tab, click the M Button next to the filename edit box.
• Render the entire Timeline as a single media file, which is often appropriate when you’re creating a “master media file” to subsequently reimport into Adobe Premiere Pro. In this workflow, Adobe Premiere Pro completes the finishing process, adding titles and other necessary effects.
• Render individual, consecutively named files relative to their position in the SpeedGrade Timeline, which makes it possible for you to quickly reassemble the project back in Adobe Premiere Pro as a series of separate clips. This can be helpful if you’re doing more elaborate effects work back in the nonlinear editing (NLE) application; having separate clips makes it easier to localize what you’re doing.
Each render workflow is enabled by choosing different options in the Render tab.
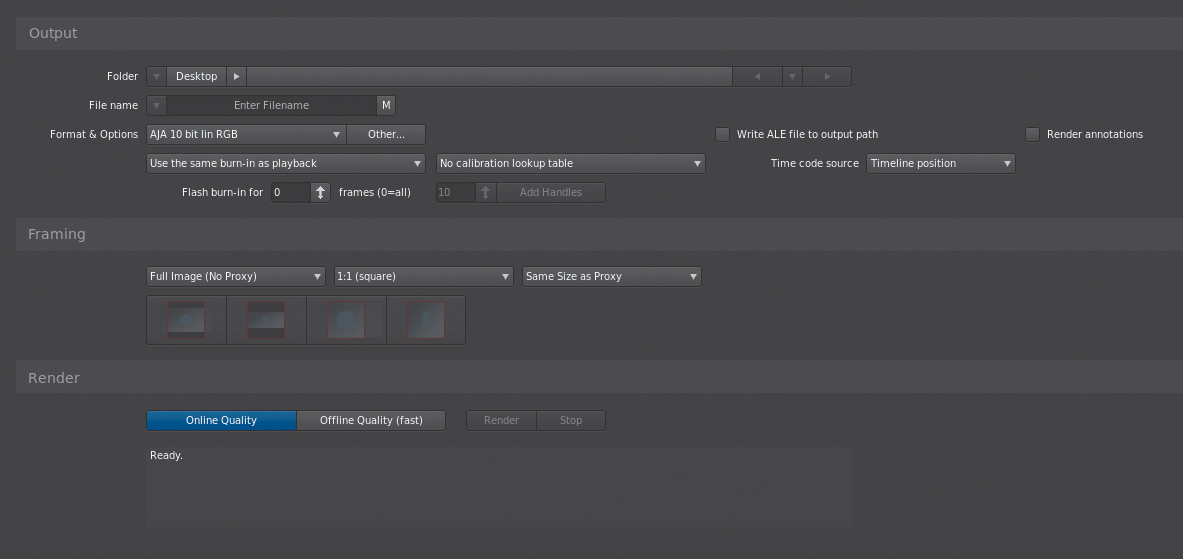
Setting Output options
To render a program, you’ll use the Render tab, which is the third tab from the left at the top of the SpeedGrade window. The Render tab displays all of the controls and options available for rendering the clips in the Timeline.
With the Lesson 10 project open, you’ll walk through the different options that are available in the following exercise.
1. Click the Render tab to display its options.

2. Define how much of the Timeline to render. Double-click any clip in the Timeline either once or twice to set the In and Out points at the beginning and end of the Timeline (double-clicking a clip toggles between selecting just that clip and selecting the entire Timeline). Alternately, you can move the playhead through the Timeline and press I and O to set In and Out points of your own to render a limited portion of the Timeline.
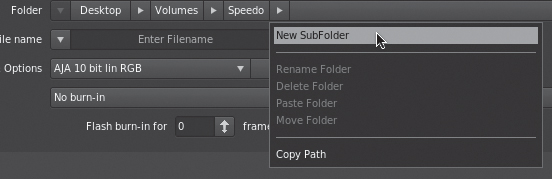
3. Choose a folder to which the resulting media will be rendered. At the very top of the Output panel is a Folder control. Click the arrows to navigate to a location for the rendered video, drilling down into deeper levels of the folder hierarchy as necessary.
Alternately, you can Control-click (right-click) any arrow and choose New Subfolder. Type a name for the new folder in the field, and press Return (Enter) to create the folder.
4. Define how you want the current project’s media to render using the File Name field. Do one of the following:
• To render the entire video from the In point to the Out point of the Timeline as a single media file, type a name in the File Name field.
• To display a menu of options for rendering individual media files, one for each clip, click the M button. To render offline media files that correspond to file-based, camera-original clips, choose Src.Filename from the Common menu.

• To render individual clips that are numbered relative to their position on the Timeline, click the M button and choose General.EditNumber from the Common menu.
When you choose an option from a File Name menu, dark gray text to the right previews the resulting filenames, guiding you to make the correct choices for your own unique workflow. Feel free to experiment with the many different options and naming conventions to see the results for your media output.
If you accidentally choose the wrong option from the File Name menu, click it again and choose a different option. If you choose an option from the menu and later decide to render a single file, you can move the pointer over the File Name field so that the X button appears, and click it to clear the File Name field.
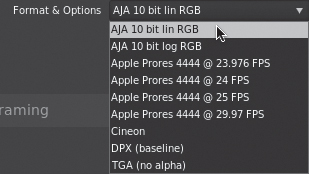
5. Choose the media format you want to render using the Format & Options menu. Do one of the following:
• Choose from the short list of formats in the Format & Options menu, which may or may not include some combination of AJA, Apple ProRes, Cineon, DPX, and TGA. Note that the Cineon, DPX, and TGA options create image sequences.
• To render to a different format, click the Other button to display the Create Output Preset dialog. Click the tab for the format you want, and then customize the options in the tab to create your own preset. This is how you can access every other codec and format your system is capable of. After you set all relevant options, type a name for the file in the field at the bottom of the Create Output Preset dialog and click Save.
The Create Output Preset dialog is also used to access lower-quality codecs and media formats for creating offline media for editorial.

Now that you have selected the minimum settings that define where to render, how to name the files, and what format to output, you can set additional options.
6. To output offline digital dailies or a review copy of a program, set the following:
• Select Render Annotations to output any annotation text or graphics along with the graded output.
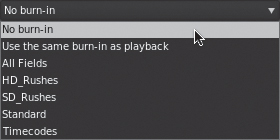
• Choose an option from the Burn-in menu. For example, SD_Rushes adds a window burn at the bottom of each rendered clip with the frame number, filename, and timecode. (Burn-in data can also be displayed by clicking the Burn In button in the Timeline’s View panel.)
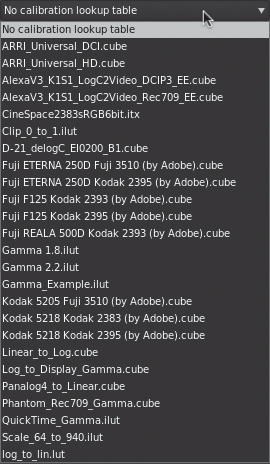
• To apply a LUT to the rendered output, choose one from the Calibration Lookup Table menu.
7. Choose an option from the Time Code Source menu that corresponds to the type of media you want to output:
• The Source option works well if you want to output digital dailies with a cloned timecode.
• The Timeline Position option works well if you want to output a program as one or more clips to reassemble in an NLE relative to the program’s record timecode.

You can also customize the framing if you like, which controls how much of the image is either preserved or cropped if the media frame size doesn’t match the output frame size. If you’re not rendering dailies, chances are the current framing setup for the project is fine. If you want to reframe your image (for example, to create SD media from an HD source or vice versa) or you want to generate digital dailies from an anamorphic format, you can select different options from the Framing controls.

8. To create lower-resolution media for faster processing, you can choose a Proxy option. The default is Full Image (No Proxy). If you use a proxy, you can choose a pixel aspect ratio that matches the frame size of your output. The default is 1:1 (square), but you can choose anamorphic, PAL, or NTSC pixel aspect ratios if you need a frame size conversion. A third menu lets you choose from among the most standard frame sizes to render the output with. The default is Same Size as Proxy.
9. Choose a level of processing quality from the Render controls.
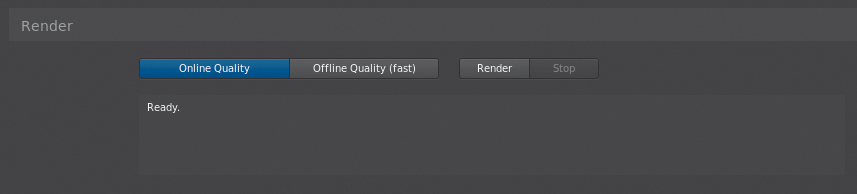
10. Click Online Quality to render final output—if the render time is not an issue. Otherwise, click Offline Quality to process files that you need in a hurry, such as digital dailies.
11. When you’re satisfied with all the settings, click the Render button.
The media starts to render; an Info box shows how the render is progressing.

After you render the project, you can click the Render Result tab to the left of the Render tab, which is a shortcut for checking on your rendered media before exiting SpeedGrade.
Exporting an EDL
If you created a custom Timeline of clips for use in another application, SpeedGrade can export the current Timeline as a basic EDL. However, this is not intended to support a round-trip workflow; it’s only meant to provide a mechanism for exporting Timeline structures out of SpeedGrade to other applications that support EDL import. To send a rendered project back to an NLE, it’s still best to render final media in such a way that it’s easy to edit back into a new Timeline for finishing.
Be aware that you can only export an EDL if the selected Timeline has a single track. Timelines with multiple tracks, such as one or more Grading Tracks, cannot be exported.
1. Set In and Out points in the Timeline to specify the range of the current project to export.
2. Click the Timeline tab, and then click Setup.
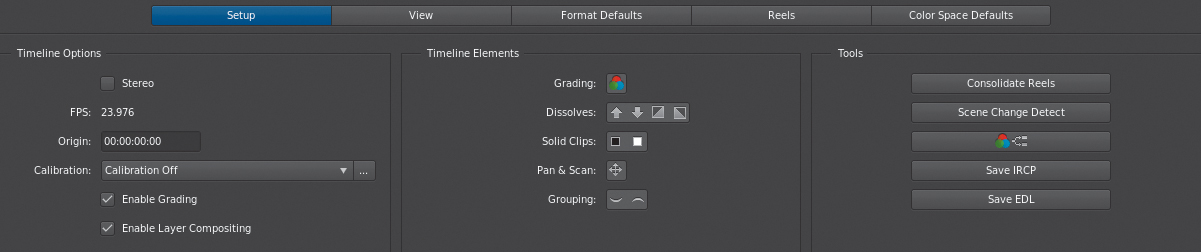
3. In the Setup panel’s Tools section, click Save EDL.
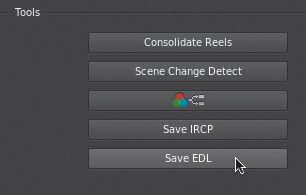
4. Choose a location for the saved EDL, type a name in the File Name field, and then click Save.
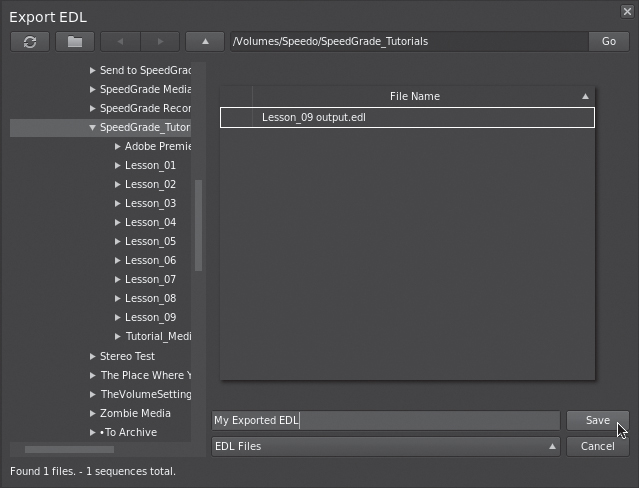
An EDL is exported.
Review questions
1. How do you render only part of the Timeline?
2. How can you render to a codec or format that isn’t in the preset menu?
3. Is it possible to render annotations into your output?
4. Does SpeedGrade render clips as individual files, the entire Timeline as one file, or either?
5. Can you choose a LUT to render your output with?
Review answers
1. Set Timeline In and Out points.
2. Use the Create Output Preset dialog.
3. Yes.
4. Either.
5. Yes.