
Chapter 5: Creating and Manipulating Media Content
In the previous chapter, we looked at the many ways of getting content outside of Animate for distribution or further work, but what about actually creating content?
This chapter covers many of the creative capabilities of the software, starting with a refresher regarding how to create shapes and add motion to them. We will follow up with the use of symbols and explore the various types of symbols available to us in Animate. We will learn why and when to use certain symbol types in different circumstances, and how to create motion with them. Importantly, we will explore the various easing profiles available within the software that allow us to refine our motion more naturally.
After reading this chapter, you'll be able to do the following in Animate:
- Design and animate vector content using shape tweens.
- Create symbols and animate them using classic tweens.
- Apply natural easing profiles to your animated content.
- Explore the properties of symbol instances and various applied tweens.
Technical Requirements
You will need the following software and hardware in order to complete this chapter:
- Adobe Animate 2022 (version 22.0 or above).
- Refer to the Animate system requirements page for hardware specifications: https://helpx.adobe.com/animate/system-requirements.html.
Working with Shapes
In this section, we are going to begin by looking at some of the shape creation tools within Animate and learn how to establish vector-based shape objects to apply motion to them in the upcoming sections.
While Animate can certainly make use of imported content, such as bitmap images, sound files, and other types of external media, the creation and manipulation of native vector shape objects is a workflow that Animate excels at. With a full range of tools that support the creation of vector shapes and a dedicated tweening engine to consider, there is no doubt that shapes are key to the Animate experience.
We'll now have a look at some of the important topics associated with the creation and manipulation of shapes within an Animate project. We'll examine the set of tools that allow us to create shape objects and learn how to set different tool property values that directly influence aspects of the resulting shapes.
Understanding the Shape Tools
There may be more shape tools than any other type of tool within the Animate toolbar. Since the software is used by artists and creators of all types, there has to be a set of tools for both freeform drawing and precise form generation.
You can view the full set of shape tools available in the following screenshot:

Figure 5.1 – Animate shape tools
These tools are arranged and listed in no particular order, and will differ depending on the current workspace that has been chosen:
- Fluid Brush: This is a GPU-accelerated brush that is built on the same technology as Adobe Fresco brushes. It allows you to draw smooth lines with a more fluid approach to painting and drawing. This brush produces a fill.
- Classic Brush: An older brush within Animate, this brush will produce a fill when used and contains a limited number of controls.
- Paint Brush: This tool produces strokes by default but can be toggled to produce fills instead. It works by mapping vector art across the paths that are generated.
- Pencil: Another older tool with a limited number of options, this one produces a stroke in the same way that Classic Brush produces a fill.
- Rectangle: This tool allows you to create rectangles and square shapes consisting of both fill and stroke.
- Rectangle Primitive: This works similarly to the Rectangle tool, with the distinction of being able to manipulate the corner radius following after creating the object.
- Oval: This tool allows you to create ovals and circular shapes consisting of both fill and stroke.
- Oval Primitive: This works similar to the Oval tool, with the distinction of being able to manipulate the start angle, end angle, and inner radius after creating the object.
- PolyStar: A unique tool that creates a polygonal or star shape where you can determine the number of sides or points accordingly. It creates a shape with both fill and stroke.
- Line: This draws a straight line consisting only of stroke.
- Pen: This tool works in a similar manner to the Pen tool in Adobe Illustrator or Photoshop. It allows the creation of custom shapes by using anchor points and their related curve handles. It creates a shape consisting of stroke alone, but that can be filled with the Paint Bucket tool if the path is closed properly.
Generally, some of these tools will be grouped, and some may not even be visible unless you specifically add them to the toolbar, depending on your chosen workspace.
Tip
Remember that you can edit the tools that appear in your toolbar or even create smaller tear-off toolbars. Have a look back at Chapter 3, Settling into the User Interface, for a refresher!
When a tool is selected, you will be able to adjust the properties of that tool from the Properties panel. It is a good idea to set tool properties before creating content with your chosen tool since often, there will be properties that cannot be easily changed with existing objects.
Just make sure to choose the Tool tab at the top of the Properties panel before you begin using any tool:
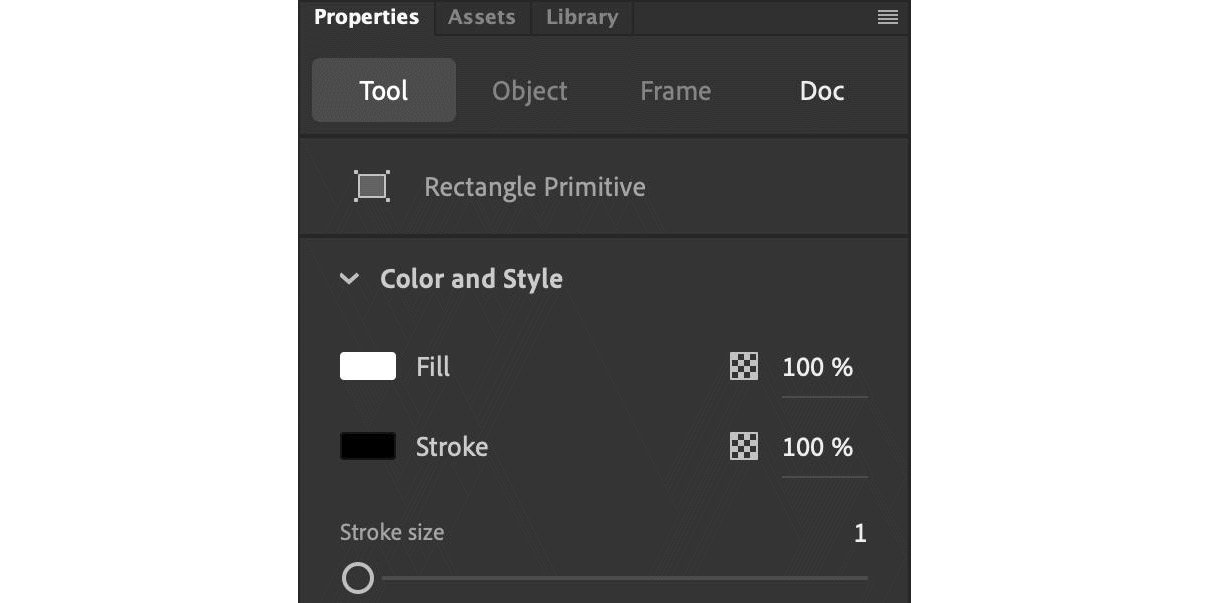
Figure 5.2 – Common Shape Tool properties
Shapes in Animate can consist of Fill, Stroke, or a combination of both. Some of the tools will have special options that you will find lower down within the Properties panel since the more common options are generally located toward the top. Once you've settled on a set of properties that make sense to your task, you can go ahead and start creating!
Note
Fill and stroke can be added or removed from any shape, so long as the requirements for each are met. Look at both the Paint Bucket and Ink Bottle tools to add each visual aspect to your shape.
In this section, we learned how to create shapes using a variety of shape tools available to us in the software. Next, we'll apply motion to these basic shapes by using shape tweens.
Creating a Shape for Animation
Before we perform any sort of animation, we'll need to create a visual shape to manipulate. Once this shape has been established, we'll perform a specific type of tween that only works with shapes. It will likely come as no surprise to anyone that this type of tween is called a Shape Tween.
Note
The term "tween" is shorthand for "in-between" and is a traditional animator's term, describing the frames that exist in-between the main "key" frames that are drawn by a senior animator. These would be filled in by less-skilled junior animators using the "key" frames as a guide. Tweens in Animate work in much the same way!
Let's now create a shape object to perform a bit of animation with:
- First, create a new ActionScript 3.0 document and set the width to 1280 and the height to 720, with an FPS setting of 30. You can verify that you've done this correctly from the Properties panel, as shown in the following screenshot:

Figure 5.3 – Document Settings
- Then, choose a tool to create your shape object with. I suggest keeping it simple for now and using the Rectangle tool.
- Look at the Tool tab of the Properties panel, set the fill to a medium blue (#0066CC), and disable the stroke by selecting the swatch that looks like a white square with a red line passing from corner to corner:

Figure 5.4 – The Rectangle tool's properties with stroke disabled
- Click on the left-hand side of the Stage area, hold down the Shift key, and drag to create a square that measures about 200 pixels in both Width and Height.
- Choose the Selection tool and select the object that was just created. Look at the Object tab in the Properties panel to ensure that your properties match what has been described. The X position value should be 220, while the Y position value should be 260:
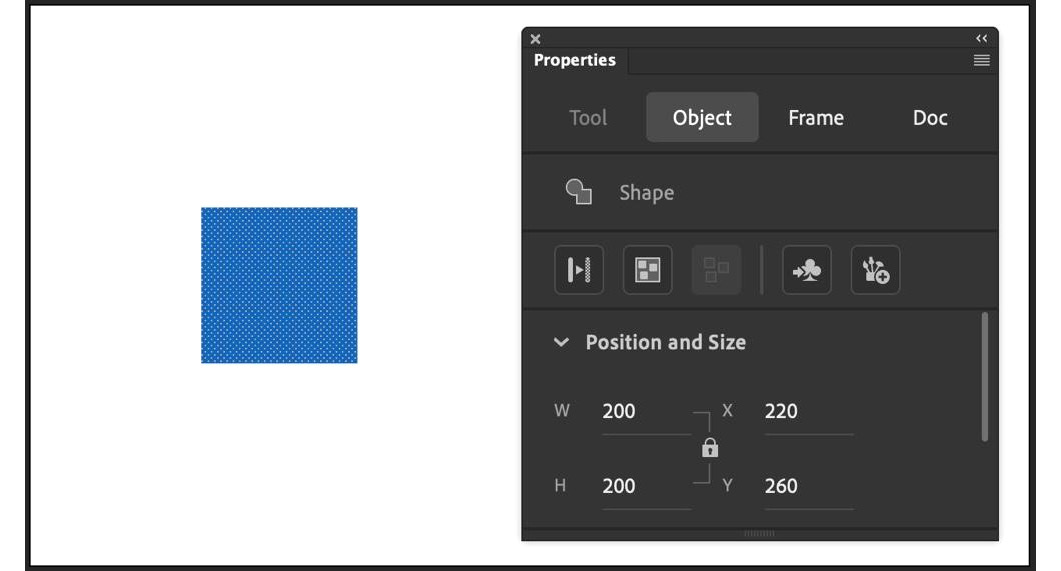
Figure 5.5 – Our newly created square shape
We now have a simple blue square shape positioned on the stage. In the next task, we'll add motion to this shape through use keyframes and a Shape Tween.
Animating with Shape Tweens
We now have a shape on the Stage area, ready to animate. At the most basic level, animation is performed within the timeline through the use of keyframes. Keyframes hold data values for certain properties, such as position, scale, rotation, and opacity. Creating multiple keyframes across time gives the appearance of motion, even though nothing is moving, but your eyes are tricked into processing the change in data between frames as motion.
Traditionally, when using a shape tween or even a classic tween, you manually create keyframes before making a change to the object properties in the Stage area. This is normally done by selecting a frame you'd like to create a keyframe on and choosing to insert a new keyframe from the buttons above the timeline, the right-click menu, the application menu by selecting Insert | Timeline | Keyframe, or using the F6 keyboard shortcut. You then select that keyframe and modify the properties of your object in the Stage area to create a change between the preceding keyframe and the one you just created.
There is also an Auto KeyFrame option that allows keyframes to be created automatically as you adjust object properties across the timeline.
The Auto KeyFrame option can be turned on and off as desired from the Insert Frames Group drop-down menu:

Figure 5.6 – Auto KeyFrame
When enabled, you get a small, circular indicator that appears above any selected frame. This indicates that a keyframe will be created there if any object properties are changed. For the next task, it doesn't matter whether the Auto KeyFrame option is enabled or not as we'll be creating keyframes manually.
Now, let's establish an additional keyframe, change certain properties of our shape in that keyframe, and apply a Shape tween to animate our object across the Stage:
- Before doing anything else, we'll want to rename Layer_1 to something more descriptive. Double-click on the layer's name and type in Square as a new layer name. It's important to stay organized!

Figure 5.7 – Renaming your layer
- Now, click the rectangle beneath the 1s mark at frame 30 to select it. It will appear highlighted in blue:
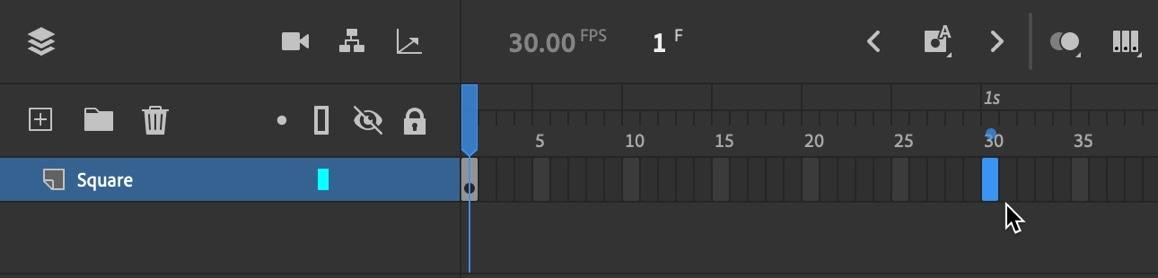
Figure 5.8 – Selecting the 1s mark at frame 30
- Click the Insert Keyframe button, or press F6, to insert a keyframe at frame 30. A duplicate keyframe will be created with the same properties as the previous keyframe at frame 1:
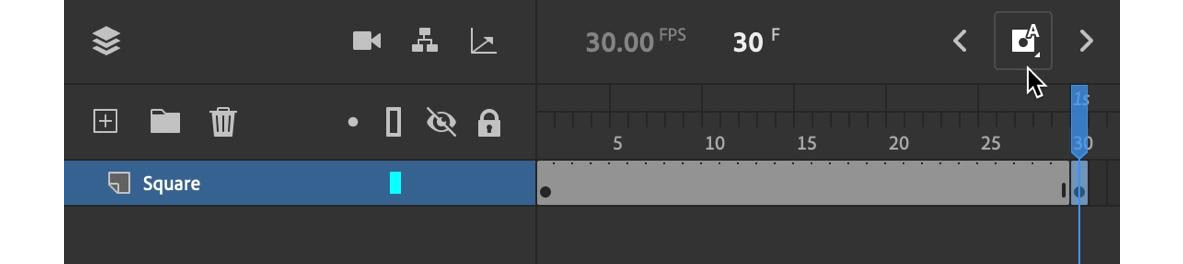
Figure 5.9 – Inserting a keyframe at frame 30
- Using the Selection tool with the Shift key held down, move the square shape to the opposite side of the Stage. Holding Shift will constrain the movement along the x and y axes. The X position should now be 860, while the Y position should remain at 260.
- The keyframes at frame 1 and frame 30 now have different position values. To create a Shape Tween to fill in the changes between these keyframes across time, click the Create Shape Tween button from the Insert Tweens group above the timeline, or choose Insert | Create Shape Tween from the application menu:
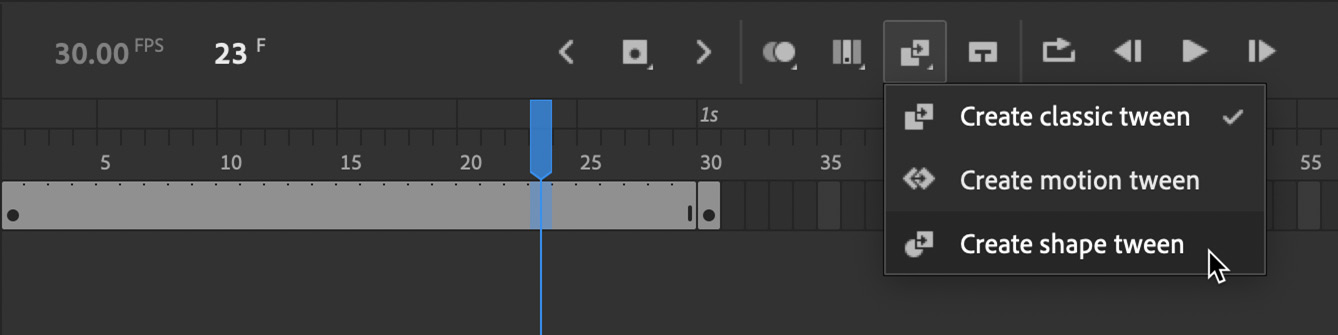
Figure 5.10 – Creating a shape tween between keyframes
The Insert Shape Tween option can be located within the Insert Tweens group.
- A Shape Tween is established between the two keyframes and an arrow appears between them across the frame span. The frames that make up the Shape Tween take on an orange color. This indicates that the tween was created successfully. Go ahead and drag the blue playhead across the frame's span to preview the animation on the stage:
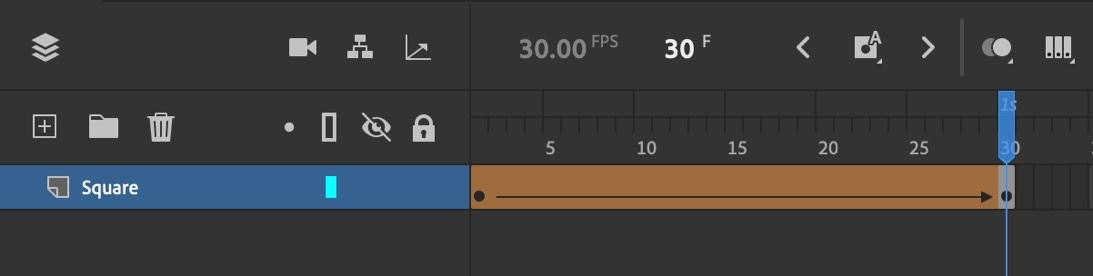
Figure 5.11 – Completed shape tween
The Shape Tween works by having Animate fill in the data values between each of the keyframes we have established, based on the properties that have been set at those keyframes. It does so in a completely linear way unless instructed otherwise.
Tip
If the arrow between keyframes appears as a broken or dashed line, this indicates a problem with the tween. Ensure that you have at least two keyframes and that both keyframes contain shape data and no other object types.
Test your movie by choosing Control | Test Movie or by clicking the Test Movie button in the top-right corner of the Animate interface. The animation of our little square will play back in a small window. Go ahead and close this window when you are finished.
We now know how to perform animation with a basic Shape Tween in our projects. Next, we'll look more deeply into the properties of the tween that can be modified.
Exploring Shape Tween Properties
There are several additional properties of a Shape Tween that can be modified once it has been created. To access these settings, select any frame or keyframe that is part of the tween and look at the Properties panel. Ensure that the Frame tab is selected and look toward the Tweening section of the panel:
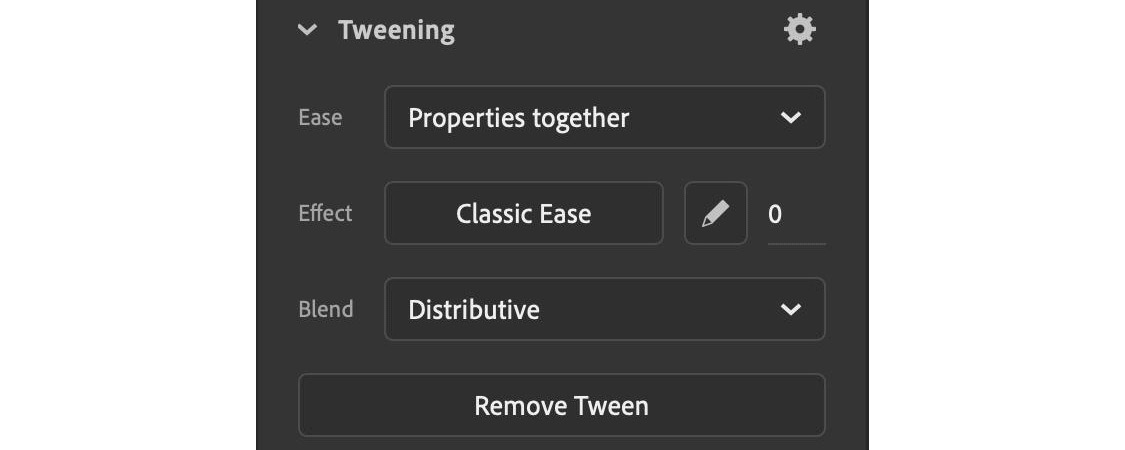
Figure 5.12 – Shape tween properties
Within the Tweening section of the Properties panel, you will find the following settings:
- Ease: There are two easing choices here: Properties together and Properties separately. When using shape tweens, you can only choose Properties together. Other tween types are more flexible in this regard.
- Effect: This setting allows you to apply different easing effects to your tween. Unless you want completely linear movement, it is recommended that you apply some sort of ease to your tween; the difference is immense! You can apply Ease Effect presets or even edit your custom ease through these controls. If you're using a Classic Ease, you can tweak the intensity by changing its value from the default of 0.
- Blend: This setting determines how the tween frames are calculated by Animate. You have two choices here: Distributive or Angular.
Each individual Shape Tween can have its properties adjusted through this section of the Properties panel. You can also remove the tween entirely by clicking the Remove Tween button.
Here is an example of our square's movement with a linear, default effect applied to the motion, versus one of the many easing effects available to us:
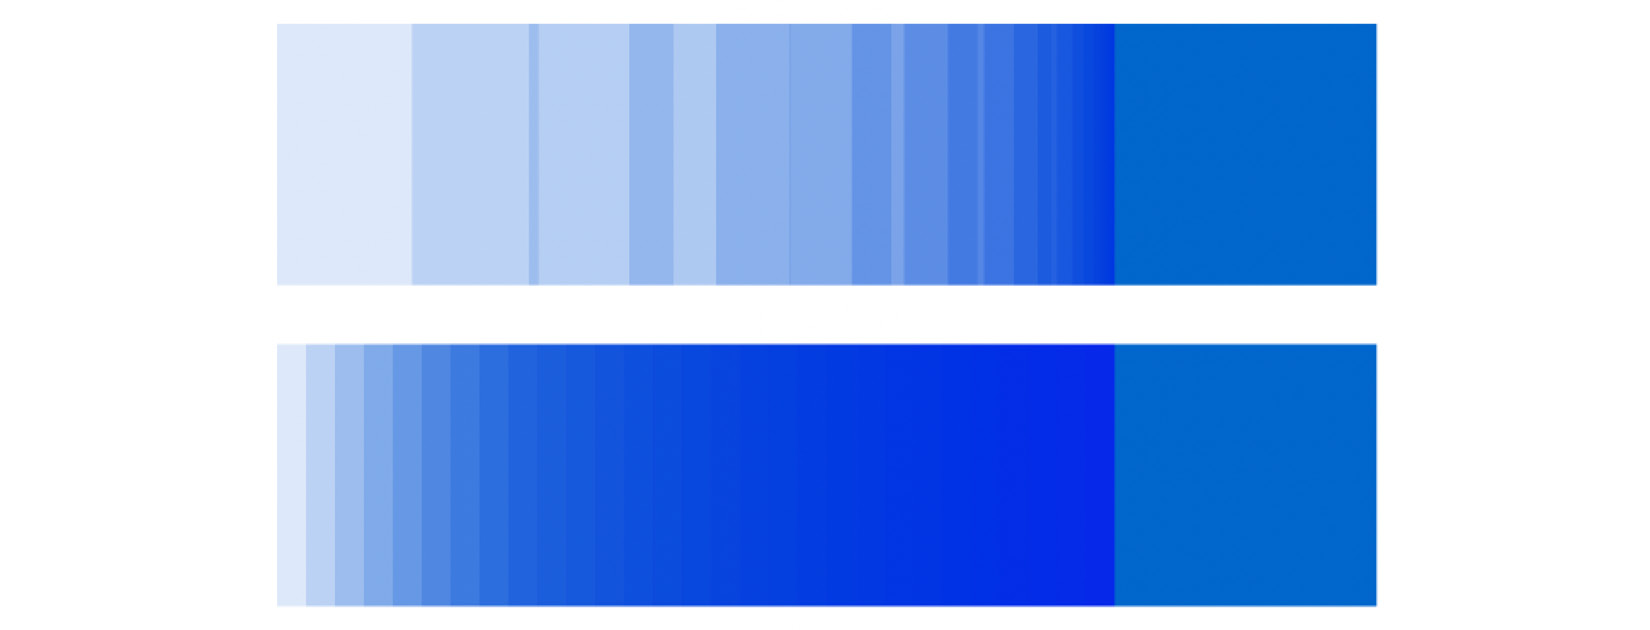
Figure 5.13 – Quint-Ease-Out versus Classic Ease
The bottom square has the default Classic Ease applied and moves across the stage at the same linear rate of speed for each of the 15 frames represented in the figure. The top square has a Quint-Ease-Out effect applied to it. Because of this, the rate of speed varies across different frames, starting slow and then speeding up.
It is important to know that both of these squares start and end in the same position on the stage and share the same first 15 frames of movement captured by this image. These effects can be used to establish much more natural, physical movements.
When tweening content, you don't have to start from scratch each time when needing to apply the same tween settings to multiple tweens. You can copy and paste tween settings from one tween to another – a huge timesaver!
With a tween selected in the timeline, look to the Properties panel for the Frame properties and locate the Tweening section once again:
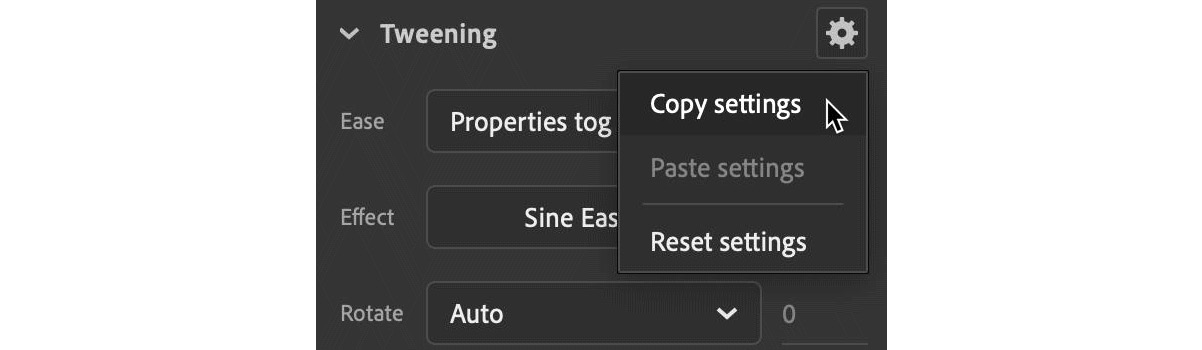
Figure 5.14 – Copy and Paste Tween Settings
At the top right of that section is a small gear icon. Clicking it gives you access to additional tween options, which allow you to choose Copy settings, Paste settings, or even Reset settings for the selected tween. This is very convenient when you need the same or even similar settings across multiple tweens.
All right – that's all there is for tween properties. Next, we'll have a deeper look at keyframes and additional shape properties that can be modified over time using the tweening engine.
Manipulating Shape Properties across Tweens
When we established our Shape Tween, the only value that differed between each of our keyframes with the shape's X position, which is used to create movement from one side of the screen to the next. Using a Shape Tween, there are many additional properties that can be tweened!
Let's go ahead and modify the animation to incorporate some of these changes in properties:
- First, we'll have the square change shape, along with the position. Move the playhead to frame 30 and select the square shape on the stage.
- Hit the Delete key on your keyboard to remove it. Note that in the timeline, there is still a keyframe present, but it is an empty keyframe since there is no longer any content. The tween also appears broken, with a dashed line through it, for this same reason:
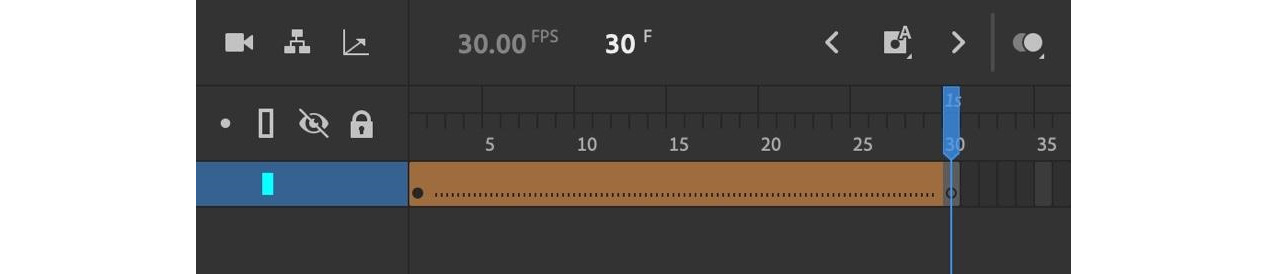
Figure 5.15 – The keyframe's contents removed
- Now, select the PolyStar tool and use it to draw a star shape on the stage in roughly the same position that the square shape used to occupy. Set your Tool options in the Properties panel to use a star Style with 5 sides and a point size of 0.5 within the Tool tab. Note that we are still at frame 30 in the timeline:
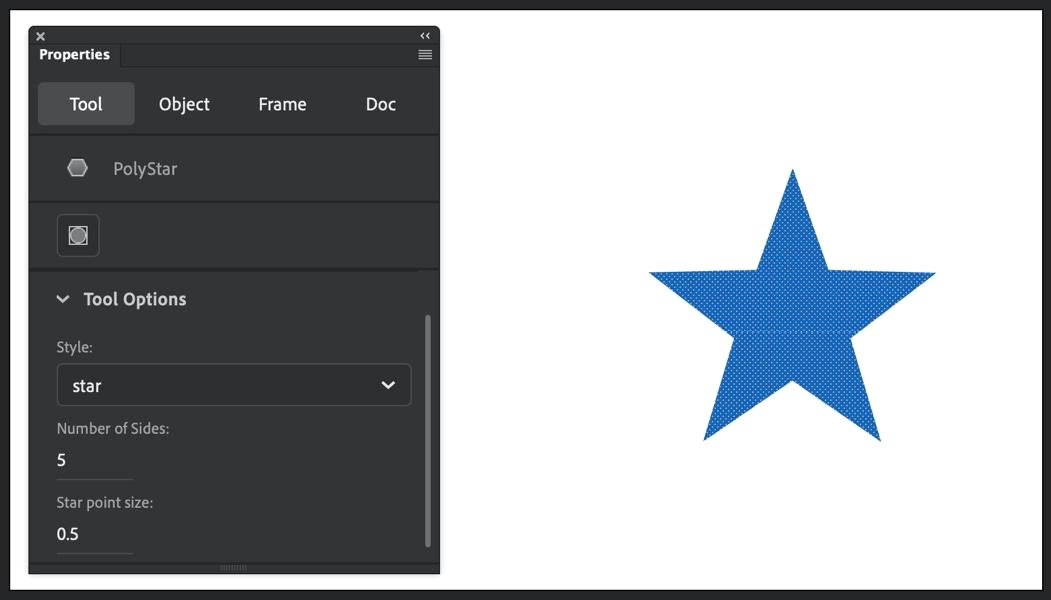
Figure 5.16 – Drawing a five-pointed star
- Let's have the square change color as it morphs into the star shape. With the star shape selected, change its fill color to a vivid violet (#9900FF).
- We can even change the scale of our elements if desired by using the Free Transform tool. With this tool selected, clicking on the star shape will display a transform box around it, allowing us to scale from any corner, and also perform additional transforms and rotations. Remember to hold down the Shift key to constrain proportions as you scale. Note the small white circle in the center of the transform box. This is our Transform Point, and any rotation or scaling will be done relative to this point:

Figure 5.17 – Using the Free Transform tool to change scale and rotation
With these changes in place, either click the Play button at the top of the timeline or the Test Movie button in the top-right corner of the Animate interface. Whichever choice you've made, you will see how the animation is now very different, with all the various properties being tweened together between the two keyframes.
You may also note that as the square morphs into the star, it does so in a strange way. There are two things we can try to correct this: one is to switch the Blend setting in the Tweening section of the Frame properties between Angular and Distributive. This may help, but a surer solution is to employ Shape Hints to guide the tweening engine into morphing our content more reliably.
Let's now fix our shape morph by adding some Shape Hints:
- Move the playhead back to frame 1. Shape Hints work across two keyframes and should be set at the initial frame of any tween.
- Add a Shape Hint by choosing Modify | Shape | Add Shape Hint from the application menu. A small red circle with the letter a will be added to the center of the square at frame 1:

Figure 5.18 – A shape hint appears as a red circle
- Move the a hint to the top center of the square. We will be placing each hint on the square where each point of the star would be if the two shapes were overlaid, one on top of the other. This will direct Animate to morph the shape in a more controlled manner.
- Continue to add four additional Shape Hints and place them along the square in a sequence that represents our five-sided star:

Figure 5.19 – Shape hints properly positioned
- Now, move the playhead to frame 30. We need to place our Shape Hints at the proper spots on this shape as well so that they correspond with their placement on the square. Notice that we do not have to add any Shape Hints at frame 30, as they carry over from frame 1 but are all grouped at the center of our star shape:
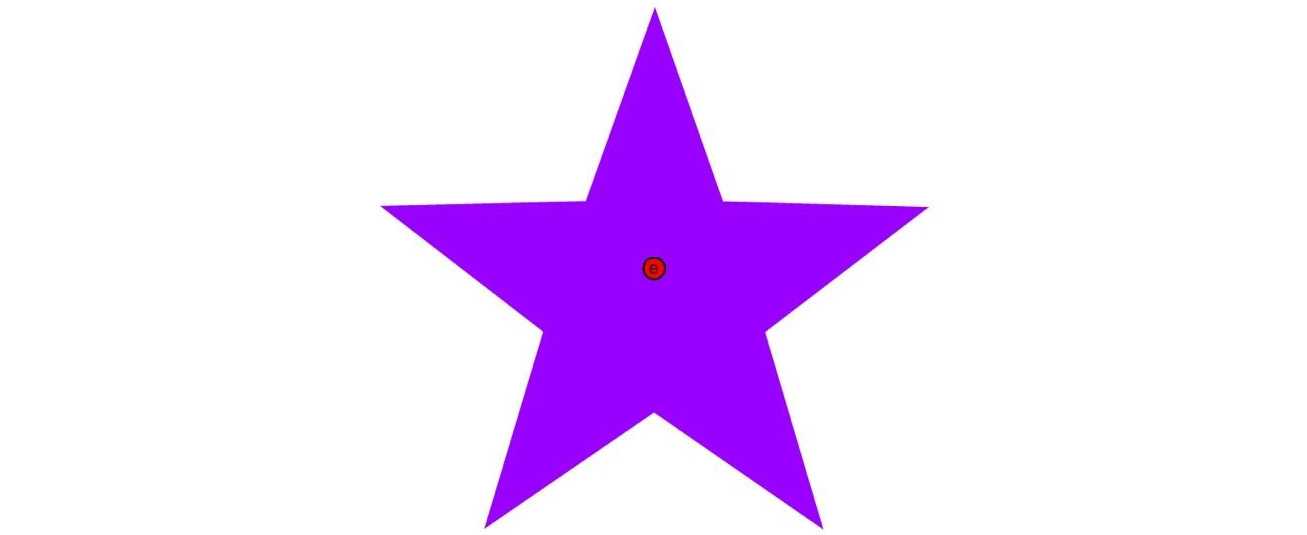
Figure 5.20 – The shape hints appear at the center
- Move each of our Shape Hints to their corresponding places on the star shape. Note that they must be placed in the same order to be most effective and that once they are positioned correctly, their color will change from red to green:

Figure 5.21 – Properly positioned shape hints
- Now, if you move the playhead back to frame 1, you will see that our Shape Hints on the square have also changed color, from red to yellow. This indicates that placement is complete on both keyframes:

Figure 5.22 – Verifying that the Shape Hints placement is correct
With that, we can once again preview the animation using the same mechanisms as before. The square will now morph into the star in a much less erratic way. Shape Hints are very powerful, but they can be easily broken as well. Always apply Shape Hints in an organized and structured way, as we've done here, to avoid any problems.
In this section, we had a comprehensive look at creating and animating shape objects within Animate. Next, we'll look beyond basic shapes and learn how to create and manipulate symbols.
Working with Symbols
As we saw in the previous section, Shape Tweens are only applicable to shape objects. They cannot be used on imported bitmap images, compound shape groups, or complex text objects. If you want to bring motion to these additional object types, you'll have to convert them into symbols and tween them using a Classic Tween or a Motion Tween.
We'll now have a look at some of the important topics having to do the various symbol types, including the differences between each type and methods for creating motion through the use of symbols.
Creating Symbols
A symbol in Animate is a special object that can be one of three types: Movie Clip, Button, or Graphic. Symbols exist within the Library panel project once created and are used by creating instances, which exist on the stage to be manipulated in various ways.
Symbols can be created through the Library panel by clicking the New Symbol button in the bottom-left corner of the Library panel or by choosing Insert | New Symbol from the application menu.
In either case, the Create New Symbol dialog will appear:

Figure 5.23 – The Create New Symbol dialog
Once you give the symbol a name and select its type, you will be placed directly within the symbol timeline to begin creating visual or motion content within the symbol, since a new symbol will be empty and void of content until you create it.
When you are taken inside a symbol timeline upon its creation, the user interface will reflect this in several ways:
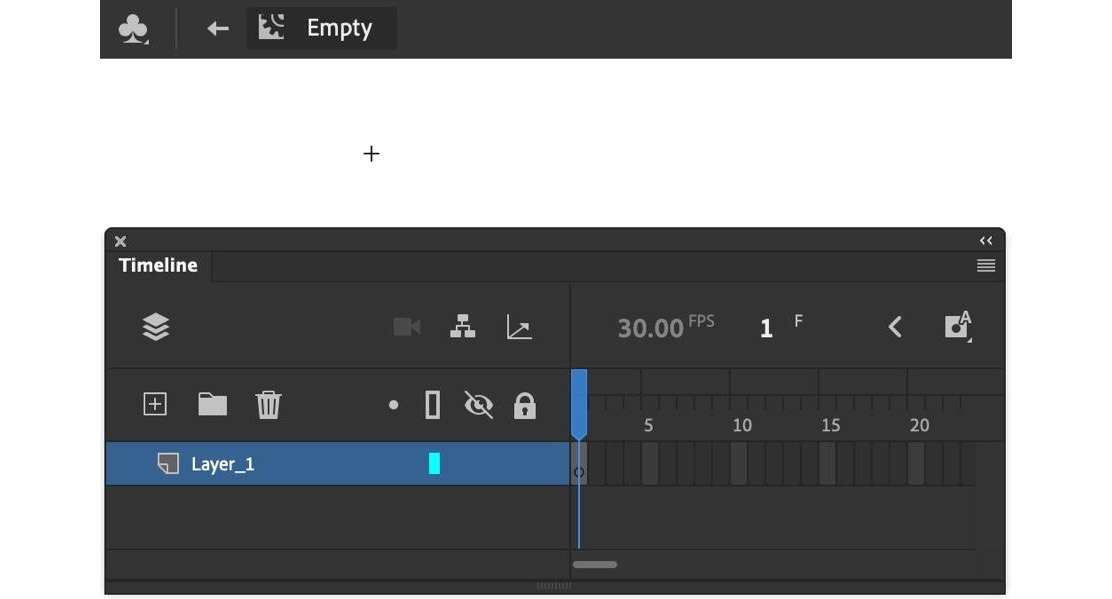
Figure 5.24 – An empty symbol timeline
Note in the previous screenshot how the symbol stage and timeline are empty. The only visible mark on the stage is a small + symbol, indicating the registration point of the empty symbol. We can tell we are within a symbol and no longer within the document root by viewing the edit bar above the stage. The symbol name appears with a small arrow pointing to the left. Clicking this arrow returns us to the project root outside the symbol.
Note
The Registration Point of a symbol determines a symbol instance's X/Y position coordinates, once placed on the Stage.
While creating symbols from nothing is definitely a useful workflow in certain circumstances, the more common way of creating symbols is done through a conversion process.
To convert existing content on your project stage into a symbol, you'll first need to select the content to convert:
- I suggest drawing another square, similar to what we created in the previous section with the Rectangle tool.
- Switch to the Selection tool and select the square shape that was just created.
- With the shape selected, look at the Object tab in the Properties panel and locate the Convert to symbol button:
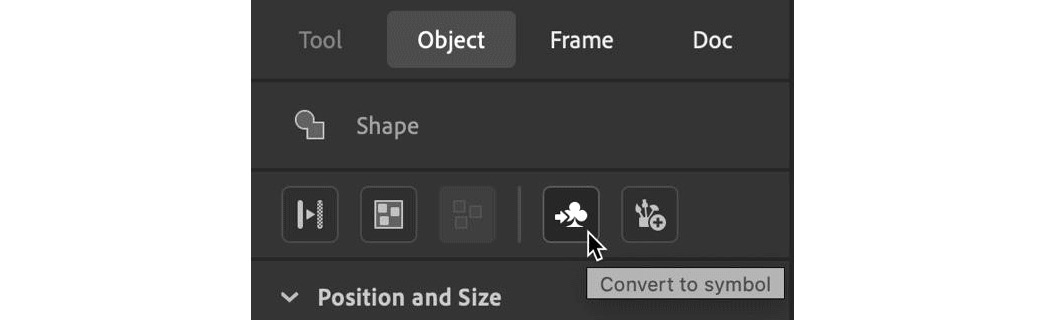
Figure 5.25 – The Convert to symbol button
- Click the Convert to symbol button for the Convert to Symbol dialog to appear. You can also choose Modify | Convert to Symbol… from the application menu:
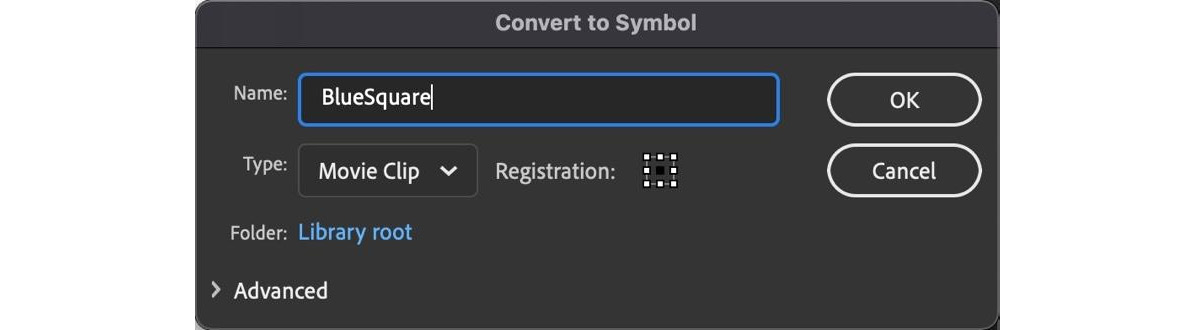
Figure 5.26 – The Convert to Symbol dialog
The Convert to Symbol dialog is very similar to the Create New Symbol dialog, but since it is converting existing content, it includes the additional option to set the registration point of the converted content. This can be set to the center, any corner, or any side, based on the content being converted.
There are a number of additional settings that are shared between the two dialogs:
- Name: This is an identifier that's given to a symbol to locate it within the Library panel. No spaces are allowed, and it must begin with a letter.
- Type: Choose Movie Clip, Button, or Graphic. You can switch type afterward if you make a mistake, and you can even change the instance behavior on the Stage to another type.
- Folder: This specifies the location of your symbol within the Library panel for organization purposes. Not specifying a folder will save your symbol to the Library root.
- Advanced: A set of options that vary according to the chosen symbol type. Most of the time, you can ignore these options as they largely have to do with ActionScript development.
If you would like to explore some of the options in the Advanced section of this panel, you will want to be using an ActionScript 3.0-based document type; otherwise, most will be entirely disabled. We'll explore these options in Chapter 13, Building Apps for Desktop and Mobile.
Note
If you ever want to adjust these settings, you can do so from the project's Library panel. Just right-click on a symbol and choose Properties… from the menu that appears.
Oftentimes, when working in Animate, you'll find yourself having created some engaging content in the main timeline that you then decide should have been created within a symbol instead. One way to turn existing content into a symbol is to create a new, empty symbol in the Library panel, then manually cut the layers you need as part of that symbol from the main timeline, and paste these layers into the empty symbol itself. As you might imagine, this can be a messy process that's prone to error. Thankfully, there is a simpler way.
We actually have the ability to select the layers we want to convert into a symbol by opening the right-click context menu from the selected layers and choosing the Convert Layers to Symbol option to simplify the entire process:
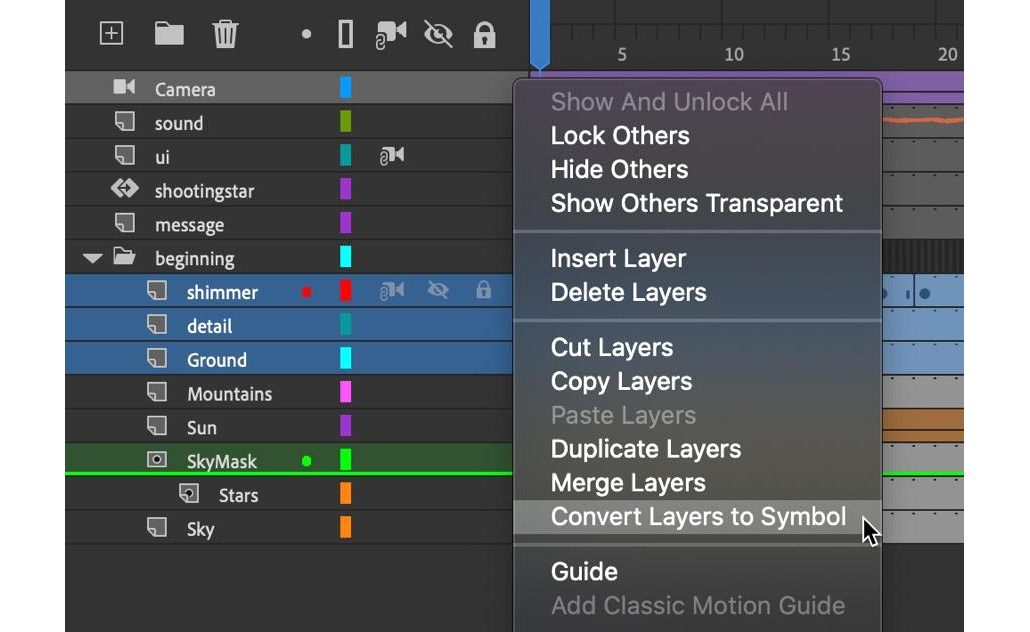
Figure 5.27 – Convert existing layers to a symbol
The Convert Layers to Symbol dialog will then appear – it looks exactly like the dialogs to both create an empty symbol or convert existing assets into a symbol, both of which we explored earlier:
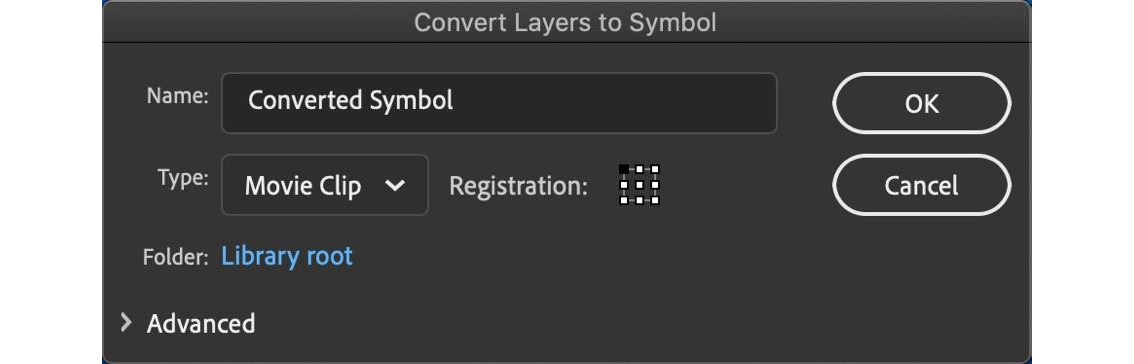
Figure 5.28 – Convert Layers to Symbol Dialog
You can provide a symbol name, choose the symbol type, and even set the registration point for your new symbol, as previously detailed.
Once you hit OK, the selected layers will be automatically transferred to the symbol's internal timeline and the original layers will be replaced with a new layer containing an instance of the new symbol.
Similarly, you can perform the inverse action on an existing symbol instance. Simply right-click on an instance and choose Break Apart Symbol to Layers from the menu that appears:

Figure 5.29 – Breaking Apart Symbol to Layers
New layers will be created, and the contents of the selected symbol will be placed in each layer, with all the properties intact.
Now that we understand how symbols are created, let's look more deeply into the three types of symbols that Animate supports.
Exploring Symbol Types
When we created our symbols, we took note that symbols had to be classified as one of three types: Movie Clip, Button, or Graphic. We'll now have a look at how each of these types differs from one another and when you would want to use one over another:
- Movie Clip symbols have internal timelines that are similar to the main timeline and run completely independent of it. This symbol type is ideal for small animations, such as flames, that should run continually in a loop. Even if an instance of this symbol is included in a single frame on the main timeline, its internal timeline will continue to animate, so long as the playhead is on that frame. When previewing your main timeline within Animate, any instance's internal timelines will not play back, and you must perform a test movie to see them in action. Instances of this symbol type can be made interactive, and their timeline can be controlled through code.
- Button symbols share some characteristics with movie clip symbols, but their internal timeline is completely fixed to four distinct frames. These frames emulate the states of a traditional button and include up, over, down, and hit. You can change the appearance of each of the first three button states by using the drawing tools. The hit state determines the pixels that will automatically trigger interactions and state switching when engaged with the mouse cursor. Instances of this symbol type can be made interactive.
- Graphic symbols have unique behavior in that their internal timeline is locked to the main timeline. There are also robust looping and frame selection mechanisms that are available by manipulating instance properties. Since their internal timelines are bound to the main timeline, previewing the main timeline within Animate will display their internal animation just the same as when a test movie is performed. Traditional animators tend to prefer this symbol type. Instances of this symbol type cannot be interactive.
Whichever symbol type you choose for a specific task, you will work within each symbol to establish its assets and timeline structures and also make use of individual instances of these symbols within your main timeline.
Tip
When exporting content as an animated GIF file, Movie Clip symbol timelines will not be included in the exported animation. If you intend to export your animation as an animated GIF, be sure to use Graphic symbols instead.
To create an instance of any symbol, simply drag the symbol from the Library panel and onto the stage. This will create an instance that you can then change the properties of, such as its position, rotation, scale, and even more, depending on the symbol type. When you adjust the properties of any symbol instance, these changes only apply to that property, whereas changing anything within the symbol itself will apply to the symbol and all of its instances.
To view the available properties of any symbol instance, select it on the stage and look at the Object tab of the Properties panel, as shown in the following screenshot:

Figure 5.30 – Symbol instance properties
As alluded to previously, instance properties will differ, depending on the symbol type selected.
Tip
As we mentioned previously, you can override the behavior of any symbol instance by choosing a new behavior from the Instance Behavior dropdown. This will not change the symbol type but will change the behavior of that particular instance.
There is a standard set of property sections that are shared across all three types of symbol instances. This can be seen in the following screenshot:

Figure 5.31 – Shared properties
- Position and Size: This includes the X and Y position of your instance on the stage, according to the registration point symbol, as measured from the top-left corner of the stage itself. The width and height of your instance can also be adjusted here.
- Color Effects: This property takes the form of a Color Styles drop-down selection, where you can choose None, Brightness, Tint, Advanced, and Alpha. Each selection will present several sliders and other controls that allow you to control the color properties of an individual instance.
The Movie Clip and Button symbol instances also include properties that pertain specifically to Accessibility and are only ever available within ActionScript 3.0 document types:
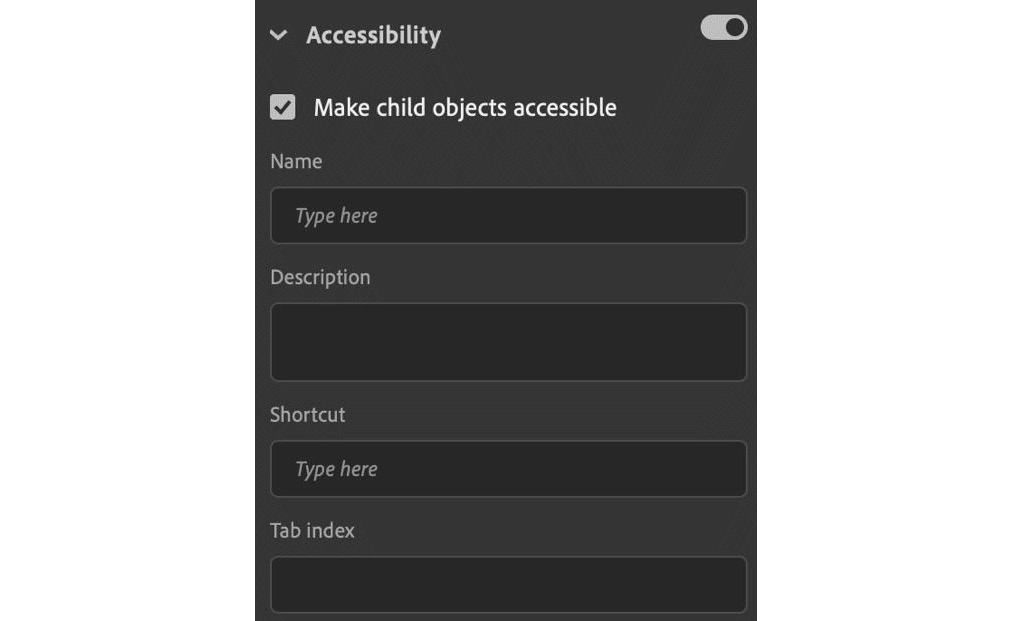
Figure 5.32 – Accessibility options for ActionScript 3.0 documents
These options allow you to include information for screen readers, such as name and description, while also allowing you to define keyboard shortcuts and the Tab order.
The Movie Clip and Button symbol instances also include Filters and Blend property selections:

Figure 5.33 – The Filters and Blend modes
These property sets allow you to choose from several Blend Mode options, including Normal, Multiply, Screen, Overlay, Hard Light, and more. You can make choices regarding how your instances are rendered when they're published within this section. A variety of filters can also be added, including Drop Shadow, Blur, and Glow, among others. The available filters and blend modes depend on your chosen document type.
Support for specific Filters and Blend Modes will vary based on the chosen document type. For instance, ActionScript 3.0 remains the most powerful and flexible document type you can choose to work with in Animate. It is a format that grew alongside the software and for a long time, it was the only platform available! Adobe owned the format and could add to or make adjustments however they pleased – making it all very powerful.
HTML5 Canvas is based on web standards and as such does not have a close relationship with Animate, nor the flexibility and power that comes with a proprietary format such as ActionScript 3.0 and the Flash Platform. Because of this, things move much more slowly – and HTML5 Canvas still has a long way to go before it gets even close to what a Flash-based SWF can do in many areas. A good example of this is blend mode support. For a long time, there were only a few blend modes that were available to use when authoring content for HTML5 Canvas.
In newer versions of Animate, this has opened up quite a bit and many more blend modes are now accessible to content authors:

Figure 5.34 – Blend Mode selection in HTML5 Canvas
The list of blend modes when using HTML5 Canvas is now much closer to what we can use when targeting ActionScript 3.0.
The previously supported blend modes in HTML5 Canvas included Add and Normal – that was it! In the current version of Animate, we have access to Darken, Multiply, Lighten, Screen, Overlay, Hard Light, and Difference – in addition to the two that were previously supported. Even with these additions, though, there are a few that will still be disabled when using HTML5 Canvas.
Note
Blend modes in HTML5 Canvas are still quite limited as they cannot be animated across keyframes. Once set, that is what you are stuck with at runtime!
Button symbol instances have a special Tracking property set that includes two options: Track as Button and Track as Menu Item. The difference here is that when you track as a button, the trigger stops at the button click, and when you track as a menu item, the trigger event bubbles up to additional containing items and can be caught to perform additional actions. It is a subtle difference, but it can be important within certain contexts where you require a secondary action to occur. This feature is only available in ActionScript 3.0 document types.
When using Movie Clip symbol instances within an ActionScript 3.0 document, you have access to both the 3D Position and View and Vanishing Point property sections:

Figure 5.35 – 3D Position and View and Vanishing Point properties
The 3D tools within Animate are only ever functional with ActionScript 3.0-based document types and even then, they are of limited use since they only provide the appearance of a third dimension. For true 3D content in Animate, it is suggested to explore WebGL glTF documents as they can import and make use of real 3D models.
Finally, Graphic symbol instances have a Looping section containing properties and tools that pertain directly to animation. We'll explore this section in Chapter 7, Character Design through Layer Parenting.
Now that you have a solid understanding of the three types of symbols, how they are instantiated for use in a project, and the differences in capabilities across them all, it's time to start animating!
In this section, we learned how to create symbols and explored the three distinct symbol types in Animate. Coming up, we'll learn how to add motion to these symbol instances using Classic Tweens.
Animating with Classic Tweens
When animating with symbol instances, you have two tween options available to you: Classic Tweens and Motion Tweens. Both of these tweening types work differently from one another, but a Classic Tween is handled more similarly to what we saw when using a Shape Tween earlier in this chapter, so we'll examine that first. Motion guides will be explored as part of Chapter 6, Interactive Motion Graphics for the Web.
We'll now step through the process of animating a symbol instance with a Classic Tween:
- The first thing you need to do is start a new document. I'm going to create a new ActionScript 3.0 document and set the width to 1280 and the height to 720, with an FPS setting of 30.
- Rename your default Layer_1 layer to something appropriate to the content you intend to create. I've renamed mine Square.
- The contents of our symbol should be pretty simple for this exercise. I'm going to use a square shape, similar in appearance to the shape we used when performing a Shape Tween. Using the Rectangle tool, draw a square shape on the stage.
- Next, you must create a symbol to animate. I'm going to create a Graphic symbol. Using the Selection tool, select the shape you created and choose Modify | Convert to Symbol from the application menu. The Convert to Symbol dialog will appear:

Figure 5.36 – Convert to Symbol
- If you do not have an instance of your symbol on the stage yet, be sure to drag one from the Library panel onto the stage. I'm placing mine on the left-hand side of the stage:
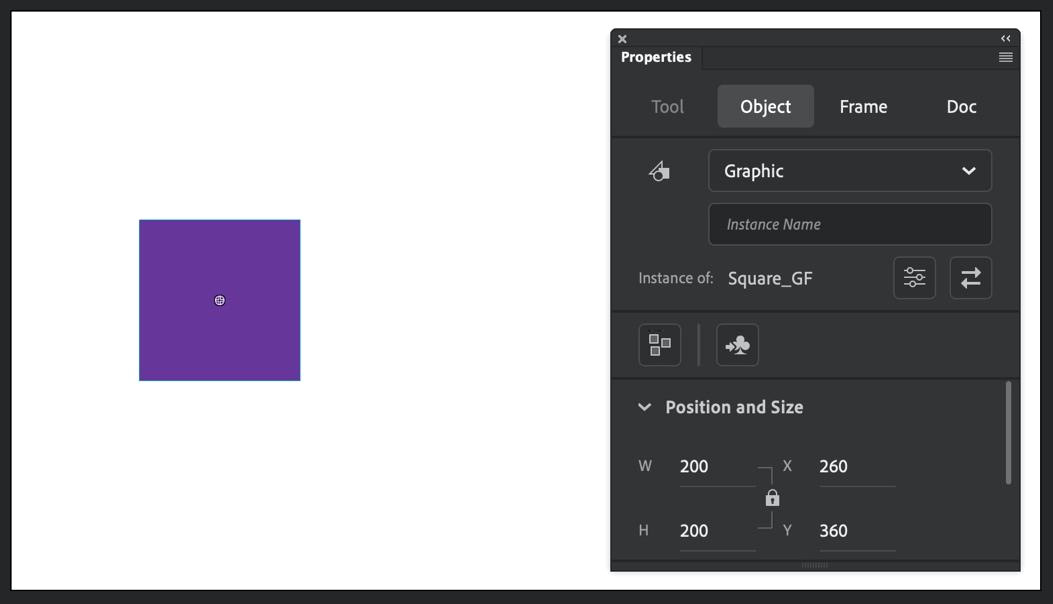
Figure 5.37 – Positioning your symbol instance
- Since the timeline only contains a single keyframe at frame 1 right now, select frame 30 and insert a new keyframe either by using the Insert Keyframe button at the top of the timeline or by choosing Insert | Timeline | Keyframe from the application menu:

Figure 5.38 – Creating a new keyframe
- You now have two keyframes. With the playhead positioned at the second keyframe (at frame 30), use the Selection tool to move the symbol instance to the opposite side of the stage. This creates a change in position values between the two keyframes:

Figure 5.39 – Modifying the symbol's instance position
- To create a Classic Tween to fill in the changes between these keyframes over time, click the Create Classic Tween button from the top of the timeline or choose Insert | Create Classic Tween from the application menu:

Figure 5.40 – A completed Classic Tween
Once these steps have been completed and Classic Tween is in place, test your animation with the Test Movie button. The symbol instance will move across the stage from left to right.
Note
Classic tweens cannot do much of what shape tweens are used for, including morphing between shapes and using shape hints, changing fill or stroke colors, and other similar property changes. Symbol instances are more limited in this respect since their contents are enclosed within the symbol itself.
As you can see, animating with Classic Tweens is very similar to doing so with Shape Tweens. Once you have a handle on one tween type, the other is easy to pick up and use.
Using Classic Motion Guides
Motion Guides within Animate allow you to direct the change in position during a tween by using a dedicated path. It is almost like placing a mining cart on a rail and just letting it go; the cart will follow any twists and turns that are present.
Say you want your symbol instance to travel in an arc. This is difficult with simple keyframes, but a Classic Motion Guide makes it a breeze:
- The first thing you need is a properly tweened object. We'll use the simple exercise that we completed previously.
- Right-click on the layer that contains the tween and choose Add Classic Motion Guide:
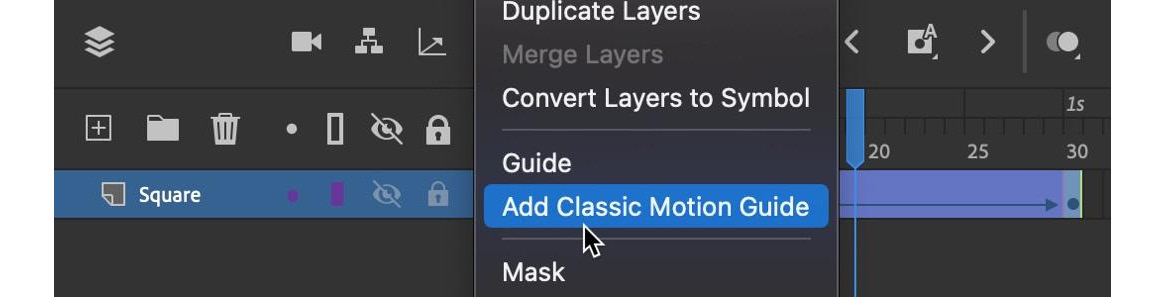
Figure 5.41 – Add Classic Motion Guide
- A new layer will be added above the selected layer, which will be nested beneath it with a slight indent:
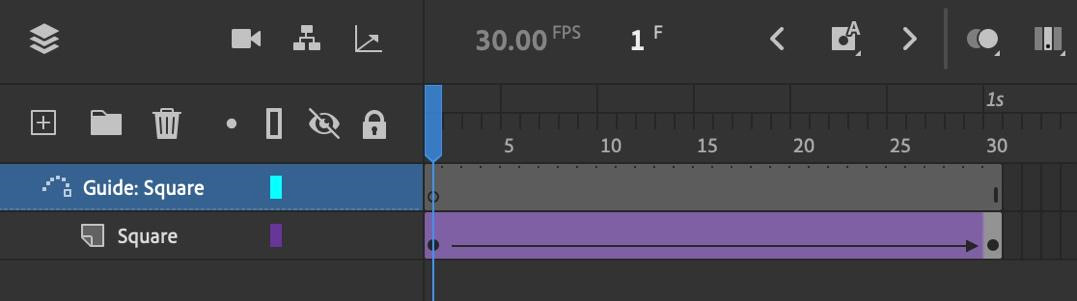
Figure 5.42 – Classic Motion Guide added
- Using any tool that will create a stroke, such as the Line tool, draw a stroke across the stage:
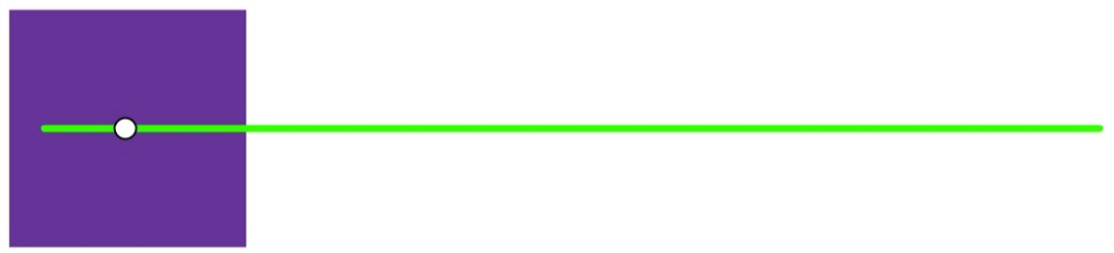
Figure 5.43 – Motion Guide created
- Now, with nothing selected whatsoever, hover the Selection tool over the line you just created and drag it upward to create an arc:
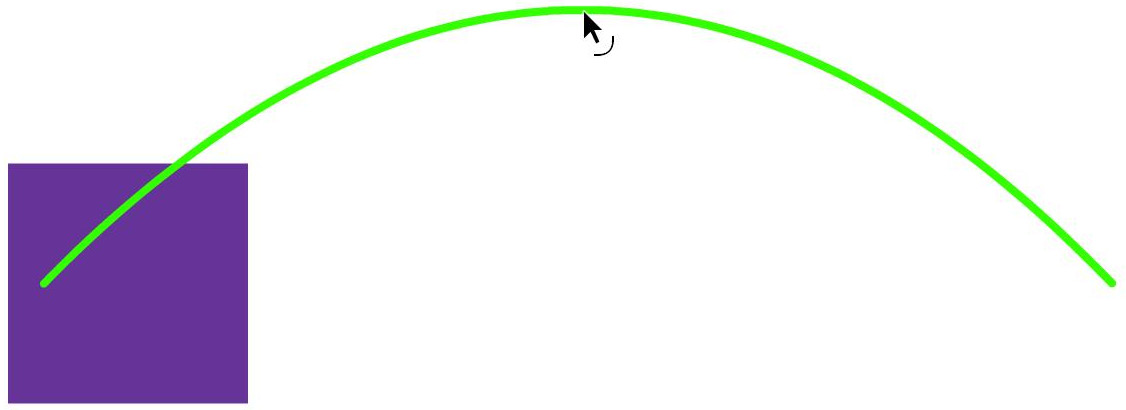
Figure 5.44 – Arcing the Motion Guide
- You will need to reposition the symbol instance on both frame 1 and frame 30 to be sure that the Transform Point property of each asset is overlaying the newly created Classic Motion Guide arced line asset.
- Scrubbing the timeline should ensure that the instance follows the arc of your guide instead of simply moving straight to the other side of the stage:
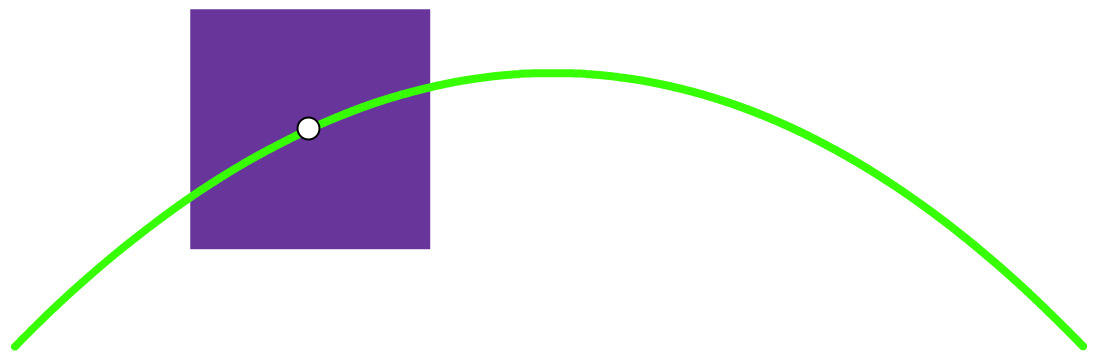
Figure 5.45 – Completed Classic Motion Guide
If your symbol instance does not follow the arc you've created, be sure that the transform points on all the keyframes align with the visible guide you've drawn! Do not worry about the visible nature of Classic Motion Guide within Animate since when you're testing or publishing it, the line is a guide and will not be visible to the user.
Note
Although they are "classic" motion guides, they are not only to be used in Classic Tweens. Shape Tweens can also make use of Classic Motion Guides in the same way!
Classic Motion Guides are a really useful feature when you want to direct the motion of your animated content across a certain path.
Exploring Classic Tween Properties
As we saw earlier with Shape Tweens, Classic Tweens have their own set of properties. Even given the similarities between both tween types, there are a few major differences when it comes to the available properties and even how shared properties function.
To view the properties of a Classic Tween, select any of the frames that make up the tween span and look at the Frame tab in the Properties panel:

Figure 5.46 – Classic tween properties with easing separated by property
Locate the Tweening section to view the various properties associated with Classic Tweens. Let's explore some of the main properties and functions here:
- Ease: One of the major differences between the Shape Tween and Classic Tween easing effects is that a Classic Tween can have individual properties, such as position, rotation, and scale, eased in different ways. Shape Tweens can only have a single easing effect applied to all properties. Otherwise, this feature has the same behavior across both tween types.
- Rotate: You can choose between None, Auto, Clockwise, and Counter-clockwise, as well as the number of rotations between keyframes.
- Snap: This option will assist in snapping to any guide that might be in use, helping to align the transform point of the instance being guided along a Classic Motion Guide.
- Orient to path: This option will preserve the orientation of your object as it moves along a Classic Motion Guide by adjusting its rotation. This is a really useful option.
- Color Along Path: This option can apply the color of the Classic Motion Guide shape to your object as a tint.
- Scale Along Path: This option can adjust the size of your object, interpreted as scale, via Classic Motion Guide being used.
- Sync Symbols: This option will force the internal timeline of the symbol to sync frames with the main timeline.
- Scale: When selected, the instance will scale across time if the scale has been adjusted within a keyframe. If deselected, scaling will not occur across the tween itself.
- Remove Tween: Choosing this button will remove the tween entirely.
There are some major differences between the various properties that are available to us when using different tween types. It's important to know what properties you want to control to choose the right type of tween.
In this section, we had a deep look into the various symbol types available in Animate and how to create motion with them with Classic Tweens.
Summary
We covered a lot in this chapter! Beginning with an introduction to the various drawing tools in Animate, we quickly moved on and applied motion to our content using Shape Tweens and explored many of the properties associated with this tween type. We then saw how to create symbols from our content and explored the different symbol types that are available to us. Following this, we looked at how to create instances of our symbols and add motion to them using Classic Tweens. Finally, we dove into using a Classic Motion Guide and the variety of properties available to us through Classic Tween properties.
In the next chapter, we will expand on what we've learned here and make use of a third type of tween, the motion tween, as we build interactive motion graphics specifically for the web.