
14 The Multitrack Mixer
Lesson overview
In this lesson, you’ll learn how to do the following:
Switch between the Multitrack Editor and the Mixer views
Adjust the Mixer fader heights to allow for greater resolution when setting levels
Show or hide various sections of the Mixer
Scroll through various Effects Rack inserts and sends within their respective areas
Scroll to view different groups of channels if the Mixer window isn’t wide enough to show them all
Differentiate among channel types via color coding
Rearrange the Mixer channel order

This lesson will take about 30 minutes to complete. Please log in to your account on peachpit.com to download the lesson files for this chapter, or go to the “Getting Started” section at the beginning of this book and follow the instructions under “Accessing the Lesson Files and Web Edition.” Store the files on your computer in a convenient location.
Your Account page is also where you’ll find any updates to the chapters or to the lesson files. Look on the Lesson & Update Files tab to access the most current content.
Audio Mixer basics
In Audition, you can view multitrack projects in two different ways. So far, you’ve been working with the Multitrack Editor, which, as its name implies, is optimized for editing. However, the Mixer panel (which shares a panel group with the Multitrack Editor panel in the Classic and Default workspaces) provides another way to work with multitrack projects, and it is optimized for mixing.
![]() Note
Note
If you have not already downloaded the project files for this lesson to your computer from your Account page, make sure to do so now. See “Getting Started” at the beginning of the book.
The Multitrack Editor shows the clips within a series of tracks. The Mixer does not show clips at all but has a corresponding Mixer channel for each Multitrack Editor track. The reason for calling a Mixer channel a channel instead of a track is because hardware-based mixers use that term. In physical studios, there isn’t necessarily a one-to-one correlation between tracks and channels; for instance, one recording track could feed more than one mixer channel.
The controls available in both the Editor and Mixer views are similar. The Multitrack Editor panel provides mixing functions and controls, but through dial controls not faders. In addition, several mixing functions (sends, EQ, effects, and ins/outs) share a common area, and you can see the settings for only one of these functions at a time. In the Mixer panel, on the other hand, all of these functions are arranged as rows and can be viewed simultaneously, plus it offers more mixing precision with fader-based controls.
Mixing typically occurs after the tracks in a session are recorded and edited, and you’re ready to concentrate solely on blending all the tracks together to create a cohesive listening experience. Sometimes when you’re editing, however, the most logical workflow is to temporarily switch over to the Mixer, then back to the Editor.
Navigate to the Lesson14 folder, and open the Multitrack Session named Mixer.sesx.
Choose the Classic workspace, and reset the workspace to the default layout by choosing Window > Workspace > Reset To Saved Layout.

The classic workspace emphasizes the Files and Editor panels. Click the Mixer panel name, next to the Editor panel name.

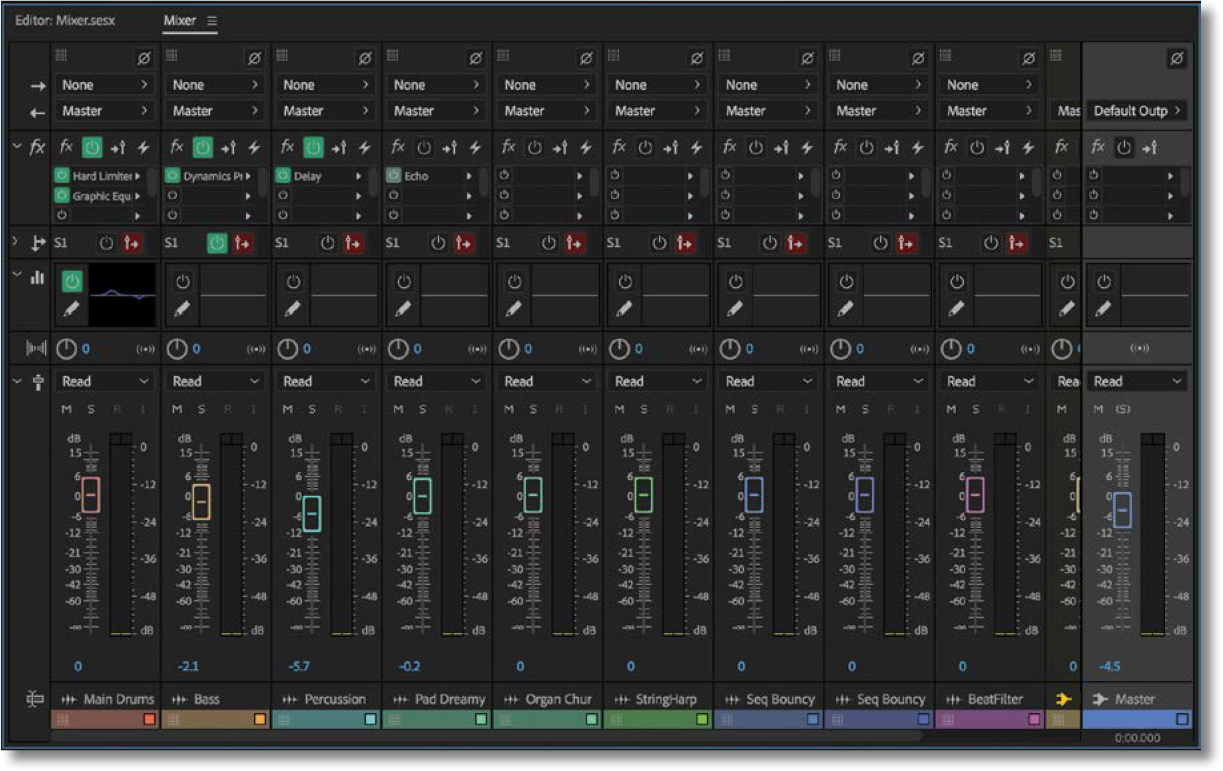
When you first look at the Mixer panel, you may feel a little overwhelmed. That’s a lot of buttons! But look carefully at the design: There’s a lot of repetition.
Every track in the current multitrack session is represented as a channel with a matching name in the Mixer panel, including the Master output track. Each channel’s name appears below the channel controls. The controls for each channel are identical; learn them once, and you’ll know them for every channel.

You’ll also see a color label that matches the relevant track color in the Editor panel.
The Mixer uses faders instead of rotary controls to adjust level. If you resize the Mixer panel to make it taller, the faders will get longer, giving you more precision when making adjustments. Click the edge at the bottom of the Mixer panel, and drag down as far as possible to make the faders as long as possible.
 Tip
TipUndocking the Mixer panel is very convenient, because you can set it to a consistent size and you don’t have to be concerned about resizing it. Undocking is also natural for two-monitor setups, because you can put the Mixer panel in its own dedicated monitor and the Multitrack Editor panel in the other monitor.
Drag the same bottom edge of the Mixer panel upward. Note that the faders get shorter. Continue dragging up; eventually the faders will collapse. Return the faders to the tallest size allowed by your screen while still being able to access the Transport controls.
 Note
NoteLong-throw hardware faders are desirable in hardware mixers because it’s easier to do precise, high-resolution mixing moves. The same is true of virtual faders in software. When Audition’s faders are extended to their greatest height, you can edit levels easily in 0.1 dB steps. In the Multitrack Editor, the most resolution you can achieve with the rotary Volume controls is 0.3 dB, and that requires a very precise touch.
Keep the session open, ready for the next exercise.
Mixer show and hide options
Most of the rows of controls in Mixer modules have a disclosure triangle; click the triangle to expand or collapse the row. You can customize how much space the Mixer takes up on the screen and automatically change the relative fader height by showing or hiding different parts of the Mixer.
When the fx area is collapsed, you can still see the fx area’s master fx Power button, the FX Pre-Fader/Post-Fader button, and the Pre-Render Track button, which can be used to reduce CPU power when mixing complex projects (pre-rendering is described in Chapter 17, “Mixing and Output”).
NoteTwo Mixer sections cannot be hidden: the I/O section at the top (Polarity Reverse button, Input Assign menu, and Output Assign menu) and the channel’s Pan control and Sum To Mono button.
If the fx area is not already displayed, click the disclosure triangle
 to expand its controls. Note that the faders become shorter because the fx area now takes up more space.
In all channels, you can now see three Effects Rack inserts. You can’t resize this area to reveal more inserts, but the scroll bar to the right of the list lets you see every item. Drag the rectangle within the scroll bar up or down to see the other inserts.
With the Sends area closed, you can see the number of the currently selected send in the upper-left corner, the Power button, and the FX Pre-Fader/Post-Fader button. Click the Sends area disclosure triangle to expand it. Note that again the faders become shorter, because the Sends area now takes up more space.

One send is shown at a time along with its Power button, FX Pre-Fader/Post-Fader, Send Volume, Stereo Balance controls, and menu for reassigning the send to a different send (or creating a new send bus or side-chain send).
Like the fx area, a scroll bar is available for choosing the current send. In the second channel from the left (labeled Bass), drag the rectangle within the scroll bar up or down to see the other sends. It takes precise control to scroll through the effects and sends, but it’s functional and saves you clicking back into the Editor panel.
With the EQ area closed, no aspect of the EQ area is visible. Click the EQ area disclosure triangle to expand it. As with expanding the fx and Sends areas, the faders become even shorter to compensate for having less available space.

The EQ section works in the same way here as it does in the Multitrack Editor. The Power button can enable or bypass the EQ. Click the Show EQ Editor Window button
 to view the channel’s Parametric Equalizer (you can also open it by double-clicking the EQ graph).
Close the Parametric EQ window, because you won’t be making any adjustments for now.
Close the fader section by clicking its disclosure triangle.

The faders section collapses to show the Mute, Solo, Arm For Record, and Monitor Input buttons, with the track title and track label colors. Closing the fader section also reduces the fader to a Volume control that’s identical to the one found in the Multitrack Editor panel.
Channel scrolling
With projects that have many channels, your monitor may not be wide enough to show them all. However, you can scroll though the various channels, as well as see which ones are buses, standard tracks, or the Master Track Output bus.
Drag the right edge of the Audition window left to narrow the Mixer. Make sure that you can’t see all channels in the Mixer.
NoteChannel fader controls have colors that match their track/channel label color. Different channel types (track, bus, master) have different icons next to the track/channel name.
A navigator scroll bar appears along the bottom of the Mixer panel if the panel isn’t wide enough to show all channels. Drag the scroll bar rectangle, all the way to the right. Now you can see the rightmost group of channels.
Restore the Audition window to full-screen size again, and drag the scroll bar rectangle all the way to the left in preparation for the next exercise.
Rearranging Mixer channel order
You’re not limited to an existing left-to-right track order. For example, you may have recorded drums first in Multitrack Editor Track 1 and a percussion part in Multitrack Editor Track 3; these appear in Mixer channels 1 and 3, respectively. However, suppose you’d rather have the Percussion channel next to the Drums channel. You can move channels horizontally to anywhere within the Mixer.
Hover the pointer over the channel you want to move (in this case, the Percussion channel) until the pointer turns into a hand. There are several places in the channel where this happens, such as the color label.
NoteChanges made to the track/channel order in either the Editor panel or the Mixer panel update in both panels.
Drag left until a vertical blue line appears to the right of the Main Drums channel. This is where the left side of the Percussion channel will be moved. (Note that if you drag right until you see a blue line, the right side of the channel will be moved there.)
Release the drag, and the Percussion channel will relocate to the right of the Main Drums channel.
Click the Editor panel name to view the session tracks. Note that the track order has changed to reflect the channel change you made in the Mixer.
The controls in the Editor panel and Mixer panel really are the same. Changes to one will update the other. In fact, the track Effects Rack updates in the Effects Rack panel too—so there are three places you can add, change, and remove the same effects for all tracks.
Using hardware controllers
Although being able to mix onscreen is convenient, many engineers prefer the human touch of using physical faders. Audition supports various control surfaces, hardware devices that include faders and can control the onscreen faders. There are even control surface apps for tablets that will integrate with Audition via a shared Wi-Fi connection.
Many control surfaces can control the Mute and Solo buttons, panning, Transport, and arm tracks for recording.
Audition supports multiple protocols for the following control surfaces:
Mackie MCU
Mackie HUI
Eucon/Avid
Presonus Faderport
ADS Tech Red Rover
Of these, the Mackie Control protocol is the most common, and several control surfaces from multiple manufacturers are compatible with this protocol. The newer Mackie HUI support expands the range of control surfaces supported.
Adding a control surface is easy; the following illustrates how to add a Mackie Control (or compatible) hardware controller. If you don’t have a Mackie compatible hardware controller, you’ll find the steps are similar for other controller types.
Choose Edit > Preferences > Control Surface (Windows) or Adobe Audition CC > Preferences > Control Surface (macOS).
Choose Add, and in the Device Class menu choose the control surface type (in this case, Mackie for Mackie Control). Then click Settings.

In the dialog box that appears, click Add to add the control surface to the Control Surface pane of the Preferences dialog box.
In the next dialog box, choose a Device Type. For virtually all devices that offer Mackie compatibility, the standard Mackie Control is the correct choice. Next, choose the controller in the MIDI Input Device and MIDI Output Device fields, and then click OK. Click OK again to leave the Configuration window.
After returning to the Control Surface preferences, click Button Assignments to display assignments for the various assignable buttons available on the Control Surface you have selected.
Note that not all Mackie Control-compatible devices incorporate all buttons, and some may not incorporate any. The lower section shows available commands; drag a command next to the button to which you want the command assigned. Once you’ve made all your assignments, click OK, and then click OK again to exit the preferences.
When you have finished exploring these controls, choose File > Close All, and click No To All if asked if you would like to save any files.
Review questions
What are the main advantages of the Mixer panel compared to the Multitrack Editor panel?
What is the Mixer panel’s main limitation?
How can you see all the Mixer channels if your monitor isn’t wide enough?
How can you differentiate a bus from a track at a glance?
Is it possible to rearrange the left-to-right channel order to create a more logical workflow?
Review answers
The faders can have extremely high resolution, and if desired, you can see the fx, Sends, and EQ areas simultaneously.
You cannot edit clip properties in the Mixer panel.
A navigator scroll bar along the bottom of the Mixer panel lets you view different groups of channels.
Each channel type has a different icon at the bottom of the channel controls.
Yes, you can drag channels horizontally anywhere you want in the Mixer panel.