
Chapter 1
Organizing and Managing Your Files with Adobe Bridge
IN THIS CHAPTER
![]() What is Adobe Bridge?
What is Adobe Bridge?
![]() The Adobe Bridge workspace
The Adobe Bridge workspace
![]() Changing the view
Changing the view
![]() Changing the workspace
Changing the workspace
![]() Using folders in Adobe Bridge
Using folders in Adobe Bridge
![]() Making a favorite
Making a favorite
![]() Creating and locating metadata
Creating and locating metadata
Adobe Bridge is an application included in the Creative Cloud collection of tools. Using Adobe Bridge, you can also organize and manage images, videos, and audio files, as well as preview, search, and sort your files without opening them in their native applications.
With Bridge, you can easily locate files using the Filters panel and import images from your digital camera right into a viewing area that allows you to quickly rename and preview your files. Adobe Bridge will save you time and frustration when looking for files you have worked on in the past; read this chapter to find out how to take advantage of its simple yet useful features.
Getting to Know the Adobe Bridge Workspace
Before you start, locate and launch Adobe Bridge. In the next few steps you will be taken through the steps to install Adobe Bridge, using the Creative Cloud app, and then shown how to launch the application.
If you open your Programs folder (PC) or Application folder (Mac), you will see a folder named Adobe. If you do not see this folder, you will want to review Book 1, “Getting Started with the Creative Cloud Suite,” in order to find out how to download and install your Creative Cloud applications. This folder contains the applications that you downloaded and installed from the Creative Cloud app. If you do not see Adobe Bridge listed, follow these steps:
- Locate your Creative Cloud application in either your Programs (PC) or Applications (Mac) folder and double-click it to launch it.
- In the Creative Cloud app, click the All Apps tab, scroll down until you see the Adobe Bridge app, and then click the Install button to the right. Follow the directions provided in order to install the application.
- After Bridge is installed, you can press the Open button on the right to launch it, or you can find the application in your Programs or Applications folder.
Now that you have launched Adobe Bridge, you might be wondering where to start. In this chapter, we introduce the file management features Adobe Bridge offers in the panels and other menu items shown in Figure 1-1.
Here are some additional details about these components:
- Application bar: The Application bar provides buttons for essential tasks, such as navigating the folder hierarchy, switching workspaces, and searching for files. The Application bar is discussed in detail later in this chapter.
- Path bar: The Path bar shows the path for the folder you’re viewing and allows you to navigate the directory by clicking on the path locations.
- Favorites panel: The Favorites bar provides quick access to frequently browsed folders. Essentially these work the same as shortcuts.
- Folders panel: The Folders panel shows the folder hierarchy. You can use it to navigate folders.
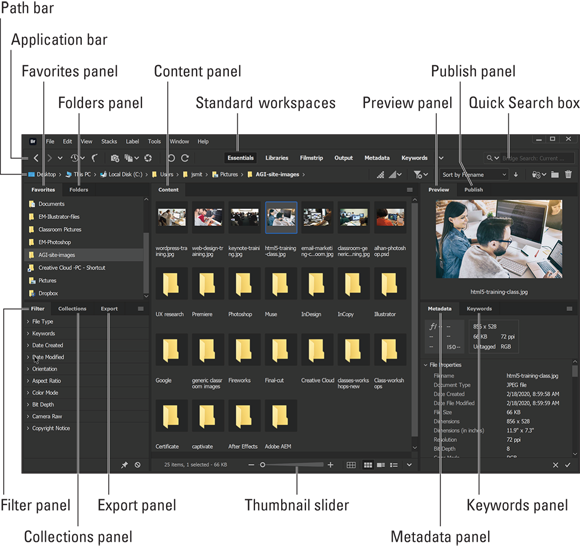
FIGURE 1-1: The Adobe Bridge workspace.
- Filter panel: The Filter panel lets you sort and filter files that appear in the Content panel. You can use this panel to easily find files of the same type, files created on the same date, and more.
- Collections panel: The Collections panel offers you the opportunity to use shortcuts to create collections of files that you can easily locate without moving in your directory.
- Export panel: The Export panel allows you to drag and drop images to export presets. This is helpful when you are creating batches of images that need to be saved in different sizes and formats.
- Content panel: The Content panel displays files specified by the navigational menu buttons, Path bar, Favorites panel, Folders panel, or Collections panel. Basically, these include thumbnails of your files within your selected folder.
- Publish panel: The Publish panel lets you upload photos to Adobe Stock from within the Bridge app. This might be used if you are a photographer who wants to submit images to Adobe Stock.
- Preview panel: The Preview panel displays a preview of the selected file or files. You can reduce or enlarge the preview by resizing the panel.
- Metadata panel: The Metadata panel includes metadata information for the selected file. If multiple files are selected, shared data (such as keywords, date created, and exposure setting) is listed.
- Keywords panel: The Keywords panel helps you organize your images by attaching keywords to them.
Practice makes perfect
Bridge offers an intuitive approach to using your system file directory. Keep in mind that Adobe Bridge is really just a visual method of accessing your files. It may help to dive right in and try out some of Adobe Bridge’s features to understand its benefits. Some step-by-step lessons are included in this minibook; if you would like to follow along with them, you can download work files at www.agitraining.com/dummies.
- Go to
https://www.agitraining.com/dummies. - Click the DummiesCCFiles folder to download the compressed folder.
- After the folder is downloaded, either right-click (PC) or Control-click (Mac) to access the contextual menu. Choose Extract All (PC) or Unzip (Mac) and locate an easy-to-find location, perhaps the desktop.
Finding and using your folders within Adobe Bridge
Let’s say that you want to locate a picture in a folder of images that are named using numbers instead of descriptive names. By opening that folder in Adobe Bridge, you can see thumbnails for each image and even locate important information about each file’s site, resolution, and more. To do so, follow the steps with your own files or download the DummiesCCfiles folder as instructed earlier:
- Select the Essentials workspace in Adobe Bridge. This is the first button in the upper-right of the Bridge Workspace.
Click the tab that says Folders, in the left column, to make sure it is brought forward.
If you have files located on your hard drive, you can navigate to them using the named folders icons in the Folders panel. Keep in mind that the folders and files that you see are exactly as you would see them if you were using your regular directory system.
- Click on Documents in the Folders panel to see saved documents that are stored in that folder. If you saved your DummiesCCFiles on the desktop, click on Desktop to see the folder in the Content pane, along with any other files that you might have on your desktop.
In the Content pane, double-click the DummiesCCFiles folder to open the contents.
You see additional folders that contain files that will be referenced throughout the book.
- Double-click the folder named Book02_Bridge to see the images within that folder, as well as a subfolder, as shown in Figure 1-2.
Now, double-click the Hockey folder. This folder contains images that were named automatically with a digital camera, as shown in Figure 1-3.
Finding the right file to open is much easier when you can see thumbnails of the images instead of just the name.
Double-click the image to have it launch Adobe Photoshop.
 Photoshop is typically the default destination for image files such as the JPGs in this folder, but you can change file associations by choosing Edit ⇒ Preferences ⇒ File Type Associations (PC) or Adobe Bridge ⇒ Edit ⇒ Preferences ⇒ File Type Associations (Windows).
- Choose File ⇒ Close in Adobe Photoshop and return to Adobe Bridge.
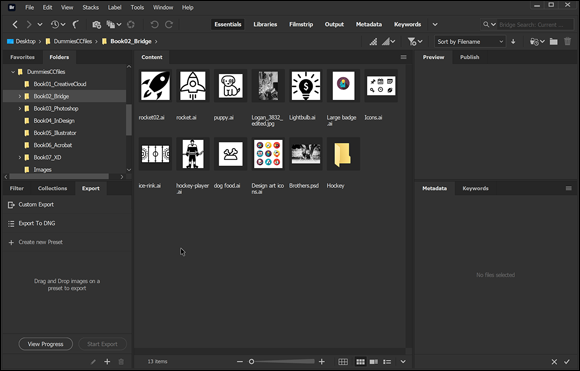
FIGURE 1-2: You can visually see the contents of a folder using Adobe Bridge.
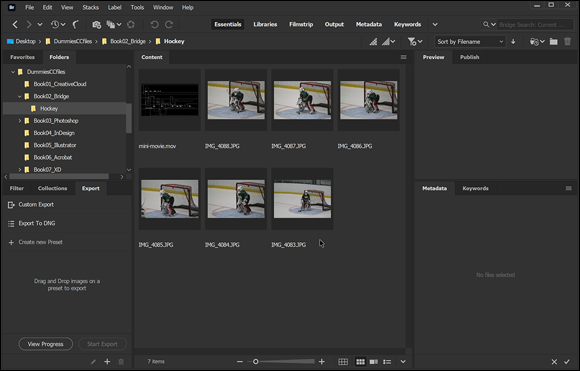
FIGURE 1-3: A visual display of images in a folder.
From most Creative Cloud applications, you can choose File ⇒ Browse in Bridge to pop back into the Bridge application.
The default workspace
As a default, Bridge is opened in the default Essentials workspace. In this view, you have three columns that you can resize by clicking and dragging the borders separating the columns. This view also provides you with a Content pane, in the center, that displays thumbnails documents in your selected folder.
In addition to the Essentials workspace, there are several other preconfigured workspaces that you can access from the Application bar, as shown in Figure 1-4. Depending upon the information you want to showcase, you might want to switch from one workspace to another. Switching workspaces does not change the locations of your files and folders; it just changes the view.
Experiment with these to see which works best for you.
Here are explanations of the preconfigured workspaces:
- Metadata: Displays the Content panel in List view, along with the Favorites, Metadata, and Filter panels.
- Essentials: Displays the Favorites, Folders, Filter, Collections, Content, Preview, Metadata, and Keywords panels.
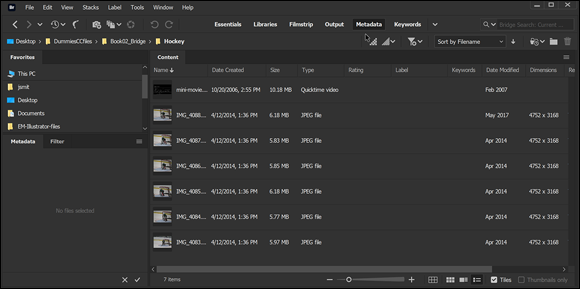
FIGURE 1-4: Change your workspace in the Application bar. The Metadata view was selected in this example.
- Filmstrip: Displays thumbnails in a scrolling horizontal row along with a preview of the selected item. This workspace also displays the Favorites, Folders, Filter, and Collections panels.
- Keywords: Displays the Content panel in Details view, as well as the Favorites, Keywords, and Filter panels.
Looking for a better view
You may want to resize your thumbnails in the Content pane, especially if you have many files. You can easily do this by using the Thumbnail slider in the lower portion of the Bridge workspace.
You can also change the presentation of the content by using the View options in the lower-right corner, as shown in Figure 1-5. Your choices are
- Click to lock to thumbnail grid
- View content as thumbnails
- View content as details
- View content as list
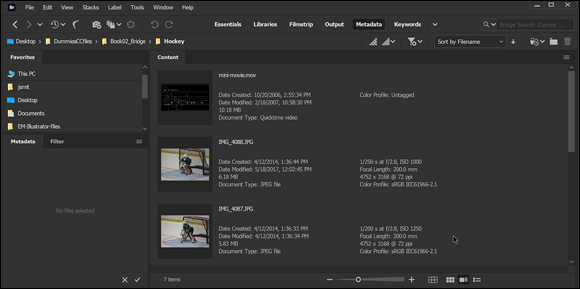
FIGURE 1-5: Change your view to bring out additional details. View content as details was selected for this example.
Creating a new folder
Perhaps you want to create a new folder. Whether you create a new folder in your system File directory or in the Finder for the Mac, it will be recognized by Bridge. In this next example, you navigate back using the Path bar, and create a new folder in the Book02_Bridge folder:
Make sure you are still viewing the contents of the Hockey folder. Note that the location your are in is listed in the Path bar as shown in Figure 1-6.
This is the directory path to the folder that you have active and open at this time.
- Click on Book02_Bridge in the Path bar to navigate back to that folder.
To create a new folder inside this folder, click the Create New Folder button in the upper right, as shown in Figure 1-7, or right-click (PC)/Control-click (Mac) and select New Folder from the contextual menu that appears.
A new folder appears, ready to be renamed.
- Name the file Rockets.
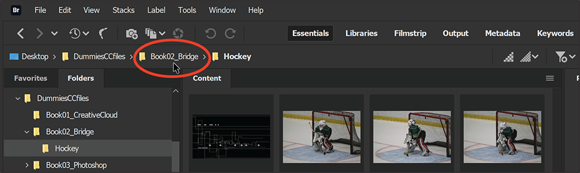
FIGURE 1-6: Use the Path bar to navigate back through your folders.
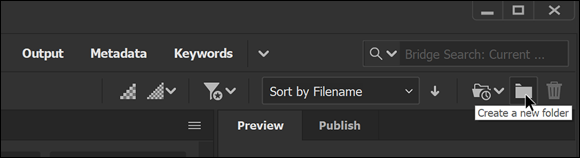
FIGURE 1-7: You can create new folders right in Adobe Bridge.
Moving a file to another folder
Next you select and move some files into your newly created folder:
Click on one of the Rocket images and then, holding down the Ctrl key (PC) or Command key (Mac), click on the other rocket image.
Using the Ctrl or Command key allows you to select multiple files.
With both rocket images selected, click and drag them over to your new Rockets folder, as shown in Figure 1-8. Release your mouse when the files are on top of the folder to move them into that folder.
You can also move and copy files using the contextual menu. Right-click (PC) or Control-click (Mac) on any image file to see the contextual menu that appears with options that include moving and copying the selected file.

FIGURE 1-8: Move images from one folder to another in Adobe Bridge.
Making a favorite
When working in the Creative Cloud, you may return to certain folders over and over again. In that situation, it would help to have some Favorite folders established and saved in the Favorites panel. When your most popular folders are saved as favorites, accessing them requires only one click.
Follow these steps in order to save your own favorite. In the following steps, the files from the DummiesCCFile are used. You can follow along with your own files and folders if you like.
Using the Folders panel, navigate your file directory system until you locate the DummiesCCFile folder. If you have followed instructions it should be easy to find on the Desktop.
In the example shown in Figure 1-9, the folder is located on the desktop.
- Make sure that the Favorites panel is forward. Check this by clicking on the tab that says Favorites.
- Click on the DummiesCCFiles folder and drag it to the Favorites panel. Release the mouse when you see a blue line that indicates where the favorite will appear in the present list, as shown in Figure 1-9.
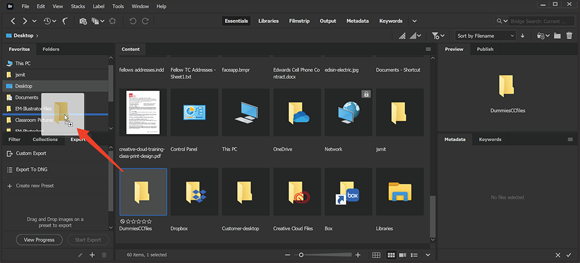
FIGURE 1-9: Click and drag a folder into the Favorites panel.
Now that you have saved the DummiesCCFiles as a favorite, you can access the folder anytime you like simply by clicking on the folder name in the Favorites panel.
Investigating the Application bar
Now that you have spent a little bit of time working in Bridge, the Application bar and its tools will make more sense to you. The Application bar runs along the top of the Bridge workspace. The tools and features are shown in Figure 1-10.
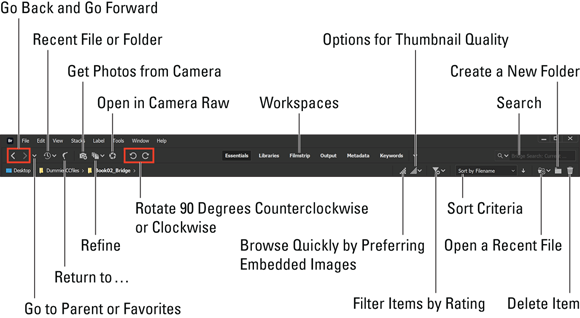
FIGURE 1-10: The Application bar.
There are many features included in the Application bar that help you with navigating, acquiring, and organizing your files. Some important features include Get Photos from Camera, which is covered in Chapter 3 of this minibook, and Sort Criteria, which is covered in Chapter 2.
Developing a Bridge habit
Now that you have experienced using Adobe Bridge, try making it a habit. Instead of selecting File ⇒ Open, choose File ⇒ Browse in Bridge and start recognizing the time savings.