
Chapter 5
Creating Images in the Right Resolution for Print and the Web
IN THIS CHAPTER
![]() Understanding resolution basics
Understanding resolution basics
![]() Adjusting file size
Adjusting file size
![]() Applying the Unsharp Mask filter to your image
Applying the Unsharp Mask filter to your image
Something as important as setting the right resolution for your images deserves its own chapter. In this chapter, you discover the recommended resolution for your images, which is dependent upon where the image is to be used. Are you going to use the image in a high-quality annual report or are you going to email it to your family? This is important information to know right from the start. Combine the information about resolution along with the steps to use the color and retouching tools we show you in Chapter 7 of this minibook, and you should be ready to roll with great imagery.
Creating Images for Print
To begin, you need to know the existing resolution of your image. To see an open image’s present size and resolution in Photoshop, choose Image ⇒ Image Size. The Image Size dialog box appears, as shown in Figure 5-1.
 At the top of the Image Size dialog box, you see the pixel dimensions noted.
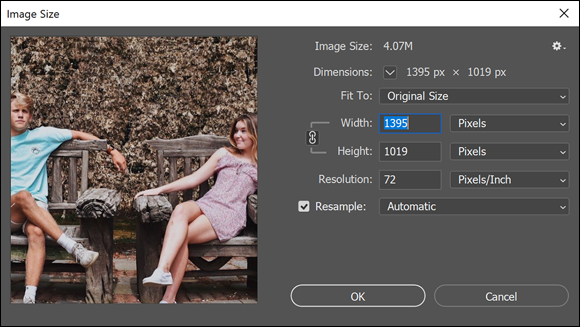
FIGURE 5-1: The Image Size dialog box.
The Width and Height text fields are in inches in the English default; you can change the increments to pixels by selecting Pixels from the measurement unit drop-down menu. The Width and Height text fields can be used for onscreen resizing. By switching the measurement unit back to inches, you can determine the size at which the image will print. The Resolution text field determines the resolution of the printed image; a higher value means a smaller (more pixels crammed in each inch), which typically produces a more finely detailed printed image.
Before you decide on a resolution, you should understand what some of the resolution jargon means:
- ppi (pixels per inch): The resolution of an image — how Photoshop measures resolution of images.
- dpi (dots per inch): The resolution of an image when printed.
- lpi (lines per inch): The varying dot pattern that printers and presses use to create images. (See Figure 5-2.) This dot pattern is referred to as the lines per inch, even though it represents rows of dots. The higher the lpi, the finer the detail and the less dot pattern or line screen you see.
- Dot gain: The spread of ink as it’s applied to paper. Certain types of paper spread a dot of ink farther than others. For example, newsprint has a high dot gain and typically prints at 85 lpi; a coated stock paper has a lower dot gain and can be printed at 133–150 lpi and even higher.
Human eyes typically can’t detect a dot pattern in a printed image at 133 dpi or higher.

FIGURE 5-2: The dot pattern used to print images is referred to as lpi (lines per inch).
Deciding the resolution or dpi of an image requires backward planning. If you want to create the best possible image, you should know where it’ll print before deciding its resolution. Communicate with your printer service if the image is going to press. If you’re sending an image to a high-speed copier, you can estimate that it will handle 100 lpi; a desktop printer handles 85 lpi to 100 lpi.
The resolution formula
When creating an image for print, keep this formula in mind:
2 × lpi = ppi (pixels per inch)
This formula means that if your image is going to press using 150 lpi, set your image at 300 ppi. To save space, many people in production use 1.5 × lpi because it reduces the file size significantly and you get similar results; you can decide which one works best for you.
Changing the resolution
Using the Image Size dialog box is only one way that you can control the resolution in Photoshop. Even though you can increase the resolution, do so sparingly and avoid it, if you can. The exception is when you have an image that’s large in dimension size but low in resolution, like those you typically get from a digital camera. You may have a top-of-the-line digital camera that produces 72 ppi images, but at that resolution, the pictures are 28 x 21 inches (or larger)!
To increase the resolution of an image without sacrificing quality, follow these steps:
- Open any image. If you want an unretouched digital image to work with you can use the image named LookingOut.jpg that is located in your Book03_Photoshop folder that you downloaded in Book 1, Chapter 1.
Choose Image ⇒ Image Size.
The Image Size dialog box appears, as shown in Figure 5-3.

FIGURE 5-3: The Image Size dialog box, before and after deselecting Resample and changing the resolution.
Deselect the Resample Image checkbox.
This way, Photoshop doesn’t add any pixels. You will also notice that when you uncheck Resample that the image is now measured in Inches instead of pixels. The measurement default can vary depending upon your preferences and location.
Enter a resolution in the Resolution text field.
Photoshop keeps the pixel size (the size of the image onscreen) the same, but the document size (the size of the image when printed) decreases when you enter a higher resolution, as you see in Figure 5-3.
If the image isn’t the size you need, select the Resample Image checkbox and type the size in the Width and Height text fields.
It’s best to reduce the size of a bitmap image, such as a digital photo, rather than increase it.
 You can also deselect the Resample Image checkbox and essentially play a game of give-and-take to see what the resolution will be when you enter the intended size of your printed image in the Width and Height text fields.
Images can typically be scaled from 50 to 120 percent before looking jagged. (To scale by a percentage, select Percent from the drop-down lists beside the Width and Height text fields.) Keep these numbers in mind when placing and resizing images in a page layout application such as InDesign.
 Click OK when you’re finished; double-click the Zoom tool in the Tools panel to see the image at its onscreen size.
To increase the resolution without changing the image size, follow these steps. (This situation isn’t perfect because pixels that don’t presently exist are created by Photoshop and may not be totally accurate. Photoshop tries to give you the best image, but you may see some loss of detail.)
- Choose Image ⇒ Image Size.
- When the Image Size dialog box appears, make sure that the Resample Image checkbox is selected.
- Enter the resolution you need in the Resolution text field, click OK, and then double-click the Zoom tool to see the image at its actual size.
Reset your Image Size dialog, or any dialog box in Photoshop by holding down the Alt or Option button. The Cancel button changes to Reset!
Determining the Resolution for Web Images
Have you ever received an image via email and, after spending 10 minutes downloading it, discovered that the image is so huge that all you can see on the monitor is your nephew’s left eye? Many people are under the misconception that if an image is 72 dpi, it’s ready for onscreen presentation. Actually, pixel dimension is all that matters for viewing images on the web; this section helps you make sense of this concept.
Many people view web pages in their browser windows in an area of about 1024 x 768 pixels. You can use this figure as a basis for any images you create for the web, whether the viewer is using a 14-inch or a 21-inch monitor. (Remember that people who have large monitors set to high screen resolutions don’t necessarily want a web page taking up the whole screen.) If you’re creating images for a web page or to attach to an email message, you may want to pick a standard size to design by, such as 600 x 400 pixels at 72 ppi.
To use the Image Size dialog box to determine the resolution and size for onscreen images, follow these steps:
Have an image open and choose Image ⇒ Image Size.
The Image Size dialog box appears.
To make the image occupy half the width of a typical browser window, choose Pixels for the unit type in the Width drop-down list and type 300 (half of 600) in the Width text field.
If a little chain link is visible to the right, the Constrain Proportions checkbox is selected, and Photoshop automatically determines the height from the width you entered.
Click OK and double-click the Zoom tool to see the image at its actual onscreen size.
That’s it! Whether your image is 3,000 or 30 pixels wide doesn’t matter; as long as you enter the correct pixel dimension, the image works beautifully.
Applying the Unsharp Mask Filter to an Image
When you resample an image in Photoshop, it can become blurry. A good practice is to apply the Unsharp Mask filter. You can see the difference in detail in the images shown in Figure 5-4. This feature sharpens the image based on levels of contrast while keeping smooth the areas that have no contrasting pixels. You have to set up this feature correctly to get good results.

FIGURE 5-4: The image with (left) and without (right) unsharp masking applied.
Here’s the down-and-dirty method of using the Unsharp Mask filter:
- Open any image, or use the
SillyDog.jpgimage located in the Book03_Photoshop folder. Choose View ⇒ 100% or double-click the Zoom tool.
When you’re using a filter, view your image at its actual size to best see the effect.Choose Filter ⇒ Sharpen ⇒ Unsharp Mask.
In the Unsharp Mask dialog box that appears, set these three options:
- Amount: The Amount value ranges from 0 to 500. The amount you choose has a lot to do with the subject matter. Sharpening a car or appliance at 300 to 400 is fine, but if you do this to the CEO’s 75-year-old wife, you may suffer an untimely death because every wrinkle, mole, or hair will magically become more defined. If you’re not sure which amount to use, start with 150 and play around until you find an Amount value that looks good. In Figure 5-4 we used a higher amount because this is an image of a dog, and we wanted to see more texture in the fur.
- Radius: The Unsharp Mask filter creates a halo around the areas that have enough contrast to be considered an edge. Typically, leaving the amount between 1 and 2 is fine for print, but if you’re creating a billboard or poster, increase the size.
- Threshold: This option is the most important one in the Unsharp Mask dialog box. The Threshold setting determines what should be sharpened. If you leave it at zero, you see noise throughout the image, much like the grain you see in high-speed film. Increase the setting to 10, and it triggers the Unsharp Mask filter to apply the sharpening only when the pixels are ten shades or more away from each other. The amount of tolerance ranges from 1 to 255. Apply too much and no sharpening appears; apply too little and the image becomes grainy. A good number to start with is 10.
To compare the original state of the image with the preview of the Unsharp Mask filter’s effect in the Preview pane of the Unsharp Mask dialog box, click and hold the image in the Preview pane; this shows the original state of the image. When you release the mouse button, the Unsharp Mask filter is previewed again.When you’ve made your choice, click OK.
The image appears to have more detail.
Once in a while, stray colored pixels may appear after you apply the Unsharp Mask filter. If you feel this is a problem with your image, choose Edit ⇒ Fade Unsharp Mask immediately after applying the Unsharp Mask filter. In the Fade dialog box, select the Luminosity blend mode from the Mode drop-down list and then click OK. This step applies the Unsharp Mask filter to the grays in the image only, thereby eliminating the sharpening of colored pixels.
You can also choose Filter ⇒ Convert for Smart Filters before you apply the Unsharp Mask filter. Smart filters let you undo all or some of any filter, including sharpening filters you apply to a layer. Find out how by reading Chapter 8 in this minibook.