Chapter Three. Working with Photoshop
There’s no question that Photoshop is the crown jewel of the Creative Suite. Through the years, the venerable image-editing tool has become the definitive “killer app.” Photoshop is used in so many different ways to accomplish so many different tasks. Graphic designers, digital photographers, and hobbyists can’t get far without it. If you’re serious about achieving the perfect image, chances are you’re using Photoshop.
This powerful, versatile application can be daunting at times. Just when you think you have a handle on the application, a new version arrives with a whole slew of new features and changes. This makes it next to impossible to keep up with it all. A couple of new features are bound to sneak below your radar.
In this chapter, you’ll find tips and techniques covering features new to Photoshop CS2 along with some lesser known or frequently overlooked features and tools that have been around for a few versions. In addition, many of the tips in this chapter also work in ImageReady, Photoshop’s Web graphics-centric component. Now let’s dive deeper into the suite, starting with this image-editing powerhouse and see just what it’s capable of.
#21 Making Color Range Selections
Efficiently selecting certain pixels to work with while excluding others is essential when working in Photoshop. Fortunately, a number of tools and commands are available to help with this task. One technique you can use to quickly isolate parts of an image is to select them through their similar color range. This works well when you have a consistently colored object set against a differently colored background.
Here are two of the more popular ways to make a selection based on a range of colors:
• ![]() Magic Wand tool: Clicking in an area that contains relatively similar colors with this tool will immediately select the entire area without having to trace the outside. Experiment with the tool’s tolerance and the other settings in the options palette if you’re not getting the desired results (Figure 21a). A low tolerance value selects colors very similar to one another, whereas a higher value selects a broader range of colors.
Magic Wand tool: Clicking in an area that contains relatively similar colors with this tool will immediately select the entire area without having to trace the outside. Experiment with the tool’s tolerance and the other settings in the options palette if you’re not getting the desired results (Figure 21a). A low tolerance value selects colors very similar to one another, whereas a higher value selects a broader range of colors.
Figure 21a. If the Magic Wand tool is selecting too little or too much, adjust the tolerance setting in the options bar appropriately. The image on the left shows a selection made with a tolerance of 12, whereas the image on the right has a value of 65.

• Color Range command: This powerful command makes it possible to build up a complex selection based on a sampled color range. Follow these steps to use this command:
1. Sample the predominate color you want to create your selection from using the Eyedropper tool and then choose Select > Color Range.
2. In the Color Range dialog (Figure 21b) you can adjust the amount of similar colors used in the selection by using the Fuzziness slider.
Figure 21b. The Color Range dialog offers an interactive yet sophisticated approach to selecting specific colors in a range.

3. Add or remove colors from the range by using the Add and Subtract from Sample Eyedropper tools and clicking on colors in the image window or preview area.
4. If you want to preview the selection in the image window, choose from the options in the Selection Preview menu.
5. When you’re satisfied with the color range selection, click OK to create your selection.
Once you’ve made your color-based selection, you can clean it up by using the Smooth command. To smooth a selection, choose Select > Modify > Smooth. Enter a value in the Sample Radius and click OK. This will select any nearby stray pixels, resulting in an overall smoother selection.
#22 Using Layer Masks
If you’re making a selection to delete contents from a layer, consider converting the selection to a layer mask instead of permanently discarding it. A layer mask usually starts as a selection that is linked to a layer. The selection acts as a cutout or frame for which only part of the layer’s contents show through. The effect is identical to deleting the contents of a layer, but layer masks afford you the freedom to change your mind since the underlying image remains intact. You can always go back and edit the mask.
It’s easy to create a layer mask. Make a selection of what you would like to keep visible on a layer (except the Background layer). Click the Add Layer Mask button ![]() at the bottom of the Layers palette. Your selection is converted into a layer mask for the selected layer. Notice that a layer mask thumbnail is now linked to your layer thumbnail (Figure 22a).
at the bottom of the Layers palette. Your selection is converted into a layer mask for the selected layer. Notice that a layer mask thumbnail is now linked to your layer thumbnail (Figure 22a).
Figure 22a. After you create a layer mask on a selected layer, a mask thumbnail appears linked next to the layer thumbnail.

To view just the layer mask, Option/Alt-click the layer mask thumbnail. While in this mode you can edit the layer mask just like any other grayscale image. Areas you paint in white are visible, black are transparent, and anything gray translates into varying levels of transparency (Figure 22b). When you’re through, click the layer thumbnail to see the effects of the layer mask. If you want to continue editing the layer mask while viewing its effect on the layer, just click the layer mask thumbnail (without the Option/Alt key). If you’d like to move the position of the mask independent of the layer, click the link icon ![]() between the layer and layer mask thumbnails. Temporarily toggle a layer mask on and off by Shift-clicking the layer mask thumbnail. To delete a layer mask, drag it to the Delete layer button on the Layers palette.
between the layer and layer mask thumbnails. Temporarily toggle a layer mask on and off by Shift-clicking the layer mask thumbnail. To delete a layer mask, drag it to the Delete layer button on the Layers palette.
Figure 22b. You can opt to view just the layer mask as you work on it, switch to the layer to see the effects of the mask, or temporarily disable the layer mask to see the layer’s actual contents.

Layer masks are great when you want to use pixels to define your transparent areas, but if you want a hard-edged layer mask with the flexibility of using vector-based tools, you’ll want to create a vector mask. You can make a vector mask by creating a work path outline using the Pen or Shape tools. Before you start creating your path, select the Pen or Shape tool and then click the Paths button ![]() in the options bar. After you’ve created your work path, hold down the Command key (Mac) or Control key (Windows) and click the Add Layer Mask button in the Layers palette. Vector masks work like layer masks, but they’re easier to edit. You can even have a layer mask and a vector mask applied to the same layer (Figure 22c).
in the options bar. After you’ve created your work path, hold down the Command key (Mac) or Control key (Windows) and click the Add Layer Mask button in the Layers palette. Vector masks work like layer masks, but they’re easier to edit. You can even have a layer mask and a vector mask applied to the same layer (Figure 22c).
Figure 22c. A layer can have a layer mask and a vector mask applied to it at the same time.

#23 Working with Multiple Layers
Ask anyone who’s been using Photoshop since its early days what its single most important feature is, and they’ll most likely cry out “Layers!” If they’re really old school, they can even tell you in which version layers were introduced (3.0). Since the introduction of layers, they’ve become the foundation of the application. Through the years, many different types of layers have made their way into the application, but how you work with them hasn’t really changed much—that is, until now. With CS2, Adobe fundamentally changed the way you work with layers, allowing you to select and control multiple layers at once. Instead of having to explicitly link or group layers just to move them in unison, you can now work with them in a way similar to how you work with them in Illustrator and InDesign. This may not seem like much on the surface, but it can drastically impact your productivity (for better and for worse).
If you’ve used previous versions of Photoshop, this dramatic shift in how you work with layers may feel clumsy at first. But give it some time, and you’ll soon discover the benefits of this new approach. What was once tedious and awkward is now fast and elegant. Here’s just some of the ways multiple layer control changes the way you work:
• Moving and transforming layers: In order to move or transform multiple layers in previous versions you had to first link them from the Layers palette. Now you simply Shift-click layers in the Layers palette (Figure 23a) or use the Move tool directly within the image area (Figure 23b).
Figure 23a. It’s now possible to select multiple layers in the Layers palette. This simple shift makes tedious layer management a thing of the past.

Figure 23b. You can now also drag a marquee or Shift-click using the Move tool to select multiple layers directly within the image area. Choose View > Show > Layer Edges to see the bounding box of a layer.
• Aligning and distributing layers: This task was so cumbersome in previous versions that many users probably didn’t know it was possible. You had to know to first link the layers and then hunt down the menu command. Now whenever you choose the Move tool with multiple layers selected, Align and Distribute buttons are front and center in the options bar (Figure 23c).
Figure 23c. Although it was possible to align and distribute layers in previous versions, it was a difficult task to manage. Now you’re offered these familiar buttons in the options bar whenever you have multiple layers selected using the Move tool.
![]()
• Linking layers: It’s a bit ironic that the multiple layer control makes it effortless to use a feature it essentially makes obsolete. Linking layers is not as necessary as it once was. Now it’s just a matter of selecting the layers you want to link and clicking the Link button, which has been relegated to the bottom of the Layers palette (Figure 23d).
Figure 23d. Linking layers isn’t as vital as it was in past versions, so it’s been reduced to a single button on the bottom, and the link indicators have been moved to the end of the layer row.

• Grouping layers: Previously, you had to either link the layers to add them to a Layer Set (now known as a Layer Group) or manually drag them one by one into the folder. In CS2, Shift-click layers and choose Layer > Group Layers or use the standard Group keyboard shortcut: Command+G (Mac)/Control+G (Windows).
#24 Adding Vector Artwork
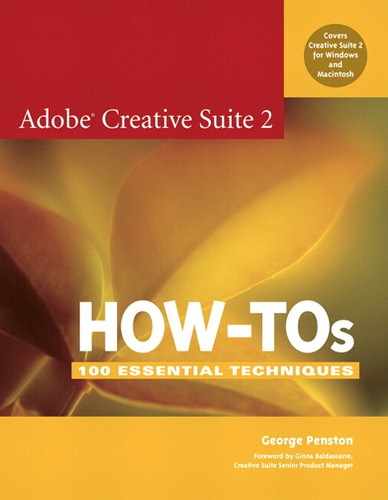
Although Photoshop is an image-editing application through and through, it’s gained a respectable amount of features in the past few versions for working with vector artwork. For instance, you can create shape layers, which are vector-based layers, directly within Photoshop using either the Shape or Pen tools. And if you find these tools a bit limiting, you can create your artwork in Illustrator and then paste it into Photoshop in a variety of ways.
Shape layers
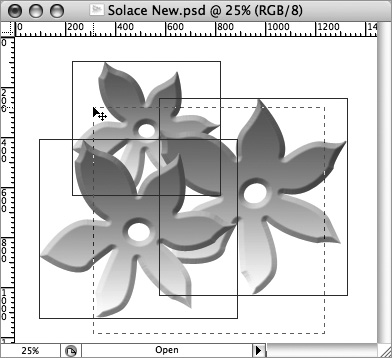
Vector-based shape layers were introduced back in Photoshop 6.0, but you could’ve easily overlooked them because other features were given the spotlight. That’s not to say they don’t deserve your attention. Shape layers are an important addition to Photoshop and ImageReady that you should take advantage of whenever possible. They combine the flexibility and resolution independence of vectors with the features available to pixel-based layers, such as blending modes, opacity, and most important, layer styles.
To create a shape layer, choose either the Pen tool ![]() or one of the Shape tools
or one of the Shape tools ![]() and click the Shapes button
and click the Shapes button ![]() in the options bar. Draw a closed path with the Pen tool or click and drag with a Shape tool to then create a shape layer. Once it’s created, look closely at how the shape layer is represented in the Layers palette (Figure 24a). It’s really just a fill layer with a vector layer mask (see #22) linked to it. This is useful to know since fill layers can be dynamically changed from a solid color to a gradient, pattern, or an adjustment layer by choosing Layer > Change Layer Content. This level of flexibility makes shape layers ideal for creating interface elements for the Web, which tend to involve several layers of gradients and shading.
in the options bar. Draw a closed path with the Pen tool or click and drag with a Shape tool to then create a shape layer. Once it’s created, look closely at how the shape layer is represented in the Layers palette (Figure 24a). It’s really just a fill layer with a vector layer mask (see #22) linked to it. This is useful to know since fill layers can be dynamically changed from a solid color to a gradient, pattern, or an adjustment layer by choosing Layer > Change Layer Content. This level of flexibility makes shape layers ideal for creating interface elements for the Web, which tend to involve several layers of gradients and shading.
Figure 24a. Shape layers are really just fill layers with a vector layer mask. They bring the flexibility and control of vector artwork to Photoshop’s pixel-based world.
Pasting from Illustrator
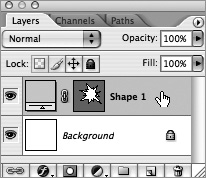
Although you can get pretty far using the Pen and Shape tools available in Photoshop to create shape layers, you don’t have to stop there. You can also create your artwork in Illustrator, where you have a full cache of tools and filters specific to working with vectors, and then copy and paste it into Photoshop. A dialog appears prior to pasting that prompts you to choose a format for your artwork. Choose from Smart Object, Pixels, Paths, or Shape Layer (Figure 24b). If your artwork is relatively simple and you want to continue to edit it directly within Photoshop, choose Shape Layer. If your artwork is rather complex with multiple layers, choose Smart Object (see #25). Both options give you the ability to continue to edit your artwork. The Smart Object format allows you to open the artwork again in Illustrator, whereas the Shape Layer format allows you to edit the artwork using the vector-based tools found in Photoshop.
Figure 24b. When pasting Illustrator artwork into Photoshop, this dialog appears. Choose Shape Layer for simple artwork you want to continue to work with in Photoshop.
#25 Introducing Smart Objects
Each time you transform a pixel-based object in Photoshop, you degrade the quality of the object to some extent. This is why Adobe included the Free Transform command a while back so that you could scale, rotate, and skew in a single operation. Although the Free Transform command goes a long way toward alleviating the image degradation problem, it doesn’t quite solve the problem of multiple transformations. You don’t want to worry about the number of times you’ve transformed an image when you’re being creative. Adobe finally solves this problem with the introduction of Smart Objects in Photoshop CS2.
Smart Objects in Photoshop are specially linked objects that dynamically update when the source objects change. The objects can be Photoshop layers or external documents, such as Illustrator, Acrobat, or Camera Raw files. If you’ve worked with Smart Objects in GoLive, the general concept still holds true. You’re free to transform the Smart Object as much as you like without loss of quality since Photoshop dynamically applies the transformations to the linked source file. But Photoshop’s approach to Smart Objects differs slightly since they’re embedded within the document and represented as a new type of layer called a Smart Object layer (Figure 25a).
Figure 25a. Smart Objects look and act like any other type of layer. The document icon stamped on the lower right of the layer thumbnail lets you know it’s a Smart Object layer.

To create a Smart Object based on a selected set of layers in Photoshop, choose Layer > Smart Objects > Group Into New Smart Object. Placed files are automatically made into Smart Object layers—no matter if they’re Illustrator, Acrobat, or other Photoshop files. You can also copy and paste artwork from Illustrator. This is an excellent way to integrate complex Illustrator artwork into Photoshop. To edit a Smart Object, double-click the Smart Object thumbnail (Figure 25b). The embedded object opens in its native application for you to edit. When you save your changes, the Smart Object dynamically updates. As you begin to work with Smart Objects, you’ll realize how powerful and innovative they truly are. They will definitely change the way you work in Photoshop for the better.
Figure 25b. You’ll be presented with this dialog the first time you edit a Smart Object. Since working with Smart Objects is completely new, this is actually a good dialog to read through.
If copy and pasting artwork from Illustrator doesn’t seem to be working, check that both PDF and AICB (No Transparency Support) are selected in the File Handling & Clipboard preferences in Illustrator.
#26 Repairing Image Flaws
Photoshop is considered the quintessential tool for retouching and repairing images. It can remove blemishes, crow’s feet, and red eye, and re-create missing corners of old photographs as if by magic. And because those magicians at Adobe are continually improving upon the set of retouching tools and filters in Photoshop, it serves you well to know what’s new and improved in CS2 for repairing images.
The Healing tools in Photoshop CS2 make it incredibly easy to repair defects in an image. The Healing Brush tool ![]() is like the Clone Stamp tool with smarts. You paint from another sampled part of an image, but the Healing Brush blends the painted pixels seamlessly by matching the texture, lighting, shading, and transparency of the pixels being sampled to the pixels being healed. The new Spot Healing Brush
is like the Clone Stamp tool with smarts. You paint from another sampled part of an image, but the Healing Brush blends the painted pixels seamlessly by matching the texture, lighting, shading, and transparency of the pixels being sampled to the pixels being healed. The new Spot Healing Brush ![]() makes the retouching process even easier (if that’s possible) by automatically sampling the surrounding area being healed. This essentially gives you a one-click retouch tool (Figure 26a). Another repair tool that’s been made one-click smart is the Red Eye tool
makes the retouching process even easier (if that’s possible) by automatically sampling the surrounding area being healed. This essentially gives you a one-click retouch tool (Figure 26a). Another repair tool that’s been made one-click smart is the Red Eye tool ![]() . Just click anywhere in the red of the eye with the tool to fix the problem; Photoshop does the rest. It even works on green and white eyes that plague photographs of dogs and cats.
. Just click anywhere in the red of the eye with the tool to fix the problem; Photoshop does the rest. It even works on green and white eyes that plague photographs of dogs and cats.
Figure 26a. Using the Spot Healing Brush, I was able to remove the painter in one click.

In addition to the assortment of retouch tools Photoshop ships with, it also includes a handful of powerful filters to address overall problems that occur in photographs. For instance, the Lens Correction filter (Filter > Distort > Lens Correction) helps fix common lens flaws (Figure 26b), whereas the Reduce Noise filter (Filter > Noise > Reduce Noise) is specifically designed to help remove image noise and JPEG artifacts (Figure 26c). If your usual filters for dealing with noise are Despeckle or Dust & Scratches, it’s time to give Reduce Noise a try.
Figure 26b. The new Lens Correction filter makes it easy to correct common lens distortion issues such as barrel and pincushion distortion, chromatic aberration, and lens vignetting.
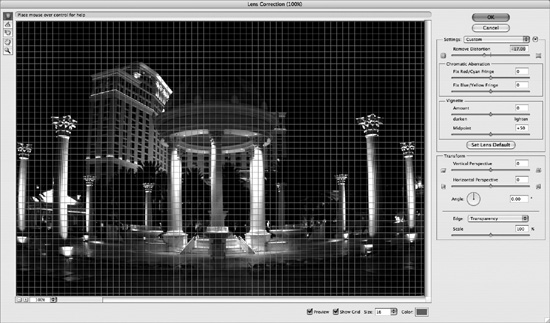
Figure 26c. Digital imaging has brought forth such problems as JPEG artifacts, scanned film grain, and overall noise. The Reduce Noise filter eliminates these types of issues as fast as it was to make them.

#27 Removing Color Casts
Unfortunately, you can’t always count on perfect lighting when shooting your photos. And less than ideal lighting conditions usually result in an unfavorable amount of one color throughout your pictures. This unpleasant effect is known as a color cast. Thankfully, removing these color casts is something Photoshop can do in its sleep.
To remove an undesirable color cast from a photograph, choose Image > Adjustments > Auto Color. Photoshop analyzes the shadows, midtones, and highlights and then automatically adjusts the contrast and color of the image. Sure, you could do much of this yourself via the Levels or Curves commands, but Photoshop does surprisingly well on its own. However, if you feel the result could stand a little help, Photoshop obliges by offering an Auto Correction Options dialog (Figure 27). Here you can adjust the settings Photoshop uses when running any Auto Correction commands, such as Auto Color or Auto Contrast. To access these settings, click Options in the Levels dialog (Image > Adjustments > Levels).
Figure 27. The Auto Color command does a fine job of removing color casts. But if you’d like to tweak the settings, use this dialog.

#28 Using the Smart Sharpen Filter
The Unsharp Mask filter has been the ultimate tool many of us reach for to bring clarity and crispness to our images. With Photoshop CS2, the new Smart Sharpen filter gives the old standard a run for its money. This filter can produce some remarkable results, especially in comparison to what we’re used to seeing from the Unsharp Mask filter. This is understandable though, considering that Smart Sharpen offers more controls to adjust how the sharpening is applied and where it occurs.
Give the filter a try to get a sense of how it measures up to the classic Unsharp Mask filter. Open an image and view it at Actual Pixels (100%) to get an accurate view of the sharpening effect. Choose Filter > Sharpen > Smart Sharpen. Notice that the filter offers Basic and Advanced modes in the dialog. Even in the Basic mode it includes more options than the Unsharp Mask filter. Both tools offer Amount and Radius settings, but the Smart Sharpen filter includes a Remove menu to choose the type of blur to remove: Gaussian, Lens, or Motion (Figure 28a):
• Leaving the Remove option on Gaussian Blur gives you results similar to the Unsharp Mask filter.
• Lens Blur is a bit more refined, allowing you to increase your Amount value before noticeable halos appear. A halo effect occurs around the edges of an image when oversharpening an image. Keeping halos in check is the fine art of sharpening.
• The Motion Blur option is ideal when your shot has a slight blur because the object or the camera moved slightly. The key is to find the best angle of the blur for the filter to work its magic.
Figure 28a. The Smart Sharpen filter includes a Basic and Advanced mode. It also lets you choose between three types of blur removal options.

The More Accurate option runs the filter in two passes. This is similar to the technique many users employ of running a weak Unsharp Mask filter twice instead of running a strong one once. I suggest leaving this option on unless you’re working with an image with a lot of grain or compression artifacts. This option actually runs the filter twice so it will take longer, but it’s worth the wait.
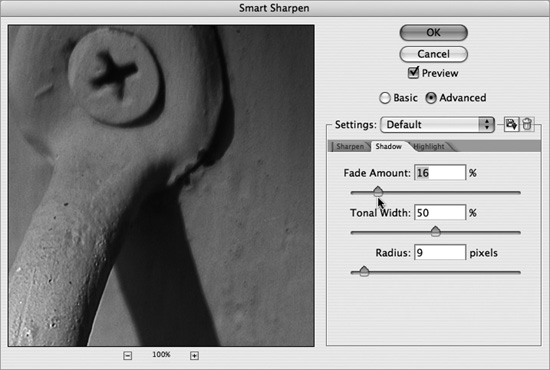
Selecting the Advanced mode makes available the Shadow and Highlight tabs (Figure 28b). These tabs allow you to selectively control the amount of sharpening that occurs in the light and dark areas of your image, providing you with independent controls to reduce halos in just these areas.
Figure 28b. For even greater control on how the sharpening filter is applied, switch to the Advanced mode. Here you can separately adjust the shadow and highlight settings.
#29 Exploring Filter Combinations
If you’re experimenting with an assortment of filters in Photoshop, trying to find just the right filter to do the trick, you may be inadvertently limiting your search. Perhaps the effect you’re looking for isn’t actually the result of a single filter but a combination of filters applied in a certain order. So let me direct your attention to the Filter Gallery.
The Filter Gallery is one of those nice gems like the File Browser that was carried over from Photoshop Elements. This tool allows you to selectively audition filter effects in Photoshop in any combination or order. Once you’ve discovered the winning combination, Photoshop applies the filters all at once to your image. This potentially could provide you with a higher-quality result than if you applied the filters over time.
To use the Filter Gallery, choose Filter > Filter Gallery. The filter opens a window that fills your screen with a large preview on the left (Figure 29a).
Figure 29a. The Filter Gallery is your one-stop shop for exploring several filter effect combinations at once.

To the right of this is a folder listing of the available effect categories. Expand any of these folders to view the set of filters along with thumbnails illustrating each filter’s effect. Click a filter thumbnail to preview its effect on your image. The settings for the selected filter will display in the top right of the window. To apply another filter on top of this filter, click the New Effect Layer button ![]() located in the bottom right of the window, and then select another effect. For a faster method, hold down Option/Alt as you select subsequent effects. As your effects get layered on one another, you can reorder them by dragging them in the effects layer panel (Figure 29b). Changing the order of the filters can really impact the overall effect. In the effects layer panel you can toggle an effect on and off, select them to apply a different effect in their place, or eliminate them by clicking the Delete Effect button
located in the bottom right of the window, and then select another effect. For a faster method, hold down Option/Alt as you select subsequent effects. As your effects get layered on one another, you can reorder them by dragging them in the effects layer panel (Figure 29b). Changing the order of the filters can really impact the overall effect. In the effects layer panel you can toggle an effect on and off, select them to apply a different effect in their place, or eliminate them by clicking the Delete Effect button ![]() . When you’re happy with your combination of filter effects, click OK to have Photoshop apply them all at once.
. When you’re happy with your combination of filter effects, click OK to have Photoshop apply them all at once.
Figure 29b. The effects layer panel lets you reorder your effects to see in the preview panel just how each effect interacts with another.

#30 Weighted Optimization for the Web
When optimizing images for the Web, you may think you can only control the compression setting of the entire image slice. But it’s actually possible to have Photoshop and ImageReady apply less compression on elements within a slice that may be of importance to you, such as a company logo or type. This accommodating feature is called weighted optimization.
Weighted optimization allows you to use Text or Shape layers (see #24), or pixel-based alpha channels in your document to set a different quality range than that in the overall optimization settings. This makes it possible to apply an aggressive amount of compression on a background while maintaining readability of your crisp type overlay (Figure 30a).
Figure 30a. Weighted optimization is helpful when you want to reduce the file size without losing image quality in critical areas such as type or a logo.

To take advantage of weighted optimization, do the following:
1. Make sure you have a type layer, shape layer, or alpha channel in your document. Alpha channels are saved selections; just make a selection and choose Select > Save Selection in either Photoshop or ImageReady.
2. In the Optimize panel in Photoshop or the Optimize palette in ImageReady, click the Mask button ![]() next to the setting you’d like to weigh in on.
next to the setting you’d like to weigh in on.
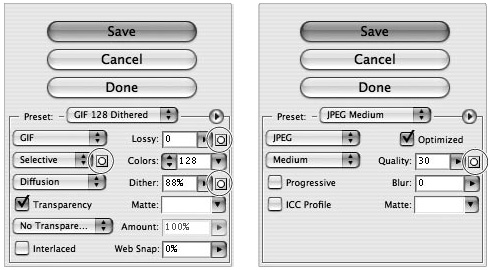
You’ll see different options depending on the format of your image. JPEG format lets you modify the quality setting, whereas GIF format offers optimization mask settings for color reduction, dithering, and lossiness (Figure 30b). PNG-8 format allows for color reduction and dithering settings.
Figure 30b. These little mask icons are cues to which settings allow weighting. Really, how could you miss them?
3. In the Modify Quality Setting dialog, choose which masks to modify the compression on: All Text Layers, All Vector Shape Layers, or an alpha channel (Figure 30c).
Figure 30c. The weighted optimization dialog allows you to give quality precedence to type and shape layers along with an alpha channel related to the overall compression setting.

4. Keep the Preview option selected so you can see how your adjustments impact the quality of the resulting image.
5. Select your quality or dithering range and click OK. The Color Reduction Options dialog for GIF format does not offer a range.