Chapter Four. Working with Illustrator
I fondly remember my first chance to use Illustrator. Even in its initial version you could feel the fluid finesse of the Pen tool. The first couple of versions of Illustrator could easily be considered a PostScript editor with a graphic user interface, which was revolutionary nevertheless. But now in its twelfth version, Illustrator offers so many features and tools for creating and editing artwork, it’s hard to recognize it from its simple beginnings.
Although Photoshop may get much of the attention, the truth is that Illustrator is the application that started Adobe. It’s also the most mature application in the suite. With so many versions packed with features being released through the years, this powerhouse vector graphics tool is definitely a force to be reckoned with. Because it’s such a deep, versatile tool, I can imagine that many people don’t fully know its capabilities.
So with that in mind, I’ve come up with a set of tips and techniques for Illustrator that really runs the gamut of its capabilities and I hope enlightens you to some of Illustrator’s lesser known but compelling features.
#31 Selecting Obscured Objects
Have you ever found yourself working on a fairly complicated Illustrator document and spending more time trying to select the objects in your artwork than manipulating them? Selecting objects positioned on top of each other in Illustrator can be quite a challenge, if not downright annoying at times. The good news is that Illustrator offers a complete set of tools and commands devoted to helping you select just the objects you want.
Illustrator CS2 includes five tools for common selection tasks: Selection, Direct Selection, Group Selection, Magic Wand, and Lasso. All of these tools perform well in their own right, but they can seem rather limited when you attempt a more complex task such as selecting an object obscured by another. This is where the Next Object command comes in handy. To select an object below a selected object, choose Select > Next Object Below (Figure 31a). Notice that you can also choose Select > Next Object Above for the opposite situation. Keep in mind that these commands will skip over locked objects, as they rightfully should.
Figure 31a. The Select > Next Object commands are available from the Object menu or via the contextual menu by Control-clicking (Mac) or right-clicking (Windows) on an object.

But if you’re still having trouble selecting certain objects, head on over to the Layers palette. In its default setup, the Layers palette provides a row for every discrete object in your document. You can drill down to the very paths that make up an object and then click the Target icon ![]() beside it to select it (Figure 31b).
beside it to select it (Figure 31b).
Figure 31b. You can also use the Layers palette to access those hard to select objects or paths.

#32 Isolating Selections with Lock and Hide
Two of the most useful tools for isolating selections are the Lock and Hide commands. Both commands have been available in a form much like their present form since the earliest incarnations of Illustrator. In fact, it would be tough to find an long-time Illustrator user who doesn’t rely on these two commands just as much as the Pen tool. Their convenience is found in the sheer simplicity of what they accomplish.
The Lock command keeps objects visible but unselectable. To lock an object or set of objects, select the objects and then choose Object > Lock > Selection. (That’s Command+2 (Mac) or Control+2 (Windows) for you keyboard-shortcut fans.) The Lock command is a great, on-the-fly method to quickly get objects out of your way, but an even more powerful option lurks just a little-known keyboard shortcut away: Select the object you want to focus on and press Shift+Option+Command+2 (Mac) or Shift+Alt+Control+2 (Windows). All other objects within your document are locked, in effect isolating your selection. This allows you to concentrate your efforts on the object selected. When you’re ready to work with all the locked object again, choose Object > Unlock All.
The Hide command works in a similar fashion to Lock but instead makes the objects invisible and unselectable. To hide selected objects, choose Object > Hide > Selection. There’s also a companion command to the above-mentioned locking command: Choose Shift+Option+Command-3 (Mac) or Shift+Alt+Control+3 (Windows) to hide all deselected artwork (Figure 32).
Figure 32. Attempting to edit a path within a complex document can be quite difficult. Using the secret Hide All Deselected command temporarily hides all artwork not selected, making it easy to edit the desired path.

#33 Creating Clipping Masks
If you’ve ever needed a fast way to crop or hide a portion of your artwork, you’ll be happy to learn about clipping masks. A clipping mask is a special type of object whose shape masks out (or clips) artwork so that only the artwork within the confines of the mask are visible (Figure 33). Clipping masks can be made up of two or more objects. The masked objects can be vector or raster, but the mask itself must be a vector object.
Figure 33. Clipping masks make it effortless to use an object as a uniquely shaped frame for other objects. Here I’ve used the outside box as a clipping mask to clip the cylinder and bottom portion of the people.

To make a clipping mask, create the object you want to use as a mask. This is known as the clipping path. Remember that the clipping path must be vector based. Move the clipping path so it’s above all the objects you want to mask in the stacking order. Use the Bring to Front command or the Layers palette to accomplish this. Next, select the clipping path and the objects you want to mask and then choose Object > Clipping Mask > Make. Feel free to commit the handy keyboard shortcut to memory: Command+7 (Mac) or Control+7 (Windows). Once the clipping mask is created, the clipping path is automatically assigned a fill and stroke value of None. This is something to be aware of if you decide to release the clipping mask back to a normal path (Object > Clipping Mask > Release) and wonder where your clipping path went. And although a clipping path reverts to no fill and stroke when made into a mask, that doesn’t stop you from applying a new fill and stroke to it.
#34 Creating Compound Shapes
Illustrator’s compound shapes feature makes it easy to create complex shapes made up of two or more basic shapes. Based on the original Pathfinder operations that have been around for some time now, compound shapes allow you to apply Pathfinder operations such as Add or Intersect to basic shapes to create a new shape while the underlying shapes remain editable.
Compound shapes are created via the Pathfinder palette (Window > Pathfinder). The four shape mode buttons, Add, Subtract, Intersect, and Exclude, result in compound shapes (Figure 34a). The best way to think of compound shapes is as live Pathfinder operations.
Figure 34a. The top four buttons in the Pathfinder palette are the shape modes available for creating a compound shape.

To create a compound shape, create two or more basic shapes that overlap one another. To better illustrate the effect of a shape compound, fill the shapes with different colors. With the shapes selected, click the Add shape mode button in the Pathfinder palette. A compound shape is created, combining the basic shapes into one (Figure 34b). The object that was at the top of the stacking order determines the appearance of the other object in the compound shape. Switch to Outline mode (View > Outline). Notice that the original shapes still exist and remain editable (Figure 34c). You can switch back to Preview mode (View > Preview) and double-click the compound shape with the Selection tool to edit the underlying shapes.
Figure 34b. You can achieve interesting results just by combining simple geometric shapes into a compound shape.

Figure 34c. This artwork was created in a minute by using these four simple shapes and applying two shape modes: Add and Subtract. Switching to Outline mode reveals the actual shapes being used.

Try experimenting with all four shape modes. You can also create nested compound shapes by selecting a new shape and an existing compound shape and applying a shape mode again. To release a compound shape back to its basic set of shapes, select it and choose Release Compound Shape from the Pathfinder palette menu (Figure 34d).
Figure 34d. When you want your artwork to revert to its basic shapes, select the Release Compound Shape command from the Pathfinder palette menu.

If you hold down the Option/Alt key when pressing a shape mode button, you can produce a combined single shape (a la the classic Pathfinder operations). Adobe refers to this type of shape as “fully expanded.” The result is the same as applying a shape mode and then clicking the Expand button, which performs the Pathfinder operation and ultimately removes the dynamic, flexible nature that compound shapes offer.
#35 Working with Symbols
Symbols are objects that can be stored as source artwork and then be reused numerous times in a document as symbol instances. Edit or replace the symbol and all linked instances automatically update. Symbols make it easy to add a bit of random complexity to your artwork while saving you time and keeping file sizes to a minimum (Figure 35a).
Figure 35a. Symbols make it incredibly easy for you to add multiple instances of your artwork by selecting a symbol from one of the sets available to you and literally spraying it onto the artboard.

A symbol can be made up of text, paths, embedded raster images, mesh objects and most groups of objects. You can even use Live Effects (see #36), brush strokes, and other symbol instances in a symbol. To create a symbol, select your artwork and click the New Symbol button in the Symbols palette (Window > Symbols). To be presented with the option to name the symbol, press the Option/Alt key when clicking New Symbol. You can hold down Shift if you’d like the selected artwork to automatically become an instance of the new symbol.
Once you’ve created your symbol, instances of it can be quickly added in volume using the Symbol Sprayer tool ![]() . With your symbol selected in the Symbols palette, choose the Symbol Sprayer tool in the Tools palette. Click and hold or click and drag to spray instances of your symbol onto the artboard, much like a paint spray can. Use the hidden symbolism tools under the Symbol Sprayer: Shifter, Scruncher, Sizer, Spinner, Stainer, Screener, and Styler to interactively tweak your instances and make them appear more natural and distinct from one another (Figure 35b).
. With your symbol selected in the Symbols palette, choose the Symbol Sprayer tool in the Tools palette. Click and hold or click and drag to spray instances of your symbol onto the artboard, much like a paint spray can. Use the hidden symbolism tools under the Symbol Sprayer: Shifter, Scruncher, Sizer, Spinner, Stainer, Screener, and Styler to interactively tweak your instances and make them appear more natural and distinct from one another (Figure 35b).
Figure 35b. Use the various symbolism tools hidden under the Symbol Sprayer tool to make your artwork appear more random and diverse in size, rotation, color, and so on.

To redefine your symbol and automatically update all the linked instances, drag an instance of your symbol from the Symbols palette to the artboard. With the instance selected, click the Break Link to Symbol button ![]() in the Symbols palette. Make your edits to the artwork and then drag it back on top of the original symbol in the Symbols palette while holding down the Option/Alt key (you can only do this if you’re using entirely new artwork). This replaces the old symbol with the new and all its instances are dynamically updated.
in the Symbols palette. Make your edits to the artwork and then drag it back on top of the original symbol in the Symbols palette while holding down the Option/Alt key (you can only do this if you’re using entirely new artwork). This replaces the old symbol with the new and all its instances are dynamically updated.
#36 Using Live Effects
If you compare the Filter and Effect menus in Illustrator, you’ll notice that they offer similar options (Figure 36a). Both set of commands mostly change the appearance of your artwork. The key difference is where effects remain “live” or editable, allowing you to adjust the underlying artwork and the effect settings. Filters are applied permanently to your artwork and can’t be changed, much like Photoshop filters. Effects can even be applied to bitmap objects you’ve embedded in your document. Although effects provide an incredible level of flexibility, filters are useful when you need to directly edit the resulting artwork produced.
Figure 36a. Although the Filter and Effect menus share many similar options, the Effect menu is the best choice for ultimate flexibility since the effects continue to be editable.

Once you’ve applied an effect, you can revisit and edit its settings at any time by double-clicking the effect name in the Appearance palette (see #37). You can apply multiple effects to an object, and they’ll appear stacked in the Appearance palette. Here you can easily reorder or remove them (Figure 36b).
Figure 36b. Once an effect is applied, you can double-click it within the Appearance palette to adjust its settings. You can also have multiple effects on any given item.

Many of the effects under the Illustrator Effect menu reshape your underlying artwork while keeping it vector-based. Some of the more compelling effects in this group are 3D, Convert to Shape, and Distort & Transform. They can radically change the appearance of your artwork, but can make it difficult to edit the underlying artwork. When this happens, switch to Outline mode (View > Outline), which hides the effects and exposes the source artwork, making it easier to edit.
The other effects are considered raster effects, which blend pixels with your vector-based artwork. The majority of the effects located in the Photoshop Effect menu are raster effects and are only available in RGB mode. You can switch your document to RGB by choosing File > Document Color Mode > RGB Mode, but be sure this is acceptable in your color workflow.
#37 Exploring the Appearance Palette
The Appearance palette may seem like a sophisticated Info palette at first glance, simply reporting the appearance attributes of the selected object. But looking deeper, you’ll see that this palette allows you to directly interact with these characteristics, build upon them, and then save them as a graphic style to apply to other objects
This means that just about any object can be made up of multiple fills, strokes, and live effects. To top it off, any of these fills, strokes, or effects (see #36) can include discrete transparency settings, or you can apply a global setting to the entire object or layer. The Appearance palette is designed to manage it all (Figure 37a).
Figure 37a. The Appearance palette is your command center for controlling every minute detail of an object’s overall appearance. Objects can have multiple fills, strokes, blending modes, and effects applied to them.

To add multiple attributes to an object, such as multiple strokes, select the attribute in the Appearance palette and click the Duplicate Selected Item button ![]() . With the duplicated attribute selected, you can apply a different attribute characteristic, for example, stroke weight, color, opacity, blending mode, or live effect. You can reorder attributes by dragging them within the palette just like you drag layers in the Layers palette. Keep in mind that you can have multiple effects on an object or certain items, such as individual fills or strokes (Figure 37b). Ordering effects and other items can dramatically change the overall appearance of an object. To delete a selected attribute, click the Delete Selected Item button
. With the duplicated attribute selected, you can apply a different attribute characteristic, for example, stroke weight, color, opacity, blending mode, or live effect. You can reorder attributes by dragging them within the palette just like you drag layers in the Layers palette. Keep in mind that you can have multiple effects on an object or certain items, such as individual fills or strokes (Figure 37b). Ordering effects and other items can dramatically change the overall appearance of an object. To delete a selected attribute, click the Delete Selected Item button ![]() . When you select an object that contains other objects, such as a layer, group, or text object, a Contents row appears in the palette. Double-click the Contents row to drill into the object’s contents. As you start working with the Appearance palette, you’ll soon realize just how powerful and flexible it truly is.
. When you select an object that contains other objects, such as a layer, group, or text object, a Contents row appears in the palette. Double-click the Contents row to drill into the object’s contents. As you start working with the Appearance palette, you’ll soon realize just how powerful and flexible it truly is.
Figure 37b. Applying multiple fills, strokes, effects, and so on, you can create some truly compelling results. All of the objects shown are basic circles with various style attributes applied to them.

#38 Distorting Artwork with Envelopes
An envelope distorts selected objects to conform to its outer shape. Envelopes make it simple to bend and warp artwork or design custom-styled type. Almost any shape can be defined as an envelope and then edited using the normal path and type tools. You can also use any of the preset warp shapes or a mesh grid as an envelope.
To distort artwork using your own envelope shape, create the objects you want to distort and then the object you want to use as the envelope. Make sure your envelope shape is at the top of the stacking order by selecting it and choosing Object > Arrange > Bring to Front or rearranging it in the Layers palette. Then select the target objects and the envelope shape, and choose Object > Envelope Distort > Make with Top Object (Figure 38a). The underlying artwork automatically assumes the shape of the envelope, although you can also manually edit the envelope path at any time.
Figure 38a. A simple shape can be used as an envelope to distort just about any other artwork.

If you’d rather use a preset warp shape to distort your selected artwork, choose Object > Envelope Distort > Make with Warp. The Warp Options dialog pops up with several preset warp styles and options to select from (Figure 38b). Bear in mind that these are merely preset warp shapes; once applied you’re still able to edit the envelope shape.
Figure 38b. The Warp Options dialog includes various preset warps to choose from and then adjust further.

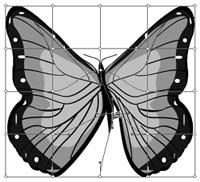
You also have the option of using a rectangular grid, known as a mesh grid, to distort your artwork (Figure 38c). With your objects selected, choose Object > Envelope Distort > Make with Mesh. Decide on the number of rows and columns you want to use in the Envelope Mesh dialog and click OK. With the envelope mesh applied, you can use the Direct Selection tool to manipulate the mesh intersections or use the Mesh tool ![]() to add more intersections.
to add more intersections.
Figure 38c. You can use a mesh grid as a basis of your envelope transform and then distort your artwork by editing the intersections of the grid.
#39 Using Live Trace
Years ago, Adobe Streamline was the definitive tool to take your scanned bitmap images and convert them into vector artwork so you could continue to work on them within Illustrator. Now this can be done directly within Illustrator CS2 using the new Live Trace feature. Live Trace automatically converts your placed images into vector graphics with a click of a button. If you’re not satisfied with the default results, change the settings (or the placed image) and Illustrator dynamically updates the vector artwork in response.
Although there are a couple of different ways to apply a Live Trace to your selected image, the most convenient is to use the new Control palette (see #17). Once you click the Live Trace button (Figure 39a) in the Control palette, your image is immediately converted to vector artwork.
Figure 39a. When you have an image selected in Illustrator, the new Control palette offers up a big, simple button to apply a Live Trace to the image.

Notice that once you apply Live Trace, the Control palette options change, presenting new options for your tracing. You can select a different tracing preset, adjust the threshold and minimum area, select different preview options, expand the artwork into editable paths, or convert the tracing to a Live Paint group (Figure 39b). All of these options except Expand and Live Paint allow you to freely experiment with different settings and automatically update the tracing. After you decide on a set of tracing settings you’re pleased with, convert your tracing to a Live Paint group (see #40) by clicking the Live Paint button.
Figure 39b. After you’ve applied a Live Trace, the Control palette presents appropriate options to adjust the Live Trace settings or convert the tracing to paths or a Live Paint group.

#40 Using Live Paint
The new Live Paint feature in Illustrator CS2 lets you paint directly in the areas between strokes as you would color a coloring book. You no longer need to concern yourself with the underlying objects and stacking order that result in the artwork. Live Paint automatically detects the gaps, boundaries, and areas throughout your artwork and makes them available as edges and faces you can quickly and easily paint. Even though you can apply Live Paint to any conventional vector artwork, it’s a perfect complement to the new Live Trace feature (see #39).
To start using the Live Paint feature, you must first convert your selection into a special type of group called a Live Paint group. To create a Live Paint group from a Live Trace, select the tracing and click the Live Paint button in the Control palette. To make a Live Paint group from selected vector artwork, choose the Live Paint Bucket tool ![]() from the Tools palette and click the artwork (Figure 40a). Note that some types of objects—type, brushes, and bitmap images—can’t be converted into a Live Paint group. To get around this you can convert type to outlines, expand brushes, and use Live Trace images.
from the Tools palette and click the artwork (Figure 40a). Note that some types of objects—type, brushes, and bitmap images—can’t be converted into a Live Paint group. To get around this you can convert type to outlines, expand brushes, and use Live Trace images.
Figure 40a. To convert artwork into a Live Paint group, simply click it with the Live Paint Bucket tool.

Once your artwork has been converted to a Live Paint group, you can continue to use the Live Paint Bucket tool to pick colors, swatches, or styles and paint them into faces or edges of the Live Paint group. Hold down the Option/Alt key to temporarily switch to the Eyedropper tool to sample an appearance from another object. The Live Paint Bucket tool nicely highlights the available faces and edges as you hover over them (Figure 40b).
Figure 40b. As soon as artwork is converted to a Live Paint group you can start painting it in a natural manner as you would a coloring book. It’s actually kind of fun. Areas are highlighted to show you what will be filled.

You also can select multiple faces and edges at once using the Live Paint Selection tool ![]() . Use this tool when you want to select multiple portions of your Live Paint group first and then apply a fill or stroke.
. Use this tool when you want to select multiple portions of your Live Paint group first and then apply a fill or stroke.
If you create a Live Paint group from artwork that didn’t originate from a Live Trace, an interesting effect reveals itself when you move the underlying objects that make up the group. Double-click your Live Paint group with the Selection tool to isolate the group. Then move one of the objects and watch as the color of the Live Paint faces automatically follows along—hence the “live” in Live Paint (Figure 40c).
Figure 40c. Live Paint groups are just that...live. Move the underlying objects around and the painted faces follow.
