Chapter Five. Working with InDesign
Among the main applications that make up the Creative Suite, InDesign could be considered the new kid on the block, with its initial version released in 1999. But that doesn’t equate to it being any less feature-rich or powerful than the 18-year-old applications in the suite. InDesign was born out of a need to create a modern page layout application that could lead the industry and handle today’s demands for multiple types of output. Regardless if the final destination is print, an Acrobat file, a Web site, or a combination of these formats, InDesign is up to the task.
With the release of InDesign CS2, Adobe has taken an already versatile page layout tool and made it even more convenient and flexible to work with. New features such as Object Styles and Anchored Objects let you focus on designing and laying out your pages instead of hunting down inconsistencies and stray page elements.
It’s evident with this fourth major release of InDesign that Adobe has no plans on easing up on the amount of features and tools packed into each release. So with this in mind, I’ve assembled a set of techniques that attempts to cover the most ground throughout this truly remarkable page layout application.
#41 Working with Master Pages
Master pages have been around for nearly as long as desktop publishing, but many users may not realize how helpful they can be when producing a long document. Master pages allow you to define how elements such as text, graphics, and guides will appear on any pages based on the master. The beauty of this approach is that you can return to the master and reposition or change any of those elements, and those changes will be reflected across the entire document.
You can create a master page from scratch or use a page you already started laying out in the document. To create a new blank master, open the Pages palette and choose New Master from the palette menu. Alternatively, press Command (Mac) or Control (Windows) while clicking the New Page button at the bottom of the palette. To create a master based on an existing page or spread in your document, select it and choose Save as Master from the palette menu. I prefer the more straightforward method of dragging the page or spread to the Master area in the palette (Figure 41a). This works just as well.
Figure 41a. You can simply drag a page or spread into the Master area to make a master page from it.

What makes master pages in InDesign even more effective is that they can be based on existing master pages. This allows you to set up a parent master page and create several different child masters from it. Say, for example, that you have a header bar that you want on all pages, but on certain pages you want a sidebar along with the header bar. You can easily accomplish this by basing the sidebar master on the header bar master. To base a master on another master, drag the master you want to use as a basis (the parent master) on top of another master (the child master) (Figure 41b).
Figure 41b. Drag and drop a parent master page on top of another master to create a parent-child relationship.

When you want to apply a master page to a document page, drag the master on top of the page icon in the Pages palette. To apply a master to a page spread, drag the master to a corner of the spread until a black outline surrounds the entire spread and then release it (Figure 41c). If you want to apply a master to multiple pages at once, select them in the Pages palette and hold down Option/Alt as you click the master you want to apply.
Figure 41c. To apply a master to a page, drag it on top of the page. To apply a master to a spread, drag it over the page’s corners until the entire spread has a thick black outline around it.

Sometimes you may want to change the contents or layout of a master page. Simply double-click its page icon in the Pages palette to go to it within the document and make your changes. Any pages based on the master will automatically update. If you need to make changes to master page objects on a specific page, you can override them. Press Command+Shift (Mac) or Control+Shift (Windows) as you click the master page object. This will release it from the master, allowing you to edit its attributes while keeping an association to it. Once you override a master object attribute, that attribute will not update if it is later changed on the master. However, attributes that haven’t been overridden will update. For example, you can change the fill and size of an object by overriding those attributes on a certain page, but when the master object’s position changes, the overridden object will change position as well. This level of control is what makes master pages so powerful.
#42 Fitting Contents within Frames
When you place or paste graphics within existing frames, they rarely conform to one another. You can go through the trouble of manually resizing the graphic or frame so the two fit together, but why bother? InDesign includes a set of commands and corresponding Control bar buttons to help achieve a perfect fit every time (Figure 42).
Figure 42. The content fitting buttons found on the Control palette make quick work of fitting graphics to frames and vice versa.

To fit content to its frame, select the frame and either click the appropriate Control palette button or choose Object > Fitting and one of the options that follow:
![]() Fit Content to Frame: Resizes the content so it fits the frame, even if it means changing the proportions. The content will appear stretched if it’s a different proportion than the frame, so this command is only useful in rare occasions in which you don’t mind that the contents are distorted.
Fit Content to Frame: Resizes the content so it fits the frame, even if it means changing the proportions. The content will appear stretched if it’s a different proportion than the frame, so this command is only useful in rare occasions in which you don’t mind that the contents are distorted.
![]() Fit Frame to Content: Changes the frame’s dimensions to match the content. Use this option if the content can’t be resized, and you want the frame to conform to the content’s proportions.
Fit Frame to Content: Changes the frame’s dimensions to match the content. Use this option if the content can’t be resized, and you want the frame to conform to the content’s proportions.
![]() Fit Content Proportionally: Resizes the content proportionally to fit the frame’s proportions. This ensures that the content will not get cropped, but you can end up with empty space if the two do not share the same proportions. This is probably one of the most useful options of the bunch. Try using this option and then follow it with the Fit Frame to Content option if you want the frame dimension to loosely define the working proportions but the content to ultimately decide them.
Fit Content Proportionally: Resizes the content proportionally to fit the frame’s proportions. This ensures that the content will not get cropped, but you can end up with empty space if the two do not share the same proportions. This is probably one of the most useful options of the bunch. Try using this option and then follow it with the Fit Frame to Content option if you want the frame dimension to loosely define the working proportions but the content to ultimately decide them.
![]() Fill Frame Proportionally: Resizes the content proportionally to fill the frame. This option will most likely result in your content being cropped unless its proportions are the same as the frame.
Fill Frame Proportionally: Resizes the content proportionally to fill the frame. This option will most likely result in your content being cropped unless its proportions are the same as the frame.
![]() Center Content: Doesn’t resize anything but instead ensures that the content is perfectly centered both horizontally and vertically within the frame.
Center Content: Doesn’t resize anything but instead ensures that the content is perfectly centered both horizontally and vertically within the frame.
#43 Using the Story Editor
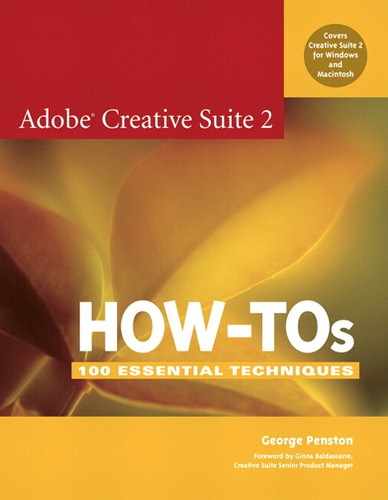
The Story Editor got its start in PageMaker, where users quickly appreciated its usefulness. It allows you to focus on editing text in a word-processor-like view without being distracted by formatting and layout. InDesign’s Story Editor improves upon the one in PageMaker, making it feel more like a word processor. You can view hidden characters, perform find/change actions, and check spelling (Figure 43a).
Figure 43a. The Story Editor window allows you to focus on the text in your document without being distracted by the layout.
To open a story in Story Editor, click an insertion point in a frame or select a text frame (or several of them) and choose Edit > Edit in Story Editor. To switch back to Layout, choose Edit > Edit in Layout or close the window. You can toggle between these views by using the easy to remember keyboard shortcut: Command+Y (Mac) or Control+Y (Windows).
Once you’re in a Story Editor window, you can concentrate on adding new text or editing existing text. But don’t mistake the simplicity of this view as being limited. There are plenty of tasks you can do without leaving the Story Editor.
Here are some of the possible functions you can perform in a Story Editor window:
• View and apply style sheets: Any styles applied appear in the left style name column. Apply paragraph and character styles as you would in Layout mode.
• Check spelling: You can check spelling in the story as you would in Layout mode. Turn on dynamic spelling (Edit > Spelling > Dynamic Spelling) to have InDesign check spelling as you type. Red squiggly underlines indicate misspellings as in Microsoft Word.
• Drag and drop text: InDesign CS2 now supports drag-and-drop text. Select your text and then hover over the selection until the new drag-drop text cursor appears ![]() . Drag the selection to a new location and drop it.
. Drag the selection to a new location and drop it.
• View and edit overset text: Text not visible in its frame is known as overset text. A red line runs alongside any overset text that occurs in your story. The Story Editor makes it possible to see and edit the overset text unlike in Layout mode where you need to expand the text frame before editing.
• View and edit a story in its entirety: Possibly the least obvious feature of the Story Editor is that it allows you to view a story in one complete window regardless of whether the story text is on multiple pages in the document layout.
#44 Defining Nested Styles
Nested styles are one of the innovative ways InDesign saves you trips to the Character Styles palette. Within a paragraph style, you can set up character styles to apply to a range of text based on a certain length or character and then automatically switch to another nested character style or revert to the base paragraph style. For example, you could define a character style to run through to the first sentence or after the first colon. This makes nested styles ideal for creating run-in headings that are popular in magazines (Figure 44a). But this is just one obvious application for them.
Figure 44a. Nested styles are perfect for handling run-in headings where the first few words or the first sentence is styled differently than the rest of the paragraph.

Before defining nested styles, create the paragraph and subsequent character styles you want to use. Double-click on the paragraph style in the Paragraph Styles palette. Next, click Drop Caps and Nested Styles on the menu list on the left of the dialog. Click the New Nested Style button and choose one of your character styles from the first menu labeled [None]. Then decide which item will determine the end of the character style formatting. You can enter a character or number, or select a special option from the menu (Figure 44b). Although you can type a whole word in the field, only the first character will be used. You can click on “through” to switch it to “up to,” which changes the character style range from including the ending character to not doing so. Then add as many other nested styles as you want and order them using the up and down buttons.
Figure 44b. You can enter a character or choose from the menu that includes special characters or other factors to end your nested style.

Once you’ve defined your nested styles within the paragraph style, all paragraphs that previously had the style applied automatically update. It’s even more fun to watch the nested styles switch as you type. Create a new text frame by dragging a rectangle with the Type tool. Then select the paragraph style with the nested styles and start typing. Watch as the formatting automatically switches as you trigger the determining characters or factors.
#45 Repeating Transformations
Illustrator allows you to repeat your last transformation and has for quite some time. When you move, scale, or rotate an object and then select Object > Transform Again, Illustrator automatically performs the transformation again on your selection. InDesign CS2 carries over this indispensable command and supercharges it. InDesign CS2 not only makes it possible to repeat the last transformation, but it remembers all the transformations you recently applied to an object and allows you to repeat the transformation sequence to other objects.
Creating Artwork with Repeated Transformations
You can use repeated transformations to create artwork that would otherwise be tedious to build. For example, to create a gear, draw a circle and a small square. Move the square to the top of the circle and choose the Rotate tool. Drag the square’s point of origin ![]() into the circle’s center and then drag the edge of the square around the circle to approximately 15-30° while holding down the Option/Alt key (this leaves a copy behind). With the square still selected, choose Object > Transform Again > Transform Again. Repeat this last step until all the teeth of the gear are created. You can use this technique to quickly produce unique artwork based on repeating objects.
into the circle’s center and then drag the edge of the square around the circle to approximately 15-30° while holding down the Option/Alt key (this leaves a copy behind). With the square still selected, choose Object > Transform Again > Transform Again. Repeat this last step until all the teeth of the gear are created. You can use this technique to quickly produce unique artwork based on repeating objects.
To access the four repeat transformation options choose Object > Transform Again (Figure 45a). But make sure you’ve actually transformed an object first by moving, scaling, shearing, or rotating it. Then select the object or objects you want to apply the transformations to and choose a Transform Again option.
Figure 45a. The Transform Again options are located in the Object menu. Notice that some of the commands offer keyboard shortcuts.

It’s a little difficult to understand the difference between the Transform Again options at first. Here’s a description of each and what to consider when deciding between them:
• Transform Again: Applies only the most recent transformation to a selection. This is probably the option you’ll use most often for typical situations, so you might want to memorize its keyboard shortcut: Option+Command+3 (Mac) or Alt+Control+3 (Windows).
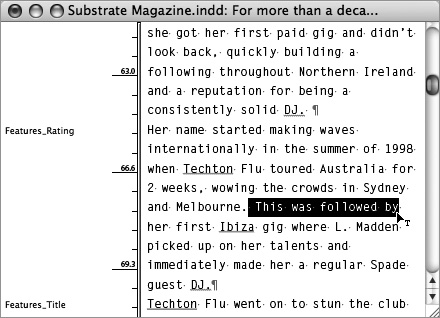
• Transform Again Individually: Works just like Transform Again, but when you have multiple objects selected, it applies the previously applied transformation on each object individually instead of treating the objects as a group. This is helpful since each object is transformed on its own axis, saving you from having to separately transform them (Figure 45b).
Figure 45b. Here’s the difference between Transform Again (left) and Transform Again Individually (right). Transform Again rotates the entire selection, whereas Transform Again Individually rotates each object.
• Transform Sequence Again: Applies the most recent sequence of transformations to a selection. Because InDesign remembers all the transformations applied to an object until you transform another object, it lets you move, scale, skew, and rotate an object, and then performs all those transformations to a selection of objects all at once.
• Transform Sequence Again Individually: Applies the last-used sequence of transformations to your selection to each selected object independently. Just like Transform Again Individually, this option respects each object’s axis within the selection and transforms them simultaneously.
#46 Applying Effects
One feature that defines InDesign as a truly modern page layout tool is its built-in ability to apply raster-based effects and have other objects interact with them. There’s no need to enlist Photoshop or a third-party plug-in to apply a drop shadow or feather the edges of an object. You can even apply transparency effects to an object as you would in Photoshop and Illustrator.
Before applying an effect, it’s a good idea to temporarily increase your display preview to high quality (View > Display Performance > High Quality Display) so that you have a truer preview of the effect.
To apply a drop shadow to a selected object, choose Object > Drop Shadow (Figure 46a). Select the Drop Shadow and Preview check boxes. You can then adjust the blend mode, opacity, offset, blur, spread, and noise to your liking. Choose a color from your list of swatches or select a different option from the Color menu to use a new color.
Figure 46a. The Drop Shadow dialog provides many of the options you’re used to seeing in Photoshop.

The feather effect softens the edges of an object by fading them to transparent. To feather a selected object, choose Object > Feather (Figure 46b). Select the Feather and Preview check boxes and set feather width. This is the distance over which the feather fades from opaque to transparent. Then choose a corner option and optionally add noise.
Figure 46b. The Feather dialog makes it easy to apply a feather effect onto images or other artwork without having to leave InDesign.

Here are a few other points to keep in mind when working with effects:
• Effects can be applied to any object whether it was created in InDesign or placed into InDesign from another application.
• Drop shadows and feathers are applied to the contents of a frame including text, if the frame has a fill of none. Give the frame a fill color, and the frame will receive the effect instead.
• These effects are flattened when printed. Although InDesign does its best to maintain the appearance you’ve created, it’s worthwhile to use the Flattener Preview palette (Window > Output > Flattener Preview) to see which objects are affected.
• Effects are live so you can adjust an applied effect on a selected object at any time by choosing the effect again from the Object menu.
#47 Anchoring Objects
InDesign has always made it intuitive and easy to work with inline graphics. Paste an object into a text frame and it behaves like any other character or word in the block of text, flowing along with the text. The only catch was that the object had to remain inside the text. Well, that is until now. InDesign CS2 introduces the ability to anchor objects to text where the object can now overlap or exist outside the text frame. This feature is a real boon to anyone who’s ever struggled to keep sidebars associated with the main story as it flowed (take this book for instance).
You create anchored objects as you would an inline graphic in previous versions of InDesign: Select the object you want to anchor and cut it. Click an insertion point within the target text frame by using the Type tool or by double-clicking the text frame with the Selection tool. Then simply paste the object. The object is anchored to the text using the default positioning of Inline (inline positioned anchored objects used to be called inline graphics).
Once you’ve anchored the object to text, you can change its position type so you can move the object to any location on the page. Use the Selection tool to select the newly created anchored object and choose Object > Anchored Object > Options. From this dialog (Figure 47a), change the Position menu to Custom and click OK.
Figure 47a. The Anchored Objects Options dialog presents a different set of options depending on which Position menu option you’ve selected.

A little blue anchor icon ![]() indicates that the object is a custom positioned anchored object. You can then use the Selection tool to reposition your anchored object anywhere on the page and have its position remain relative to the anchored text (Figure 47b). Is it just me, or did page layout seem to just get a whole lot easier?
indicates that the object is a custom positioned anchored object. You can then use the Selection tool to reposition your anchored object anywhere on the page and have its position remain relative to the anchored text (Figure 47b). Is it just me, or did page layout seem to just get a whole lot easier?
Figure 47b. As the frame of the anchored text is repositioned or reflows, the anchored object moves along with it.

#48 Using Object Styles
Object styles in InDesign CS2 do for objects what paragraph and character styles do for text. With one click you can consistently apply the same graphical treatment to a series of objects. Then, if you change your mind about a stroke width, color, or effect, update the object style and all the objects with styles applied automatically update.
The most straightforward way to define an object style is to base it on an object you’ve already created and styled. Open the Object Styles palette (Window > Object Styles). With the object selected, hold down the Option/Alt key as you click the Create New Style button at the bottom of the palette. Holding down Option/Alt displays the Object Style Options dialog (Figure 48), giving you an opportunity to name the style and adjust any of the options before the style is created. Select any of the categories and adjust their options as needed. Categories not checked will not be applied to the style. This behavior is similar to character styles where an object’s original attributes will not be overridden or cleared unless specified by the style.
Figure 48. The Object Style Options dialog includes a plethora of options that you can assign to a style.

Once you’ve defined an object style, you can easily apply it to other selected objects, groups, or frames by selecting it in the Object Styles palette or Control palette. Object styles also appear in the Quick Apply list (see #49). And as with other styles, you can double-click the name of the object style to edit its options and then have your changes automatically reflected on any objects that have the style applied.
#49 Applying Styles Quickly
As you begin to take advantage of using styles throughout your documents, you may find that applying styles can become unwieldy when you have several to choose from. InDesign CS2 offers two new timesaving features, Quick Apply and the Next Style option, to quickly find and apply styles, no matter how many styles you are working with.
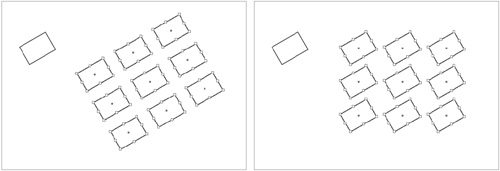
Quick Apply lets you promptly locate a style and apply it by typing part of its name. Your fingers never have to leave the keyboard. Quick Apply finds paragraph and character styles and also includes object styles (see #48) when an object is selected. To use Quick Apply, select the text or object you want to apply a style to and press Command+Return (Mac) or Control+Enter (Windows) to bring up the Quick Apply list (Figure 49a). Begin typing part of the style name and the list narrows the search results the more you type. You don’t have to type the name exactly; any part of the style name will work. You can use the up and down arrow keys on your keyboard to change the selection highlight in the results. Once the style you want is highlighted in the list, press Return or Enter to apply it. Press Shift+Return/Enter to apply the style and leave the Quick Apply list open. This is handy for when you want to apply both a paragraph and character style to a selection in record time.
Figure 49a. The Quick Apply list lets you type parts of a style name to select it and then quickly apply it.
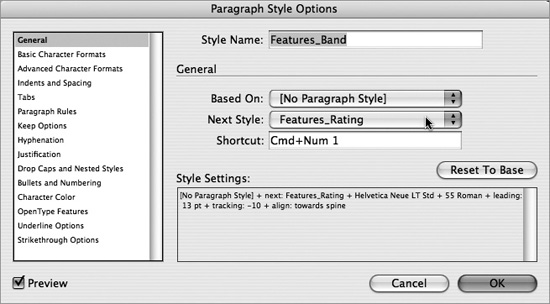
Suppose you have a run of text that consists of a headline, subhead, and body text. Normally, you’d have to click into each one to apply individual paragraph styles. InDesign CS2 lets you define a Next Style setting in a paragraph style so that you can apply a succession of styles to multiple paragraphs at once. To do this, edit a style by double-clicking on it and choose another paragraph style from the Next Style menu in the General category options (Figure 49b).
Figure 49b. Selecting a style from the Next Style menu automates the switching of paragraph styles while you’re typing or makes it possible to apply sequential styles at once.
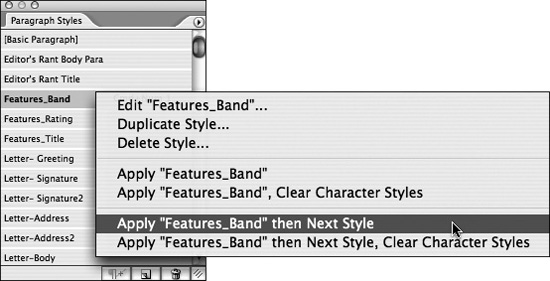
After you’ve established all your next styles in your paragraph styles, you can see them in action. As soon as you start a new paragraph from this style, InDesign automatically assigns the defined next style to it. You can apply paragraph styles with next styles assigned to a selection of paragraphs at once by Control-clicking (Mac) or right-clicking (Windows) on the style name and choosing Apply {style name} then Next Style from the contextual menu (Figure 49c). As long as there are next styles defined, the next paragraph style will be applied.
Figure 49c. After you’ve selected multiple paragraphs, open this contextual menu on a style with a next style applied to it to instantly apply multiple styles at once.
#50 Working with Books
Books are a collection of InDesign documents that can share styles and colors between them. Breaking up a long document into shorter ones managed through a book offers many benefits. It keeps the file sizes to a minimum, and if for some horrible reason a document becomes corrupt, you potentially lose only a handful of pages instead of your entire document. Using books also makes sense if you’re working within a team, allowing you to divvy up the work across documents. Be sure to take advantage of Version Cue in situations like these so you and your team members don’t accidentally overwrite each other’s work. You can also use books to collect documents of different page orientations or sizes into one set.
Here’s how to create a book from individual documents and start working with it:
1. Choose File > New > Book and then decide on a location and name for your book file. The saved book shows up as a palette in InDesign but behaves like a document. If you close it, you must choose File > Open to reopen it.
2. Add your documents to the book by dragging them into the Book palette from the Finder (Mac) or File Explorer (Windows). You can also click the Add Documents button ![]() on the Book palette.
on the Book palette.
3. Rearrange your documents in the Book palette by dragging them up or down as you would layers in the Layers palette. The order of the documents determines the page number sequence (Figure 50a).
Figure 50a. The Book palette shows all the associated documents and their page numbers. Rearrange the documents to change their order in the book and page numbering.

4. Save the changes to your book by clicking the Save Book button ![]() on the Book palette.
on the Book palette.
5. Open documents within the book by double-clicking their name in the Book palette. You should always open booked documents through the Book palette, especially when working collaboratively. This ensures that the documents remain synchronized with the book and its pagination.
6. Print or output an entire book or just certain documents within it. If you want to print or output the entire book, be sure none of the documents are selected by clicking in the gray area below the document names. If you want to print or output certain documents in the book, you first need to select them. Then with either no documents selected or certain ones selected, go to the Book palette menu and choose one of the options listed: Preflight, Package for GoLive or Print, Export to PDF, or Print (Figure 50b).
Figure 50b. You can print or output a book just as you would a document. The Book palette menu lists all the options available to you.

Synchronizing Styles Across Books
By default the first document in a book is designated as the style source. This means that the document will be used to synchronize the styles and swatches throughout the book. You can choose another document as the source by clicking the empty box to the left of its name in the Book palette. The style source icon ![]() will then switch to this document. Click the Synchronize button
will then switch to this document. Click the Synchronize button ![]() to sync your styles and swatches across all the documents in the book.
to sync your styles and swatches across all the documents in the book.