Chapter Seven. Creative Suite Integration
So this is where Adobe’s decision to bring the products together into one suite really comes to fruition. The very word, suite, can’t be attached to software without people expecting an incredible level of integration between the products that’s never been realized before. Happily, Adobe has met the expectation with Creative Suite 2. Very few other software companies have enjoyed this kind of interoperability among their applications as Adobe has. Whether you’re bringing Illustrator artwork into Photoshop or considering how to take your InDesign document to GoLive, the Creative Suite is there to answer the call.
With CS2, you can move your creative elements freely between the applications while maintaining a considerable amount of editability. Have a Photoshop file you’d like to integrate and continue to work with in Illustrator? No problem. Do you want to turn off a layer in your placed Photoshop file without leaving InDesign? Sure, why not? These are the types of features and capabilities a suite promises, and without question CS2 delivers.
Here are some of my favorite integration points within the suite. They mainly focus on bringing elements of a document over into another CS2 application while keeping (or sometimes even gaining) as much flexibility as possible as you move forward in your workflow.
#61 Bringing Illustrator Artwork into Photoshop
The tight integration that exists between Illustrator and Photoshop makes it possible to bring your Illustrator artwork over to Photoshop and continue to work with it. You have a few different options available to you with each offering and varying degrees of continued edibility of your artwork. Although some of these options have been mentioned in earlier techniques, it makes sense to cover all the bases in one place.
Pasting artwork
Pasting Illustrator artwork into Photoshop is best suited for times when you want to transport bits of simple artwork and continue to edit them. When you paste artwork into Photoshop, the Paste dialog asks you which format you’d like the artwork to be pasted as: Smart Object, Pixels, Path, or Shape Layer (Figure 61a).
Figure 61a. The Paste dialog in Photoshop CS2 presents you with four options to choose from for how your artwork comes in.

Here’s a brief explanation of the results of each option:
• Smart Object: Selecting Smart Object embeds the artwork within the Photoshop file as a Smart Object layer. You can continue to edit the embedded artwork in Illustrator by double-clicking the Smart Object layer thumbnail. When you save and close the artwork, the Smart Object is updated in Photoshop. Note that pasting artwork as a Smart Object breaks its association to the original Illustrator file you created it in. Consider placing the file instead of pasting it if you’d like to maintain this link.
• Pixels: Pasting as pixels is the most clear-cut and probably the most limiting of the set of options. Your vector artwork is rasterized and inserted as a normal layer into Photoshop. If you resize the artwork afterwards, the rasterized image starts to degrade.
• Path: Selecting Path pastes your artwork as a path that can then be selected via the Paths palette and edited with the Pen and Direct Selection tools.
• Shape Layer: Pasting as a Shape Layer results in your artwork coming over as a single shape layer (see #24). Photoshop will even leave your compound shapes intact (see #34). Pasting as a shape layer is ideal when you want to continue to edit your artwork as vector artwork in Photoshop using its tools.
Exporting as a Photoshop file
If you’d like to bring your entire Illustrator file into Photoshop while keeping elements such as layers, transparency settings, and editable text intact, consider exporting it as a Photoshop file. With your Illustrator file open, choose File > Export in Illustrator and then select Photoshop (.psd) from the Format menu. Decide on a name and location for the exported file and then click the Export button. You will be prompted with the Photoshop Export Options dialog (Figure 61b). In this dialog, determine the color mode and resolution you want to save the Photoshop file as and keep the Write Layers option selected along with its editability suboptions. Click OK to export your Illustrator file. Open the exported file and notice that all your layers and blending modes are just as they were in Illustrator. You can even edit text since it comes over as type layers. How’s that for integration?
Figure 61b. The Photoshop Export Options dialog in Illustrator CS2 is your one-stop shop to get your artwork into Photoshop with layers, text, and other attributes intact.

#62 Making a PDF Presentation from Photoshop Layer Comps
Photoshop’s layer comps really come in handy when you want to explore different creative avenues in your design. Nothing beats being able to flip through several comps within the same document so that you, your colleagues, or client can review different approaches and decide among them. But what if it’s not possible to get everyone huddled around your screen? Not a problem. Just save your set of layer comps as an Acrobat PDF presentation so that everyone can review and comment on them from the comfort of their own computer.
Here’s how to make a PDF presentation from your layer comps:
1. In Photoshop, open the document that has the desired set of layer comps created within it (see #73).
2. Choose File > Scripts > Layer Comps To PDF. A dialog appears prompting you to choose a destination for the resulting Acrobat file (Figure 62a).
Figure 62a. Use the Layer Comps To PDF dialog to set the options for your exported PDF presentation.
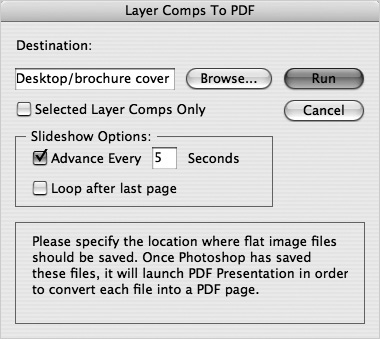
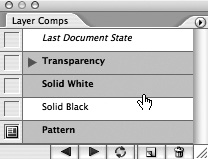
3. If you just want to select specific layer comps to save to the PDF file, be sure to first select the comps you want in the Layer Comps palette (Figure 62b) and then check the Selected Layer Comps Only option in this dialog. You can opt to adjust the available Slideshow Options for advancing the pages after a certain number of seconds and looping after the last page.
Figure 62b. Hold down Command (Mac) or Control (Windows) to select multiple, noncontiguous layer comps. Then you can choose to export only those selected layer comps in your presentation.
4. When you’re ready to create the PDF presentation, click the Run button. Once Photoshop has flattened and packaged all your layer comps, Acrobat launches and opens the presentation in full screen mode for you to preview. Each layer comp becomes a slide in the presentation. Press the Escape key to exit full screen and stop the presentation.
5. Now you can send the PDF presentation out for feedback via email or for download from your file server or Web site.
#63 Importing Photoshop Files into Illustrator
Not to be outdone by Photoshop’s ability to bring over Illustrator artwork (see #61), Illustrator includes exceptional support for importing Photoshop files. Among Illustrator CS2’s import options is the ability to select layer visibility or a layer comp within a Photoshop file. You can even choose to convert the Photoshop layers to objects and editable text where possible.
Follow these steps to access these import options when placing or opening your layered Photoshop file in Illustrator:
1. Make sure your Photoshop file (.psd) is ready to import into Illustrator—that is, you no longer need to edit it in Photoshop.
2. Within Illustrator, choose File > Place. Locate your Photoshop file and select it. If you want to import the actual Photoshop objects directly into your Illustrator document, be sure to uncheck the Link option in the Place dialog. Then click the Place button. You can also open a Photoshop file via Illustrator’s Open command to place the file in a new Illustrator document.
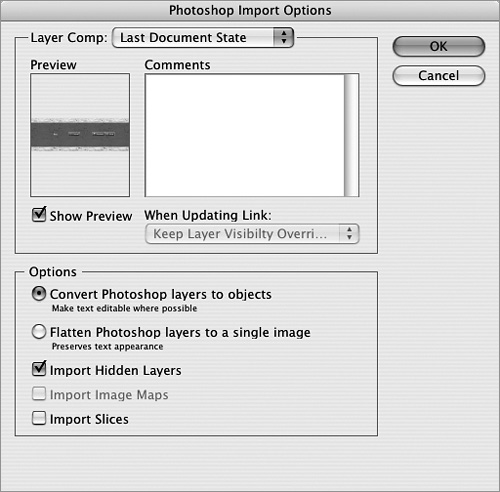
3. The Photoshop Import Options dialog offers you a set of import options (Figure 63). In Illustrator CS2, you can select a particular layer comp to import if your Photoshop file happens to have one. If you checked the Link option in the Place dialog, the When Updating Link menu will be available to you to decide which layer settings are honored: Photoshop’s or the settings you changed within this dialog. In the Options section you can choose to either Convert Photoshop layers to objects or Flatten Photoshop layers to a single image. (The Flatten option is your only option if you decided to link the file.) If your Photoshop file includes hidden layers, image maps, or slices, these options will become available to you as well for import. Choose between the two main import options (convert or flatten) and click OK.
Figure 63. The new Photoshop Import Options dialog in Illustrator CS2 allows you to select a layer comp from your Photoshop file.
4. If you opted to convert your Photoshop objects, you’ll notice that practically everything translates over from Photoshop. Layers, layer groups, most blend modes, opacity settings, masks, and even text come through intact. Now you can continue to work with the objects in Illustrator as if you created them there.
#64 Saving Out Multipage PDF Files from Illustrator
Some argue that you should do your page layout in a page layout application (say in InDesign), not in a drawing application. But many purists and resourceful users have continued to use the classic page-tiling feature found in Illustrator to create multiple pages in their documents. Although you’ve always been able to print out tiled documents (otherwise what’s the reason for them), the challenge remained as to how to easily produce a multipage PDF from them. In Illustrator CS2, Adobe has thankfully made this possible.
Here’s how to save your tiled Illustrator document as a multipage PDF:
1. In Illustrator, choose File > Print, and in the General set of options in the Media area of the Print dialog, select the page size you want the resulting PDF pages to be.
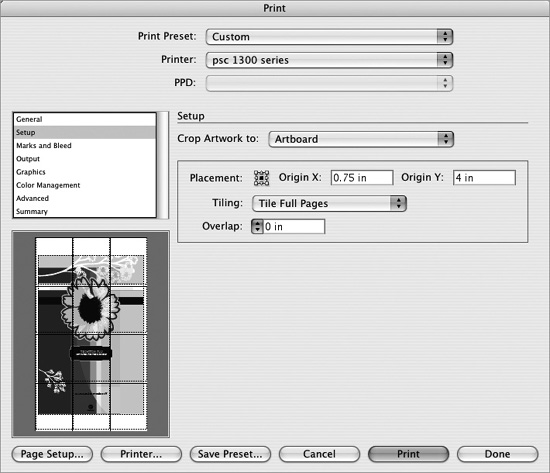
2. Select Setup in the options list on the left side of the dialog. Keep the Crop Artwork to menu at the Artboard option. In the Tiling menu, choose either Tile Full Pages or Tile Imageable Areas (Figure 64a). Select Tile Full Pages to make Illustrator separate the artboard into as many whole pages as will fit, resulting in no partial pages being displayed or printed. Select Tile Imageable Areas to divide the artboard into as many sections needed to print all the artwork. Click the Done button.
Figure 64a. Choose either Tile Full Pages or Tile Imageable Areas from the Setup page of the Print dialog.
3. Set up your Illustrator document so the artboard can accommodate the number of pages you want in it by choosing File > Document Setup and entering the artboard dimensions. For example, a four-page letter document could be tiled on a 17 × 22” artboard.
4. Choose View > Show Page Tiling to see the tiling divisions on the artboard. You can use the Page tool ![]() , which is the hidden tool under the Hand tool, to adjust where the tiling divisions lie on the artboard.
, which is the hidden tool under the Hand tool, to adjust where the tiling divisions lie on the artboard.
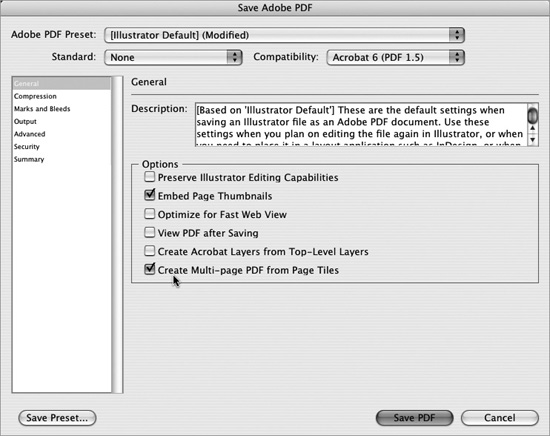
5. When you have your tiling set up and your artwork in place, you can save it as an Acrobat file. Choose File > Save a Copy, and then in the Save a Copy dialog select Adobe PDF (.pdf) from the Format menu. Decide on a name and location for the PDF and click Create. In the ensuing Save Adobe PDF dialog, check the Create Multi-page PDF from Page Tiles option (Figure 64b). Notice that you can’t preserve Illustrator editing capabilities with this option selected. This is why I suggest saving a copy instead of saving your native Illustrator file.
Figure 64b. To export your Illustrator file as a multipage PDF, you must check this option in the Save Adobe PDF dialog.
With your multipage PDF file saved, you can then send it to others to print from Adobe Reader or Acrobat Professional. And the best part is, your recipients won’t even know you used a drawing application to lay out your multiple pages.
#65 Changing Layer Visibility of Placed Photoshop and PDF Files in InDesign
InDesign CS2 offers a long sought-after integration feature: the ability to toggle layers on and off within placed Photoshop and PDF files. This means you can adjust the visibility of any layer in InDesign without jumping over to Photoshop or Acrobat Professional. The layer visibility in the original file isn’t altered, so you can in effect use one linked file that appears different with each placement of it. If your placed Photoshop file includes layer comps, you can switch between them as well.
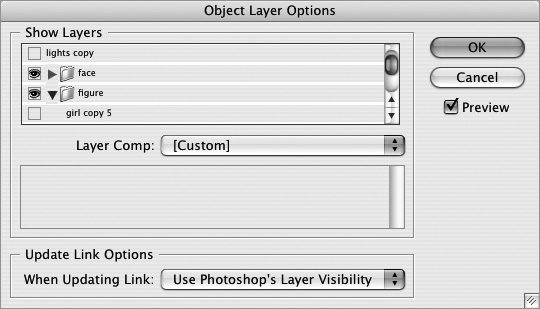
To set the layer visibility of a placed Photoshop or PDF file, select the placed file in your InDesign document. Then choose Object > Object Layer Options. Within this dialog (Figure 65a), you’ll find a portal into all the layers in your Acrobat or Photoshop file as well as the layer groups and layer comps of your Photoshop file. You may want to select the Preview option, although this can get sluggish with larger files.
Figure 65a. A long wished-for feature has found its way into InDesign CS2. You can now selectively toggle the visibility of layers in your Photoshop and PDF files directly in InDesign.
Click any layer or layer group eye icon to hide a layer just as you would in Photoshop. To show a layer or layer group, click the empty eye box next to it. Drag through the eye column when you want to adjust the visibility of multiple layers at once. If you’ve placed a Photoshop file that contains layer comps, you can choose between them from the Layer Comp pop-up menu.
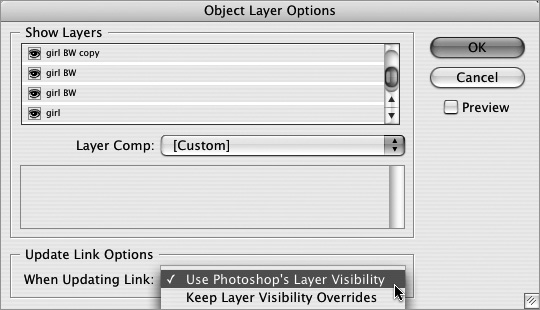
Another setting to consider is the When Updating Link option (Figure 65b). If you want InDesign to always match the layer visibility set in the linked file, select the Use Photoshop’s/PDF’s Layer Visibility option. This means that if you go back to the linked file and change the layer visibility, InDesign will then use these updated layer visibility settings once the link is updated. If you want to always keep the layer visibility settings you’ve designated in this dialog, select the Keep Layer Visibility Overrides option. Click OK and watch with amazement as your placed file magically updates (if you didn’t have Preview selected, that is).
Figure 65b. Use the When Updating Link menu to specify which layer visibility should be honored: the linked file or the settings in InDesign.
#66 Placing Multipage PDF Files in InDesign
In #64, I explained how Illustrator saves a multipage PDF from your tiled document. Now let’s say you’re feeling somewhat embarrassed about using Illustrator for your page layout needs and decide you want to bring the multipage PDF into InDesign—or any multipage PDF for that matter (it doesn’t have to be from Illustrator). Fortunately, Adobe has made it possible to place multiple-page PDF files into InDesign CS2.
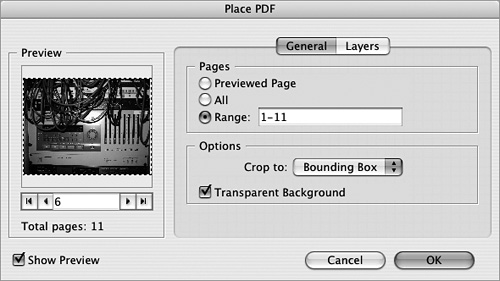
Choose File > Place. To let InDesign know you want to place more than just the first page of your multipage PDF file, you must select Show Import Options in the Place dialog (Figure 66a). With this option selected, you’ll be presented with the Place PDF dialog (Figure 66b). Within the Pages section of the dialog, you can choose to place the page you’re currently previewing in the Preview section, all pages, or a range of pages. To import multiple pages from your multipage PDF, choose the All or Range option. The Range text field supports specifying pages to import as a range using a hyphen (1-3), separate pages using commas and spaces (1, 3, 8), or a combination of both (1-3, 7). Click OK to place your PDF pages.
Figure 66a. When placing your multipage PDF, be sure to check Show Import Options in the Place dialog to display the Place PDF dialog.
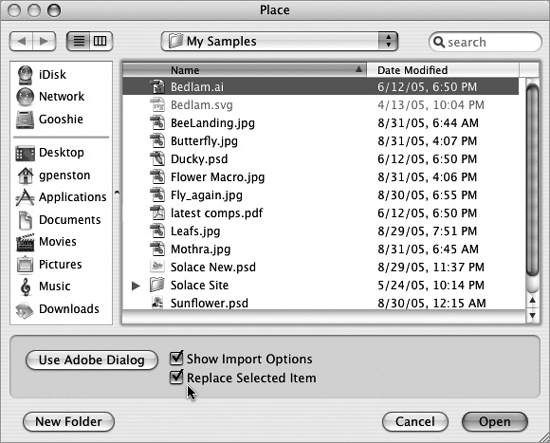
Figure 66b. The Place PDF dialog lets you specify which pages of a multipage PDF you would like to place.
After you click OK in the Place PDF dialog, your cursor changes to the loaded multipage PDF icon ![]() . Click anywhere in your document to place the first page you’ve specified to import. Notice that after you place the PDF page, your cursor remains a loaded icon. InDesign reloads the cursor with the next page ready for you to place. Place the second page on the current page or navigate to another page to place it. You can even create new pages via the Pages palette: Your PDF pages stay loaded in the cursor while you navigate and create your pages. Continue this process until all the pages you’ve specified in the PDF are placed. If at anytime you want to cancel the placement of the remaining pages in your cursor, click the Selection tool.
. Click anywhere in your document to place the first page you’ve specified to import. Notice that after you place the PDF page, your cursor remains a loaded icon. InDesign reloads the cursor with the next page ready for you to place. Place the second page on the current page or navigate to another page to place it. You can even create new pages via the Pages palette: Your PDF pages stay loaded in the cursor while you navigate and create your pages. Continue this process until all the pages you’ve specified in the PDF are placed. If at anytime you want to cancel the placement of the remaining pages in your cursor, click the Selection tool.
When placing a multipage PDF, it usually makes sense to place pages one at a time so you can jump to other pages in the document or add new pages as needed. But if you want to just place all the pages at once, hold down the Option/Alt key once your cursor is loaded. The cursor will then change to a loaded multipage PDF stacked icon ![]() . Click anywhere in your document, and all of the remaining pages in your PDF will be placed at once, stacked on top of one another.
. Click anywhere in your document, and all of the remaining pages in your PDF will be placed at once, stacked on top of one another.
#67 Building an Interactive PDF in InDesign
Sure, InDesign is a page layout application through and through, but it turns out to be a very capable tool for getting your ideas into an interactive format. Among InDesign’s well-known page layout tools are less familiar features for creating interactive PDF files. You can create hyperlinks and bookmarks that result in navigational aides in the exported PDF. You can also add buttons to your InDesign document and then assign actions such as jumping to a page, playing a movie, or hiding elements.
Adding bookmarks and hyperlinks
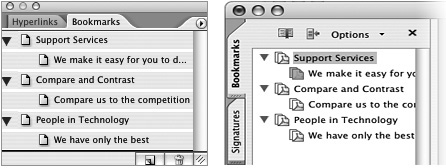
You can add bookmarks to your InDesign document to make it easier navigate the exported PDF. The bookmarks appear in the PDF within the Bookmarks tab in Acrobat or Adobe Reader (Figure 67a). To create a bookmark, open the Bookmarks palette in InDesign by choosing Window > Interactive > Bookmarks. Next, decide where you want the bookmark to jump to by clicking an insertion point in text, highlighting text, selecting a graphic, or choose an entire page by double-clicking on a page in the Pages palette. Then just click the New Bookmark button on the Bookmarks palette to create the bookmark.
Figure 67a. Bookmarks that you create in your InDesign document (left) end up in the exported PDF (right), making it easy for readers to navigate your document.
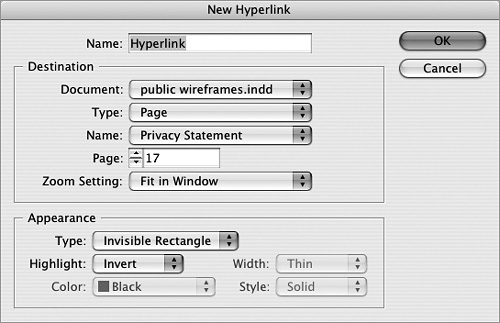
Hyperlinks are similar to bookmarks but allow you to set up navigational links directly within your document’s content much like a Web page. Adding and managing hyperlinks is all done in the Hyperlinks palette (Window > Interactive > Hyperlinks). Select the text or graphic you want to act as your hyperlink’s source and then click the New Hyperlink button in the Hyperlinks palette. In the New Hyperlink dialog (Figure 67b), name your hyperlink and choose a destination. Destinations can be other pages (even in other documents), a URL (e.g., www.adobe.com), or a text anchor. You can then choose an appearance for your hyperlink and click OK. When you export your PDF, be sure to select the Include Bookmarks and Hyperlinks option in the Export PDF dialog.
Figure 67b. Use the New Hyperlink dialog to specify a destination and appearance for your hyperlink.
Creating buttons
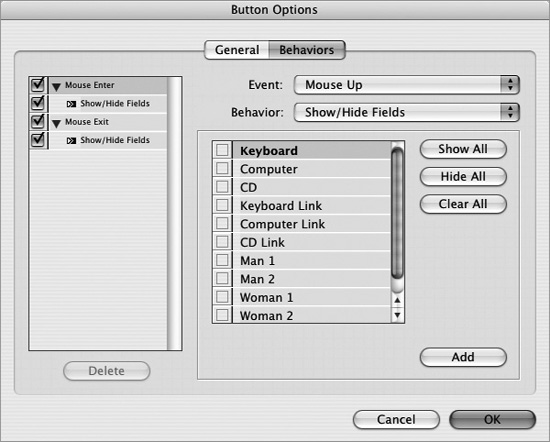
You can create buttons in InDesign and set them up to perform actions when the document is exported to a PDF. You can create a button by using the Button tool ![]() to drag out an area on top of text or a graphic. (A button acts as an overlay, so you still need to create content for your button.) But the easiest way to create a button is to select your button content (text or graphics) and choose Object > Interactive > Convert to Button. Once you’ve created your button, you can then assign actions to it by choosing Object > Interactive > Button Options. In the General tab, you can edit the name, description, and visibility attributes of the button. Switch to the Behaviors tab of the dialog (Figure 67c) to add behaviors triggered by certain events. For example, to show the next page in your document when you click the button, you would choose Event: Mouse Up along with Behavior: Go To Next Page. Remember to click the Add button in the lower-right corner of the dialog to add the behavior you’ve set up. To make your buttons function in your exported PDF, select the Include Interactive Elements option in the Export PDF dialog.
to drag out an area on top of text or a graphic. (A button acts as an overlay, so you still need to create content for your button.) But the easiest way to create a button is to select your button content (text or graphics) and choose Object > Interactive > Convert to Button. Once you’ve created your button, you can then assign actions to it by choosing Object > Interactive > Button Options. In the General tab, you can edit the name, description, and visibility attributes of the button. Switch to the Behaviors tab of the dialog (Figure 67c) to add behaviors triggered by certain events. For example, to show the next page in your document when you click the button, you would choose Event: Mouse Up along with Behavior: Go To Next Page. Remember to click the Add button in the lower-right corner of the dialog to add the behavior you’ve set up. To make your buttons function in your exported PDF, select the Include Interactive Elements option in the Export PDF dialog.
Figure 67c. The Button Options dialog offers several useful behaviors that you can associate to common events like mouse clicks and rollovers.
#68 Packaging InDesign Documents for GoLive
Let’s say you’ve laid out your document in InDesign and then want to reuse many of the graphics and text in a GoLive site. Before the Creative Suite this practically meant starting over again to move all the elements into formats suitable for online viewing. But now InDesign and GoLive go together like peanut butter and jelly. InDesign collects all your text stories and graphics in your document, converts them into Web-friendly formats, and outputs it all into a nice package that you can then load into your GoLive site and start working with.
Use the following steps to package your InDesign document for GoLive:
1. With your document open in InDesign, choose File > Package for GoLive.
2. Decide on a name and location for the package. If you already have a GoLive project site set up that you’d like to add the package to, save it to the web-dataInDesignPackages folder of that site’s project folder. If you don’t have a site set up, you can always move the package in later; save it to wherever you’d like for now. Once you’ve selected a location and named your package, click the Save button.
3. After you click Save, a Package for GoLive dialog appears with options organized into three sections (Figure 68).
Figure 68. The Package for GoLive dialog in InDesign makes it simple to select which pages and assets should be packaged together.

• In the Pages section, you can decide to package all the pages in your document, a specific range, or just the objects you currently have selected. If your InDesign document includes hidden layers, you can select the Include Hidden Layers option to package those objects as well.
• In the Options section, check the View Package When Complete option to have the package open in GoLive afterwards. And unless you’re working on a multilingual site, you can leave the encoding option set to UTF-8.
• The Images, Movies & Sounds section offers the option to copy the original and formatted images along with any movies and sounds you may have in your document to a subfolder in the package.
4. Click the Package button. InDesign begins to process your document. Text stories are converted to XML files for easy GoLive digestion, placed images and graphics are converted to TIFF images, and paragraph and character styles are translated into corresponding CSS for GoLive. Depending on the complexity and size of your document, package creation may take a while. After InDesign has processed your document, your newly created package is ready to work with in GoLive.
#69 Working with InDesign Packages in GoLive
Once you’ve successfully saved your InDesign document as a package, you’re ready to work with it in GoLive. You open an InDesign package in GoLive by double-clicking on it. The package then opens in a separate window in GoLive where you can quickly browse and zoom in on assets, and then drag them into your working GoLive page. Here’s a rundown of how to get up and running with the package window.
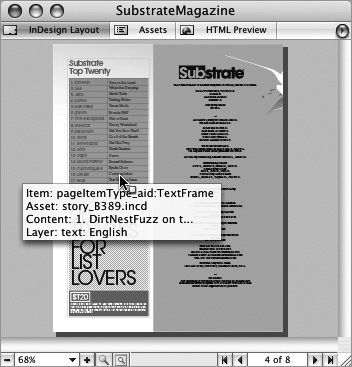
• Highlighting, tool tips, defaults: Hover over items with your mouse in the InDesign Layout tab, and the bounding box of the item will highlight in green. Wait a second and a tool tip will appear providing details about the item. Items appended with TextFrame will result in HTML text by default when dragged onto a page (Figure 69a), whereas anything else will result in a graphic by default.
Figure 69a. Hovering over a page in a package window will highlight the item in green and eventually display a tool tip with details about the item.
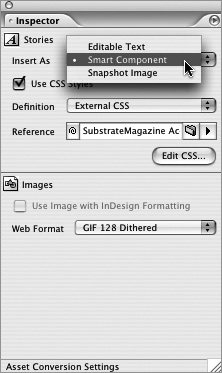
• Adding text or tables: To add text or a table to your GoLive page, simply drag the item from the InDesign Layout tab in the package window onto your page. You have three options available to you as to how the text should be inserted: Smart Component, Editable Text, or Snapshot Image. You choose the insert option of a text item before you add it to your page by clicking it in the InDesign Layout tab and then open the Inspector palette. You then choose one of the options from the Insert As menu (Figure 69b):
Figure 69b. With a text frame selected in the package window, you can open the Inspector palette to decide on the format the text should be inserted as.
Editable Text: With the Editable Text option, you can directly edit the inserted HTML text in GoLive, but you lose any formatting or automatic updating from InDesign.
Smart Components: By default, text frames and tables are inserted as Smart Components. Smart Components have a dynamic link back to the source InDesign document, allowing the text and formatting to automatically update when the package is updated. But this means you must go back to the InDesign document to edit the text or rely on GoLive’s XML editor.
Snapshot Image: The Snapshot Image inserts the text frame as a Smart PDF object. A Smart PDF creates an image file from the text, allowing you to preserve any unusual fonts or formatting the text may have that can’t be reproduced reliably in HTML alone. And since Smart is in its name, yep, you guessed it, it will automatically update when the InDesign package is updated.
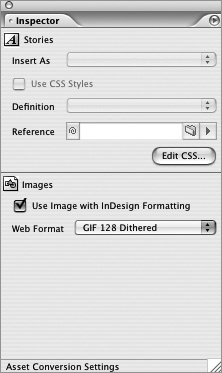
• Adding an image or graphic: To add an image or graphic, drag the object from your package window to your page. All images and graphics dragged from your package window are Smart Objects (see #70) by default. As with text frames, you can click on an image or graphic in the InDesign Layout tab and then open the Inspector palette to adjust the asset conversion settings (Figure 69c). In the Inspector palette you can select the Use Image With InDesign Formatting setting to keep any formatting you may have applied such as clipping paths, cropping, and borders (provided you saved your package with this option). You can also select an optimization preset from the Web Format menu.
Figure 69c. When inserting graphics, you can jump to the Inspector palette to decide whether to use the InDesign formatting of the image or graphic along with the optimization setting.
#70 Using Smart Objects in GoLive
Although Smart Objects can now be found in Photoshop as well, they originally made their appearance in GoLive. Smart Objects in GoLive eliminate the need to optimize your Creative Suite documents into Web-friendly formats before bringing them into GoLive. You can drag a Photoshop, Illustrator, or Acrobat file into a document in GoLive to make it a Smart Object. GoLive creates a dynamic link between the source file and the resulting Web-optimized files. Smart Objects make it easy for you to freely transform and edit the source files without having to resave the optimized files every time you make a change. GoLive automatically re-creates these files for you on the fly.
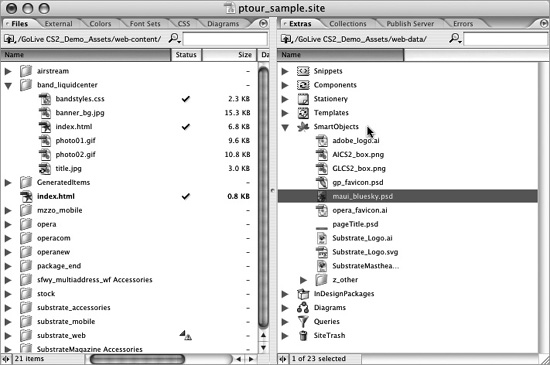
You can import your source files (native CS2 documents) and have them live anywhere in your GoLive project site folder. However, Adobe sets up a specially designated folder at web-dataSmartObjects just for storing all your source files in one place. You can find this special folder in your site window by toggling Split View ![]() and clicking the Extras tab (Figure 70a).
and clicking the Extras tab (Figure 70a).
Figure 70a. You can add all your native source files to the SmartObjects folder in the Extras tab of your GoLive site project folder. You can then access them easily from there or the Library palette’s Smart Objects tab.
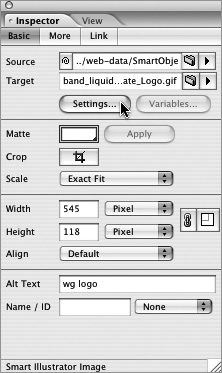
Once you have your source files in your GoLive site, you can easily drag them from the SmartObjects folder into a GoLive document. GoLive then displays its very own Save for Web window so you can decide on the optimization settings and where the optimized files should be saved. GoLive creates a dynamic link between the source file and the resulting Web-optimized files and updates the page with the resulting image. Now you can resize the Smart Object without worrying about the image degrading since GoLive goes back to the source to reoptimize. You can edit the source file by simply double-clicking on the Smart Object within the page. After you’ve saved any changes to a file, GoLive automatically updates to reflect the changes to the Smart Object. If you want to edit the optimization setting of your Smart Object, select it and open the Inspector palette (Figure 70b). In the Basic tab, click the Settings button to call up the Save for Web window again.
Figure 70b. With your Smart Object selected, open the Inspector palette to adjust any of its optimization settings.
Smart Objects offer more than just automated image optimization. This merely scratches the surface of the flexibility and power Smart Objects bring to Web design in GoLive. Be sure to take advantage of them. Once you do, you’ll never want to be without them.