Chapter 11: Extending Illustrator Through Third-Party Tools and the iPad
By now, I hope you are getting more comfortable with your skills in Adobe Illustrator and gaining lots of valuable knowledge. As you continue to use what you have learned, you should see a marked improvement in your skill set. The best tool I can recommend to you is time. With time, your skills will continue to grow, and you will become more efficient using techniques, shortcuts, and additional tools.
Illustrator is already a great tool for creating vector artwork, but when we leverage the benefits that Illustrator offers us with additional tools, it gets even better. Whether it is through powerful third-party plugins, keyboard shortcuts, or even the iPad app, the benefits will be similar. Having these additional options will allow you to extend the capabilities of the software and break out from the rest that use Illustrator. This chapter is loaded with additional resources that can allow you to extend the capabilities of Illustrator.
To accomplish this, the chapter will be divided into the following main topics:
- Adobe Stock & Marketplace in your Creative Cloud app
- Powerful and creative plugins from Astute Graphics
- Cineware by Maxon for 3D objects
- Substance 3D in Illustrator
- Illustrator for iPad
Technical requirements
To complete this chapter, you will need the following:
- Adobe Illustrator 2022 (version 26.0 or above).
- High-quality internet access may be required for some situations.
Adobe Stock & Marketplace in your Creative Cloud app
As you continue to develop your skills and work to increase the quality of your designs, you will inevitably strive to gain a more professional appearance. Resources such as templates, stock images, and quality fonts will help you to move in that direction. Adobe has several resources (some included with your subscription and some requiring an additional fee) to allow you to expand your options. In the next sections, we will discuss each service offered by Adobe and what benefits you can obtain from it.
Adobe Stock
With the Adobe Stock subscription site (https://stock.adobe.com), you can look for a large variety of stock files to use within your own work. Available items include photos, illustrations, vectors, videos, audio, and 3D assets.
Adobe Stock is not included with your Creative Cloud subscription but can be utilized through an Individuals, Teams, or Enterprise monthly plan. You can also choose to pay as you go for each individual asset you need or prepay for a specific number of items (including 4K video, Premium, and extended licenses) using a product that Adobe calls a Credit Pack. You can purchase these packs with several different quantities of credits.
Figure 11.1 shows the website page for Adobe Stock, which includes a prominent search bar. To use the search bar, I recommend narrowing your search by first selecting a filter (located on the left side of the bar). By doing this, you will then only search for your intended media type instead of seeing results from the entire stock library:
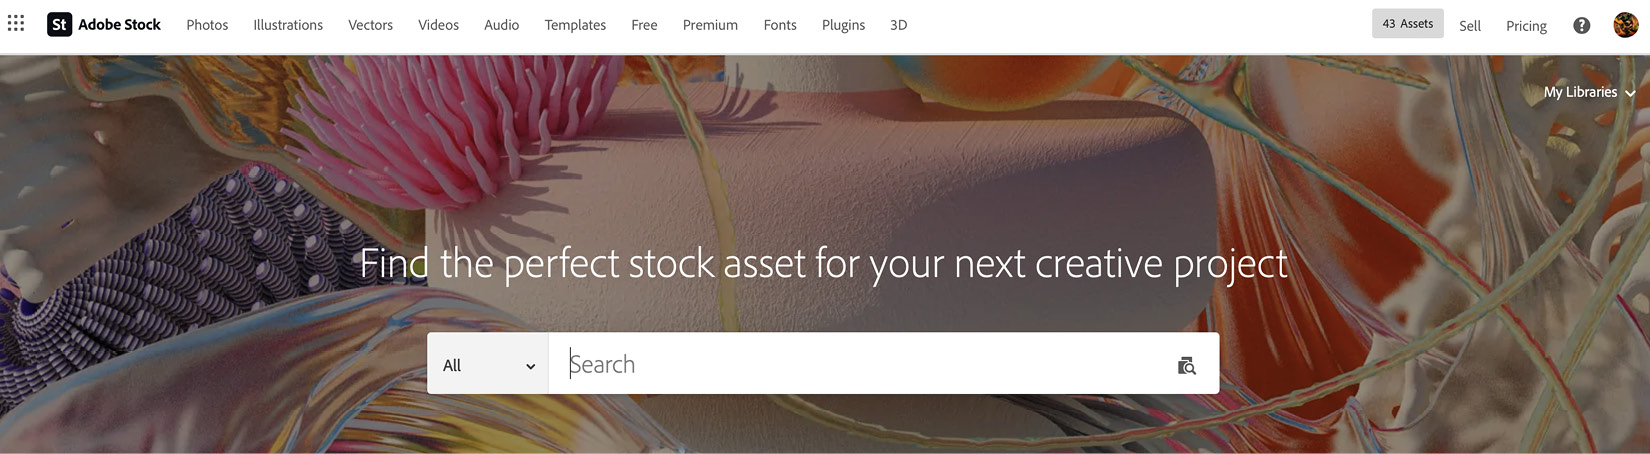
Figure 11.1 – The Adobe Stock menu displays available media types
You could also utilize the menu at the top of the website to filter the results based on the content you are looking for. After finding an item you are considering, you can download a preview or save a preview to a Creative Cloud library. This will be a lower resolution and watermarked image. If you later decide to use this file, you can then upgrade it to a paid asset.
See Figure 11.2 to view the Download Preview, Save to Library, Open in App, and License buttons:

Figure 11.2 – The Adobe Stock preview and licensing screen
You can design a composition using the downloaded sample file, and then update it if you decide to share your work or offer it to a client.
When working with vector assets, you can choose to always download them as a vector file type, a JPEG file type, or to be asked each time. As shown in Figure 11.3, my preferred setting is to always download items as a vector file type, but of course, this is only for paid assets, as preview files will always be downloaded as lower resolution JPEG files:

Figure 11.3 – Adobe Stock vector download settings
One of the greatest benefits of utilizing stock assets is the avoidance of copyright infringement. The fee is a small price to pay when your integrity is on the line. You will have peace of mind knowing that you have resourced additional assets to use with your work appropriately and legally. In addition to that, they will also raise the quality of your work by providing professional-quality items.
Adobe Fonts
Using the Adobe Fonts site (https://fonts.adobe.com), you can search for and add the perfect type to express the communication of your work. Adobe allows you access to a great collection of fonts that will help you set the tone or personality of your work.
Figure 11.4 shows the website page for Adobe Fonts, which includes a prominent search bar:

Figure 11.4 – Adobe Fonts displays available options in the submenu
The ability to have an extensive library of quality fonts is a great advantage to a creator, and Adobe now makes it available to anyone with a Creative Cloud subscription.
You can use the search bar, but I recommend narrowing your search by first selecting Browse all fonts (located directly below the bar). By doing this, you will then be taken to a web page (see Figure 11.5) that offers you a variety of filters on the left side of the page. The filters are divided into three categories – TAGS, CLASSIFICATION, and PROPERTIES:

Figure 11.5 – Adobe Fonts user interface
You can search for the right font by using the website's filters menu.
Adobe Exchange
Using the Adobe Exchange site (https://exchange.adobe.com/creativecloud), you can expand the capabilities of your software by using third-party plugins. These plugins range from time-efficient workflow tools to design enhancement and template offerings.
Figure 11.6 shows the website page for Adobe Exchange, which includes a prominent search bar. To use the search bar, I recommend narrowing your search by first selecting a filter (located on the left side of the bar). By doing this, you will then only search for your intended media type instead of seeing the results from the entire stock library:

Figure 11.6 – Adobe Exchange is divided into two categories: Extensions and App Integrations
Substance 3D
The Substance 3D Community Assets site (https://substance3d.adobe.com/community-assets) allows you to find material assets that have been shared by others. It also allows you to share your assets with others.
Figure 11.7 shows the website page for Substance 3D Community Assets, which includes a prominent search bar at the top of the page. When using the search bar, you can narrow your search by first selecting a filter (located on the left side of the page). By doing this, you will then only search for what you are looking for instead of seeing results from the entire community library:
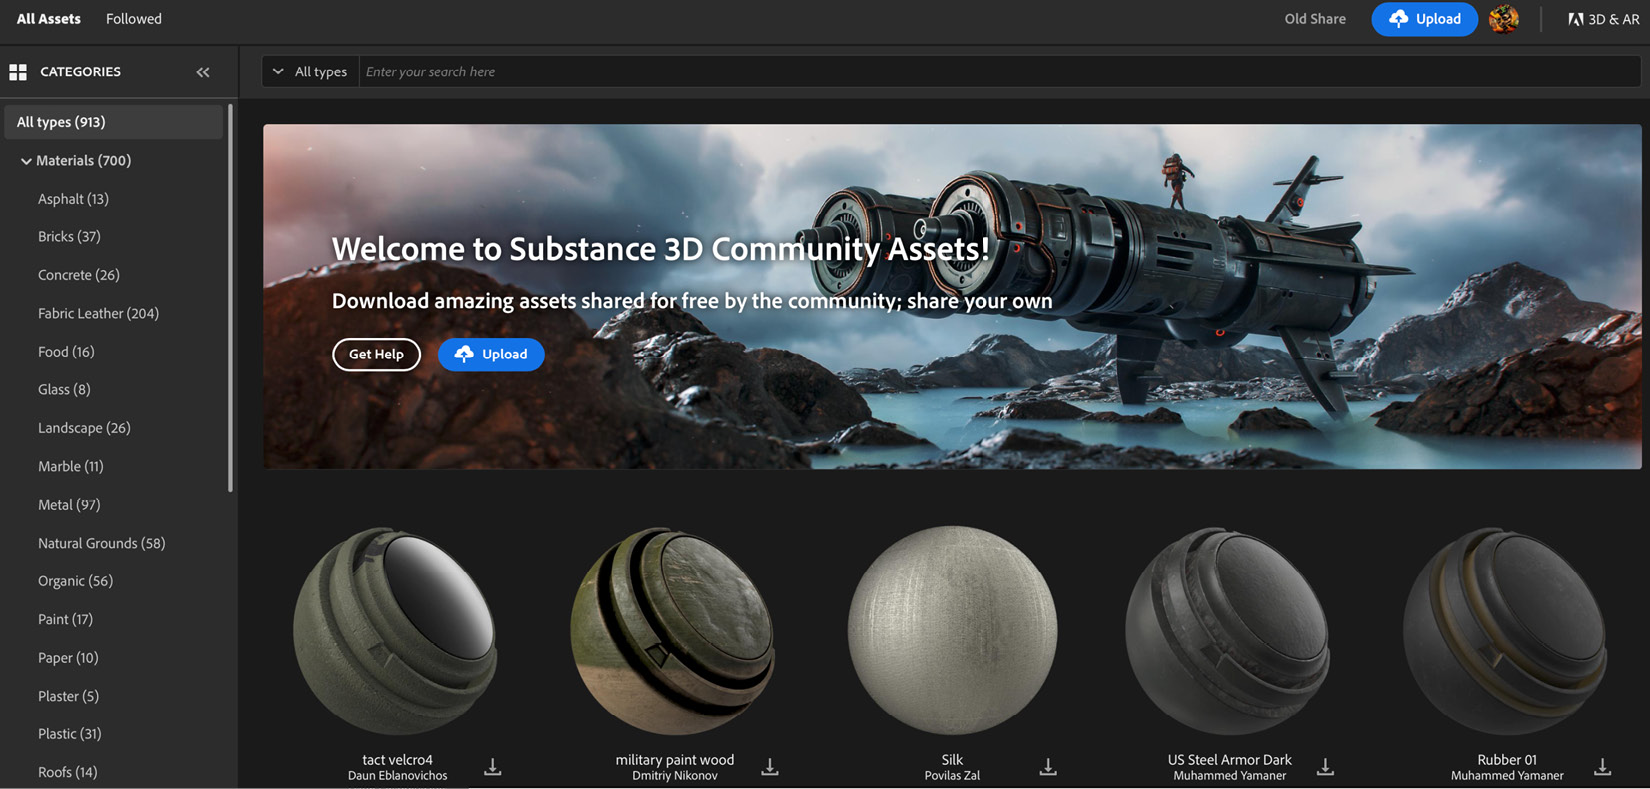
Figure 11.7 – Substance 3D interface
Creative Cloud libraries
After downloading assets from any of the previously mentioned sites, you can curate them in a Creative Cloud library (https://creativecloud.adobe.com/libraries) for easy access inside Illustrator (or any other Adobe title):

Figure 11.8 – Free curated libraries
You can also add additional files that you use to any Creative Cloud library. These additional files could include vector objects, images, type, brushes, patterns, templates, color swatches, and more.
Figure 11.9 shows the website page for curated Creative Cloud libraries:
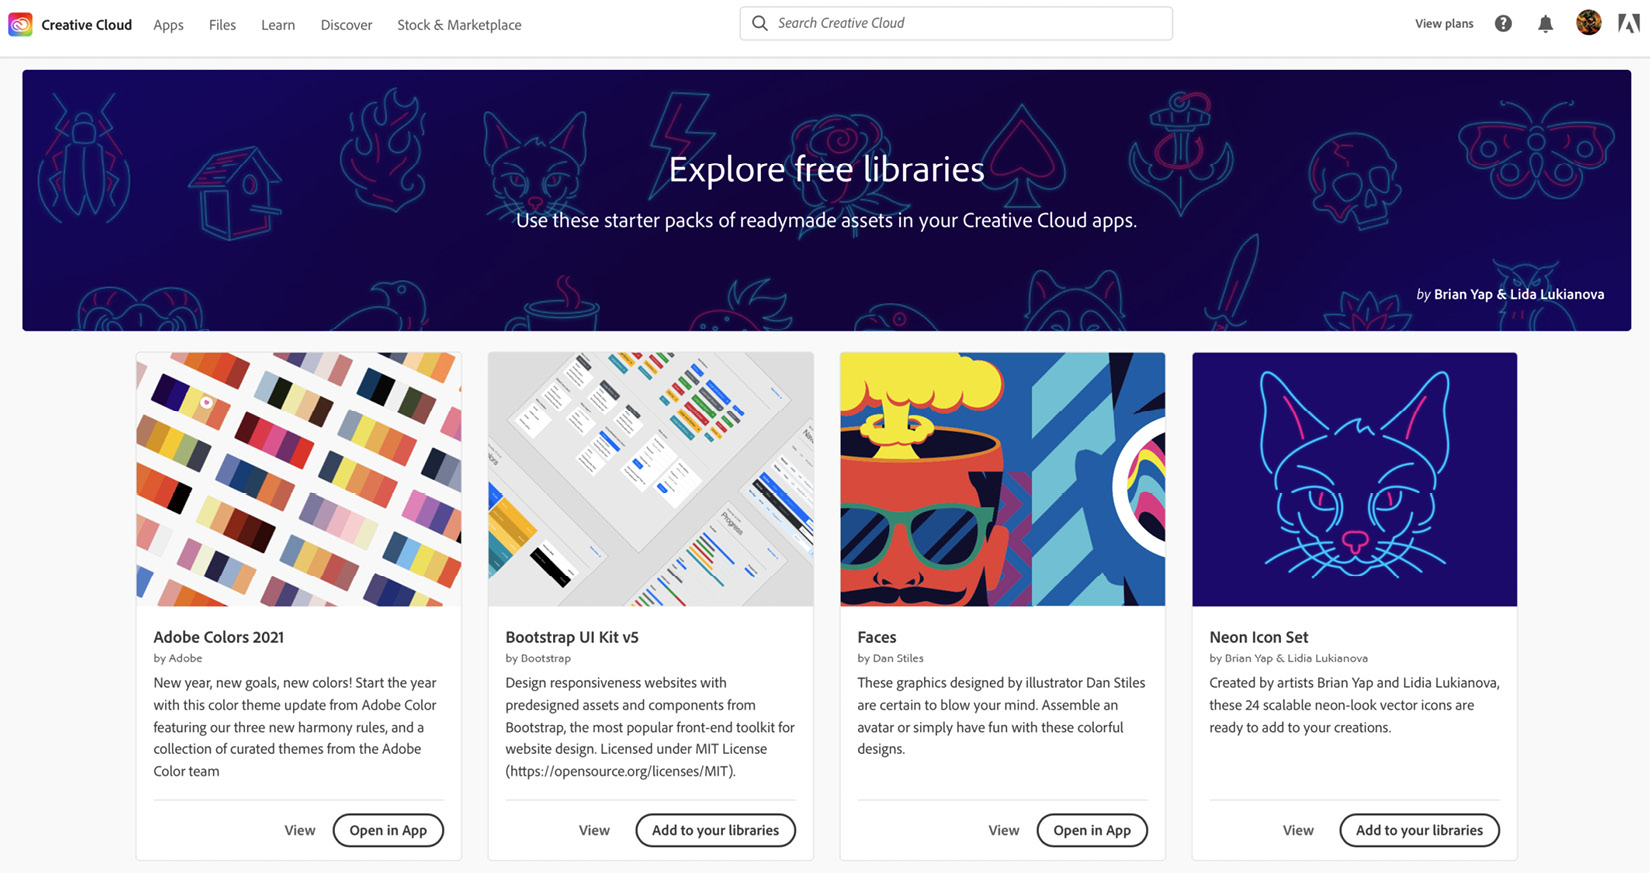
Figure 11.9 – Creative Cloud libraries
There is a huge number of resources available to you using these free shared libraries. Creative Cloud libraries also allow you to collect your own resources into a library, which can then be shared with and used by anyone who is collaborating with you on a project.
You can use the Creative Cloud app to find access to all these resources under the Stock & Marketplace tab, as shown here:

Figure 11.10 – The Stock & Marketplace section in the Creative Cloud panel
Adobe has done an excellent job of curating content that you may find useful for your workflow and hosting all of it directly in the app. This is also where you can find additional tutorials and update all your licensed Adobe software.
In this section, I have introduced you to each of these resources individually, so that I can highlight them one at a time. Figure 11.10 shows the Creative Cloud app's menu, which includes the Apps, Files, Discover, and Stock & Marketplace tabs. By selecting the Stock & Marketplace tab, you will find the links to every resource we have just gone through.
By using the benefits of the Creative Cloud Libraries, you will be able to bring in resources that you have created and saved or those you have acquired from any of the Stock & Marketplace options. This will up your efficiency game quite a bit, as you won't be wasting valuable time searching for items such as branding, type, and colors if you have prepared a project library first.
Next, we will look at even more ways to extend Illustrator's abilities and further increase your efficiency with the software.
Powerful and creative plugins from Astute Graphics
As you get more and more comfortable with the tools already offered to you within Illustrator, the inevitable need to ask even more from it will occur. It might be based on a desired look or even a specific printing requirement. Although Adobe has done an excellent job developing Illustrator through the years, there are still areas where a third-party developer can devote a great deal of time and resources to bring even more out of the software. A third-party developer has the benefit of having a more limited focus than Adobe, since Adobe is looking at how everything works within Illustrator and even how it interacts with the additional software titles offered by their company.
There are many plugins out there, but the one that I go to most often and has the most opportunities to extend the capabilities of what Illustrator can do for me is the Astute Graphics (AG) collection (https://astutegraphics.com). The collection offers 21 different plugins. Four are considered free and included with a free 7-day trial (Astute Buddy, AutoSaviour, DirectPrefs, and MirrorMe), while the other 17 are all included in a yearly subscription. In addition to the 21 plugins, the subscription will give you updates on current plugins, new plugins when they become available, texture packs, brush sets, graphic styles, and more. They also have lots of training videos and knowledgeable customer support.
Let's look at what each AG plugin does and the opportunities it offers to you for improvement. This is not intended to be an extensive list of their functions and capabilities, but rather a brief overview of each, so you can get a feel for what each one is intended for.
Variety
The apps offered by AG perform a variety of tasks, and it might help to explain each app. In the following list, with each app, the available options are listed as described directly from the AG website, with a few additional thoughts from me:
- AstuteBuddy (free): Keyboard shortcut panel – Keeping this panel open as you utilize a different AG plugin will show pertinent keyboard shortcuts for that plugin.
- Autosaviour (free): Autosave, backups, and reminders – This tool helps by autosaving at a predetermined period and shows you the last time the document was saved. It can also be set up as a reminder for you to save if that is what you prefer.
- ColliderScribe: Precise alignment and selection – This tool helps you to build relationships between shapes.
- DirectPrefs (free): Nudge distance, angles, and guides – This plugin will allow you to customize your preferences for nudge distance, common angles, and guides.
- DynamicSketch: Intuitive vector sketching – When using this tool, you will gain a more natural sketch-like feeling.
- FindReplace: Instantly locate and modify objects – This plugin allows you to search out many similar items, and then make batch replacements.
- InkFlow: Drawing and lettering in one tool – This plugin intuitively draws smooth strokes with a more natural gestural feeling.
- InkQuest: Pre-press controls and checks – This is a great plugin to prepare your work for final approval and print.
- InkScribe: Precise path creation – This plugin assists you in adjusting your vector paths more logically. Simply select the path between two anchors and bend it to the arc that you want.
- MirrorMe (free): Instant symmetry – This is a great tool for both bilateral and radial symmetrical art creation.
- Phantasm: Instant color control and halftone – With this plugin, you would swear you are in Photoshop with the ability to adjust hues, opacity, values, and more. In addition, it can also process a vast variety of halftone patterns.
- Randomino: Randomize in Illustrator – This really allows you to creatively experiment within your work, as it will give you extensive control while developing a very randomized appearance.
- Rasterino: Image crop and editing – This plugin allows you to trim transparency areas from any raster image placed within an Illustrator file. You will also be able to edit, crop, and link any raster-based file.
- Reform: Shape and manipulate – With this plugin, you can reform the path of objects by selecting the path and pulling it to a new location. This doesn't require the level of knowledge and skill that adjusting paths using the anchors and direction handles requires.
- Stipplism: Live stipple effect – This plugin adds dense random dot patterns to represent the appearance of a stipple drawing.
- Stylism: Live effects made easy – This plugin allows for several effects that can be adjusted with live previews. Items such as drop shadows, feather, blur, and inner or outer glow can be explored without a final commitment.
- SubScribe: Create accurate artwork – This plugin straightens or connects paths for greater accuracy of your work. It also locks and unlocks objects directly.
- Texturino: Textures and opacity brush – This applies raster-based texture images to any shape. Through the user interface, you can adjust scale, opacity, and blend mode.
- VectorFirstAid: Clean up vector documents – This plugin makes an inventory of your document and discovers inaccurate and unnecessary elements and then removes them with a single click.
- VectorScribe: Editing, shapes, corners, and measure – This plugin allows intelligent adjustments to your vectors. It cleverly removes extra anchors, and edits and extends paths.
- WidthScribe: Variable stroke width effects – With a pull from your mouse, you can expand or contract the width of any path.
Methods of use
The apps that you acquire through a subscription offer a wide range of capabilities. Whether your work is graphic or illustrative in nature, the AG plugins can be a huge benefit to your workflow. They can also be very helpful to the final output quality. To illustrate the point, I have shared one of AG's online lessons for creating infographics and what my results were in Figure 11.11:
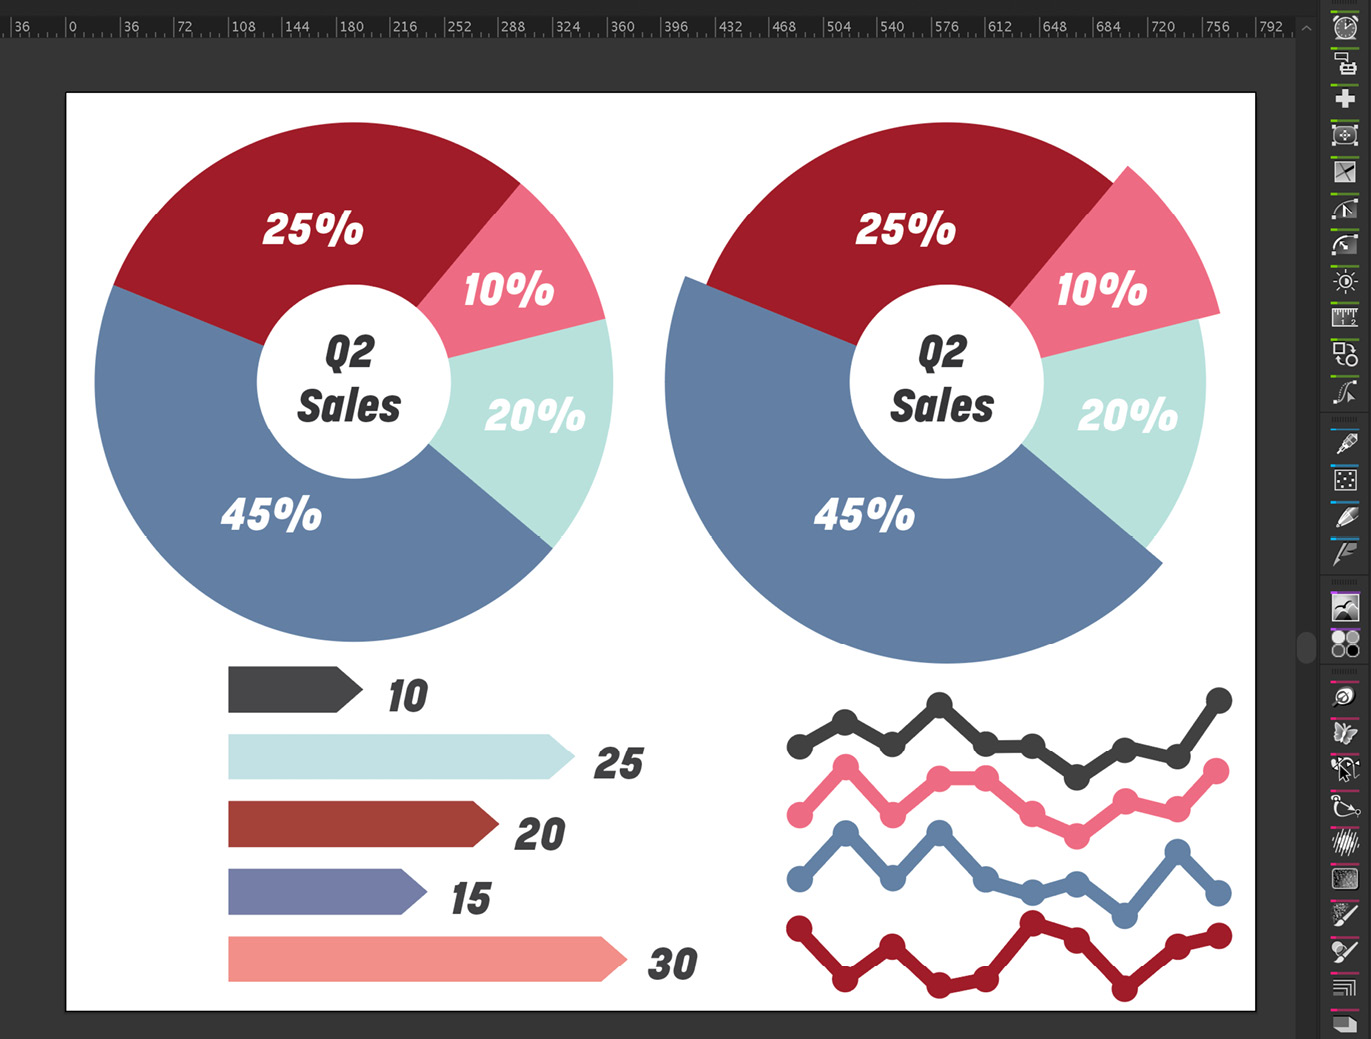
Figure 11.11 – Infographics created using the Dynamic Shapes plugin
Astute offers tutorials for each plugin they offer, as well as several quality lessons for completed projects. The AG infographics lesson that I used can be found at https://astutegraphics.com/learn/tutorial/how-to-create-infographic-elements-with-vectorscribe-in-illustrator. This lesson allows you to become better acquainted with the capabilities of the Dynamic Shapes plugin while creating completed infographic elements.
In contrast, here is an illustration I created using a variety of AG's plugins (Figure 11.12):

Figure 11.12 – Illustration created using several AG plugins
Many additional industries make use of third-party extensions to Illustrator, but graphic design, fashion design, and illustration are the three most prominent trades that make use of them.
I created the bug illustration to illustrate the use of AG plugins. The illustration benefited from the use of many AG plugins, but really highlights the benefits of the Stipplism, Texturino, and Stylism plugins.
Additional Information
I have included a link that was shared on the AG website, which highlights an extensive collection of additional third-party plugins: https://astutegraphics.com/learn/tutorial/third-party-illustrator-plugins.
To take a deeper dive into what the AG plugins are capable of, I would recommend researching a few of these artists, who make excellent use of these tools:
- Aaron Draplin: http://www.draplin.com
- Von Glitschka: https://www.glitschkastudios.com
- Dave Clayton: https://heshootshedraws.com
To reach a professional level of production within Illustrator, practice your skills and techniques as often as possible, and even extend the capabilities of Illustrator when needed to get to what you truly intended. The most important thing to remember is to be creative! Tools can help you create your concepts but being able to conceptualize something intriguing and unique is the "secret sauce" that you must bring to any creativity tool you are using.
In the next section, we are going to look at an enhancement to Illustrator that allows you to map your artwork directly onto complex prebuilt 3D models.
Cineware by Maxon for 3D objects
Maxon is the creator of Cinema 4D and has been in the 3D workspace for many years. You can find out more about them and the products they offer at https://www.maxon.net/en/. They have now partnered with TurboSquid (a stock 3D store owned by Shutterstock) to offer a plugin that will work with selected 3D models offered under the Cineware brand. These objects can work directly within Illustrator and allow a simple method for 2D artwork mapping onto an assortment of items represented by 3D models, such as packaging and apparel. You can find out more about the plugin and access a download link at https://www.maxon.net/en/cineware-illustrator. After downloading and installing the plugin, you should visit https://www.turbosquid.com/cineware/browse to find a selection of both free and paid 3D models to download and use the Cineware plugin with.
The plugin has a custom workspace that you need to set up before beginning to import any of the TurboSquid 3D templates. Go to the top menu and choose Window > Workspace > Cineware 3D. This will give you three panels that are part of the Cineware plugin package. These three panels are Scene Structure, Attributes, and Materials (see Figure 11.13):

Figure 11.13 – Cineware by Maxon interface
From the Scene Structure window, you can open the subdivision that you intend to adjust (in the case of this baseball cap, it would be the Logo Space subdivision), and then select that subdivision's material (represented by a small sphere icon). This will open the properties for the material in the Attributes panel. Inside this panel, you should find a Texture attribute that may already contain the image for that panel. You can apply your adjusted texture simply by dragging it to your selected attribute and dropping it on top of the previous instance.
Adobe has continued to add valuable 3D options and improvements to Illustrator. In the next section, we will look at how you can use the built-in offerings to create 3D objects, apply and edit materials, and render the final output.
Substance 3D in Illustrator
Through the acquisition of Substance 3D, Adobe has begun to integrate this product into the Creative Cloud subscription in interesting ways. You can now benefit from some of the free materials offered within the updated 3D user interface within Illustrator. Adobe has decided to offer the complete Substance 3D package as an additional subscription, but you can still do quite a bit with the free materials, as it gives you the ability to add your own materials or even wrap a graphic. You can also add lighting for a final touch before rendering your image.
For a thorough introduction of the latest 3D options offered in Illustrator, including the integration of Substance 3D, check out this section of the Illustrator User Guide: https://helpx.adobe.com/illustrator/using/create-3d-graphics.html?trackingid=YB1TGLWS&mv=in-product&mv2=ai.
This guide offers simple instructions divided into three steps:
- Create a vector art
- Apply 3D effects to the artwork
- Render the artwork
The first and the third steps are part of most Illustrator workflows and are quick and simple, but with 3D, we should take a moment to discuss step 2.
As you will see in the second step, Apply 3D effects to the artwork, the 3D and Materials panel (Effect > 3D and Materials) has three sections that offer options for transitioning your vector artwork to 3D. The three sections are as follows:
- Object
- Materials
- Lighting
The Object section will allow you to select which type of 3D you would like by selecting one of the 3D Type buttons at the top of the panel.
Illustrator can develop vector artwork into Plane, Extrude, Revolve, and Inflate types of 3D. In Figure 11.14, you can see that I have simulated a cork by first drawing a simple rectangular vector shape, then using the Revolve type to develop it into 3D:

Figure 11.14 – Applying Adobe Substance materials to a 3D form
Using the Materials section, I have applied the Cork Natural material offered by the free Adobe Substance Materials library that comes with Illustrator. In the third section, you can make final lighting decisions before rendering the scene out as an image file. To render the image, use the button on the top right of the 3D and Materials panel and choose your intended render results.
Adobe has been making steady improvements to the 3D panel and it has become a valuable element of the Illustrator offerings. Another area of steady development is the iPad version of Adobe Illustrator. In the next section, we will look at what you can do with this tablet version of Illustrator.
Illustrator for iPad
Adobe has been working hard at developing a natural workflow between the desktop and iPad versions of Illustrator. Using the new cloud AI format (.aic), your work can be saved to the cloud and then travel between the two Illustrator apps. At the time of writing this book, I would not recommend this for all situations, as there are still many things that the iPad version cannot do. In fact, I have found that it makes some destructive changes to files occasionally. The good news is that cloud files always have a revisions list and can be brought back to a previous state.
To get acquainted with what you can do with Illustrator for iPad, follow along as I build a quick card design that can later be opened in Illustrator on the desktop for further enhancements. Before beginning the project, it is worth noting that a quick way of learning about different tools and methods of working with them in this version of Illustrator is to explore the help icon (third from the right at the top of the GUI). This offers a very thorough library of tool hints, shortcuts, and tutorials.
As you can see in the screenshots I have included in Figure 11.15, starting a file is still similar in this version of the software, but due to the touchscreen capabilities and the Apple Pencil option, there are several iPad-specific techniques to get familiar with:

Figure 11.15 – Various menus found in the help section of Illustrator for iPad
The following activity is intended to give you something to create that will allow you to get more familiar with the iPad version of Illustrator and consider what you might want to use it for. I have found that it allows you to get an artwork started, even when you are away from your desktop (or laptop), and then you can choose to continue working on it with the desktop version. In this activity, we are creating a holiday card design that will require building objects with simple shapes, the use of text, and the use of patterns:
- To begin this design, choose Rectangle Tool and create a background shape that encompasses the entire artboard. In Figure 11.6, you will see that I created a rectangle with a violet fill. Also, note the location of the Layers panel in this figure, as we will be utilizing it often throughout this project. The Properties panel is located directly below the Layers panel, and we will also make use of that quite a bit:

Figure 11.16 – Creating a background using Rectangle Tool
We are now going to go through a few steps to develop a heart shape. Granted, there are several options for creating such a shape, but I have found this to be an interesting way to show how to make use of the tools within Illustrator and Illustrator for iPad.
- Start by creating a rectangle that is approximately twice as tall as it is wide using the Live Corners widget to maximize the corner radius of all four corners. This will result in a pill shape, as shown here:
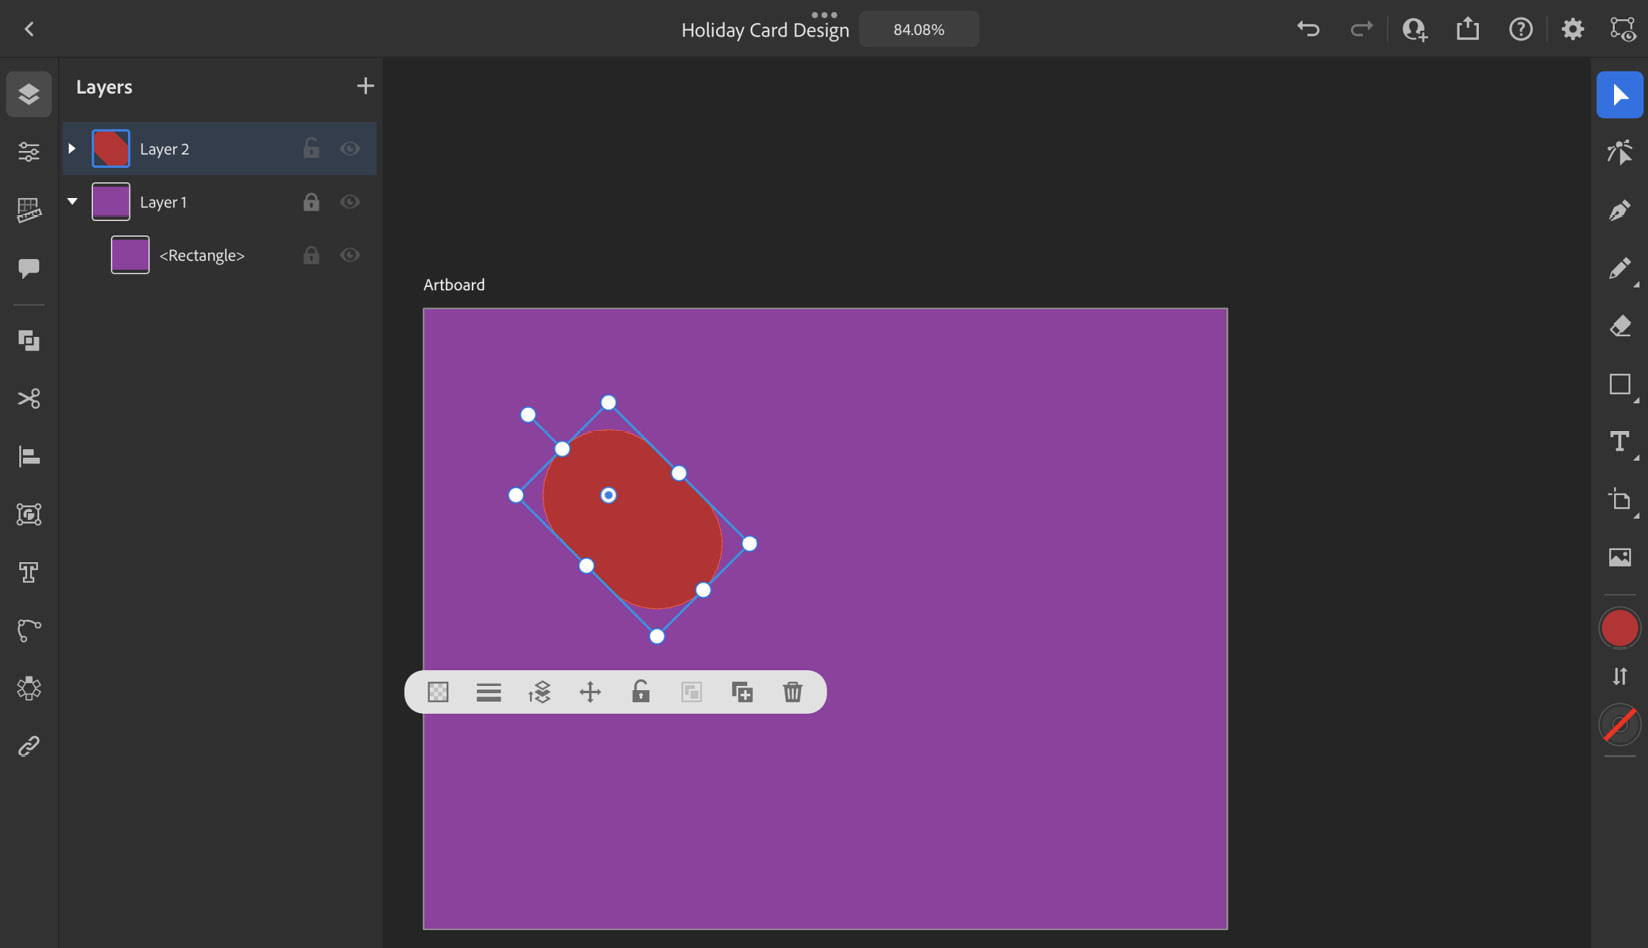
Figure 11.17 – Using the Live Corners widget to create a pill shape
Use the Rotate handle on the outside of the object's bounding box or use Properties > Transform to rotate this shape to 45˚. When using the Rotate Tool, you can also hold the center of the Touch Shortcut tool (gray circle in the lower left of the GUI in Figure 11.16) to get Illustrator to snap the rotation to 45˚. The center of the Touch Shortcut tool is known as the primary shortcut. If you were to pull the Touch Shortcut tool to the outside of the circle, a secondary shortcut would occur. In this case, the selected object would then snap to 10˚.
Now that we have a single pill shape angled to 45˚, we need to make the bottom point. Using the Direct Selection tool, we will select one of the lower anchors and then pull the Live Corners widget outward to develop a sharp corner. Next, we will need to make a duplicate using the Common Actions bar located directly below the selected object (See Figure 11.17). The icon located second from the right will create a duplicate, and you can then go to the taskbar located on the left of the GUI to select Flip > Vertical.
- We will now move the mirrored copy over to create the second top curve of the heart shape. To be sure the alignment is correct, I would suggest changing the View mode to the Outline mode, which can be found at the top-right corner of the GUI:

Figure 11.18 – Check alignment of overlapping shapes in Outline mode
- After making sure the alignment is correct, we will select both overlapping halves with the Selection tool. You can click to select the first shape, and then hold the Touch Shortcut tool while clicking on the second shape to add it to the selection. In the area to the left that we now know as the taskbar, you will find the Combine Shapes panel, which includes the Shape builder tool. We will use this tool to draw a line across the two objects. This will create a new shape resulting from their combination (see Figure 11.19). Also, note that you will want to hit Done near the top of the workspace to close the Shape builder tool:

Figure 11.19 – Resulting shape after using the Shape builder tool
- Let's again go up to the top-right corner where we can select the View mode and change it back to Preview. We are now going to start to develop an illustration of a 3D box using Rectangle Tool. Draw out a rectangle that has a similar shape to the one you can see in Figure 11.20. This will not need exact dimensions. Just remember that it is being used to cover one side of the heart shape, so make sure it overlaps one side of the heart and extends beyond the outside of the shape a little bit as well, as shown here:
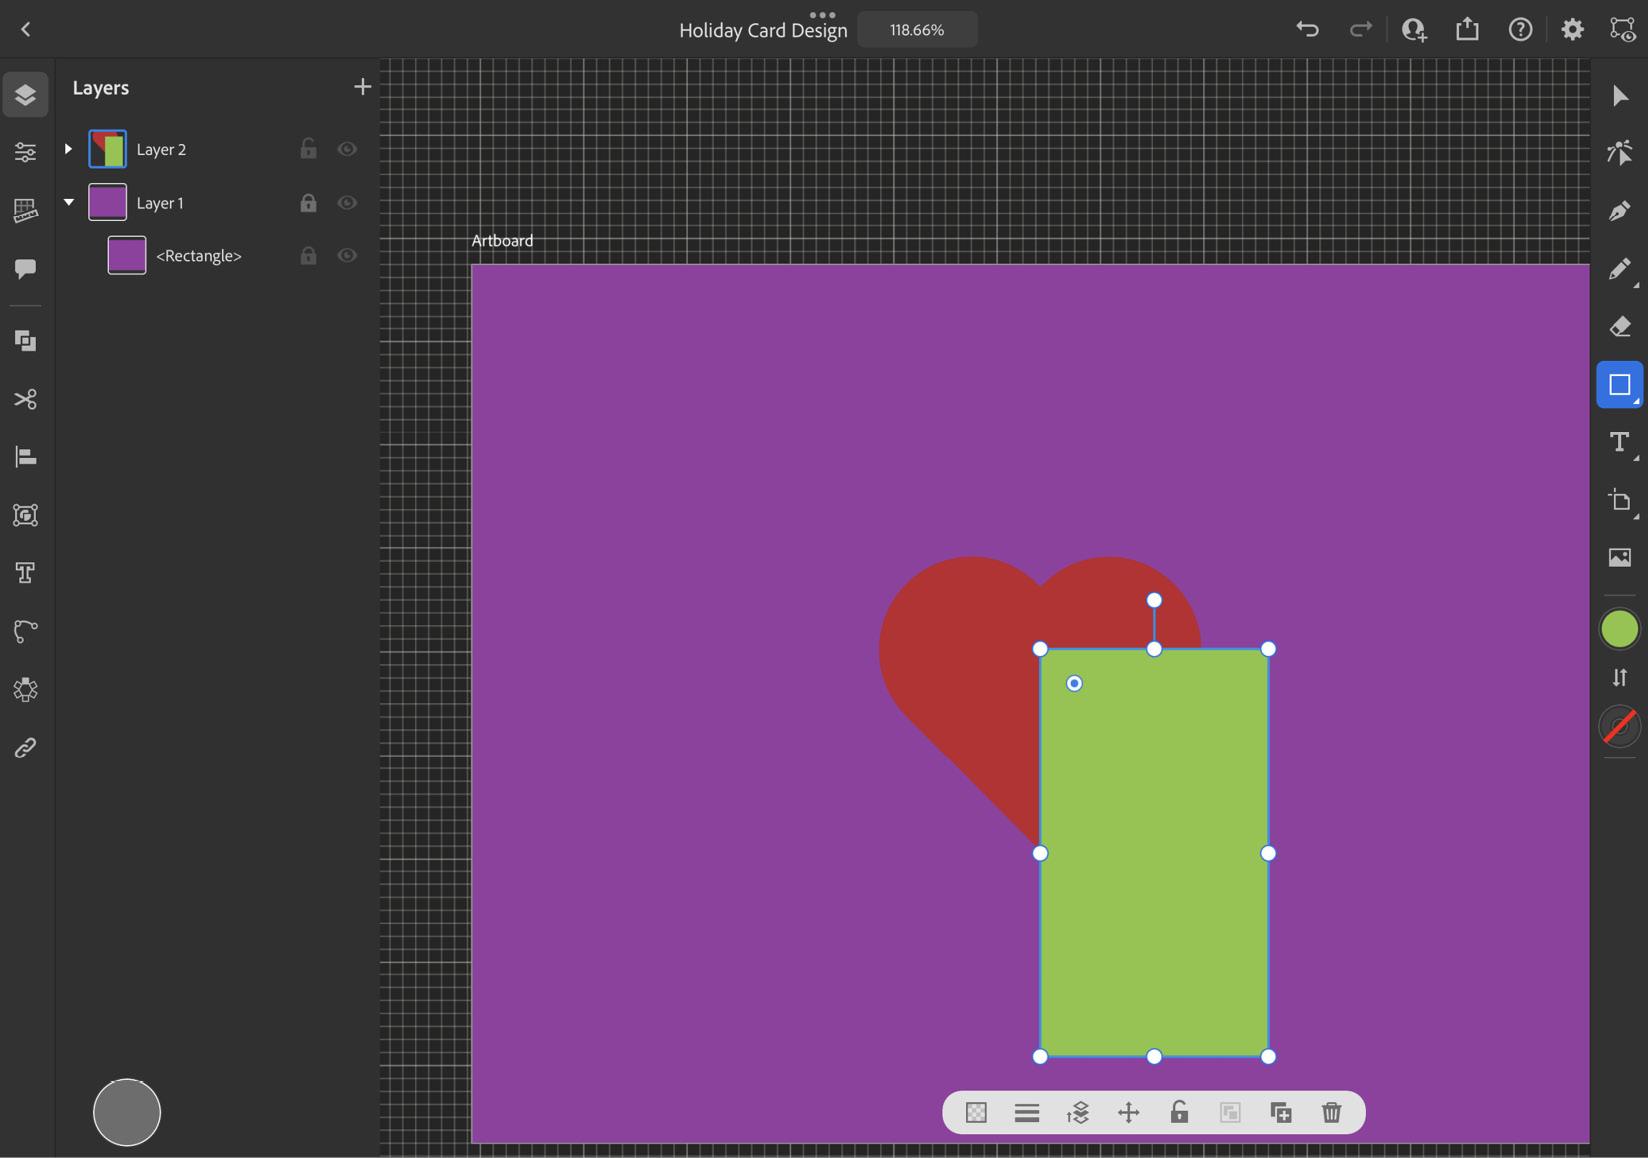
Figure 11.20 – Creating a box panel using Rectangle Tool
- Use the Direct Selection tool to select the top-right corner of the bounding box. Hold down the Touch Shortcut tool and add the bottom-right corner to your selection. Click and drag to move both anchor points upward to simulate dimension to this side of the box:

Figure 11.21 – Using the Direct Selection tool to select multiple corners
Holding the Touch Shortcut tool will allow you to constrain the movement if you would like it to only move upward, but not outward.
- Now, we will use the Selection tool to select this first side of the box and create a duplicate using the Common Actions bar located directly below the object. As was pointed out in step 2, you can duplicate a selection using the icon that is second from the right. To adjust this shape to reflect the first side, we will again go over to the taskbar on the left and choose Flip > Vertical. You may recall that this is the same method we used in creating the second side of the heart shape in step 2. To complete this step, we will need to move the flipped copy over using the Touch Shortcut tool to constrain the movement:
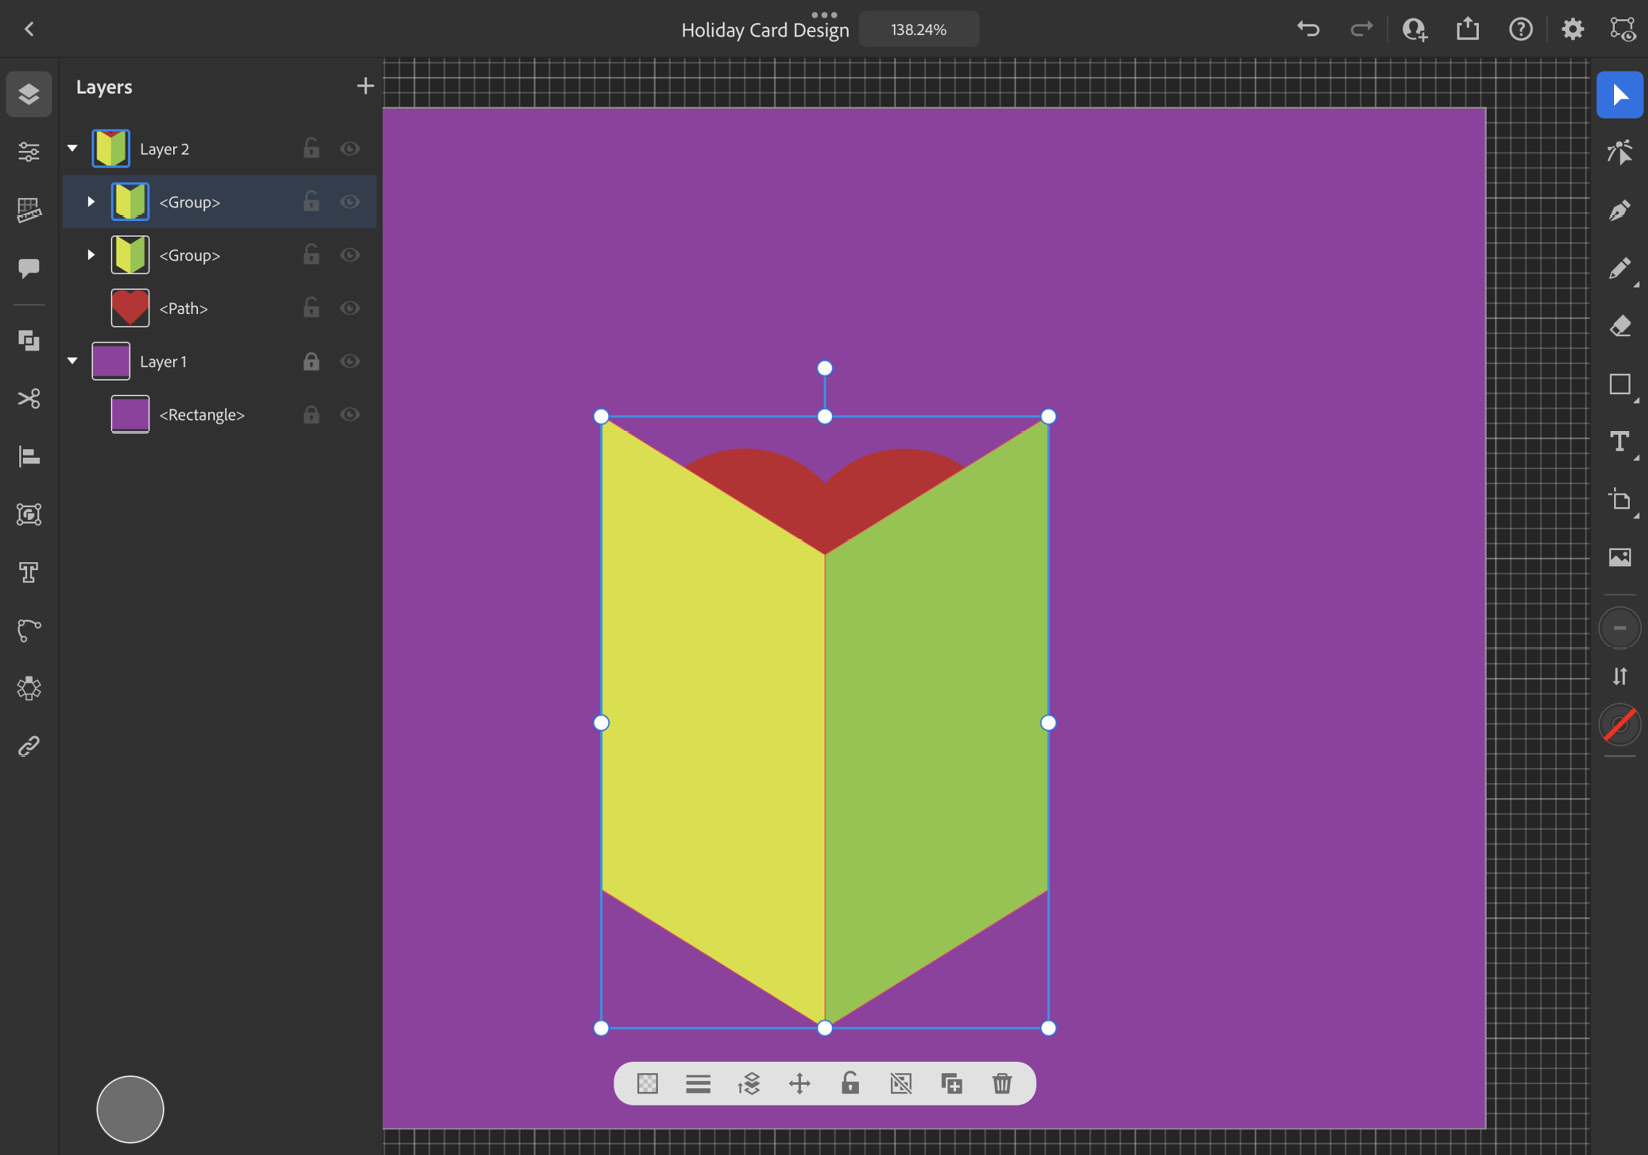
Figure 11.22 – Utilizing Duplicate and Flip to create a second box panel
Try to align the center edges so that there is neither overlap nor a gap. Adjust the color of this second side of the box so that it is a tint of the first side. This will represent the side of the box that is receiving more light.
Now that we have the front of the box created, we will be using it to create the back of the box.
- Let's first select both sides using the Selection tool. Then, open the Object panel located in the taskbar and select the Group command. With the newly created group still selected, use the Common Actions bar to create a duplicate, and then, use the Layers panel located in the top left of the GUI (or you can also use the icon that is third from the left in the Common Actions bar) to move this duplicate below the heart shape. To give this box the feeling of perspective, we need to flip this bottom group. Select the group, go to the taskbar, and select Flip > Horizontal (see Figure 12.23):

Figure 11.23 – Duplicating a group and arranging the layer order
You will need to move this group up to meet the edges of the front of the box. Hold down the Touch Shortcut tool to constrain the movement. I would recommend you lock the other objects using the lock icon in the Layers panel, as they may inadvertently get selected as you are trying to work with the back of the box grouping.
- To make this represent an open box, we will next need to customize the colors so that it appears that a single light source is illuminating it. A great technique for getting to individual items with a group is to first select the group and then double-click on the object within the group you would like to select, as shown here:

Figure 11.24 – Adjusting an object within a group after double-clicking with the Selection tool
You can then open the Fill attributes and use the eyedropper to the top right of the color wheel to select the opposing color from the front of the box. For example, if you have selected the back-right box shape, you will fill it with the same color as the front left. If you selected the back left, then you will initially fill it with the same color as the front right. I like to adjust the back left to have a slightly darker shade, as it is an inside panel so would be receiving less light. I would recommend setting the color space to be CMYK and then moving the black slider to the right by a small amount.
- Be sure to move the heart to a level that gives the appearance that it is partially in the box, and we can then consider this icon complete. Remember that you may need to unlock the layer, group, or object. In Illustrator for iPad, if you see a lock icon on the top left of a bounding box, you can click this icon to unlock the item. While you still have the heart selected, you can create a duplicate that will be used to develop a pattern for the background. After creating the duplicate, I would recommend moving it into your background layer. Then, using the Selection tool, let's select the new heart and move it off to a side of the artwork. Click and drag one of the corner anchors while holding the Touch Shortcut tool to constrain the scale as you reduce the size in preparation for making a pattern from it:
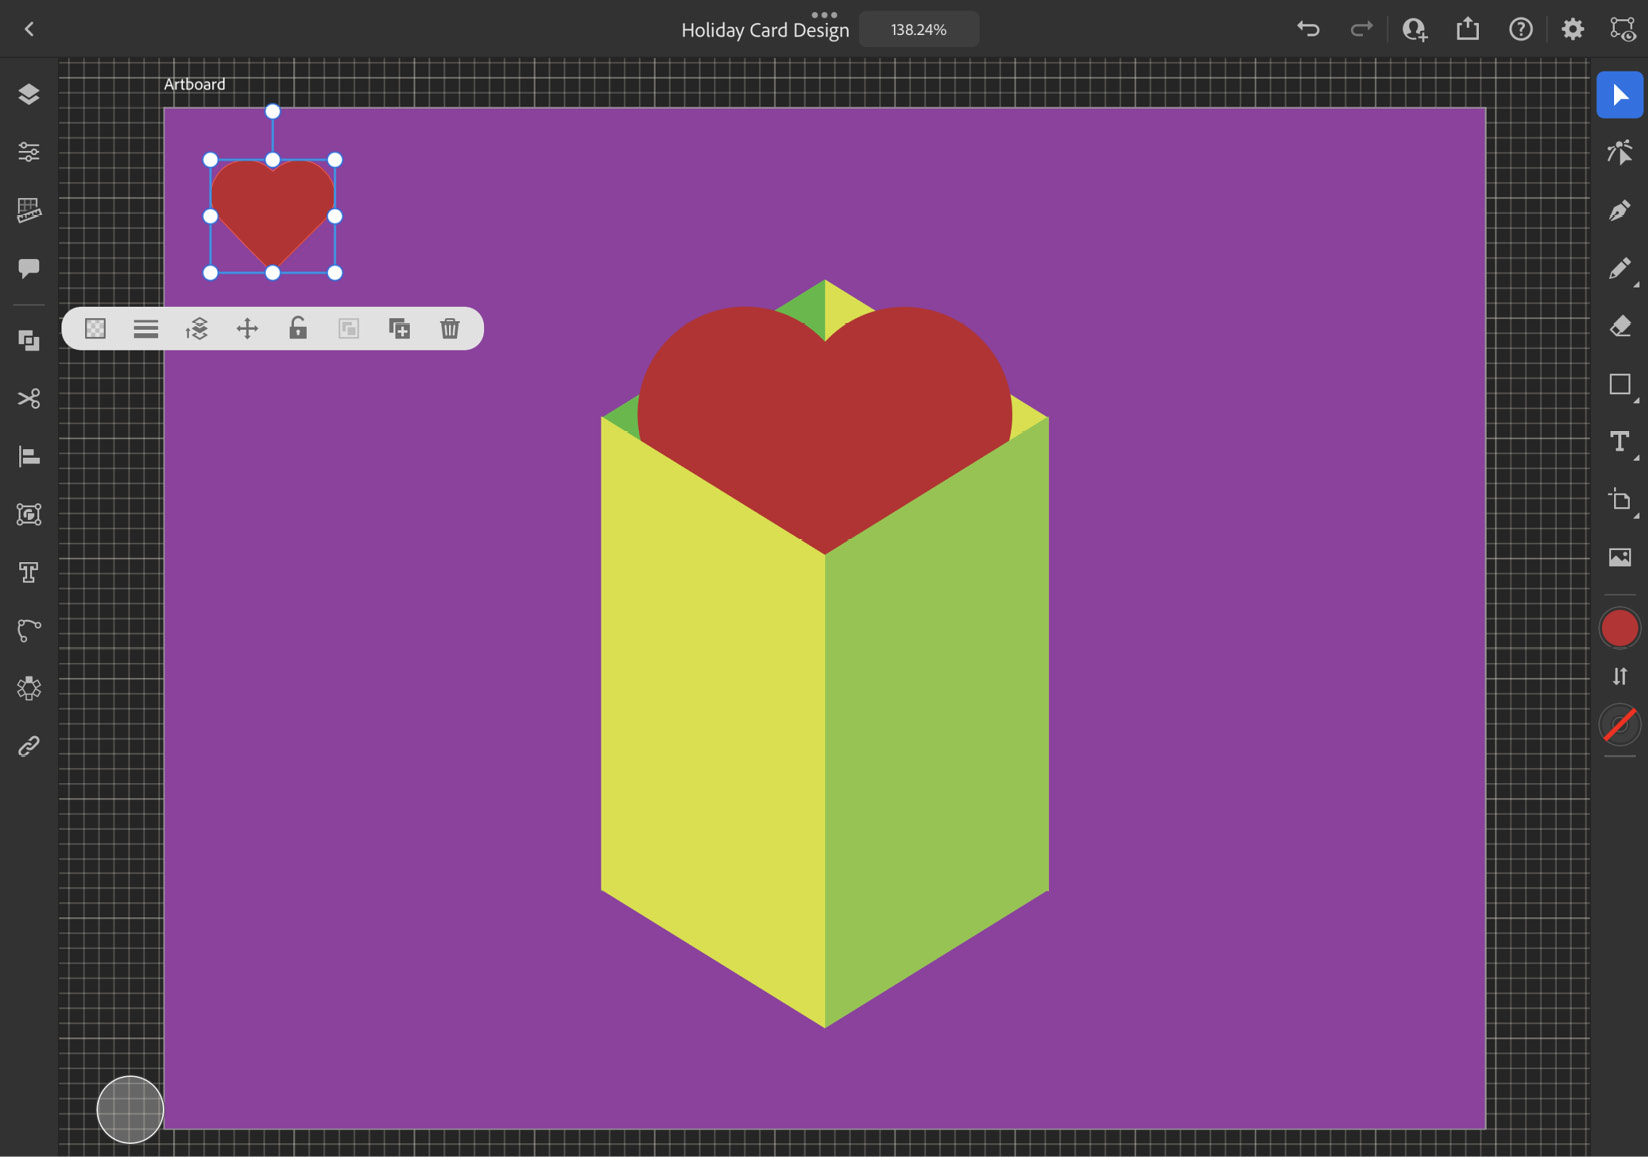
Figure 11.25 – Scaling a duplicate of the heart shape
- While the smaller heart is still selected, go to the taskbar and choose Repeat > Grid to begin creating a repeating pattern that can fill the background. Changing the bounding box size using a corner will change the size of the objects within the pattern, so make that decision before moving to the next step. Now, move the entire bounding box to the top-left corner of your work, and then drag the handles to the right and downward to add more rows and columns. This will decide the boundaries for this background pattern. To complete the customization of the grid, drag the sliders to decide on the vertical and horizontal spacing between the repeating objects:

Figure 11.26 – Developing a pattern utilizing the Repeat tool in Grid mode
- You can do further customization by utilizing the Grid Repeat properties located in the Properties panel. In this example, I used Brick by Row and Flip Column > Flip Vertical:

Figure 11.27 – Customizing the pattern using Repeat options as well as Blending Mode and Opacity
- To develop the message for this card, let's prepare to use Type on Path. Create a new layer (using the + icon in the Layers panel). In this new layer, we will use the Ellipse tool to draw out a circle that is slightly bigger than our main art but leaves space for the type that will be outside of it (look for a diagonal Smart Guide to be sure it is a perfect circle). Go to the taskbar and use the Align tool to make sure things are falling into the center of your design. You might notice that the main artwork has been grouped at this point. This will need to be done before selecting the Horizontal Align Center and Vertical Align Center buttons. After checking on the heart in a box artwork, do the same centering for the circle behind it. Now, using the Common Actions tool, create a duplicate of the circle. This extra circle will be used to assign the Type on Path text.

Figure 11.28 – Creating a circle and then aligning and duplicating in preparation for the Type on Path tool
- To create the text, we will select Type Tool and then draw out a textbox to contain the phrase we would like the card to say. Feel free to use what I have used or get creative! Use the Properties panel to choose an appropriate font and customize the text attributes, such as size and color. Select the new text and add the top circle shape, and then from the taskbar, choose Type > Type on Path:

Figure 11.29 – Applying text to a path and utilizing Type on Path options
Your text should now be wrapping around the ellipse shape but might not be located along the path the way you would like. Find the left alignment bracket (single line) and the right alignment bracket (double line) and place them at the beginning and end of the intended arc for the text. Then, under the Properties panel, choose Paragraph > Align Center to distribute it evenly between the two guides.
- As a final element, I chose to apply a secondary phrase in a textbox just below the artwork. This allows for a secondary phrase as well as giving a balance to the overall design. Again, I centered the textbox and then chose Paragraph > Align Center. Now that you have reached the end of this project, review the appearance and make any design adjustments you feel might improve the design. For example, I decided I wanted to try out some different colors and ultimately chose to recolor the large circle to coordinate more with the rest of the color palette:

Figure 11.30 – Finalizing the design with additional text and organizing layers in the Layers panel
Although the organization of layers is not required, I would highly recommend once again that you consider it for your own benefit. You are likely to use Adobe Illustrator for iPad as a method for starting your work but will usually revisit it in Illustrator on your desktop, and the naming and placement of layers will make it easier for you to jump in where you left off.
It is also going to be highly appreciated if you are sharing the document. While still in Illustrator for iPad, you can quickly export as PNG and then share the file as a composite layout (comp) for approval (see Figure 11.31):

Figure 11.31 – Design as created in Adobe Illustrator for iPad
Illustrator for iPad works well with the Apple Pencil and thus becomes a great alternative to a drawing tablet (such as a Wacom Intuos Pro tablet). Having both an Apple iPad and a drawing tablet adds additional benefits to your workflow, but either one will help you get the job done with more control than a mouse generally can.
Although both the desktop and iPad versions have some similarities, they still differ quite a bit when it comes to their features and capabilities. Storing your files in the cloud allows you to easily move back and forth between the desktop and iPad versions while keeping the files synced (see Figure 11.32):
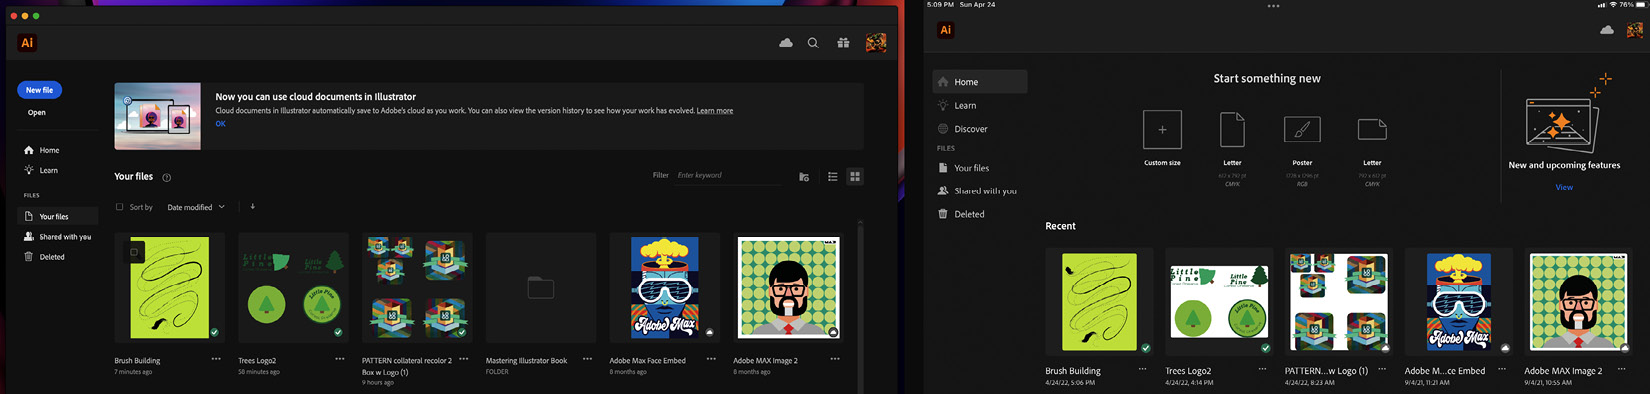
Figure 11.32 – GUIs on desktop (left) and iPad (right)
One of the best benefits of Illustrator for iPad is the ability to continue working on your vector-based artwork when a desktop or even a laptop is not convenient. You can also work offline and then update it when you once again have a connection to the internet.
Summary
The additional options for Illustrator allow you to customize important tasks that Illustrator might not have been specifically designed for or is currently capable of doing.
As I have said in previous chapters, it is not only about gaining skills but also becoming more efficient with them. The plugins and extensions I have highlighted in this chapter will save you valuable time as well as improve the quality of your work.
In this chapter, you have learned that using the Creative Cloud app will connect you to a large volume of resources. More specifically, when using the Stock & Marketplace tab, you will gain access to a variety of websites that Adobe is offering specifically to enrich your artwork through additional resources and knowledge. We have also looked at the AG line of plugins to extend the capabilities currently offered in Illustrator. We finished this chapter by exploring the use of 3D options through both the third-party plugin known as Cineware by Maxon, as well as the built-in capabilities of Illustrator and the inclusion of Substance 3D.
In the next (and final) chapter, we will try to pull together all that you have learned to this point and put it into action. We will discuss why efficiency is such a valuable asset. Most creatives understand the necessity to gain knowledge and skills (myself included) but fall short in increasing their ability to use them efficiently. We will look at methods for gaining and practicing several time-management behaviors, such as keyboard shortcuts and focusing apps.