
Chapter Four
Typography and Tables
It’s hard to say when you go from “working with text” to focusing on “typography,” where your primary concern is the appearance of the text. Some of the basic decisions you make, such as font and size, affect typography, but the real reason you use InDesign is for all its fine-tuning options. This includes text within tables, which are often ideal for presenting information. Judicious use of features discussed in this chapter can give your projects a professional edge.
In this chapter, you’ll learn how to apply special effects such as scaling type, creating drop caps, anchoring objects in text, wrapping text around objects and images, and more. In addition, you’ll look at features for creating and formatting tables that save you time and enhance your designs.
The look of type is largely dependent on the typeface you select, the style (such as bold or italic), and the size. The spacing between characters, words, lines, and paragraphs affects the design as well. But for serious impact, you might experiment with some of InDesign’s special effects, such as stroke, color, scale, and skew. (Note that two special effects are discussed in other chapters; see #19 for type on a path and #65 for drop shadows and other effects.)
When type is selected, you can apply a style to characters by clicking buttons in the Control panel’s character options: All Caps, Small Caps, Superscript, Subscript, Underline, and Strikethrough (Figure 33a). All these commands are available in the Character panel menu as well.
When text is selected with the Type tool, you can stroke, or outline, its edges and change its color. To apply a stroke to text, enter a value in the Weight field in the Stroke panel (Window menu). To change the color of text, click a color swatch in the Swatches panel (Window menu). The Fill/Stroke button on the Swatches panel and the Tools panel controls whether the color applies to the stroke or body of the characters (Figure 33b).

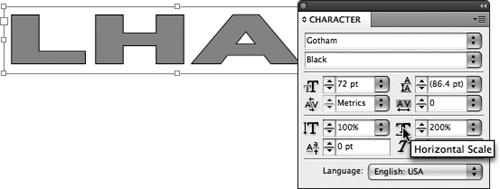
To achieve certain design effects, you might want to horizontally scale (expand) or vertically scale (condense) text. Since scaling distorts text, it is usually reserved for increasing the visual impact of display type such as headlines. Some designers, however, will scale text a tiny bit (such as 97% horizontally) for copyfitting purposes. You have two options for scaling text, numerically or visually:
• Using the Type tool, select a range of text and then enter a percent value in the Horizontal Scale or Vertical Scale field in the Character panel (Figure 33c) or in the character options in the Control panel. If you end up with overset text from scaling characters, resize the text frame.
• Using the Scale tool
![]() , drag a corner of a text frame to resize it (Figure 33d). All the text scales automatically, scaling vertically if you change the frame width and scaling horizontally if you change the frame width. As a shortcut to selecting the Scale tool, you can press Command (Mac OS) or Ctrl (Windows) while using the Selection tool to resize a text frame.
, drag a corner of a text frame to resize it (Figure 33d). All the text scales automatically, scaling vertically if you change the frame width and scaling horizontally if you change the frame width. As a shortcut to selecting the Scale tool, you can press Command (Mac OS) or Ctrl (Windows) while using the Selection tool to resize a text frame.
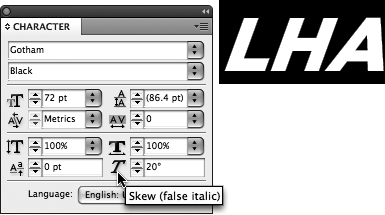
InDesign can skew, or slant, type to somewhat mimic italics. To do this, select text with the Type tool and enter a value in the Skew field in the Character panel (Figure 33e) or in the character options in the Control panel. Skew is expressed in degrees with positive values skewing text to the right and negative values skewing text to the left.
If you cannot achieve the look you want by adjusting the font, stroke, color, scale, or skew of type, you can convert the characters to a frame of the same shape. You can then add a stroke or fill color—or you can fill the frame with text or a graphic. To do this, select the text with the Type tool (you can only convert one line of text at a time) and choose Type > Create Outlines.
Tip
When you use Create Outlines, the new frame is automatically anchored in the surrounding text. To remove an anchored frame, select it with the Selection tool, choose Edit > Cut, and deselect the containing text frame. Then, choose Edit > Paste to place the unanchored frame on the page. To create an unanchored frame, press Option (Mac OS) or Alt (Windows) while you choose Type > Create Outlines.
Look at the first paragraph of a story in just about any magazine. Usually, at least the first letter is enlarged and embellished in some way to draw your eyes into the paragraph. In graphic design, this is referred to as a drop cap. In addition to the drop cap, the first few words or the first line might look different, often with all caps or small caps, although a font switch is becoming more common. InDesign refers to this as a nested style.
Although they appear to be applied to specific characters, both drop caps and nested styles are paragraph formats. The benefit of this is that you can use a paragraph style to apply both formats with a single click—and the formats are not dependent on any specific text. You can edit text and even delete the first character of a paragraph, and the drop cap style remains. The nested style formatting might be set up to change the font of the first four words, for example, or to change the font and size of all the words in the first sentence. Again, editing the text will not remove the nested style formatting.
To create a drop cap:
1. Click in a paragraph with the Type tool to select the paragraph.
2. In the Paragraph panel (Type menu) or in the paragraph options in the Control panel (Figure 34a), locate the Drop Cap Number of Lines
![]() and Drop Cap One or More Characters
and Drop Cap One or More Characters
![]() fields.
fields.
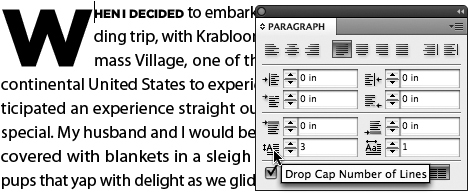
3. In the Drop Cap Number of Lines field, enter the number of lines you want the drop caps to drop into. For example, if you enter 3, the drop caps become large enough to drop down into the first three lines of the paragraph.
4. In the Drop Cap One or More Characters field, enter how many characters you want to become drop caps.
Generally, you will only see one-character drop caps, but sometimes the number is adjusted based on the context. For example, it might be modified so the entire first word of a paragraph becomes the drop cap (and therefore you have to set the value for each paragraph). Or, if you usually use one drop cap but the first character is an open quotation mark, you might adjust that paragraph to have a two-character drop cap.
Once you have created drop caps for a paragraph, you can still select those characters and apply additional character attributes. It’s pretty common to see a font or color change in a drop cap.
The Drop Caps and Nested Styles dialog box (Figure 34b) lets you create a drop cap, apply a character style to it, and apply a character style to the beginning of the paragraph—for example, to change the first sentence to all caps—all in one place. You can also apply character styles to specific lines—such as every third line—in a paragraph using line styles. To set up this formatting, first create any character styles you will need for the drop caps, nested styles, and line styles. Then click in the paragraph and choose Drop Caps and Nested Styles from the Control panel menu or Paragraph panel menu.
• Drop Caps area: Set up the drop cap in the Lines and Characters fields. To apply additional formatting to the drop caps through a character style, choose it from the Character Style menu.
• Align Left Edge check box: Certain characters, often in sans serif fonts, might appear to be out of alignment with the rest of the paragraph. If this is the case, check Align Left Edge.
• Scale for Descenders check box: In tight leading situations, some drop-cap characters may overlap text below in the paragraph. If this is the case, check Scale for Descenders.
• Nested Styles area: To specify formatting for the beginning of the paragraph, click New Nested Style. Select the character style for the text first, and then use the next three fields to specify how much text to apply it to. For example, you might apply a bold font to the first three words in a paragraph. Or, you might apply a different color up to an em space. You can create more than one nested style for a paragraph, which is helpful for formatting single-line paragraphs in a table of contents, for example.
• Line Styles area: This area works much the same as the Nested Styles area. To get started, click New Line Style. Select a character style to specify the formatting for the line. Then, specify the number of lines for that formatting. To create a pattern of formatting, such as every other line, create additional line styles.

Note that you do not have to use drop caps, nested styles, and line styles: You can specify only what you need.
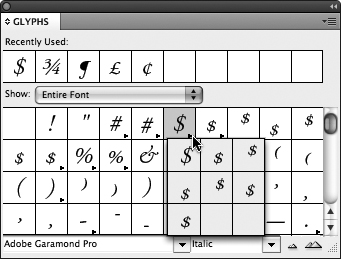
Many of the special typographic features within fonts—from bullets and em dashes to fractions and ligatures—cannot be found on the keyboard. InDesign provides quick access to common special characters through the Insert Special Character submenu in the Type menu. To see all the characters in a font, use the Glyphs panel. (A glyph is a form of a character; for example, some fonts include several different versions of an ampersand. The smallest unit of a font is actually a glyph, not a character.) If you frequently access the same glyphs, you can save them as glyph sets.
From the Insert Special Character submenus (Type menu), you can insert commonly used characters. For example, the Symbols submenu lets you insert a Bullet •, Copyright Symbol ©, Ellipsis ..., Paragraph Symbol ¶, or Registered Trademark Symbol ®; the Hyphens and Dashes submenu lets you insert an Em Dash—or En Dash –. The character is inserted at the text insertion point and formatted with the active font. If you end up inserting these characters often, you might want to learn and remember their standard keyboard shortcuts or create your own (see #3).
To access every variation of every character within a font, choose Type > Glyphs to open the Glyphs panel (Figure 35). To insert a glyph at the text insertion point, scroll through the panel to locate the glyph and then double-click. The glyph is inserted and formatted according to the surrounding character formats. The Glyphs panel provides access to all the fonts currently active on your system and offers the following controls:
• Recently Used: The most recent glyphs you access are listed across the top of the Glyphs panel for quick insertion.
• Show menu: You can limit the glyphs shown in the panel by choosing an option from the Show menu such as Alternates for Selection or Standard Ligatures. The options vary according to what is built into the font, with OpenType fonts generally offering the most options.
• Font menu: By default, the Glyphs panel displays the font in use at the text insertion point. You can select a different font from the menu in the lower-left corner of the panel. The menu next to it lets you choose a variation of the font such as Bold or Italic.
• Scale buttons: Click the scale buttons
![]() in the lower-right corner of the panel to increase or decrease the size of the glyphs shown. This makes it easy to find the right glyph but does not affect the size of the character you insert.
in the lower-right corner of the panel to increase or decrease the size of the glyphs shown. This makes it easy to find the right glyph but does not affect the size of the character you insert.
• Alternates indicator: Some glyphs have alternates, or different visual forms, from which you can choose. If you see an arrow in the lower-right corner of a glyph’s field, click it to view and select alternates.
If you use certain glyphs frequently—for example, if you’re working on a cookbook and need to access various fractions—you can save them as a glyph set for quick access. Glyph sets are saved with your copy of InDesign. To create a glyph set:
1. Choose New Glyph Set from the Glyphs panel menu. Name the set and click OK.
2. To add glyphs to the set, select a glyph in the Glyphs panel, and then choose Add to Glyph Set from the panel menu. If you have more than one glyph set, select the appropriate set from the submenu.
3. To view glyphs in the set, choose the set from the Show menu at the top of the Glyphs panel. You can also choose View Glyph Set from the panel menu and select the set you want to display.
As with other glyphs, you can insert a glyph from a set by double-clicking it.
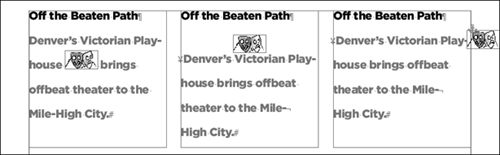
If you have pictures or other graphic elements that need to flow with related text, you can anchor the objects in the text. This prevents you from having to manually reposition objects such as charts, sidebars, or graphics every time text reflows. Any type of object or group can be anchored in text, including text frames, picture frames, paths, and tables. When you anchor objects, you can position them inline with text, above text, or in a custom position such as out in the margin (Figure 36a). You have precise control over each object’s position, including the ability to fine-tune placement with the mouse.
Figure 36a Anchored objects flow with text. At left, an Inline object is positioned at the baseline of text at the text insertion point. In the center, an Above Line object is positioned above the line containing the text insertion point. At right, an object with Custom positioning is placed outside the text frame, relative to the spine, margins, and more.
You have two choices for anchoring objects: You can anchor existing objects or you can anchor placeholder objects. To anchor an existing object in text:
1. Select any object or group using one of the selection tools.
2. Choose Edit > Cut or Edit > Copy.
3. Select the Type tool and click in text to position the insertion point where you want the anchored object.
4. Choose Edit > Paste.
By default, the object is anchored Inline, but you can reposition it using the Anchored Object Options dialog box. If the object is larger than surrounding text, it may overlap the text; in that case, you may need to adjust the leading or insert line breaks.
If you haven’t created the object that will be anchored—or if its content is not ready—you can create a rectangular placeholder and anchor it in text. To do this:
1. Select the Type tool and click in text to position the text insertion point.
2. Choose Object > Anchored Object > Insert.
3. In the Object Options area at the top of the Insert Anchored Object dialog box, specify the Content for the object (such as Text or Graphic).
4. Select an Object Style to specify the object’s formatting (if you’ve created any object styles).
5. Select a Paragraph Style for the text it will contain (if the object is a text frame).
6. Enter a Height and Width for the object.
You can also specify the position of the anchored object, as discussed in the next section.
To change the positioning of an anchored object, click it using a selection tool and choose Object > Anchored Object > Options. The controls in the Anchored Object Options dialog box are the same as those for positioning in the Insert Anchored Object dialog box. Choose an option from the Position menu at the top:
• Inline or Above Line: Select this option if you want to anchor the object inline with the text or above a line of text.
• Custom: Select this option if you want to anchor the object in a different position, such as outside the text frame.
If you choose Inline or Above Line from the Position menu, the Anchored Object Options dialog box (Figure 36b) lets you specify which type of anchoring you want and then further fine-tune the positioning.
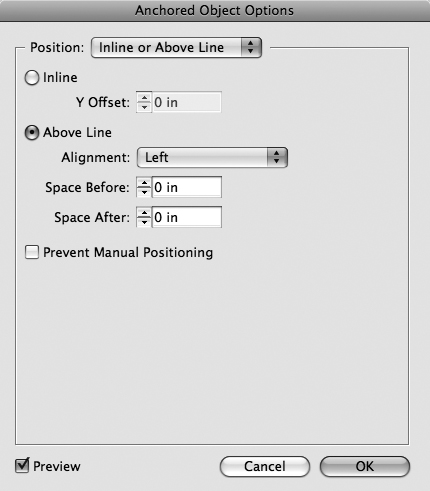
• Inline: To position the object inline with text, click Inline. Enter a value in the Y Offset field to move the object up or down from the baseline of the text.
• Above Line: To position the object above the line containing the text insertion point, click Above Line. Choose an option from the Alignment menu to specify how the object is positioned within the text frame: Left, Center, Right, Towards Spine, Away from Spine, or Text Alignment (which matches the alignment of the paragraph). Enter values in the Space Before and Space After fields to control the amount of space above and below the anchored object.
If you choose Custom from the Position menu, the Anchored Object Options dialog box (Figure 36c) lets you specify precisely where the object should be placed.
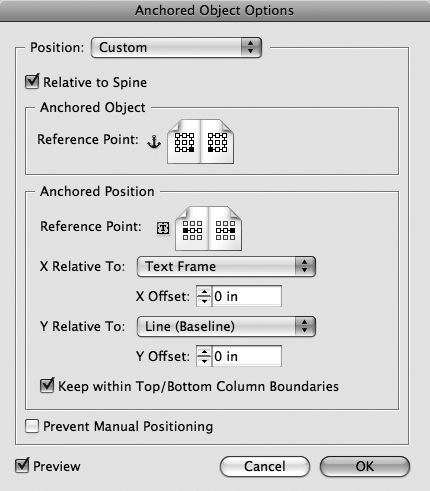
• Relative to Spine: Check this option if you want the object’s placement to be different for right-facing and left-facing pages. For example, if a book has a wide outer margin, you might place anchored objects in the margin. When text reflows from left to right pages, you’ll want the anchored objects positioned accordingly.
• Anchored Object Reference Point: This option specifies what part of the anchored object should align with the page, text frame, or margins (as specified in the Anchored Object Position area below). For example, if the lower-right corner of the object should align with the text frame, click a box on the lower-right corner.
• Anchored Position: In this area, the X Relative To menu and X Offset field control the horizontal placement of the anchored object. The Y Relative To menu and Y Offset field control the vertical placement of the anchored object. The reference points available vary according to the selections you make in the X Relative To and Y Relative To fields, but essentially the Reference Point you click indicates the location on the page with which the object should align.
The interplay of these settings is fairly complex, so be sure to check the Preview box so you can see any changes you make as you make them.
If you no longer want an object anchored, select it with a selection tool, and then choose Object > Anchored Object > Release. (The Release command is available only for anchored objects with Custom alignment.) To unanchor an object that you anchored, select it with the Selection tool, choose Edit > Cut, and deselect the containing text frame. Then, choose Edit > Paste to place the unanchored object on the page.
The interplay of text and images in a layout contributes significantly to the overall message. You achieve a lot of this interplay by wrapping text around objects such as text frames or lines or around contours within a graphic such as a clipping path or an alpha channel. You specify text wrap for the object that the text will wrap around. For example, if text will wrap around a picture frame, you specify text wrap for the picture frame. The object that text wraps around is called the wrap object (Figure 37a).
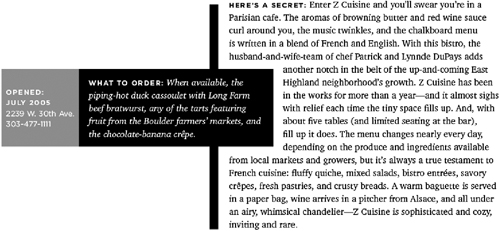
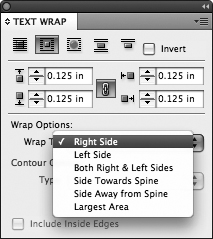
To wrap text around an object, select the wrap object with one of the selection tools. Choose Window > Text Wrap to open the Text Wrap panel (Figure 37b). To add Wrap Options and Contour Options to the Text Wrap panel, choose Show Options from the panel menu.
• Wrap shape buttons: Click one of the first three buttons to indicate the shape of the text wrap—No Text Wrap
![]() , Wrap Around Bounding Box
, Wrap Around Bounding Box
![]() , or Wrap Around Object Shape
, or Wrap Around Object Shape
![]() . None places the object on top of text or flows text over the object. Bounding Box wraps text around the rectangular bounding box of the object, and Object Shape wraps text around the contours of the object within the box.
. None places the object on top of text or flows text over the object. Bounding Box wraps text around the rectangular bounding box of the object, and Object Shape wraps text around the contours of the object within the box.
• Jump Object: If you don’t want text on either side of the object (only above or below it), click the Jump Object button
![]() .
.
• Jump to Next Column: If you want text below the object to flow to the next column rather than under the object, click the Jump to Next Column button
![]() .
.
• Offset fields: Enter values in the fields to specify the amount of space between the wrap object and the text.
• Wrap Options: If you click Wrap Around Bounding Box or Wrap Around Object Shape, the Wrap To menu lets you specify where the text wraps. By default, text wraps to the left and right of the object. You can choose from Right Side, Left Side, Both Right & Left Sides, Side Towards Spine, Side Away from Spine, and Largest Area.
• Contour Options: If you want to wrap text around contours within a graphic, click the Object Shape wrap button. From the Type menu, select any alpha channel or Photoshop path saved with the graphic file. If you’ve selected a clipping path for the graphic in the Clipping Path dialog box (Object menu), you can wrap text around it by choosing Same as Clipping. For a graphic with a lot of contrast between the foreground and background, you can use the Detect Edges option to create a text wrap contour.
• Include Inside Edges: If you’re wrapping text around an image contour, you can flow text into any holes in the contour. For example, if you have a picture of a doughnut, you can flow text around the edges and into the white space in the center. To do this, check Include Inside Edges in the Contour Options area. (If the check box is not available, the selected contour has no holes.)
Once you have a text wrap specified, you can edit the contour using the Pen tool or the Direct Selection tool.
In typography, there is a difference between text that is numerically aligned and text that is optically aligned. When text is left aligned or right aligned, the aligned edges still look ragged sometimes due to the shape of the characters. For example, punctuation such as quotation marks, commas, and em dashes often cause this problem as do some letters such as “W” and “A.” To fix this, InDesign provides optical margin alignment—also known as hanging punctuation—which “hangs” the edges of offending characters slightly outside the margins to produce a smoother looking edge (Figure 38a). This is a special effect that you will generally use sparingly for text such as pull quotes; it is not generally used for body text.

Optical margin alignment is an attribute of a story—which consists of all the text in a series of threaded text frames—so you cannot apply it to selected paragraphs. However, you can select paragraphs and specify that they ignore optical margin alignment.
To apply optical margin alignment to a text frame:
1. Select a text frame with the Type tool or either selection tool.
2. Choose Type > Story.
3. Check Optical Margin Alignment in the Story panel (Figure 38b).
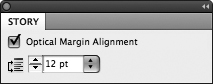
4. Specify how much the text should hang outside the margins by entering a point size in the field. (In general, select the point size of the text itself.)
If you have headlines and body text in the same text frame, you might want to set optical margin alignment for the text frame so the headline appears properly aligned. You can then specify that the body paragraphs ignore the optical margin alignment setting. To do this, select the paragraphs with the Type tool and choose Ignore Optical Margin from the Paragraph panel menu (Type menu).
In most workflows, data that will be presented in a table—whether it’s financial data for an annual report or a price list for a catalog—is born in another program. It might be extracted from an accounting system and stored in a Microsoft Excel spreadsheet, or it might be a table a writer produced in Microsoft Word. Either way, InDesign makes it easy to handle tables created elsewhere: You import them like you import other text files. See #20 for more information about importing text.
Note
In InDesign, tables are always anchored in a text frame and always flow with surrounding text. For more information about anchored objects, see #36.
To import tables from Word or Excel:
1. Choose File > Place.
2. In the Place dialog box, navigate to and select the Word (.doc) or Excel (.xls) file.
3. Check Show Import Options.
4. Click Open. The Microsoft Word Import Options dialog box or the Microsoft Excel Import Options dialog box opens.
5. For Word files, make sure Preserve Formatting from Text and Tables is selected in the Formatting area in the Microsoft Word Import Options dialog box. For Excel files, make sure Formatted Table is selected from the Table menu in the Formatting area (Figure 39).
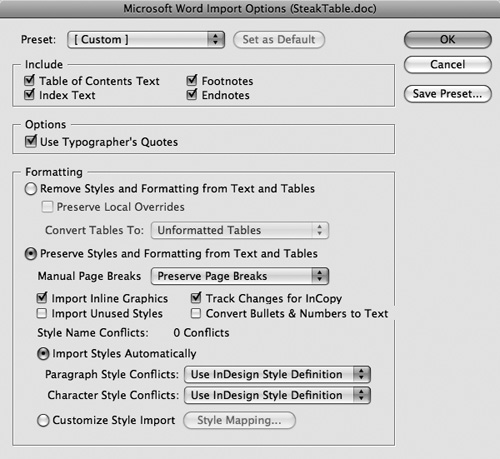
6. Click OK.
7. Since the table is treated like text, the table is either imported at the text insertion point or the cursor is loaded and you click in an existing text frame or create a new one.
When you import tables, spreadsheets, and text files, you have the option to link to the original file. If any changes occur in the original file, you can update the link in InDesign (using the Links panel) and the table or text is automatically updated. This is similar to updating the link to a graphic file, which InDesign maintains automatically. If you want to do this, check Create Links When Placing Text and Spreadsheet Files in the Type pane in the Preferences dialog box before you import the table. Then check the Links panel to see if a table needs to be updated. See #58 for more information about managing links.
Linking to tables sounds great, right? How many times do writers and accountants make changes after you have formatted their text and tables? But linking is really not as great as it seems, because if you update the link between InDesign and the original file, any formatting you applied in InDesign is lost. And why would you be using InDesign if not to make the table look better? Use this feature only if you’re not planning to make formatting changes to the tables in InDesign.
If you need to build a table in InDesign from scratch, you can easily create one with the number of rows and columns you need. In addition, you can add header rows for labeling the table and footer rows for details and such. Since tables are always anchored in text, you need to click in a text frame to create a table. The table will automatically match the current column width, so if you need to create a text frame to contain a table, make it approximately the width you want for the table. (See #36 for more information about anchored objects.)
To create a table:
1. Select the Type tool.
2. Click in a text frame to position the text insertion point wherever you want the table.
3. Choose Table > Insert Table.
4. In the Insert Table dialog box (Figure 40a), enter the number of horizontal rows you need for basic table data in the Body Rows field.
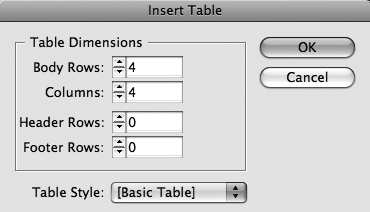
5. Enter the number of vertical columns you need in the Columns field.
6. If you need header rows for the table (to contain a table head and column heads, for example), enter the number of rows in the Header Rows field.
7. If you need footer rows for the table (to contain a citation, for example), enter the number of rows in the Footer Rows field. The advantage to creating official Header Rows and Footer Rows is that they automatically repeat if the table splits across columns or pages.
8. If you have created any table styles, you can choose one from the Table Style menu. See #44 for more information.
9. Click OK to create the table.
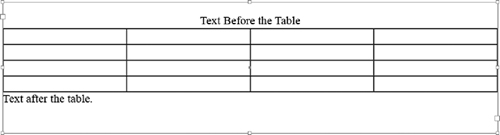
The table is anchored in text at the text insertion point. The height of the rows is based on the formatting of the text insertion point, whereas the width of the columns is calculated according to the width of the text frame and the number of columns specified (Figure 40b).
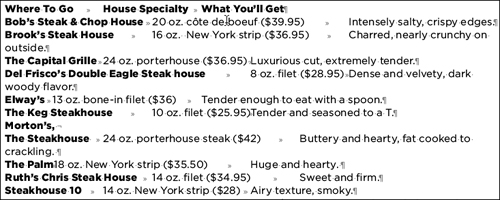
The text that needs to go in a table often already exists, usually in a tab-delimited format (meaning that the cells of information for the table are separated by tabs and paragraph returns). You do not need to retype this text into a new table; you can easily convert it into a table. To do this:
1. If necessary, import the text into a text frame.
2. Choose Type > Show Hidden Characters to determine how the text is currently separated (Figure 41a). Usually, you will see tabs between “columns” of information and paragraph returns between “rows” of information. Check that all the columns have the same number of tabs between them; it doesn’t matter if the tabs don’t line up and the text looks messy. All that matters is consistency in the separation characters used.
3. Select the Type tool and select the text to convert to a table.
4. Choose Table > Convert Text to Table.
5. In the Convert Text to Table dialog box (Figure 41b), confirm the selections for the Column Separator and Row Separator. If necessary, you can change the separators by choosing Tab, Comma, or Paragraph from the menus or by entering a different separation character (such as a semicolon) in the fields.

6. If you choose the same separation character for columns and rows, you can clarify how many columns you need by entering a value in the Number of Columns field. Otherwise, this field is unavailable.
7. If you have created any table styles, you can choose one from the Table Style menu. See #44 for more information.
8. Click OK to create the table.
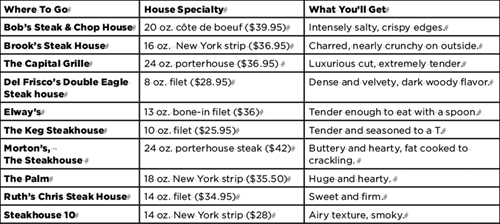
You may need to manually adjust the column widths (Figure 41c), and you can add header and footer rows as necessary.
Tables consist of individual cells, which function like miniature text frames. You can enter text in individual cells, or you can anchor graphics in them. The one thing you cannot do is flow text through table cells as if they were threaded. If text already exists that you’d like to flow through a table, you’re better off converting it to a table (see #41).
To add text to a table cell, click in the cell with the Type tool. You can then type in that cell, paste text into the cell (Edit > Paste), or import text into the cell (File > Place). To navigate between cells, press the Tab key to jump to the next cell and press Shift+Tab to jump to the previous cell. Row height will adjust automatically to accommodate the amount of text you type in the cell.
Since table cells function like small text frames, to place graphics in them you anchor the graphic in text. With tables, it’s easiest to size the graphic appropriately first, before you anchor it. That way, you can ensure the graphic will fit in the cell. To anchor a graphic in text, select it with the Selection tool and choose Edit > Cut or Edit > Copy. Select the Type tool, click in a cell where you want the graphic, and choose Edit > Paste (Figure 42). You can also click in a cell and choose Object > Anchored Object > Insert to anchor a placeholder for a graphic.

With the table formatting options, you can create eye-catching, easy-to-read tables by automatically applying strokes and fills to alternating rows or columns of information, specifying different strokes and fills for individual cells, applying a border to the entire table, and much more. To access the formatting controls, you need to select all or parts of a table with the Type tool. All the formatting commands are available in the Table menu and the Table panel menu (Window > Type & Tables > Table). When cells are selected, frequently used table-formatting options are available in the Control panel as well.
To format an entire table as opposed to individual cells, click anywhere in the table with the Type tool. Then choose Table > Table Options > Table Setup. The Table Setup tab (Figure 43a) lets you change the number of rows and columns, add a table border, and specify the amount of space before and after the table.
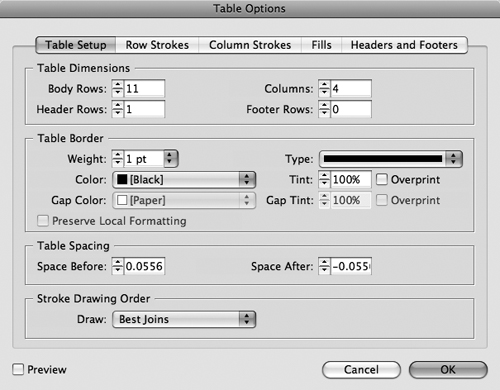
In the Table Options dialog box, the Row Strokes, Column Strokes, and Fills tabs (Figure 43b) let you apply a pattern of strokes and/or fills such as applying a fill to every third column. You can also apply a table style to a selected table (see #44). For information about the Headers and Footers tab, see #45.

To format cells, you first need to make a selection—a single cell, multiple adjacent cells, or the entire table. You can then specify how the text is positioned within the cell, specify strokes and fills for the cell, and even select cells with a pattern of diagonal lines. To make a selection, use the Type tool and then do one of the following:
• Click in a single cell to select it.
• Click and drag to select multiple cells.
• Move the pointer over the left or top edge of the table until it turns into an arrow. Click the arrow to select an entire row or column; click and drag to select multiple rows or columns.
• Choose an option from the Table > Select submenu, including Cell, Row, Column, or Table.
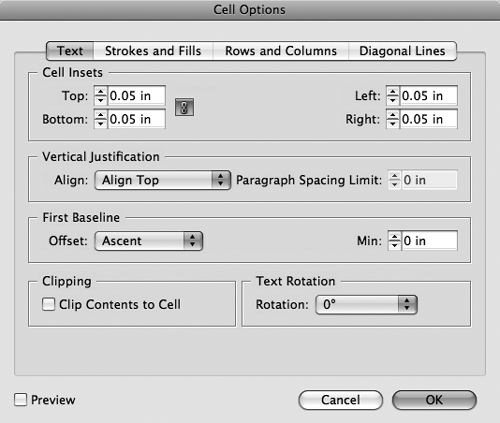
Once you have cells selected to format, choose Table > Cell Options > Text. The Text tab in the Cell Options dialog box (Figure 43c) lets you change Cell Insets, Vertical Justification, First Baseline, Clipping, and Text Rotation within the cells. The Strokes and Fills, Rows and Columns, and Diagonal Lines tabs let you specify cell sizes and add strokes and/or fills to the cells for emphasis or clarity. You can also apply cell styles (see #44).
The table formatting options used most often are also available in the Table panel (Figure 43d). To open the panel, choose Window > Type & Tables > Table. Point at the controls on the panel to display their tool tips and see what they do. The Table panel menu provides quick access to most of the commands in the Table menu.
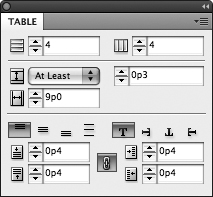
When table rows or columns are selected, the Control panel provides quick access to common table formatting options (Figure 43e). These include options for formatting text in selected cells, rotating text, adding rows and columns, merging cells, and more. You can also apply styles to selected cells or the entire table (see #44).
With the array of table-formatting options in InDesign, you can create impressive-looking tables. The process, however, can get tedious if you’re working on a document with many tables or applying the same table attributes over and over. To quickly format tables, InDesign lets you create table styles and cell styles. Similar to paragraph styles and character styles, table styles and cell styles let you apply multiple attributes with one click. In addition, changes you make to table styles and cell styles are reflected in any tables and cells to which the styles are applied. So if you decide that cells need a larger text inset or tables need a stroke, you can make that change globally in multiple tables. You can apply a table style when you create a table.
Table styles apply to entire tables and include both table formatting options and cell styles. For example, a table style might include a table border, a cell style for header rows, and an alternating pattern of row strokes. Cell styles include options such as text inset, baseline, and fills.
Generally, the best way to create styles is to first format a sample table or sample cell. Then, use the formatted table or cell as a basis for the style. To create a style:
1. Using the Type tool, select a formatted table.
2. Choose Window > Type & Tables > Table Styles or Cell Styles.
3. From the Table Styles or Cell Styles panel menu, choose New Table Style or New Cell Style.
4. In the Table Style Options (Figure 44a) or Cell Style Options dialog box, enter a name for the style.
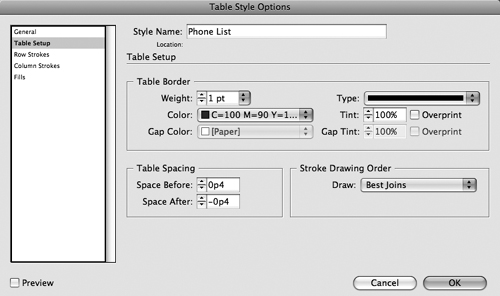
5. All the options are already set based on the formatting applied to the selected table or cell as summarized in the Style Settings area. Click in the scroll list at left to display panes of different options and change any formatting.
If you’re not working with a formatted table or cell, you can create a new style by clicking the Create New Style button at the bottom of the Table Styles or Cell Styles panel. This creates a new style in the panel called Table Style 1 or Cell Style 1. The number reflects the creation order. Double-click the new style to name and modify it.
You can apply a table style when you create a table (Table > Insert Table) or convert text to a table (Table > Convert Text to Table). In addition, you can select tables and cells and apply styles from the Control panel, Table Styles panel, and Cell Styles panel.
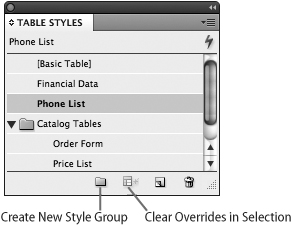
• Table style: To apply a table style, click in a table with the Type tool. Click the style name in the Table Styles panel (Figure 44b). If rows or columns are selected in the table, you can choose a style from the Control panel as well.
• Cell style: To apply a cell style, select the cell, cells, rows, or columns with the Type tool (see #43 for more information about selecting rows and columns). Click the style name in the Cell Styles panel or the Control panel.
Once you apply a table style, you’re not stuck with that formatting. You can continue to modify the table’s formatting as you wish. Any formatting that does not match the style is called an “override.” After applying overrides, if you need to revert a table’s formatting to exactly match the formatting in its style, choose Clear Overrides from the Table Styles panel menu. You can also Option-click (Mac OS) or Alt-click a style name. If rows or columns are selected in the table and you only want to clear overrides in the selection, click Clear Overrides in Selection at the bottom of the Table Styles panel. These same techniques work for clearing overrides in selected cells.
To change the attributes specified in a table style or cell style, double-click the style name or select the style name and choose Style Options from the Table Styles or Cell Styles panel menus. Or, as a shortcut, reformat a cell or table, and then choose Redefine Style from the panel menu. The Table Styles and Cell Styles panel menus also provide options for duplicating, deleting, importing, and exporting styles.
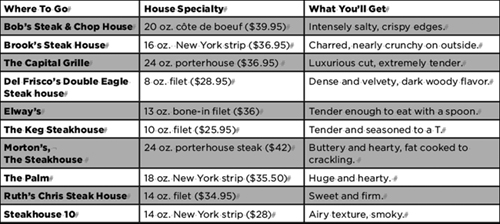
For a table to be useful, it generally needs row and column headings—so you know what kind of information the cells contain. This is easy to accomplish with a row at the top of the table containing column headings and a column down the left containing row headings. A problem occurs, however, if the table is split across several columns, text frames, or pages. The first row, which contains the column heads, can become separated from the columns, leaving the reader to guess what’s in them. Fortunately, InDesign provides a simple solution with its header rows feature that automatically repeats the necessary rows whenever the table splits across columns, frames, or pages. In addition, if you need a footer in the table (to contain a disclaimer or source, for example), footer rows repeat as well.
In the following sample table (Figure 45a), the first row is designated as a header. So if we add 20 more steakhouses and need to continue the table on another page, the column heads will repeat. The last row is designated as a footer, so it will repeat as well.
You have two choices for creating header and footer rows: You can convert existing rows, or you can add new rows.
• Converting Rows: In many cases, you will format your own rows to serve as header or footer rows—then realize you need the “official” header or footer rows because the table will actually continue in a different column, text frame, or page. In that case, you can convert the rows containing the header and footer information into actual header and footer rows. To do this, select the rows containing the header or footer information. (Using the Type tool, move the pointer over the right or left edge of the table until it turns into an arrow. Click to select the row, or click and drag to select multiple rows. Choose Table > Convert Rows > To Header or Table > Convert Rows > To Footer. If you’re using both headers and footers in a table, you’ll have to convert the rows separately.
• Adding New Rows: To add new rows for headers and footers, choose Table > Table Options > Headers and Footers. In the Headers and Footers tab (Figure 45b), enter the number of header rows to add in the Header Rows field. Enter the number of footer rows to add in the Footer Rows field.
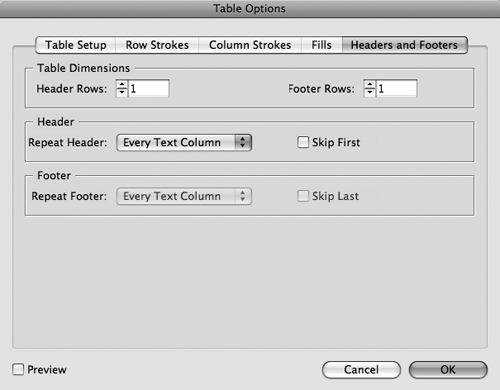
• Headers and Footers Options: Whether you convert existing rows or add new headers and footers, you can control how often they appear in the Headers and Footers tab. Use the Repeat Header and Repeat Footer menus to specify whether the row should appear every time the table flows to a new column, to a new text frame, or only to a new page. If the start of the table contains column headings or footer information in a different format, such as a graphic, you can remove the header and footer from the start of the table. To do this, click Skip First in the Header area or Skip Last in the Footer area.
If you change your mind about header and footer rows, you can select the rows and delete them or decrease the number of Header Rows or Footer Rows in the Headers and Footers tab.
When you edit content in rows designated as headers and footers, the text and graphics automatically update wherever the header and footer is used. (As a result, do not insert words such as “continued” in the header of the continuation of a table because it will show up on the first part of the table as well.) To quickly jump to a header or footer row to start editing it, choose Table > Edit Header or Table > Edit Footer.
When it comes to tables, change is inevitable. You will find yourself constantly adjusting column widths and row heights, adding rows and columns, deleting rows and columns, and so on. Both the Table menu and the Table panel menu provide many options for editing tables.
You can insert blank rows and columns within a table whenever you need them. To insert rows and columns, first select the Type tool.
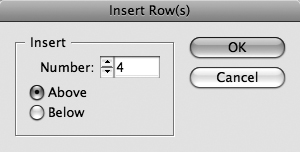
• Inserting rows: To insert rows within a table, click in a row above or below where you want the new rows. Choose Table > Insert > Row. In the Insert Row(s) dialog box (Figure 46a), enter the number of rows to insert in the Number field and then click Above or Below to indicate the position.
• Inserting columns: To insert columns within a table, click in a column to the left or right of where you want the new columns. Choose Table > Insert > Column. In the Insert Column(s) dialog box, enter the number of columns to insert in the Number field and then click Left or Right to indicate the position.
You can add rows to the bottom of a table or add columns to the right side of a table at any time. First, click in the table somewhere with the Type tool, then do one of the following:
• Change the values in the Body Rows field or the Columns field in the Table Setup tab (Table > Table Options > Table Setup).
• Change the values in the Number of Rows field or the Number of Columns field in the Table panel (Window > Type & Tables > Table).
• Change the values in the Number of Rows or Number of Columns field in the Control panel (available when rows or columns are selected).
The Delete key will eliminate just about any selection in InDesign—selected text and objects, for example. It will not, however, delete selections within a table but will delete the contents instead.
To delete parts of a table or an entire table, make a selection first. With the Type tool, click in a row, column, or table that you want to delete. Choose Table > Select, and then choose Row, Column, or Table. You can also click outside the table when the arrow pointer displays to select a row or column (Figure 46b). Drag the arrow pointer to select multiple rows or columns. Once you’ve made a selection, choose Table > Delete, and then choose Row, Column, or Table.

If the initial column widths and row heights are not quite right—and they rarely are—they are easy to adjust. Using the Type tool, you can drag the gridlines between rows and columns to adjust the sizes (Figure 46c). You can also drag any edge of the table to resize the table height or width in any direction.

To “clean up” a table so the columns are the same width and the rows are the same height, choose Table > Distribute Columns Evenly or Table > Distribute Rows Evenly. You can also specify a height for selected rows and a width for selected columns in the Table panel and in the Rows and Columns tab in the Cell Options dialog box (Table menu).
Tip
When specifying the height of rows in the Table panel or the Rows and Columns panel (Table > Cell Options), the Row Height menu lets you specify whether selected rows increase in height when you add content to cells. If you choose At Least, you specify the minimum height for the row, and the row height will expand as necessary to fit the content. (You can specify a maximum height in the Rows and Columns panel.) If you choose Exactly, the row height is fixed and text will be overset if it doesn’t fit in its cell.
You may need to merge and split cells for various reasons such as creating a single-cell row for a table’s title, adding a column that contains a vertical graphic, or dividing a cell into two to contain a note along with data.
To merge cells, first select the cells to merge with the Type tool. You can select any number of adjacent cells, including selecting cells across rows and columns to create a large rectangular cell. When the cells are selected, choose Table > Merge Cells (Figure 46d). If you change your mind about the merged cells, select the cell and choose Table > Unmerge Cells.
To split a cell, click in it to select it. Then, choose Table > Split Cell Horizontally or Table > Split Cell Vertically.