
Chapter Six
Working with Graphics
In addition to using InDesign’s drawing tools to create graphic elements within InDesign, you can also import graphics created with other programs, such as Adobe Photoshop and Adobe Illustrator. After you import a graphic into an InDesign layout, you can modify it in many ways, including cropping, scaling, rotating, and flipping it horizontally or vertically. You can also use InDesign to apply see-through effects to imported graphics that make them appear translucent.
In this chapter we begin by explaining how to import graphics into InDesign layouts, and then tell you how to use some of InDesign’s most powerful features to modify imported graphics and manage graphic files.
InDesign lets you import a broad range of common graphic formats, including TIFF, JPEG, PDF, and EPS, as well as several lesser-known formats like DCS, PNG, and Scitex CT. You can also import native Photoshop and Illustrator files. Once you import a graphic into a layout, InDesign lets you modify it in several ways, as explained in #54, #55, #56, and #57.
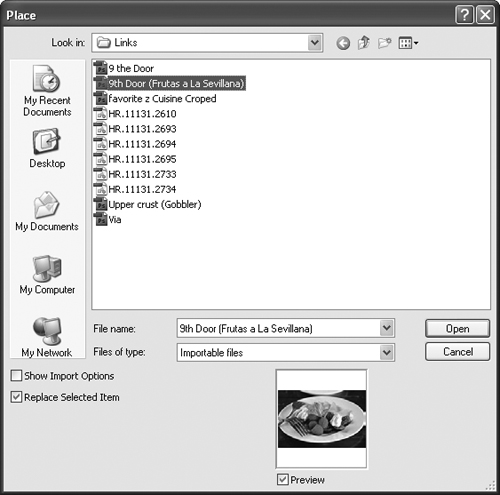
To place a graphic into an InDesign document, simply choose File > Place. InDesign doesn’t require you to create a frame before you import a graphic, although you can work this way in InDesign if you want to. The Place dialog box (Figure 52) lets you locate and choose the graphic. What happens after you click Open depends on what object, if any, is selected.
• If nothing is selected, the loaded graphics icon
![]() is displayed in the upper-left corner of a thumbnail proxy of the graphic, and you can click once or click and drag to place the graphic into a new graphics frame. If you click once, the resulting frame is the same size as the full-size graphic. If you click and drag, the rectangle you create becomes the frame that contains the graphic. As you drag, the rectangle that’s displayed automatically matches the proportions of the graphic. When you release the mouse after clicking and dragging, the graphic is scaled up or down to fit within the frame while the graphic’s original proportions are maintained. You can also click the loaded graphics icon within an empty frame to place the graphic within it.
is displayed in the upper-left corner of a thumbnail proxy of the graphic, and you can click once or click and drag to place the graphic into a new graphics frame. If you click once, the resulting frame is the same size as the full-size graphic. If you click and drag, the rectangle you create becomes the frame that contains the graphic. As you drag, the rectangle that’s displayed automatically matches the proportions of the graphic. When you release the mouse after clicking and dragging, the graphic is scaled up or down to fit within the frame while the graphic’s original proportions are maintained. You can also click the loaded graphics icon within an empty frame to place the graphic within it.
• If a graphics or unassigned frame is selected, the graphic is placed within the frame.
• If the text insertion cursor is flashing, the graphic is placed within the text frame as an anchored graphic. (See #36 for more about anchored objects.) An anchored graphic is treated like a text character and moves when editing causes text to reflow.
If you want, you can import multiple graphics at once into a layout. To do this, choose File > Place, and then select the files you want to import. (All files must be in a single folder, and you can select any combination of graphics files and text files.) When you click Open in the Place dialog box, a number indicating the number of loaded files is displayed in parentheses next to the loaded graphics icon. Ctrl+click (Windows) or Command+click (Mac OS) to cascade all of the loaded files onto a single page, or click once with the mouse to place only the next loaded graphic. The number of remaining files is displayed along with a thumbnail proxy of the next graphic.
After you import a graphic into an InDesign layout, InDesign maintains a link between the graphic file and the InDesign document. InDesign uses the original graphic file to display it at high resolution, and the original graphic files are also used when you print or export an InDesign document that contains imported graphics. The Links panel (Window > Links) displays a list of all placed graphics. For information about managing links to graphic files, see #58.
After you import a graphic, chances are you’ll want to resize it, crop it, or both. InDesign offers several ways to scale and crop imported graphics. But before you begin working with graphics, it’s important to understand some basics about how InDesign handles them.
Every imported graphic is contained within a graphics frame. Most graphics frames are rectangular; however, you can use any object (except a text frame) as a graphics frame regardless of its shape.
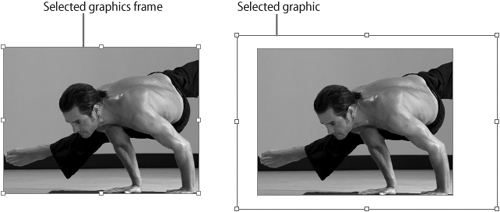
Use the Selection tool to select a graphic and its frame, or use the Direct Selection tool or the Position tool, which is paired with the Direct Selection tool in the Tools panel, to select only the graphic (Figure 53a). If you look closely, you’ll notice that the bounding box of a selected graphics frame is displayed in a different color than the border around a selected graphic. Once you select a graphics frame or graphic, you’re ready to modify the selection.
Figure 53a This graphic is larger than the frame that contains it, and is cropped on all four sides by the frame. Clicking the graphic with the Selection tool selects the graphics frame (left). Clicking the graphic with the Direct Selection tool selects the graphic itself (right). The color of the bounding box of a selected graphics frame is different from that of a selected graphic.
You can show and hide different portions of a graphic by adjusting the size and shape of its frame or by adjusting the size of the graphic. The Selection tool is the best tool for cropping graphics. To crop a graphic by resizing its frame:
1. Choose the Selection tool, and then click on or within a graphics frame.
2. Drag any of the eight resizing handles to control what portion of the graphic is visible. If the frame is an irregular shape, use the Selection tool to resize its bounding box or use the Direct Selection tool to drag anchor points or segments and change the shape of the frame.
You can resize a graphic and its frame at the same time manually or by specifying scale percentages. To resize a graphic and its frame manually:
1. Select the frame with the Selection tool.
2. Hold down the Shift and Ctrl keys (Windows) or the Shift and Command keys (Mac OS), and drag a handle. If you hold down only the Ctrl key or the Command key as you drag, the frame and graphic are scaled disproportionately. If you hold down only the Shift key, the frame is scaled proportionally and the scale of the graphic does not change.
To resize a graphic and its frame by specifying scale percentages:
1. Select the frame with the Selection tool.
2. Enter values in the Scale X Percentage or Scale Y Percentage fields in the Transform panel or the Control panel. If you click the Constrain Proportions for Scaling button next to the scale fields in either panel, horizontal scale (Scale X) is automatically adjusted when you change vertical scale (Scale Y) and vice versa.
To manually resize a graphic but not its frame:
1. Choose the Direct Selection tool or the Position tool, and then click a graphic.
2. Drag any of the eight resizing handles. To maintain the graphic’s proportions, hold down the Shift key when dragging.
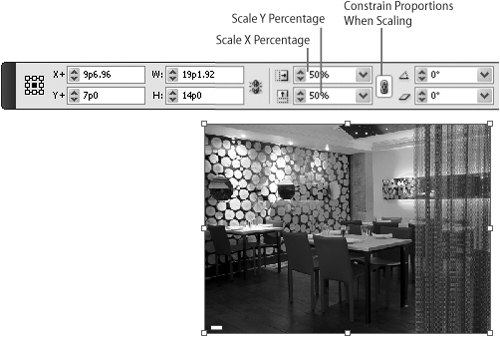
You can also change the scale of a selected graphic by modifying the Scale X Percentage or Scale Y Percentage values in the Control panel or the Transform panel (Figure 53b). If the Constrain Proportions for Scaling button next to the scale fields in either panel is enabled, horizontal scale (Scale X) is automatically adjusted when you change vertical scale (Scale Y) and vice versa.
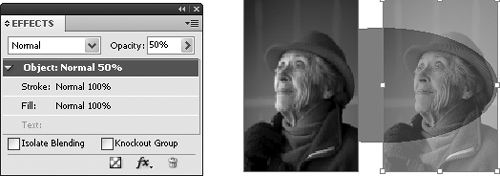
Figure 53b The Scale X Percentage and Scale Y Percentage fields in the Control panel show that the selected graphic is scaled to 50% of its original size. (The graphic was selected by clicking it with the Direct Selection tool.) The Constrain Proportions When Scaling button to the right of the fields is selected, which means the graphic’s proportions will be maintained if you change either of the scale values.
InDesign includes a set of fitting options that lets you resize a graphic to fit within its frame or resize a frame to fit the graphic. To use the fitting options, first select a graphic or a graphics frame. Next, click any of the five fitting buttons at the right end of the Control panel. The options are
Cropping and scaling are only the beginning of what you can do to imported graphics with InDesign. You can also modify a graphic, its frame, or both by rotating, shearing (slanting), or flipping horizontally or vertically or both—not to mention applying any of several special effects that are explained in #55. In InDesign the controls for making basic modifications to graphics are available in the Control panel and the Transform panel (Window > Object & Layout > Transform).
As is the case with cropping and scaling, it’s important that you make the correct selection before you modify a graphic. To modify a graphic and its frame, select the frame with the Selection tool. To modify only the graphic, select the graphic with the Direct Selection or Position tool. If you look carefully, you’ll notice that the border displayed around a selected graphics frame is a different color than the border that’s displayed around a selected graphic.
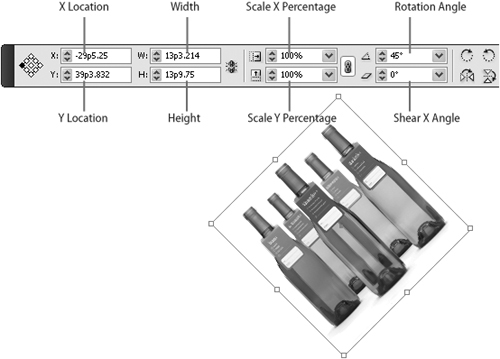
Use the Control or Transform panel to make the following modifications (Figure 54a):
• To change the position of the selection: Change the X Location or Y Location value. If a graphics frame is selected, the values are measured from the ruler origin to the selected reference point, which is highlighted in the Reference Point button at the left of the Control and Transform panels. (By default, an object’s center point is its reference point; however, you can change the reference point of a selected object by clicking a different handle in the Reference Point button.) If a graphic is selected, the values are measured from the reference point of the frame to the reference point of the graphic.
• To change the size of the selection: Change the Width or Height values. By default, the accompanying Constrain Proportions for Width and Height button is selected, which means that changing either the Width or Height value will automatically change the other value to maintain the object’s proportions.
• To change the scale of the selection: Change the values in the Scale X Percentage (horizontal scale) or Scale Y Percentage (vertical scale) fields or choose a value from the accompanying menu. By default, the Constrain Proportions When Scaling button (to the right of the two fields) is selected, which means that changing either the horizontal or vertical scale value will automatically change the other value to maintain the graphic’s proportions.
• To rotate the selection: Enter a value other than 0 in the Rotation Angle field or choose a value from the accompanying menu.
• To shear the selection: Enter a value other than 0 in the Shear X Angle field or choose a value from the accompanying menu. Positive values slant the selection to the right; negative values slant it to the left.
The Control and Transform panel menus include additional commands for modifying objects, including Flip Horizontal, Flip Vertical, Flip Both, Rotate 180°, Rotate 90° CW (clockwise), and Rotate 90° CCW (counterclockwise).
You can also modify a graphics frame by adding a stroke (border) or a background fill or both. To add a stroke to a graphics frame:
1. Choose Window > Stroke to open the Stroke panel (Figure 54b).
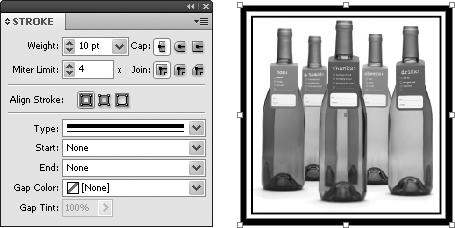
2. Specify a stroke width in the Weight field and choose a stroke style from the Type menu in the Stroke panel. The Stroke panel includes other options that let you control the appearance of a stroke.
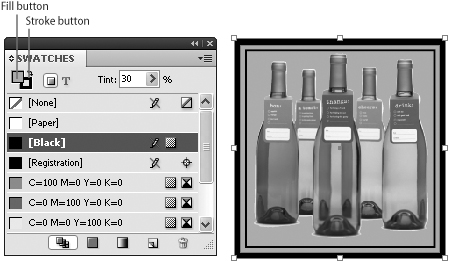
3. To apply a color to the stroke, open the Swatches panel (Window > Swatches), click the Stroke button in the upper-left corner of the panel, and then choose a color. If you want, you can apply a tint (shade) of the selected color swatch by specifying a value in the Tint field at the top of the Swatches panel.
To add a background fill to a graphics frame, click the Fill button in the Tools panel or the Swatches panel, and then choose a color in the Swatches panel (Figure 54c). Optionally, specify a Tint value. A background fill is visible only outside the rectangle that contains the graphic—unless the graphic was saved with a transparent background or it is displayed using a clipping path.
If you’re looking for more exotic graphics modifications than simple rotation, scale, and shear, InDesign offers several special effects for creating see-through objects through which underlying objects are visible. For example, you can apply a basic feather to a graphic so that it fades to transparent near its edge. You can apply Photoshop effects—collectively referred to as transparency effects in InDesign—independently to an object or its fill, stroke, or content (text or graphic).
Before you apply a transparency effect, make sure you use the correct tool to select a graphics frame or a graphic. Use the Selection tool to select the frame; use the Direct Selection or Position tool to select the graphic within. Generally, you’ll apply these special effects to graphics frames; however, you can achieve different results by applying them to graphics—or both. Do whatever achieves the results you want.
To apply an effect to the selection, choose Object > Effects, and then select Transparency or an effect from the submenu. The same options are available if you choose Effects from the Effects panel menu (Window > Effects), or if you click the
![]() button at the bottom of the Effects panel. When you choose a command, the Effects dialog box is displayed. The Settings For menu at the top of the dialog box lets you apply effects independently to the object, stroke, or fill if a graphic frame is selected or to the graphic if a graphic is selected. InDesign includes the following transparency effects:
button at the bottom of the Effects panel. When you choose a command, the Effects dialog box is displayed. The Settings For menu at the top of the dialog box lets you apply effects independently to the object, stroke, or fill if a graphic frame is selected or to the graphic if a graphic is selected. InDesign includes the following transparency effects:
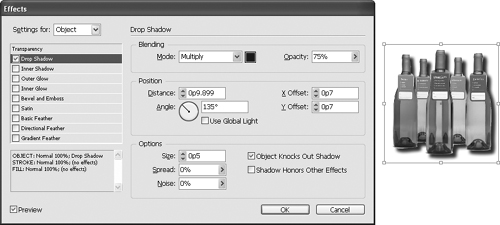
• Drop Shadow adds a soft- or hard-edged shadow behind graphics and graphics frames (Figure 55a). The controls in the Effects dialog box let you specify the placement and appearance of the shadow.
• Inner Shadow adds a shadow inside the edge of an object’s content to create a recessed appearance.
• Outer Glow and Inner Glow add glows to the outer or inner edges of an object’s content.
• Bevel and Emboss add highlights and shadows to create a raised appearance.
• Satin applies shading that creates a smooth, satin-like appearance.
• Basic Feather fades the edge of a graphic or a graphics frame from opaque to transparent.
• Directional Feather is similar to a basic feather but includes separate controls for the top, bottom, left, and right edges of the selection.
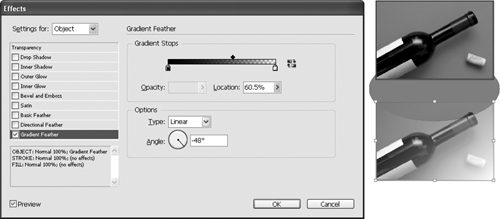
• Gradient Feather lets you fade an object from opaque to transparent with controls for specifying the type of gradient (linear or radial), the length of the gradient, and its angle (Figure 55b).
• Blending Mode blends the colors where objects overlap. Use the Blending Mode menu in the Effects panel to apply a blending mode. You can also specify a blending mode in the Effects dialog box by selecting Transparency in the list of effects.
• Opacity makes a graphic appear to be translucent. The Opacity controls are in the Effects panel (Figure 55c). You can also specify opacity in the Effects dialog box by selecting Transparency in the list of effects. Lower the opacity value to make the selection increasingly lighter and more translucent.
To mask portions of a graphic so they’re not visible, you can use a clipping path. The Clipping Path dialog box (Object > Clipping Path > Options) lets you choose a clipping path or an alpha channel that’s built into a graphic, or you can choose Detect Edges in the Clipping Path dialog box’s Type menu to have InDesign create a clipping path based on light and dark areas (Figure 55d). Detect Edges works best when the portion of the image you want to keep is silhouetted against a background that’s uniformly lighter or darker.

InDesign and Illustrator are close cousins and very much alike. They’re both vector-based programs, they’re both from Adobe, and they share many of the same features. One benefit of the similarity between Illustrator and InDesign is that you can copy objects between the two programs. This lets you take advantage of the features in both programs to create graphic elements.
The easiest way to add an Illustrator file to an InDesign layout is to use the Place command (File menu). When you place a graphic into a layout, InDesign maintains a link to the graphic file and uses the original file when displaying at high resolution, printing, and exporting the graphic. (When you place an Illustrator graphic into an InDesign layout, you cannot modify any of the objects within the graphic. If you need to modify the graphic, you must open it in Illustrator and then make the changes.) Subsequent changes you make to the graphic file in Illustrator are reflected in the InDesign layout. Not only does InDesign support native Illustrator (.ai) files, but it also supports illustrations saved as EPS or PDF.
In addition to importing Illustrator graphics into InDesign layouts, you can also copy and paste or drag and drop objects between the two programs. The benefit of being able to use these methods is that they let you use InDesign to modify objects you’ve created in Illustrator, and vice versa. Before you copy and paste or drag and drop Illustrator objects into InDesign, make sure to check AICB (Adobe Illustrator Clipboard) in the File Handling & Clipboard pane of Illustrator’s Preferences dialog box (Illustrator > Preferences > File Handling & Clipboard [Mac OS]; Edit > Preferences > File Handling & Clipboard [Windows]).
To use the copy-and-paste method:
1. Select one or more objects in Illustrator.
2. Choose Edit > Copy.
3. Switch to InDesign and choose Edit > Paste. The copied elements are pasted into InDesign as a group of editable objects.
To use the drag-and-drop method:
1. Arrange an Illustrator document window and an InDesign document window so you can see both onscreen.
2. Select one or more Illustrator objects, drag them into the InDesign window, and then release the mouse button.
When you copy and paste or drag and drop Illustrator objects into an InDesign layout, the objects behave as though you created them in InDesign, and InDesign does not maintain a link to the Illustrator file (that is, they’re not listed in the Links panel).
Yet another option for working with Illustrator is to copy and paste or drag and drop InDesign objects into Illustrator, modify them in Illustrator, and then copy and paste or drag and drop the modified objects back into InDesign. This is called “round tripping.” See Figure 56 for an example.

While the InDesign interface has more in common with Illustrator than with Photoshop, InDesign and Photoshop are also tightly integrated. You can import native Photoshop (.psd) files into InDesign layouts, and you can import other Photoshop-generated bitmap graphics such as TIFF, JPEG, and DCS. InDesign’s support of native Photoshop files also includes several features that let you control how images are displayed and printed.
When you import a Photoshop file that includes layers or layer comps, you can control the visibility of both within InDesign.
1. Choose File > Place.
2. Check Show Import Options in the Place dialog box, and then click Open.
3. Display the Layers pane and make sure Show Preview is checked.
4. To achieve the result you want, do one of the following:

If you import a Photoshop file that contains clipping paths or alpha channels into an InDesign layout, you can use them to mask parts of a graphic or wrap text around them. To apply a clipping path or an alpha channel to a graphic:
1. Select the graphic or its frame, and then choose Object > Clipping Path.
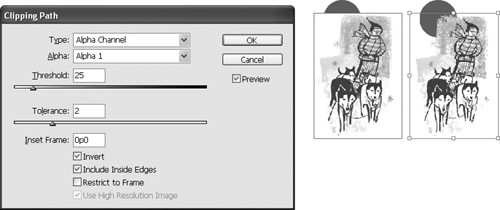
2. In the Clipping Path dialog box, choose Alpha Channel or Clipping Path from the Type menu (Figure 57b). (If these options are not available, the graphic has no alpha channels or clipping paths.) If you choose Detect Edges in the Type menu, InDesign will generate a clipping path based on the light and dark areas of the image.
Figure 57b The original graphic (the one on the left above) has an opaque white background. Choosing an alpha channel and adjusting the settings in the Clipping Path dialog box produced the variation on the right. Notice how the circular shape behind the graphics frame is visible through the background of the graphic on the right that uses an alpha channel as a clipping path.
Each time you place a graphic into an InDesign layout, InDesign collects and stores information about the graphic file, including its size, file type, link status (Up to Date, Modified, Missing, or Embedded), and location. InDesign uses the original graphic files when printing and exporting documents that contain imported graphics, as well as when displaying graphics at high resolution.
The Links panel (Window > Links) has been completely redesigned for InDesign CS4 and displays a list of all graphic files that have been placed in an InDesign layout and provides information about the files (Figure 58). It also includes commands and controls for managing the links between the document and the imported graphic files.

For each graphic file listed in the Links panel, InDesign displays a thumbnail of the graphic, an icon that indicates the status of the source file (Modified, Missing, or Embedded; no icon is displayed for graphics whose status is OK), and the number of the page that contains the graphic. A triangle is displayed to the left of graphics that have been placed more than once. Click this triangle to display each instance.
• OK: If only the page number is displayed to the right of a graphic file, it means that the link is up-to-date (that is, the original file is not missing and has not been modified since it was imported).
|
Missing: The red missing link icon indicates that the graphic file has been moved or renamed since it was imported. To fix a missing link, select it in the Links panel, click the Relink button at the bottom of the panel or choose Relink from the panel menu, and then locate and open the graphic file. If the graphic file has been modified since you imported it, the status indicator will change from Missing to Modified. If the selected file has been placed more than once, the Relink button changes to Relink All Instances. |
|
|
Modified: The yellow modified link icon indicates that the current version of the graphic file is more recent than the version used when the file was imported. To update the link, click the Update Link button at the bottom of the panel or choose Update Link from the panel menu. Update Link changes to Update All Instances if you select a file that’s been imported more than once. |
|
|
Embedded: The embedded icon indicates that the graphic file has been embedded within the InDesign file. You can embed a graphic by selecting it in the Links panel and then choosing Embed File from the Links panel menu. When you embed a graphic file, a copy of the file is stored within the InDesign file, and InDesign does not maintain a link to the original file. Any changes you make to the original file are not reflected in the InDesign document. Generally, it’s not a good idea to embed graphic files within InDesign documents because InDesign file sizes can become prohibitively large. |
To view all information available for a particular graphic, double-click its name in the Links panel. This expands the Link Info area at the bottom of the panel. Double-click the filename again to collapse the Link Info area.
Although it’s possible to display, export, and print documents that have modified or missing graphics, you should make sure all links are up to date before you perform any of these functions. If you try to export or print a document with missing or modified links, InDesign will warn you and let you update the links, or you can continue, in which case InDesign will use low-resolution graphics.