
Chapter Eleven
Preflight and Output
As you work on a publication, you’ll probably print several proofs to one or more desktop printers before the publication is completed. After you’ve added the final touches and the publication is ready for final output, you or your print service provider will print the finished document, probably using a high-resolution printer. If you’re producing a color publication for print on a printing press, final output means printing color separations that will be used to print the document on-press.
One of the main advantages of page-layout software is that it lets you view publications onscreen before you print them. However, displaying a publication onscreen and printing it are very different processes. InDesign includes several features for troubleshooting potential printing problems before they occur, as well as an abundance of print-related controls that help ensure you get the results you want when you print a document.
In this chapter you’ll learn how to preview color separations onscreen, how to preflight a document throughout its life span to identify and avoid potential problems, and how to gather all the files required to print a document. You’ll also learn how to export documents to PDF, as well as how to export InDesign objects, pages, and documents for use in other InDesign documents and media. Finally, you’ll learn how to print documents.
The term “preflight” comes from the aviation industry and refers to the checklist that pilots use to confirm that everything is ready for takeoff. In print publishing, when you preflight a publication you check the electronic file for potential printing-related problems, such as missing fonts or graphics or the use of color in a black-and-white publication.
In the past, preflight was generally performed immediately before a file was printed—which is not always the best time to find problems. The new Preflight panel in InDesign CS4 lets you preflight a document throughout its life span and identify potential printing problems as they occur. You have the option to use the default preflight settings, which warn you about overset text, missing and modified graphics, and missing fonts, or you can create custom preflight profiles that are appropriate for the publications you create.
To turn on preflight:
1. Choose Window > Output > Preflight to open the Preflight panel (Figure 94a).
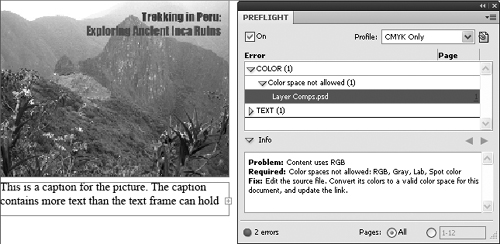
2. Click the On check box. When a green check mark is displayed, preflight is enabled. By default, the [Basic] (Working) preflight profile is used.
If a document does not have any preflight problems, a green dot and “No errors” is displayed in the lower-left corner of the Preflight panel, as well as at the bottom left of the document window. If you violate any of the conditions of the current preflight profile, the green dot turns red and the number of errors is displayed. All errors are listed in the Preflight panel. If you select a specific problem, detailed information about the error is displayed in the Info area.
Although the default preflight profile [Basic] (working) warns you about the most common printing-related problems, you’ll probably want to create your own custom preflight profiles.
To create a custom preflight profile:
1. Choose Window > Output > Preflight to open the Preflight panel.
2. Choose Define Profiles from the Preflight panel menu.
3. In the Preflight Profiles dialog box (Figure 94b), click the New preflight profile button (
![]() ), and then enter a name in the Profile Name field.
), and then enter a name in the Profile Name field.
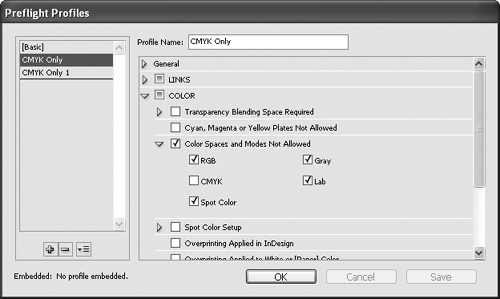
4. Use the controls for Links, Color, Images and Objects, and so on to specify what you want to allow and exclude.
5. Click OK to save the profile.
6. If you want to use the profile you just created, select it from the Profile menu in the Preflight panel.
InDesign includes several features that let you preview and prepare documents before you print final versions or send them to a print service provider for high-resolution output. The Separations Preview panel (Window > Output > Separations Preview) is one of the most useful production tools for color publications. It lets you show or hide individual colors, display color values for objects and graphics, and show areas that exceed a specified maximum ink coverage.
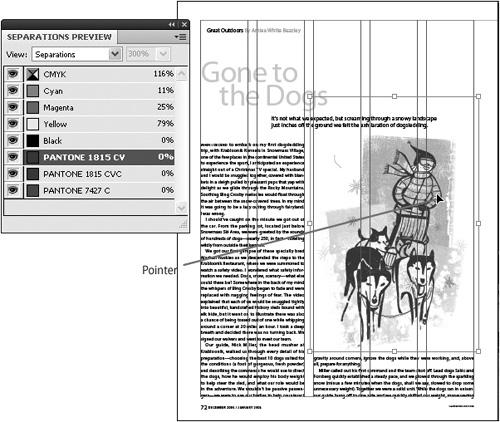
To preview color separations onscreen, open the Separations Preview panel (Figures 95a and 95b), and then choose Separations from the View menu. The color list in the panel includes process colors—cyan, magenta, yellow, and black—as well as any other spot colors in the Swatches panel regardless of whether you’ve used them.
The Separations Preview panel works as follows:
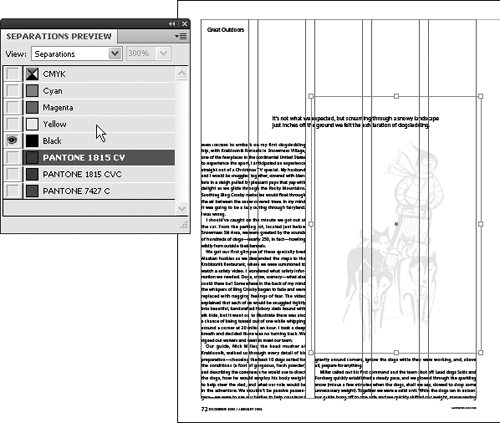
• Clicking the small square to the left of a color name shows or hides the color. Clicking CMYK shows or hides all process colors. You can show or hide whatever colors you want, although at least one color must always be displayed. The Show Single Plates in Black command in the Separations Preview panel menu lets you control how a color is displayed when all other colors are hidden. When it’s checked, single colors are displayed as black.
• As you drag the pointer over a page, the values associated with the colors in the Separations Preview panel change to reflect the color of the pixel that the pointer is over.
• When you’re done previewing separations and areas that exceed maximum ink coverage (see sidebar), choose Off from the Separations Preview panel menu to return to normal view.
When it’s time to send a finished InDesign document to a print service provider, you need to gather all of the font and graphic files used in the document, as well as a copy of the InDesign file, into a single folder for easy transport. Fortunately, InDesign can do this file management work for you.
In addition to collecting font and graphic files, the Package command (File menu) scans a document for potential printing problems and warns you if it finds anything amiss. (See #94 for information about preflighting documents.)
To package a document:
1. Choose File > Package.
2. The Summary pane of the Package dialog box displays information about the document’s Fonts, Links and Images, Colors and Inks, and External Plug-ins. Yellow warning triangles are displayed next to potential printing problems. The other panes display details. You may want to click Cancel and resolve the problems; however, if you decide to ignore them, click Package to display the Printing Instructions dialog box. You’ll be prompted to save the document if you’ve made changes since you last saved it.
3. The information you enter into the various fields of the Printing Instructions dialog box is saved as a text file that’s included in the package. After you’ve entered the information you want to include, click Continue.
4. In the Folder Name field of the Package Publication dialog box (Figure 96), enter a name for the folder into which files will be copied and specify the location of the folder.
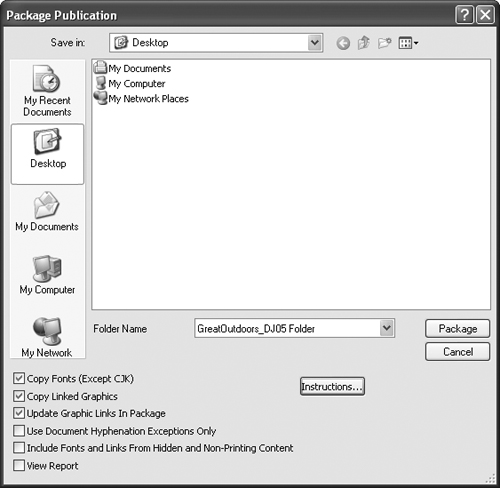
5. Use the check boxes at the bottom-left of the Package Publication dialog box to specify the files you want to include. You’ll probably want to check Copy Fonts (Except CJK) and Copy Linked Graphics, and you should check Update Graphic Links in Package so that the InDesign file copied into the package folder is linked to the graphic files that are copied to the package folder and not to the original files. (Linked graphics are placed in a folder called Links within the package folder; fonts are placed in a folder called Fonts.) Click Package to create the package folder and include the files you’ve chosen.
After you’ve packaged an InDesign document, you’ll probably want to compress the package folder and then e-mail the compressed file to your print service provider, upload the file to your provider’s FTP site, or copy the file onto a CD or portable drive for delivery to your provider. Package folders are also useful for storing and archiving InDesign documents and all of the files required to print them at the end of the production cycle.
At many publishing sites, publications in progress are exported as PDF documents for electronic markup and review, and finished publications are exported as PDF for final, high-resolution output. When it’s time to export an InDesign layout to PDF, you have many options for controlling the size and many other characteristics of the file. The choices you make when you export to PDF depend on how the PDF will be used. For example, if you want to distribute a PDF via e-mail to colleagues or clients for electronic review and markup using Adobe Acrobat or Adobe Reader, you should save a compact, low-resolution PDF that’s well suited for electronic distribution and review. If you intend to send a PDF file to a print service provider for high-resolution output, you should save a high-resolution file.
To export a layout to PDF:
1. Choose File > Export.
2. In the Export dialog box, enter a name for the PDF file and choose the folder in which the file will be saved.
3. Choose Adobe PDF from the Format menu (Mac OS) or Save as Type menu (Windows), and then click Save.
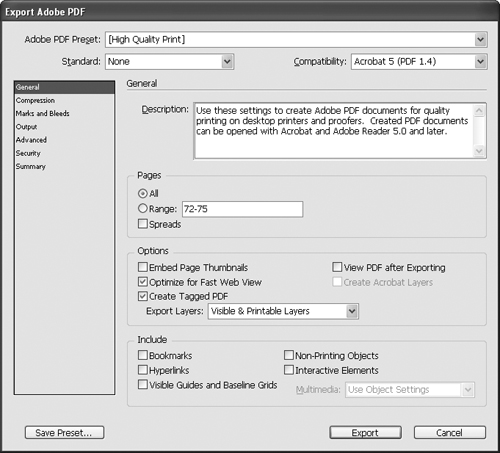
4. In the Export Adobe PDF dialog box, you can simply choose a PDF preset in the Adobe PDF Preset menu, and then click Export, or you can choose a preset, customize the settings in the various panes of the Export Adobe PDF dialog box (Figure 97), and then click Export. If the document contains any missing fonts or any missing or modified graphics, alerts are displayed. You can ignore any alerts and continue export by clicking OK, or you can click Cancel to cancel export and return to the document. If you change a setting, “(modified)” is displayed to the right of the preset selected in the Adobe PDF Preset menu.
When you make changes in the Export Adobe PDF dialog box, the new settings are saved with the application and used the next time you export a layout to PDF.
Sometimes, you may want to use InDesign pages, objects, or text in another application or in another InDesign document. For example, if you’ve created a magazine cover, you may want to use a reduced version of the layout in an advertisement for the magazine. Or you may want to include an image of the cover on a Web page. InDesign lets you export objects, text, pages, spreads, and documents in a variety of different file formats.
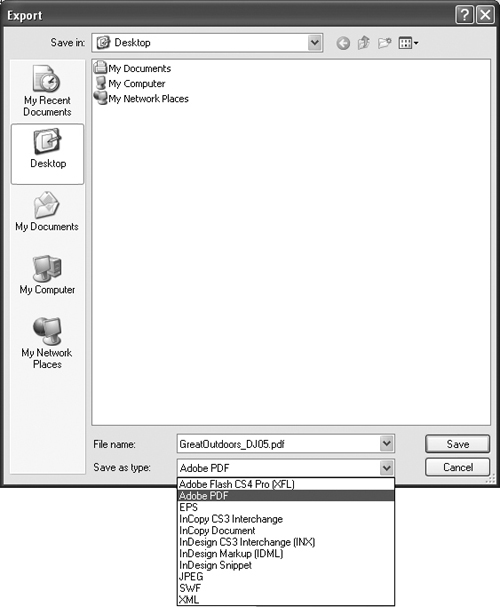
To export a selected object or multiple objects, selected text, or document pages, choose File > Export. The Export dialog box is displayed (Figure 98). The file formats displayed in the Save as type menu (Windows) or Format menu (Mac OS) and what you can export depend on what’s currently selected in the document: nothing, one or more objects, a text frame, or text.
Figure 98 The Export dialog box, showing the formats available when an object is selected. When a text frame is selected, the insertion point is blinking, or text is highlighted, the Format menu in the Export dialog box includes text file formats, such as Rich Text Format and Text Only, as well as graphic formats, such as EPS and JPEG.
The Save as type menu (Windows) and Format menu (Mac OS) in the Export dialog box offer the following choices:
• Adobe Flash CS4 Pro (XFL): If you export an XFL file, you can edit the file using Adobe Flash Pro. Interactive elements such as hyperlinks, page transitions, and buttons are not included in exported XFL files.
• Adobe InDesign Tagged Text: This text file format saves all InDesign text-formatting codes. If you open a tagged text file in a word processing program, the formatting codes are displayed along with the text. If you import a tagged text file into InDesign, the formatting codes are applied to the text and are not visible. This option is available only if text is highlighted or the insertion point is blinking.
• Adobe PDF: This option lets you export a page, multiple pages, or a document to PDF. See #97 for more about exporting as PDF.
• EPS: If you need to use an InDesign page in another program or another InDesign document, the EPS file format is the best option. When you export to EPS, you can export a page, a spread, a range or pages, or all pages. Each page or spread is saved as a separate EPS file.
• InCopy CS3 Interchange: If your workflow includes Adobe InCopy CS3, a word processing and editorial application closely integrated with InDesign, you can export content (text and graphics) in the InCopy CS3 Interchange format (.inx). InCopy CS3 users can check out and modify these files. A link is maintained between the exported file and the InDesign document so that modifications made to the exported file are reflected in the InDesign document.
• InCopy Document: Lets you export InDesign content in .icml format that can be opened and modified using InCopy CS4.
• InDesign CS3 Interchange (INX): If you, a colleague, or a client needs to open an InDesign CS4 document using InDesign CS3, you can export the InDesign CS4 document using the InDesign Interchange format. If any objects use features that are new in InDesign CS4, they may be modified or omitted when the file is opened in InDesign CS3. Copies of InDesign CS3 may need to be updated to be able to open .inx files.
• InDesign Markup (IDML): This format is useful for saving documents that were created in other page layout programs (QuarkXPress or PageMaker) or when you’re having problems with an InDesign document. Developers can use standard XML tools to assemble and disassemble .idml files.
• InDesign Snippet: A snippet is an electronic file with an .inds extension that contains one or more InDesign objects. Snippet files are much like graphic files—for example, you can import (File > Place) or drag and drop snippet files into InDesign layouts.
• JPEG: The JPEG file format is often used for images in Web pages. When you export to JPEG, you can export an object, a page, a spread, a range of pages, or all pages, and you can specify the resolution of the file. Each page or spread is saved as a separate JPEG file.
• Rich Text Format: The Rich Text Format (RTF) converts all text formatting to text instructions that other programs, particularly Microsoft Word, can recognize. Not all of the text-formatting features in InDesign are supported by RTF. For example, horizontal/vertical scaling, optical kerning, and shear are not supported. This option is available only if text is highlighted or the insertion point is blinking.
• SWF: You can export SWF files that include page transitions, buttons, rollovers, and hyperlinks. SWF files can be opened and played using Adobe Flash player.
• Text Only: This option saves a .txt file and removes all paragraph and character formatting and is available only if text is highlighted or the insertion point is blinking.
• XML: Similar to HTML files, XML files include tags that describe text and graphic content, but do not include information about how the content is displayed or formatted. The XML file format is particularly useful for using the same content across different media. There’s no point in exporting a document as XML without first assigning XML tags to the objects in the document.
While you can use InDesign to produce nonprinted documents, such as interactive multimedia PDFs, chances are you’ll print most of the documents you create. Whether you need to print proofs of a layout to an inkjet or laser printer or send a finished layout to a high-resolution printer, such as an imagesetter, you can use InDesign’s extensive printing controls to ensure that you get the results you want.
Before you print a document, it’s a good idea to preflight it (Window > Output > Preflight; see #94) to determine whether there are any potential printing problems and, if so, fix them. You should also make sure that the correct printer drivers and PostScript Printer Descriptions (PPDs) are installed on your computer. When you’re ready to print, choose File > Print.
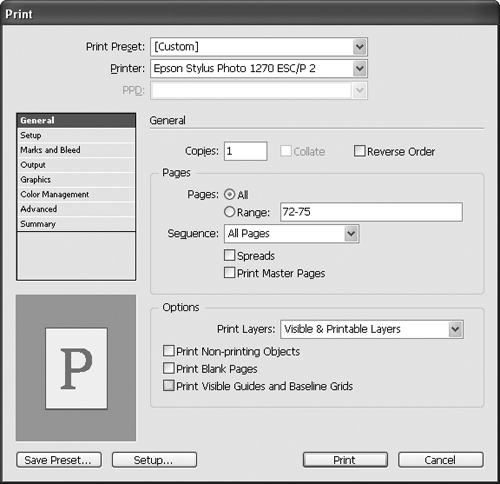
To specify the printer, choose a print preset from the Print Preset menu in the Print dialog box (Figure 99; for more about print presets, see the sidebar on the next page), or choose Custom if you want to modify settings in any of the Print dialog box panes. You can also choose a printer from the Printer menu.
Figure 99 The Print dialog box contains several panes of controls for specifying printing settings. Here you see the General pane, which lets you choose a printer and specify the pages to print, and also provides options for printing objects, blank pages, and guidelines and gridlines that wouldn’t otherwise print.
If you choose a print preset, all you have to do is click Print. All of the settings in the General, Setup, Marks and Bleeds, Output, Graphics, Color Management, and Advanced panes of the Print dialog box are automatically set based on the settings in the selected preset. You can specify custom print settings by making changes in any of the panes. When you modify default settings for a print preset or choose a different printer from the Printer list, “[Custom]” is displayed in the Print Preset menu.
The Print dialog box contains several dozen controls—too many to attempt to explain here. It’s a good idea to examine the controls in each pane so that you know what’s available. You probably won’t need to change many of the controls very often, but, if you do, familiarity will come in handy.
When you create multipage documents with InDesign, the pages are displayed in the document window in the same order that a reader would read them. Page 1 is the first page, followed below by pages 2 and 3 (displayed together), then pages 4 and 5, and so on. Each facing-page spread is called a reader spread. However, before a multipage document is printed at a commercial printer, the pages must be rearranged into printer spreads. For example, the first page of a document and the last page form a printer spread. Page 2 and the next-to-last page are a printer spread, and so on. The process of creating printer spreads from reader spreads is called imposition.
Choosing the Print Booklet command (File menu) displays the Print Booklet dialog box (Figure 100), which provides several controls for specifying how multipage documents are printed. In the Setup pane, choose a print preset, specify the pages you want to print, and then choose one of the five options in the Booklet Type menu:
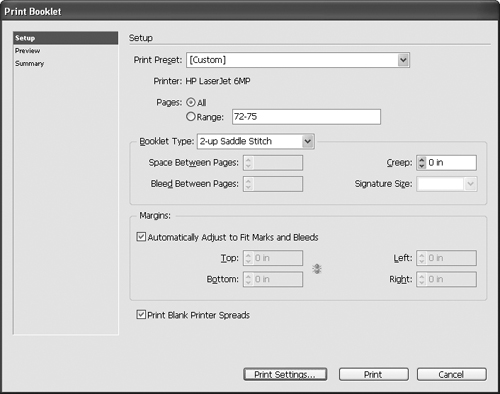
• 2-up Saddle Stitch: This option creates two-page, side-by-side printer spreads. The Space Between Pages, Bleed Between Pages, and Signature Size controls aren’t available when 2-up Saddle Stitch is selected.
• 2-up Perfect Bound: This option creates two-page, side-by-side printer spreads that fit within the specified signature size (see below).
• 2-up Consecutive, 3-up Consecutive, and 4-up Consecutive: All of these options create multipage panels appropriate for a foldout publication or a brochure. The Bleed Between Pages, Creep, and Signature Size controls are not available when any of these options is selected.
Here’s a brief description of the other controls in the Print Booklet dialog box:
• Space Between Pages: This specifies the amount of space between pages in a printer spread.
• Bleed Between Pages: This determines the distance within the specified Gap that objects extending beyond the inner edge of a page will print (somewhat like a bleed for the inner edges of a spread).
• Creep: If 2-up Saddle Stitch or 2-Up Perfect Bound is selected in the Booklet Type menu, the Creep value you enter accommodates for the accumulated thickness of the paper and folding.
• Signature Size: This specifies the number of pages in a perfect-bound document signature and is available only if you choose 2-up Perfect Bound from the Booklet Type menu.
• Margins: The values you enter in the Margins area determine the amount of space that surrounds a printer spread after it is trimmed.