THE IMAGE WINDOW OPENS BEFORE YOU FOR THE FIRST TIME, and you take a deep breath as you look it over and realize all the little things that need to be fixed before the image can be unleashed upon the public. What to do first? How to turn this into a masterpiece? Many images need only tone and color corrections plus a little sharpening before they’re ready to go out the door. Other images need a few physical adjustments such as cropping and straightening, or may suffer from lens distortion that you’d like to remove. For these images, it’s good to take care of physical corrections before you start adding layers and elements that depend on where things are in the image.
Before we get into the tone and color corrections in the following chapter, we want to spend a little time covering the ins and outs of image editing basics: resolution, transformations, and selecting areas and objects. Once you get a handle on these methods, it becomes much easier to apply tone and color corrections exactly where you want them.
![]() If there’s one thing that always trips me up, it’s the concept of resolution. Is it just me, or does the word resolution have multiple meanings?
If there’s one thing that always trips me up, it’s the concept of resolution. Is it just me, or does the word resolution have multiple meanings?
![]() In the strict sense, resolution is a measure of how fine the image dots are, by dividing the number of pixels by the physical size (as in “300 dots per inch”). But the exact meaning of that number does change depending on where and how an image is used, and where it is in the capture-to-output workflow. Knowing your resolutions is important when you’re communicating with someone else. Here’s how we’ve boiled it down (Figure 3.1):
In the strict sense, resolution is a measure of how fine the image dots are, by dividing the number of pixels by the physical size (as in “300 dots per inch”). But the exact meaning of that number does change depending on where and how an image is used, and where it is in the capture-to-output workflow. Knowing your resolutions is important when you’re communicating with someone else. Here’s how we’ve boiled it down (Figure 3.1):
Sampling resolution. If you’re using a scanner, this is the resolution at which a scanner samples the original. This number describes, in samples per inch (spi), how precisely an image was scanned. You control sampling resolution using your scanning software. For digital cameras, sampling resolution doesn’t really apply: You could be taking a photo of a landscape 3 miles wide or a close-up of a 3-inch-wide flower, making “dots per inch” quite arbitrary.
File resolution. When you save an image from Photoshop or other software, the software writes an image resolution into the file. File resolution doesn’t mean much unless you print the image, because it doesn’t refer to the number of pixels in the file. Some digital cameras write 72 ppi into a file just to put a number in that field.
Effective resolution. This is the resolution of an image at its final output dimensions. For example, a 1600x1200-pixel digital camera photo scaled to 2.5 inches wide on a layout, creates an effective resolution of 1,600 pixels ÷ 2.5 inches or 640 ppi. If you scale up an image too far, its effective resolution drops below the value required for good quality.
Device resolution. This number isn’t part of the image at all, but is the resolution of the output device. For example, a monitor might be 96 dpi, and a platemaker might be 2,400 dpi. For print, an image doesn’t need to match the device resolution. For example, you don’t need to send a 5,760 ppi image to a 5,760 dpi inkjet! A 360 ppi image prints very well.
If you aren’t printing an image, don’t worry about dpi at all. Just pay attention to the image dimensions in pixels (e.g., 1600x1200 pixels). That’s how image sizes are measured on monitors.
![]() I do a lot of print work, so I do need to be aware of the effective resolution of my images. Our publication requires images to have a resolution of 300dpi or higher. How do I use Photoshop to find out the resolution of an image?
I do a lot of print work, so I do need to be aware of the effective resolution of my images. Our publication requires images to have a resolution of 300dpi or higher. How do I use Photoshop to find out the resolution of an image?
![]() You may not even need to use Photoshop! If you view an image in Adobe Bridge and display the Metadata panel (View > Metadata Panel), you’ll see Resolution listed there. If you’ve already got the image open in Photoshop, you’ve got options (Figure 3.2):
You may not even need to use Photoshop! If you view an image in Adobe Bridge and display the Metadata panel (View > Metadata Panel), you’ll see Resolution listed there. If you’ve already got the image open in Photoshop, you’ve got options (Figure 3.2):
To display the file resolution in the document window status bar, click the black triangle next to the status bar and choose Document Dimensions. The status bar displays the file resolution after the dimensions, in parentheses.
To display the file resolution in the Info palette, choose Palette Options from the Info palette menu and enable Document Dimensions.
Choose Image > Image Size, and you’ll find the Resolution option in the Document Size section. What happens when you change the Resolution value depends on if you enabled the Resample checkbox; see the topic “To Resample or Not to Resample” on the next page.

![]() I sent a digital photo to a magazine editor, but he told me that its resolution was too low. The magazine requires 300 ppi, and he said my image wasn’t acceptable because it was 180 ppi. I was told that a 6-megapixel camera can produce quite good quality for an 8x10 image, and I didn’t crop my image or change its resolution before I sent it to him. So why does he think the resolution is too low?
I sent a digital photo to a magazine editor, but he told me that its resolution was too low. The magazine requires 300 ppi, and he said my image wasn’t acceptable because it was 180 ppi. I was told that a 6-megapixel camera can produce quite good quality for an 8x10 image, and I didn’t crop my image or change its resolution before I sent it to him. So why does he think the resolution is too low?
![]() The editor is making a classic, common mistake: evaluating file resolution when he needs to be looking at effective resolution instead. In other words, he didn’t take the final output size into account when looking at your image.
The editor is making a classic, common mistake: evaluating file resolution when he needs to be looking at effective resolution instead. In other words, he didn’t take the final output size into account when looking at your image.
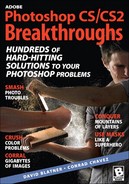
Let’s examine at a 6-megapixel image and look at its resolution properly. One popular 6-megapixel digital SLR produces an image with dimensions of 2000x3008 pixels. The resolution means nothing until you state the size at which it will be printed, so let’s state some sizes. Use the Image Size dialog box in Photoshop to do the math for you:
With the image open in Photoshop, choose Image > Image Size (Figure 3.3).
Make sure the Resample Image checkbox is disabled.
In the Document Size section, enter the width or height at which you want to output the image.
The Resolution value now tells you the resolution the image can inherently provide at that size.
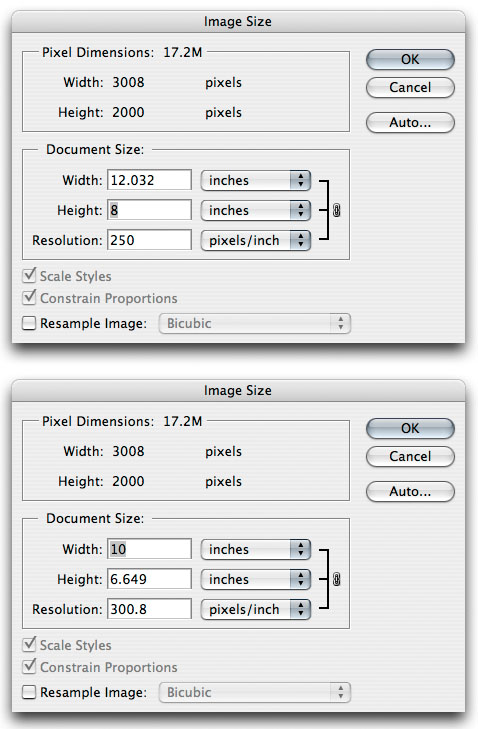
The 2:3 frame proportions of the image don’t match the 3:4 proportions of an 8×10-inch image, so we try entering 8 inches wide and Photoshop tells us it’ll be 12 inches tall and 250 pixels per inch. A little low, but most magazines aren’t 12 inches tall.
That still leaves one big question: Why does the editor see the image as 180 ppi? Digital cameras have no inherent resolution, but some would find it odd to have an empty Resolution field, so digital cameras tend to embed an arbitrary ppi value into their files. You could pull 3 different 6-megapixel cameras off the shelf, take a picture with each one, and compare the dpi values in the images. The image from one camera might claim 180 ppi, the second 300 ppi, and the third 350 ppi—even though all three actually produced the same number of pixels.
![]() When should I enable or disable the Resample Image checkbox in the Image Size dialog box?
When should I enable or disable the Resample Image checkbox in the Image Size dialog box?
![]() That little Resample Image checkbox at the bottom of the Image Size dialog box (Figure 3.3) is a frequent source of confusion.
That little Resample Image checkbox at the bottom of the Image Size dialog box (Figure 3.3) is a frequent source of confusion.
When Resample Image is on, pixels are added or subtracted during resizing (Figure 3.4). Resampling is usually a good idea when you make an image smaller, and occasionally a good idea when you enlarge an image. Resampling during reduction can remove unnecessary image data so that the file size doesn’t take up too much disk space. Resampling during enlargement can help avoid jaggies in the image, but only to a point. Even with the best resampling methods, you can enlarge an image only so far—typically less than 200 percent—before it no longer looks sharp. Resampling carefully can help keep an image within that happy medium between too little detail and an unnecessarily dense image file.
Figure 3.4. When the original image (top) is enlarged with resampling on (top right), Photoshop creates more pixels to keep the resolution constant. When enlarged with resampling off (bottom right), the number of pixels must stay constant, causing the resolution to drop—the pixels get bigger.
You can experiment with resampling if you have an image open in Photoshop. First choose Image > Image Size. When you enter new values for Width and Height under Pixel Dimensions and Resample Image is turned on, the file size changes but Document Size stays constant.
![]() I have an image that I need to resample, but I don’t know which of the five resampling choices to use. Should I simply leave it at the Bicubic default?
I have an image that I need to resample, but I don’t know which of the five resampling choices to use. Should I simply leave it at the Bicubic default?
![]() There isn’t one best method for all situations, so Adobe provides five ways to resample (Figure 3.5):
There isn’t one best method for all situations, so Adobe provides five ways to resample (Figure 3.5):
Nearest Neighbor duplicates a sample by simply copying a pixel next to it. This doesn’t make photographic images look good, but is often better for some 1-bit-perchannel or indexed-color images.
Bilinear duplicates a sample by averaging the pixels on either side of it. It’s faster than the Bicubic options, but doesn’t look as good.
Bicubic looks at the samples on all four sides, averages them, and applies that value to the new sample point. Bicubic is slower than Bilinear or Nearest Neighbor, but yields the best quality with continuous tone images.
Tip
When talking about resolution, you may see references to samples per inch (spi), pixels per inch (ppi), and dots per inch (dpi). Strictly speaking, these terms help distinguish sampling and file resolution from effective and device resolution, to avoid the various kinds of resolution confusion we talk about in this section. In casual conversation, however, it’s OK to use these units of measure interchangeably.
Bicubic Smoother is a version of Bicubic that often works better when enlarging an image.
Bicubic Sharper is a version of Bicubic that often works better when reducing an image.

The bottom line? When working with photos, use one of the Bicubic options. Because actual results depend on the image content, you might want to try each option when you’re working with critical images.
![]() What’s the difference between Image Size and Canvas Size?
What’s the difference between Image Size and Canvas Size?
![]() The simplest explanation is that the Image Size command (Image > Image Size) affects the image, and Canvas Size (Image > Canvas Size) affects the document. If you enlarge the Canvas Size, you end up with more space around the image. If you reduce the Canvas Size, part of the image is chopped off.
The simplest explanation is that the Image Size command (Image > Image Size) affects the image, and Canvas Size (Image > Canvas Size) affects the document. If you enlarge the Canvas Size, you end up with more space around the image. If you reduce the Canvas Size, part of the image is chopped off.
A common use for Canvas Size is adding more area to a document while preserving the existing image size (Figure 3.6). A great example of this is when you’re assembling several photos into one big document. You can start with one photo and enlarge the Canvas Size to make room for adding and arranging other photos.

![]() I’ve got a folder full of images that my boss wants me to put up on our web site. I’ve got two problems here. One, the images are print-sized, so I have to reduce them for the Web. Two, they’re all different sizes, so the Image Size command won’t work right in a batch action. What can I do?
I’ve got a folder full of images that my boss wants me to put up on our web site. I’ve got two problems here. One, the images are print-sized, so I have to reduce them for the Web. Two, they’re all different sizes, so the Image Size command won’t work right in a batch action. What can I do?
![]() Use Fit Image (File > Automate > Fit Image) instead of the Image Size command. You can set a width and height within which each image is resized to fit. And it works great as part of a Photoshop action.
Use Fit Image (File > Automate > Fit Image) instead of the Image Size command. You can set a width and height within which each image is resized to fit. And it works great as part of a Photoshop action.
![]() Is there a way to restore an area I’ve cropped out of an image? Before you ask: Yeah, I already saved and closed the file.
Is there a way to restore an area I’ve cropped out of an image? Before you ask: Yeah, I already saved and closed the file.
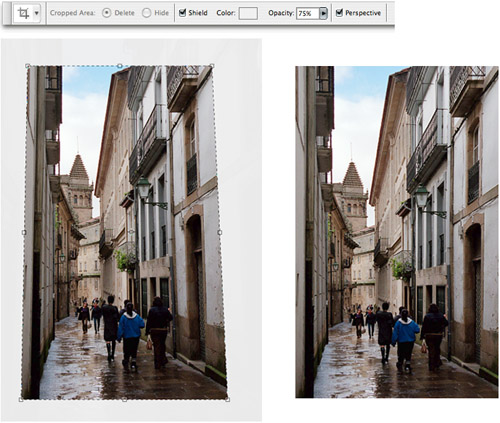
![]() By default, the crop tool permanently deletes the cropped area, and you can’t recover that area after saving. However, if you check out the Options bar for the Crop tool, you’ll find two Cropping Area options: Delete, and Hide (you only see these after drawing the cropping rectangle). The Hide option is unavailable if you’re cropping an image with a Background in the Layers palette, so the first step is to convert Background to a layer.
By default, the crop tool permanently deletes the cropped area, and you can’t recover that area after saving. However, if you check out the Options bar for the Crop tool, you’ll find two Cropping Area options: Delete, and Hide (you only see these after drawing the cropping rectangle). The Hide option is unavailable if you’re cropping an image with a Background in the Layers palette, so the first step is to convert Background to a layer.
In the Layers palette, Option/Alt-double-click the Background layer to convert it to Layer 0.
Select the Crop tool, and drag a crop rectangle.
In the Options bar, click the Hide button (Figure 3.7).
Press Enter or Return.

Because you clicked the Hide option, there are two things you can now do that you couldn’t before. First, you can reposition the cropped image using the Move tool (wow!). And second, at any time you can restore the cropped area by choosing Image > Reveal All.
You can also recover any part of the hidden area by dragging the Crop tool beyond the edge of the image.
The area cropped out by the Hide option stays around even after you save and reopen the document, as long as you don’t flatten the image. Because documents cropped with the Hide option look the same as documents cropped with the Delete option, you might want to add a note to the document using the Notes tool, to remind you that there is extra image area that needs to be preserved.
![]() Is it true that you can actually use the Crop tool to correct perspective distortion in an image?
Is it true that you can actually use the Crop tool to correct perspective distortion in an image?
![]() It sure is! There’s a Crop tool option called Perspective, which is yet another crop tool option that’s only visible when a crop area is active:
It sure is! There’s a Crop tool option called Perspective, which is yet another crop tool option that’s only visible when a crop area is active:
Using the Crop tool, drag a crop rectangle. Don’t worry about precision at the point.
In the Options bar, check the Perspective option (Figure 3.8).
Drag corner handles to line up the edges of the crop area with perspective lines in the image.
Press Enter or Return to commit the crop area. The Crop tool uses your modified crop area to remove the perspective distortion.
![]() The Crop tool is hard to control when it’s right up against the edge of the window. I notice this most when I’m trying to move crop area handles in Perspective mode. If I drag a crop handle outside the window, I can’t get it back. If I zoom out to see the area outside the image, I can no longer position the handle with precision. Is it possible to have more control over cropping near edges while I’m zoomed in close on the image?
The Crop tool is hard to control when it’s right up against the edge of the window. I notice this most when I’m trying to move crop area handles in Perspective mode. If I drag a crop handle outside the window, I can’t get it back. If I zoom out to see the area outside the image, I can no longer position the handle with precision. Is it possible to have more control over cropping near edges while I’m zoomed in close on the image?
![]() Yes. If you’re viewing a document in the default window view (Standard Screen Mode), you may find it difficult to start or stop dragging precisely at the edge of an image. It’s much easier if there’s space around the image. Either zoom out or enlarge the window slightly to reveal the area outside the image, and you’ll now be able to snap exactly to the image edge when you start or stop dragging (Figure 3.9). If you’re viewing the document in Full Screen mode or Full Screen with Menu Bar mode, either choose View > Fit on Screen or zoom in and use the Hand tool to scroll past the edge; either method allows tools to snap to the edge.
Yes. If you’re viewing a document in the default window view (Standard Screen Mode), you may find it difficult to start or stop dragging precisely at the edge of an image. It’s much easier if there’s space around the image. Either zoom out or enlarge the window slightly to reveal the area outside the image, and you’ll now be able to snap exactly to the image edge when you start or stop dragging (Figure 3.9). If you’re viewing the document in Full Screen mode or Full Screen with Menu Bar mode, either choose View > Fit on Screen or zoom in and use the Hand tool to scroll past the edge; either method allows tools to snap to the edge.

Figure 3.9. In Standard Screen Mode (top), it’s possible to drag a crop area handle past the window edge. To reach that handle after you release the mouse, you’d have to zoom out. If you work in one of the Full Screen modes (bottom), you can reach handles outside the crop area without having to zoom out.
![]() When I use the Crop tool Options bar to crop to a specific dimensions, it changes the resolution of the image. How can I crop to specific dimensions without altering the resolution of the image? I just want to clip some pixels off of the sides of the image.
When I use the Crop tool Options bar to crop to a specific dimensions, it changes the resolution of the image. How can I crop to specific dimensions without altering the resolution of the image? I just want to clip some pixels off of the sides of the image.
![]() When you use the Crop tool and in the Options bar you specify a fixed size while leaving Resolution blank, the size of the crop area you drag determines the resolution of the resulting image. For example, if you set the Crop tool for 4 inches wide, any crop area you drag must be resized to fit into 4 inches. If one crop area you drag is twice as large as another, that’s double the pixels to fit into four inches; therefore the resolution doubles.
When you use the Crop tool and in the Options bar you specify a fixed size while leaving Resolution blank, the size of the crop area you drag determines the resolution of the resulting image. For example, if you set the Crop tool for 4 inches wide, any crop area you drag must be resized to fit into 4 inches. If one crop area you drag is twice as large as another, that’s double the pixels to fit into four inches; therefore the resolution doubles.
To crop to specific dimensions without altering the resolution, you can use the Rectangular Marquee tool:
Select the Rectangular Marquee tool.
On the Options bar, choose Fixed Size from the Style popup menu, and enter the size you want, such as “4 in” or “200 px” (Figure 3.10).
Drag the Rectangular Marquee tool to position the selection marquee. You can only reposition the marquee; you won’t be able to resize it because you used the Options bar to lock the dimensions.
Choose Image > Crop.
Choose Select > Deselect.

Why not just fill in the Resolution field in the Options bar for the Crop tool? If you do this, the Crop tool resamples the image, so if you’re trying to avoid resampling, don’t fill in the Resolution field.
![]() I see that Camera Raw also has a Crop tool. When should I use that one?
I see that Camera Raw also has a Crop tool. When should I use that one?
![]() We think you should crop in Adobe Camera Raw whenever possible. If you crop in Camera Raw, you’ll reduce the amount of data that’s passed to Photoshop in the first place. Also, the Crop tool in Adobe Camera Raw is nondestructive, so if you screw up a crop, just go back to Camera Raw, edit the crop, and re-convert the raw image to Photoshop. Nondestructive cropping in Camera Raw is much easier than using the Hide feature in the Options bar for the Crop tool.
We think you should crop in Adobe Camera Raw whenever possible. If you crop in Camera Raw, you’ll reduce the amount of data that’s passed to Photoshop in the first place. Also, the Crop tool in Adobe Camera Raw is nondestructive, so if you screw up a crop, just go back to Camera Raw, edit the crop, and re-convert the raw image to Photoshop. Nondestructive cropping in Camera Raw is much easier than using the Hide feature in the Options bar for the Crop tool.
One big advantage to cropping in Camera Raw is that Camera Raw remembers the crop. If you ever need to convert the raw image again, your previous crop is already there. If you crop a converted raw in Photoshop and you need to convert the raw file again, you have to somehow re-create the same crop.
Camera Raw records your crop area along with your other raw adjustments, saving it all to the Camera Raw database or in the image’s XMP file, depending on how you’ve set your preferences. That’s how it remembers the crop.
Tip
You can use the Crop tool to extend the canvas size, by dragging a crop rectangle that’s larger than the canvas area. The catch is that you have to drag the crop tool to the document edge and let go; only after the crop area exists are you able to drag the crop area past the edge of the image. The new area uses the background color by default. If you want to added area to have a particular color, set the background color before you add to the canvas area.
![]() I need to get an image into an aspect ratio of 16:9 for an HDTV project. What’s the fastest way to do that?
I need to get an image into an aspect ratio of 16:9 for an HDTV project. What’s the fastest way to do that?
![]() If you know the pixel dimensions of the new aspect ratio, such as 1280×720 pixels, simply choose the Crop tool and enter the new dimensions in the Crop tool’s Options bar before you start dragging the crop rectangle.
If you know the pixel dimensions of the new aspect ratio, such as 1280×720 pixels, simply choose the Crop tool and enter the new dimensions in the Crop tool’s Options bar before you start dragging the crop rectangle.
However, the Crop tool doesn’t provide a way to enter an aspect ratio, such as 16:9, without also changing the dimensions of the image. If you want to crop to a specific aspect ratio (outside of Camera Raw), you can use the Marquee tool.
Select the Rectangular Marquee tool.
On the Options bar, choose Fixed Aspect Ratio from the Style popup menu, and enter the aspect ratio you want. For example, to set a 16:9 aspect ratio, enter 16 into the Width box and 9 into the Height box.
Drag the Marquee tool to position the selection rectangle (Figure 3.11). If you want to reposition or resize the selection rectangle after you release the mouse, choose Select > Transform Selection and Shift-drag a corner handle to resize it proportionally (and then press Enter).
Choose Image > Crop.

If you import an image from a video capture (such as a frame from iMovie) and the contents appear distorted in Photoshop, you may need to assign a different pixel aspect ratio to the image. Simply choose the pixel aspect ratio of the source video from the Image > Pixel Aspect Ratio submenu.
Assigning a pixel aspect ratio doesn’t alter the image data at all. It only corrects the display to account for the pixel aspect ratio under which the image was created. If you want to see what the image looks like without the pixel aspect ratio correction and without losing the assigned pixel aspect ratio, you can turn the command View > Pixel Aspect Ratio Correction on and off. You can assign a pixel aspect ratio to a new document, too.
In the New dialog box (File > New), click the triangle next to Advanced and enter a Pixel Aspect Ratio.
Tip
When all you want to do is remove extra blank space around a graphic, choose Image > Trim as a fast alternative to manual cropping. The Trim command works when the area you’re removing is all one color or tone; it won’t work if there are stray pixels or a texture. We mentioned the Trim command before for screen shots, but we mention it here again because it’s good for cropping more than screen shots.
![]() Are there secrets to using the Lasso tool? I never get a perfect selection and I hate having to start over because of stray bumps and missed areas.
Are there secrets to using the Lasso tool? I never get a perfect selection and I hate having to start over because of stray bumps and missed areas.
![]() No one makes a perfect selection with the Lasso tool the first time. First, make an initial selection that’s close enough for you to fine-tune. You can then make additional passes to refine the selection until it’s just right. As is so often the case, the secret lies within modifier keys you can press to change the behavior of the lasso tool as you draw:
No one makes a perfect selection with the Lasso tool the first time. First, make an initial selection that’s close enough for you to fine-tune. You can then make additional passes to refine the selection until it’s just right. As is so often the case, the secret lies within modifier keys you can press to change the behavior of the lasso tool as you draw:
To add to an existing selection, start with the mouse button up and then Shift-drag the Lasso tool through the existing selection (Figure 3.12).
To subtract from an existing selection, start with the mouse button up and then Option/Alt drag through the existing selection.
When you Option-Shift-drag/Alt-Shift-drag a selection tool through an existing selection, what’s left is the intersection between the two selections.

You can use these techniques with any tool that creates a marquee (that “marching ants” effect), such as the Magic Wand, Magnetic Lasso, or Elliptical Marquee tools. As you memorize the modifier keys, you can get into a rhythm where you “sculpt” rough initial selections into precise selections over multiple passes.
Tip
To draw a perfectly straight segment while you’re dragging the Lasso tool, hold down Option/Alt, keep holding down Option/Alt as you release the mouse button, then click. As long as you keep holding down Option/Alt, clicking creates straight segments and dragging creates freeform segments. When you release the Option/Alt key, the lasso tool returns to its usual mode.
![]() Can you give me an example of when I might want to use the Magnetic Lasso tool? It doesn’t seem to work too well when I drag it.
Can you give me an example of when I might want to use the Magnetic Lasso tool? It doesn’t seem to work too well when I drag it.
![]() The Magnetic Lasso tool can be a godsend when an edge is so complicated that dragging the Lasso tool along it would be extremely tedious. As you move the Magnetic Lasso tool (Figure 3.13), it looks for contours in the form of contrasty edges, and it creates a selection along the contour it finds.
The Magnetic Lasso tool can be a godsend when an edge is so complicated that dragging the Lasso tool along it would be extremely tedious. As you move the Magnetic Lasso tool (Figure 3.13), it looks for contours in the form of contrasty edges, and it creates a selection along the contour it finds.

Figure 3.13. The Magnetic Lasso tool automatically follows an edge formed by obvious contrast between colors or tones.
You don’t need to constantly press the mouse button as you use the Magnetic Lasso tool. After you first click the tool to set the starting point of the selection, you can let go of the mouse button and simply move the pointer along the contour you want the magnetic lasso to follow, and the magnetic lasso can usually follow it. If it goes off course, you can then back up and drag, or back up and click to put down a control point.
![]() What’s the easiest way to select all the parts of an image that are the same color?
What’s the easiest way to select all the parts of an image that are the same color?
![]() If you just want to select a few regions of the same color, the simplest way is probably to click the region with the Magic Wand tool.
If you just want to select a few regions of the same color, the simplest way is probably to click the region with the Magic Wand tool.
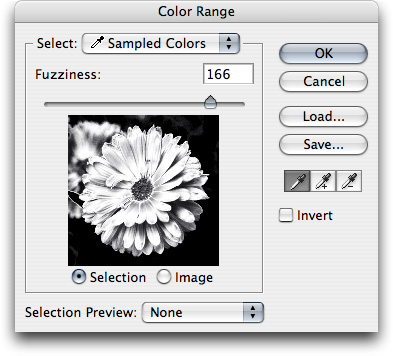
If you want to select all areas of a color and the color appears in many separated areas throughout the image, the Color Range tool is probably a more efficient way. The Color Range command lets you click the color you want, and provides a Tolerance value so you can interactively include or exclude a range of variations in your target color. Unlike the Magic Wand tool, the Color Range command always selects all instances of your target color. Even though the feature is called Color Range, you can also use it to select a particular tone in a black-and-white image. To use the Color Range command:
Choose Select > Color Range.
In the Color Range dialog box (Figure 3.14), set the color or tone to select by choosing it from the Select popup menu, or clicking the color in the image window.
If you want to select more or fewer pixels based on their similarity to the color you clicked, drag the Fuzziness slider.
To add or subtract colors from the selection, use the eyedroppers with the plus or minus sign, respectively, to click colors in the image.
Click OK.
![]() It looks to me like the Threshold feature would work much like the Color Range command. Right?
It looks to me like the Threshold feature would work much like the Color Range command. Right?
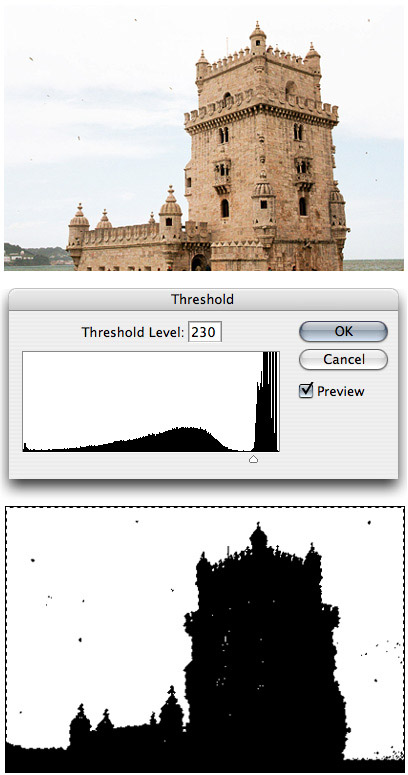
![]() Not exactly. Color Range can select a range starting from any color or tone in the image, and provides ways to customize the selection. Threshold only lets you select a range of tones starting from black or white. Also, you can’t go straight from the Threshold dialog box to a selection; after you isolate the area you need to click it with the Magic Wand tool.
Not exactly. Color Range can select a range starting from any color or tone in the image, and provides ways to customize the selection. Threshold only lets you select a range of tones starting from black or white. Also, you can’t go straight from the Threshold dialog box to a selection; after you isolate the area you need to click it with the Magic Wand tool.
However, when you quickly want to select a range based on the very lightest or darkest tones in the image, Threshold is a fast way to get it done (Figure 3.15). Follow these steps:
Choose Layer > New Adjustment Layer > Threshold and click OK.
Drag the slider until you see the edge you want to define, and click OK.
Select the Magic Wand tool, and click either the white or black area.
In the Layers palette, click the eye icon for the Threshold adjustment layer to hide it, and select the layer where you want to apply the selection. The selection marquee now applies to the selected layer. (If you don’t need the Threshold layer any further, you can delete it.)
![]() I’ve heard of people making selections through channels. What does that mean, how do I know when this is a good idea, and then how do I do it?
I’ve heard of people making selections through channels. What does that mean, how do I know when this is a good idea, and then how do I do it?
![]() An object with a dominant color has more color contrast in some color channels than in others. For example, if you have an RGB image of a landscape with a blue sky and you use the Channels palette in Photoshop to look at each channel individually, the sky stands out very clearly in the blue channel. This is similar to how Color Range works: If you want to select an area already isolated in one color channel, you can save a lot of time and effort by using that channel as a starting point for selection.
An object with a dominant color has more color contrast in some color channels than in others. For example, if you have an RGB image of a landscape with a blue sky and you use the Channels palette in Photoshop to look at each channel individually, the sky stands out very clearly in the blue channel. This is similar to how Color Range works: If you want to select an area already isolated in one color channel, you can save a lot of time and effort by using that channel as a starting point for selection.
Keep in mind that image channels look different when you convert the image to different color modes. If the RGB channels of an image don’t reveal any selection shortcuts, try duplicating the image and converting it to CMYK or LAB before checking the channels. If you’re isolating an area defined by light and dark, you may find a selection shortcut in the K channel of a CMYK version of an image, or in the L channel of a LAB version of an image. To make a selection from a channel:
In the Channels palette, click each of the different channels to see which one isolates your subject the best (Figure 3.16).

Figure 3.16. In this RGB image (far left), the flower’s outline stands out clearly in the red channel (second from left). It’s easy to make a clean selection from the red channel, though not from the green or blue channels (last two top images). At left is the Channels palette with the Red channel selected.
In the Channels palette, Command/Ctrl-click the channel you picked in step 1. The channel is now a selection.
If the subject or its edges need a little more isolation (it almost certainly will), you can use any other selection tools or Quick Mask mode to refine the selection into exactly the form you want. We discuss how and why to use Quick Mask mode in “Edit a Selection as a Quick Mask,” later on in the chapter.
To save what you’ve done as a new channel (so you can recall it again later), click on the Save Selection as Channel button in the Channels palette.
![]() I’m trying to get rid of a background in an image, and all of the suggested methods so far are too tedious. Is there anything left in the Photoshop bag of tricks?
I’m trying to get rid of a background in an image, and all of the suggested methods so far are too tedious. Is there anything left in the Photoshop bag of tricks?
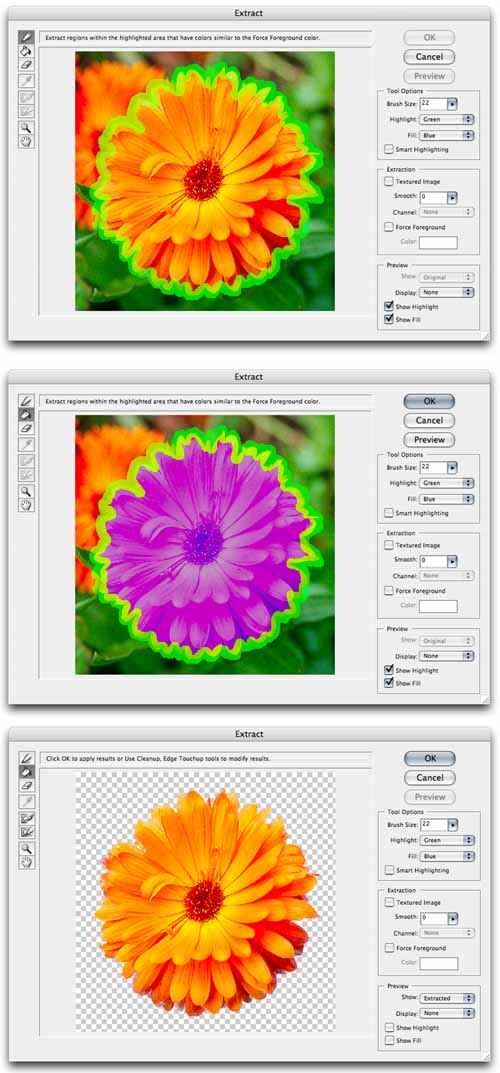
![]() You’re nowhere near out of options! When you try to select along a very complex edge like hair, where contrast isn’t consistent, selecting the edge you want may still be a challenge even with an intelligent selection tool like the Magnetic Lasso tool. The Extract feature is a way of indicating an edge through painting instead of drawing. Like other methods, it’s not a cure-all, but when you need it, you need it. To use Extract:
You’re nowhere near out of options! When you try to select along a very complex edge like hair, where contrast isn’t consistent, selecting the edge you want may still be a challenge even with an intelligent selection tool like the Magnetic Lasso tool. The Extract feature is a way of indicating an edge through painting instead of drawing. Like other methods, it’s not a cure-all, but when you need it, you need it. To use Extract:
In the Layers palette, drag the layer you’re working with to the New Layer button to duplicate it, then click the eye icon for the original layer to hide it. This step backs up the original layer data in case you want to try again.
Choose Filter > Extract.
Select the Edge Highlighter tool, and drag it to paint an outline along the edge you want to define (Figure 3.17). When dragging the brush, keep it over the edge you want to define. It’s better to keep the brush center on the subject’s side of the edge.
When you’re done painting the outline, select the Fill tool and click inside the area you want to keep.
Click Preview to check the separation of foreground from background.
If needed, use the Cleanup tool to make unwanted areas transparent, or use the Edge Touchup tool to define the edge of the subject more cleanly.
When you’re done, click OK.
Tip
You can view each channel of an image without having to open the Channels palette; just use keyboard shortcuts. Press the Command/Ctrl key with number keys 1 through 3. For example, press Command/Ctrl-1 to display the red channel of an RGB image or the L channel of a LAB image. For CMYK images, Command/Ctrl 1 through 4 display each of the CMYK channels. In any color mode, Command/Ctrl-~ (tilde) displays all channels. And you can add the Option/Alt key to load the channel as a selection!
One of the interesting things about the Extract feature is that it actually performs “edge-spill decontamination.” That is, it gets rid of those ugly halos around the selection by removing the background color from the remaining edge pixels. Cool!
![]() I was editing a selection once and the image turned red. I think it’s because I pressed a key. When I restarted Photoshop, everything was back to normal. What was that all about?
I was editing a selection once and the image turned red. I think it’s because I pressed a key. When I restarted Photoshop, everything was back to normal. What was that all about?
![]() You accidentally put Photoshop into Quick Mask mode. This is not a bad thing. Quick Mask mode simply displays your selection as a channel instead of as a selection marquee (Figure 3.18). Anywhere you paint in the Quick Mask becomes a selection when you exit Quick Mask mode. Use Quick Mask mode whenever you think it would be easier to define a selection through painting black and white rather than by using a selection tool.
You accidentally put Photoshop into Quick Mask mode. This is not a bad thing. Quick Mask mode simply displays your selection as a channel instead of as a selection marquee (Figure 3.18). Anywhere you paint in the Quick Mask becomes a selection when you exit Quick Mask mode. Use Quick Mask mode whenever you think it would be easier to define a selection through painting black and white rather than by using a selection tool.

Figure 3.18. When the Quick Mask button is active (left), a selection (center) appears as red pixels (right) so that you can use painting tools to edit the selection.
Now back to the main question: How did you accidentally get into Quick Mask mode? Normally, you’d enter or exit Quick Mask mode using the Standard Mode and Quick Mask Mode icons in the toolbox. You probably pressed the keyboard shortcut for Quick Mask mode, which is Q. If your selection goes Quick Mask red all of a sudden, all you need to do is press Q again (or click the Standard Mode icon in the toolbox). Or, you can edit your selection in Quick Mask mode before returning to Standard mode.
You can use selection tools to help you paint or erase in Quick Mask mode, but don’t let that confuse you. The only areas that convert back into a selection when you leave Quick Mask mode are the areas that are colored when you’re in Quick Mask mode.
If you don’t like the red color, you can change it by double-clicking either the Standard Mode or Quick Mask Mode icon in the toolbox.
Tip
If you accidentally deselect a selection, choose Edit > Undo right away and you’ll restore the selection. Selection actions are added to the History palette, so you can undo selections or step backward or forward through them in the History palette. You can also try choosing Select > Reselect if you don’t want to undo intermediate steps.
![]() I just painted a great Quick Mask, but I’d like to keep it around. But as soon as I deselect the resulting selection, I lose the Quick Mask. How can I save a Quick Mask with the document?
I just painted a great Quick Mask, but I’d like to keep it around. But as soon as I deselect the resulting selection, I lose the Quick Mask. How can I save a Quick Mask with the document?
![]() You can save the Quick Mask selection as an extra “alpha” channel. In the Channels palette, click the Save Selection as Channel button (Figure 3.19)—or Option/Alt-click the button if you want to name the channel right away. A new channel based on the selection appears in the Channels palette. (Note that while you work in Quick Mask mode, a temporary Quick Mask channel appears in the Channels palette.)
You can save the Quick Mask selection as an extra “alpha” channel. In the Channels palette, click the Save Selection as Channel button (Figure 3.19)—or Option/Alt-click the button if you want to name the channel right away. A new channel based on the selection appears in the Channels palette. (Note that while you work in Quick Mask mode, a temporary Quick Mask channel appears in the Channels palette.)

Figure 3.19. Click the Save Selection as Channel button to convert the current selection to a new channel.
Once you save a selection as a channel, you can convert the channel back to a selection by Command/Ctrl-clicking the channel name in the Channels palette.
When you select your new channel in the Channels palette, you see the contents of the channel. You can edit a channel much like you would a Quick Mask—with painting tools. If you want to see the channel and the main image at the same time, enable the eye icons for both the channel and the main image in the left column of the Channels palette.
Tip
When you want to copy the pixels inside a selection, but the contents of the selection exist on different layers, you don’t have to flatten the document to copy the selection the way you want to. Simply make your selection and choose Edit > Copy Merged, and Photoshop merges all visible layer contents to the clipboard.
![]() Making a selection into a channel is a nice trick, but what I do most often with selections is try to separate a subject from its background. Can I go straight from a selection to background removal?
Making a selection into a channel is a nice trick, but what I do most often with selections is try to separate a subject from its background. Can I go straight from a selection to background removal?
![]() Yes, by converting a selection to a layer mask. It’s quite common to create a selection and then turn that into a layer mask. If you can create a selection that defines the outline of a subject, you’ll be able to separate it from its background rather quickly.
Yes, by converting a selection to a layer mask. It’s quite common to create a selection and then turn that into a layer mask. If you can create a selection that defines the outline of a subject, you’ll be able to separate it from its background rather quickly.
Create a selection (Figure 3.20).
You must be working with a layer that isn’t the Background in the Layers palette. If the subject you want to mask is part of the Background, first Option/Alt-double-click the Background to convert it to a layer.
Make sure the subject’s layer is selected in the Layers palette and click the Add Layer Mask button in the Layers palette.
A new layer mask appears (Figure 3.21). If needed, use any painting or editing tools to refine the layer mask by painting with black or white.

Figure 3.21. Clicking the Add Layer Mask button with the sky selection active adds a layer mask (left) to the current layer. Because the sky is selected, the new mask keeps the sky visible and hides the rest (center). This is the opposite of what we want, so with the layer mask selected in the Layers palette, we choose Image > Adjustments > Invert. That inverts the mask and gives us what we want: a mask that makes the old sky transparent and reveals the new sky.

As with channels, you can convert the layer mask to a selection at any time: Just Command/Ctrl-click the layer mask icon in the Layers palette. If these shortcuts don’t work, make sure the document is in Standard mode, not Quick Mask mode.
![]() But... if channels and masks are both ways to store and use selections as pixels, what exactly is the difference between a channel and a layer mask?
But... if channels and masks are both ways to store and use selections as pixels, what exactly is the difference between a channel and a layer mask?
![]() Extra channels (those other than the image’s own color channels, such as RGB) don’t directly affect the final look of the document (unless you export one along with an image, as an alpha channel). Compared to a channel, a layer mask does affect the final look of a document by applying transparency to a layer.
Extra channels (those other than the image’s own color channels, such as RGB) don’t directly affect the final look of the document (unless you export one along with an image, as an alpha channel). Compared to a channel, a layer mask does affect the final look of a document by applying transparency to a layer.
You’d typically create a new channel to store selections or transparency away in a file for later use, and you’d typically create a new mask to create transparent areas on a specific layer right now.
![]() I created a selection that was just right, except that I needed to rotate and scale the entire selection. When I tried using the Free Transform command, it rotated and scaled the selected pixels, not the selection. How can I transform the selection but not the pixels?
I created a selection that was just right, except that I needed to rotate and scale the entire selection. When I tried using the Free Transform command, it rotated and scaled the selected pixels, not the selection. How can I transform the selection but not the pixels?
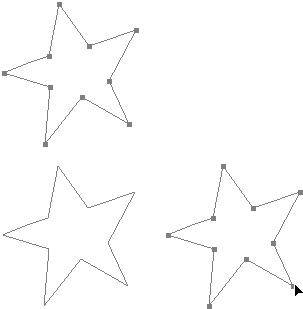
![]() As you discovered, the transformation commands on the Edit menu affect only pixels, not selection marquees. Instead, choose Select > Transform Selection (Figure 3.22). With Transform Selection, the transformation bounding box works the way it does for the Edit > Free Transform command but only affects the selection marquee, not the image. When you’re done, commit the transformation by pressing Enter or Return.
As you discovered, the transformation commands on the Edit menu affect only pixels, not selection marquees. Instead, choose Select > Transform Selection (Figure 3.22). With Transform Selection, the transformation bounding box works the way it does for the Edit > Free Transform command but only affects the selection marquee, not the image. When you’re done, commit the transformation by pressing Enter or Return.

![]() I want to make a selection slightly larger, but because it isn’t a uniform shape, the selection becomes distorted if I try to enlarge it using Transform Selection. What now?
I want to make a selection slightly larger, but because it isn’t a uniform shape, the selection becomes distorted if I try to enlarge it using Transform Selection. What now?
![]() Sounds like you’ll find the answer in the Expand/Contract commands. They don’t scale selections—they offset them inward or outward. To spread out or pull in a selection, choose Select > Modify > Expand or Contract (Figure 3.23). However, for really fine control over spreading or choking a selection edge, switch to Quick Mask mode, run a small Gaussian Blur filter on the mask (perhaps 1 pixel), then open the Levels command (Image > Adjustments > Levels). Drag the gray midpoint slider to expand or contract the selection in the channel, then click OK and leave Quick Mask mode.
Sounds like you’ll find the answer in the Expand/Contract commands. They don’t scale selections—they offset them inward or outward. To spread out or pull in a selection, choose Select > Modify > Expand or Contract (Figure 3.23). However, for really fine control over spreading or choking a selection edge, switch to Quick Mask mode, run a small Gaussian Blur filter on the mask (perhaps 1 pixel), then open the Levels command (Image > Adjustments > Levels). Drag the gray midpoint slider to expand or contract the selection in the channel, then click OK and leave Quick Mask mode.

![]() How can I paint along a selection edge with a line, instead of filling it?
How can I paint along a selection edge with a line, instead of filling it?
![]() You can choose between two options in this case. To paint the selection marquee with a simple stroke, choose Edit > Stroke, enter a width and other options, and click OK.
You can choose between two options in this case. To paint the selection marquee with a simple stroke, choose Edit > Stroke, enter a width and other options, and click OK.
Alternately, you can be more creative with that border, such as painting it with an interesting fill, by choosing Select > Modify > Border. After you enter a Width and click OK, the selection encloses the border of the original selection, instead of enclosing an area. Now fill it with something interesting, or run a filter.
![]() What’s the best way to soften the edge of a selection?
What’s the best way to soften the edge of a selection?
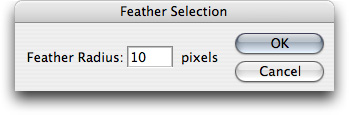
![]() When a selection is active, simply choose Select > Feather and enter the width of the edge blur you want (Figure 3.24). Keep in mind that there won’t be any visible change to the selection marquee after you feather the selection—you’ll only see the effect of feathering after you apply a change to the selection in some way, such as filling it.
When a selection is active, simply choose Select > Feather and enter the width of the edge blur you want (Figure 3.24). Keep in mind that there won’t be any visible change to the selection marquee after you feather the selection—you’ll only see the effect of feathering after you apply a change to the selection in some way, such as filling it.
For more control over the softening the edges of a selection, try these steps:
Make a selection.
In the Channels palette, click the Save Selection As Channel button to make a new channel from the selection.
Apply a blur filter to the channel (Figure 3.25). If you want, you can use other blur filters and tools to get exactly the blur you want.
In the Channels palette, Command/Ctrl-click the channel to convert it back to a selection. Because blurring the channel created grayscale values, the selection is feathered.

![]() I made a selection in one document, and I realized that I have a use for that same selection in another document. How can I quickly transfer a selection from one document to another?
I made a selection in one document, and I realized that I have a use for that same selection in another document. How can I quickly transfer a selection from one document to another?
![]() Piece of cake! Photoshop makes it possible to move selections between documents in two ways: as a “marching ants” selection or as a saved channels. To move the selection itself, make sure both documents are visible and drag the selection from one window to the next using any of the selection tools. If you want to center the selection, hold down the Shift key while dragging. (If the two images have the same pixel dimensions, the Shift key will make the selection appear in the same position as in the original file.)
Piece of cake! Photoshop makes it possible to move selections between documents in two ways: as a “marching ants” selection or as a saved channels. To move the selection itself, make sure both documents are visible and drag the selection from one window to the next using any of the selection tools. If you want to center the selection, hold down the Shift key while dragging. (If the two images have the same pixel dimensions, the Shift key will make the selection appear in the same position as in the original file.)
Alternately, you could save the selection in the Channels palette and then drag the channel tile across to the other document or use the Duplicate Channel feature in the Channels palette flyout menu to copy it into the other file.
Tip
When converting between a mask (or channel) and a selection, Photoshop has to draw the selection line somewhere. For a mask that contains only black and white, the border is easy to figure out. For grayscale masks, the selection border is drawn at the 50-percent value of the grayscale image that forms the mask. If a selection edge isn’t falling exactly where you expected, you can fine-tune the resulting selection by first using Levels or Curves to adjust the contrast in the mask. And if you’re painting in a mask, a harder-edged brush makes it easier to tell where the selection border will fall.
![]() I was looking at the Paths palette and I found a button that can convert a path to a selection. When is this useful?
I was looking at the Paths palette and I found a button that can convert a path to a selection. When is this useful?
![]() Many people who are fluent with the Pen tool find it easier to set up selections by drawing a path and then converting the path to a selection. Paths can be much easier to edit for subjects that involve precise lines and curves. Instead of having to drag the mouse so carefully, as you must do with the marquee and Lasso tools, with the Pen tool you can adjust paths precisely by dragging handles, points, and segments as needed.
Many people who are fluent with the Pen tool find it easier to set up selections by drawing a path and then converting the path to a selection. Paths can be much easier to edit for subjects that involve precise lines and curves. Instead of having to drag the mouse so carefully, as you must do with the marquee and Lasso tools, with the Pen tool you can adjust paths precisely by dragging handles, points, and segments as needed.
Another advantage of paths is that you can draw multiple paths, store them in the Paths palette, and convert them to selections at any time. Here’s how:
Select the Pen tool and click the Paths icon in the Options bar.
Use the Pen tool to draw the outline you want (Figure 3.26).
Paths are temporary unless you save them. To save the path with the document, double-click the temporary Work Path in the Paths palette to name it as a new entry.
To save more paths, click in the empty area of the Paths palette and draw and save another path.
In the Paths palette, Command/Ctrl-click the Work Path to create a selection from the path. (Or press Command-Return/Ctrl-Enter.)
To build a selection out of multiple paths, Command/Ctrl-click a path in the Paths palette, and then Command/Ctrl-Shift-click the other paths.

![]() Is there a way to save multiple crop areas within a single document? We’ve worked out preferred crop areas for various media like 4:3 aspect ratio TVs and widescreen TVs, and we’d like to save these crop areas in the master image.
Is there a way to save multiple crop areas within a single document? We’ve worked out preferred crop areas for various media like 4:3 aspect ratio TVs and widescreen TVs, and we’d like to save these crop areas in the master image.
![]() Once you crop an image with the Crop tool and save the document, you can’t retrieve the deleted area unless it still exists in a history state, or you applied the crop in Adobe Camera Raw, or you turned on the “Hide” feature in the Options bar with the Crop tool (see “Keeping What You Cropped,” earlier in this chapter). However, you can sort of store multiple crop areas by saving selections in the Channels palette.
Once you crop an image with the Crop tool and save the document, you can’t retrieve the deleted area unless it still exists in a history state, or you applied the crop in Adobe Camera Raw, or you turned on the “Hide” feature in the Options bar with the Crop tool (see “Keeping What You Cropped,” earlier in this chapter). However, you can sort of store multiple crop areas by saving selections in the Channels palette.
Use the Rectangular Marquee tool to draw a selection rectangle around the crop area you want to save.
In the Channels palette, click the Save Selection as Channel button, as we described earlier in this chapter.
Repeat steps 1 and 2 for other crop areas you want to save.
When you want to use a saved crop area, Command/Ctrl-click it in the Channels palette, and then choose Image > Crop. You might want to do this to a duplicate of the original image.
![]() How can I rotate an entire document? The commands on the Edit > Transform submenu rotate only one layer at a time.
How can I rotate an entire document? The commands on the Edit > Transform submenu rotate only one layer at a time.
![]() Photoshop has two sets of rotation commands. One rotates layers and objects, and the other rotates everything (Figure 3.27). When you want to rotate just one layer or object (like a path), select a layer in the Layers palette, then choose a command from the Edit > Transform submenu.
Photoshop has two sets of rotation commands. One rotates layers and objects, and the other rotates everything (Figure 3.27). When you want to rotate just one layer or object (like a path), select a layer in the Layers palette, then choose a command from the Edit > Transform submenu.

Figure 3.27. The original (left) has two layers: One with the triangle, and the other with the letter N. In the center image, only the triangle layer is rotated, using Edit > Transform > Rotate 90° CW. In the right image, the entire document is rotated, using Image > Rotate Canvas 90°CW.
When you want to rotate absolutely everything in a Photoshop document, including the document dimensions, choose a command from the Image > Rotate Canvas submenu.
![]() I’ve used the Arbitrary rotation option, but it takes a lot of trial and error. How can I tell how much an image needs to be straightened?
I’ve used the Arbitrary rotation option, but it takes a lot of trial and error. How can I tell how much an image needs to be straightened?
![]() When you want to straighten an image but you don’t know the exact angle you need, the Measure tool can help you (Figure 3.28):
When you want to straighten an image but you don’t know the exact angle you need, the Measure tool can help you (Figure 3.28):
Select the Measure tool. It normally hides in the toolbox under the Eyedropper tool; if the Measure tool is hidden, hold down the mouse on the Eyedropper tool to reveal it.
Drag the Measure tool along a line in the image that should be perfectly horizontal or vertical.
Choose Image > Rotate Canvas > Arbitrary. The angle from the Measure tool is entered automatically, so just click OK and the image should straighten perfectly.

![]() I see the same rotation features in Photoshop, Camera Raw, and Bridge. When is it better to rotate in Bridge or Camera Raw rather than Photoshop?
I see the same rotation features in Photoshop, Camera Raw, and Bridge. When is it better to rotate in Bridge or Camera Raw rather than Photoshop?
![]() Adobe Bridge is great for applying 90-degree rotations to a bunch of images at once. You’d usually do this when you import scans or digital camera photos that don’t automatically rotate. Camera Raw is the best place to straighten many crooked digital camera photos at once. Use Photoshop for any remaining rotational needs that aren’t met by Bridge or Camera Raw.
Adobe Bridge is great for applying 90-degree rotations to a bunch of images at once. You’d usually do this when you import scans or digital camera photos that don’t automatically rotate. Camera Raw is the best place to straighten many crooked digital camera photos at once. Use Photoshop for any remaining rotational needs that aren’t met by Bridge or Camera Raw.
To apply 90-degree rotations in Bridge, select an image and click one of the Rotate icons at the top of a Bridge window (Figure 3.29). Note that you can select multiple images and rotate them all at once much faster than you can in Photoshop.
Figure 3.29. In any Bridge window, you can rotate one or more selected images 90 degrees at a time using the two rotate icons in the middle of the toolbar.
Camera Raw also sports these same Rotate icons. However, Camera Raw also lets you rotate at any angle with its Crop tool. If you drag a crop rectangle in Camera Raw and position the pointer outside the crop rectangle, you can drag to rotate the crop rectangle (Figure 3.30). The rotation takes effect when you open the raw image in Photoshop; rotation and cropping are applied during the conversion.

Figure 3.30. Dragging from just outside the top right corner of a Crop Tool rectangle to rotate an image in Camera Raw.
In both Camera Raw and Bridge, the rotation information is saved with the object’s metadata, which means you always retain the complete original image in case you want to edit the rotation later.
![]() I see a Straighten tool in Camera Raw. How does this compare to the Photoshop Measure tool method you covered earlier?
I see a Straighten tool in Camera Raw. How does this compare to the Photoshop Measure tool method you covered earlier?
![]() Both Adobe Camera Raw and the Lens Correction filter include a Straighten tool that directly corrects crooked images. If you thought the Measure tool trick was cool (see “Rotating an Image the Fast, Precise Way”, earlier in this section), the Straighten tool does the same thing in fewer steps:
Both Adobe Camera Raw and the Lens Correction filter include a Straighten tool that directly corrects crooked images. If you thought the Measure tool trick was cool (see “Rotating an Image the Fast, Precise Way”, earlier in this section), the Straighten tool does the same thing in fewer steps:
Open a raw image in Camera Raw, or if you already have an image open in Photoshop, choose Filter > Distort > Lens Correction.
Select the Straighten tool from the Camera Raw or Lens Correction toolbox.
Drag the Straighten tool along a line in the image that should be perfectly horizontal or vertical (Figure 3.31). In Camera Raw, the crop rectangle rotates, but the image itself remains unrotated during conversion from raw format. In Lens Correction, the image immediately rotates according to the angle formed by the line.
Click OK when you’re done making all corrections in Camera Raw or Lens Correction. The rotation is applied to the image.

![]() Is there a way to transform with a bounding box or by typing numbers, as you can in Illustrator or InDesign?
Is there a way to transform with a bounding box or by typing numbers, as you can in Illustrator or InDesign?
![]() In a word: Yes. The Free Transform command does it all. When you choose Edit > Free Transform, a bounding box appears around the current layer. You can, of course, use the bounding box to transform the layer. What most folks don’t notice, however, is that when the Free Transform bounding box is active, numeric entry options appear in the Options bar, too! So you can move, rotate, or scale the layer by entering precise values and then pressing Return or Enter.
In a word: Yes. The Free Transform command does it all. When you choose Edit > Free Transform, a bounding box appears around the current layer. You can, of course, use the bounding box to transform the layer. What most folks don’t notice, however, is that when the Free Transform bounding box is active, numeric entry options appear in the Options bar, too! So you can move, rotate, or scale the layer by entering precise values and then pressing Return or Enter.
But for those who want to work visually rather than numerically, here’s a quick guide to the Free Transform bounding box:
To rotate, position the cursor outside the bounding box until you see the double-arrow rotation icon, and drag (Figure 3.32).
To scale, drag any handle.
To skew, Command/Ctrl-drag a handle.
When using the bounding box, add the Shift key to transform proportionally, or add Option/Alt to transform from the center.

![]() Is there anything I can do about the barrel distortion that’s produced by my camera lens, particularly in wide angle shots?
Is there anything I can do about the barrel distortion that’s produced by my camera lens, particularly in wide angle shots?
![]() Photoshop CS2 includes the new Lens Correction filter, which is great for removing various types of visual distortion which are usually most obvious in images shot using wide-angle lenses. Start by choosing Filter > Distort > Lens Correction (Figure 3.33).
Photoshop CS2 includes the new Lens Correction filter, which is great for removing various types of visual distortion which are usually most obvious in images shot using wide-angle lenses. Start by choosing Filter > Distort > Lens Correction (Figure 3.33).

Figure 3.33. Formerly distorted vertical bars are straightened after adjusting the Remove Distortion, Vertical Perspective, and Angle options in the Lens Correction dialog box.
It’s a good idea to straighten the image first. Select the Straighten tool and drag it along a line in the image that should be perfectly horizontal or vertical, and Photoshop rotates the image accordingly. If the result is just a little bit off, click in the Angle value and press the up and down arrow keys. That’s usually an easier and more precise way to adjust the value, rather than dragging the Angle control.
Then, to correct the barrel distortion, increase or decrease the Remove Distortion amount. Check your progress by keeping your eye on the grid.
To correct perspective distortion, increase or decrease the Vertical Perspective or Horizontal Perspective values. It’s usually easier to see what you’re doing here after you’ve straightened the image and removed barrel distortion.
As you make corrections, Photoshop automatically sizes the image. If you think too much of the edges are cut off, reduce the Scale value at the bottom of the dialog box. Click OK when you’re done.
![]() I sometimes want to make a quick copy of a document so I can try out an idea. Is there an easier way than closing the document and duplicating it on the desktop?
I sometimes want to make a quick copy of a document so I can try out an idea. Is there an easier way than closing the document and duplicating it on the desktop?
![]() No need to run off to the desktop; you can duplicate a document from within Photoshop. Choose Image > Duplicate, name the duplicate, select Duplicate Merged Layers Only if you want the duplicate to be a flattened version of the current document, and click OK. The duplicate document appears as a new window.
No need to run off to the desktop; you can duplicate a document from within Photoshop. Choose Image > Duplicate, name the duplicate, select Duplicate Merged Layers Only if you want the duplicate to be a flattened version of the current document, and click OK. The duplicate document appears as a new window.
Or even faster: Add the Option/Alt key when you choose Image > Duplicate and you’ll get a copy without the annoying dialog box!
A document you create with the Duplicate command doesn’t exist as a file until you save it, even though you see a named title bar at the top of the duplicate document.
Duplicate documents can be useful for creating variations on a document, or for quickly experimenting with techniques on a flattened or downsampled version of a document.
![]() What’s the best way to duplicate a layer? And can a layer be copied to another document?
What’s the best way to duplicate a layer? And can a layer be copied to another document?
![]() There are lots of ways to duplicate a layer, depending on what you’re trying to accomplish.
There are lots of ways to duplicate a layer, depending on what you’re trying to accomplish.
To duplicate the current layer using the Layer menu, choose Layer > Duplicate Layer. In the Duplicate Layer dialog box, you have the option to create the duplicate in another open document or in a new document. This is a great way to “send” a layer to another document. The Duplicate Layer command also appears on the Layers palette menu.
Another, faster way to copy a layer is to select the Move tool and Option/Alt-drag anywhere in the image. This is a good option if you don’t want the duplicate to be in the exact same position as the original layer.
Or, to duplicate the current layer using the Layers palette, drag a layer to the New Layer icon.
A type object exists on its own layer, so you can use any of these methods to duplicate a type object too.
![]() How can I duplicate a path or shape without duplicating the entire layer? I just want to make a copy of the vector object on the same layer.
How can I duplicate a path or shape without duplicating the entire layer? I just want to make a copy of the vector object on the same layer.
![]() It’s a simple matter of changing the tool you’re using to select. To copy a path or shape without making a new layer, Option/Alt-drag the path or shape using the Path Selection tool (the black arrow tool), not the Move tool (Figure 3.34).
It’s a simple matter of changing the tool you’re using to select. To copy a path or shape without making a new layer, Option/Alt-drag the path or shape using the Path Selection tool (the black arrow tool), not the Move tool (Figure 3.34).
![]() I don’t have a layout program and I sometimes need to create step-and-repeat layouts, like a page full of business cards. It’s easy enough to copy layers, but when the original needs to be updated, I have to set up the copies all over again. Is there an easier way?
I don’t have a layout program and I sometimes need to create step-and-repeat layouts, like a page full of business cards. It’s easy enough to copy layers, but when the original needs to be updated, I have to set up the copies all over again. Is there an easier way?
![]() Thanks to the new Smart Objects feature in Photoshop CS2, it’s now practical to create step-and-repeat jobs right in your favorite image-editing program. You can create a single graphic, make a Smart Object out of it, and duplicate the Smart Object as needed. If you edit the contents of the Smart Object, all of the Smart Object duplicates update automatically. Here’s how it works:
Thanks to the new Smart Objects feature in Photoshop CS2, it’s now practical to create step-and-repeat jobs right in your favorite image-editing program. You can create a single graphic, make a Smart Object out of it, and duplicate the Smart Object as needed. If you edit the contents of the Smart Object, all of the Smart Object duplicates update automatically. Here’s how it works:
Tip
To duplicate specific pixels (not the entire layer), select the pixels first, then switch to the Move tool and Option/Alt-drag the selection. To duplicate a selection while keeping the duplicate on the original layer, choose Layer > New > Layer via Copy (Command/Ctrl-J).
In the Layers palette, select the layers you want to repeat, and choose Layer > Smart Objects > Group Into New Smart Object (Figure 3.35).
Make sure the image canvas is large enough to contain all the duplicates you’re going to make (see “Image Size vs. Canvas Size, earlier in this chapter). Or, probably better, just create a new document large enough, and drag your new smart object layer into it.
Using the Move tool, position the Smart Object in the top left corner of the document.
Using the Move tool, Option-Shift-drag/Alt-Shift-drag the Smart Object to make and position a duplicate next to the original. Repeat until you’ve created an entire row of duplicates (Figure 3.36).
Tip
The flexibility of smart objects opens up a universe of editing possibilities. For example, when you choose File > Place and select a Camera Raw file, the file becomes a smart object. What’s so great about that? It means that at any time after you place the raw file, you can doubleclick the Camera Raw smart object in the Layers palette and edit its settings—you don’t have to worry about getting the raw settings right before importing the Camera Raw image.
If you didn’t space the layers evenly while drawing, you can do it now. Select all of the layers making up the row and choose Layer > Distribute > Horizontal Centers.
In the Layers palette, select the layers you created. Choose Layer > Group Layers The layers are now grouped in a folder in the Layers palette.
You can now Option-Shift-drag/Alt-Shift-drag a copy of the group downward from the original, repeating until you have the number of rows you want.
To update all of the smart objects at once, double-click any of them in the Layers palette, or choose Layer > Smart Objects > Edit Contents (Figure 3.37).
The contents of the smart object open in a temporary window. Edit it as needed then save it and close the window.


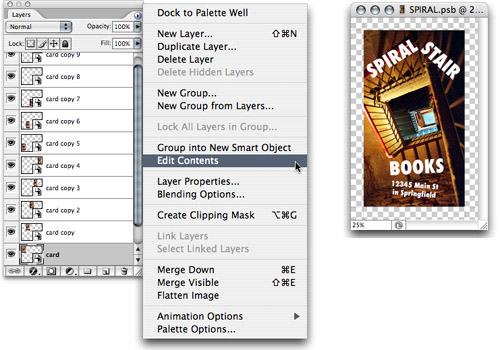
When you close that editing window, Photoshop updates all of the smart object copies in the document!
Tip
When you edit a smart object, there’s behind-the-back document magic going on. When you choose Edit Contents and see the smart object opening in another window, it’s opening as a temporary file stored in a hidden folder on your disk. When you close the edited smart object, the temporary file closes and is embedded back into the main Photoshop document.