Photoshop Elements supplies you with all types of adjustment and manipulation tools. In addition to image enhancement, Photoshop Elements can also be considered a powerful design from scratch application. With the vast array of brushes, tips, and shape drawing tools that are supplied, Photoshop Elements helps you produce the images, either enhanced or developed from scratch, which you might need for virtually any conceivable project.
Brushes come in all sizes and shapes, and can be controlled with a mouse or drawing tablet. Since the shape of the tip controls brushes, Photoshop Elements gives you access to several sets of pre-defined brush tip shapes, or you can create you own customized sets. As for shape drawing tools, Photoshop Elements doesn’t limit your creativity to just drawing circles and squares; it gives you instant access to dozens of pre-defined shapes. When it comes to Editor’s paint and drawing tools, your choices are limitless, based only on your knowledge of the available tools, and a creative imagination—the more you know, the more you can do with Photoshop Elements.
And, when all the drawing is said and done, there will be a need for cleaning up. With the various Eraser tools, you can make quick work of touching up those small problem areas. Photoshop Elements provides straight eraser tools, eraser tools that erase to a definable edge, and even eraser tools that target specific color values.
When enhancing an image, you might want to apply a gradient. Gradients can be something as simple as black and white, or as complex as one that contains the colors of the rainbow. Gradients can be applied to an image; completely covering the original image information, or they can be controlled through targeted selection, and creative uses of blending modes.
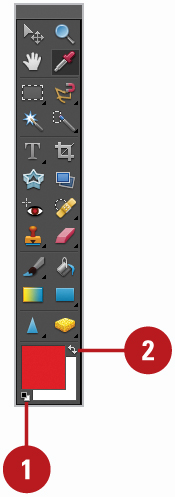
The Foreground and Background colors, located near the bottom of the toolbox, are the way of identifying your primary painting color, as well as the color Photoshop Elements uses in conjunction with the Background layer. When you select any of the painting or drawing tools, the color applied to the document will be the foreground color—that’s its purpose. Hence, it’s sometimes referred to as the active color. The Background color serves several functions—its primary purpose is to instruct Photoshop Elements how to handle erasing on the Background layer. When you use an eraser tool on a layer, by default, the pixels are converted to transparent. However, when you use an eraser tool on the Background something different happens. Since the Background does not support transparency, it replaces the erased pixels with the current background color.
Use any of the following methods to change the active foreground or background colors:
Select the Eyedropper tool on the toolbox, and then click anywhere in the active document to change the foreground color.
Hold down the Alt key, and then click to change the background color.
Click on a color swatch in the Swatches palette to change the foreground color.
Hold down the Ctrl key, and then click to change the background color.
Create a color in the Color palette. Click the Foreground or Background thumbnail to choose the color’s destination.
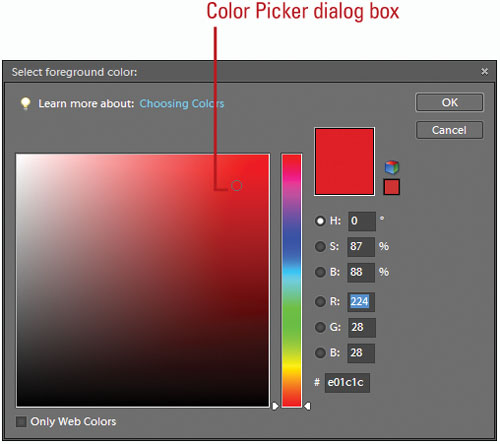
Click the Foreground or Background Color box to open the Color Picker dialog box, select a color or enter color values, and then click OK.

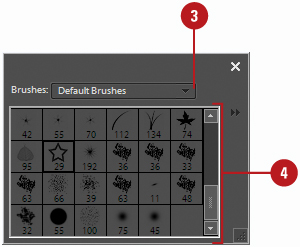
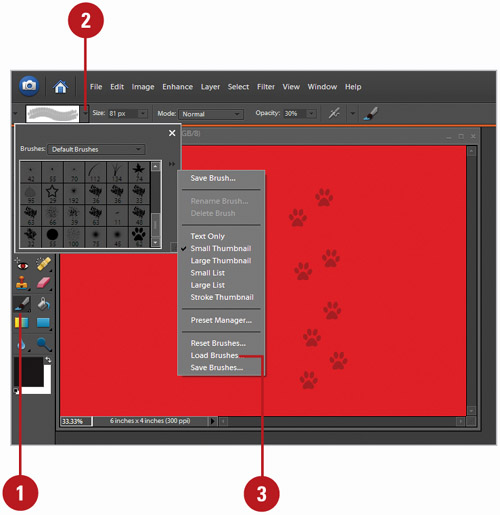
The Brushes palette provides access to brush tips you can use with brush and painting tools. The Brushes palette is, by default, located on the Options bar. You access the Brushes palette by selecting a brush tool, or a tool that requires the use of a brush, such as the Eraser tool, and then clicking the Brushes list arrow on the Options bar, which is next to the currently selected brush. The Brushes palette displays another list arrow at the top where you can select a brush set, also known as a library, and the current brush set at the bottom. The Brushes palette comes with 14 pre-defined brush sets.
 In the Editor, select a Brush tool on the toolbox.
 Click the Brushes list arrow on the Options bar.
 Click the Brushes list arrow on the Brushes palette.
 Select the set of brushes you want to use.
Default Brushes.
Assorted Brushes.
Basic Brushes.
Calligraphic Brushes.
Drop Shadow Brushes.
Dry Media Brushes.
Faux Finish Brushes.
Natural Brushes.
Natural Brushes 2.
Pen Pressure.
Special Effects Brushes.
Square Brushes.
Thick Heavy Brushes.
Wet Media Brushes.
 To close the Brushes palette, click the Close button on the palette, or click outside the palette.
The Brushes palette comes in many forms; you can view brushes as strokes, or you can choose thumbnails, or even text descriptions. The form of the Brushes palette does not impact its performance, only how you view the available brush tips. Choose the version that best suits your current design needs, and then change the view as needed. When you select a brush, it becomes the default for that tool only. This gives you the ability to choose a default brush for each of the brush-specific tools.
 In the Editor, select a Brush tool on the toolbox.
 Click the Brushes list arrow on the Options bar.
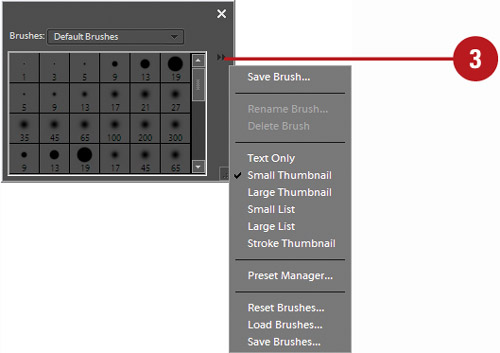
 Click the More Options button, and then select from the available View options:
Text Only. Select this option to display all brush tips by their names.
Small Thumbnail. Select this option to display all brush tips using a small thumbnail.
Large Thumbnail. Select this option to display all brush tips using a large thumbnail.
Small List. Select this option to display all brush tips by their names and small thumbnail.
Large List. Select this option to display all brush tips by their names and large thumbnail.
Stroke Thumbnail. Select this option to display all brush tips with a stroke. (This is useful in determining how the brush will look when applied in the document).
The Brushes palette comes with 14 pre-defined sets. Each set, organizes specific brush tips by name. Since more than the paintbrush tool uses brush tips, it’s important to have the right tool (brush tip) for the right job. Using or making do with the wrong brush tip is akin to digging a swimming pool with a teaspoon. You wouldn’t paint a portrait with a house-painting brush, so don’t settle for anything less than the exact brush tip you need to get the job done.
 In the Editor, select a Brush tool on the toolbox.
 Click the Brushes list arrow on the Options bar.
 Click the Brushes list arrow on the palette, and then select any of the pre-defined brush sets.
This replaces the current brush tips with the selected set.
 Select the brush tip you want to use.
The brush tip on the Options bar changes to the one you selected.
Did You Know?
You can resize the Brushes palette. If you’re having a hard time viewing all the brushes in the Brushes palette, display the Brushes palette, point to the bottom right-corner of the palette (cursor changes to a diagonal double-arrow, and then drag to resize the palette.

The Brushes palette gives you many choices for brush tips. Any good designer will tell you that no matter how many brush tips you have, you’ll always want more. For example, you’re working on a 100-year-old photograph, and you need a specific brush to add hair details to the blown-out areas of the image. It’s a special type of brush that literally creates the illusion of wavy hair. In an effort to help keep you organized, Photoshop Elements gives you the ability to create your very own customized brush tips, and then save them later in organized sets.
 In the Editor, open an image, scan an item, or select any of the painting tools and create a shape for a new brush tip.
 Select the brush tip using any of the selection tools.
Important
Photoshop Elements picks up any pixel information in the underlying layers, even white. If you want the brush to have a transparent background, make sure the areas surrounding the image show as transparent.
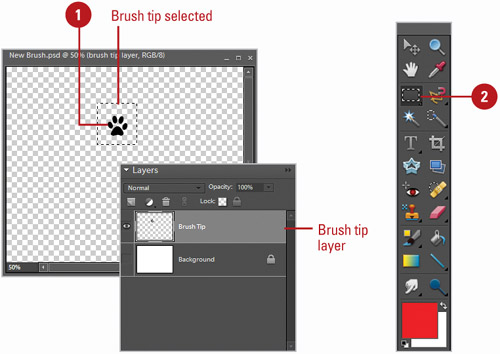
 Click the Edit menu, and then click Define Brush from Selection.
 Enter a name for the new brush preset.
 Click OK.
 Open the Brushes palette on the Options bar, and then scroll to the bottom of the list to access your newly created brush tip.
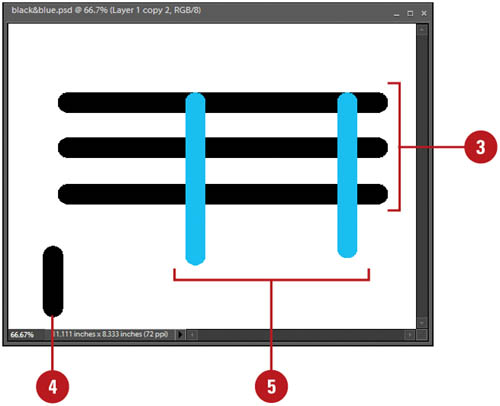
Since the Define Brush Preset button picks up any background colors within the selection area, always create the brush tip in a black layer.

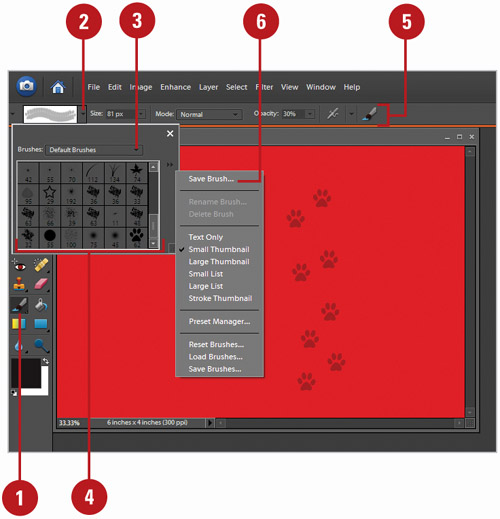
After looking through the brush tip sets that come with Photoshop Elements, you don’t see the one that suits your needs. You can modify an existing brush tip that is close to the one you want to create a new brush. Simply select the brush tip you want to modify on the Brushes palette, make the changes you want, and then save it as a new brush tip. If you no longer want to use a brush tip, you can quickly remove it from the Brush palette.
 In the Editor, select a Brush tool on the toolbox.
 Click the Brushes list arrow on the Options bar.
 Click the Brushes list arrow on the palette, and then select any of the pre-defined brush sets.
This replaces the current brush tips with the selected set.
 Select the brush tip you want to use.
 Changes settings on the Options bar to modify the brush tip.
 Click the Brushes list arrow, click the More Options button, and then click Save Brush.
 Enter a name for the new brush preset.
 Click OK.
 Click the Brushes list arrow on the Options bar.
 Click the Brushes list arrow on the palette, and then select any of the pre-defined brush sets.
This replaces the current brush tips with the selected set.
 Select the brush tip you want to use.
 Click the Brushes list arrow, click the More Options button, and then click Delete Brush.
 Click OK.
Once a brush tip is created, it becomes a part of the current set. However, the brush has not yet been permanently saved in Photoshop Elements. Although the new brush tip will reappear every time you access the Brushes palette, if you choose the option to reset the palette, the new brush will be lost. To keep brushes you must save them into customized sets.
 In the Editor, select a Brush tool on the toolbox.
 Click the Brushes list arrow on the Options bar.
 Create a set of customized brushes.
 Click the More Options button, and then click Save Brushes.
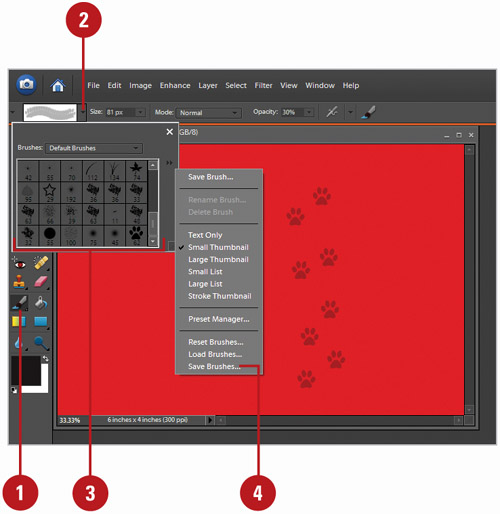
 Enter a name for the set (with the .ABR extension) in the File name box.
The default folder location appears, displaying Adobe/ Photoshop Elements 6.0/ Presets/Brushes.
When you store a brush set in the default folder, it appears in the Brushes list arrow on the Brushes palette.
 Click Save.
 Click the Brushes list arrow on the Options bar.
 Click the More Options button, and then click Load Brushes.
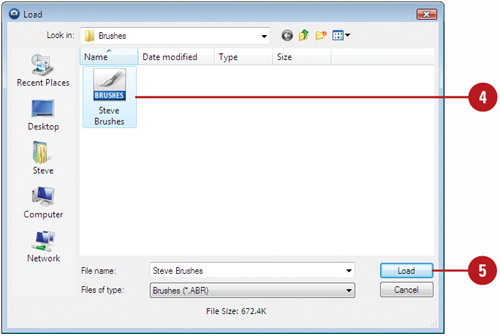
The default folder location appears, displaying Adobe/ Photoshop Elements 6.0/ Presets/Brushes.
 Select the swatch palette file (.ABR extension) you want to load from the Brushes folder.
 Click Load.
Did You Know?
You can reset a brush set back to its original state. If you modified a brush tip in a brush set and no longer want it, you can reset the brush set back to its original state. Select a brush tool on the toolbox, click the Brushes list arrow on the Options bar, click the Brushes list arrow on the Brushes palette, select the brush set you want to reset, click the More Options button, and then click Reset Brushes.
The Brush and Airbrush tools were designed to reproduce the visual effect of applying paint to a canvas. You have full control over the brush tip, color, size, opacity, and even the brush’s blending mode. Control over the image is achieved by using additional layers to hold the brush strokes—adding additional layers increases the file size of an image document. Since layers have their own control systems, such as opacity, fill, and blending modes, you achieve even greater control over the final design, and once the brush stroke is correct, you can always merge the brush-stroke layer into the image to conserve file size.
 In the Editor, select the Brush tool on the toolbox.
 Click the Brushes list arrow on the Options bar, and then select a brush tip.
 Select from the following Brush options on the Options bar:
Size. Sets the size of the brush in pixels.
Mode. Click the list arrow to choose from the available blending modes. The blending mode option controls how the active brush color blends with the colors in the active image.
Opacity. Enter an opacity percent (1 to 100), or click the list arrow, and then drag the slider left or right.
Airbrush. Click the button to change the Brush into an Airbrush.
Brush Tablet. Sets the options to control with your stylus when you have a drawing tablet, such as a Wacom tablet, attached to your computer.

 Drag within the image to paint.
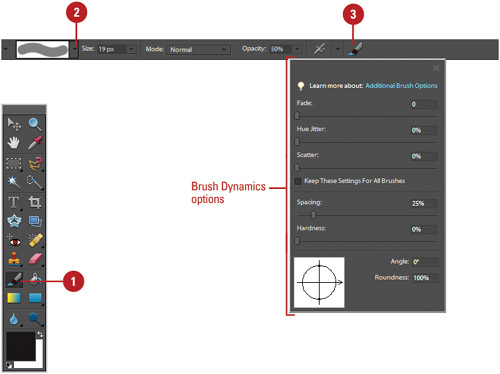
The Brush tool also includes a set of controls, known as brush dynamics, that let you define how a brush tip is applied to the active image. Features, such as Scattering, Spacing, and Hardness let you further customize your brush tips so you can create that specialized brush for your image enhancement needs.
 In the Editor, select the Brush tool on the toolbox.
 Click the Brushes list arrow on the Options bar, and then select a brush tip.
 Click the Brush Dynamics button on the Options bar, and then specify the following options:
Fade. Enter the number of steps (0 to 9999) until the paint flow fades to nothing. A low number fades quickly, while a high number fades later.
Hue Jitter. Enter the rate at which the stroke color switches between the foreground and background color. A high value causes frequent switches.
Scatter. Enter a value to create brush marks in a stroke. A low number creates a thicker stroke, while a high number creates a scattered effect.
Spacing. Sets the distance between the brush marks in a stroke.
Hardness. Enter a value to control the size of the brush’s center.
Angle. Enter an angle by which an elliptical brush’s long axis is offset from horizontal.
Roundness. Enter a value to set the ratio between the brush’s short and long axes.
 Drag within the image to paint.
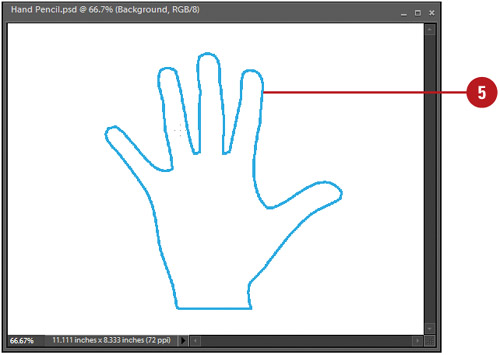
The Pencil tool is exactly what its name implies... a pencil. The Pencil tool is limited to hard brush tips of any size or shape, and creates freeform lines using the current foreground color. In fact, the major difference between the Pencil and Brush tools, is the Pencil tool’s inability to draw anything but a hard edge line. A unique feature of the Pencil tool is its ability to switch between the current foreground and background colors using the Auto Erase feature.
 In the Editor, select the Pencil tool on the toolbox.
 Click the Brushes list arrow on the Options bar, and then select a brush tip.
 Click the Mode list arrow on the Options bar, and then select a blending mode.
 Enter an Opacity percentage value (1 to 100) on the Options bar.
 Drag the Pencil tool across the active document.
Did You Know?
You can use the Pencil tool to create calligraphy lettering. Select the Pencil tool, click black as your painting color, and then click one of the oblong brush tips on the Options bar. If you own a drawing tablet, use the tablet with the Pencil tool to create beautifully formed calligraphy letters.
You can draw straight lines using brush tools. Holding the Shift key while dragging, constrains the brush to a 90-degree line. To draw a straight line between two points, click once in the document window, move the mouse to another position, hold down the Shift key, and then click a second time. A straight line will be drawn between the first and last mouse clicks.
The Auto Erase feature lets you automatically switch the Pencil tool’s painting color using the current foreground and background color swatches. The trick is where you start drawing the line. If you start dragging the brush tip from a new location in the document, the Pencil tool creates a line in the active foreground color. If you then place the brush tip on a previously drawn line and drag, the Pencil tool creates a new line in the active background color. Since the Auto Erase feature doesn’t really erase anything, it will perform exactly the same way on a transparent layer as it does on the background layer.
 In the Editor, select the Pencil tool on the toolbox.
 Select the Auto Erase check box on the Options bar.
 Drag the Pencil tool across the active document to create a line in the active foreground color.
 Click anywhere in the background and the Pencil tool will use the foreground color.
 Move the brush tip over one of the previous lines, and then drag to create a line in the active background color.
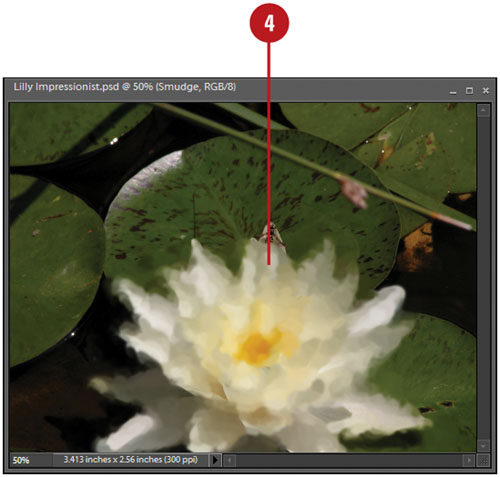
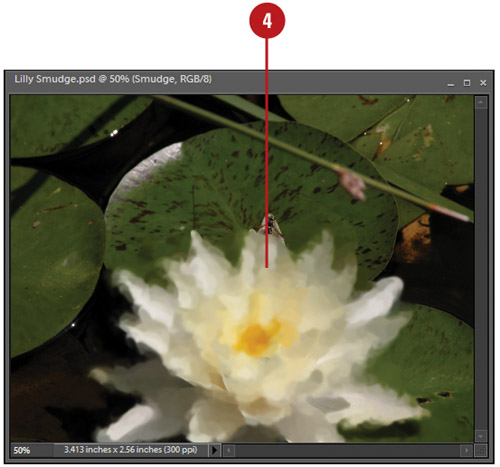
The Impressionist and Smudge tools were designed to reduce or blur the details in an image. The Impressionist Brush tool changes the existing colors and details in an image to look blurred, like it was painted with a stylized brush. The Smudge tool simulates dragging a finger through wet paint. You have full control over the brush tip, size, opacity, and even the brush’s blending mode. The Impressionist Brush and Smudge tools also provide tool specific options. The Impressionist Brush includes tools that affect the style, area and tolerance of the brush stroke, while the Smudge tool includes tools that affect the strength and color of the smear.
 In the Editor, select the Impressionist tool on the toolbox.
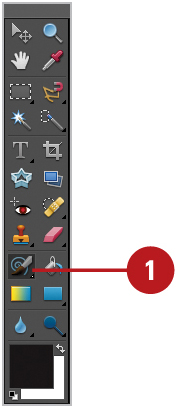
 Click the Brushes list arrow on the Options bar, and then select a brush tip.
 Select from the following Impressionist Brush options on the Options bar:
Size. Specify a size of the brush in pixels.
Mode. Click the list arrow to choose from the available blending modes. The blending mode option controls how the active brush color blends with the colors in the active image.
Opacity. Enter an opacity percent (1 to 100), or click the list arrow, and then drag the slider left or right.
Style. Specify a shape of the brush stroke.
Area. Specify a size of the brush stroke.
Tolerance. Select a Tolerance value (0 to 255). The Tolerance value influences the range of the brush stroke to fill a given area.

 Drag within the image to paint.
 In the Editor, select the Smudge tool on the toolbox.
 Click the Brushes list arrow on the Options bar, and then select a brush tip.
 Select from the following Smudge options on the Options bar:
Size. Specifies the size of the brush in pixels.
Mode. Click the list arrow to choose from the available blending modes. The blending mode option controls how the active brush color blends with the colors in the active image.
Strength. Specifies the amount of the smudge effect.
All Layers. Select to smudge using color from all visible layers. Deselect to smudge using colors from only the active layer.
Finger Painting. Select to smear using the foreground color at the beginning of each stroke. Deselect to smear using the color under the pointer at the beginning of each stroke.

 Drag within the image to smudge color.
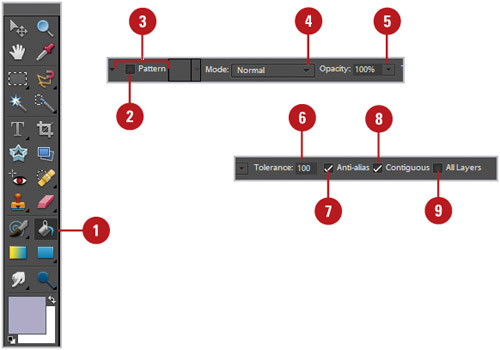
The Paint Bucket tool is not new, in fact it’s been around almost as long as Photoshop Elements. The paint bucket’s primary function is to fill an area with the active foreground color, but that’s not all it’s capable of doing. The Paint Bucket tool can fill areas with a selected pattern and, much in the same way that the Magic Wand tool selects image information, the fill area can be controlled by the shift in brightness of image pixels. Combine those features with the ability to change the paint bucket’s blending mode, opacity, and you have a tool with a lot of horsepower.
 In the Editor, select the Paint Bucket tool on the toolbox.
 Select the Pattern check box to fill a selected area with a pattern. Deselect to fill a selected area with the current foreground color.
 Click the Pattern list arrow, and then select a pre-defined fill pattern. This option is available if you select Pattern as a fill option.
 Click the Mode list arrow, and then select a blending mode.
 Enter an Opacity percentage value (1 to 100).
 Select a Tolerance value (0 to 255). The Tolerance value influences the range of the Paint Bucket uses to fill a given area.
 Select the Anti-alias check box to create a visually smoother line.
 Select the Contiguous check box to restrict the fill to the selected area.
 Select the All Layers check box to fill all the color range information from the image’s layers.
 Click the Paint Bucket tool cursor on the area to be changed.
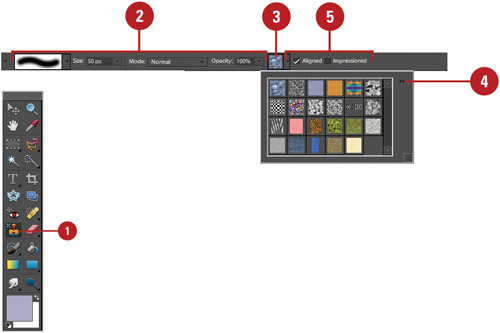
The Pattern Stamp tool allows you to paint with a pattern from a predefined set on the Patterns palette or defined from your image, and then apply it over the same or another image. For example, you could use the Pattern Stamp tool to apply a pattern to an image or add something to an image. When you select the Aligned check box on the Options bar, you can reuse the most current sampling point, no matter how many times you stop and resume painting. When Aligned is deselected, you’ll reuse the same sampled pixels each time you paint. When you select the Impressionist check box on the Options bar, you can paint the pattern using the paint daubs to create an impressionist effect.
 In the Editor, select the Pattern Stamp tool on the toolbox.
 Select a brush tip, and then select brush options, such as size, blending mode, and opacity on the Options bar.
 Click the Pattern list arrow on the Options bar, and then select a pattern.
 To select another pattern set, click the More Options button on the Pattern palette, and then select the pattern set you want from the bottom of the list.
Create Custom Pattern. Select the pattern in an image, click the Edit menu, click Define Pattern from Selection, type a name, and then click OK.
 Select from the following Pattern Stamp options on the Options bar:
Aligned. Select to repeat the pattern as a contiguous paint aligned from one paint stroke to the next. Deselect to center the pattern on each paint stroke.
Impressionist. Select to paint the pattern using the paint daubs to create an impressionist effect.
 Drag within the image to paint.
The basic Eraser tool converts image pixels in a layer to transparent pixels. While the primary function of the eraser tool has not changed, it has been greatly improved upon. For example, you can use the eraser tool to remove a specific color or to erase around the edge of an image object. You can instruct the Eraser tool to remove a specific color while protecting another color and at the same time, increase or decrease the tools’ tolerance (the range of selection). If you use the Eraser tool on a layered document, the tool will erase to transparency. If the Eraser tool is used on a flattened document (flattened documents do not support transparency), the Eraser tool will use the active background color to perform the eraser. As you can see, the eraser tools do more than blindly erase image information. As you master the eraser tools, you just may find those complicated image eraser jobs becoming easier and easier. The Background Eraser tool lets you select specific colors within an image and erase just those colors.
 In the Editor, select the Eraser tool on the toolbox.
 Click the Brush list arrow on the Options bar, and then select a brush tip.
 Click the Size list arrow on the Options bar, and then select a brush size.
 Click the Mode list arrow on the Options bar, and then click Brush, Pencil, or Block. Options vary depending on the the brush tip.
 Enter an Opacity percentage value (1 to 100) on the Options bar to determine how much the eraser removes from the image.
 Drag the Eraser over an image layer to convert the image pixels to transparent.
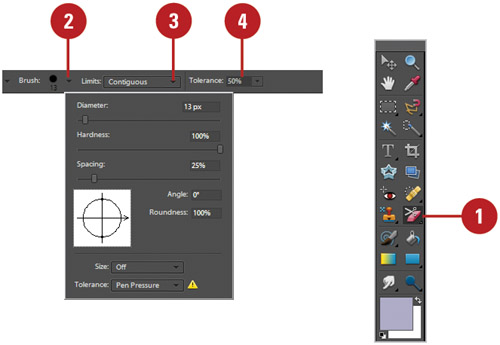
 In the Editor, select the Background Eraser tool on the toolbox.
 Click the Brush Preset Picker list arrow on the Options bar, and then select from the following options:
Diameter. Sets the brush size from the center to the edge in pixels.
Hardness. Enter a value to control the size of the brush’s center.
Spacing. Sets the distance between the brush marks in a stroke.
Angle. Enter an angle by which an elliptical brush’s long axis is offset from horizontal.
Roundness. Enter a value to set the ratio between the brush’s short and long axes.
Size and Tolerance. Select options for a drawing tablet: Off Pen Pressure, or Stylus Wheel.
 Click the Limits list arrow, and then click how far you want the erasing to spread:
Discontiguous. Lets the Eraser tool work with all similar color range pixels throughout the image.
Contiguous. Restricts the Eraser tool to the selected color range, without moving outside the originally sampled area.
 Select a Tolerance percentage value (1 to 100). The higher the tolerance, the greater the range.
 Drag the image to erase.
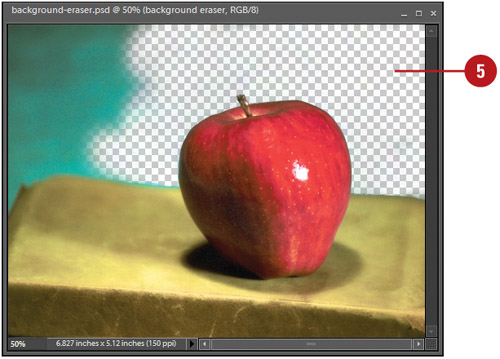
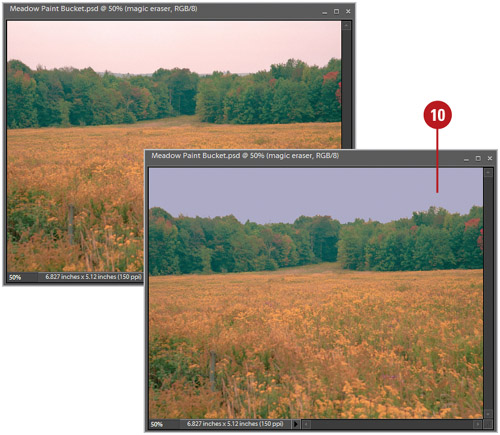
The Magic Eraser tool functions the same way the Magic Wand selection tool functions, except instead of selecting an area it erases it. The Magic Eraser tool works on any traditional layer, including the Background. Clicking with the Magic Eraser tool converts image pixels into transparent pixels. Since the Background layer does not support transparency, using the Magic Eraser tool causes Photoshop Elements to convert the Background into a traditional layer.
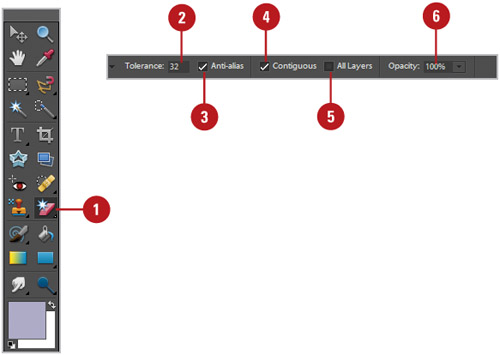
 In the Editor, select the Magic Eraser tool on the toolbox.
 Enter a Tolerance percentage value (0 to 255). The higher the value the greater the range the Magic Eraser erases.
 Select the Anti-alias check box to create a visually softer eraser (useful when dealing with intensely rounded or curved selections).
 Select the Contiguous check box to select adjacent pixels within the active document.
 Select the All Layers check box to erase using color from all visible layers. Deselect to erase using colors from only the active layer.
 Enter an Opacity percentage value (1 to 100) on the Options bar to determine how much the eraser removes from the image.
 Click within the active document.
The Magic Eraser tool, depending on options, samples the pixel directly under the tool and uses that to create a range for erasing image information.

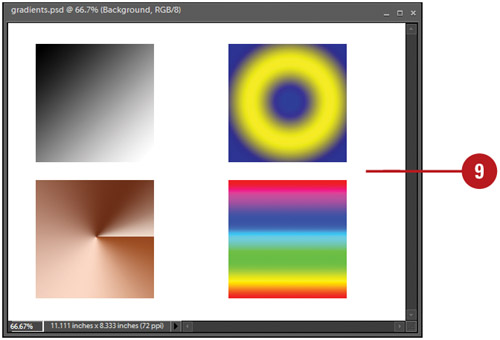
While most of the paint and drawing tools let you select and paint with a single color, the gradient tool lets you paint with a veritable rainbow of colors. The gradient tool comes packaged with several sets of pre-designed gradients, or you can create and save your own customized gradient sets. The process of creating a gradient is simple; you select a gradient along with a specific type, and then drag in the document window. The length and angle of the drag, determines how the gradient is applied. Since gradients, by default, overwrite the image, it’s a good idea to create gradients in separate layers.
 In the Editor, select the Gradient tool on the toolbox.
 Click the Gradient list arrow, and then select from the available gradients.
To change the gradient set, click the More Options button, and then select a gradient set at the bottom of the menu.
 Click one of the following gradient buttons: Linear, Radial, Angle, Reflected or Diamond.
 Click the Mode list arrow, and then select a blending mode.
 Enter an Opacity percentage value (1 to 100).
 Select the Reverse check box to reverse the color order of the selected gradient.
 Select the Dither check box to visually create a smoother transition between gradient colors.
 Select the Transparency check box to create gradients using a gradient mask (allows for transparency in the gradient).
 Drag in the image to create a gradient.
Customized gradients are easy to create and essential when you just can’t find what you want in the predefined sets. It doesn’t matter how many gradients Photoshop Elements provides for you, there will always be that one instance where they just don’t do the required job. With just a few clicks of your mouse, you can create your own customized gradients. You can start with one of the predefined gradients, and modify it to your needs. You can also start completely from scratch; the choice is yours, and so are the rewards of creating that one-of-a-kind stunning gradient you can use for your current project and in the future.
 In the Editor, select the Gradient tool on the toolbox.
 Click Edit or the current gradient on the Options bar to open the Gradient dialog box.
 Select a gradient from the available options that is close to what you want to create.
 Enter a name for the new gradient.
 Click New.
A thumbnail (copy of the selected gradient) appears at the bottom of the list.
 Click the Gradient Type list arrow, and then select one of the following:
Solid. Uses solid colors for the gradient.
Noise. Uses randomly distributed colors within a range.
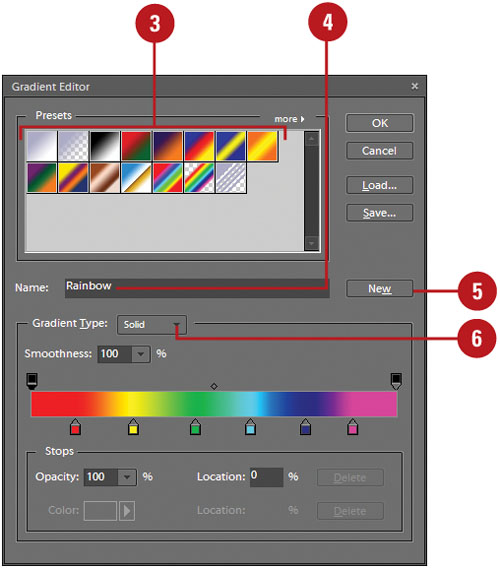
 Click the Smoothness list arrow, and then select one of the following:
Smoothness. A percentage value (0 to 100) that determines how smoothly the colors of the gradient blend together (available when the Solid option is selected).
Roughness. A percentage value (0 to 100) that determines how much noise to introduce into the gradient colors (available when the Noise option is selected).
 To add Opacity Stops, click above the gradient line; to remove Opacity Stops, drag a stop away from the line.
 To add Color Stops, click below the gradient line; to remove Color Stops, drag a stop away from the line.
 Click on an Opacity Stop, and then enter an Opacity percentage (0 to 100), and a Location percentage (0 to 100) for the stop to rest on the line.
 Click on a Color stop, and then select a color, and a Location percentage (0 to 100) for the color stop to rest on the line.
 Click Delete to delete the selected opacity or color stop.
 Click Save to save the new gradient set.
The set will include the new gradients, and all the gradients that appear in the Presets panel.
 Click OK.
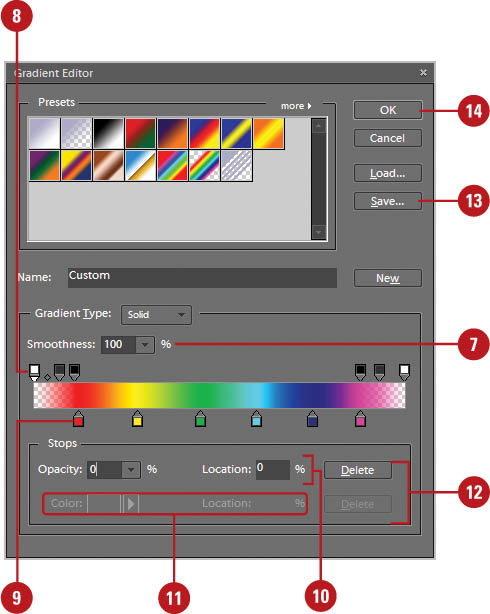
The Color Replacement tool lets you replace a specific color in your image. For best results use soft brushes with this tool, to help blend the colors into the original image. Have you ever captured that perfect picture of a family member or friend, only to see the resulting image with red eyes? Or maybe there’s a part of your image where the color draws attention away from the focal point. Either way, the Color Replacement tool is a great feature that allows you to take control of the image output.
 In the Editor, select the Color Replacement tool on the toolbox.
 Click the Brush Preset Picker list arrow on the Options bar, and then select from the available options.
 Select from the available Sampling options:
Continuous. Samples colors continuously as you drag.
Once. Replaces the targeted color only in areas you click.
Background Swatch. Erases areas matching the background.
 Select from the available Limits options:
Discontiguous. Replaces the sampled color under the pointer.
Contiguous. Replaces connected areas containing the sampled color and preserves the sharpness of shape edges.
 Enter a Tolerance percentage value (0 to 255).
 Select the Anti-alias check box for a smoother edge on areas you correct.
 Select a foreground color to use to replace the unwanted color.
 Drag in the image the color you want to replace.
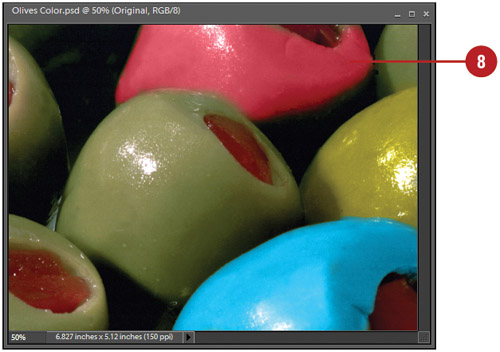
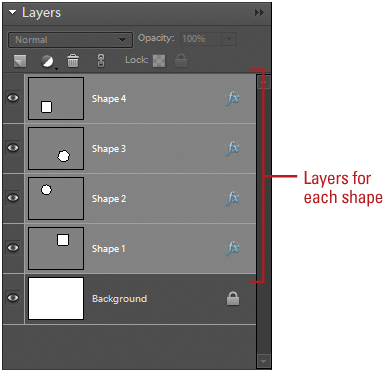
Shape are created in shape layers. They are useful for creating buttons, navigation bars, frames, backgrounds, and other elements for web pages. You can add one or more shapes to a shape layer depending on the shape area you select. The shape area options allow you to add a shape, remove areas, show intersecting shapes, and remove overlapping areas. You can change shape color and apply effects, such as bevels and shadows, to all shapes on a layer.
 In the Editor, select or create a shape layer in the Layers palette.
 Select a shape tool (Rectangle, Rounded Rectangle, etc.) on the toolbox.
 Click one of the following shape area options on the Options bar:
Create New Layer. Add a shape to a new shape layer.
Add. Add a shape to the existing shape.
Subtract. Removes the area where shapes overlap.
Intersect. Shows only the area where shapes intersect.
Exclude. Removes the overlapping areas in the new and existing shapes.
 To change the shape color, click the Color list arrow on the Options bar, and then select a color.
To change the color of all shapes in a layer, double-click the shape layer thumbnail in the Layers palette, and then use the Color Picker tool to select a new color.
 To add a style to the shape, click the Style list arrow on the Options bar, and then select a style effect.
To remove the style, click the More Options button, and then click Remove Style.

 Drag in the document window to create the shape.
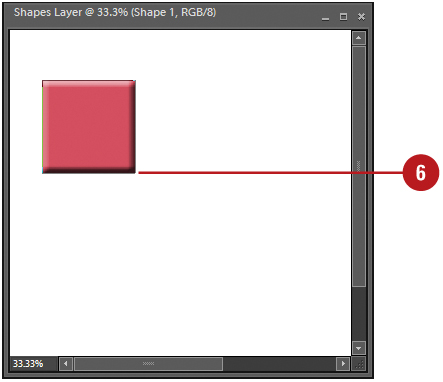
After you create shapes in a layer, you can use the Shape Selection tool to select one or more of them by clicking each one. After you select one or more shapes on the same layer, you can move or modify them. To a move a selected shape, you simply drag it to a new location. If you simplify a shape (covert it into a bitmap element) using the Simplify button on the Options bar, you can no longer use the Shape Selection tool. You need to use the Move tool instead, which you can also use the move all the shapes on the same shape layer at the same time.
 In the Editor, select the layer with the shapes you want to use in the Layers palette.
 Select the Shape Selection tool on the toolbox.
If another shape is selected, click the Shape Selection tool on the Options bar.

 Select or deselect the Show Bounding Box to show or hide the selection box.
 Click one of the following shape area options on the Options bar:
Add. Adds to the shape area.
Subtract. Removes the area where shapes overlap.
Intersect. Shows only the area where shapes intersect.
Exclude. Removes the overlapping areas in shapes.
 To select a shape, click it or drag a selection box around the shapes to select them.
 To add or remove shapes to the selection, hold down the Ctrl key, and then click the shapes you want to add or remove.
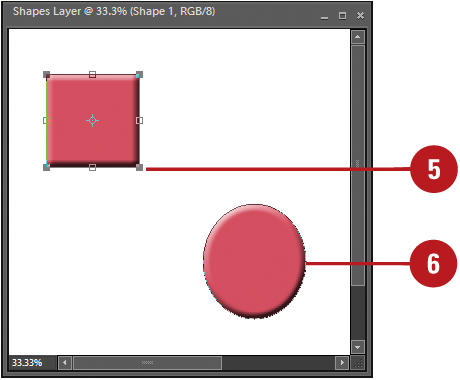
 To combine two or more shapes, select the shapes on the same layer, and then click Combine on the Options bar.
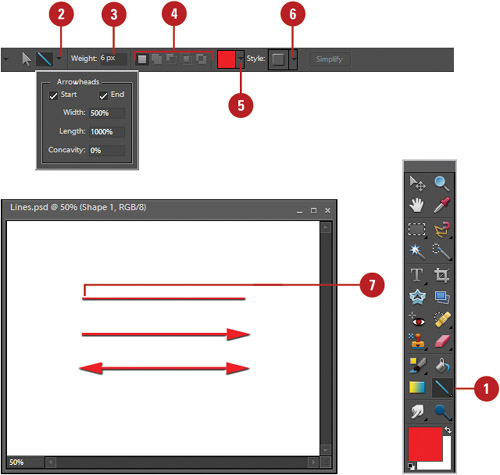
The Line tool lets you draw lines by dragging from one point in the active document and releasing in another. Lines drawn at precise 90- or 45- degree angles are achieved by holding down the Shift key as you drag. Select the Line tool, or if you have any drawing tool selected, you can choose the Line tool from the Options bar. Then configure the Line tool, using the Options bar. It’s also a good idea to create the lines in a separate layer. That way once the line has been drawn, it’s as easy as selecting the Move tool, and repositioning the line to the desired position.
 In the Editor, select the Line tool on the toolbox.
 Click the Geometry list arrow, and then select from the following options:
Arrowheads. Select the Start and/or End check boxes to create arrowheads on the line.
Width. Enter a percentage (10 to 1000), to determine the width of the arrowhead in relation to the width of the line.
Length. Enter a percentage (10 to 5000), to determine the length of the arrowhead.
Concavity. Enter a percentage (-50 to +50) to determine the concavity of the arrowhead.
 Enter a value (1 to 1000 pixels) to determine the weight of the line.
 Click one of the following shape area options on the Options bar: Create New Layer, Add, Subtract, Intersect, or Exclude.
 To change the shape color, click the Color list arrow on the Options bar, and then select a color.
 To add a style to the shape, click the Style list arrow on the Options bar, and then select a style effect.
 Drag in the document window to create the line.
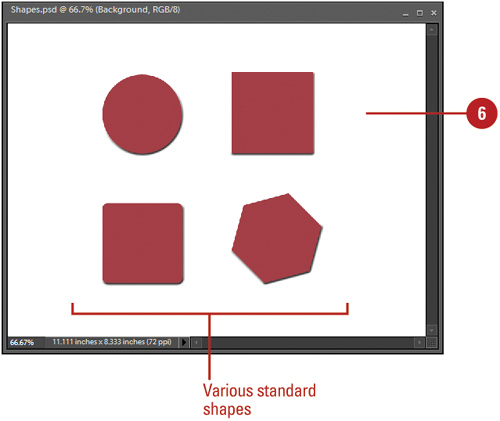
Creating standard shapes, such as polygons or rectangles with rounded corners is a simple matter of selecting a shape tool, choosing a color, and then drawing the shape. A shape is a vector graphic made up of lines and curves instead of pixels, which allows you to move, resize, and change it without losing quality. As with any of the drawing functions, control is maintained with the use of additional layers. The standard shapes consist of rectangles, rounded rectangles, ellipses, polygons; and each one of the shape tools comes with additional options to control exactly how the shape appears when drawn, including extensive layer effects to colorize the shape, add a drop shadow or bevel, even apply a gradient or pattern to the shape.
 In the Editor, select the Rectangle, Rounded Rectangle, Ellipse, or Polygon tool on the toolbox.
 Click the Geometry list arrow, and then select from the following drawing options or check boxes:
Unconstrained. (Rectangle, Rounded Rectangle, Ellipse) Draws to any size.
Square. (Rectangle, Rounded Rectangle) Draws a perfect square.
Circle. (Ellipse) Draws a perfect circle.
Fixed Size. (Rectangle, Rounded Rectangle, Ellipse) Draws to a specific size.
Proportional. (Rectangle, Rounded Rectangle, Ellipse) Draws to proportional width and height.
From Center. (Rectangle, Rounded Rectangle, Ellipse) Draws from center.
Snap to Pixels. (Rectangle, Rounded Rectangle) Snaps edges to the pixel boundaries.
Radius. (Polygon) Specify the distance from the center to the outer points.
Smooth Corners. (Polygon) Select to smooth corners.
Star. (Polygon) Select to turns a polygon into a star.
Indent Sides By. (Polygon) Specify a depth for the star’s indentations.
Smooth Indents. (Polygon) Select to display a star with smooth edges.
 Click one of the following shape area options on the Options bar:
Create New Layer. Add a shape to a new shape layer.
Add. Add a shape to the existing shape.
Subtract. Removes the area where shapes overlap.
Intersect. Shows only the area where shapes intersect.
Exclude. Removes the overlapping areas in the new and existing shapes.
 To change the shape color, click the Color list arrow on the Options bar, and then select a color.
 To add a style to the shape, click the Style list arrow on the Options bar, and then select a style effect.
To remove the style, click the More Options button, and then click Remove Style.

 Drag in the document window to create the shape.
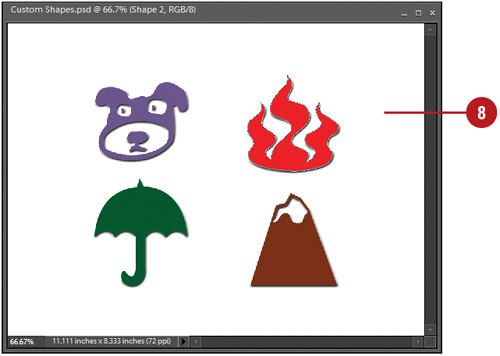
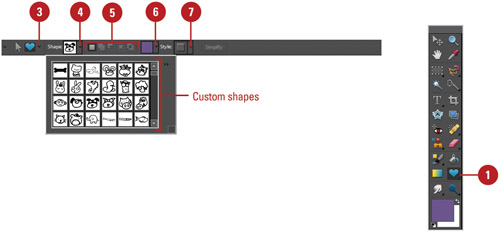
Having the ability to draw a perfect polygon or rounded-corner rectangle is nice, however, Photoshop Elements went way beyond standard shapes when it introduced the Custom Shape tool. Photoshop now comes packaged with dozens of pre-designed shapes, or you can even create your own. User-defined shapes can be literally any vector objects. For example, a company logo can be converted to a custom shape. Custom shapes have many timesaving applications. As previously mentioned, a company logo, if used frequently, is only a mouse click away. Any vector form, outline, or shape used on a recurring basis, can be converted to a custom shape and saved for future use. Select the Custom Shape tool or, if you have any shape drawing tool selected, click the Custom Shape button from the Options bar, and then configure the shape using the options on the Option bar.
 In the Editor, select the Custom Shape tool on the toolbox.
 Click the Fill Pixels button to create raster shapes using the active foreground color.
 Click the Geometry list arrow, and then select from the available options: Unconstrained, Defined Proportions, Defined Size, Fixed Size, or From Center.
 Click the Shape list arrow, and then select a shape from the available options.
 Click one of the following shape area options on the Options bar: Create New Layer,Add, Subtract, Intersect, or Exclude.
 To change the shape color, click the Color list arrow on the Options bar, and then select a color.
 To add a style to the shape, click the Style list arrow on the Options bar, and then select a style effect.
To remove the style, click the More Options button, and then click Remove Style.
 Drag in the document window to create the customized shape.