Once you create your Photoshop Elements masterpiece, you will have to decide the output for the image file, and how the image will be printed. These are not easy considerations. For example, an image created with a resolution of 72ppi, might be fine if output to the web, but would not be of sufficient quality for output to a high-quality laser printer.
Raster images (Photoshop documents) do not handle change very well, so it’s important to design with a goal in mind. Designers call this process a workflow. When you start a Photoshop Elements project you should have a good idea whether the project is headed to a press or inkjet printer, a copy machine, or a monitor. Knowing this information helps you design with the end in mind. That’s not to say you can’t make changes to a Photoshop document; however, when it comes to color space and resolution, the less change the better the output quality.
Color management has changed a lot in the last few years, standards have been set up, and Adobe is at the forefront of this new technology. No longer do you have to fear color management, because Photoshop Elements has taken all (or at least most) of the guesswork out of the equation. Adobe’s color management system translates, known as rendering intents, color discrepancies between the input device and the output device using color profiles to avoid color-matching problems.
You can use the Page Setup dialog box to select the size and location in the printer of the paper you want to use. You can also select the page orientation (portrait or landscape) that best fits the entire document or any selection. Portrait orients the page vertically (taller than it is wide) and landscape orients the page horizontally (wider than it is tall). When you shift between the two, the margin settings automatically change. Margins are the blank space between the edge of a page and the image. The printer only prints within these margins. Different printer models support different options and features; the available options depend on your printer and print drivers.
 In the Organizer or Editor, display a a document.
 Click the File menu, and then click Page Setup.
 Select from the various Page Setup options:
Size. Click the list arrow, and then select from the available options. The default printer will determine the available paper sizes.
Source. Click the list arrow, and then select from the available options.
Orientation. Click the Portrait or Landscape option.
Margins. Enter Top, Bottom, Left, and Right paper margins for the custom item.
 Click OK.
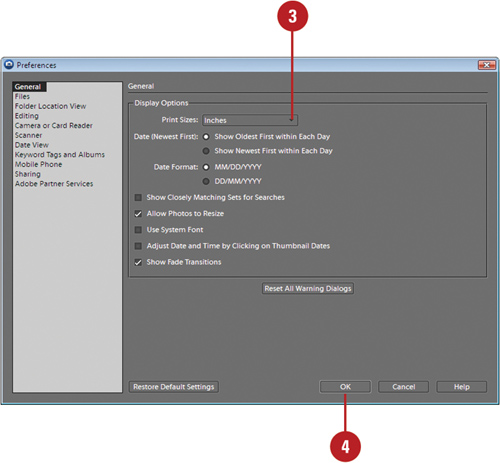
When you print a photo, you can set options to print image sizes and other measurement information. In General preferences for the Organizer, you can set the unit of measurement you want to use for printing. The two available options include Inches (in) and centimeters (cm)/millimeters (mm).
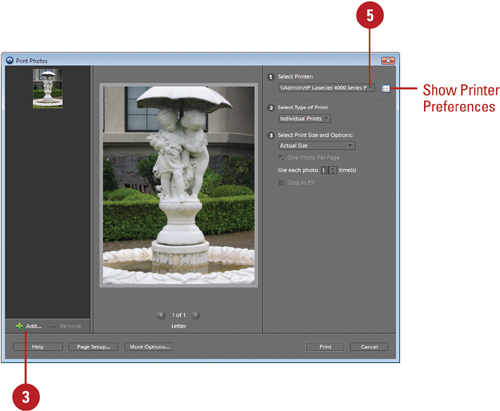
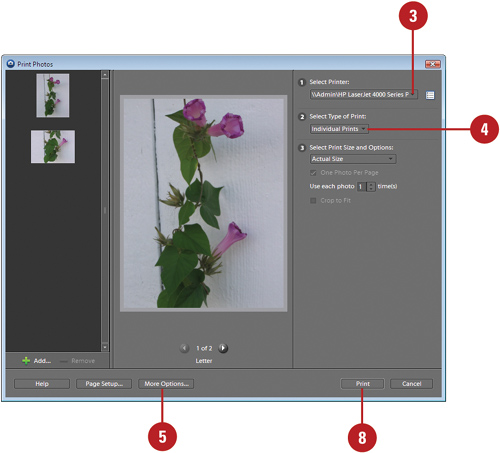
When you’re working in the Organizer, you can print one or more photos and other media files. If you select a video to print, only the first frame of the video prints. When you select the Print command in the Organizer, Photoshop Elements displays the Print Photos dialog box, where you can preview and print one or more photos. You can print your photos as individual prints, in a contact sheet (photo thumbnails), in a picture package (multiple photos on a single sheet), or as labels. When you print a picture package or labels, you can add an artistic frame around the photos. For labels, you can select a layout from some common Avery label sheets.
- In the Organizer, select the photos and other files you want to print.
- Click the File menu, and then click Print.
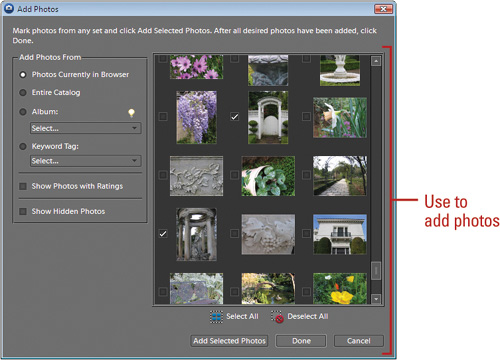
- To add photos to the list, click Add, and then do the following:
Select options to display the photos you want to add.
Select the check boxes next to the photos.
Click Add Selected Photos.
Click Done.
- To remove a photo from the list, select the photo, and then click Remove.
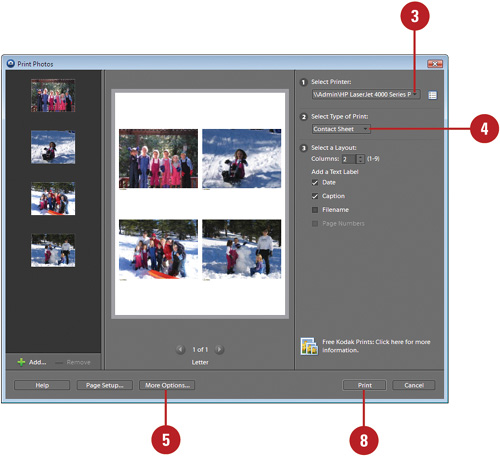
 Click the Select Printer list arrow to select a printer.
If available, click the Show Printer Preferences button (next to the list arrow) to set printer specific options.
If available, select the PRINT Image Matching (PIM) or Exif Print option.
 Click the Select Type of Print list arrow, and then select a print type:
Individual Prints.
Contact Sheet.
Picture Package.
Labels.
 If you selected Individual Prints, select from the following options:
Select Print Size. Click the list arrow to select a print size.
Options. Select or deselect the One Photo Per Page check box, specify the number of times to use each photos, and select or deselect the Crop to Fit check box.
 If you selected Contact Sheet, select from the following options:
Columns. Enter the numbers of columns (1-9).
Add a Text Label. Select or deselect the Date, Caption, Filename, or Page Number check boxes.
 If you selected Picture Package or Labels, select from the following options:
Layout. Click the list arrow to select a print size.
Frame. Click the list arrow to select a frame.
Options. Select or deselect the Fill Page with First Photo check box, and select or deselect the Crop to Fit check box.
Offset Print Area. For Labels, enter an offset print area to align print labels. Check your label sheets for numbers.
 To preview your photos, click the Previous and Next buttons under the Preview pane.
 Click Print.
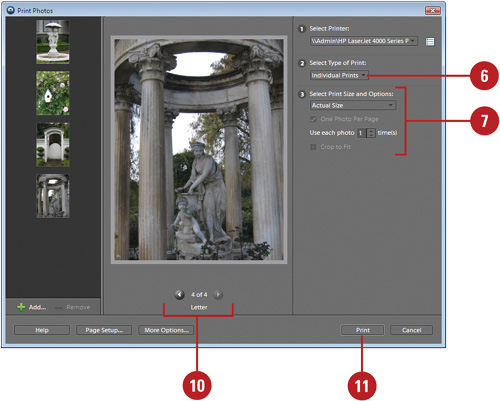
When you print from the Organizer, Photoshop Elements provides more print options. The options available depending on the type of print job you want to perform. If you want to print a contact sheet, picture package, or labels, you can select a print profile to use the right colors for the print job. If you want to print individual prints, you can add information labels under the photos, add a border, invert the image for transfer printing, print crop marks for alignment purposes, and set print resolution in addition to selecting a print profile.
- In the Organizer, select the photos and other files you want to print.
- Click the File menu, and then click Print.
- Click the Select Printer list arrow to select a printer.
- Click the Select Type of Print list arrow, and then one of the following:
Contact Sheet.
Picture Package.
Labels.
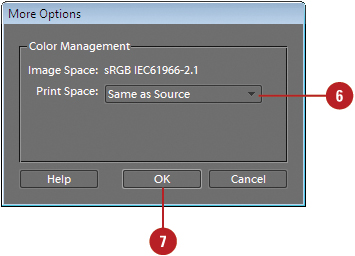
- Click More Options.
- Click the Print Space list arrow, and then select a print profile.
- Click OK.
- Click Print.
- In the Organizer, select the photos and other files you want to print.
- Click the File menu, and then click Print.
- Click the Select Printer list arrow to select a printer.
- Click the Select Type of Print list arrow, and then click Individual Prints.
- Click More Options.
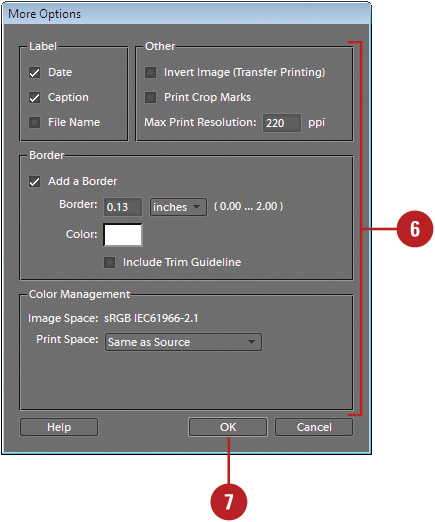
- Select from the following options:
Label. Select the Date, Caption, or File Name check boxes to display the information below each photo.
Invert Image (Transfer printing). Select to print T-shirt transfers with an inverted image.
Print Crop Marks. Select to print guide lines on all four edges to make it easier to trim a photo.
Max Print Resolution. Enter the maximum resolution needed to print a photo (220 to 600 ppi). The default is 220 ppi.
Add a Border. Select to add a border, and then enter a value for a border’s thickness in inches (in), centimeters (cm), or millimeters (mm). Click the color box to select a color. If you want to print guides around the image, select the Include Trim Guideline check box.
Color Management. Click the Print Space list arrow, and then select a print profile.
- Click OK.
- Click Print.
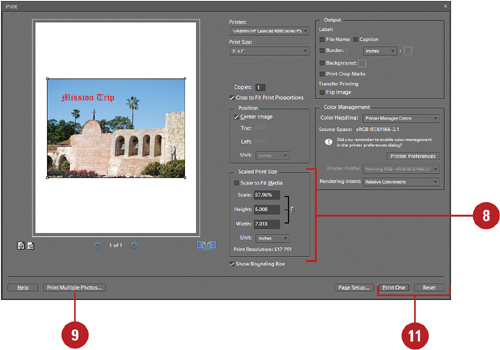
When you select the Print command in the Editor, Photoshop Elements displays a preview dialog box, which gives you the opportunity to view the image (on screen), and decide whether to print or return to the drawing board. The white area in the image preview is the printable area, while the shaded border at the edge is the paper margins. You can adjust the position and scale of the image and see the results. The size of the image is determined by the document size settings in the Image Size dialog box. When you scale an image in the Print dialog box, the changes only affect the printed image, not the actual image.
- In the Editor, open a document.
- Click the File menu, and then click Print.
- Click the Printer list arrow to select a printer.
- Click the Print Size list arrow, and then select a print size.
- Select from the Preview options:
Orientation. Click the Portrait or Landscape button.
Preview. Click the Previous or Next button.
Rotate. Click the Rotate 90° Left or Rotate 90° Right button.
- Select the Crop to Fit Print Proportions check box to make sure the photo prints at the size chosen from the Print Size.
- Select from the Position options:
Center Image. Select to center the image on the paper.
Top. Select to print the image from the top of the page.
Left. Select to print the image from the left of the page.
Units. Specify the measurement units.
- Select from the various Scaled Print Size options:
Scale to Fit Media. Select the check box to scale the image to the selected paper size.
Scale. Enter a percentage value.
Height. Enter a specific height for the image.
Width. Enter a specific width for the image.
Show Bounding Box. Select the check box to create a viewable bounding box around the image.
- To print multiple photos, click Print Multiple Photos, and then do the following:
Select options to display the photos you want to add.
Select the check boxes next to the photos.
Click Add Selected Photos.
Click Done.
- Click Print to open the Print dialog box, or click Cancel to return to your document without printing.
- To access other print buttons, do any of the following:
Reset. Hold down Alt, and then click Reset to reset print options.
Print One. Hold down Alt, and then click Print One to print without displaying a dialog box.

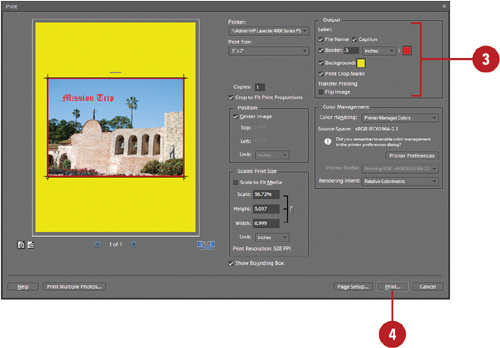
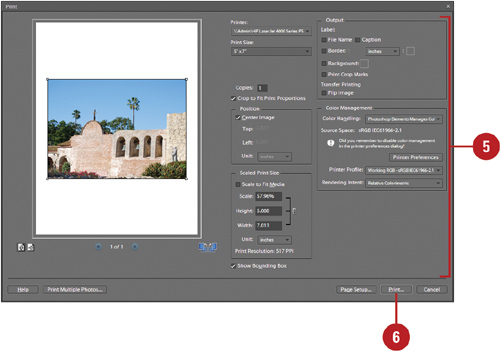
On the right side of the Print dialog box from the Editor, Photoshop Elements not only gives you access to its powerful color management tools, it also lets you print file name labels or captions, print crop marks, print T-shirt transfers with an inverted image, add a background color outside the image area, and even place a custom border around the image. It’s just one more way that Photoshop Elements gives you control over document output.
- In the Editor, open a document.
- Click the File menu, and then click Print.
- Select from the various Output options:
File Name. Select to print the image file name.
Caption. Select to print the image caption in 9-point Helvetica plain type.
Border. Select to print a border around the image. Specify the size of the border and select a color.
Background. Select to use a background color to be printed outside the image area. Select a color.
Print Crop Marks. Select to print marks where the page is to be trimmed.
Flip Image. Select to print T-shirt transfers with an inverted image.
- Click Print to open the Print dialog box.
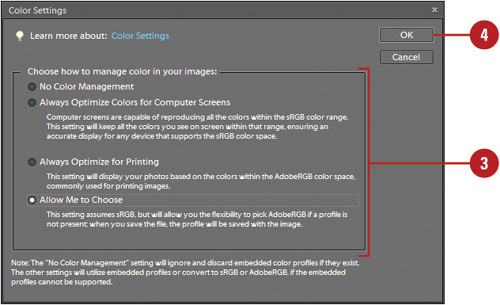
Colors in an image many times will appear different when you view them using different monitors. They may also look very different when printed on your desktop printer or when printed on a professional printing press. If your work in Photoshop Elements requires you to produce consistent color across different devices, managing color should be an essential part of your workflow. Photoshop Elements gives you a group of pre-defined color management systems, which are designed to help you produce consistent color. In most cases, the predefined sets are all you will need to manage color workflow. The power of color management lies in its ability to produce consistent colors with a system that reconciles differences between the color spaces of each device.
- Open Photoshop Elements (it is not necessary to open a document).
- In the Organizer or Editor, click the Edit menu, and then click Color Settings.
- Select from the available options:
No Color Management. Select to use your monitor profile and removes any embedded profiles and leaves the image untagged.
Always Optimize Colors for Computer Screens. Select to use sRGB as the RGB working space or the Gray Gamma 2.2 as the Grayscale working space and maintains any embedded profiles.
Always Optimize for Printing. Select to use Adobe RGB as the RGB working space or Dot Gain 20% as the Grayscale working space and maintains any embedded profiles.
Allow Me to Choose. Select sRGB or Adobe RGB when opening untagged files.
- Click OK.
Photoshop Elements’ color management system must know the color space of the image so it can decipher the meaning of the color values in the image. When assigning a profile to an image, the image will be in the color space described by the particular profile. For example, a document’s profile can be assigned by a source device, like a printer, or assigned directly in Photoshop Elements. When using the Assign Profile command, color values are mapped directly into the new profile space. Rendering intent deals with how the color profile selected is converted from one color space into another. When you define rendering intent you are specifying how the colors should be displayed, even at the expense of the original gamut (colors) within the active document. The rendering intent you choose depends on whether colors are critical in an image and on your preference of what the overall color appearance of an image should be. Many times the intent of the images color gamut is different than how the original image was shot.
- In the Editor, open a document.
- Click the File menu, and then click Print.
- Click the Color Handling list arrow, and then select from the following options:
Printer Manages Colors. Select to let the printer specify the color profile.
Photoshop Elements Manages Colors. Select to choose the profile you want.
No Color Management. Select to use your monitor profile and removes any embedded profiles and leaves the image untagged.
- To change printer specific options, click Printer Preferences. Options vary depending on the printer.
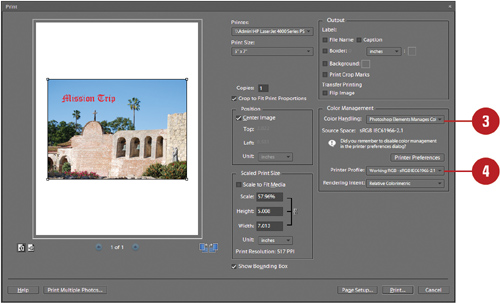
- If you selected the Photoshop Elements Manages Colors option, click the Printer Profile list arrow, and then select a profile.
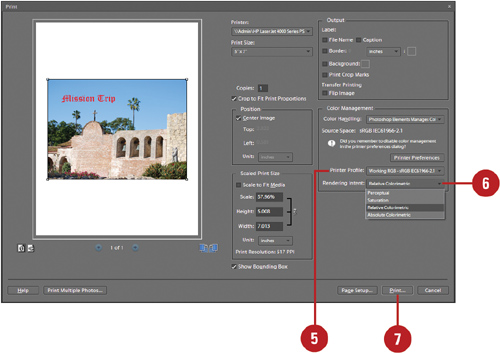
- Click the Rendering Intent list arrow, and then select from the following options:
Perceptual. Preserves the natural colors of an image, as viewed by the human eye, sometimes at the expense of the true color values. Good for photographic images.
Saturation. Produces vivid colors in an image, without paying attention to the original color values of the image. Good for business graphics, and charts where you want the colors to pop.
Relative Colorimetric. Shifts the color space of the document to that of the maximum highlight values of the destination. Useful for photographic images, and preserves more of the original color than Perceptual.
Absolute Colorimetric. Clips any colors in the destination image that do not fall into the color gamut of the destination. Use to proof images sent to devices, such as 4-color presses.
- Click Print to open the Print dialog box.
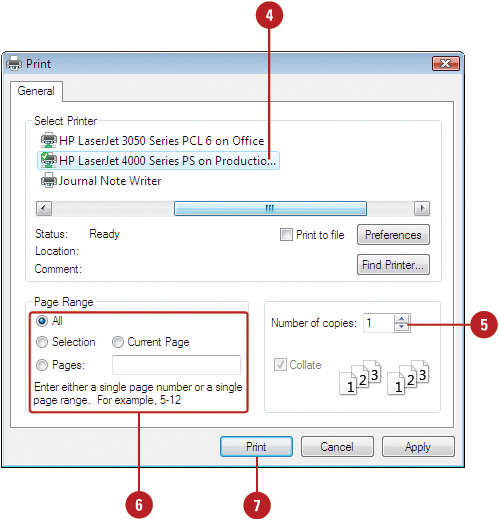
Printing a paper copy is the most common way to preview and share your documents. You can use the Print dialog box to set how many copies to print, specify a range of pages to print, and print your document. Understand that the options available for the Print command will be determined by the default printer, and operating system. Different printers will display different options; there are some options that are fairly universal, and these options are covered here.
- In the Editor, open a document.
- Click the File menu, and then click Print.
A print preview dialog box opens.
- Specify the print options you want, and then click Print.
- If necessary, click the Name list arrow, and then click the printer you want.
- Type the number of copies you want to print.
- Specify the pages to print:
All. Prints the entire document.
Pages. Prints the specified pages.
Selection. Prints the selected item.
Current Page. Prints the currently selected page.
- Click Print.
If you have an image document with multiple layers, such as a Photoshop document with the PSD format or an image file with the TIFF format, Photoshop Elements prints the layers that are visible in the Editor. Use the eye icon in the Layers palette to make the layers visible, and then print the document.
- In the Editor (in Full Edit), open a document (PSD) or image (TIFF) with multiple layers.
- Display the Layers palette.
- Click the eye icon in the Layers palette to make the layers you want to print visible.
- Click the File menu, and then click Print to view the visible layers in the preview.

- Specify the print options you want.
- Click Print.
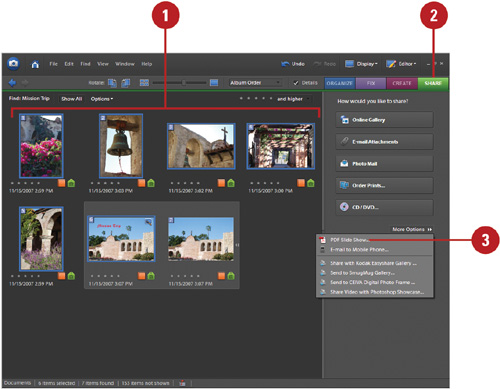
In Photoshop Elements, you can use the Sharing Center (New!) to share and send your photos and projects to others as e-mail, as PDFs, on CD/DVD, and online using Adobe Photoshop Services. You can access the Sharing Center on the Share tab from either the Organizer or the Editor.
- Select (in the Organizer) or open (in the Editor) the photos you want to use in your project.
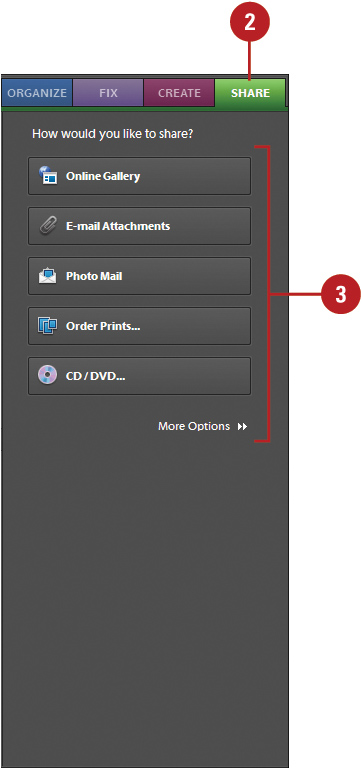
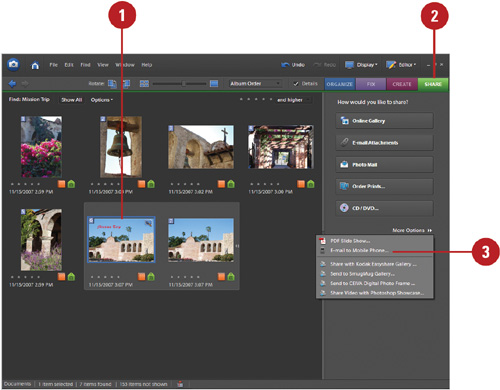
- Click the Share tab.
- Select any of the sharing options:
Online Gallery. Presents your photos on a web page.
E-mail Attachments. Sends photos and projects in as an e-mail attachment.
Photo Mail. Sends photos as an e-mail.
Order Prints. Orders prints online using Adobe Photoshop Services.
CD/DVD. Creates a CD/DVD with your photos and projects.
PDF Slide Show. Creates a PDF Slide Show with your photos and projects.
E-mail to Mobile Phone. Sends photos to your mobile phone.
Share and Send to Adobe Photoshop Services. Shares photos and projects with Kodak Easyshare Gallery or Photoshop Showcase, or sends them to SmugMug Gallery or CEIVA Digital Photo Frame.
See Also
See “Creating an Online Gallery” on page 418 for information on creating an online gallery.
In Photoshop Elements, you can send photos and other media files to other recipient as attachments in an e-mail message. You can use the Share tab to start the process, select file options, type a message, and select recipients before Photoshop Elements creates an e-mail message using the e-mail application you specified in Sharing Preferences in the Organizer.
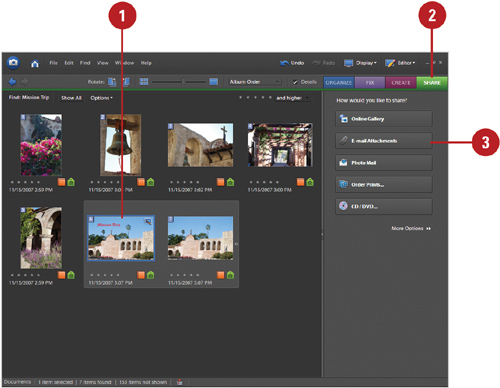
- Select (in the Organizer) or open (in the Editor) the photos you want to use in your project.
- Click the Share tab.
- Click E-mail Attachments on the Share tab.
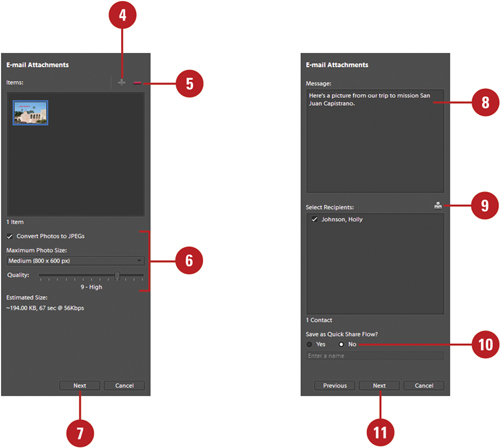
- To add photos to the list, click Add, select options to display the photos you want, select photo check boxes, click Add Selected Photos, and then click Done.
- To remove a photo, select the photo, and then click Remove.
- Select from the following options:
Convert Photos to JPEGs. Select to convert to JPEG.
Maximum Photo Size. Select a resolution size; larger the size, the larger the file size.
Quality. Select a image quality setting; higher the setting, the larger the file size.
- Click Next.
- Type a message.
- Select or enter the recipients you want to send the e-mail.
- To save and name these setting for future use as a Quick Share Flow, click the Yes option and name it.
- Click Next.
 Complete and send the e-mail from your e-mail program.
Instead of sending photos and other media files as e-mail attachments, you can send them in a photo e-mail (New!) as an embedded message using colorful stationery, which you can customize with different backgrounds, layouts, text, and borders. You can use the Share tab to start the process, type a message, select recipients and select stationery options before Photoshop Elements creates an e-mail message using the e-mail application you specified in Sharing Preferences in the Organizer.
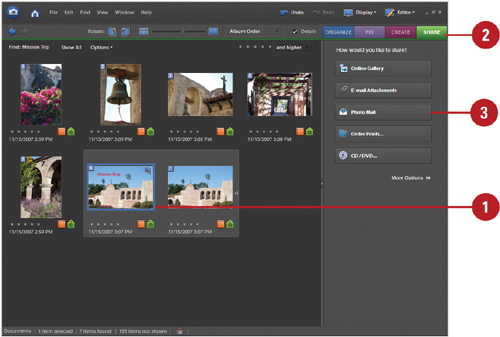
- Select (in the Organizer) or open (in the Editor) the photos you want to use in your project.
- Click the Share tab.
- Click Photo Mail on the Share tab.
- To add photos to the list, click Add, select options to display the photos you want, select photo check boxes, click Add Selected Photos, and then click Done.
- To remove a photo, select the photo, and then click Remove.
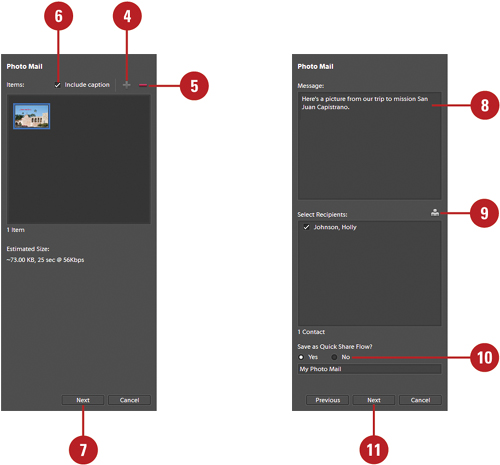
- Select the Include caption check box to add the photo caption to the photo mail.
- Click Next.
- Type a message.
- Select or enter the recipients you want to send the e-mail.
- To save and name these setting for future use as a Quick Share Flow, click the Yes option and name it.
- Click Next.
The Stationery & Layouts Wizard dialog box appears.
- Select a stationery, click Next Step, select a background, layout, text, and border, and then click Next.
 Complete and send the e-mail from your e-mail program.
Sending and receiving photos and other media to mobile phones is common place now a days. If you have a photos, video, and audio clips that you have stored or fixed in Photoshop Elements, you can send them to your mobile phone. Unfortunately, you cannot send project or PDF files to mobile phones in this version.
- Select (in the Organizer) or open (in the Editor) the photos you want to use in your project.
- Click the Share tab.
- Click the More Options button on the Share tab, and then click E-mail to Mobile Phone.
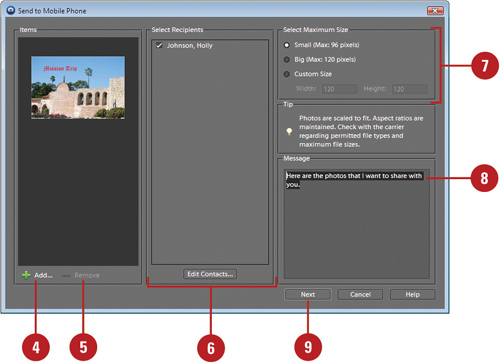
- To add photos to the list, click Add, select options to display the photos you want, select photo check boxes, click Add Selected Photos, and then click Done.
- To remove a photo, select the photo, and then click Remove.
- Select or enter the recipients with a mobile phone e-mail address you want to use; click Edit Contacts to make changes to recipients.
- Click the Small, Big, or Custom option, and then specify width and height, if necessary.
- Type a message.
- Click Next.
- Complete and send the e-mail from your e-mail program.
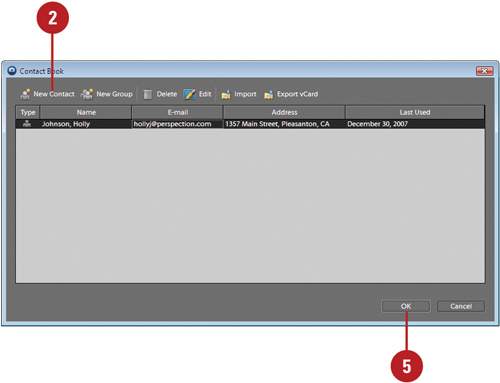
The contact book allows you to store, edit, group, and manage e-mail addresses for use in Photoshop Elements. Instead of typing an e-mail address every time you want to send a photo or project in as an e-mail attachment, you can quickly select an address from the contact book. You can import addresses from Outlook, Outlook Express/Windows Mail, or a vCard file, and export them as a vCard file.
- In the Organizer, click the Edit menu, and then click Contact Book.
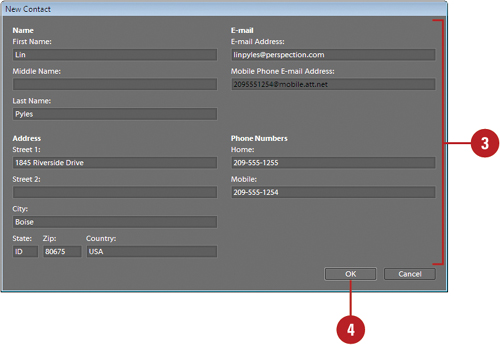
- Click the New Contact button.
- Type a name, e-mail address, and other information.
- Click OK.
- Click OK.
Did You Know?
You can delete a contact. In the Organizer, click the Edit menu, click Contact Book, select a contact, click the Delete button, and then click OK.
You can import addresses into the contact book. In the Organizer, click the Edit menu, click Contact Book, click the Import button, select the application where you want to get contacts from, and then click OK.
You can export contact information to vCard files. In the Organizer, click the Edit menu, click Contact Book, select the contacts you want to export (use Ctrl-click to select multiple contacts) click the Export vCard button, select a destination for the vCard file, and then click OK.

- In the Organizer, click the Edit menu, and then click Contact Book.
- Click the New Group button.
- Type a name for the group.
- Select the contact you want to add to the group, and then click the Add button.
Use the Shift-click to add adjacent contacts, or Ctrl-click to add nonadjacent ones.
- To remove a contact, select it, and then click the Remove button.
- Click OK.
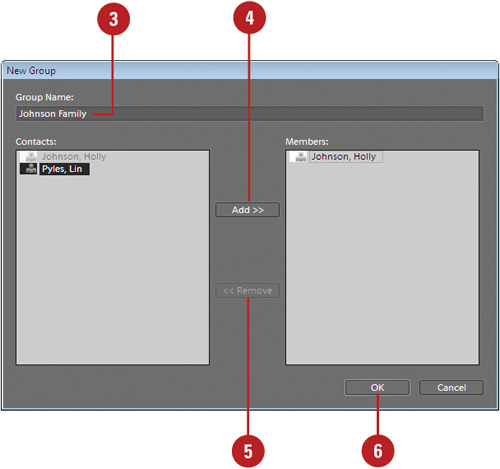
- Click OK.
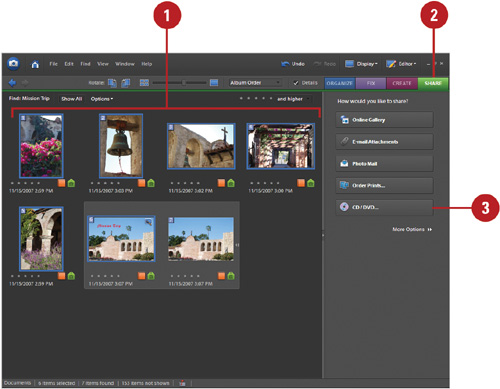
If you want to share a large number of files with someone or you simply want to back them up for safe keeping, you can create a CD or DVD with the files you have stored in Photoshop Elements. You don’t need an external program to make a CD or DVD. You can write, also known as burn, a CD or DVD directly from Photoshop Elements in the Organizer.
- Select (in the Organizer) or open (in the Editor) the photos you want to use in your project.
- Click the Share tab.
- Click CD/DVD on the Share tab.
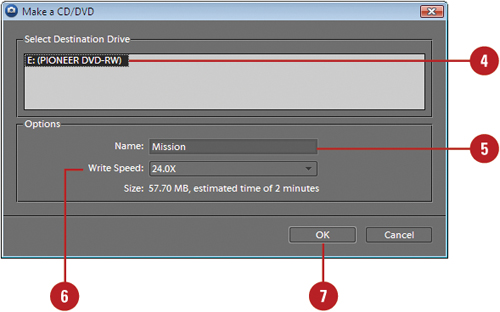
- Select the destination drive.
- Enter a name for the CD or DVD.
- Click the Write Speed list arrow, and then select a write speed that works with your CD or DVD drive.
- Click OK.
A progress dialog box appears during the burning process.
- Click Verify or Don’t Verify.
- If prompted upon completion, click OK.
A PDF (Portable Document Format) is a common file type that allows anyone with the Adobe Reader software (available free at www.adobe.com) to open and view the file contents. In Photoshop Elements, you can select a number of photos to create a slide show in the PDF format, which makes it accessible to almost everyone.
- Select (in the Organizer) or open (in the Editor) the photos you want to use in your slide show project.
- Click the Share tab.
- Click the More Options button on the Share tab, and then click PDF Slide Show.
- To add photos to the list, click Add, select options to display the photos you want, select photo check boxes, click Add Selected Photos, and then click Done.
- To remove a photo, select the photo, and then click Remove.
- Select from the following options:
Maximum Photo Size. Select a resolution size; larger the size, the larger the file size.
Quality. Select a image quality setting; higher the setting, the larger the file size.
- Enter a name for the PDF file.
- Click Next.
- Type a message.
- Select or enter the recipients you want to send the e-mail.
- To save and name these setting for future use as a Quick Share Flow, click the Yes option and name it.
- Click Next.

- Click OK or Cancel to attach the PDF to an e-mail message.
 Complete and send the e-mail from your e-mail program.
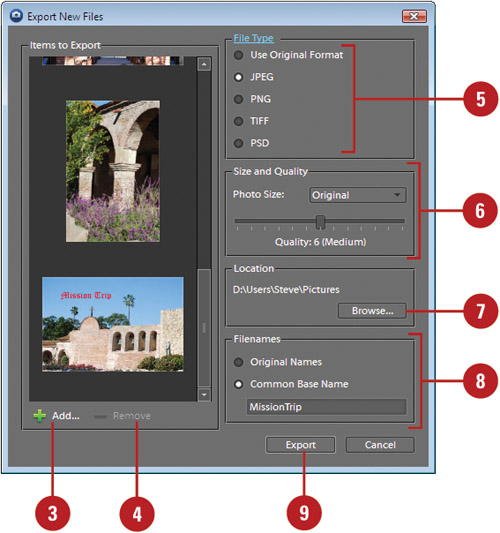
After correcting and fixing files in Photoshop Elements, you can export them as files to use in other applications or share with others, or export them to a mobile phone. When you export photos as files, you can export them with the original file format or select a different file format, such as PSD Photoshop, and rename them in a sequence.
- In the Organizer, select the photos and other media you want to export.
- Click the File menu, point to Export, and then click As New File(s).
- To add photos to the list, click Add, select options to display the photos you want, select photo check boxes, click Add Selected Photos, and then click Done.
- To remove a photo, select the photo, and then click Remove.
- Select a file type option: Use Original Format, JPEG, PNG, TIFF, or PSD (Photoshop).
- Click the Photo Size list arrow, select a size, and then drag the Quality slider; higher the setting, the larger the file size.
- Click Browse, select an export location, and then click OK.
- Click the Original Names option to use existing file names or click the Common Base Name option, and then enter a name to export files with the same name plus a sequential number.
- Click Export.
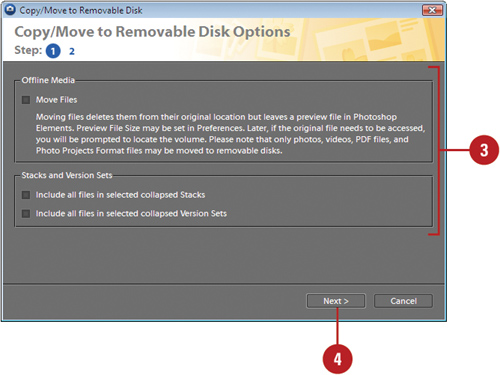
If you want to share files in Photoshop Elements with others or you simply want to back them up for safe keeping, you can copy or move them to a removable disk or create a CD or DVD. You can copy or move them to a removable disk or CD/DVD directly from Photoshop Elements in the Organizer.
- In the Organizer, select the photos and other media you want to copy or move to a removable disk.
- Click the File menu, and then click Copy/Move to Removable Disk.
- Select from the following options:
Move Files. Select to move files from your computer; not available for projects and audio clips.
Include All Files in Selected Collapsed Stacks. Select to include all files in a selected collapsed stack.
Include All Files in the Selected Collapsed Version Sets. Select to include all files in a selected collapsed version set.
- Click Next.
- If missing files are detected, click Reconnect to automatically connect, Browse to manually select, or Cancel.
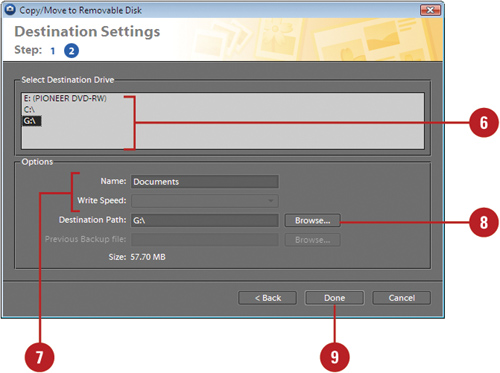
- Select the destination drive.
- For a CD or DVD, enter a name, click the Write Speed list arrow, and then select a write speed.
- For a removable disk, specify a destination path; click Browse to select a folder.
- Click Done, and then complete the process for a CD or DVD, if necessary.
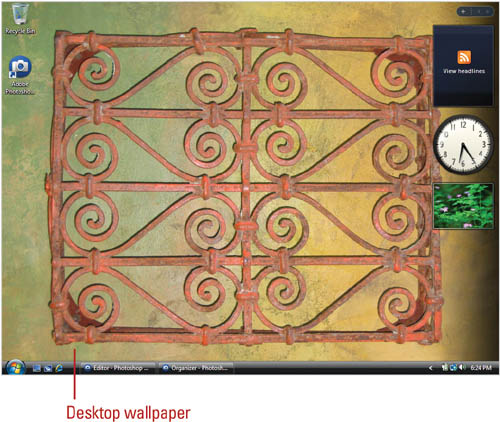
You can select one or more photos in Photoshop Elements and use them as desktop background, also known as desktop wallpaper. If you selected more than one photo, the photos are tiled on the desktop. If you no longer want to use the photos from Photoshop Elements, you can change the desktop background using the Control Panel in Windows XP or Vista.
- In the Organizer, select one or more photos you want to use as a desktop wallpaper.
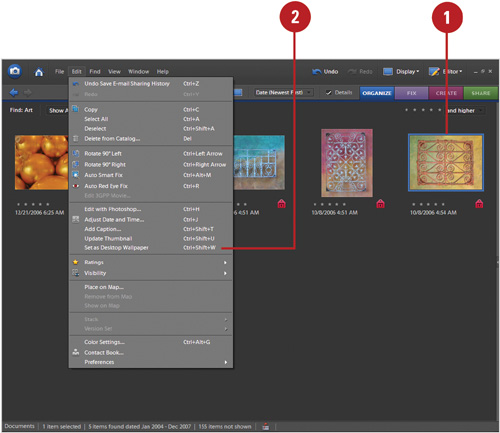
- Click the Edit menu, and then click Set as Desktop Wallpaper.
If you selected more than one photo, the photos are tiled on the desktop.
Did You Know?
You can create a Windows XP or Vista screen saver. In the Organizer, select the photos you want to use in the screen saver, click the File menu, point to Export, click As New File(s), specify a file type, size and quality, new folder name and location (such as Screen Saver) and file names, and then click Export. In Windows XP or Vista, open the Screen Saver dialog box from the Control Panel, select the Photos screen saver type, click Settings, click Browse to select the folder with the photos you exported from Photoshop Elements, click Save, and then click OK.