No description of Photoshop Elements would be complete without that well known, but little utilized area called Preferences. Photoshop Elements preferences for the Editor serve several purposes. They help customize the program to your particular designing style, and they help you utilize available computer resources to increase the overall performance of the program.
As you use Photoshop Elements, you’ll come to realize the importance of working with units and rulers. Precision is the name of the game when you are working with images. What about the color of your grids? No big deal, you say. Well, if you’ve every tried viewing a blue guide against a blue-sky image, you know exactly why color is important. By working through preferences such as Image Cache, Scratch Disks, and RAM Memory, speed increases of up to 20 percent can be achieved.
In addition, customizing the program, helps make you more comfortable, and studies show that the more comfortable you are as a designer the better your designs. What does setting up preferences do for you? They make Photoshop Elements run faster (up to 20 percent), you work more efficiently, and your designs are better. That’s a pretty good combination. Photoshop Elements doesn’t give you preferences to confuse you, but to give you choices, and those choices give you control.
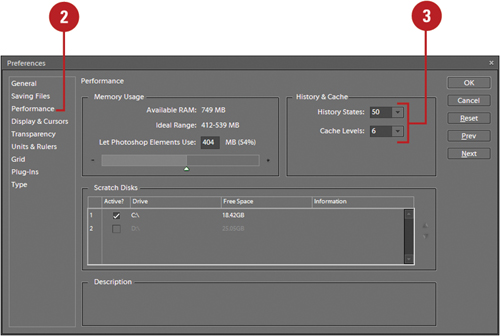
Photoshop Elements is a powerful program, and as such, requires a tremendous amount of computing power. When working on large documents, a poorly optimized Photoshop will translate into long wait times. That’s the bad news if you have a deadline to meet. The good news is that Photoshop Elements can be configured to run more efficiently. To optimize Photoshop Elements, click the Edit menu, point to Preferences, and then click Performance. The Performance preferences dialog box contain options that will help increase the performance of Photoshop Elements.
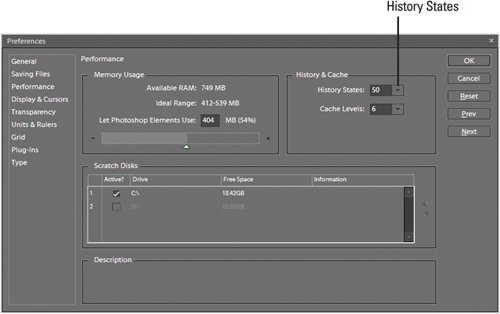
History States control the number of undos available. In fact, you can have up to 1000 undos (ever wonder who would make so many mistakes that they would need 1000 undos?). Unfortunately, increasing the number of History States will ultimately increase the amount of RAM Photoshop Elements uses to manage the Undo History palette. Assigning more RAM memory to manage History means less memory for Photoshop Elements to perform normal operations, and will reduce the performance of the program. If you are experiencing slow performance problems, lowering the number of History States frees up more RAM, and permits Photoshop Elements to operate more efficiently.
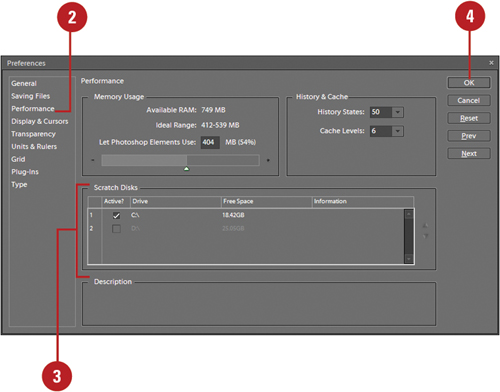
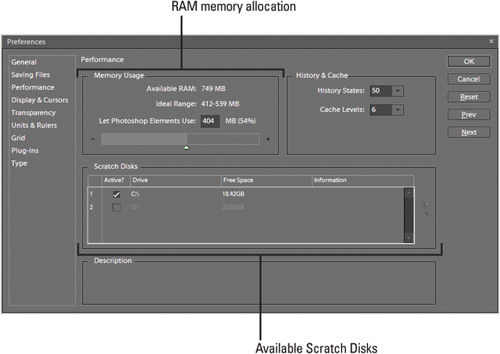
When your computer doesn’t have enough RAM to perform an operation, Photoshop Elements uses free space on any available drive, known as a Scratch Disk. Photoshop Elements requires 5 times the working size of the file in contiguous hard drive space. For example, if the working size of your file is 100MB, you will need 500MB of contiguous hard drive space, or you will receive an error message: Out of Scratch Disk Space (I hate it when that happens). Using additional hard drives gives Photoshop Elements the ability to divide the processing load and increase performance. Photoshop Elements detects and displays all available internal disks in the Preferences dialog box. Scratch disks must be physically attached to your computer (avoid networks and removable media, such as removable drives, or rewriteable CDs or DVDs). For maximum speed, avoid USB, and use 4 or 6-pin Firewire drives. Benchmark tests show Firewire drives provide up to a 20 percent speed improvement when used as Scratch Disks. Think of saving one hour out of every five, or one full day out of every five. That’s not too bad. For best results, select a scratch disk on a different drive than the one used for virtual memory or any large files you’re editing.
Photoshop Elements functions in RAM memory (actually all applications work within RAM). To run efficiently, Photoshop Elements requires five times the working size of the open document in available memory (some tests indicate 6 to 8 times). Strictly speaking, the more RAM memory you can assign to Photoshop Elements, the more efficient the program operates, especially when opening large documents.
RAM memory usage is determined by the working size of the document, not its open size. As you work on a document, you will eventually add additional layers to separate and control elements of the image. As you add these new layers, the working size of the file increases.
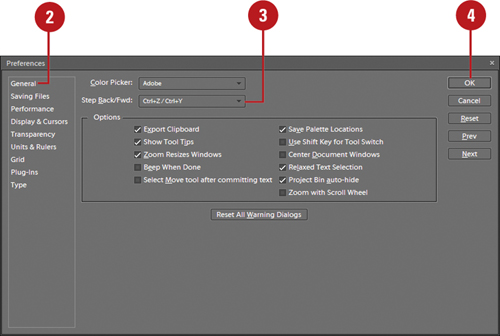
Photoshop Elements’ General preferences in the Editor help you configure some of the more common features of the program. Selecting a color picker dialog box, as well as the shortcut keys for using Undo and Redo are available in General preferences. Other options, such as showing tool tips, beeping when an operation is finished, centering document windows when an image opens, and saving palette locations, can all be turned on or off in the options area. If you have hidden a dialog box by selecting the Don’t Show Again check box, you can reset all the warning dialog boxes so they appear again.
 In the Editor, click the Edit menu, and then point to Preferences.
 Click General.
 Click the Color Picker list arrow, and then select Adobe or the Windows operating system.
 Click the Step Back/Fwd list arrow, and then select the keyboard shortcuts you want to use to step backward and forwards in the Undo History palette with the Undo and Redo commands.
 Select the various options you want to use:
Export Clipboard. Transfers a copied image to the operating systems clipboard.
Show ToolTips. Displays a screen tip when you point to buttons and options in the Photoshop Elements window or dialog boxes.
Zoom Resizes Windows. Forces the image window to resize when zoom is selected.
Beep When Done. Sounds when an operation is complete.
Select Move tool after committing text. Changes from the Text tool to the Move tool after you create a text box.
Save Palette Locations. Saves and restores the current palette locations when you exit/launch Photoshop Elements.
Use Shift Key For Tool Switch. Allows you to use the Shift key or keyboard shortcut when two tools share the same slot in the toolbox.
Center Document Windows. Determines whether to center document windows when you open an image.
Relaxed Text Selection. Allows you to select text by clicking near it.
Project Bin Auto-Hide. Displays the Project Bin closed until you point to the bin border edge to open it.
This works like the auto-hide option for the taskbar on the desktop.
Zoom With Scroll Wheel. Determines whether zooming or scrolling is the default operation of the scroll wheel.
 To display all warning dialog boxes hidden by selecting the Don’t Show Again check box, click Reset All Warning Dialogs.
 Click OK.
Prev and Next. Click to display the previous or next preference section. When you reach the last section, it cycles back to the first section.

Sooner or later, you’ll have to save the file (document) you’ve created in Photoshop Elements. The final output of any document is contained within a specific file format such as TIF, EPS, JPG, or even BMP. In fact, Photoshop Elements lets you save files using over 18 different formats. The Saving Files preferences in the Editor provide several options that modify what information is saved with a file. Image previews are typically very small; add very little to the file size of the saved document. Once saved you will want to open, print, and possibly even modify the document using other image-editing applications. The File compatibility options help you save a file that will be transportable to other applications.
 In the Editor, click the Edit menu, and then point to Preferences.
 Click Saving Files.
 Select the File Saving options you want to use:
On First Save. Select Always Ask, Ask If Original, or Save Over Current File.
Image Previews. Select Always Save, Never Save, or Ask When Saving.
File Extension. Choose to have upper or lower case extensions.
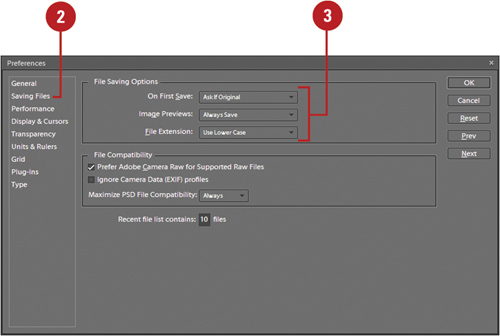
 Select the File Compatibility options you want to use:
Prefer Adobe Camera Raw for Supported Raw Files (New!). Open Raw supported files in Camera Raw.
Ignore Camera Data (EXIF) Profiles. Ignores color space metadata attached to digital camera images.
Maximize PSD File Compatibility. Lets you save .psd files that can be opened in earlier versions of the program.
 Enter the number of files (up to 30) to keep in the Open Recent menu available on the File menu.
 Click OK.
See Also
See “Understanding File Formats” on page 149 for information on some of the various file formats available in Photoshop Elements.
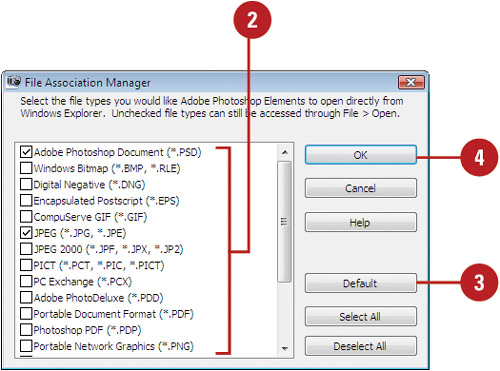
You can open a variety of images in Photoshop Elements using the Open command on the File menu. If you have not opened Photoshop Elements, you can open an image file in Photoshop Elements directly from Windows Explorer by using the File Association Manager. The File Association Manager allows you to select the file types you want to associate with Photoshop Elements. After you associate a file type with Photoshop Elements, the program automatically opens whenever you double-click an associated file type in Windows Explorer. If you don’t associate a file type with Photoshop Elements, you can always open the file using the Open command.
 Click the Edit menu, and then click File Associations.
 Select the check boxes next to the file types you want to open directly from Windows Explorer.
Select All and Deselect All. Click to select all or deselect all the check boxes.
 To use default Photoshop Elements settings, click Default.
The button is grayed out when the default settings are currently in use.
 Click OK.
The Performance preferences in the Editor are available to help you get the best performance out of your computer, by letting you choose one or more hard drives for scratch operations. When your computer doesn’t have enough RAM to perform an operation, Photoshop Elements uses free space on any available drive, known as a Scratch Disk. Photoshop runs faster when you divide the Scratch Disk workload. Scratch operations are performed on your hard drive, and take place when Photoshop Elements is using one of its many filters and adjustments. Photoshop Elements detects and displays all available internal disks in the Performance preferences dialog box, where you can select the disks you want. By assigning additional hard drives to the task, you speed up Photoshop Elements’ overall performance. Scratch Disk changes take effect the next time you start Photoshop Elements.
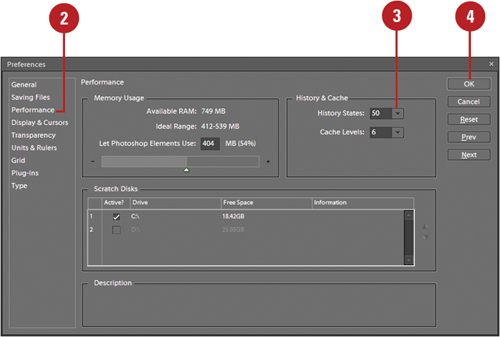
The Memory & Image Cache preferences in the Editor give you control over how much RAM memory is assigned to Photoshop Elements, and how much memory is allocated to screen draws (Image Cache). Photoshop Elements, being a high-performance application, requires a fairly large amount of RAM memory. Adjusting these options can help increase Photoshop Elements’ overall speed performance. Photoshop Elements uses many things that effect RAM memory: History States, Undo, Clipboard, and Cache. When you modify the cache settings, you are increasing or decreasing the amount of RAM Photoshop Elements uses for various tasks. Experimentation is the key here. Try different settings and record Photoshop Elements’ performance. By fine-tuning Photoshop Elements’ engine, you increase its overall speed, and you’ll get more design miles to the gallon.
 In the Editor, click the Edit menu, and then point to Preferences.
 Click Performance.
 Select the History & Cache options you want to use:
Cache Levels. Select a number from 1 to 8.
History States. Enter the amount of History States steps you want to keep as undos; you can enter up to 1,000.
Important
History States impact Photoshop Elements’ performance by holding the History States using a combination of RAM and Scratch Disk space. The more History States used, the more RAM memory is required. Using an extensive number of History States can impact Photoshop Elements’ performance.
See Also
See “Installing Photoshop Elements 6,” on page 2 for information on RAM and other system needs.
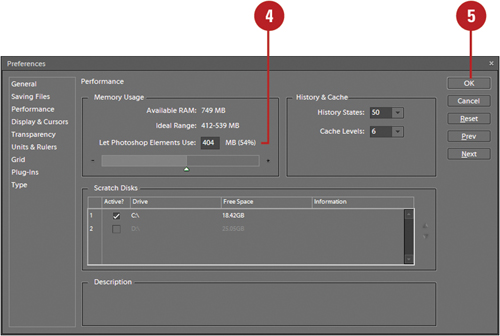
 Enter the percentage of RAM used in the Let Photoshop Elements Use box.
Photoshop Elements needs RAM memory to work efficiently (5 times the size of the open document).
 Click OK.
Important
Never select 100 percent Memory Usage. Selecting 100 percent gives Photoshop Elements your entire available RAM, leaving nothing for the operating system or any other open programs. If you are experiencing more than your usual share of Photoshop Elements crashes, experiment with reducing memory usage.
Working with the Undo History palette in the Editor requires a firm understanding of how the palette functions, and what you can and cannot do with History. The Undo History palette records your steps as you work through a document. A step is defined as a specific action, such as creating a layer, or adding a brush stroke. Every time you perform an action, a step is recorded in the Undo History palette. The Undo History palette gives you the ability to go back to a previous history state, which is the same as performing an undo command. You can perform multiple undo commands up to the number set in Photoshop Elements preferences for the History States.
 In the Editor, click the Edit menu, and then point to Preferences.
 Click General.
 Click the Step Back/Fwd list arrow, and then select one of the following keyboard shortcuts to step backward and forward through the Undo History palette:
Ctrl+Z / Shift+Ctrl+Z. Ctrl+Z executes the Undo command, while the Shift+Ctrl+Z executes the Redo command.
Alt+Ctrl+Z / Shift+Ctrl+Z. Alt+Ctrl+Z executes the Undo command, while the Shift+Ctrl+Z executes the Redo command.
Ctrl+Z / Ctrl+Y. Ctrl+Z executes the Undo command, while the Ctrl+Y executes the Redo command (default).
 Click OK.
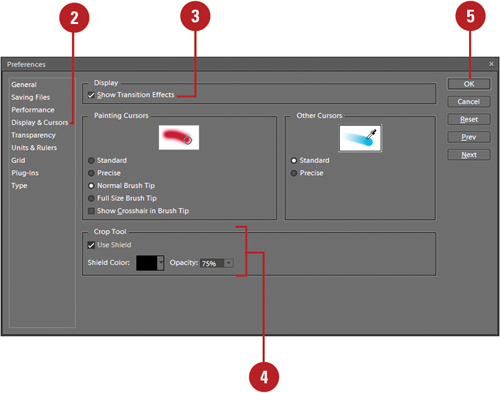
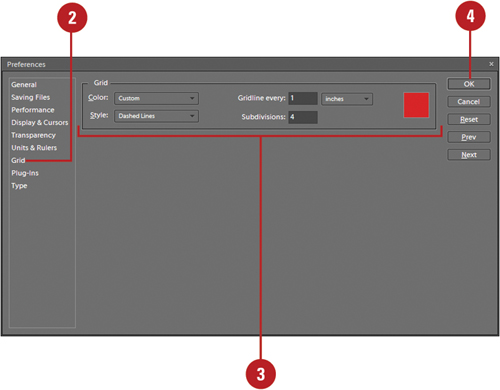
We communicate with Photoshop Elements using various devices, such as a drawing table, mouse, touch screen, track pad, and a keyboard. Photoshop Elements communicates with us using visual cues, the most prominent one is the shape of the cursor. For example, when a cursor looks like an I-beam, this typically means it’s time to enter text, or when the cursor looks like a magnifying glass, clicking on the image expands the view size. Photoshop Elements also displays visual cues, such as transition effects and color shields for cropped areas of an image. Working with the Display & Cursors preferences in the Editor gives you control over how Photoshop Elements communicates with you.
 In the Editor, click the Edit menu, and then point to Preferences.
 Click Display & Cursors.
 Select the Show Transition Effects check box to show transition effects.
 Select the Use Shield check box to display a color in the cropped area, and then select a shield color and opacity.
Shield Color. Displays the selected color in the cropped area. Click the list arrow to select a color or click Options to select another color palette.
Opacity. Displays the transparency level for the shield color. The lower the number, the higher the transparency.
 Click OK.
See Also
See “Using the Color Swatches Palette” on page 244 for information on using color.
 In the Editor, click the Edit menu, and then point to Preferences.
 Click Display & Cursors.
 Select the Painting Cursors options you want to use:
Standard. Painting cursors appear as their toolbox buttons.
Precise. Painting cursors appear as cross-hairs.
Normal Brush Tip. Painting cursors appear with the shape of the active brush tip.
Full Size Brush Tip. Shows the full size of the brush tip, including feathered edges.
Show Crosshair In Brush Tip. Displays a crosshair in the center of the brush tip.
 Select the Other Cursors options you want to use:
Standard. Painting cursors appear as their toolbox buttons.
Precise. Painting cursors appear as cross-hairs.
 Click OK.
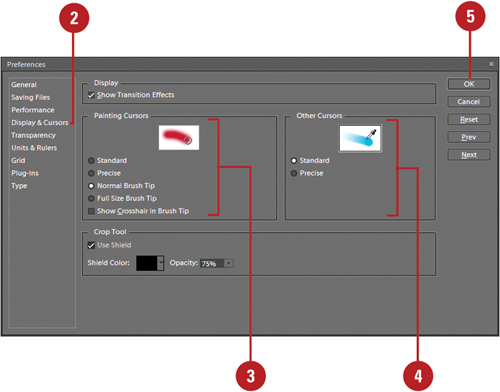
While changing the measurable units and rulers do not affect output quality, they do help to measure information in a document consistent with the specific output device. Ruler units give you precise information on the width and height of the active document. The column size measurements provide information that Photoshop Elements needs to create documents in the column and width of newspapers, magazines, brochures, etc. The Preset Resolutions lets you select specific resolution values for creating new documents. Insert the values you’ll use most often in the creation of a new document.
 In the Editor, click the Edit menu, and then point to Preferences.
 Click Units & Rulers.
 Select the Units options you want to use:
Rulers. Sets a default measuring system for the Ruler bar.
For example, pixels would be most common for images displayed on a monitor, and pica or inches most common for output to press or printer.
Type. Sets to measure type with a default value of pixels, points, or millimeters.
Print Sizes. Sets to measure print with a default value of inches or centimeter/ millimeters (cc/mm).
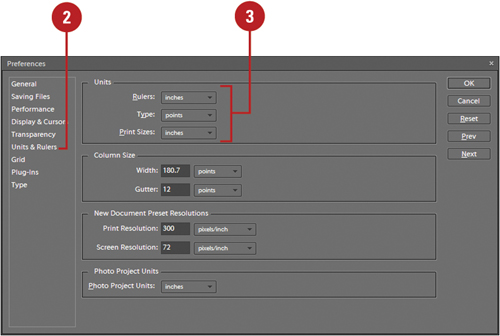
 Select the Column Size settings you want to use:
Width. Choose a measurement system and numerical value for column width.
Gutter. Choose a measurement system and numerical value for gutter (the space between the columns).
When you choose a measurement system (points, inches, or cm), Photoshop Elements changes the value to correspond to the type of measurement system.
 Select the New Document Preset Resolutions settings you want to use:
Print Resolution. Select a print resolution and measurement value for default printing.
Screen Resolution. Select a print resolution and measurement value for default screen display.
 Click the Photo Project Units list arrow, and then select a measurement system (inches or cm/mm).
 Click OK.
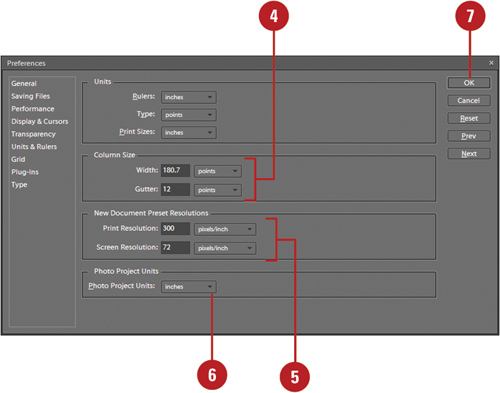
The Grid preferences in the Editor help keep a multi-layered document in proper order. For example, lining up buttons on a web interface, or making sure specific design elements are exactly in place within the document window. The Grid options let you decide on a color, style, and layout for Photoshop Elements’ grid system. A grid is a series of crisscrossed lines that aid in aligning objects in the document window. The grid is useful in designing a layout that is proportional and balanced. You can also use the Snap To option with the grid to enable objects to snap to a grid line when they get close to it.
 In the Editor, click the Edit menu, and then point to Preferences.
 Click Grid.
 Select the Grid options you want to use:
Color. Select a default color for displaying grids.
Style. Select a default style (Lines, Dashed Lines, or Dots) for displaying the grid.
Gridline Every. Enter a value for how often the grid lines appear within the active document.
Subdivisions. Enter a value for how many subdivisions (lines) appear between each main gridline.
 Click OK.
 In the Editor, click the View menu, and then click Grid to show the grid lines.
The grid appears in the Document window with the color and size you selected in the Grid preferences dialog box.
 Select an object.
 Select the Move tool on the toolbox.
 Drag the object in the Document window to line it up along the grid line.
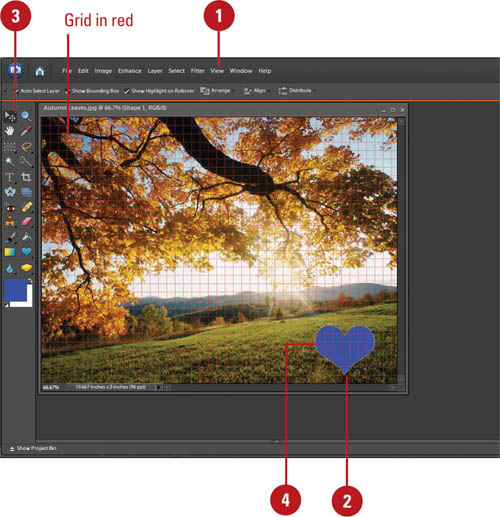
 To have the object snap to a grid line, click the View menu, point to Snap To, and then click Grid.
As you drag close to a grid line, the object snaps to the grid line.
A check mark appears next to the Grid option when enabled, while no check mark appear when disabled.
 Click the View menu, and then click Grid to hide the grid lines.
The Transparency preferences in the Editor control how Photoshop Elements displays transparent areas of a document (commonly called the tablecloth), as well as the color and opacity of areas of an image that fall outside of the CMYK (Cyan, Magenta, Yellow, Black), color mode. It’s important to understand that transparency in Photoshop Elements does not always translate into transparency, after you save the file. For example, the JPEG format is used primarily for images saved for the Internet, and does not support transparency. When you save the file, Photoshop Elements will fill the transparent areas of the image with a matte color (default white).
Although Photoshop Elements is not by definition a type setting application, such as Adobe InDesign, it does have some very powerful type features. For example, Photoshop Elements allows you to output PostScript text to a printer with a PostScript option. This way you will not need to place images into type intensive applications, such as InDesign or Illustrator, just to create a few lines of text. In addition, type font menu on the Options bar (with the Text tool selected) lets you see fonts as they will print or display. For designers that use a lot of fonts, this WYSIWYG (What You See Is What You Get) type font menu is a timesaver. You can use Type preferences in the Editor to help you select the type and font options you want to use.
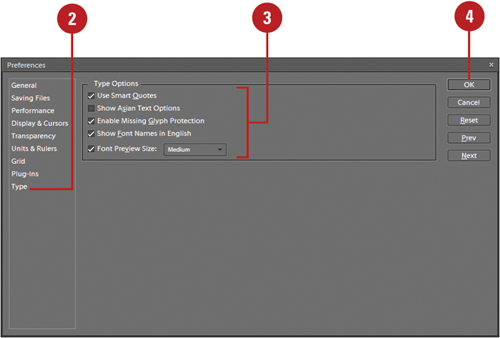
 In the Editor, click the Edit menu, and then point to Preferences.
 Click Type.
 Select the Type options you want to use:
Use Smart Quotes. Select to use left and right quotations.
Show Asian Text Options. Select to display Japanese, Chinese, and Korean type options in the Character and Paragraph palettes.
Enable Missing Glyph Protection (New!). Select to automatically select incorrect, unreadable characters between Roman and non-Roman (Japanese or Cyrillic) text.
Show Font Names In English. Select to display non-Roman fonts using their Roman names.
Font Preview Size. Select to display fonts on the menu in small, medium, or large size.
 Click OK.
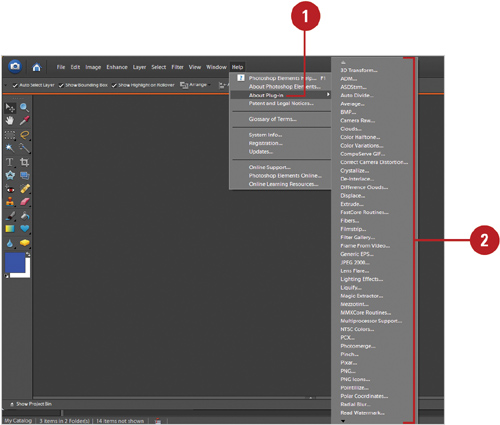
The Plug-Ins preferences in the Editor give you the ability to organize your plug-ins by saving them in one or more folders. These additional folders are typically used to hold additional third-party plug-ins. When selected, plug-ins contained within the folder will be available from Photoshop Elements’ Filters menu. Organizing your plug-ins into folders helps keep your project focused and reduces the clutter of plug-ins when you select the Filter menu. After an plug-in is installed and ready to use, you can use the Help menu to open an About box for the plug-in to find basic information about it.
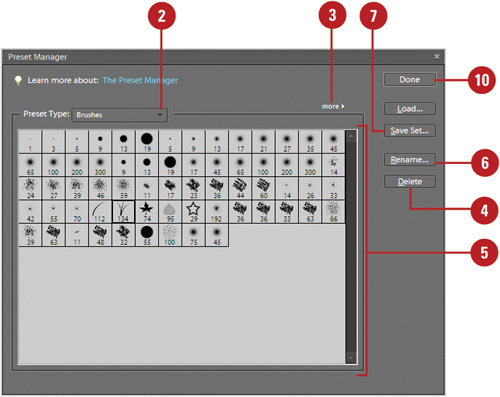
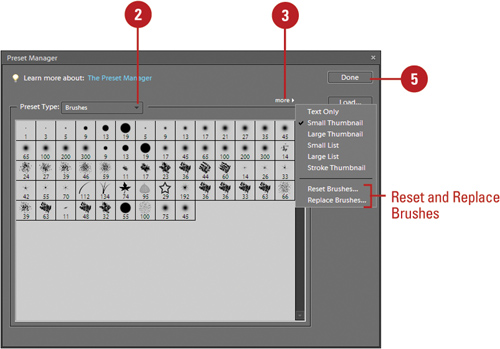
The Preset Manager gives you one place to manage brushes, swatches, gradients, and patterns. The Preset Manager can be used to change the current set of preset items and create new libraries of customized sets. Once a library is loaded in the Preset Manager, you can access the library’s items in all locations the preset is available. Changes made in the Preset Manager are global, and are applied every time you open Photoshop Elements. When you save a new preset, the name appears in the dialog box for the specific option you selected. If you change a preset type, you can reset it to the original default or replace it with another preset.
 In the Editor, click the Edit menu, and then click Preset Manager.
 Click the Preset Type list arrow, and then select the options.
 Click the More Options button, and then select from the available presets to add them to the list.
 To remove any items in a new preset, click a thumbnail, and then click Delete.
 To reorganize their order, click and drag the thumbnails to new positions within the view window.
 To change a preset name, click a thumbnail, click Rename, change the name, and then click OK.
 Click a thumbnail, and then click Save Set.
 Enter a new set name, and then use the default location (Brushes folder) to store the set, which is stored as a Brushes file with an .ABR extension.
 Click Save.
 Click Done.
 In the Editor, click the Edit menu, and then click Preset Manager.
 Click the Preset Type list arrow, and then select the options.
 Click the More button, and then select the reset or replace command you want:
Reset Brushes or Replace Brushes.
Reset Swatches or Replace Swatches.
Reset Gradients or Replace Gradients.
Reset Patterns or Replace Patterns.
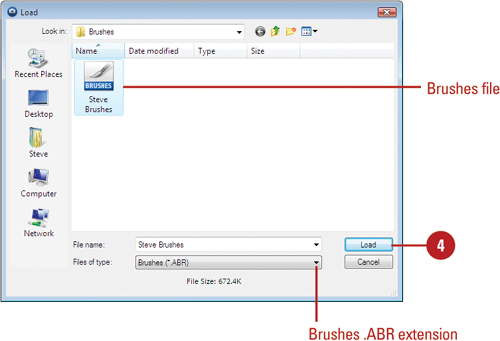
 To replace a preset, select the preset file, and then click Load.
Brushes. Uses the .ABR extension.
Swatches. Uses the .ACO extension.
Gradients. Uses the .GRD extension.
Patterns. Uses the .PAT extension.
 Click Done.
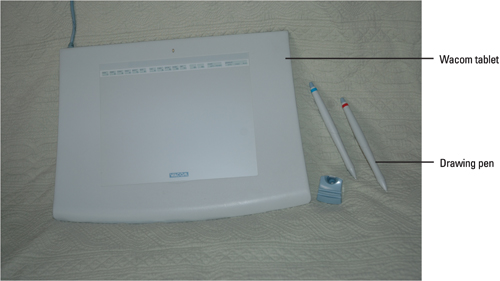
When you design on a computer, you’re leaving the natural world of oil, watercolor, and canvas, for the electronic world of computer monitors and pixels (don’t worry, it’s a relatively painless transition). Without a doubt there are many differences between traditional and digital design; however, it’s not necessary to abandon all aspects of the natural media world. For example, the computer mouse has always been a problem with designers who miss the feel and control of a brush in their hands. Fortunately, technology came to the rescue several years ago, with the invention of the drawing tablet. Drawing tablets incorporate a drawing surface, and a brush-like drawing tool. A designer picks up the brush and moves it across the drawing tablet surface. In turn, the drawing tablet interprets those movements as brush strokes. Not only does Photoshop Elements fully support drawing tablet technology, it also interprets the particular drawing style of the designer. For example, pushing harder with the brush against the drawing tablet, instructs Photoshop Elements to create a wider stroke, or even to apply more color. Drawing tablets have helped to translate the control of working with real art brushes against canvas, into the world of the digital designer. Of all the manufacturers, Wacom stands out as the leader in drawing tablet technology. Wacom returns the feel of designing with a brush to the digital designer’s world, and the software required to power the tablet works seamlessly with Photoshop Elements and the Windows operating systems. To check out what tablet might be right for your needs, point your browser to www.wacom.com and check out the available options.
