
The Workshop is all about being creative and thinking outside of the box. These workshops will help your right-brain soar, while making your left-brain happy; by explaining why things work the way they do. Exploring the possibilities is great fun; however, always stay grounded with knowledge of how things work. Knowledge is power.
Each project in the Workshop includes a start file to help you get started with the project, and a final file to provide you with the results so you can see how well you accomplished the task.
Before you can use the project files, you need to download them from the web. You can access the files at www.perspection.com. After you download the files from the web, uncompress the files into a folder on your hard drive to which you have easy access from Photoshop Elements.
Photoshop Elements has a ton of filters. In fact, there are 105 filters located under the Filters menu. Filters perform a wealth of special-effects operations; everything from artistic, distort, and even sketch effects, and while filters are very creative, and fun to use, there is a limit to what they can do. For example, Photoshop Elements has no less than 14 Sketch filters, and while they do creative things to an image they can’t do everything. What if you want to create what looks like a sketch effect and none of the sketch filters do what you want? If you don’t know how to do things from scratch, you’re stuck with the limitations of the filters. The technique you are about to learn will not only let you create an awesome sketch effect, but will give you a better understanding of how blending modes work with multiple layers. There are a lot of steps to this process; however, the end result is more than worth the effort. In addition, if this process seems familiar, they are; many of the steps used in the sharpening workshop are similar to this effect, until you get to the end.
In this project, you’ll take a photograph and through the judicious use of multiple layers, and blending modes convert in into a beautiful colorized sketch. There are a lot of steps in this workshop, but the final results are more than worth the journey.
 Open the file sketch_start.psd in Editor, and then save it as my_sketch.psd .
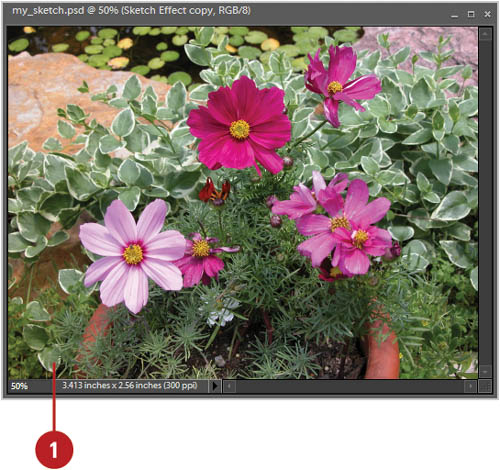
 Create a duplicate of the image by dragging the layer over the Create New Icon.
 Click the Enhance menu, point to Adjust Color, and then click Remove Color. The copied layer is converted (desaturated) into shades of gray.
 Create a copy of the desaturated layer, and then select it.
 Click the Filter menu, point to Adjustments, and then click Invert. The image layer becomes a grayscale negative (leave the negative image selected).
 Click the Blending Mode list arrow on the Layers palette, and then click Color Dodge. The image appears to change to white.
 Click the Filter menu, point to Blur, and then click Gaussian Blur.
 Very slightly blur the image (just a few radius pixels) until you see a soft-ghosted outline of the image.
 Click OK.
 Select the top layer in the Layers palette, click the More Options button, and then click Merge Down.
You should now be left with the original image (the bottom layer), and the softly ghosted image (the top layer), which I’ve named, Sketch Effect.

 Create a copy of the layer named Sketch Effect, and select it.
 Click the Blending Mode list arrow on the Layers palette, and then click Multiply. The two copies combine to create a darker image.
 Continue to make copies of the Sketch Effect layer until the image darkens to your taste (this might be 3 or 10 layers).
 Merge all the Sketch Effect layers together, but do not merge the original image layer into the Sketch Effect layers.
 Create another copy of the merged Sketch Effect layer, and select it.
 Click the Blending Mode list arrow on the Layers palette, and then click Multiply.
 Click the Filter menu, point to Blur, and then click Gaussian Blur.
 Add a small amount of Gaussian Blur to taste (1 or 2 Radius). This will soften the edges of the image and create softer sketch lines.
 Click OK.
 Merge the two Sketch Effects layers together.
 To colorize the image, select the top layer (Sketch Effect), click the Blending Mode list arrow, and then click Luminosity.
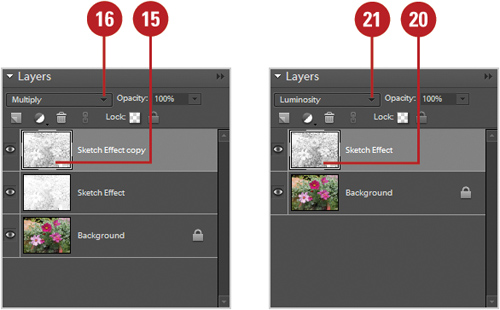

The subjective items that will influence the final sketch image are how much you Gaussian Blur the image, and how many additional copy layers you create. Creating more blur enhances the sketch lines, and adding more copy layers, increases the overall density of the final sketch image.
In the world of photography, not everything has to be in focus. In fact, smart photographers know that placing image elements out of focus will help to draw the eye to the focused areas. However, there are times when you will take a photograph and the image was accidentally, not intentionally, out of focus (I hate it when that happens). Photoshop Elements has several filters that help you create a sharper image. As a matter of fact, Photoshop Elements has four sharpen filters and tools: Sharpen tool, Auto Sharpen, Adjust Sharpen, and Unsharp Mask. Of these filters, Auto Sharpen, and Unsharp Mask are considered the two most powerful sharpening filters. Unfortunately, all the sharpen tools have one major flaw; they do not separate the sharpening effects from the image, as in an adjustment layer. So, when you click OK, you’re stuck with the results. That’s not necessarily a bad thing; however, there is another way. The technique you’re about to learn for sharpening an image does not require any of the sharpening filters, its effect on the image creates a more believable sharpening effect, and the changes to the image are contained within a separate layer. That gives you the control you need to be creative, and get the pleasing sharpening results possible.
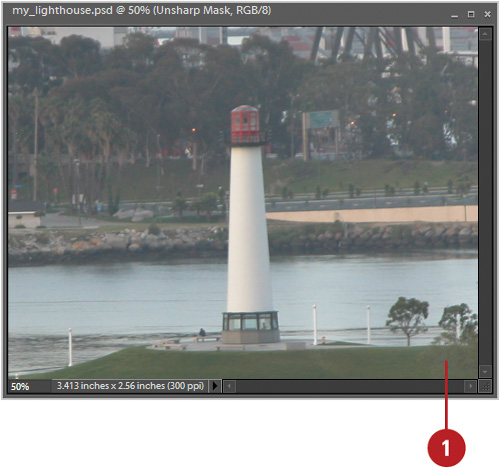
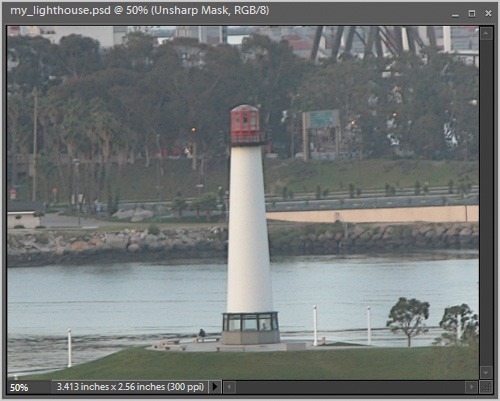
In this project, you’ll take an out-of-focus image and sharpen it by creating an editable sharpening layer. Separating the sharpening adjustments from the image, gives you creative control over the entire process.
- Open the file lighthouse_start.psd in Editor, and then save it as my_lighthouse.psd.
- Create a duplicate of the image by dragging the layer over the Create New Layer button, or by selecting the layer and pressing Ctrl+J.
- Click the Enhance menu, point to Adjust Color, and then click Remove Color. The copied layer is converted into shades of gray.
- Create a copy of the desaturated layer and select it.
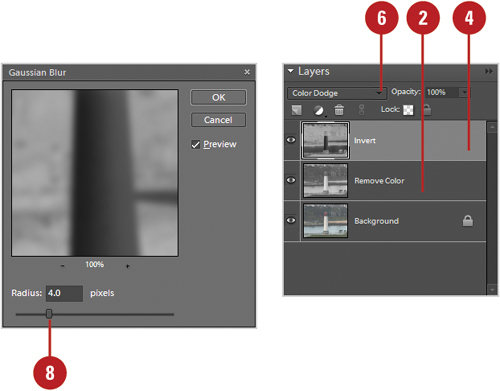
- Click the Filter menu, point to Adjustments, and then click Invert. The image layer becomes a grayscale negative (leave the negative image selected).
- Click the Blending Mode list arrow on the Layers palette, and then click Color Dodge. The image appears to change to white.
- Click the Filter menu, point to Blur, and then click Gaussian Blur.
- Very slightly blur the image (just a few radius pixels) until you see a soft-ghosted outline of the image.
- Click OK.
- Select the top layer in the Layers palette, click the More Options button, and then click Merge Down, or press Ctrl+E.
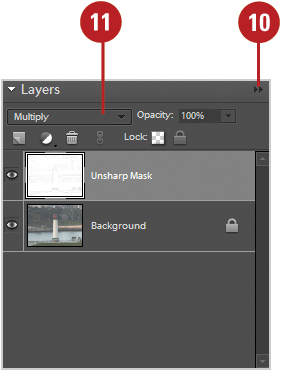
You should now be left with the original image (the bottom layer), and the softly ghosted image (the top layer), which I’ve named, Unsharp Mask.
- Click the Blending Mode list arrow on the Layers palette, and then click Multiply. The white areas of the ghosted image change to transparent, and the darker lines are blended in with the original image, creating the illusion of sharpness.
It’s possible that the sharpening effect is too intense. If that’s the case, simply reduce the opacity of the top layer to reduce its effect on the image. If, however, the effect is less than you hoped for, simply create a copy of the top layer to double the effect. Additionally, if you want to remove some of the sharpening effects from portions of the image, just select your Paintbrush tool, and paint the top layer using white, in the areas you want removed.
Good to Know: What happens in this technique is that the unsharp mask layer actually creates visible lines of force around the out-of-focus areas of the image, and the mind interprets those lines as being a sharper image.
There is nothing more important to a family than its history. History is found in many ways, places, and formats. For example, you may have historical documents that relate to who you are, or you might have physical artifacts from your ancestors. However, nothing strikes an emotional cord more than a photograph. A picture is indeed worth a thousand words. Yet even while an image freezes a moment in time, the actual photograph is traveling through time and unfortunately, Father Time can do major damage to a photographic image. Fortunately for us we have Photoshop Elements. Photoshop Elements is your time machine for restoring old images. While there are many methods for restoring an old grayscale image, one of the most consistently successful methods is through the use of a Levels Adjustment layer.
In this project, you’ll take an old image, and through the use of the amazing Adjustment layers, restore the image. It’s not that difficult, and the final results are awesome.
- Open the file three_girls_start.psd in Editor, and then save it as my_three_girls.psd.

- Click the Create New Fill or Adjustment Layer button (half-moon icon), and then click Levels.
The Levels dialog box represents the brightness values of the pixels within the image. The data is called a Histogram, and is similar to a bar chart.
- Click the RGB Channel list arrow, and then click the Red channel.
- Drag the black input slider to just below the visible rise of the histogram.
- Drag the white input slider to just below the visible rise of the histogram (that’s where white has moved to after all those years).
- Once you have established the position of black and white, increase the input value of the white slider by 4, and decrease the value of the black slider by 4.
The value of 4 is an average, and based on the image; however, backing down both sliders, you help keep the light and dark areas of the image from blowing out (going pure white or black).
- Click the RGB Channel selector, click the Green channel, and then repeat steps 4 thru 6.
- Click the RGB Channel selector, click the Blue channel, and then repeat steps 4 thru 6.

- If the image still appears a bit too dark or light, return the RGB Channel selection to the RGB option, then drag the middle gray slider to correspondingly lighten or darken the image in the mid-tones.
- Click OK.
- Click the Create New Fill or Adjustment Layer button (half-moon icon), located at the bottom of the Layers palette, and then click Hue/Saturation.

- Drag the Saturation slider to the far left.

- Click OK.

This has the effect of removing any unwanted colorcasts from the image.

It’s possible that the sharpening effect is too intense. If that’s the case, simply reduce the opacity of the top layer to reduce its effect on the image. If, however, the effect is less than you hoped for, simply create a copy of the top layer to double the effect. Additionally, if you want to remove some of the sharpening effects from portions of the image, just select your Paintbrush tool, and paint the top layer using white, in the areas you want removed.
Good to Know: The brightness levels of a pixel range from 0 (black) to 255 (white). When you move the input sliders, you’re redefining where black and white are within the active image. As an image ages the original values of black and white shift. The purpose of Levels is to reestablish those positions. Once that’s completed, Levels can approximate the positions of all the other remaining pixels, and balance the image.
Have you ever wanted to colorize an old grayscale image? Well, if you’ve ever wanted to add color to an old image, or ever change the colors within a new color image, then you’ve come to the right place. There are a lot of ways to colorize an image, and Photoshop Elements knows them all. The technique you are about to learn will help you control the colorization process through the use of layers, blending modes and opacity. As a matter of fact, you will be able to control each color within the image and, later change those colors with the click of a button. This method is so powerful that with a little bit of patience and care, the image won’t just look colorized; it will look like an original color image. Just remember this simple item: every time you add a new color to the image, you will add a new layer. This means that a single image may contain twenty or more layers; however the final results are worth it.
In this project, you’ll take a old, or new grayscale image, and through the use of multiple layers and blending modes create a colorized image that looks like it was taken with color film.
- Open the file colorization_start.psd in Editor, and then save it as my_colorization.psd.

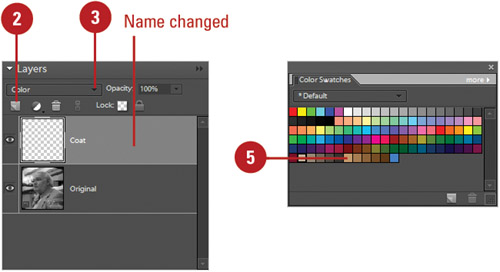
- Click the Create New Layer button, located at the bottom of the Layers palette, and name the layer to correspond to the area of the image you’re coloring.
- Click the Blending Mode list arrow, and then click Color.
- Select the Paintbrush tool.
- Select the color you want to use to paint a specific area of the image within the new layer.
- Use the Paintbrush tool to paint an area of the image.
- Depending on the color you chose, slightly lower the opacity of the layer to make it appear natural.

- Repeat steps 2 thru 7 for each individual color within the image.

Since you are using individual layers to control the colorization process, if you over paint an area, it’s a simple matter to use your eraser tool and remove the offending color information.
Smart Tip: When you change the opacity of a layer, it’s not necessary to click the triangle button, located to the right of the Opacity input box, to access the triangular slider. All you have to do is click the word, Opacity, and drag left or right. It’s that simple.
Adjustment layers are thought of mostly for image enhancement. For example, the Levels and Curves adjustment layers are excellent tools for restoring lost contrast, or rebalancing out the colors in an old photograph. The technique you are about to learn will give you a greater understanding of how adjustment layers can be used to not only correct image problems, but to generate special effects. The key is in understanding that an adjustment layer can be controlled using its built-in layer mask. The adjustment layer mask functions similar to a normal layer mask; in other words, you can paint the mask with black, white, or shades of gray. However, the results are different. In a normal layer mask, areas of the mask painted black make the corresponding areas of the image transparent, when you paint with black on an adjustment layer mask, you mask out the effects of the adjustment. That means you can create a mask, and isolate its effects on the image by using the mask. While this is a powerful way to control image enhancement, it’s also a great way to use adjustment layers to produce special effect. In addition, when you use an adjustment layer, the changes to the image are contained with the adjustment layer, and never change the original images. This gives you the ability to precisely control the creative process. In this example, you will completely change the mood of an image; using an adjustment layer and mask to create the illusion of looking through blinds.
In this project, you’ll learn how to use Adjustment layers to precisely control the restoration, and enhancement of any Photoshop Elements image.
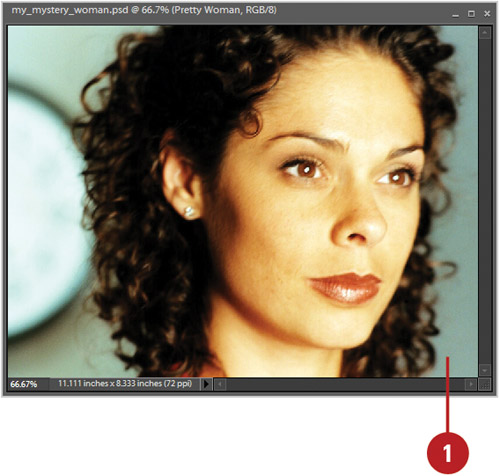
- Open the file mystery_woman_start.psd in Editor, and then save it as my_mystery_woman.psd.
- Select the Rectangular Marquee tool.
- Create a long rectangular selection from left to right, across the image (like a window blind).
- Hold the Shift key, and proceed to draw several more rectangular selections underneath the first.

- Click the Select menu, and then click Inverse (this reverses the selection).
- Click the Create New Fill or Adjustment Layer button (half-moon icon), located at the bottom of the Layers palette, and then click Hue/Saturation.
Photoshop Elements creates the adjustment layer, and the mask is created based on the selected areas of the image.
- Drag the Lightness slider to the left until the non-masked areas of the image have significantly darkened.
- Drag the Saturation slider to the left and lower the saturation value to -20 percent.
- Click OK.
- Select the Hue/Saturation adjustment layer.

- Click the Filter menu, point to Blur, and then click Gaussian Blur.
- Drag the Radius slider to the right to slightly blur the adjustment layer mask (you’re looking for the light areas of the mask to resemble sunlight streaming through window blinds).
- Click OK.
- Use the Paintbrush tool with white (in this example) to paint out the blinds on the right side where they expose the back wall.

The image has now completely changed, and even the mood of the woman seems to be more serious. This is an example of how you can use adjustment layers to change the very mood of a digital image.
The realism in this effect is all in the Gaussian Blur. Light streaming through blinds, and falling on someone’s face (in this example) would create a soft transition between dark and light. However the amount of blur would be determined by the image, and the resolution of the image. Therefore, don’t look for a specific Radius, just look at the image and stop when you like what you see. Remember, being creative is not about a mathematical equation, it’s about a certain look that you want to create.
Good to Know: The reason we slightly lowered the saturation value of the image is to make it appear more natural. In the real world, when images darken, they have a tendency to loose some of their tonal values, and that effect can be replicated by slightly lowering the saturation of the darker areas.
When we look at an image in the Editor, the photograph is obviously flat. Computers lack one important thing, the third-dimension. Yet, although we know logically that the image is flat, our minds still persist in see the image as three-dimensional. For example, you’re looking at an image of a landscape with mountains in the background, white puffy clouds in the sky, and your Uncle Charley waving in the foreground. The depth you perceive within the image is based on how our mind perceives three-dimensional objects, on a two-dimensional monitor, or page. The technique you are about to learn will give you a visible demonstration of how the illusion of depth can be achieved within a digital image. In this workshop, you will open two images, move one into the other, and using a few simple techniques, create the visual illusion of depth.
In this project, you’ll learn how to blur selective areas of an image to focus the viewer’s eye to specific portions of the image, and to create a feeling of depth within the image.
- Open the file lincoln_monument_start.psd in Editor, save it as my_lincoln_monument, and then open soldier.psd.
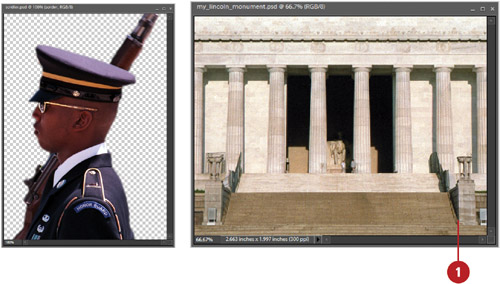
- Click in the document window of the image you want to move (in this example, soldier.psd).
- Drag the layer from the Layers palette into the document window of the receiving document.
- Close the document (solder.psd).
- Move to the Layers palette and select the bottom layer.

- Click the Filter menu, point to Blur, and then click Motion Blur.
- Adjust the motion blur options until you create a soft blur (about 5 pixels).
- Click OK.
- Select the bottom layer in the Layers palette.
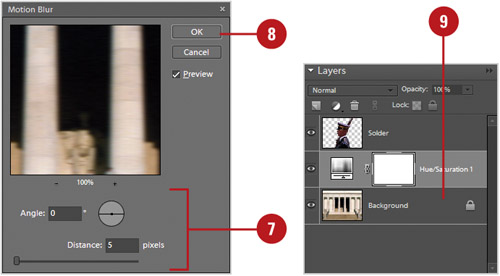
- Click the Add Fill or Adjustment Layer button (half-moon icon), and click Hue/Saturation.
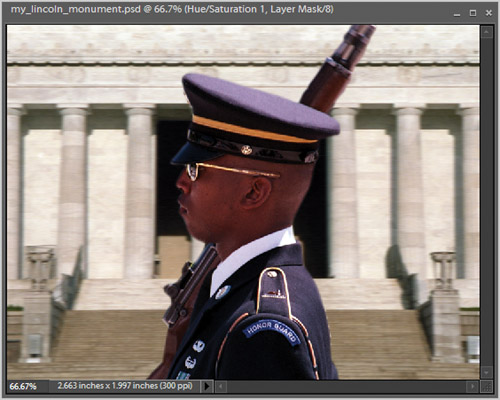
- Drag the Saturation slider to the left and reduce the saturation value to -20 percent.
- Click OK.
With the background blurred and partially desaturated, the mind maps a greater distance between the foreground objects and the background, creating the illusion of depth.
Blurring the background using the Lens blur filter, as opposed to the Gaussian Blur filter, creates a bit more realism within the image. You can vary the amount of Lens Blur to increase or decrease the effect depth.
Good to Know: The human eye does not like to look at blurred objects. Therefore, when you blur specific areas of an image, not only are you generating the illusion of depth within the image, you’re helping to direct the viewer’s eyes to the focused areas.
You can access and download more workshop projects and related files at www.perspection.com. After you download the files from the web, uncompress the files into a folder on your hard drive to which you have easy access from Photoshop Elements.
Instead of downloading everything from the web, which can take a while depending on your Internet connection speed, you can get all the files used in this book and much more on a Photoshop Elements 6 On Demand DVD. The DVD contains task and workshop files, tips and tricks, keyboard shortcuts, and other goodies from the author.
To get the Photoshop Elements 6 On Demand DVD, go to www.perspection.com.