Create, Modify, Merge, and Delete Adjustment and Fill Layers
To be successful with Photoshop Elements, the single most important item you will need is control. You need control over color, control over the elements of the design, even control over what order design elements appear. If control is what you crave, then Layers, more than any other single Photoshop Elements feature helps you gain control. Layers give you the ability to separate individual elements of your design, and then let you control how those elements appear. You can think of layers as transparency sheets one on top of the other. You can blend the elements of two or more layers, and even create layers to adjust and control contrast, brightness, and color balance. Layers are the digital designers canvas, and they are just as real as a stretched canvas is to a natural media designer. The strokes you apply to a real canvas, using a brush, appear as strokes in a layer when you use any of the painting tools. The natural artist uses oils, and watercolors; the Photoshop Elements artist uses electronic inks.
In Photoshop Elements, multiple layers are how you control the information within a document. There are times when you will create several layers, each with a piece of the document design. The multiple layers give you the ability to adjust and move each element. Eventually, during the course of the design, the multiple layers are no longer necessary. You don’t want to link them together, or even place them within a folder; you’ll want to combine them into a single unit. Once again, Photoshop Elements comes to the rescue by giving you several options for combining layers without flattening the entire document.
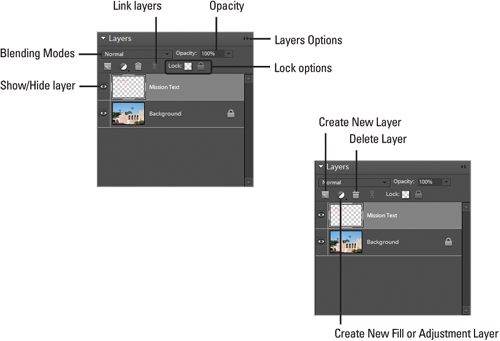
With the Layers palette, you can control elements of a design by assigning separate layers to each individual object. In addition, Layer effects control the application of everything from drop shadows to gradient overlays, and adjustment layers let you control color overlays and image corrections. To access the Layers palette, select the Layers palette or, if the Layers palette is not visible, click the Windows menu, and then click Layers.
Blending Modes. Select this option to change how two or more layers interact or “blend” together.
Opacity. Select a value from 0 to 100 percent to change the opacity of the active layer.
Create New Layer. Click this button to create a new layer in the active document.
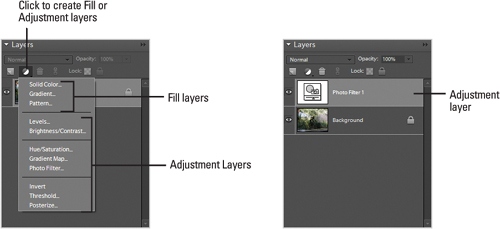
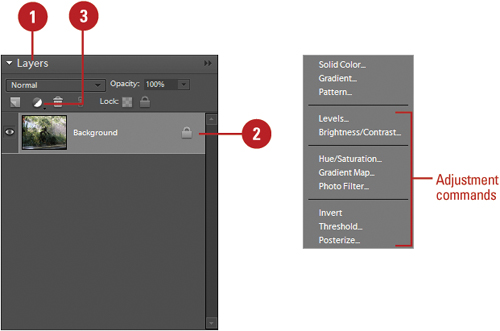
Create New Fill Or Adjustment Layer. Click this button, and then select from the available fill or adjustment layers.
Delete Layer. Click this button to delete the active layer.
Link Layers. Hold down the Shift key and click to select two or more layers, and then click this button to link the layers.
Lock options. Click the Lock Transparent Pixels or Lock All button.
Layers Options. Click this button to access a menu of layer specific commands.
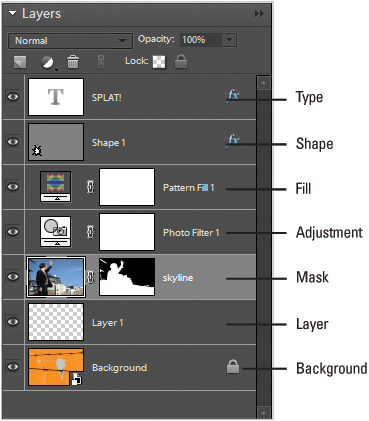
Not only does Photoshop Elements give you the ability to generate layers, it gives you the ability to generate layers with different designations. The designation of a layer determines the type of information the layer contains. For example, type layers hold editable text, and a mask layer holds image masks. The ability to control the designation of a layer helps to organize the different elements that typically make up an image.
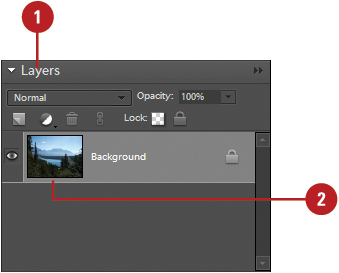
Background. The Background is a unique type of layer element (technically, it’s not called the Background layer; just the Background). Backgrounds are always positioned at the bottom of the layer stack and they cannot be moved. In addition, the Background does not support transparency.
Layer. Clicking the Create New Layer button creates layers. New layers are always inserted directly above the active layer. Traditional layers support all of Editor’s drawing and shape tools, opacity and fill and blending mode options, but do not support type. Traditional layers can be moved up and down in the layer stack by dragging.
Fill. Fill layers contain color gradient, solid color, or patterns. To create a Fill layer, click the Create New Fill Or Adjustment Layer button, and then select the file type you want.
Type. Type layers control vector text. To create a Type layer, select one of Editor’s Type tools, click in the active document and begin typing. Photoshop Elements automatically creates the Type layer directly above the active layer in the Layers palette.
Mask. Masks create transparent areas in the visible image. Use masks to remove elements of an image without physically erasing them.
Shape. Shape layers control vector data by the use of a vector mask. You can create a shape layer in one of several ways: Select the Pen tool from the toolbox, click the Shape Layer button (located on the Options bar, and then begin drawing, or select any of Editor’s shape tools using the Shape layer option.
Adjustment. Adjustment layers let you control everything from contrast to color. To create an Adjustment layer, click the Create New Fill Or Adjustment Layer button, and then select from the available options. The adjustment layer is placed directly above the active layer, and controls the information in all the underlying layers.
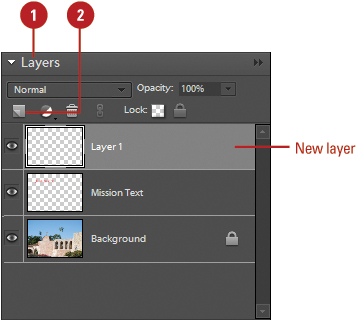
Layers give you control over the design elements of your document, so Photoshop Elements makes sure you have plenty of them. You have the ability to create up to 8,000 layers. While that may be more layers than you would ever use in one single document, it guarantees that you have the creative options to carry your designs to any level you desire. To create a new layer, you must first have an open document. A new image has a single layer. If you have more than one document open, make sure the active image is the one you want to add a layer. You can quickly add a layer using a menu or button or add a layer and select options using a dialog box. You can select options to name the layer, designate it as a clipping group, or even change its color Blending mode, and Opacity.
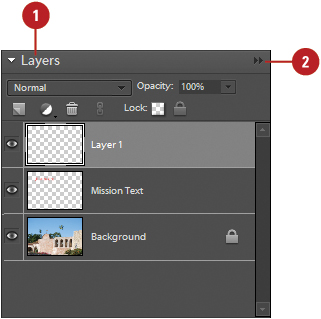
 In the Editor, open a document and display the Layers palette.
 Click the Create New Layer button.
The new layer is inserted directly above the active layer with default name and settings, which is Normal mode with 100% opacity.
 To rename the new layer, double-click layer name in the Layers palette, type a name, and then click OK.
- In the Editor, open a document and display the Layers palette.
- Click the More Options button, and then click New Layer.
Timesaver
Hold down the Alt key, and then click the Create New Layer button to open the New Layer dialog box.
- Select the layer options you want:
Name. Enter the name of the layer into the Name box.
Group With Previous Layer. Select the check box to group the new layer with the previous layer in the Layers palette.
Color. This option lets you color-code your layers. Click the Color list arrow, and then select from the available colors.
Mode. Click the Mode list arrow, and then select from the available blending modes.
Opacity. This option controls the visibility of the new layer. Select a value from 0 to 100 percent.
 Click OK.
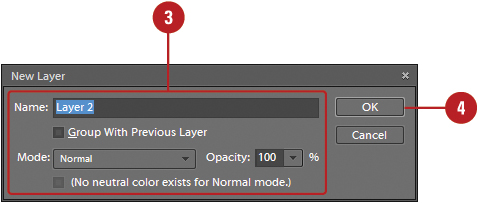
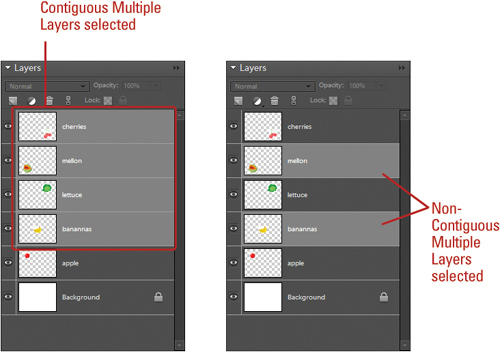
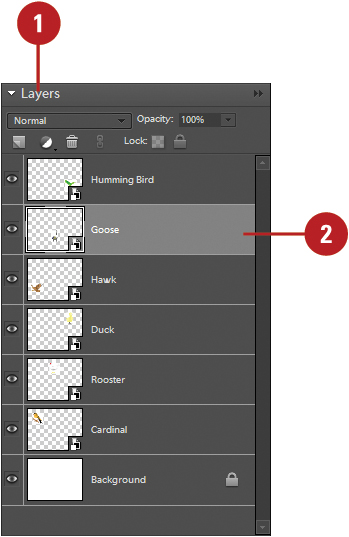
Photoshop Elements lets you select multiple layers either in the Layers palette, or directly in the document window, using the Move tool. Say, for example, you want to quickly move two or more layers but you don’t want to spend the time linking, and then unlinking, you could quickly select the layers, and then perform the move. Or, perhaps you want to delete several layers and you don’t delete them one at a time. The ability to select multiple layers gives you the ability to exert more control over Photoshop Elements, and that control quickly changes into creative energy. A single selected layer is called the active layer.
- In the Editor, open a multiple layered document and display the Layers palette.
- Select multiple layers in the Layers palette using the following options:
Contiguous Layers. Click on the first layer, and then Shift+click the last layer to select first, last, and all layers in-between.
Non-Contiguous Layers. Click on a layer, hold down the Ctrl key, and then click on another layer.
- Select layers in the document window using the following options:
Single and Multiple Layers. Select the Move tool, select the Auto Select Layer check box in the Options bar, and then click on an object in the document window. The layer holding that object is selected. To add or subtract layers from the selection, Shift+click (or drag).
- To deselect all layers, click the Select menu, and then click Deselect Layers.
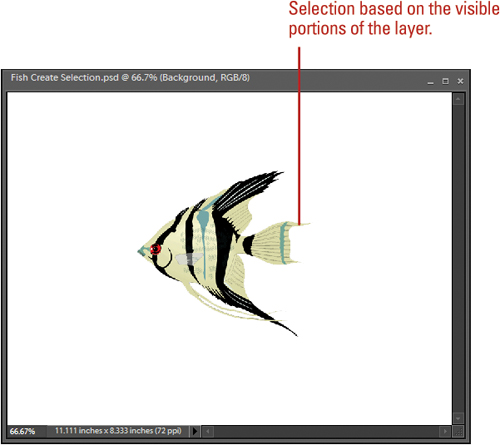
Traditional layers are basically sheets of transparent acetate or clear plastic. Once created they support all painting tools, as well as shape and gradient tools. While traditional layers may start out as transparent pieces of plastic, they don’t remain that way for long. In fact, a layer can, over time, be a complicated mix of non-transparent (the image), and transparent areas. It’s also possible you might want to make a selection out of that complicated image. Photoshop Elements knows this and gives you an easy way to convert an image on a layer into a selection.
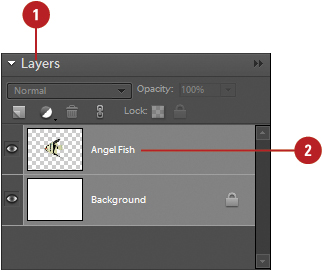
- In the Editor, open a document and display the Layers palette.
- Hold down the Ctrl key, and then click on the image thumbnail of the layer you want converted into a selection. Be sure you click on the image thumbnail, not the layer name like previous versions.
The visible portions of the image on the layer are converted into a selection.
Important
Since Photoshop Elements creates the selection based on the image information, there must be transparent and non-transparent areas within the image or the command selects the entire layer as if you had clicked the Select menu, and then clicked All.
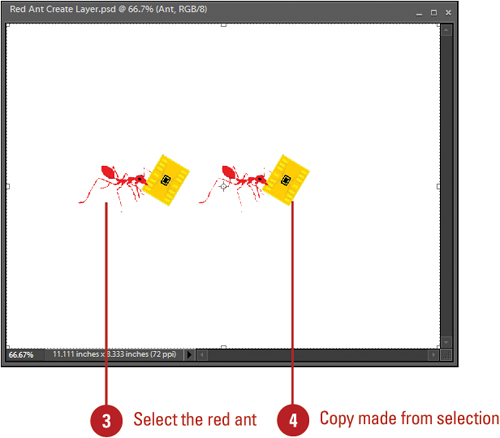
On the previous page, you learned how to create a selection based on the image information within a layer. In addition to creating a selection from a layer, Photoshop Elements gives you the ability to instantly create a layer from a selection. Creating layers from selections opens up all kinds of opportunities for generating special effects. For example, selecting an object from one layer, and then making a layer with that selection, or making a selection of a portion of a image, creating the layer, and applying a layer style to the copy. The possibilities are endless, and the fun is exploring those possibilities.
- In the Editor, open a document and display the Layers palette.
- Click on the layer containing the information you want to convert into a layer.

- Select an area of an image using any of the selection tools.
- Click the Layer menu, point to New, and then click Layer Via Copy or Layer Via Cut.
Photoshop Elements converts the selected area into a new layer.
Did You Know?
You can make a copy of all elements within a layer. Select the layer in the Layers palette, and then click Ctrl+J. Since there are no selections, Photoshop Elements creates a copy of the entire layer.
You can make copies of layer objects without selection. To make a copy of a layer that contains an object, select the layer in the Layers palette, select the Move tool, hold down the Alt key, and then click and drag (in the document window).
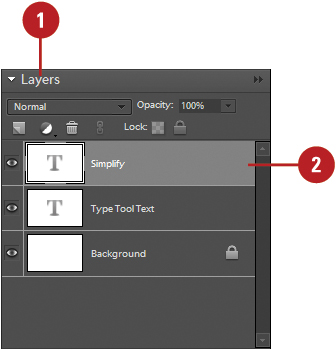
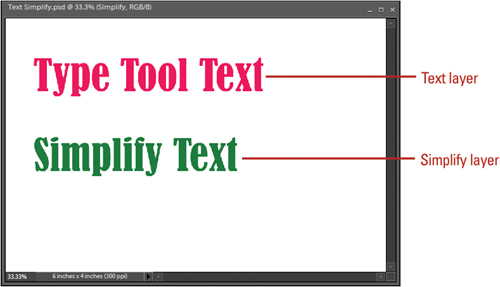
If you have a type layer, shape layer, gradient layer, solid color layer, pattern fill layer, frame layer, a smart object, or a layer group (from a Photoshop document), you can convert it into a normal image layer. You need to simplify these layers before you can apply filters to them or edit them with the painting tools. When you simplify a layer, you can no longer use the type and shape editing options.
- In the Editor, open a document and display the Layers palette.
- Select the layer you want to convert to an image layer.
- Use one of the following options depending on the layer type:
Shape Layer. If you selected a shape layer, click Simplify on the Options bar.
Type, Shape, Fill Layer. If you selected a type, shape, or fill layer, click the Layer menu, and then click Simplify Layer.
Photoshop Layer Group. If you selected a layer group from a Photoshop document, click the Layer menu, and then click Simplify Layer.

The Background serves a unique function. Since some layout programs do not support Photoshop Elements’ multiple layers, and transparency; in a process called flattening, a final image must sometimes be converted into a background. When an image is flattened, all of the documents layers are compressed into a single element in the Layers palette designated as the Background. That means no more layers, no more transparency, and no more control. Backgrounds are a necessary evil because Photoshop Elements does not stand alone, and it’s sometimes necessary to move images from Photoshop Elements into other applications. However, there are times you start with an image that’s on a background and you want to apply transparency, blending modes, or other adjustments that cannot be applied to a background, or move it to another position. In those cases you will need to convert the Background into a traditional layer. The Background layer must remain at the bottom of the Layers palette.
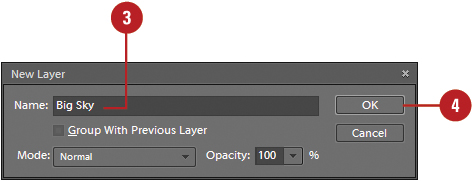
- In the Editor, open a document and display the Layers palette.
- Double-click the Background layer in the Layers palette to open the New Layer dialog box.
You can also click the Layer menu, point to New, and then click Layer from Background.
- Rename the layer in the Name box (leave the other options at their default values).
- Click OK.
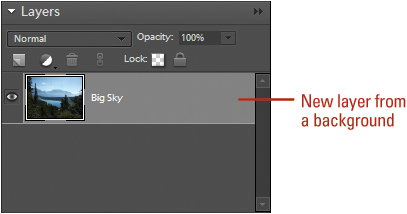
The Background is converted into a traditional layer.
Did You Know?
You can make a layer the Background layer. If the image already has a background layer, you cannot create one from another layer. In the Editor, open a document, select a layer in the Layers palette, click the Layer menu, point to New, and then click Background From Layer.
- In the Editor, open a document and display the Layers palette.
- Click the More Options button, and then click Flatten Image.
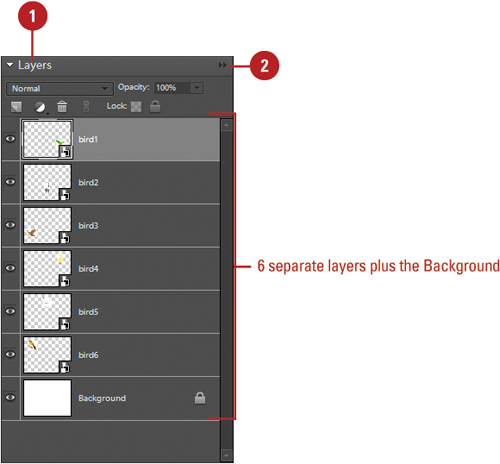
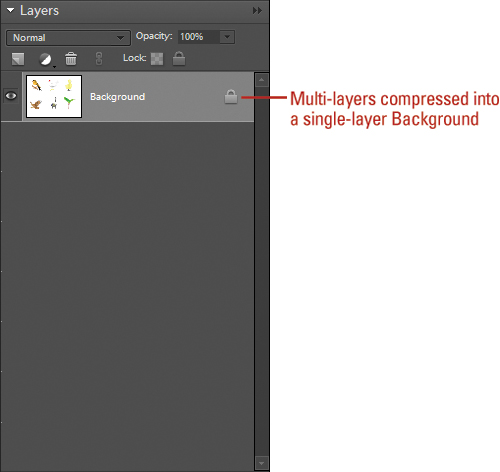
The multi-layer document is compressed into a single-layer Background.
Did You Know?
You can create a composite image of a multi-layered document without flattening the image. Create and select a new layer, and then hold down the Alt key. Now, go to the Layers palette, click the Layers Options button, and then click Merge Visible. The Editor creates a composite of all the visible layers in the new layer. You now have the control and flexibility of a multiple-layered document, along with a separate composite layer and control gives you the confidence to be more creative.
See Also
See “Using Merge Layer Options” on page 218 for more information on how to merge two or more layers without flattening all the layers.
When you work on multi-layered documents, it’s important to understand the ways Photoshop Elements gives you to control image information. For example, working on a document that contains 20 layers is a difficult proposition. Fortunately, Photoshop Elements gives you control over the document, everything from layer names to locking pixel information is available in Photoshop Elements’ bag of image-control tricks. When linking two layers together, you can move or resize the layers at the same time, thus saving valuable time. Let’s explore some of the ways you can control image information on the Layers palette.
- In the Editor, open a document, display the Layers palette, and then use one of the following options:
Create Layers. To create a normal image layer, click the New Layer button.
To create an fill or adjustment layer, click the Create Adjustment Layer button, and then select the fill (first three) adjustment (after first three) or layer option you want.
Select Layers. To select a layer, click the layer’s thumbnail or name. To select more than one layer, Ctrl-click each layer.
Name/Rename Layers. To name a layer, double-click on the current layer name, type a new name, and then press Enter.
Show/Hide Layers. To temporally hide or show a layer (make its contents invisible or visible in the document window), click the Eye icon, located in the Show/Hide box.
To display just one layer, Alt-click the Eye icon for the layer. Alt-click in the Eye icon again to show all layers.
Link/Unlink Layers. To link two or more layers, hold the Shift key and click the layers you want to link, and then click the Link Layers button. The link icon indicates the layers are linked. Linking lets you move or resize the layers as a unit.
To unlink layers, select a linked layer, and then click the Link Layers button.
Lock/Unlock Layers. Click the Lock All button in the Layers palette to lock all layer properties. Click the button again to unlock it.
Click the Lock Transparency button in the Layers palette to lock the transparent areas of the layer. Click the button again to unlock it.
Change Layer Order. To change the position of a layer in the stack, drag the layer up or down. A dark line appears as a visual cue to indicate the new layer location.
Move Layer Content. Select the layer with the content you want to move, select the Move tool on the toolbox, and then drag within the image to move the content position.
Change Layer Thumbnails. Click the More Options button, click Palette Options, select the size and contents options you want, and then click OK.


Layers are like stacked transparencies with images and other content. You can change the stacking order of the stacked layers to display the content you want. You can change the stacking order by simply dragging layers in the Layers palette or using commands on the Arrange submenu on the Layers menu. The Background layer must remain at the bottom of the Layers palette. To move it, you need to convert it to a normal image layer. If the content on a layer is blocked by the content on another layer, you can move the content on a layer.
- In the Editor, open a document and display the Layers palette.
- Select one or more layers you want to move.
- Drag the layers up or down the Layers palette to a new location.
You can also click the Layer menu, point to Arrange, and then click Bring to Front, Bring Forward, Send Backward, or Send to Back.

- In the Editor, open a document and display the Layers palette.
- Select one or more layers you want to move.
- Select the Move tool on the toolbox.
- Drag within the image to move the content in the selected layers. To constraint your movement up down, left, right, or a 45 degree diagonal, hold down the Shift key.
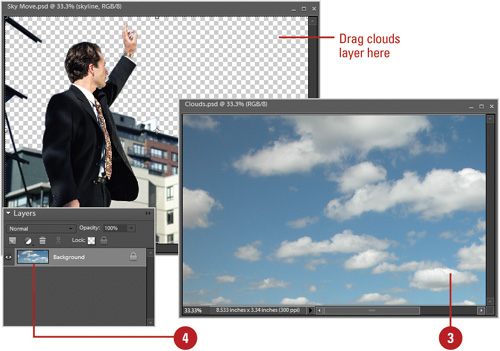
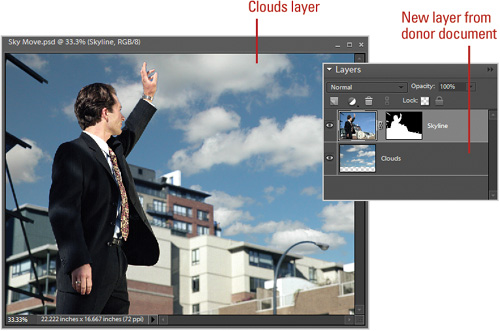
Photoshop Elements documents typically contain multiple layers. One web survey concluded that the designer creates documents with an average of 14 layers. Controlling layers is an important aspect of design, because the more control you maintain, the more organized you are, and the better your designs will be. But what about controlling layers across multiple documents? For example, you’re working on a design, and you need access to some additional image information. The only problem is that the additional information is located in another Photoshop Elements document. Photoshop Elements gives you the ability to move layers between open documents.
- In the Editor, open multiple documents and display the Layers palette.
- To have more than one document in view, click the Window menu, point to Image, and then click Tile or Cascade.
- Click on the document containing the layer you want to move.
- Drag the layer from the Layers palette into the window of the receiving document.
Photoshop Elements creates a new layer with a copy of the image information from the other document.
Did You Know?
You can control the position of the moved layer. Hold down the Shift key while dragging the layer into the other document. Photoshop Elements aligns the new layer to the center of the receiving document.
You can move selected portions of a layer. Select the area you want to move, click the Move tool, and then drag the selected area directly from the document window into the window of the receiving document.
The Merge Down option lets you merge one selected layer into the layer directly below. Merged layers take on the characteristics of the layer they are being merged into. For example, merging a layer into a layer that uses the Darken blending mode. The two merged layers will still use Darken, or if you merge a layer into the background, the merged layer becomes a part of the background. The Merge Visible option gives you the ability with one click to merge all of the layers that have the Show option enabled (Eye icon shown).
If you’re currently looking at the Layers palette, and wondered where the linking button is, don’t worry; it’s not missing, it’s just been moved. Linking multiple layers is a snap. Simply select one or more layers, and then click the Link Layers button at the bottom of the Layers palette. You can link two or more layers or groups. Unlike selected multiple layers, linked layers retain their relationship (stay together) until you unlink them, which allows you to move or resize the layers as a unit.
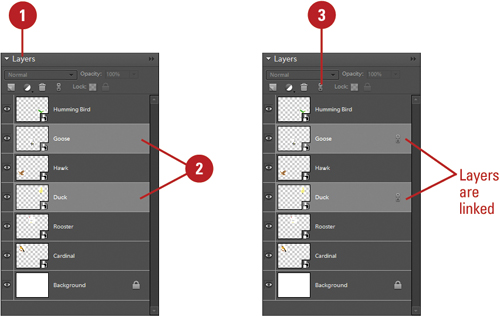
- In the Editor, open a multiple layered document that contains links and display the Layers palette.
- Select a layer that contains the link icon.
- Click the Link Layers button.
Timesaver
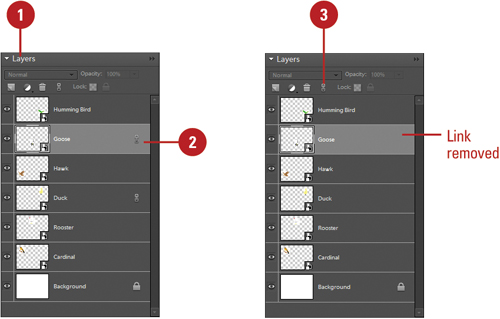
To temporarily disable a linked layer, Shift+click the link icon for the linked. A red X appears. Shift+click the link icon to enable it.
Photoshop Elements lets you add layers to a document (up to 8,000), and it lets you delete layers. Remember that once you’ve deleted a layer, and saved the document, there is no way to recover the deleted layer. However, while the document is open, there is always the chance of recovering the deleted layer through the History palette.
- In the Editor, open a document, display the Layers palette, and then select the layer you want to delete.

- Hold down the Alt key, and then click the Delete Layer button.
If you don’t hold down the Alt key, click OK in the confirmation dialog box.
To drag delete, click the layer you want to delete, and then drag it to the Delete Layer button.

There are times when you will need a copy of a layer. Duplicating a layer is a simple process which creates a pixel-to-pixel copy of the selected layer. Once the copied layer is created, it becomes a separate image within the document. You can then begin to make any additions to the new layer. Duplicating a layer gives you the ability to control each layer separately and to create any desired effect.
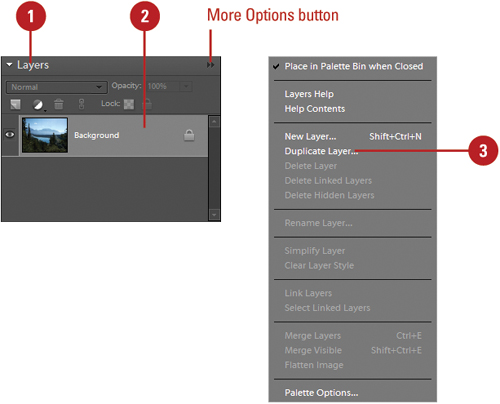
- In the Editor, open a document and display the Layers palette.
- Select the layer you want to duplicate.
- Click the More Options button, and then click Duplicate Layer.
- Enter a name for the new layer.
 To place the layer in another open document, click the Document list arrow, and then select a document.
 Click OK.
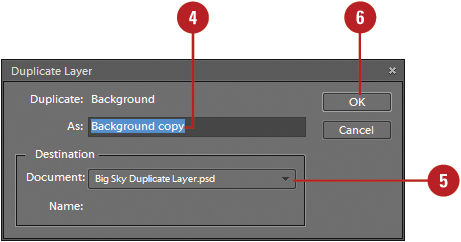
Did You Know?
You can duplicate a layer with the Create New Layer button. Drag the layer over the Create New Layer button and Photoshop Elements creates an exact copy of the layer and appends the word copy at the end of the original layer name.

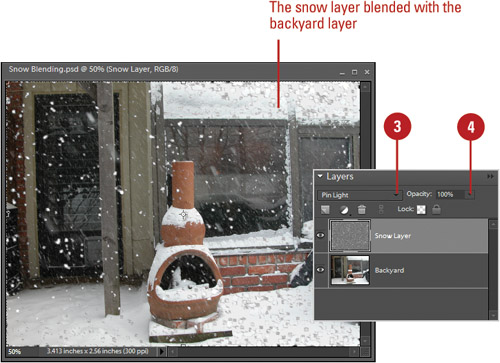
Layer Blending Modes are one of the most creative areas in the Layers palette. With blending modes you can instruct Photoshop Elements to mix the image information between two or more layers. For example, the Multiply blending mode instructs Photoshop Elements to mix the image information of two or more layers together. Blending modes give you control over images up and over that what you would expect to find in the real world.
- In the Editor, open a multiple layered document and display the Layers palette.
- Select a layer.
Since blending modes work downward, select the layer directly above the layer you want to blend.
- Click the Blending Mode list arrow, and then select a blending mode.
Photoshop Elements uses the selected blending mode to visually blend the image through all the layers below the blending mode layer.
- Click the Opacity list arrow, and then drag the slider to lower the opacity of the layer.
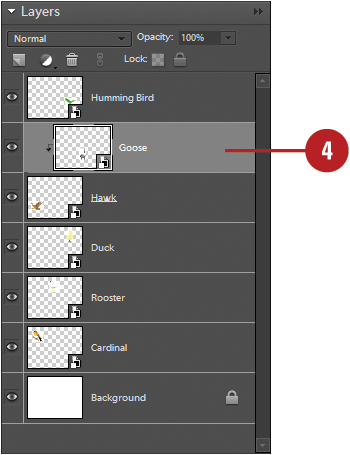
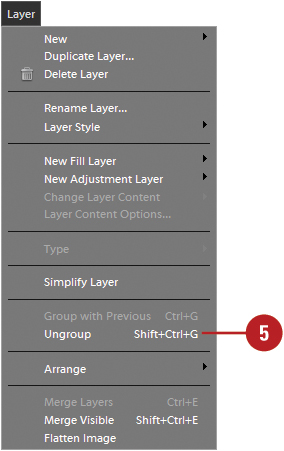
A clipping group is a group of layers with a mask. A mask creates a transparent area in the visible image. Use masks to remove elements of an image without physically erasing them. The bottommost layer, known as the base layer, defines the visible area of the group, or mask, while the layers above it, known as the overlay layers, show through the base layer. For example, you can have a shape as the base layer and a photo as the overlay layer. The photo appears through the shape outline. In the Layers palette, the name of the base layer in the group is underlined, while the thumbnails for the overlay layers are indented and displayed with a clipping group icon (a left down arrow). You can group only successive layers, one on top of the other.
- In the Editor, open a document and display the Layers palette.
- Select the top layer of a pair of layers you want to group.
- Click the Layer menu, and then click Group with Previous.
Photoshop Elements creates a clipping layer group.
- To remove layers from a clipping group, select the layer you want to remove (except the base layer), and then drag it below the base layer or drag it between two ungrouped layers.
- To ungroup layers in a clipping group, select the base layer in the clipping group or the layer immediately above the base layer, click the Layer menu, and then click Ungroup.
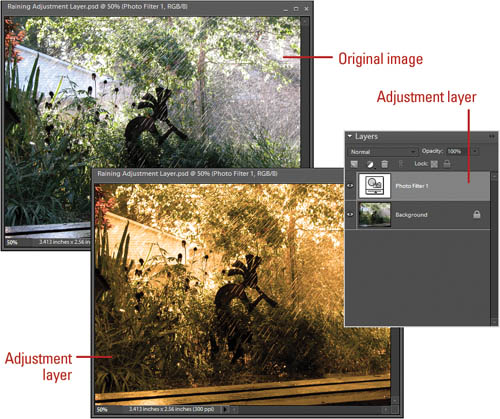
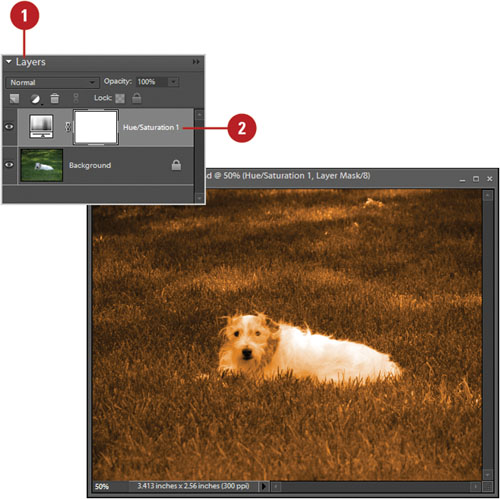
If you want to visually control an Photoshop Elements document, then adjustment layers are the ultimate tool. The purpose of an adjustment layer is to visually illustrate how a specific adjustment, such as Hue & Saturation, is applied to the image. Since the adjustment is contained within a separate layer, the original image never changes. This gives you the ability to experiment with different settings, and since adjustment layers are saved with the document, you can save and return at a later time to make further adjustments.
Another advantage of adjustment layers is size. Adjustment layers do not increase the size of a Photoshop Elements document. Most layers are composed of pixels, so adding traditional layers to a document increases the size of the file. Since adjustment layers are simply a set of mathematical information, they do not increase the size of the file.
Photoshop Elements has two ways to apply adjustments to an image. The first is going through the Enhance menu, and choosing Adjust commands, however, when you apply the adjustment it’s permanent. The other is using an adjustment layer—the very definition of control over time. When working with adjustment layers, you can modify, merge, or even create a temporary composite image, all while your original image stays in tact. With all of their advantages, you may never perform adjustments using the Image menu again.
In addition to letting you apply adjustments to an image without changing the original data, adjustment layers, because they are separate layers, give you the ability to apply standard layer controls, such as blending modes, opacity, and fill. Layer masks come with their own built-in masks, and allow you to control how and where the adjustment is applied to the image.
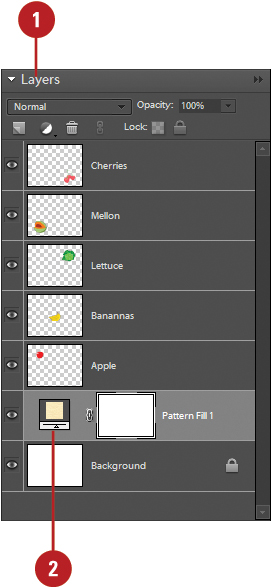
Adjustment layers are applied within the Layers palette. By default, all layers beneath the adjustment layer are changed. In addition, adjustment layers will work on any type of layer, including the Background. You can have as many adjustment layers as needed. For example, you might create a Levels adjustment layer to control the contrast of an image, and add a Curves adjustment layer to correct image color. When you create an adjustment layer, a white box representing the adjustment for that layer appears along with a name based on the layer type, such as Gradient Map 1, in the Layers palette. The new adjustment layer affects all the layers below it in the Layers palette, so you may want to move it to another position, depending on your needs.
- In the Editor, open a document and display the Layers palette.
- Select the layer you want to adjust.
- Click the Create New Fill or Adjustment Layer button, and then select from the available adjustment options:
Levels. Corrects tonal values in the image.
Brightness/Contrast. Lightens or darkens the image.
Hue/Saturation. Adjusts color in the image.
Gradient Map. Maps pixels to the color in the selected gradient in the image.
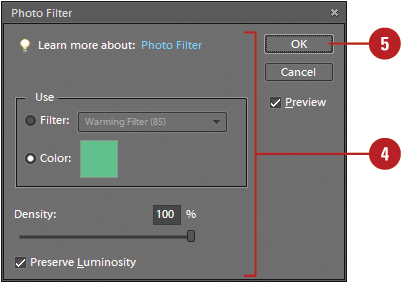
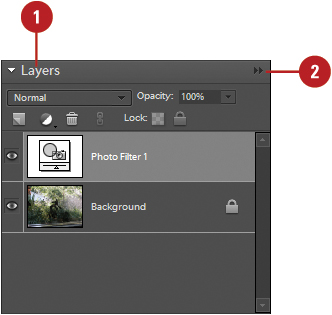
Photo Filter. Adjusts the color balance and temperature in the image.
Invert. Creates a negative of the image.
Threshold. Creates a black and white image.
Posterize. Creates a flat appearance (decrease brightness) in the image.
- If a dialog box opens, make changes to the adjustment, and then click OK.
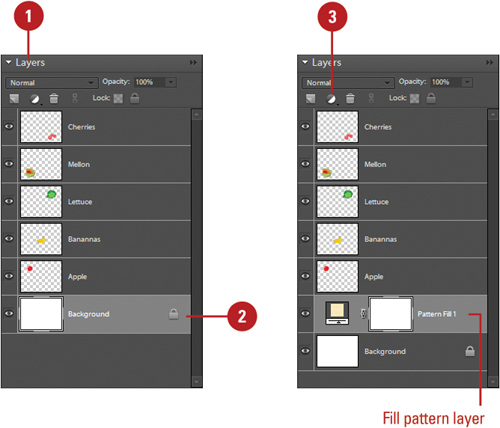
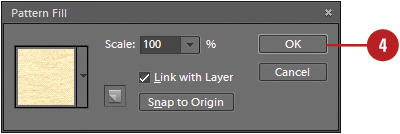
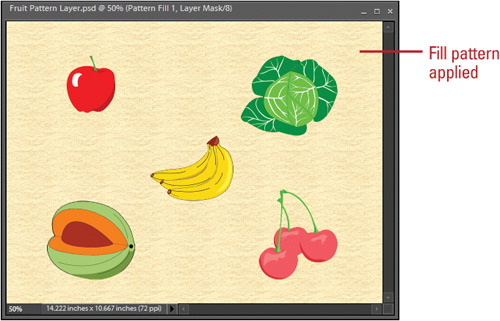
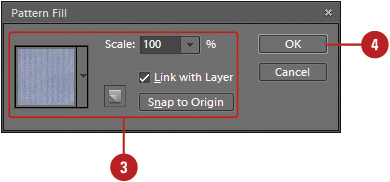
Fill layers let you fill a layer with a solid color, gradient, or pattern. When you create a fill layer, a white box representing the fill for that layer appears along with a name based on the layer type, such as Color Fill 1, in the Layers palette. Also, fill layers do not affect the layers below them. If you want to paint on a fill layer, you need to convert, or simplify, it to a traditional layer.
- In the Editor, open a document and display the Layers palette.
- Select the layer you want to adjust.
- Click the Create New Fill or Adjustment Layer button, and then select from the available adjustment options:
Solid Color. Creates a layer with a solid color.
Gradient. Creates a layer with a gradient.
Pattern. Creates a layer with a pattern.
- If a dialog box opens, make changes to the adjustment, and then click OK.
If an adjustment layer doesn’t quite suit your artistic needs, you can change it. Instead of deleting an adjustment or fill layer and creating a new one, you can use the Change Layer Content command to select another file or adjustment layer and then specify the options you want. Since adjustment and fill layers keep settings isolated in a separate layer, you can experiment with different settings until the image is exactly what you want. The beauty of adjustment and fill layers is in the control they offer to the Photoshop Elements user.
- In the Editor, open a document and display the Layers palette.
- Select the fill or adjustment layer you want to change.

- Click the Layer menu, point to Change Layer Content, and then select the fill or adjustment layer option you want.
The dialog box for that specific adjustment reopens. Options for each adjustment dialog box vary.
- Make the changes you want for the specific adjustment.
- Click OK.
When you modify a traditional layer, any changes made to the image are permanent, as soon as you click OK. But that’s not true of adjustment or fill layers. Adjustment and fill layers keep the changes isolated in a separate layer, and this allows you to modify the adjustment or fill minutes, or even days later. With this type of creative control at your fingertips, you can experiment with different settings until the image is exactly what you want.
- In the Editor, open a document and display the Layers palette.
- Double-click on the thumbnail of the Fill or Adjustment layer you want to modify.
You can also select the layer, click the Layer menu, and then click Layer Content Options.
The dialog box for that specific adjustment reopens. Options for each adjustment dialog box vary.
- Make the changes you want for the specific adjustment.
- Click OK.
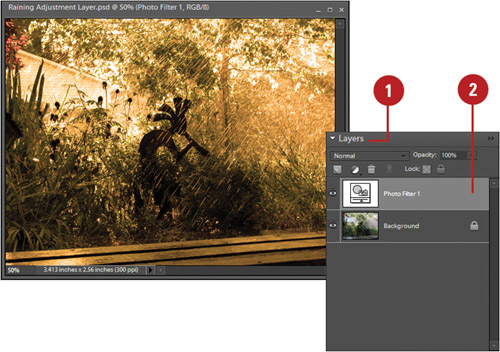
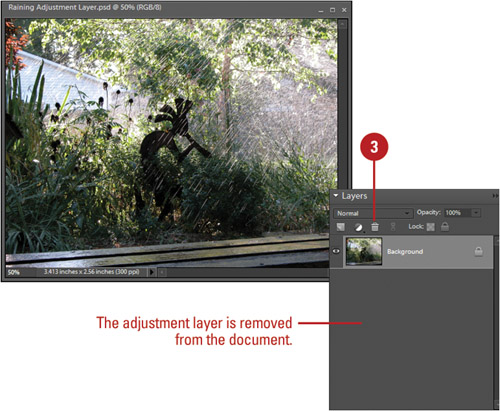
When you delete a fill or adjustment layer you are simply deleting the adjustment, not the image. Adjustment layers do not contain image data; they only manipulate the information contained within the image layer. Deleting an adjustment layer is as easy as deleting any other layer type. The effect is the same; the function of the layer is removed from the document. For example, if you delete a curves adjustment layer, the effects are removed and the image returns to its original state. When you delete an Adjustment layer, the change to the image induced by the adjustment layer is removed, and the image returns to normal.
- In the Editor, open a document and display the Layers palette.
- Select the fill or adjustment layer you want to delete.
- Hold down the Alt key, and then click the Delete Layer button.
If you don’t hold down the Alt key, click OK in the confirmation dialog box.
To drag delete, click the layer you want to delete, and then drag it to the Delete Layer button.
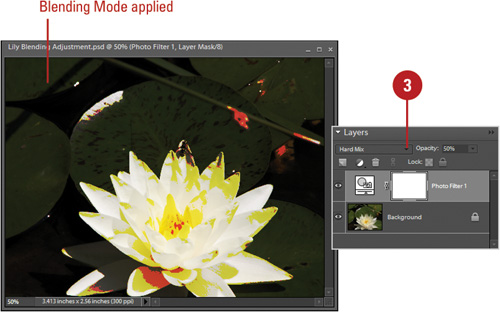
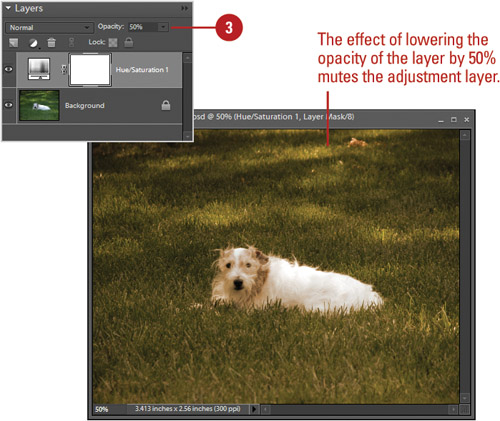
Adjustment layers perform two functions—they adjust the image and they give you control. Since an adjustment is held in a separate layer, you have the advantage of isolating the adjustment, and all the options that apply to a normal a layer. Combine that with an adjustment layers ability to manipulate pixel information and you have a very powerful image-editing tool. Blending Modes change how two or more layers interact. For example, the multiply blending mode instructs Photoshop Elements to mix the pixels of two or more layers, thus creating an entirely new image from the mix. With that in mind, the five modes that produce the most stunning results are Multiply, Screen, Hard Mix, Difference, and Exclusion. The opacity of an adjustment layer controls the intensity of the selected adjustment. You can reduce the opacity of the Hue & Saturation adjustment to 50 percent, and it would reduce its effect on the image. Since each adjustment layer has its own opacity settings, multiple adjustment layers can be fine-tuned to create the desired impact on the image.
- In the Editor, open a document and display the Layers palette.
- Click the layer you want to adjust.
- Click the Opacity list arrow, and then drag the slider to lower the opacity of the layer.
The results of the change appear in the document window.
Timesaver
Click inside the Opacity box, and then use the Up and Down Arrow keys to increase or decrease the opacity 1 percentage point at a time. Hold the Shift key, and then use the Up and Down Arrow keys to increase or decrease the opacity 10 percentage points at a time. You can also select the percentage in the box and enter a value.
Photoshop Elements lets you create as many adjustment layers as needed. For example, you might create a Levels adjustment layer to balance image contrast, Curves to correct color, and a Photo Filter, to create an overall warming effect to the image. Each adjustment layer works with the other adjustment layers to produce the final image. It’s not unusual to have three, four, or even five adjustment layers controlling a single image. At some point in the design, you might decide to save space by merging some or all of the adjustment layers. However, when you merge the adjustment layers, the image looses the effect produced by the adjustments. The reason lies in how Photoshop Elements works with adjustment layers. Each adjustment layer controls one part of the adjustment. The layers themselves do not hold an image; they hold mathematical data on how to change an image. Each adjustment layer holds data relating to a specific adjustment, such as Curves or Levels. A single adjustment layer cannot hold more than one set of adjustments. That’s why you have multiple adjustment layers. Merging two or more adjustment layers together forces Photoshop Elements to discard all of the adjustment data and the merged adjustment layers turn into a traditional simplified layer. To solve the problem, try merging the adjustment and the image layers into a single layer.
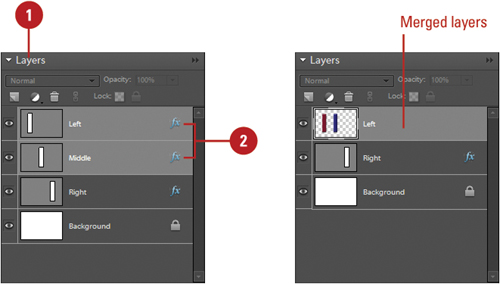
- In the Editor, open a document containing an image layer, and two or more adjustment layers.
- Display the Layers palette.
- Click the More Options button, and then select from the following merge options:
Merge Layers. Merges only the layers selected in the Layers palette into a single layer.
Merge Down. Merges the selected layer and the one below it.
Merge Visible. Merges only the layers that are visible, leaving the hidden layers untouched.
Flatten Image. Merges all layers into a flattened background. If you have one or more layers hidden, a warning dialog box asks if you want to discard the hidden layers.
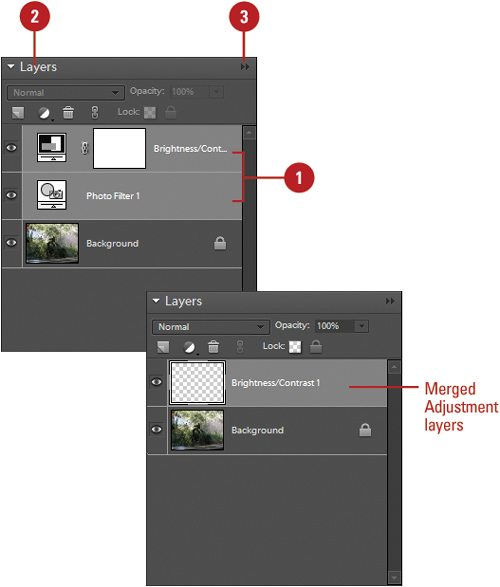
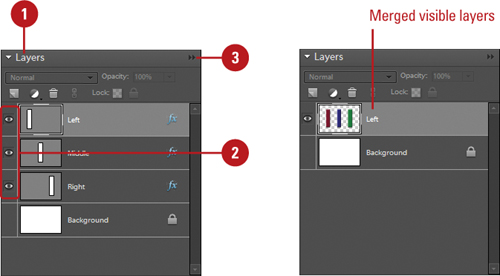
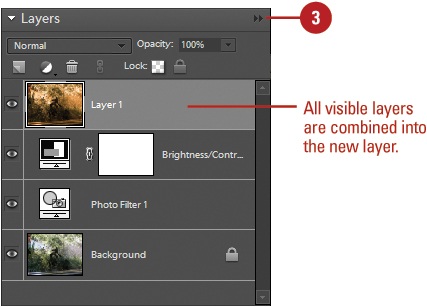
When you merge adjustment layers into the image, you wind up with a single layer, which contains all of the adjustments. By merging the adjustment layers, you do lose control over the individual adjustment layers. It’s basically a trade off of smaller files sizes, less layers to contend with, but less control over the image. Let’s say you want the best of both worlds—a single layer that contains the image, all of the adjustments, and the original image with separate adjustment layers. It’s possible, all you have to do is create a composite layer.
- In the Editor, open a document that contains an image, and two or more visible adjustment layers.
- Display the Layers palette, create a new layer at the top of the layer stack, and then select it.
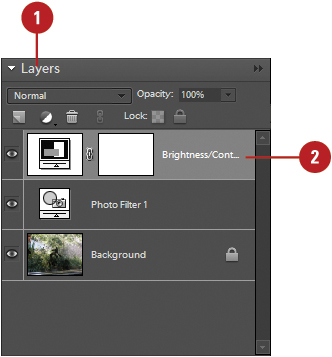
- Hold down the Alt key, click the More Options button, and then click Merge Visible.
Photoshop Elements combines all of the visible layers into the new layer; while leaving the original layers untouched.
Did You Know?
You can use the composite layer option on any multiple layered PSD document. Once you’ve created the composite layer, you can perform other adjustments without impacting the original images, or even drag and move the composite into another PSD document.
You can use the link option to control the composite image. In the Editor, create a new layer, and then link the layers you want included in the composite. Follow the steps for creating a composite, except click Merge Linked.
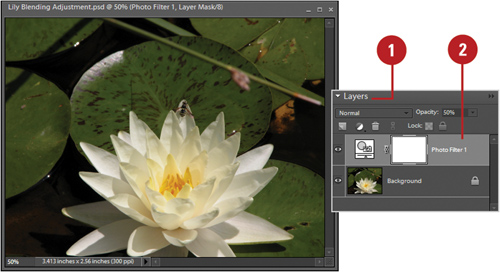
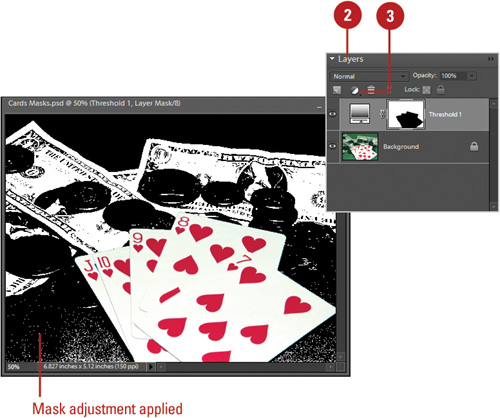
When you create an adjustment layer, the effects of the adjustment are applied to the entire image. For example, if you use the Curves adjustment, the entire image receives the effects of the adjustment. It’s true you can modify the adjustment with the use of layer blending modes, and opacity settings but, the effects are applied equally to the entire image. The problem is that many times you don’t want the adjustment applied to the entire image. For example, color correcting a portion of the image, or lightening the shadows of an image without applying the same lightening adjustment to the highlights. Photoshop Elements handles this problem with the use of masks. When you create an adjustment layer, Photoshop Elements creates a mask with the image. The mask controls how the adjustment is applied to the image, and you control the effect by painting in the mask with black, white, or a shade of gray. When you paint the mask with black, it masks the adjustment, painting with white fully applies the adjustment. If you paint with 50 percent gray, then 50 percent of the adjustment is applied to the image.
- In the Editor, open a document and display the Layers palette.
- Click the layer mask thumbnail in which you want to paint a mask.
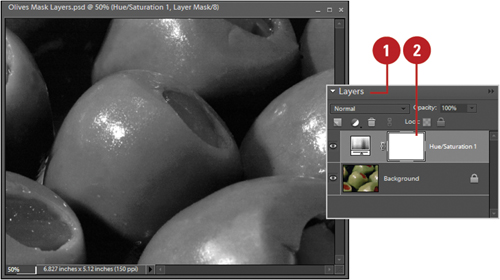
- Select a Paintbrush tool.
- Select a brush size on the Options bar.
- Set the Foreground Color box on the toolbox to black as the painting color.
- Paint the areas of the image in the document window you want to mask. The adjustment layer must be selected.
The areas painted black mask the adjustment, and return the image to normal.

 To restore the masked areas, switch to white and drag across the image in the areas previously painted black.
You can create an instant mask using traditional selection techniques. Before creating the adjustment layer, select the area of the image you want the adjustment applied. Use any of the selection tools for this purpose. When you create the adjustment layer, Photoshop Elements converts the selection into a mask, and only the selected areas of the image receive the adjustment.
- In the Editor, open a document, and then use any of the selection tools to create a selection around the area of the image you want the adjustment applied.
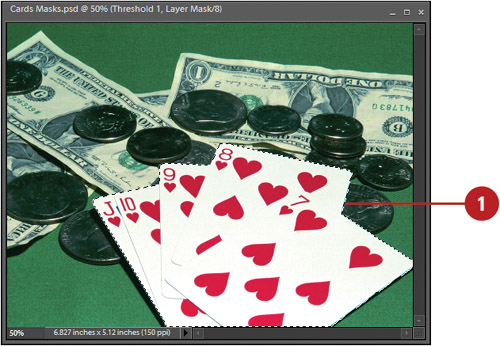
- Display the Layers palette.
- Click the Create New Fill or Adjustment Layer button, and then select from the available adjustments.
Photoshop Elements creates a mask based on your selection with the selected areas receiving the adjustment and the non-selected areas masked.
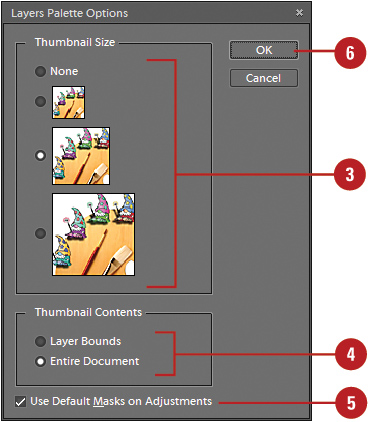
Photoshop Elements doesn’t have a lot of options for controlling the palette; in fact, there is only one—changing the size of the thumbnail. Thumbnail size options come in three sizes, or you can select to have no thumbnail shown. When you change the size of the thumbnail, you’re instructing Photoshop Elements to spend more, or less processing time on the display of the image. The larger the thumbnail, the easier it is to see, but the longer it takes for Photoshop Elements to draw the images in the Layers palette. If you’re experiencing performance issues with Photoshop Elements, and you’re using a large thumbnail, you might consider downsizing the thumbnail image.
- In the Editor, open a document and display the Layers palette.
- Click the More Options button, and then click Palette Options.
- Click a thumbnail size or the None option.
- Click the Layer Bounds or Entire Document option.
- Select the Use Default Masks On Adjustments check box to automatically insert a mask when creating a new Adjustment layer.
- Click OK.