
Chapter 2. The Timeline

I’ve been a long time coming, and I’ll be a long time gone. You’ve got your whole life to do something, and that’s not very long.
–Ani DiFranco (American singer, songwriter, and guitarist)
The Timeline is After Effects’ killer application. More than any other feature, it extends After Effects unique versatility to a wide range of work. With the Timeline at the center of the compositing process, you can time elements and animations precisely as you control their appearance.
The Timeline panel is also a user-friendly part of the application, albeit one packed with hidden powers. By mastering its usage, you can streamline your workflow a great deal, setting the stage for more advanced work.
One major source of these hidden powers is the Timeline’s set of keyboard shortcuts and context menus. These are not extras to be investigated once you’re a veteran, but small productivity enhancers that you can learn gradually all the time. They actively build your momentum and confidence as an After Effects artist.
The Timeline makes render order explicit if you know how to view it. 2D layers render beginning with the lowest in the stack and ending with the top, while properties of each layer (visible by twirling down) render in top-to-bottom order. More about this can be found in Chapter 4, “Optimize the Pipeline.”
Organization
The Timeline is a dynamic environment; as you work with it, you constantly alter not only its contents, but also your view of the environment itself. Its building blocks are layers organized into columns, and you determine which layers or columns are visible at any given time.
Column Views
You can context-click on any column heading to see and toggle available columns in the Timeline, but there are smarter ways to configure these than toggling all the time. A minimal setup is shown in Figure 2.1. You can then augment or change the setup with the following tools:

Figure 2.1. This basic column layout works when screen real estate is at a premium. The columns shown are useful virtually all of the time, and most of the rest are only a shortcut away.
• Lower-left icons: Most (but not quite all) of the extra data you need is available via the three toggles found at the lower left of the Timeline (Figure 2.2).
Figure 2.2. These icons at the lower left of the Timeline expand (or collapse) the most used columns: Layer Switches, Transfer Controls, and the various timing controls. The button to the right corresponds to the first two, toggling between them.
• Layer Switches/Transfer Controls: Save horizontal space (if you need it) using a built-in toggle between the modes represented by the first two lower-left icons. When only one of them is enabled, the F4 key or the Toggle Switches / Modes button which appears below the column will swap them.
If both Layer Switches and Transfer Controls are displayed, the F4 toggle hides both of them, maximizing horizontal space.
• Time Stretch: The third lower-left icon toggles the timing columns (In, Out, Duration, and Stretch) together. It’s easy to forget these even exist, given that layer Duration and In/Out are usually set to the layer bar itself, and Stretch isn’t the usual way to retime a layer except in specific instances (detailed in “Manipulate Time,” ahead).
• Layer/Source: You can (and often should) give a layer a custom name by selecting it, pressing Return, typing, and deselecting. The column heading switches from Source Name to Layer Name; click it to toggle them. Items in brackets in Layer Name mode still have the Source Name.
The general convention to rename an item anywhere in After Effects is to highlight it and press Return, instead of clicking and hovering (as can be done in the operating system).
• Parent: On by default with no shortcut, this one is most likely to be visible when it’s not needed. Not parenting in this comp? Context-click the column title and choose Hide This from the resulting menu.
• AV Features/Keys: AV Features are usually too useful to hide, and Keys comes along for free; its controls are embedded beneath AV Features when the layer is twirled down. Unless you are really desperate, leave these alone.
Unless your monitor is huge or you’re not doing much keyframing, the game is to preserve horizontal space for keyframe data by keeping only the relevant controls visible.
Comments and Color
Ever try to make sense of someone else’s project? You can make it easier for others—and even yourself—by color-coding layers and compositions, so everyone can see at a glance how comps are organized (Figure 2.3). Or, if you’re creating a template or other project to hand off to others, or use again in the future, you can append comments to whole layers as well as specific points on the Timeline.

Figure 2.3. Each type of layer has a unique color, making it easy to discern among them.
After Effects colors and their names can be edited in Preferences > Label Colors; version CS3 includes 16 unique color labels. Therefore the same label can have a different color on another system. Preferences > Label Defaults assigns specific colors to nine basic item types.
Colors are assigned to specific types of layers according to Preferences > Label Defaults. Additionally, you may wish to call out special types of layers, such as track mattes and adjustment layers, with specific colors of your own choosing.
Comments are generally the least used column in the Timeline, but they let you offer full contextual explanations of the comp setup, with no character limit (although you may have to twirl down some properties to reveal the scroll bar). However, if the column is not made visible, neither are the comments.
Included in the Redefinery folder on the book’s disc is a script called rd_Commentron.jsx. It takes advantage of the long-text handling ability of the Comments fields in the Timeline and Project panels by duplicating information that is truncated in other fields, such as example, layer, and footage names that exceed 31 characters or other useful information.
Comments attached to layer markers are visible in the Layer view, where they require no extra space. To add one, highlight a target layer at a specific time and press the * key on the numeric keypad; a layer marker appears at the current time. Double-click it to open the Marker dialog. Add text to the Comment field and if the layer bar is visible, the result appears right on top of it.
New in After Effects CS3, you can add text to comp markers (Figure 2.4).
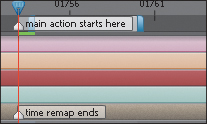
Figure 2.4. Comments can be added to layer or comp markers. In this case the layer marker is aligned to the comp marker, easy to do by holding down the Shift key to snap as you drag.
Solo, Lock, and Shy
Several toggles on the A/V Features and Switches columns pertain to how layers are edited and viewed (or, in the case of audio, heard) as you work.
The round, white icon (Figure 2.5) in A/V Features is the Solo switch. Solo a layer, and you see only it; render a comp with a layer toggled solo, and the Solo Switches menu in Render Settings determines whether it outputs that way. By default, whatever visibility settings you have in the comp, including solo layers, are what render.

Figure 2.5. Three layers are solo, and the others behave as if deactivated; by default, the comp will also render this way.
To change the visibility (rather than the solo state) of selected layers, use Layer > Switches > Hide Other Video.
The Lock toggle is useful in situations when you know a layer is done and should not be touched; a locked layer can’t even be selected, let alone edited.
To unlock a number of layers at once, use Layer > Switches > Unlock All Layers (Ctrl+Shift+L/Cmd+Shift+L).
Shy is a more elusive feature; toggle a layer to shy and nothing happens, until you also activate the Shy toggle for the entire composition (Figure 2.6). All shy layers disappear from the Timeline, although they still display in the comp itself, as before. This is a great way to keep only the layers you need in front of you.

Figure 2.6. Layers 1, 2, and 4 from Figure 2.3 are shy; they still display in the comp viewer if visible, but I’ve made them invisible in the Timeline to leave only the layers I’m currently editing.
Shy layers can greatly reduce clutter in the Timeline, but if you ever lose a layer, take a close look at the Index numbers. If any are out of sequence, the missing number belongs to a layer that is now shy.
Navigation and Shortcuts
More than anywhere else in After Effects, the Timeline is the place where keyboard shortcuts—lots of them—allow you, the expert, to make changes via a single keyboard shortcut or a single click of the mouse, where a beginner might require several mouse clicks, or might not know that a given feature existed at all.
Time Navigation
Many users—particularly editors—learn time navigation shortcuts right away. Others primarily drag the Current Time Indicator, which can quickly become tedious. Here are some useful time navigation shortcuts:
• The Home, End, Page Up, and Page Down keys correspond to moving to the first or last frame of the composition, one frame backward, and one frame forward, respectively. Laptop users in particular may prefer Ctrl/Cmd+left and right arrow as an alternative to Page Up and Page Down.
• Shift+Page Up and Shift+Page Down skip ten frames backward or forward, respectively.
• Shift+Home and Shift+End navigate to the Work Area In and Out points, which can be set with the B and N keys, respectively. The I and O keys navigate to the beginning and end frames of the comp.
There’s no need to add punctuation when entering time values into a number field in After Effects. 1000 is ten seconds (10:00) in Timecode mode or frame 1000 in Frames mode.
• Click on the current time status at the upper left of the Timeline to open the Go to Time dialog (press Alt+Shift+J/Opt+Shift+J).
• To navigate an arbitrary but precise number of frames or seconds (say, 48 frames following the current time), in the Go to Time dialog, replace the current time with your increment in the format +48, click OK, and After Effects calculates the increment for you.
If instead you need to navigate backward in time 48 frames, you can’t simply enter –48 in the Go to Time dialog. If you do, you’re transported to negative 48 (frames or seconds, either of which probably moves the indicator right off the Timeline—very confusing). Instead, you must use the format “+–48” to enter the offset; think of it as adding a negative number, rather than subtracting. It’s weird, but it works.
Go to Time used to have the shortcut Ctrl+Shift+G/Cmd+Shift+G, but Shape layers claimed this one for grouping shapes, so that After Effects would be consistent with other Adobe applications such as Illustrator. Think of the new shortcut (Alt+Shift+J/Opt+Shift+J) as “Jump” to help yourself remember it.
Make Layers Behave
I was reviewing film-outs of shots from The Day After Tomorrow with the other artists at The Orphanage when my shot began to loop; it looked out a window at stragglers making their way across a snow-covered plaza and featured a beautiful matte painting by Mike Pangrazio. About two-thirds through the shot came a subtle pop. At some point, the shot had been lengthened, and a layer of noise and dirt I had included at approximately 3% transparency (for the window itself) had remained shorter in a sub-composition.
The add-a-negative number offset now operates in most number fields in After Effects (including Composition Settings).
This is a primary reason some effects artists don’t like to work with a timeline-based application; in other compositing programs, such as Shake, this would not inadvertently happen because static elements don’t have a length unless you specify one.
After Effects CS3 is more fluid and flexible in this respect than previous versions. Static elements such as stills and solids no longer have a fixed beginning or end, so you can always drag to extend them, and by default they extend the full length of the composition. If you lengthen the composition, however, you must still lengthen the layers themselves if you intend them to span the comp.
To add a layer beginning at a specific time, drag the element to the layer area; a second Time Indicator appears that moves with your cursor (horizontally). This determines the layer’s start frame. If other layers are present and visible, you can also place it in layer order.
To avoid the gotcha in which a layer ends up too short for its host composition when either is edited, some users prefer to make all of their comps longer (in duration) than they ever expect to need, and manage timing using only the Work Area settings.
Here are some other useful tips and shortcuts:
• Navigate to the previous or next keyframe (or layer marker) by pressing J and K, respectively. This works for any visible keyframe or layer marker.
• To reset the Work Area to the length of the composition, double-click it; to set it to the exact length of the currently active layer, press Ctrl+Alt+B/Cmd+Option+B.
The keyboard shortcut Ctrl+/ (Cmd+/) adds selected items as the top layer(s) of the active composition.
• Besides clicking on a layer to select it, you can enter the layer’s index number using the numeric keypad.
• To select an adjacent layer without touching the mouse, use Ctrl+Up Arrow (Cmd+Up Arrow) to select the next layer up, and Down Arrow to select the next layer down.
To trim a composition’s Duration to the current Work Area, choose Composition > Trim Comp to Work Area.
• Add the Alt (Option) key to move a layer up or down in the stack, which you can also do with Ctrl+] and Ctrl+[ (as in other Adobe applications). Ctrl+Shift+] moves a layer to the top of the stack and Ctrl+Shift+[ moves it to the bottom.
• You can invert the layers currently selected: Context-click on a selected layer, and choose Invert Selection. (Locked layers are not selected, but Shy layers are selected even if invisible.)
• Duplicate any layer (or virtually any selected item) using Ctrl+D (Cmd+D). If you duplicate a layer and its track matte (Chapter 3, “Selections: The Key to Compositing”), they remain paired in layer order, above the source layers.
It can be annoying that the Work Area controls both preview and render frame ranges, because the two are often used exclusively of one another. By employing a separate “Render Final” composition that contains the Work Area for the final render, you can mess with your other composition Work Areas as much as you want without affecting the render range.
• For various reasons you might instead wish to split a layer (Ctrl+Shift+D/Cmd+Shift+D); the source ends and the duplicate continues from the current time. This is useful, for example, when you need one layer to straddle another in 2D order.
• To move a layer In point to the current time, use the [ key, or press ] to move the Out point. Add the Alt (Option) key to set the current frame as the In or Out point, trimming the layer.
There is even a preference controlling whether split layers are created above or below the source layer (Preferences > General; the toggle is labeled Create Split Layers Above Original Layer).
• To slide a trimmed layer, preserving the In and Out points but translating the footage and its layer markers (but not keyframes), drag using the double-ended arrow you see over the area outside the In and Out points; it is visible when the layer has already been trimmed, making an edit handle available.
• To nudge a layer forward or backward in time (including its keyframes) use Alt+Page Up/Page Down (Option+Page Up/Page Down; hold Option/Alt with Home and End to move the layer’s In point to the beginning of the comp, or the Out point to the end).
Often, you may add elements whose size or pixel aspect doesn’t match those of the composition, yet which are meant to fill the frame (or one axis). No need to break open the Scale controls and guess; you can use the Fit to Comp shortcuts (which are included in the Layer > Transform menu).
The standard Fit to Comp, Ctrl+Alt+F (Cmd+Option+F) can be dangerous in that it ignores the aspect ratio of the layer, stretching X and Y scale individually to match each to the comp itself.
Double-click a keyframe and some rather cool hidden options present themselves for positioning and scaling relative to the comp (Figure 2.7).

Figure 2.7. Need to position that layer relative to the composition, or to its source size? Double-click the keyframe and make use of this dialog; it’s useful for other types of keyframes as well.
More commonly useful are the shortcuts for Fit to Comp on a single axis (X or Y), which retain the aspect ratio to scale the non-dominant axis. You can Fit to Comp Width (Ctrl+Alt+Shift+H/Cmd+Option+Shift+H), or Fit to Comp Height (twisting your fingers around Ctrl+Alt+Shift+G/Cmd+Option+Shift+G).
Timeline View Options
After Effects offers some useful workflow enhancements to help you work with keyframe data. These will help you work with timing more quickly, accurately and confidently.
• The ; key toggles between a fully zoomed-in view of the current frame and a fully zoomed-out view of the whole Timeline.
• The slider at the bottom of the Timeline zooms in and out more selectively (Figure 2.8).
Figure 2.8. Absent a mouse scroll wheel, this click-and-drag interface at the bottom of the Timeline panel is probably the fastest method of zooming in and out.
• If your mouse includes a scroll wheel, there’s a cooler option: Not only can you scroll up and down the layer stack and Shift-scroll left and right in a zoomed Timeline view, but Alt-scrolling (Option-scrolling) dynamically zooms you in and out of time. Shift-scrolling navigates back and forth. Position your cursor over the Timeline panel to try these.
At the right edge of the Timeline is the Comp button (Figure 2.9a), which brings forward the Composition view associated with that Timeline. The Composition panel has a corresponding Timeline button (Figure 2.9b). Neither of these is strictly necessary, however; if you need to make either panel appear, or toggle between the two of them, use the backslash () key.
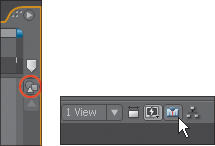
Figure 2.9. Need to locate the Timeline related to the displayed composition, or vice versa? The shortcut for each is here, or simply use the on your keyboard. Also in this group is the Comp marker bin; drag comp markers from here.
The scroll wheel also zooms in and out of viewer panels when the cursor is placed over them, no modifier or selection needed.
The Current Time Indicator is capable of going where your Timeline panel cannot: to time frames previous to the first frame of the composition or beyond the last frame (usually because the trimmed area of a layer extends there). In such cases, the indicator disappears from the Timeline entirely. Have no fear. Clicking in the Time Ruler to place the indicator or using any of the time shortcuts outlined above recovers it.
Just above the Comp button is the Comp marker bin, where you can drag out a marker to a point on your Timeline. Markers are numbered sequentially, but new in CS3, you can double-click them to add names instead.
Replace a Layer or Composition
You can easily replace the source of a layer with an alternate take or a different element in the Project panel, keeping all of its settings and keyframes. Highlight the layer to be replaced in the Timeline and hold down the Alt (Option) key while dragging the new source to the Timeline. Or even easier, select both the existing layer and the new source and then press Ctrl+Alt+/ (Cmd+Option+/).
Hold down the Shift key as you drag the Current Time Indicator to snap current time to comp or layer markers or visible keyframes.
You can even Alt/Option-drag one composition over another in the Project panel to replace its usage throughout the project.
To add a specific numbered comp marker, press Shift and one of the numbers at the top of your keyboard (not the numeric keypad): 1 through 0.
Animation Methods
Twirl down any layer in the Timeline, and the Transform controls are revealed. Transforms are spatial data related to Position, Anchor Point, Scale, Rotation, and, um, Opacity. Opacity isn’t really spatial transform data, but it’s essential enough to be included with the spatial data.
• The keyboard shortcuts to reveal individual transforms are the first letter of each type: P, A, S, R, and, um, T—Opacity is the oddball again, because O is already in use as the Out point of a layer (mentioned above). Think of Opaci-“T.”
• To reveal additional properties, hold down Shift when typing the letter shortcut; you can also toggle a property to hide in this manner.
Beware when replacing with source material of a different size or aspect; mask values are relative and scale to the dimensions of the new layer, but other values (transforms and effects settings) are absolute and, generally speaking, do not.
A property in After Effects is a data channel under a twirled-down layer. Typically a property can be animated and has a stopwatch icon beside it which, when clicked, sets a keyframe at the current time.
That by itself is simple enough. But there are, in fact, many different ways to animate a property in After Effects (Figure 2.10).

Figure 2.10. Each layer moves 200 pixels along the X axis over 24 frames; look carefully and you can see that each employs a unique method.
Suppose you wanted to move a layer 200 pixels along the X axis over 24 frames. After setting the first keyframe and moving the time indicator forward 24 frames, you could
• Drag the layer to the new position in the Composition viewer (holding the Shift key to constrain it to one axis)
• Shift+Right Arrow 20 times to move the layer exactly 200 pixels
• Enter the new value in the Timeline by highlighting the X Position numerical value and typing in the new number
• Drag the X Position numerical value to the right until it is 200 pixels higher (perhaps holding Shift to increment by ten pixels)
• Enter a numerical offset by highlighting the X Position numerical value and typing +200 (as was done with time, above)
• Copy and paste the Position keyframe from another layer, or another point in time (assuming one exists)
And those are just the options to keyframe-animate that one property. You could also create the same animation without keyframing Position values, by
• Keyframing the anchor point in the opposite direction (negative 200 pixel X value) over 24 frames
• Enabling 3D for the layer, adding a 50mm camera, and animating the camera moving 200 pixels, again in the negative X direction
• Parenting the layer to another layer with the transform animation
• Replacing the layer with a nested composition that already contains the layer and transform
• Assigning an expression to the Position channel that performs the animation without keyframes
Don’t worry, you won’t be tested on these. This list is here to spark your imagination and perhaps provide animation ideas you hadn’t considered.
If that’s not crazy enough, you could even
• Apply the Transform effect to the layer and animate the effect’s Position value
• Animate in real time via the cursor using Motion Sketch (I did say “crazy”)
• Paste in a path (perhaps using a Mask or a Path from Photoshop or Illustrator) to the Position channel, adjusting timing as needed (this method defaults to creating a two-second animation)—again, crazy, but possible
The Transform effect allows you to specify when transforms occur relative to effects. Normal transforms occur before effects, but this plug-in lets you interleave them with effects without precomping.
Some of these options are clearly designed for other specific and most likely, more complex situations, such as parenting (under “Parent Hierarchy” later in this chapter) and expressions (Chapter 10).
Note that there is even a variety of ways to enter values while animating. You can
• Drag with the Selection tool (shortcut: V)
• Drag the Pan Behind tool to move the anchor point (shortcut: Y)
• Drag the Rotate tool (shortcut: W, which the documentation even points out is for “wotate”)
When dragging text in the Timeline or Effect Controls, hold down Shift to increment values at ten times the normal amount, or hold down Ctrl+Alt (Cmd+Option) to increment at one tenth the standard increment (usually a whole integer value, but this depends on the slider range, which you can edit; context-click the value in Effect Controls and choose Edit Value to adjust it).
You can also work directly with these values in the Timeline, whether by highlighting and entering values, or simply by dragging the value without highlighting. Try it.
Keyframes and the Graph Editor
The purpose of the Graph Editor is to give you maximum control over fine-tuning a keyframe animation, whether it consists of one animated property or several. If you’re adjusting one property, you can take complete control of its animation; if several, you get a thorough comparison of timings.
Make Use of the Graph Editor
The simplest way to get started with the Graph Editor is to examine a sample project and to try messing around with it. To demonstrate the many features of this tool set, 02_graphEditor.aep in the accompanying disc’s Chapter02 directory contains a simple animation, “bouncing ball 2d.” A ball bounces across the frame, with a little bit of squash and stretch animation occurring from where it hits the bottom of the boundary
To enable the Graph Editor, click its icon in the Timeline (Figure 2.11).

Figure 2.11. This icon activates the Graph Editor.
A grid appears in the area previously occupied by the layer bars. At the bottom of this grid are the Graph Editor controls, labeled in Figure 2.12.

Figure 2.12. Components of the Graph Editor: (A) Show Properties, (B) Graph Options, (C) Show Transform Box, (D) Snap, (E) Zoom controls, (F) Keyframe controls, (G) Ease controls, (H) properties graphs, and (I) Graph Editor Set toggles.
Show Properties
By default, if nothing is selected, nothing displays; what you see depends on the settings in the Show Properties menu (the eye icon lower left). Three toggles in this menu control how animation curves are displayed:
• Show Selected Properties displays animation data only for selected properties
• Show Animated Properties displays all animated properties in a selected layer, whether they are selected or not
• Show Graph Editor Set displays properties whose Graph Editor Set toggle (next to the stopwatch and labeled I in Figure 2.12) is enabled
It’s easy to turn on Show Selected Properties and disable the other two, but the opposite configuration (disabling that Show Selected Properties and turning on the others), is a more powerful (less annoying) way to work because properties don’t inadvertently appear and disappear as you work.
You may already have your own preference, but I consider Graph Editor Set to be the most versatile option. By specifying what properties you want to see, you ensure that only they are displayed, and you can freely mix and match selections from various layers without having to keep everything carefully selected.
Graph Options
The real power of the Graph Editor has to do with how data is displayed, and there are options for displaying data that even advanced users miss. The Graph Options menu (labeled B in Figure 2.12) controls which components of the properties are displayed. For example, display only the Position data for ball and you might see something like the keyframe data in Figure 2.13.

Figure 2.13. The 2D version of the bouncing ball animation is shown with the Speed graph active and the Value graph shown as a Reference graph.
Enable Show Reference Graph in the Graph Options and the actual spatial animation is displayed as curves, even though you normally edit motion paths in the viewer, and the Speed graph (the rate at which the layer animates) in the Graph Editor. For a bouncing ball animation, both contain vital information; as you edit speed to speed the ball toward the ground and slow it down in midair, you can move your cursor over the Value graph to see exactly where the ball is at a particular frame.
Auto Select Graph Type selects Speed graphs for spatial properties and Value graphs for all others.
Switch to Edit Value Graph and you can actually grab a vertex belonging to a given axis and change its value. What you cannot do is offset it in time from the other axes; any temporal changes you make to a keyframe on X are also made to Y and Z.
The Separate XYZ Position preset (in Animation Presets, in the Effects & Presets panel) uses expressions to set up separate spatial channels that can be timed independently of one another. This, however, can make life more complicated because it contains its own spatial properties which link to Position, and you must animate those to get the benefit.
The main use of the Reference graph is to get a property value at a specific time, which you can do by moving the cursor over the curve or simply by checking the Reference graph values displayed in gray at the right end of the Graph Editor (while values of the active graph are displayed left). If this is too much information at any point, toggle the Reference graph off (Figure 2.14).
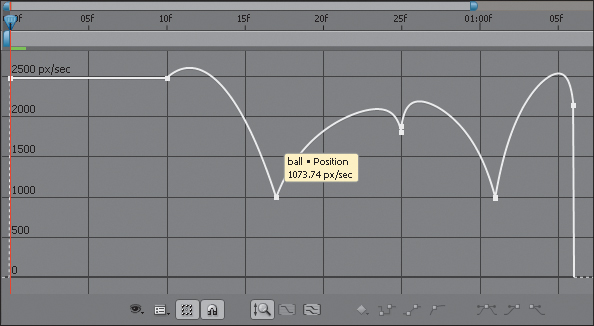
Figure 2.14. A Reference graph as in Figure 2.13 can be overkill, cluttering the view if more than one property is active. The Speed graph shows rates of transition; in this case, each bounce of the ball is an abrupt shift in speed.
Show Graph Tool Tips is worth leaving on most of the time; values are displayed for any curve under the mouse, whether or not a keyframe occurs at that point in time.
At the bottom of the Graph Options menu is the Allow Keyframes Between Frames toggle. With this off, keyframes that you drag snap to precise frame values (as you would expect); turn it on and you can drag a keyframe to any point in time, should you need a keyframe to occur between frames. For example, you might want the moment when the ball hits not to be visible to match timing from a live shot. When you scale a set of keyframes using the Transform Box, keyframes will often fall in between frames whether or not this option is enabled.
The Transform Box
The Transform Box lets you edit keyframe values in all kinds of wacky ways. Toggle on Show Transform Box and select more than one keyframe, and a white box with vertices surrounds the selected frames. Drag the handle at the right side left or right to speed or slow the entire animation, respectively, while the relative timing remains the same. Just as with mask transforms—covered in Chapter 3—dragging inside the box translates a set of keyframes, dragging the corners scales values. Additionally
Take note of the second set of “Show” options – layer In/Out points, audio waveforms, layer markers and expressions, all features of the Layer view (most of them described in this chapter) can also be displayed in the Graph Editor to help avoid excessive toggling.
• To offset the center of the Transform Box and thus the scale pivot, first drag the anchor to the desired pivot point, then (this is the important extra point) Ctrl-drag/Cmd-drag.
• To reverse keyframes, drag left/right beyond the opposite edge of the box (or simply context-click and choose Keyframe Assistant > Time-Reverse Keyframes).
The Snap button causes any keyframe you drag to snap to virtually any other visible marker in the Graph Editor, but it does not snap to whole frame values with Allow Keyframes Between Frames enabled.
• To scale the box proportionally, Shift-drag on a corner. To taper values at one end, Ctrl+Alt-drag (Cmd+ Option-drag) on a corner (Figure 2.15). To move one side of the box up or down, Ctrl+Alt+ Shift-drag (Cmd+Option+Shift-drag) on a corner. You can even skew the contents of the box by Alt-dragging (Option-dragging) on a corner handle.

Figure 2.15. The Transform Box makes it possible to scale values proportionally. By Ctrl+Alt-dragging (Cmd+Option-dragging) on a corner, you can taper or expand values at one end of the selection area.
Temporal Data and Eases
By default, After Effects offers linear temporal transitions between keyframes; a property proceeds from keyframe A to keyframe B at a steady rate, then from keyframe B to keyframe C at a separate but still steady rate, with an abrupt change of pace.
After Effects includes a Flop, as well as a Flip and a Flip + Flop in Animation Presets > Image – Utilities (search on any of these in the Effects & Presets panel). To “flop” a shot means to invert it horizontally, on the Y axis (a “flip” occurs on the X axis). The preset employs the Transform effect, which unfortunately is not compatible with 32 bpc mode; you can instead toggle Constrain Proportions for Scale and add a minus sign beside the X value (Figure 2.16).

Figure 2.16. To flop a shot, be sure to uncheck Constrain Proportions before setting the X value to –100%.
Experienced animators, anthropologists and economists alike recognize how rarely anything in nature proceeds in a linear fashion; natural motion is mostly arcs and curves. Think of a camera push: with a real camera operator moving that camera, a push starts and stops gently due to inertia and the human body, gradually moving at a more or less steady rate only at the middle of the transition. Thus the Easy Ease feature is your friend.
Spatial interpretations, however, do not default to linear unless you enable Default Spatial Interpretation to Linear in Preferences > General. By default, a Bézier shape eases spatial transitions.
Easy Ease
Part of After Effects since around the time rapper Easy E was laid to rest (coincidence? Only a handful of guys named Dave know the truth), Easy Ease keyframe assistants ease transitions as follows:
• Context-click a keyframe and choose one of the Easy Ease options under the Keyframe Assistant submenu.
• Use keyboard shortcuts: F9 applies Bézier interpolation, creating eases in and out of a keyframe, while Shift+F9 creates an ease into the keyframe only, and Ctrl+Shift+F9 (Cmd+Shift+F9) creates an ease out, maintaining a linear transition in.
• Click one of the Easy Ease buttons at the lower right of the Graph Editor (the ones that depict s-curved graph lines leading in and out of vertices).
Mac users beware: The F9 key is used by the system for the Exposé feature, revealing all open panels in all applications. You can change or disable this feature in System Preferences > Dashboard & Exposé.
For a camera push, you might add eases to the first and final frames, perhaps also adding intermediate keyframes with eases (disrupting the move to make it feel even more human and organic).
Figures 2.17a and b show the difference between a default linear camera push and one to which eases have been applied. The keyframes change from linear to Bézier type, and rate of motion is described by a curve instead of a straight line.

Figures 2.17a and b. With no eases, the Speed graph for Position is flat, moving at a steady rate (a). Add eases (b), and it arcs from 0 (at the beginning and end of the move) to a higher value at the center peak of the ease.
You can (and often should) freely customize an ease using the Graph Editor. Select any keyframe and yellow Bézier handles extend to its left and right. To increase an ease, drag the yellow handle away from the keyframe; or inward toward the keyframe to reduce it. You don’t even need Easy Ease.
Holds
A Hold keyframe prevents any change to a value until the next keyframe. Set it as follows:
• Context-click on the keyframe and choose Toggle Hold Keyframe.
• Use the shortcut Ctrl+Alt+H (Cmd+Shift+H).
• Choose the Hold button below the Graph Editor (the one with the graph lines all at right angles).
Hold keyframes solve problems any time you see unwanted in-between information creep into an animation; beware of this particularly with spatial animations, which can drift or even loop without holds.
In Layer Bar mode a hold is indicated by the square appearance on one or both sides of the keyframe. In the Graph Editor it appears as a flat horizontal line to the right of a keyframe.
To reposition a layer over time with no in-betweening whatsoever, begin by setting the first frame as a Hold keyframe; all keyframes that follow it in time will be Hold keyframes, signaled by their completely square appearance in layer bar mode or a series of right angles in the Graph Editor (Figures 2.18a and b). The result is that the property transitions instantly to the next held value, so for example, if you want to animate a layer’s visibility on and off, set Opacity with Hold keyframes to 0% and 100%.
Figures 2.18a and b. A series of Bézier keyframes have been converted to Hold keyframes, evident by the square shape at the right of each keyframe in the Layer Bar view (a) and right angles in the Graph Editor (b).
Spatial Data and Curves
When you are called upon to create a complex animation, the After Effects interface is up to it. I can’t teach you to be a great animator, but I can focus on what you need to know to keyframe effectively and to avoid common pitfalls.
A closer look at the simple bouncing ball reveals a lot about animating spatial and temporal keyframes data (Figures 2.19 to 2.22). If this is new material and you are willing, try re-creating it yourself, as it reveals most of the fundamentals of expressing motion with keyframe animation.

Figures 2.19a and b. Under Preferences > General (Ctrl+Alt+; or Cmd+Option+;), Default Spatial Interpolation to Linear is off by default (a), producing this result (b) with three or more position keys.

Figure 2.20. Click the check box for Default Spatial Interpolation to Linear, restart After Effects for the preference to take effect, and the result is three keyframes that are linear in both time and position.

Figure 2.21. Hold down the Ctrl/Cmd key while clicking a spatial keyframe to activate its Bézier handles, then Ctrl/Cmd-click on one of the handles to “break” them. This enables you to form the V-shaped bounce shown here.

Figure 2.22. The Speed Curve below corresponds to the motion curve above, but it is showing completely different data and could have a very different shape without changing the motion. An ease has been applied to the final frame with the F9 key; eases reduce speed to 0. The middle frame has the most abrupt shift of motion, for the bounce—it’s the opposite of an ease.
In the (possibly likely) case that the need for a bouncing ball animation never comes up, what does this example show you? Let’s recap:
• You can control a motion path in the Composition viewer, using Bézier tools and the Pen tool (described in detail in the next chapter).
• Realistic motion often requires that you shape the motion path Béziers and add temporal eases; the two actions are performed independently on any given keyframe, and in two different places (in the viewer and Timeline).
Animation can get a little trickier in 3D, but the same basic rules apply (see Chapter 9, “The Camera and Optics,” for more).
Three preset keyframe transition types are available, each with a shortcut at the bottom of the Graph Editor: Hold, Linear, and Automatic Bezier. Adjust the handles or apply Easy Ease and the preset becomes a custom Bezier Shape.
Sometimes an animation must follow an exact path, hitting precise points, but progress steadily, with no variation in the rate of travel. This is the situation for which Roving keyframes were devised. Figure 2.23 shows a before and after view of the application of a roving keyframe to the animation in Figure 2.22; the path of the animation is identical, but the keyframes are now evenly spaced.
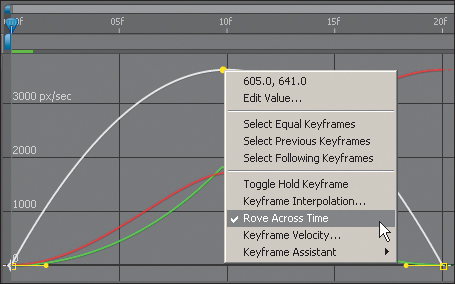
Figure 2.23. The middle keyframe is set to rove and thus is now positioned in between frames; the arc of its motion is now even in and out of the keyframe.
Copy and Paste Animations
There’s more to copying and pasting keyframe data than you might think. If you ever want to see exactly how it is organized, try copying a set of keyframes and pasting the data into an Excel spreadsheet. This is also a great way to reformat keyframe data copied from other applications such as Shake or Maya.
Copy keyframes from a particular property, then paste them with another layer selected, and they are automatically pasted to that layer’s corresponding property, but always beginning at the current time; thus it’s easy to relocate keyframes to another point in time, whether or not that’s your intention.
If that target property doesn’t exist, because it’s part of an effect applied only to the source layer, After Effects adds the effect as well as the keyframes, just as you might expect.
Enable a small lock icon that appears on the Effect Controls tab, and that effect remains visible even when you select a different layer. (This toggle also resides on the Composition and Layer tabs; its full use is described in Chapter 4.)
Copy keyframes from a particular property and select a property with similar parameters; the animation data transfers to the new property, often very useful as long as you know it’s happening. For example, apply a 2D Position keyframe to the Flare Center position of a Lens Flare effect by selecting the Flare Center property in the Timeline prior to pasting and the keyframes go to that property instead of Position.
That all means that you should pay attention to which item is currently selected when copying or pasting. Figure 2.24 shows how easy it can be to miss that the Effect Controls panel is forward and has an effect highlighted, so that effect is copied, not the entire layer.

Figure 2.24. It’s possible to have a different item selected in each panel, yet only one is the active item. If you were to press Delete in this case, the effect would be deleted because the Effect Controls panel is active.
If the result of a copy and paste ever seems strange, just undo and try again, carefully selecting exactly the thing you want to copy.
Layer vs. Graph
To summarize the distinction between Layer and Graph Editor views, in Layer view you can
• Block in keyframes with respect to the overall composition
• Establish broad timing (where Linear, Easy Ease, and Auto-Bezier keyframes are sufficient)
Ctrl/Cmd-click on a keyframe to reset its Temporal Interpretation to linear. Alt+Ctrl+K/Opt+Cmd+K opens the Keyframe Interpolation dialog where you can choose any Temporal or Spatial interpolation, or set a keyframe to rove.
The Graph Editor is essential to
• Refine an individual animation curve
• Compare spatial and temporal data
• Scale animation data, especially around a specific pivot point
• Perform extremely specific timing (for example, a keyframe is needed between frames)
• Adjust keyframe values not at the current time (difficult in the layer view)
With either view you can
• Edit expressions
• Change keyframe type (Linear, Hold, Ease in, and so on)
• Make editorial/compositing decisions regarding layers (start/stop/duration, split layers, order—possible in both, easier in Layer view)
By no means, then, does the Graph Editor obviate use of the Layer view, where the majority of compositing and simple animation is typically accomplished.
Über-duper
More than anything, knowing shortcuts makes you a rapid-fire animator. This section is not only about the überkey, which is among the most useful shortcuts in all of After Effects, but also about taking control of keyframe data in general.
The überkey is available in two delicious flavors: U and UU. In the same 02_graphEditor.aep project, highlight the ball layer, and press a single U. All properties with keyframes (Position and Scale in this case) are revealed. Press U again to toggle, and they are concealed. When arriving cold at an animation you’ve never seen, or returning to one of your own, this is how you immediately find out where the keyframes are.
The “überkey” plays of off Friedrich Nietzsche’s übermensch—a man more powerful and important than others. It’s one shortcut to rule them all.
But wait, there’s more. Now highlight the bg layer, which contains no keyframes whatsoever, and press UU (two Us in quick succession). All of the properties set to any value other than their default—including those with keyframes (none in this case)—are revealed.
To reveal only applied effects on a selected layer, use the E key. Or, if the überkey reveals effects and transforms and you want only the transforms, Shift+E toggles off revealed effects.
The U shortcut is a quick way to find keyframes to edit or to locate a keyframe that you suspect is hiding somewhere. But UU—now that is a full-on problem-solving tool all to itself. It allows you to quickly investigate what has been edited on a given layer, is helpful when troubleshooting your own layer settings, and is nearly priceless when investigating an unfamiliar project. Highlight all of the layers in your comp, press UU, and you have before you all of the edits that have been made to all of the layer properties.
What, if anything, is beyond the reach of the UU shortcut when analyzing a comp?
• Contents of nested compositions, which must be opened (Alt/Option-double-click) and analyzed individually
• Locked layers
• Shy layers remain hidden if the Shy toggle is on
• Settings not related to properties, such as Blending Modes and Motion Blur
Dissect a Project
If you’ve been handed an unfamiliar project and need to make sense of it quickly, there are a couple of other tools to help you.
The Flowchart view offers a broad overview of the project’s structure; it is enabled with the right-most button along the bottom of the Composition panel, via Window > Flowchart or using Ctrl+F11/Cmd+F11. You have to see it to believe it: a nodal interface in After Effects (Figure 2.25), perhaps the least nodal of any of the major compositing applications.

Figure 2.25. Although After Effects is a layer-based application, the underlying logic of compositing and the flow of images and effects is clearly displayed in Flowchart. Interaction here is limited—there is no way to change the pipeline order or add nodes directly.
This view shows how objects (layers, compositions, and effects) are used, and in what relationship to one another. The + button above a composition reveals its components; for the cleanest view, toggle layers and effects off at the lower left.
![]() Close-Up: Nerd-based Compositing
Close-Up: Nerd-based Compositing
How exactly is the node view in After Effects more limited than what you’d find in a node-based compositor? Essentially, you can’t make creative decisions there; it’s useful for project analysis only, offering some insight into the order in which items render. It’s also less “atomic”: Properties and effects are grouped directly with layers instead of being listed as their own nodes, because their render order cannot be freely reconfigured as it can with nodes.
To investigate a project, start with the end composition and work your way backward; open any comp by double-clicking it in the Flowchart. Turn off the Shy toggle at the top if it’s on, highlight all of the layers (Ctrl+A/Cmd+A), and press UU to reveal all altered properties. Now preview the composition, stopping at any frame where you have questions and investigating which settings and animations apply to that point in time. If you find a nested composition, open it (Alt/Option-double-click) and investigate. With some patience, you can make sense of even the most complicated project, one step at a time.
In the panel menu you can choose your view; Left to Right fits well on a typical monitor. Whether you choose straight or curved connecting lines is up to you, but you can clean up the view by clicking this toggle holding the Alt/Option key.
Keyframe Navigation and Selection
Although no shortcut can hold a candle to the überkey, there are several other useful Timeline shortcuts:
• J and K keys navigate backward and forward, respectively, through all visible keyframes (and layer markers, and Work Area boundaries).
• To select all keyframes for a property, highlight that property’s name in the Timeline. To delete any keyframes not visible in the Timeline (those occurring before or after the comp), select all, then Shift-drag a rectangular selection around the ones you want to keep (the visible ones). Now delete.
• Context-click on a keyframe to Select Previous Keyframes or Select Following Keyframes. There is even an option to Select Equal Keyframes (those with an identical value).
J and K hit all revealed keyframes, so to navigate one property only, click the arrows that appear under A/V Features (the Keys column). Or reveal only the keyframes in that channel; J and K will ignore the rest.
• Alt/Option+Shift+the shortcut corresponding to a transform property (P, A, S, R, or T) sets the first keyframe, no need to click anywhere.
• Any stopwatch in the Effect Controls sets the first keyframe for an effect property at the current frame. However, if keyframes are already set, clicking the stopwatch deletes them.
• To add a keyframe without changing any value, context-click on the stopwatch in Effect Controls and choose Add Keyframe.
Read on; you are not a keyframe Jedi—yet.
Keyframe Offsets
To offset the values of multiple keyframes by the same amount in Layer view, select them all, make certain that the Current Time Indicator is resting on a frame with one of the selected keyframes, and drag text to offset. If instead, you edit one of these by typing in a new value, all keyframes will be set to that value—not, in most cases, what you want. The Graph Editor makes it easier to see what’s happening.
Multi-selection works differently with keyframes in the Layer Bar view than anywhere else in the application. To add or subtract a single frame from a selected group, Shift-click. Ctrl/Cmd-clicking on keyframes converts them to Auto-Bezier mode. This is not the case in the Graph Editor view.
Other tips for working with multiple keyframes include
• Nudge selected keyframes (one or many) forward or backward in time using Alt+Right/Left Arrow (Option+Right/Left Arrow), respectively.
• Deselect keyframes only using Shift+F2. Select all visible keyframes (without selecting their layers) using Ctrl+Alt+A (Cmd+Option+A).
Ctrl+Alt+A/Cmd+Option+A selects all visible keyframes while leaving the source layers, making it easy to delete them when, say, duplicating a layer but changing its animation.
Spatial Offsets
The two most common ways to offset a transform animation—to edit its position, rotation, or scale from a point other than its center—are intuitive, easy to use, and well documented. In an individual layer, move the anchor point from the center to a specific point in the frame, typically using the Pan Behind tool (keyboard shortcut: Y). Details are in the “Anchor Point” section.
The transform box in the Graph Editor offers an easy method for scaling keyframes temporally, but in Layer view you can instead select a set of keyframes, Alt-drag (Option-drag) on a keyframe at either end of the set, and the entire set is scaled proportionally in time (with the opposite end of the selected set acting as the stationary anchor).
Alternatively, you can center several layers around the center point of a single layer by parenting them to that layer. The children take on all of the transforms of the parent layer (except Opacity, which, remember, isn’t a real transform) plus whatever offsets they already have.
After Effects is generally designed to preserve the appearance of the composition when you are merely setting up animation, toggling 3D on, and so forth. Therefore editing an anchor point position with the Pan Behind tool triggers the inverse offset to the Position property. Parent a layer to another layer and the child layer maintains its position until you further animate either of them.
Edit anchor points or set up a parent-child relationship before animating, if at all possible, to avoid offsetting keyframes and messing up the whole animation.
That’s all clear enough. But reset an offset anchor point in the middle of a Position animation, and the Position keyframe at that point in time changes. Or undo parenting at a frame other than the one where you set it, and its Position value changes so that it appears to remain in the same place. I have used this to my advantage for 3D setup; I start with the camera at or near its default, toggle the layer to 3D and parent it to the camera, move the camera to some crazy faraway position where the layer is to appear and un-parent the layer.
To adjust an anchor point or undo parenting without the automatic compensation from the application, hold down the Alt (Option) key as you make the change.
Anchor Point
The most straightforward method to edit an anchor point in the Composition panel is to use the Pan Behind tool (Y); doing so offsets Position to maintain current appearance. For a similar result, you can edit anchor point values in the Timeline, but Position data is unaffected.
It can be difficult to edit animated anchor point data in the Composition viewer. Instead, activate the Layer viewer and change the View pull-down menu from Masks to Anchor Point Path (Figure 2.26).

Figure 2.26. Masks, not Anchor Point Path, is the default Layer display mode. Change it as needed using this menu at the bottom of the Layer panel. Note that the bouncing ball examples included in 02_graphEditor.aep feature an offset (but not animated) anchor point, allowing squash and stretch animation to occur around the point of contact (at the base of the ball).
The 02_graphEditor.aep project used for the bouncing ball animation earlier in this chapter includes an anchor point offset to the base of the ball; this allows the scaling involved for squash and stretch in the bounce to occur around the point of contact.
Parent Hierarchy
A parent-child relationship is set up by choosing the target parent layer from the child’s pull-down menu in the Parent column of the Timeline, or by dragging the pickwhip adjacent to that menu to the target parent layer.
Parenting “sticks” even when you change layer order or duplicate or rename the parent. You can select all of the children of a parent layer by context-clicking it and choosing Select Children. To remove parenting from all selected layers, choose None from the pull-down menu of any one of them.
To move layers relative to a point that is not represented in any current layer, you can add a null object (for the shortcut, go to Layer > New > Null Object). Null objects are actually 100 × 100 pixel layers that do not render. They possess all of the normal transform controls and can contain effects (and Masks for that matter, which are completely useless in null objects). Contained effects can be used by expressions as reference for other settings; more on this in Chapter 10, “Expressions.”
If you’ve ever worked with 3D animation, you are probably already aware how usefully parenting solves all kinds of animation puzzles, even just during setup. For example, you can array layers in a circle by parenting one layer, rotating the parent, parenting the next layer, rotating again, and so on.
Motion Blur
Motion blur is essential to most realistic animated shots. If a layer and/or the camera is animated at a sufficiently high velocity, and the Motion Blur toggle is enabled at the Layer and Composition levels, then, for free, realistic blur is added to match the apparent motion of the scene, using settings you control.
Motion blur is the natural result of movement that occurs while a camera shutter is open, causing the image to smear. This can be the result of moving objects, or of movement of the camera itself. Far from something to avoid, however, motion blur not only can be aesthetically quite beautiful, it also helps create persistence of vision, the means by which the eye detects motion, and thus it is often more natural relaxing to the eye.
You might not notice motion blur with your naked eye, but it does occur—watch a ceiling fan in motion, and then follow the individual blades with your eye; depending on how closely you can follow its movement, you will see more or less blur.
All of this helps explain why efforts to eliminate motion blur from a sampled image have tended to seem faddish and strange, although new cameras, from high-speed live-event HDTV to the Red camera, are capable of almost eliminating it. Who knows, along with grain, motion blur may become more of an arbitrary artistic choice as viewers adapt to 21st century electronic imaging.
After Effects offers control over how long and precisely when the camera shutter is open, via the Composition Settings dialog’s Advanced tab (Figure 2.27). This latest version of After Effects offers major improvement to the quality and default effectiveness of motion blur.

Figure 2.27. The Shutter Angle and Shutter Phase settings on the Advanced tab of the Composition Settings dialog control the appearance of motion blur.
Shutter Angle controls how long the shutter is open; a higher number (up to a maximum of 720) means more blur. Shutter Phase controls at what point, during a given frame, the shutter opens. The new Samples Per Frame and Adaptive Sample Limit settings permit you to refine the look of the blur, to make it appear smoother and less “steppy” (at the expense of extra process cycles naturally), as in Figure 2.28.

Figure 2.28. By raising Samples per Frame from the default shown in Figure 2.27, you can finally avoid steppy motion blur when creating fast motion in After Effects. This setting determines the minimum number of samples; Adaptive Sample Limit determines the maximum.
![]() Close-Up: The Virtual Camera Shutter
Close-Up: The Virtual Camera Shutter
Using a real, physical camera, the shutter setting (along with the aperture) determines the amount of light passed onto the film or video pickup. Low-lit scenes are blurrier because the shutter remains open longer, allowing it to gather more light. Other scenes will be deliberately taken with a slow shutter (and the aperture closed down) to produce, streaky, smeary blur, which, if taken with a high-quality video pickup or film, can look quite lovely.
Unlike an actual camera, After Effects is unconcerned with the need to gather light, and it does not produce (or even emulate) any other lens effects associated with a high or low shutter angle setting (nor the Aperture setting on a 3D camera, explored in Chapter 9). Therefore, by opening the aperture, you mimic only the desirable part—the blur itself.
What the Settings Mean
A physical film camera employs an angled mechanical shutter that opens in a circular motion anywhere between a few degrees and a full 360 degrees (an electronic shutter behaves differently, but never mind about that—it’s the metaphor that’s important here). Theoretically, 360 degrees provides the maximum open aperture, and thus the greatest amount of blur a shot would contain; After Effects doubles this ceiling for cases where you simply want more.
A camera report can help determine this setting, although you can typically eyeball it by zooming in on an area where background and foreground elements should be blurred with the same motion and matching them (Figures 2.29a and b). If your camera report includes shutter speed, you can calculate the Shutter Angle setting using the following formula:
shutter speed = 1 / frame rate * (360 / shutter angle)

Figures 2.29a and b. In 2.29a, the default Shutter Angle setting of 180 degrees appears too heavy for the white solid masked and tracked over the front hubcap. In 2.29b, Shutter Angle was cut down by 50% (to 90 degrees). In this case, blur has simply been eye-matched to that of the moving truck.
This isn’t as gnarly as it looks, but if you dislike formulas, think of it like this: If your camera takes 24 frames per second, but Shutter Angle is set at 180 degrees, then the frame is exposed half the time (180/360 = ½) or ![]() of a second. If the camera report shows a
of a second. If the camera report shows a ![]() of a second exposure, Shutter Angle should be 90 degrees.
of a second exposure, Shutter Angle should be 90 degrees.
180 Shutter Angle and -90 Phase are the default settings in After Effects CS3. However, the defaults change to whatever was set most recently, saved in Preferences.
Setting Shutter Phase to -50% of Shutter Angle is useful when motion tracking and should probably be the default. When motion blur is added to the tracked layer, the track stays centered, instead of appearing offset.
Shutter Phase determines when the shutter opens.
A setting of 0 opens the shutter and starts the blur at the beginning of the frame while the default –90 setting (with a 180° Shutter Angle setting) causes half the blur to start before the frame (blurring the layer in the frame) and half to follow it.
Manipulate Time
After Effects is quite flexible when working with time. You can retime footage or mix and match speeds and timing using a variety of methods, each of which is useful for a particular set of situations.
Absolute (Not Relative) Time
After Effects measures time in absolute (not relative) terms, using seconds (rather than frames, whose timing and number changes according to how many there are per second). If time were measured using the total number of frames, or frames per second, changing the frame rate would pose a problem. Instead, at the very deepest level, After Effects is entirely flexible about frame rate.
![]() Close-Up: Motion Blur without Motion
Close-Up: Motion Blur without Motion
You get motion blur for free with any layer animated in After Effects and toggled to generate it. However, there is no built-in provision to generate motion blur for footage that contains motion but insufficient blur—a 3D element, say, or footage shot with a high shutter speed. Directional Blur can help, until you deal with footage whose directionality isn’t uniform (as is typical with natural motion). At that point, consider Reel Smart Motion Blur from RE:Vision Effects. This plug-in uses optical flow technology (for which the founders won a Technical Achievement Academy Award) to sample the motion in the scene and generate or enhance motion blur, with powerful controls to allow for transparency and sub-sampling. A demo is included on the book’s disc.
So, you can change the frame rate of any comp on the fly, and the keyframes maintain their position in actual time. The timing of an animation won’t change, only the number of frames per second used to display it (Figure 2.30).

Figure 2.30. The composition’s frame rate was altered from 29.97 fps to 24 fps after keyframes were set. All frames following the first one now fall in between the whole frames represented by the grid, but the timing of the animation itself, measured in seconds, is unchanged.
Likewise, footage (or a nested composition) whose frame rate does not match that of the current composition displays in absolute time, even if the beginning of each frame matches up only at the one-second mark.
If time was measured as frames, or frames per second, a change to the frame rate would offset keyframes. Instead, After Effects consistently evaluates time in seconds; keyframes are allowed to fall between frames if necessary to keep the overall timing consistent.
This should make sense to musicians who know how to beat 3 against 4, or other polyrhythms, creating elaborate syncopations, against the steady beat of the metronome. In After Effects, one second is one beat of that metronome.
Time Stretch
Time Stretch lets you alter the duration (or speed) of a source clip; provided you don’t need to animate the rate of change (in which case only Time Remap will do).
The third of the three icons at the lower left of the Timeline reveals the In/Out/Duration/Stretch columns (Figure 2.31).
Figure 2.31. The highlighted icon reveals and conceals Time Stretch settings.
You can
• Edit the In or Out point: Ctrl+Shift+comma (Cmd+Shift+comma) stretches the In point to the current frame, Ctrl+Alt+comma (Cmd+Option+comma) stretches the Out point to the current time
• Change the duration of the layer
• Alter the stretch value from 100%
Alternatively, specify these settings in the Time Stretch dialog, activated by clicking the Duration or Stretch value, or choose Layer > Time > Time Stretch (Figure 2.32).

Figure 2.32. You can set an alternate Duration or Stretch Factor in the Time Stretch dialog. It’s easy to miss that you can specify the pivot point: In point, Out point, or current time.
Stretching a layer does not “stretch” the timing of any applied keyframes; you can use the Graph Editor to stretch keyframes to match, or precompose the layer with its keyframes prior to Time Stretch to guarantee that the animation lines up.
Frame Blending
The noticeable side effect of lengthening or shortening a source clip is that motion becomes choppier as frames repeat (or skip). Unless the stretch value factors evenly into 100% (say, 50% or 200%), the repeating or skipping occurs in irregular increments, typically causing a distracting lurching motion.
Enable Frame Blending for the layer and the composition, and After Effects averages the adjacent frames together to create a new image on frames that fall in between the source frames.
Frame blending is available not only on layers with time stretching but with any footage that comes in at a frame rate other than that of the composition.
There are two basic modes for Frame Blending. Frame Mix mode overlays adjoining frames, essentially blurring them together. Pixel Motion mode uses optical flow techniques to track the motion of actual pixels from frame to frame, creating new frames that are something like a morph of the adjoining frames. Confusingly, the icons for these modes are the same as Draft and Best layer quality, respectively, yet there are cases where Frame Mix may be preferable.
The optical flow in Pixel Motion and the Timewarp effect was licensed from The Foundry. The same underlying technology is also used in Furnace plug-ins for Shake, Flame, and Nuke.
Figure 2.33 shows where the mode is located. Whether the result is acceptable depends on a few predictable criteria. It may appear too blurry, too distorted, or contain too many noticeable frame artifacts, in which case either Frame Mix is preferable, or the Timewarp effect, because it offers control over how the frame blend happens, explained in detail below.

Figure 2.33. These toggles enable Frame Mix or Pixel Motion mode for a retimed layer.
Time Reversal and Freeze Frame
A layer’s timing can be reversed with a simple shortcut: Highlight the layer, and press Ctrl+Alt+R (Cmd+Option+R) or choose Layer > Time > Time-Reverse Layer to set the Stretch value to –100%. The layer’s appearance alters to remind you that it is reversed (Figure 2.34).

Figure 2.34. The candy striping along the bottom of the layer indicates that the Stretch value is negative and the footage will run in reverse.
The Layer > Time > Freeze Frame command applies the Time Remap effect and sets a Hold keyframe at the current time.
Time Stretch and Nested Compositions
If you apply Time Stretch (or Time Remap) to a nested composition, the nested comp behaves as if it now has the main composition’s frame rate. Keyframe animations are resliced to fit the new rate instead of adhering to the old one.
You can instead force After Effects to use the frame rate of the embedded composition. On the Advanced tab of the Composition Settings panel of the nested comp, toggle Preserve Frame Rate When Nested or in Render Queue (Figure 2.35). This forces After Effects to use only whole frame increments in the underlying composition, just as if it were imported footage with that frame rate.

Figure 2.35. If you need a subcomposition to run at a different rate than the master composition, checking the highlighted box in the subcomp prevents After Effects from resampling keyframes at the master comp’s rate.
An alternative method to force a given layer to a particular frame rate, whether or not it is a nested composition, is to apply Effect > Time > Posterize Time, entering the desired rate (any value lower than the source rate).
Time Remap
However, once you’re comfortable with Time Remap, you may find that you let go of the Time Stretch feature set altogether. The philosophy behind Time Remap is elusively simple: Time has a value, just like any other property, so you can keyframe it, ease in and out of it, loop and ping-pong it, and generally treat it like any other animation data.
The final Time Remap keyframe is one greater than the total timing of the layer (in most cases a nonexistent frame) to guarantee that the final source frame is reached, even when frame rates don’t match.
Figures 2.36a, b, and c show sample timelines that contain typical uses for Time Remap. You needn’t go completely nuts rolling footage back and forth, ramping the frame rate up and down, although you can of course do just that. From The Matrix to 300, it’s noticeable how accustomed audiences have become to fluid, stylized timing treatments over the past decade or so.

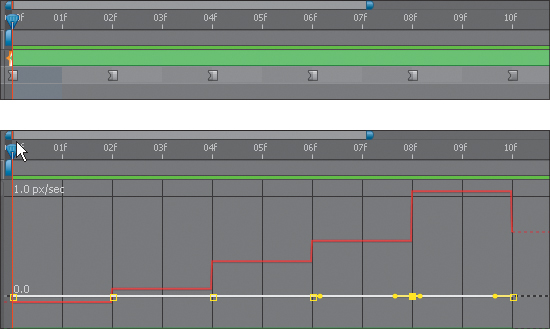
Figures 2.36a, b, and c. Simple, everyday things you can do with Time Remap, shown with reference curves: speed up the source with eases (a), progress through a series of stills selected from the moving clip using Hold keyframes (b), and loop the source using a simple expression (c).
You can set Time Remap by selecting it under the Layer menu or using the shortcut (Ctrl+Alt+T/Cmd+Option+T). This reveals two keyframes, at the beginning and one frame beyond the end of the layer. Time remapped layers have a theoretically infinite duration, so the final Time Remap frame effectively becomes a hold keyframe for the remaining layer duration.
Time Remap can take a little while to understand in complex situations, but it is useful in a more daily way for retimes with eases, holds, time loops (discussed in Chapter 10), or time reversal. Once you’ve done a few of these, the more complicated stuff becomes easier.
Beware when applying Time Remap to a layer whose duration exceeds that of the composition; either default keyframe may be hidden beyond the Timeline boundaries. You can add keyframes at the layer in and out points, click Time Remap to highlight all keyframes, deselect the added ones, and delete the rest.
Timewarp
Although The Foundry’s amazing Furnace plug-ins are not, at this writing, available for After Effects, Adobe did license one component of Furnace: Kronos, the retiming tool. It’s the technology in Pixel Motion, and the Timewarp effect offers actual control over the way that Pixel Motion works with footage.
Timewarp can be used to speed up, slow down, or (like Time Remapping) dynamically animate the timing of a clip. When you speed up a clip with Timewarp, it can add the appropriate amount of motion blur (if so enabled under the Motion Blur settings of the effect).
To reverse a clip via Time Remap, highlight all keyframes by clicking on the Time Remap property name. Next, context-click one of the highlighted keyframes, and select Keyframe Assistant > Time-Reverse Keyframes.
Most of the time, however, Timewarp is used to slow footage down, creating new in-between frames, and to do this, a particular extra bit of setup is required. By default, Timewarp is set with a speed of 50.00, or 50% (half) of the original speed. Apply it directly to a footage layer and you’ll find that the layer ends halfway through the retime operation. There’s no way to extend the length of the original footage layer unless you either precompose it into a longer composition or enable Time Remapping. Leave the Time Remap keyframes at their defaults, as they are overridden by Timewarp’s Speed or Source Frame property. You determine which of these two criteria to animate in Timewarp with the Adjust Time By setting.
Like Pixel Motion mode, Timewarp employs optical flow, tracking individual pixels via a matrix of vectors. There’s no option to see or control those vectors directly, but you can influence how footage is analyzed as follows:
• The biggest improvement you can make to the result is to give Timewarp a mask specifying a given layer of movement. Figure 2.37a shows a typical case where this is helpful. Specify which portions of the footage are sampled using the Matte Channel, Matte Layer, and Source Crops options.

Figures 2.37a and 2.37b. In this shot, the camera viewpoint revolves around the subject (a), and Timewarp has no way of distinguishing foreground and background elements, so they tend to tear. You can help guarantee success by providing a traveling foreground matte (b).
By default, Timewarp uses Pixel Motion as the Method setting, and it’s hard to imagine changing this setting other than to temporarily compare what is happening with the source (Whole Frames) or a simple blend without optical flow (Frame Mix).
• The Warp Layer control sets another layer as a target for the Timewarp operation. This is vital when you are working footage that would be difficult for Timewarp to analyze without first adjusting its contrast or luminance, or keying it, but those adjustments don’t belong in the final shot.
• The Tuning section contains controls to specify how many vectors Timewarp uses (Vector Detail) and how much smoothing to add (Global and Local Smoothing, Iterations), as well as Filtering, Error Threshold, and Block Size settings. It’s incorrect to assume that the best result will always come from raising Vector Detail, Smoothing, and Filtering, although in many cases it will help, even though it may slow image processing considerably.
Image tearing and pixel artifacts are the most common problems when using Timewarp. To solve these, specify a matte if at all possible. Next, you can increase Filtering from Normal to Extreme (although, even if Extreme helps, you may want to leave Filtering on Normal until it’s time to render, as Extreme will slow things down considerably). You can even increase the amount of smoothing on the Global (all vectors) and Local (single vector) level.
Timewarp isn’t the only optical flow option for After Effects users; before it ever existed, there was Twixtor from RE:Vision Effects, which may very well yield preferable results more easily. To explore whether this is the case with a given shot, try the demo version, available on this book’s disc.
Increasing Error Threshold from the default of 1.00 results in fewer motion vectors and more blending, so it will also help with image tearing. However, a scene with heavy grain or other high-frequency detail will actually be improved by lowering this setting so that it is ignored.
Finally, you can increase Vector Details right up to the maximum setting of 100 and reduce Block Size from the default of 6.0, but this can be inadvisable when analyzing fast motion, where the vectors will not be spread across a wide enough matrix to track it.
Just like color keying (Chapter 6, “Color Keying”) successful retiming with optical flow requires that you learn to balance an interdependent set of adjustments, and to give the effect what it needs, source-wise, to maximize the possibility of success. And just as with keying, there is a third-party plug-in alternative that some users may prefer (see tip on this page).
In Conclusion
The elegance and logic of the After Effects Timeline is not always evident to the new user, but this chapter taught you that shortcuts and other workflow enhancements help streamline what might otherwise be tedious or exacting edits. The Timeline and Graph Editor, once mastered, give you the control you need over the timing and placement of elements.
If this chapter’s information seems overwhelming on first read, keep coming back to it so that specific tips can sink in once you’ve encountered the right context to use them.