
Chapter 14. Pyrotechnics: Heat, Fire, Explosions

My nature is to be on set, blowing things up.
–Ken Ralston (winner of five Academy Awards for visual effects)
A significant number of people first became interested in visual effects work simply because they are borderline pyromaniacs or gun nuts. You have to follow your passion in life, after all. Creating conflagration on the computer doesn’t qualify for the same type of fun as blowing stuff up, but keeping these people busy either way may be better than letting them loose on society at large.
These effects have traditionally been created live on set or via practical elements such as miniatures. The craft of the on-set pyrotechnician is not obsolete by any means, but these days there are many, many cases (particularly the smaller, more common ones) in which compositing can save a lot of time and expense at the shoot, no matter the budget of the production. Blowing stuff up on set is fun, but it involves extensive setup and a not insubstantial amount of danger to the cast and crew. Second chances don’t come cheap.
On the other hand, there’s often no substitute for the physics of live-action mayhem. I hope it doesn’t come as a disappointment to learn that not everything pyrotechnical can be accomplished start to finish in After Effects. Some effects require actual footage of physical or fabricated elements being shot at or blown up, and good reference of such events is immensely beneficial. The truth is that practical elements often rely on After Effects to look good, but the opposite, that you rely on those elements to succeed in After Effects, is equally true if not more so.
Firearms
Blanks are dangerous, and real guns deadly. To create a shot with realistic gunfire safely requires
• A realistic-looking gun prop in the scene
• Some method to mime or generate firing action on set
• The addition of a muzzle flash, smoke, cartridge, or shell discharge (where appropriate)
• The matching shot showing the result of gunfire: debris, bullet hits, even blood
In the period since the most recent edition of this book, the definitive text on this topic has appeared. The DV Rebel’s Guide has been mentioned a couple of times already in this book, but its author’s status in the After Effects community combined with the bullet-hole-riddled cover should be a clue that this is prime territory for Stu. Included on that book’s disc are a couple of nifty After Effects tools, to create muzzle flashes and eject shells, as well as double the amount of already generous text on the subject found inside that cover.
After Effects can help with all of these to some extent, and some of them completely, relieving you of the need for more expensive or dangerous alternatives.
The Shoot
For the purposes of this discussion it is assumed that you begin with a plate shot of an actor re-creating the action of firing a gun, and that the gun that was used on set produces nothing: no muzzle flash, no smoke, no shell. All that’s required is some miming by the actor of the recoil, or kick, which is relatively minor with small handguns, and a much bigger deal with a shotgun or fully automatic weapon.
Happily, there’s no shortage of reference, as nowhere is the Second Amendment more cherished than in movies and television. Granted, most such reference is itself staged, but remember, we’re going for cinematic reality here, so if it looks right to you, use it as reference.
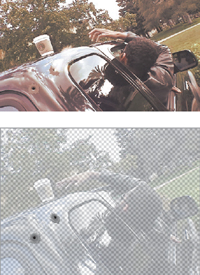
Figure 14.1 shows something like the minimum amount that needs to be composited to create a realistic shot of a gun being fired (albeit artfully executed in this case). Depending on the gun, smoke or a spent cartridge might also discharged. As important as the look of the frame is the timing; check your favorite reference carefully and you’ll find that not much, and certainly not the flash, lingers longer than a single frame.

Figure 14.1. At minimum, the firing of a gun should cause a single frame of muzzle flash and the brightening of nearby elements (including the figure holding the gun. (Image courtesy Mars Productions.)
The actual travel of the bullet out of the barrel is not generally anything to worry about; at roughly one kilometer per second, it moves too fast to see amid all the other effects, particularly the blinding muzzle flash.
Muzzle Flash and Smoke
The clearest indication that a gun has gone off is the flash of light around the muzzle, at the end of the barrel. This small, bright explosion of gunpowder actually lasts about ![]() second, short enough that when shot live it can fall between frames of film (in which case you might need to restore it in order for the action of the scene to be clear).
second, short enough that when shot live it can fall between frames of film (in which case you might need to restore it in order for the action of the scene to be clear).
A flash can be painted by hand, cloned in from a practical image, or composited from stock reference. It’s not too significant how you generate it, although muzzle flashes have in common with lens flares that they are specific to the device that created them. Someone in your audience is bound to know something about how the muzzle flash of your gun might look, so get reference: certain guns emit a characteristic shape such as a teardrop, cross or star (Figure 14.2).

Figure 14.2. The angle of the shot and the type of gun affect the muzzle flash effect. The first image is from an M16 rifle; the other is from a handgun. (Images courtesy Artbeats.)
Typically, an explosion travels in two directions from the end of the barrel: arrayed outward from the firing point and in a straight line out from the barrel. If you don’t have source that makes this shape at the correct angle, it is simplest to paint it.
The key to a good muzzle flash, and to heat and light effects throughout this chapter, is to create thresholds in the matte that feel organically real. That sounds a little bit flaky, but look at all of the explosive images in this chapter; if each was instead a solid white blob with no darker thresholds, they wouldn’t look hot at all. The greater the perception of shadow, the more powerful the impression of light. Very Zen.
Some guns, like rifles, may cause quite a bit of smoke, but many emit little or none at all. Obviously you’re better off avoiding a situation where you need to create a lot of smoke that has to interact with agitated gunplay; a little Fractal Noise smoke at a low opacity as was introduced in the previous chapter is much simpler to create than a big gray cloud in the streaming sunlight.
Shells and Interactive Light
If the gun in your scene calls for it, that extra little bit of realism can be added with a secondary animation of a shell popping off the top of a semi-automatic. Figure 14.3 shows how such an element looks being emitted from a real gun and shot with a high-speed shutter.

Figure 14.3. A shell pops off of the fired handgun. It’s discernable because it was shot with a very high shutter speed, but even so, it doesn’t stay in frame very long, and it doesn’t take much to re-create this element (or check Stu Maschwitz’s The DV Rebel’s Guide for a very cool Particle Playground-based setup to create them automatically). (Images courtesy Artbeats.)
It’s definitely cool to have a detailed-looking shell pop off of the gun, although the truth is that with a lower camera shutter speed, the element will become an unrecognizable blur anyhow, in which case all you need is a four-point mask of a white or brass colored solid. With animation and motion blur, the element only appears as a nearly subliminal element for two or three frames.
The bright flash of the muzzle may also cause a brief reflected flash on objects near the gun as well as the subject firing it. Chapter 12, “Light,” offers the basic methodology: Softly mask a highlight area, or matte the element with its own highlights, then flash it using an adjustment layer containing a Levels effect or a colored solid with a suitable blending mode.
As a general rule, the lower the ambient light and the larger the weapon, the greater the likelihood of interactive lighting. A literal “shot in the dark” would fully illuminate the face of whomever (or whatever) fired it, just for a single frame. It’s a great dramatic effect, but one that is very difficult to re-create in post. This is a rare case where firing blanks on set might be called for, unless you can fake it by dropping in a single-frame still of a bright flash on the shooter.
By contrast, or rather by reduced contrast, a daylit scene will heavily dampen the level of interactivity of the light. Instead of a white hot flash, you might more accurately have saturation of orange and yellow in the full muzzle flash element, and the interactive lighting might be minimal. This is where understanding your camera and recording medium can help you gauge the effect of a small aperture hit by a lot of light.
Hits and Squibs
Bullets that ricochet on set are known as squib hits because they typically make use of squibs, small explosives with the approximate power of a firecracker that go off during the take. Sometimes squibs are actual firecrackers.
It is possible to add bullet hits without using explosives on set, but frenetic gunplay will typically demand a mixture of on-set action and post-production enhancement.
Figure 14.4 shows a before-and-after addition of a bullet hit purely in After Effects. Here the bullet does not ricochet but is embedded directly into the solid metal of the truck. In such a case, all you need to do is to add the results of the damage on a separate layer at the frame where the bullet hits; you can paint this (it’s a few sparks). The element can then be motion tracked to marry it solidly to the background.
(Images courtesy markandmatty.com.)
Figure 14.4. This sequence of frames shows a second bullet hitting the cab of the truck, using two elements: the painted bullet hit and the spark element, whose source was shot on black and added via Screen mode.
At the frame of impact, and continuing a frame or two thereafter, a shooting spark and possibly a bit of smoke (if the target is combustible—not in the case of a steel vehicle) will convey the full violence of the bullets. As with the muzzle flash, this can vary from a single frame to a more fireworks-like shower of sparks tracked in over a few frames (Figure 14.5).

(Images courtesy markandmatty.com.)
Figure 14.5. A source spark element using Add or Screen blending mode to drop out all of the black background.
A bullet hit explosion can be created via a little miniature effects shoot, using a fire-retardant black background (a flat, black card might do it) and some firecrackers (assuming you can get them). The resulting flash, sparks, and smoke stand out against the black, allowing the element to be composited via a blending mode (such as Add or Screen), a hi-con matte (Chapter 6, “Color Keying”), or a plug-in such as Knoll UnMult. If dangerous explosives aren’t your thing, even in a controlled situation, stock footage is available. However, if debris is also part of the shot, the more that can be done practically on set, the better (Figure 14.6).
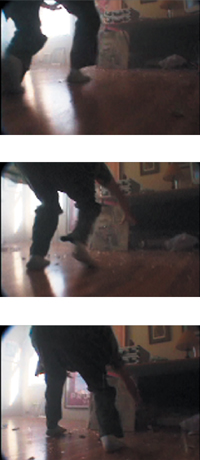
Figure 14.6. This debris, caused by a BB gun aimed at various breakaway objects and other debris hurled on set, would be somewhere between painful and impossible to create purely in post. (Images courtesy The Orphanage.)
So to recap, a good bullet hit should include
• Smoke or sparks at the frame of impact, typically lasting between one and five frames
• The physical result of the bullet damage (if any) painted and tracked into the scene
• Debris in cases where the target is shatter-able or scatter-able
Later in this chapter, you’ll see how larger explosions have much in common with bullet hits, which are essentially just miniature explosions. In both cases, a bit of practical debris can be crucial to sell the shot.
Energy Effects
Other types of blasts can of course occur in a scene. Before we move on to full explosions and fire, let’s shift into the pure energy of lightning and the realm it opens up: science fiction weapons, those that appear to involve no physical matter at all.
You would think that because blasters and lightsabers and so on are more or less completely made up, they are as arbitrary a subject as, say, hamster fur simulations. However, these types of effects seem to resound deeply, and they are only one degree removed from our reality and from their real-world counterparts. There’s not a huge difference between re-creating a lightning strike or compositing a lightsaber, and the more that a made-up effect is rooted in something we recognize, the better chance it has of working as an effect while seeming original and otherworldly.
The key seems to be that we know what pure photon-driven energy looks like, and so even if your shot doesn’t involve a high-powered laser or a high-voltage electrical arc, those may make excellent reference as you go about creating it. Once again, the basic look is often a hot white (or bright) core surrounded by a luminescent glow or even a bit of distortion.
Core and Decay
A couple of effects in the Render category of the Effects menu automatically create an element with a core and a surrounding glow. For your basic blaster or lightsaber effect, you might be tempted to reach for Beam. True, a canned effect such as this surrenders artistic control for convenience, but it lays the groundwork necessary for what this section is all about by providing an element with built-in thresholding. Not only that, but in CS3 it’s now a 32 bpc effect, so the setup steps are simple.
Disclaimer: Although the author of this book and the guy who shot the footage used in this section are both ex-Lucas employees who worked on Star Wars movies (in Matt’s case) and related projects (in Mark’s case), this bears no relationship to the “official” method for creating a lightsaber at ILM, which will never be publicly divulged by any soul, living or otherwise.
1. Apply the Beam effect to a solid layer above the plate layer. Beam can be applied directly to the plate by checking Composite on Original, but working with the element in HDR requires that it be a separate layer.
2. Extend the length to 100% and match the Starting and Ending points to the ends of the stick.
3. Add some Thickness: 24 for Starting and 30 for Ending (the non-uniform settings lend an artificial impression of three-dimensionality with 3D Perspective checked on, as it is by default).
4. The basic element is there but it’s not looking too cool. Switch the Project to 32 bpc mode and toggle Blend Colors Using 1.0 Gamma on. Because Beam is now 32 bpc you need only boost the Inside and Outside Color settings into overbright range.
5. Make sure you are using the Adobe color picker (Use System Color Picker is unchecked in Preferences > General) and click the color swatch for Inside Color. Click the R value and type *4 after the value (although the math is simple in this case), then do the same for G and B values; it’s the same tone but 4 times brighter. Do the same for the Outside Color.
6. Finesse the look by manipulating the Softness and Outside Color settings in Beam and Gamma in Levels (Figure 14.7).

(Source footage courtesy markandmatty.com.)
Figure 14.7. If you remain unconvinced about the power of 32 bit per channel HDR, check out how good this effect looks even though it’s based on a simple (cheesy, really) Beam effect, its source colors boosted into overbright range.
What happens next is what gives it the cool factor, and just offhand there are several available options:
• Animate the saber being waved around and enable motion blur.
With Length in Beam set to less than 100%, you can animate the beam traveling between the Starting and Ending Points using the Time setting: this is designed as a quick way to animate a blaster shot, or power-up of the saber in this case.
• For other types of shots: add interactive lighting where needed, such as the glow on nearby faces and passing objects.
• Add bullet hits, either like those discussed earlier or your own special version of energy coursing through the target.
• Create a unique effect, without Beam, using the basic formula: a bright (or white) core layer and a darkercolored, blurred duplicate (or several), comped together using the Add blending mode and boosted with Levels or Exposure to glow.
• Add distortion around the edges using techniques shown in the following section.
The same principles apply to other related effects such as lightning. After Effects includes an Advanced Lightning effect capable of generating a nice organic element, but really selling the effect has to do with adjusting the core, decay and blend to create a powerful look. Reference images are readily available and highly useful in this case (Figure 14.8).
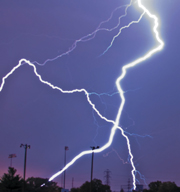
Figure 14.8. Actual reference images containing energy effects with realistic thresholding and interaction with the surrounding environment help you recreate the same look with seemingly ordinary After Effects effects. (Image courtesy of Kevin Miller via Creative Commons license.)
This effect is best for creating actual lightning; it’s called “advanced” mostly because it doesn’t automatically animate (you need to add keyframes for that). The Lightning effect doesn’t create such a nice-looking initial element but it’s a lot like a more organic version of Beam, with specific Start and End points and properties that can be adjusted and blended for a more subtle overall look.
Heat Distortion
Heat distortion, that strange rippling in the air that occurs when hot air is dissipated into cooler air, is another one of those effects compositors love. Like a lens flare, it’s a highly visible effect that, if properly motivated and adjusted, adds instant realism.
Figures 14.9a and b show the fabricated results of heat distortion in a close-up of a scene that will also incorporate fire. When your eye sees heat distortion, it understands that the environment is dynamic, even if your brain has no idea what causes the phenomenon.

Figure 14.9a and b. Heat haze by itself can look a little odd (a) but it adds significantly to the realism of a scene containing a prominent heat source (b).
What Is Actually Happening
Stare into a swimming pool, and you can see displacement caused by the bending of light as it travels through the water. Rippled waves in the water cause rippled bending of light. There are cases in which our atmosphere behaves like this as well, when ripples are caused in it by the collision of warmer and cooler air, a medium that is not quite as transparent as it seems.
As you know from basic physics, hot air rises and hot particles move faster than cool ones. Air is not a perfectly clear medium but a translucent gas that can act as a lens. This “lens” is typically static and appears flat, but the application of heat causes an abrupt mixture of fast-moving hot air particles rising into cooler ambient air. This creates ripples that have the effect of displacing and distorting what is behind the moving air, just like ripples in the pool or ripples in the windows of an old house.
Because this behavior resembles a lens effect, and because the role of air isn’t typically taken into account in a 3D render, it can be adequately modeled as a distortion overlaid on whatever sits behind the area of hot air.
How to Re-create It
The basic steps for re-creating heat distortion from an invisible source in After Effects are
1. Create a basic particle animation that simulates the movement and dissipation of hot air particles in the scene.
It can be useful to generate the particles for the displacement map itself in 3D animation software, when the distortion needs to be attached to a 3D animated object, such as a jet engine or rocket exhaust. The distortion is still best created in After Effects using that map.
2. Make two similar but unique passes of this particle animation—one to displace the background vertically, the other to displace it horizontally—and precompose them.
3. Add an adjustment layer containing the Displacement Map effect, which should be set to use the particle animation comp to create the distortion effect, and apply it to the background.
Particle Playground is practically ideal for this purpose because its default settings come close to generating exactly what you need, with the following minor adjustments:
• Under Cannon, move Position to the source in the frame where the heat haze originates (in this case, the bottom center as the entire layer will be repositioned and reused).
• Open up Barrel Radius from the default of 0.0 to the width, in pixels, of the source. Higher numbers lead to slower renders.
• Boost Particles Per Second to something like 200. The larger the Barrel Radius, the more particles needed.
• Under Gravity, set Force to 0.0 to prevent the default fountain effect.
The default color and scale of the particles is fine for this video resolution example, but you might have to adjust them as well according to your shot. A larger format (in pixels) or a bigger heat source might require bigger, softer particles.
4. Now duplicate the particles layer and set the color of the duplicated layer to pure green. As you’ll see below, the Displacement Map effect by default uses the red and green channels for horizontal and vertical displacement. The idea is to vary it so that the particles don’t overlap by changing Direction Random Spread and Velocity Random Spread from their defaults.
5. The heat animation is almost complete; it only needs some softening. Add a moderate Fast Blur (Figure 14.10).

Figure 14.10. This displacement layer, matted against gray merely for clarity, was created with the included steps and used with the Displacement Map effect to create the effect shown in Figure 14.9.
Now to put the animation to use: Drag it into the main comp, and turn off its visibility. The actual Displacement Map effect is applied either directly to the background plate or preferably to an adjustment layer sitting above all the layers that should be affected by the heat haze. Displacement Map is set by default to use the red channel for horizontal displacement and the green channel for vertical displacement; all you need to do is select the layer containing the red and green particles under the Displacement Map Layer pulldown.
Heat displacement often dissipates before it reaches the top of the frame. Making particles behave so that their lifespan ends before they reach the top of the frame is accurate, but painstaking. A simpler solution is to add a solid with a black-to-white gradient (created with the Ramp effect) as a luma matte to hold out the adjustment layer containing the displacement effect.
Fire
Within After Effects, fire synthesis (from scratch) is way too hot to handle. If fire is at all prominent in a shot, it will require elements that come from somewhere else—most likely, shot with a camera.
Creating and Using Fire Elements
Figure 14.11 shows effects plates of fire elements. The big challenge when compositing fire is that it doesn’t scale very realistically—a fireplace fire will look like it belongs in the hearth, no matter how you may attempt to scale or retime it.
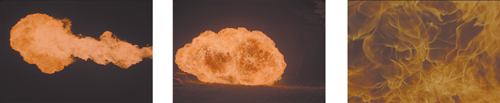
Figure 14.11. Fire elements are typically shot in negative (black) space, or occasionally in a natural setting requiring more careful matting. By adjusting Input Black in Levels, you can control the amount of glow coming off the fire as it is blended via Add mode, lending the scene interactive lighting for free. (Images courtesy Artbeats.)
Fire elements are ideally shot in negative space—against a black background, or at least, at night—so that they can be composited with blending modes and a minimum of rotoscoping. Fire illuminates its surroundings—just something to keep in mind.
This, then, is a case where it can be worth investing in proper elements shot by trained pyrotechnicians (unless that sounds like no fun, but there’s more involved with a good fire shoot than a camera rental and a blow torch). In many cases, stock footage companies, such as Artbeats (examples on the book’s disc), anticipate your needs. The scale and intensity may be more correct than what you can easily shoot on your own unless you’re pals with Mark Pauline.
All Fired Up
Blending modes and linear blending, not mattes, are the key to good looking fire composites. Given a fire element shot against black (for example, the Artbeats_RF001H_fireExcerpt.mov included on the disc and used for the depicted example), the common newbie mistake is to try to key out the black with an Extract effect, which will lead to a fight between black edges and thin fire.
A first step is to simply lay the fire layer over the background and apply Add mode. To firm up a fire (or flare, or other bright) element you can
• Ascertain that Blend Colors Using 1.0 Gamma is enabled in Project Settings.
• Apply the Knoll Unmult (this free plug-in, included on your disc makes all black areas of the image transparent).
• Fine-tune the result with a Levels effect, pushing in on Input White and Black (as well as color matching overall).
• Add an Exposure effect (with a boosted Exposure setting) to create a raging inferno.
• Add interactive lighting for low-lit scenes (next section).
• Create displacement above the open flames (as detailed in the previous section).
• Add an adjustment layer over the background with a Compound Blur effect, using transparency of the fire and smoke as a blur layer (Figure 14.12).

Figure 14.12. A subtle Compound Blur based on flame and smoke in the foreground better integrates those elements with the background.
Compound Blur simply varies the amount of blur according to the brightness of a given pixel in the Blur Layer, up to a given maximum. It’s the right thing to use not only for fire and smoke but for fog and mist; heavy particulate in the air acts like little tiny defocused lenses, causing this effect in nature.
Where there’s fire there is, of course, smoke, which can at a modest level be created with a Fractal Noise effect as described in the previous chapter, bringing this shot home (Figure 14.13).
Figure 14.13. Finally the furniture has a motivation to jump out the window. This shot incorporates all of the techniques described in this and the previous section.
Light Interacts
Provided that your camera does not rotate too much, a 2D fire layer should read as sufficiently three dimensional. The key to making it interact dimensionally with a scene, particularly a relatively dark one, is often interactive light. As was stated above, fire tends to illuminate everything around it with a warm, flickering glow.
As shown in Figure 14.14, a fire element may include a certain amount of usable glow. Input White and Input Black in Levels control the extent to which glow is enhanced or suppressed, respectively; you can use these controls to dial it in and out.

Figure 14.14. Input White and Black on the RGB and Red channels of the Levels effect allow you to accentuate or eliminate glow around the element. The better the dynamic range of the source image, the harder you can push this, so higher bit depth source can be invaluable in this case.
Note, however, that this glow isn’t anything particularly unique or special; you can re-create it either via a heavily blurred duplicate of the source fire or using a masked and heavily feathered orange solid, with perhaps a slight amount of wiggle added to the glow opacity to cause a bit of interactive flickering.
Dimensionality
You can pull off the illusion of fully three-dimensional fire, especially if the camera is moving around in 3D space, directly in After Effects. I was frankly surprised at how well this worked back when I created the shot featured in Figures 14.15a, b, and c.

Figure 14.15a, b, and c. Before-and-after sequential stills of a flyover shot. Because of the angle of the aerial camera, the shot required 3D motion tracking, in this case with 2D3’s Boujou. (Images courtesy ABC-TV.)
For a shot featuring a character or object that reflects firelight, there’s no need to go crazy projecting fire onto the subject. In many cases, it is enough to create some flickering in the character’s own luminance values, for example by wiggling the Input White value at a low frequency in Levels (Individual Controls).
As shown, the background plate is an aerial flyby of a forest. Because of the change in altitude and perspective, this shot clearly required 3D tracking (touched upon at the end of Chapter 8, “Effective Motion Tracking”). The keys to making this shot look fully dimensional were to break up the source fire elements into discrete chunks and to stagger those in 3D space so that as the plane rose above them, their relationship and parallax changed (Figure 14.16).
Figure 14.16. A top view of the 3D motion-tracked camera from Figure 14.15 panning past one set of fires (of which the final composition had half a dozen). The pink layers contain fire elements, the gray layers smoke.
It is easy to get away with any individual fire element being 2D in this case. Because fire changes its shape constantly, there is nothing to give away its two dimensionality. Borders of individual fire elements can freely overlap without being distracting, so it doesn’t look cut out. The eye sees evidence of parallax between a couple dozen fire elements, and does not think to question that any individual one of them looks too flat. The smoke elements were handled in a similar way, organized along overlapping planes. As mentioned in the previous chapter, smoke’s translucency aids the illusion that overlapping smoke layers have dimensional depth.
Explosions
The example forest fire shot also contains a large explosion in a clearing. There is not a huge fundamental difference between how you composite an explosion and how you composite fire, except that an explosion is far more likely to require a mixture of strategies. It is largely a question of what is exploding.
All explosions are caused by rapidly expanding combustible gases; implosions are caused by rapid contraction. Just by looking at an explosion, viewers can gauge its size and get an idea of what blew up, however, so you need to design the right explosion for your situation, or your result will be too cheesy even for 1980s television sci-fi. How do you do it?
Light and Chunky
Each explosion you will see is a little bit unique, but to narrow the discussion I’ll organize all explosions into two basic categories. The easier one to deal with is the gaseous explosion, one made up only of gas and heat. These behave just like fire; in fact, in the shot in Figure 14.17 the explosion is fire, a huge ball of it where something very combustible evidently went up very quickly. Maybe someone left a propane tank in the forest.

Figure 14.17. Pyrotechnics footage is just the thing when you need a big explosion, filled with debris. (Images courtesy Artbeats.)
Some shots end up looking fake by using a gaseous explosion when some chunks of debris are needed. This is a prime reason that exploding miniatures are still in use, shot at high speed (or even, when possible, full-scale explosions, which can be shot at standard speed). The slower moving and bigger the amount of debris, the bigger the apparent explosion.
If your shot calls for a chunky explosion and the source lacks them, you need an alternate source. Many 3D programs these days include effective dynamics simulations; if you go that route, be sure to generate a depth map as well because each chunk will be revealed only as it emerges from the fireball. Many other concerns associated with this are beyond the scope of this discussion because they must be solved in other software.
One effect that seems to come close in After Effects is Shatter, but it’s hard to recommend this unless it is specifically a pane of glass or other plane that breaks. Shatter isn’t horrendous for a decade-old dynamics simulator, but its primary limitation is a huge one: It can only employ extruded flat polygons to model the chunks. A pane of glass is one of the few physical objects that would shatter into irregular but flat polygons, and Shatter contains built-in controls for specifying the size of the shards in the point of impact. Shatter was also developed prior to the introduction of 3D in After Effects; you can place your imaginary window in perspective space, but not using a camera or 3D controls.
A wide selection of pyrotechnic explosions is also available as stock footage from such companies as Artbeats. In many cases, there is no substitute for footage of a real, physical object being blown to bits (Figure 14.17).
In a Blaze of Glory
With good reference and a willingness to take the extra step to marry your shot and effect together, you can create believable footage that would require danger or destruction if taken with a camera. Even in cases when you work on a project that had the budget to actually re-create some of the mayhem described in this chapter, you can almost always use After Effects to enhance and build upon what the camera captured. Boom.
May as well go out with a bang, after all.