
Chapter 13. Climate and the Environment

Conversation about the weather is the last refuge of the unimaginative.
–Oscar Wilde
Yes, yes, let’s talk about the weather.
–W. S. Gilbert, The Pirates of Penzance, or, The Slave of Duty
Even if you’re not called upon to re-create extreme climate conditions (as seems to be the case with many projects I’ve worked on), even a casual glance out the window demonstrates that the meteorological phenomena are always in play: a breeze blowing the trees, water and particulate in the air changing the appearance of buildings and land closest to the horizon.
This chapter offers methods to create natural elements such as particulate and wind effects, as well as to replace a sky, add mist, fog, or smoke, and various forms of precipitation. All of these are more easily captured with a camera than re-created in After Effects, but sometimes the required conditions aren’t available on the day of a shoot. Mother nature is, after all, notoriously fickle, and shooting just to get a particular environment can be extraordinarily expensive.
It’s rare indeed that weather conditions cooperate on location, and even rarer that a shoot can wait for perfect weather or can be set against the perfect backdrop. Transforming the appearance of a scene using natural elements is among the most satisfying things you can do as a compositor. The before and after comparison alone can be stunning, the result worthy of a blockbuster film.
Particulate Matter
Particulate matter in the air influences how objects appear at different depths. What is it? Fundamentally, it is water and other gas, dust, or visible particulate usually known as pollution. Even in an ideal, pristine, pollution-free environment there is moisture in the air—even in the driest desert, where there also might be heavier forms of particulate like dust and sand. The amount of haze in the air offers clues as to
• The distance to the horizon and of objects in relation to it
• The basic type of climate; the aridness or heaviness of the weather
• The time of year and the day’s conditions
• The air’s stagnancy (think Blade Runner)
• The sun’s location (when it’s not visible in shot)
The color of the particulate matter offers clues to how much pollution is present and what it is, even how it feels: dust, smog, dark smoke from a fire, and so on (Figure 13.1).
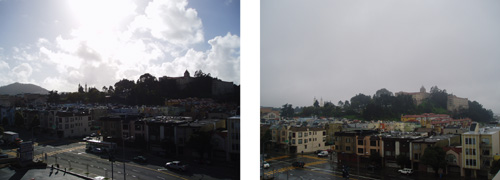
Figure 13.1. The same location under varied weather conditions. This type of study reveals environmental subtleties, such as how backlighting emphasizes even low levels of haze and reduces overall saturation, or how more diffuse conditions desaturate and obscure the horizon while emphasizing foreground color.
Essentially, particulate matter in the air lowers the apparent contrast of visible objects; secondarily, objects take on the color of the atmosphere around them and become slightly diffuse. This is a subtle yet omnipresent depth cue: With any particulate matter in the air at all, objects lose contrast further from camera; the apparent color can change quite a bit, and detail is softened. As a compositor, you use this to your advantage, not only to re-create reality, but to provide dramatic information.
Particulate matter does not occur in outer space, save perhaps when the occasional cloud of interstellar dust drifts through the shot. Look at photos of the moon landscape, and you’ll see that the blacks in the distance look just as dark as those in the foreground.
Match an Environment
Figure 13.2 shows how the same object at the same size can appear to be a child’s toy or a large presence in the distance, with only color adjustment and composition to differentiate the two. The background has great foreground and background reference for black and white levels; although the rear plane looks icy blue against gray, it matches the look of gray objects in the distance of the image.
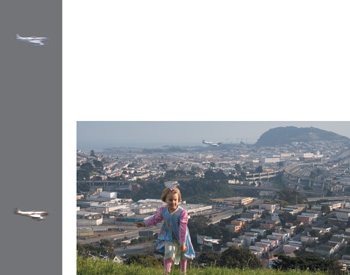
Figure 13.2. The difference between a toy model airplane flying close, a real airplane flying nearby, and the same plane in the distant sky, is conveyed with the use of Scale, but just as importantly, with Levels that show the influence of atmospheric haze.
The technique used here is the same as outlined in Chapter 5, “Color Correction,” with the additional twist of understanding how atmospheric haze influences the color of the scene. Knowing how this works from studying a scene like this one helps you create it from scratch even without such good reference.
The plane as a foreground element seems to make life easier by containing a full range of monochrome colors. When matching a more colorful or monochrome element, you can always create a small solid and add the default Ramp effect. With such a reference element, it is simple to add the proper depth cueing with Levels, and then apply the setting to the final element (Figure 13.3).

Figure 13.3. Does your foreground layer lack clean black, white and gray values? Match a gradient instead, then apply the setting to the final element.
Creating an Environment
What about creating a new background from scratch, as with a matte painting or 3D rendered background? In either case there is no longer reference built into the shot, but that doesn’t mean you can’t still use reference if you need it; a photo containing the necessary conditions will get you started.
To re-create depth cues in a shot, you must somehow separate the shot into planes of distance. If the source imagery is computer-generated, the 3D program that created it can also generate a depth map for you to use (Figure 13.4). If not, you can slice the image into planes of distance, or you can make your own depth map to weight the distance of the objects in frame.
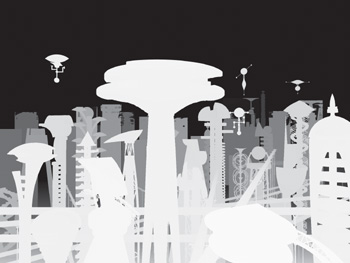
Figure 13.4. This map can be applied directly to an adjustment layer as a Luma Inverted Matte; Levels and Fast Blur effects are then used to add atmospheric haze, weighted to affect the background more than the foreground. (Image courtesy Fred Lewis/Moving Media.)
Getting reference is easy for anyone with an Internet connection these days, thanks to sites and services like flickr.com and Google image search.
There are several ways in which a depth map can be used, but the simplest is probably to apply it to an adjustment layer as a Luma (or Luma Inverted) Matte, and then add a Levels or other color correction adjustment to the adjustment layer. With the depth matte in Figure 13.4, the heaviest level adjustments for depth cueing would be applied to the furthest elements, so applying this matte as a Luma Inverted Matte and then by flashing the blacks (raising the Output Black level in Levels), you would instantly add the effect of atmosphere on the scene.
One good reason to use a basic 3D render of a scene as the basis for a matte painting is that the perspective and lens angle can be used not only for reference, but to generate a depth map, even if the entire scene is painted over.
Depth data may also be rendered and stored in an RPF file, as in Figure 13.5 (which is taken from an example included on the disc as part of 13_multipass.aep). RPF files are in some ways crude, lacking even thresholding in the edges (let alone higher bit depths), but they can contain several types of 3D data, as are listed in the 3D Channel menu. This data can be used directly by a few effects to simulate 3D, including Particle Playground, which accepts RPF data as an influence map.
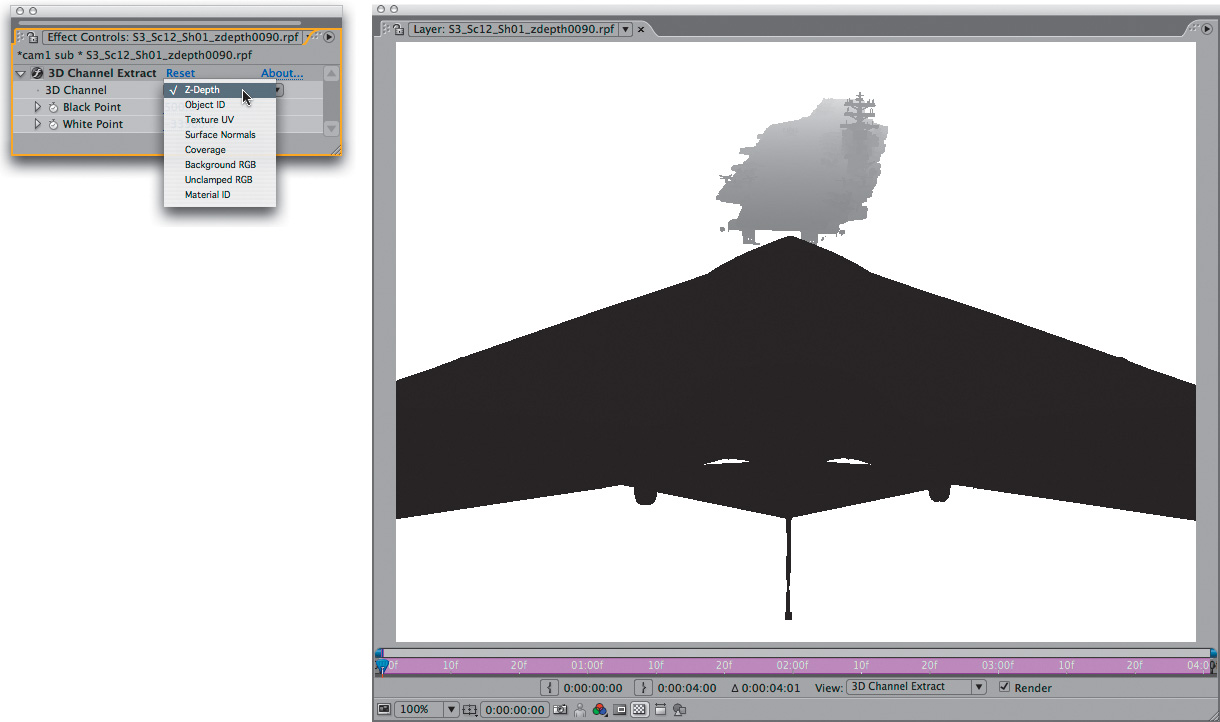
Figure 13.5. RPF images have jagged edge pixels, but a depth map does not have to be perfectly pristine. The 3D Channel Extract effect allows After Effects to work with RPF data. (Created by Fred Lewis; used with permission from Inhance Digital, Boeing, and the Navy UCAV program.)
More extreme conditions may demand actual particles, and the phenomena that accompany them, as is explored later in this chapter.
Sky Replacement
Sky replacement is among the cheapest and easiest extensions that can be made to a shot. This opens up various possibilities to shoot faster and more cheaply. Not only do you not have to wait for ideal climate conditions, you can swap in a different sky as well as an extended physical skyline.
Skies are, after all, part of the story, often a subliminal one but occasionally a starring element. An interior with a window could be anywhere, but show a recognizable skyline outside the window and locals will automatically gauge the exact neighborhood and city block of that location, along with the time of day, time of year, weather, outside temperature, and so on, possibly without ever really paying conscious attention to it.
Why spend extra production money on background conditions for a scene that could be shot cheaper elsewhere? You could spend tens (even hundreds) of thousands of dollars for that view apartment on Central Park East for a scene at golden hour (the beautiful “hour” of sunset that typically lasts about 20 minutes and is missing on an overcast day). The guerilla method would be to use your friend’s apartment, light it orange, shoot all day, and add the sunset view in post. In many cases, the real story is elsewhere, and the sky is a subliminal (even if beautiful) backdrop that must serve that story (Figures 13.6a through d).
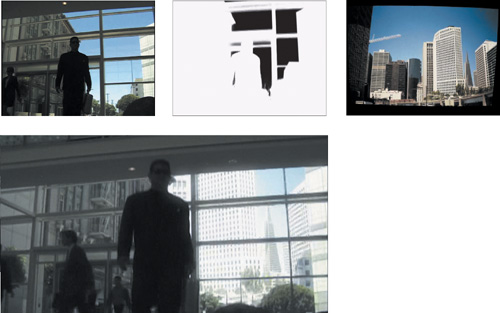
Figure 13.6a through d. For an independent film with no budget set in San Francisco, the director had the clever idea of shooting it in a building lobby across the bay in lower-rent Oakland (a), pulling a matte from the blue sky (b), and match moving a still shot of the San Francisco skyline (from street level, c) for a result that anyone familiar with that infamous pyramid-shaped building would assume was taken in downtown San Francisco (d). (Images courtesy The Orphanage.)
The Sky Is Not (Quite) a Blue Screen
Only on the clearest, bluest days does the sky become a candidate for blue-screen keying. Look at an actual sky (there may be one nearby as you read this) or even better, study reference images, and you may notice that the blue color desaturates near the horizon, cloudless skies are not always so easy to come by, and even clear blue skies are not as saturated as they might sometimes seem.
Still, some combination of a color keyer, such as Keylight, and a hi-con luminance matte pass or a garbage matte, as needed, can remove the existing sky in your shot, leaving nice edges around the foreground. Chapter 6, “Color Keying,” focuses on strategies for employing these, and Chapter 7, “Rotoscoping and Paint,” describes supporting strategies when keys and garbage mattes fail.
The first step of sky replacement is to remove the existing “sky” (which may include other items at infinite distance, such as buildings and clouds) by developing a matte for it. As you do this, place the replacement sky in the background; a sky matte typically does not have to be as exacting as a blue-screen key because the replacement sky often bears a resemblance to the source (Figure 13.7).

Figure 13.7. A very challenging matte for several reasons, not the least of which is the uneven desaturated quality of the sky. Placing the pigeon in a radically different environment requires color and grain matching to compensate for less than stellar source.
Infinite Depth
A locked-off shot can be completed with the creation of the matte and a color match to the new sky. If, however, there is camera movement in the shot, you might assume that a 3D track is needed to properly add a new sky element.
Typically, that’s overkill. Instead, consider
• When matching motion from the original shot, if anything in the source sky can be tracked, by all means track the source.
• If only your foreground can be tracked, follow the suggestions in Chapter 8, “Effective Motion Tracking,” for applying a track to a 3D camera: Move the replacement sky to the distant background (via a Z Position value well into four or five digits, depending on camera settings). Scale up to compensate for the distance; this is all done by eye.
• A push or zoom shot (Chapter 9, “The Camera and Optics,” describes the difference), may be more easily re-created using a tracked 3D camera (but look at Chapter 8 for tips on getting away with a 2D track).
The basic phenomenon to re-create is that scenery at infinite distance moves less than objects in the foreground. This is the parallax effect, which is less pronounced with a long, telephoto lens, and much more obvious with a wide angle. For the match in Figure 13.6, a still shot (no perspective) was skewed to match the correct angle and tracked in 2D; the lens angle was long enough and the shot brief enough that they got away with it. A simpler example is included on the disc in 13_skyReplace2.aep.
Fog, Smoke, and Mist
An animated layer of translucent clouds is easily enough re-created in After Effects. The basic element can be fabricated by applying the Fractal Noise effect to a solid, and then using a blending mode such as Add or Screen to layer it in with the appropriate Opacity setting. On the book’s disc, 13_smokyFlyover.aep contains a simple example of layers of smoke laid out as if on a three-dimensional plane.
Fractal Noise at its default settings already looks smoky (Figure 13.8); switching Noise Type setting from the default, Soft Linear, to Spline, improves it. The main thing to add is motion, which I like to do with a simple expression applied to the Evolution property: time*60 (I find 60 an appropriate rate in many situations, your taste may vary). The Transform properties within Fractal Noise can be animated, causing the overall layer to move as if being blown by wind.
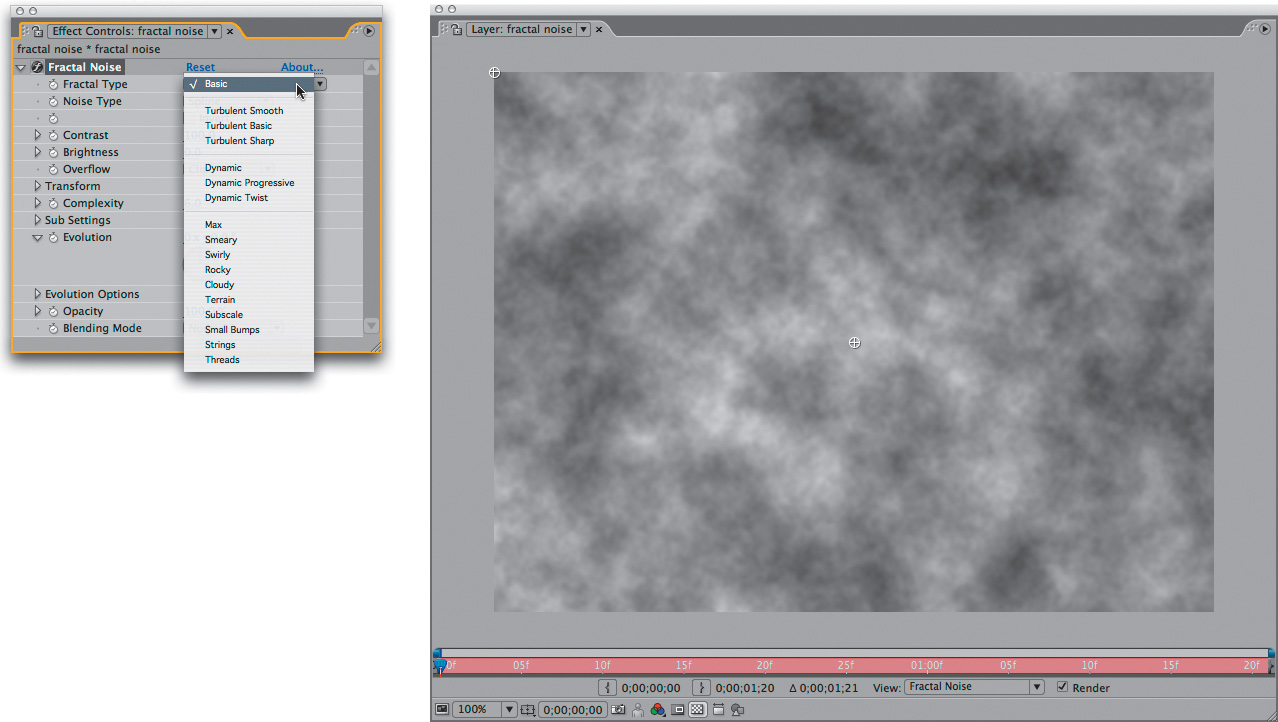
Figure 13.8. Fractal Noise (shown at the default setting, but with Noise Type set to Spline) is a decent stand-in for organic-looking fog. You can try varying the Fractal Type or Noise Type to get different looks, and you must animate the Evolution if you want any billowing of the element. Several Fractal Types are available, as seen in the pull-down menu.
Brightness, Contrast, and Scale settings influence the apparent scale and density of the noise layer. Complexity and Sub Settings also affect apparent scale and density, but with all kinds of undesirable side effects that make the smoke look artificial. The look is greatly improved by layering at least two separate passes via a blending mode (as in the example project).
The eminently useful Fractal Noise effect, found in the Noise & Grain category, should not be confused with the far less useful (albeit pretty) Fractal effect in the Render category.
Masking and Adjusting
When covering the entire foreground evenly with smoke or mist, a more realistic look is achieved using two or three separate overlapping layers with offset positions (Figure 13.9). The unexpected byproduct of layering 2D particle layers in this manner is that they take on the illusion of depth and volume.

Figure 13.9. The smoke in this shot is made up of one large solid with a Fractal Noise effect that is sliced up, staggered (as seen with the layer outlines), and animated in pseudo-3D.
The eye perceives changes in parallax between the foreground and background, and automatically assumes these to be a byproduct of full three-dimensionality, yet you save the time and trouble of a 3D volumetric particle render. Of course, you’re limited to instances in which particles don’t interact with movement from objects in the scene; otherwise, you instantly graduate to some very tricky 3D effects.
Particle layers can be combined with the background via blending modes, or they can be applied as a Luma Matte to a colored solid (allowing you to specify the color of the particles without having a blending mode change it).
Fractal Noise texture maps can loop seamlessly (allowing reuse on shots of varying length). In Evolution Options, enable Cycle Evolution, and animate Evolution in whole revolutions (say, from 0° 2 × 0.0°). Set the Cycle (in Revolutions) parameter to the number of total revolutions (2). The first and last keyframes now match, and a loopOut("cycle") expression continues this loop infinitely.
To add smoke to a generalized area of the frame, a big elliptical mask with a high feather setting (in the triple digits even for video resolution) will do the trick; if the borders of the smoke area are apparent, increase the mask feather even further (Figure 13.10).

Figure 13.10. This mask of a single smoke element from the shot in Figure 13.8 has a 200-pixel feather, despite that the resolution of the shot is standard definition NTSC video (720 × 486). The softness of the mask helps to sell the element as smoke and works well overlaid with other, similarly feathered masked elements.
Moving Through the Mist
The same effect you get when you layer several instances of Fractal Noise can aid the illusion of moving forward through a misty cloud. That’s done simply enough (for an example of flying through a synthetic cloud, see 13_smokyLayers.aep), but how often does your shot consist of just moving through a misty cloud? Most of the time, clouds of smoke or mist are added to an existing shot.
![]() Close-Up: Selling the Effect with Diffraction
Close-Up: Selling the Effect with Diffraction
There is more to adding a cloud to a realistic shot than a simple A over B comp; water elements in the air, whether in spray, mist, or clouds, not only occlude light but diffract it. This diffraction effect can be simulated by applying Compound Blur to an adjustment layer between the fog and the background and using a precomposed (or prerendered) version of the fog element as its Blur layer.
This usage of Compound Blur is is detailed further in the following chapter, where it is used to enhance the effect of smoky haze.
You can use the technique for emulating 3D tracking (see Chapter 10, “Expressions”) to make the smoke hold its place in a particular area of the scene as the camera moves through (or above) it. To make this work, keep a few points in mind:
• Each instance of Fractal Noise should have a soft elliptical mask around it.
• The mask should be large enough to overlap with another masked instance, but small enough that it does not slide its position as the angle of the camera changes.
• A small amount of Evolution animation goes a long way, and too much will blow the gag. Let the movement of the camera create the interest of motion.
• Depending on the length and distance covered in the shot, be willing to create at least a half-dozen individual masked layers of Fractal Noise.
13_smokyFlyover.aep features just such an effect of moving forward through clouds. It combines the tracking of each shot carefully into place with the phenomenon of parallax, whereby overlapping layers swirl across one another in a believable manner. Mist and smoke seem to be a volume but they actually often behave more like overlapping, translucent planes—individual clouds of mist and smoke.
Billowing Smoke
Fractal Noise works fine to create and animate thin wispy smoke and mist. It will not, however, be much help if you need to fabricate thick, billowing clouds. Instead of a plug-in effect, all you need is a good still cloud element and you can animate it in After Effects. And all you need to create the element is a high-resolution reference photo—or even a bag of cotton puffs, as were used to create the images in Figure 13.11.
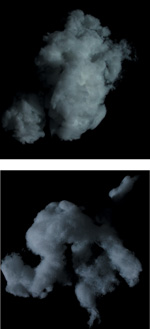
Figure 13.11. Cotton puffs can be arranged on black posterboard and photographed under daylight conditions for realistic highlights and shadows.
To give clouds shape and contour, open the image in Photoshop, and use the Clone Stamp tool to create a cloud with the shape you want. You can do it directly in After Effects, but this is the kind of job for which Photoshop was designed. Clone in contour layers of highlights (using Linear Dodge, Screen, or Lighten blending modes) and shadows (with Blending set to Multiply or Darken) until the cloud has the look you’re after (Figure 13.12).

Figure 13.12. The elements from Figure 13.11 are incorporated into this matte painting, and the final shot contains a mixture of real and composited smoke.
So now you have a good-looking cloud, but it’s a still. How do you put it in motion? This is where After Effects’ excellent distortion tools come into play, in particular Mesh Warp and Liquify. A project containing just such a cloud animation appears on the disc as 13_smokeCloud.aep.
Mesh Warp
Mesh Warp lays a grid of Bézier handles over the frame; to animate distortion by setting a keyframe for the Distortion Mesh property at frame 0, then move the points of the grid, and realign the Bézier handles associated with each point, to bend to the vertices between points. The image to which this effect is applied follows the shape of the grid.
By default, Mesh Warp begins with a seven-by-seven grid. Before you do anything else, make sure that the size of the grid makes sense for your image; you might want to increase its size for a high-resolution project, and you can reduce the number of rows to fit the aspect ratio of your shot, for a grid of squares (Figure 13.13).

Figure 13.13. The Mesh Warp controls are simple, just a grid of points and vectors. You can preset the number and quality; more is not necessarily better (just more to control). Points can be multiselected and dragged, and each point contains Bézier handles for warping the adjacent vectors.
You can’t typically get away with dragging a point more than about halfway toward any other point; watch carefully for artifacts of stretching and tearing as you work, and preview often. If you see stretching, realign adjacent points and handles to compensate. There is no better way to learn about this than to experiment.
I have found that the best results with Mesh Warp use minimal animation of the mesh, animating instead the element that moves underneath it.
Mesh Warp, like many distortion tools, renders rather slowly. As you rough in the motion, feel free to work at quarter-resolution. When you’ve finalized your animation, you can save a lot of time by pre-rendering it (see Chapter 4, “Optimize the Pipeline”).
Liquify
Mesh warp is appropriate for gross distortions of an entire element. The Liquify effect is a brush-based system for fine distortions. 13_smokeCloud.aep includes a composition that employs Liquify to swirl a cloud. Following is a brief orientation to this toolset, but as with most brush-based painterly tools, there is no substitute for trying it hands-on.
The principle behind Liquify is actually similar to that of Mesh Warp; enable View Mesh under View Options and you’ll see that you’re still just manipulating a grid, albeit a finer one that would be cumbersome to adjust point by point—hence the brush interface.
Of the brushes included with Liquify, the first two along the top row, Warp and Turbulence, are most often used (Figure 13.14). Warp has a similar effect to moving a point in Mesh Warp; it simply pushes pixels in the direction you drag the brush. Turbulence scrambles pixels in the path of the brush.

Figure 13.14. Liquify is also a mesh distortion tool, only the mesh is much finer than Mesh Warp’s and it is controlled via brushes, allowing more specific distortions.
The Reconstruction brush (rightmost on the bottom row) is like a selective undo, reversing distortions at the default setting; other options for this brush are contained in the Reconstruction Mode menu (which appears only when the brush is selected).
Liquify has the advantage of allowing hold-out areas. Draw a mask around the area you want to leave untouched by Liquify brushes, but set the Mask mode to None, disabling it. Under Warp Tool Options, select the mask name in the Freeze Area Masked menu.
Liquify was a key addition to the “super cell” element (that huge swirling mass of weather) for the freezing of the New York City sequence in The Day After Tomorrow. Artists at The Orphanage were able to animate matte paintings of the cloud bank, broken down into over a dozen component parts to give the effect the appropriate organic complexity and dimension.
Smoke Trails and Plumes
Many effects, including smoke trails, don’t require particle generation in order to be re-created faithfully. This section is included less because the need comes up often and more to show how, with a little creativity, you can combine techniques in After Effects to create effects that you might think require a dedicated solution. Check out the reference in Figure 13.15 and you’ll notice that smoke trails are essentially just clouds.
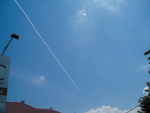
Figure 13.15. Clearly, this effect could easily be painted with no external source whatsoever.
Initial setup of such an effect is simply a matter of starting with a clean plate, painting the smoke trails in a separate still layer, and revealing them over time (presumably behind the aircraft that is creating them). The quickest and easiest way to reveal such an element over time is often by animating a mask, or you could use techniques described in Chapter 8 to apply a motion tracker to a brush.
The optional second stage of this effect would be the dissipation of the trail; depending on how much wind is present, the trail might probably drift, spread, and thin out over time. That means that in a wide shot, the back of the trail would be more dissipated than the front.
A simple method to achieve this (which could work with a distant shot, at least) would use a black-to-white gradient (created with Ramp) and Compound Blur. The gradient is white at the dissipated end of the trail and black at the source (Figures 13.16a and b); each point can be animated or tracked in. Compound Blur uses this gradient as its Blur Layer, creating more blur as the ramp becomes more white.
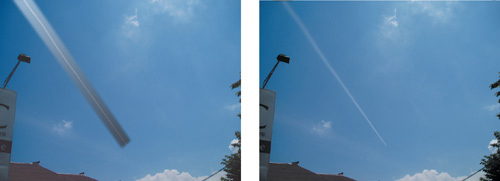
Figure 13.16a and b. A gradient is created to match the start and end of the plane’s trajectory, masked and precomposed (a). This is then applied via a Compound Blur to the source layer (b)—a simple example of building up your own effect with the tools at hand.
Wind
What is wind doing in this chapter? You can’t see it. Nevertheless, a static environment is rarely believable if it’s not the surface of the moon, and because your job is to help the viewer suspend disbelief, you may have to consider adding the influence of wind to your scene.
The fact is that most still scenes in the real world contain ambient motion of some kind. Not only objects directly in the scene, but reflected light and shadow might be changing all the time in a scene we perceive to be motionless.
As a compositor, you always look for opportunities to add to them in ways that contribute to the realism of the scene without stealing focus. Obviously, the kinds of dynamics involved with making the leaves and branches of a tree sway are mostly beyond the realm of 2D compositing, but there are often other elements that are easily articulated and animated ever so slightly. Successful examples of ambient animation should not be noticeable, and they often will not have been explicitly requested, so it’s an exercise in subtlety.
Adding and Articulating Elements
To make it easier on yourself, look for elements that can be readily isolated and articulated; you should be able to mask the element out with a simple roto or a hi-con matte if it’s not separated to begin with. Look for the point where the object would bend or pivot, place your anchor point there, then animate a gentle rotation. 13_ambientAnim.aep (on the disc) offers a simple animation of the arm of a streetlight, held out from the background. A little warp on the clouds behind it, and this still image could convincingly be a brief moving shot (Figure 13.17).

Figure 13.17. The arm of the streetlight is masked, its anchor point moved to the base, and a simple wiggle to the Rotation gives it ambient motion as would be caused by wind.
You also have the option of acquiring and adding elements that indicate or add to the effect of wind motion. Figure 13.18 is an element of blowing autumn leaves shot against a black background for easy removal and matting; granted, you could add an element this turbulent only to a scene that either already had signs of gusts in it or that contained only elements that would show no secondary motion from wind whatsoever.
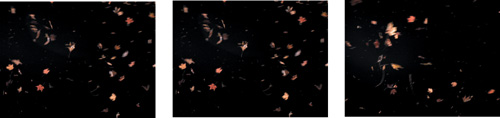
Figure 13.18. It would be very difficult to create the impression of a windstorm in a shot from scratch, but if the shot is taken in windy conditions (or using large fans on set) an element like this will enhance the impression of a blustery day. (Footage courtesy Artbeats.)
![]() Close-Up: Primary and Secondary
Close-Up: Primary and Secondary
Primary animation is the gross movement of the object, the movement of the object as a whole. Secondary animation is the movement of individual parts of the object as a result of inertia. So, for example, a helicopter crashes to the ground: That’s the primary animation. Its rotors and tail bend and shudder at impact: That’s the secondary animation. For the most part, in 2D compositing, your work is isolated to primary animation.
Precipitation
You’ve already examined the effect of water in its gaseous form (as fog, mist, or steam); what about water in its liquid and solid states? It’s rare to create elaborate water effects without relying on some even more elaborate practical or computer-generated source. I’ll assume that you’re trying to complete shots only in After Effects, but these techniques are equally valid even to enhance particle and water animations from a 3D animations system.
One area where After Effects’ built-in features fall short is particle generation. The Particle Playground effect, which ships with the program and hasn’t changed much since around version 3.0, is slow, crude, and cumbersome. I have yet to work with anyone who had the patience to coax realistic effects out of this plug-in.
If you’re called upon to create rainfall or snowfall from scratch, consider the Particular plug-in from Trapcode (a demo is included on the book’s disc). Not only does it outdo Particle Playground in features and ease of use, but also, if set up correctly, it allows you to refine the look interactively, instead of iteratively. There’s no need to keep re-rendering.
Create Precipitation
Particular contains all the controls needed to create a great precipitation element, but it also contains a lot of controls, period. Here is a brief attempt to outline a few of the most significant ones, followed by an example of how to use a final element.
A standard particle shape can be used, or customized particles, such as an irregular snowflake shape. There are several choices of particle emitters, but one great option is to use a spotlight, making the light layer’s Transform controls available to establish the position and direction of the particles in 3D space (Figure 13.19).
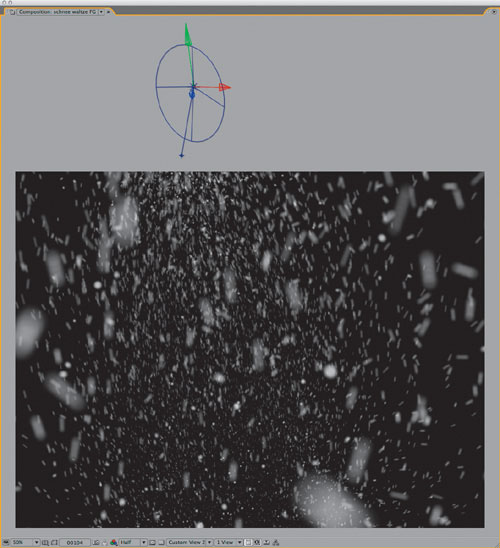
Figure 13.19. The axes belong to a light used as an emitter for Particular. It can be freely translated in 3D space.
The most important settings for precipitation are found in the Emitter and Physics categories. Emitter settings establish the amount, velocity, and direction of particles, while Physics contains controls pertaining to the environment itself: gravity, air resistance, wind, turbulence, and spin.
The Visibility category contains controls affecting the depth of your particles. You may find that, as with smoke earlier in the chapter, several planes will offer a better result than one big simulation, allowing you to control, say, the foreground separate from everything else. Particular resides on a 2D layer, but the effect is 3D-aware, so if you add a camera to the composition, the particles will behave as if seen through that camera.
Composite Precipitation
When it comes time to integrate falling rain or snow with a background plate, you can do better than a simple A over B comp; in fact, the key is to show the effect of these elements on the scene rather than showing the elements themselves.
Raindrops and snowflakes are translucent, their appearance heavily influenced by the environment. More than that, these individual bits of precipitation behave like tiny lenses that diffract light, defocusing and lowering the contrast of whatever is behind them, but also picking up the ambient light themselves. Therefore, on The Day After Tomorrow our crew found success with using the rain or snow element as a track matte for an adjustment layer containing a Fast Blur and a Levels effect.
To allow you to sample the results of a Particular render, included on the DVD are a foreground and background snow animation, which have been applied as follows in 13_snowfall.aep.
Blurriness is set very high (200), so that the area behind each individual raindrop or snowflake becomes a wash of color. Levels is applied with a slightly lowered (90%) Output White value, and a very high (80%) Output Black value. The precipitation is visible by its effect on the scene, lightening dark areas, darkening light ones, and adding diffusion throughout (Figure 13.20).
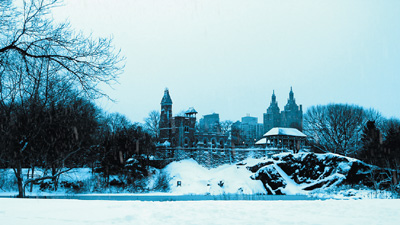
(Source image courtesy Eric E. Yang via Creative Commons.)
Figure 13.20. You must look closely to see the added snowfall in a still image with so many bright regions; to see it applied in motion via adjustment layers, open 13_snowfall.aep.
The best thing about this approach is that it works independently of the background appearance. There is no need to decide the color of the element for a given shot, and shots retain source colors, the precipitation having a similar influence on each shot in a sequence.
![]() Close-Up: Water Surface Reflection
Close-Up: Water Surface Reflection
The presence of water (outside of the shot area) is implied by the presence of its reflected light in the scene. Light from water has a compelling shape and movement, and if you’ve set up the scene so that the viewer knows there’s a swimming pool or a lake nearby, it may even be expected.
The question is how to get the sample of the play of light, reflected off of the waves. With patient adjustments, you can use Wave World, an effect included when you register your copy of After Effects. The default settings won’t do. For one thing, View must be changed to Height Map just to preview the effect, and Grid Resolution must be raised (it’s set for a feeble 1990s-era computer) along with optional Pre-roll settings. Reflect Edges can be set to All. Then the trick is to set Position and Amplitude for a natural look. The compositing technique is similar to what is done with shadows (Chapter 12): Position the plane and choose a blending mode, such as Add or Vivid Light, or apply it as a Luma Matte to an adjustment layer containing Levels.
Conclusion
To fully mess with climatic effects may require elaborate 3D simulations, but even then, the compositing approach remains much the same. The chapter’s focus has been on how elements behave in the real world, and how best to emulate that reality in After Effects. This approach should serve you well even if an element is needed—frost, say, or hail—that was not covered directly here.
The next chapter heats things up with fire, explosions, and other combustibles.