
Line
A line is a line is a line. In the act of drawing, perhaps no other component or factor is as valuable in shaping and communicating depth, life, energy, and personality as a line.
A line can be rigid or fluid. It can have weight and presence or be delicate and seem to float translucently beneath the surface of the paper. It can be quick or studious, continuous, rhythmic, or aloof. Line can be all or a combination of these characteristics.
The personality of a line can be used to define leather or chiffon, create a texture to mimic reptile goods, capture the movement in a skirt, or with one stroke illustrate the arch of an eyebrow.
We will explore the personality of line in Chapter 4. Here we will begin with the basic contour line. Integrity of line will be examined through a balancing act; exercises incorporating straight, curved, and opposition of line will be included to allow the student to acquire a basic foundation for seeing and communicating the figure.
The Contour Line
The contour line creates a solid outline of the image; it is very different to a rapidly executed sketch. It will be used to discover and realize the silhouette of the figure.
Integrity of Line
There are numerous ways to observe and draw the figure. The method applied in this book uses a balancing method. In this method you will draw the figure in stages, starting from the left side, then moving to the right, and then back to the left, and so on down the figure using various points on the model to anchor your line. This exercise is most successful if done very slowly, maintaining the integrity of the line, not allowing one side of the drawing to extend too far below the other, much like the balancing movement of a seesaw. It is important to balance the length of line from one side of the figure to the other, allowing yourself time to observe distance, proportions, and the angles of the figure.
Preparation
For this exercise, the following supplies are necessary:
One pad of 18 x 24in (A2) white all-purpose paper or comparable
Charcoal pencils—hard to medium
Kneaded eraser
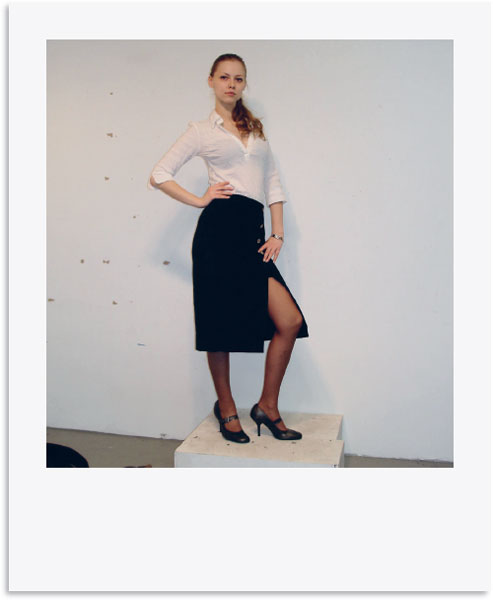
Ideally, this lesson should be done with a live model. Although the same results can be achieved with the use of a photo, it is to your benefit to accustom yourself to drawing from life rather than photos. Drawing from life is more challenging and is a proven method of training your eye to communicate three-dimensional form in a drawing. Photos are usually distorted, so a drawing from a photo of a fashion model will seem squat and out of proportion.
Ask a friend, acquaintance, or family member to pose for a series of positions. If this is not an option, you could use any bottle that has some unusual curved and straight lines in its shape, such as a wine bottle or perfume decanter, an accessory such as a shoe, a pair of sunglasses, or a handbag—and of course, there is always the option of drawing yourself in a mirror.
To prepare, you will need the supplies listed and a surface to work upon. The live model or the selected photo should be simple in dress, pose, and nature. If a photo is your only option then this reference should be posted on a surface directly in front of you rather than placed beside the drawing pad. This will allow you to observe from a distance and mimic the idea of a live model who would be posing in a similar position in relation to your drawing surface.
We begin the initial drawing using a charcoal pencil on a pad of 18 x 24in (A2) all-purpose paper that has been turned horizontally.
Note:
It is important with each drawing of the figure that you make while carrying out the exercises in this book that you place the head at the top of the horizontal paper. This allows you to begin to get a sense of proportion. The consistency of this placement will encourage you to think about size and how to fit the whole fi gure into the space on the paper.
Directions
One technique that will be used throughout most of the chapters in this book is that of drawing from the top of the model’s head down to the feet. This is a technique where the eye slowly follows the outside shape of the form and communicates that observation with a contour line. This is an important tool in developing a good sense of draftsmanship.
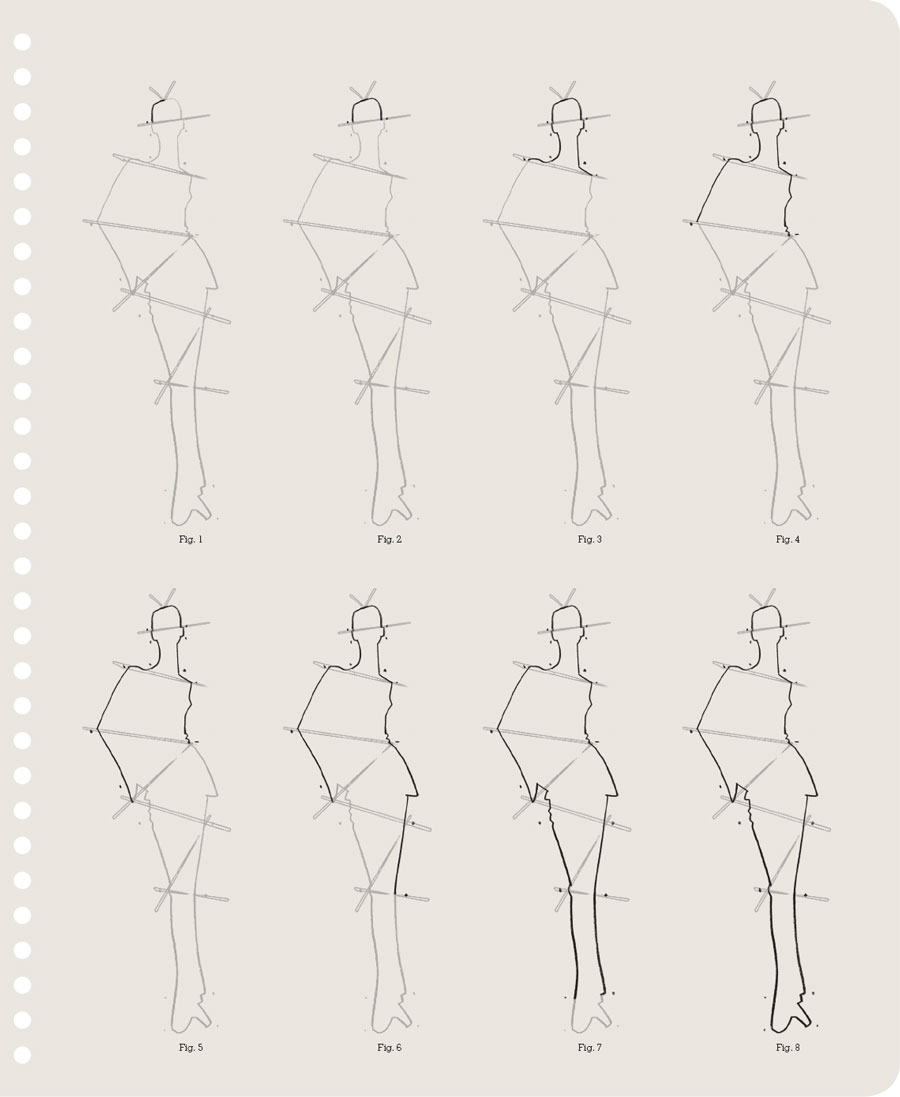
Step One
Beginning from the center point of the head, slowly observe the slant of the head, noting the slant of the diagonal. Begin to draw a strong contour line from the center point to the left side of the head, anchoring that line to the top of the ear (see Figure 1).
Step Two
Once accomplished, return to the top of the center point of the head and begin to follow the shape of the right side of the head and anchor this line to the top of the right ear, observing as you continue which ear is higher or lower than the other (see Figure 2).
Step Three
Return to the left side and continue from the ear to the base of the neck or shoulders. Then balance this line on the other side, comparing which side of the neck or shoulder is higher and which is lower (see Figure 3).
Step Four
Once the shoulder lines are balanced, follow through to an area that is distinctly higher or angular in nature, such as the elbow or waist or top of the hip, again comparing which of these anchor points is higher or lower than the same point of the body on the opposite side (see Figure 4).
Follow this method, continuing to allow gravity to drag your line down the figure and constantly making pit stops to observe, compare, and make adjustments, until you have drawn the contour shape of the complete figure (see Figures 5–8).


Robert Risko’s image of Madonna Dancing with Derby in Green incorporates a mixture of straight lines complemented by curved lines.
Imagine that you are given the task of communicating the figure in a language of strictly straight lines. The terms “curve,” “round,” and “fluid” do not exist in this language. Now entertain the idea that you will draw this figure with your charcoal as if you were using a ruler to accomplish the task. If you did use a ruler, this challenge would soon become very tedious. Having to draw every fold in the garment or every loose hair on the head would eventually cause you to try to limit the number of lines you used, forcing you to become more selective. Use this idea of selectivity to accomplish this drawing. The aim is to make yourself focus and find the line that best communicates the image.
Preparation
For this exercise, the following supplies are necessary:
One pad of 18 x 24in (A2) white all-purpose paper or comparable
Charcoal pencils—hard to medium
Kneaded eraser
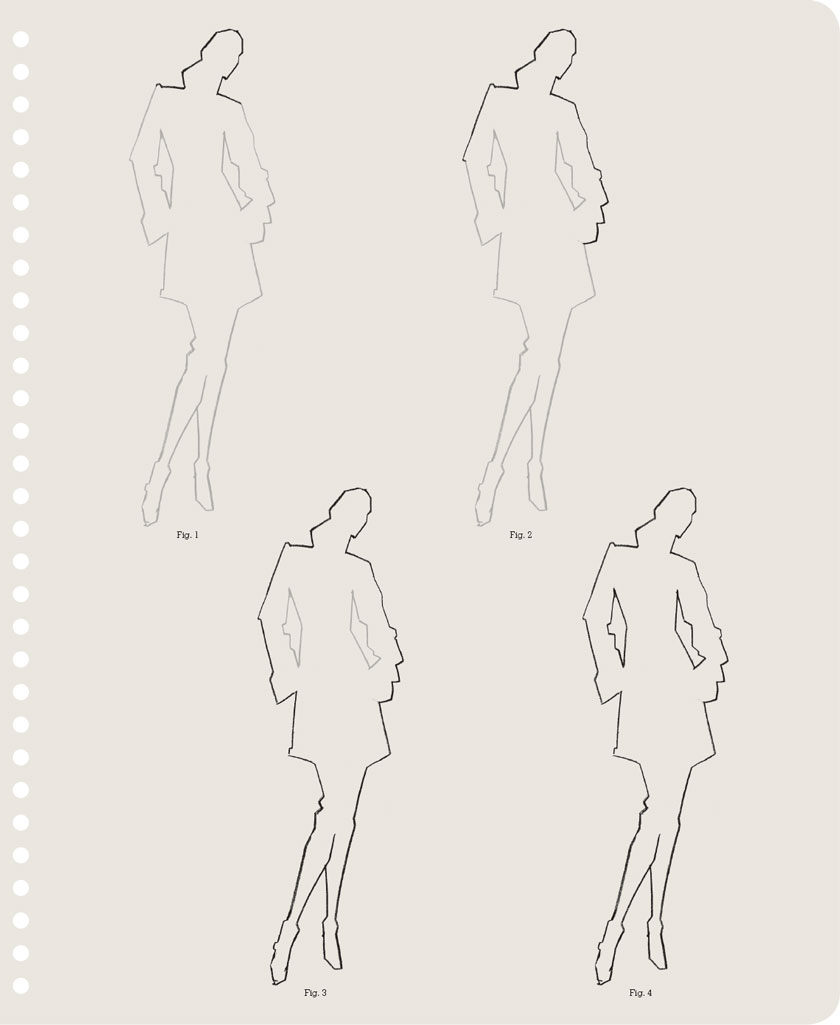
The pose used for this exercise has negative space visible between the arms, which, unlike the solid shape created by the balancing-act outline, will be represented in the final drawing.
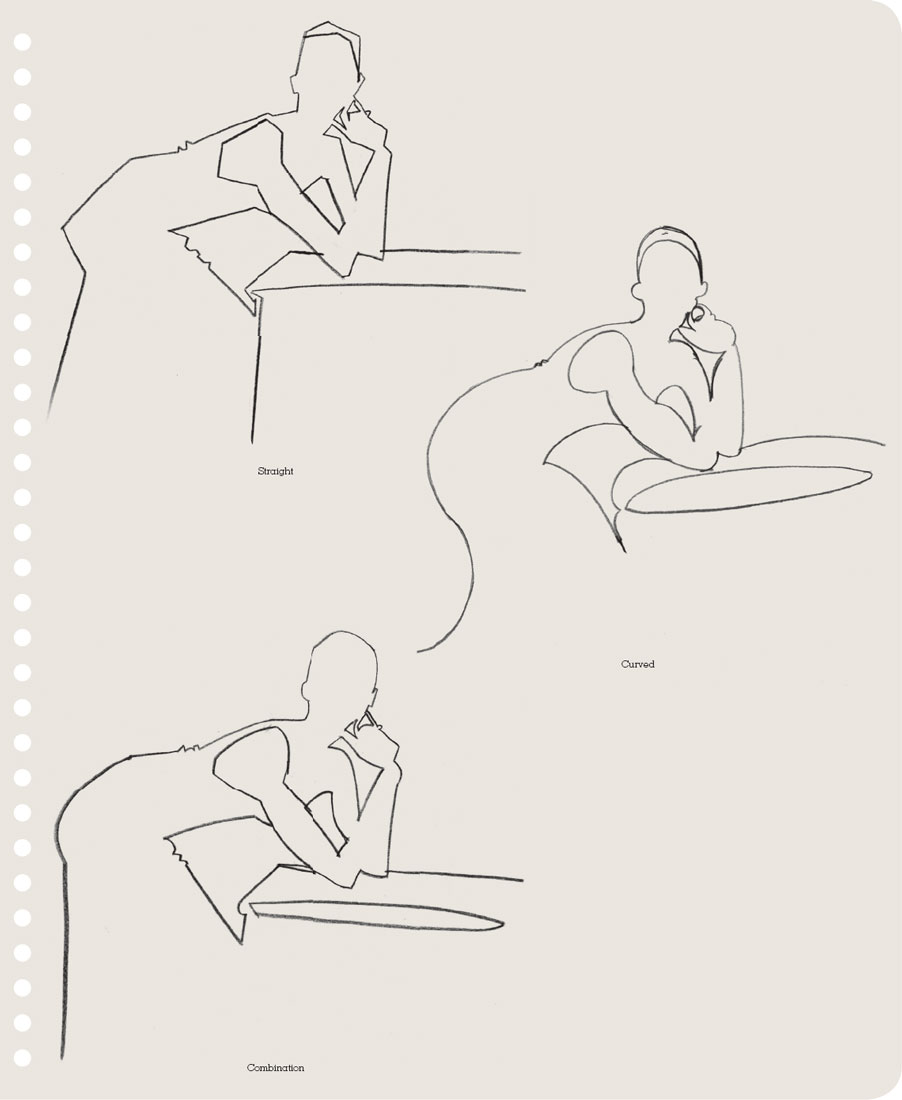
In this and the following two exercises, you will be drawing a single figure using a straight line, a curved line, and a combination of the two. The purpose of these exercises will be more apparent if you see the resulting three figures side-by-side on the paper, so start this first straight-line drawing on the left-hand side of an 18 x 24in (A2) piece of paper, pinned horizontally to your drawing surface. Position the top of the head of this figure near the upper left-hand side of the pad and close to the edge of the paper to sustain consistency in proportion.
Negative Space:
After you have drawn a line around all the positive shapes you see in front of you, the areas left behind are called negative space.
Note:
It is important at this stage that you draw with a dark, deliberate line. The pressure you use when making your line will reinforce a slow, observant method. The balancing-act technique will encourage you to notice the diagonals, verticals, and horizontals in the figure. It allows for an understanding of measurement and observation of high and low points in the figure that will serve as a guide for your drawing.

Directions
Now that you are acquainted with the balancing-act method, it is time to apply this technique to the exercises.
In this instance, again start at the top of the head of the figure, continuing to utilize the balancing act to guide the straight-line contour drawing. Continue to draw the whole figure. Once completed, draw and define the negative shapes within the contour drawing.
Step One
Beginning from the center point of the head, as you did in the balancing act, slowly observe the slant of the head, noting the slant of the diagonal. Use a straight line to draw to the left and then to the right. Continue with straight lines, and, noting the balance points, continue down to the shoulder line—an obvious straight line in the figure (see Figure 1).
Step Two
As you contine to draw down the arms, you will see how the tubular shape lends itself to the use of straight lines, but choose your lines carefully when you come to draw the curve of the arm around the elbow (see Figure 2).
Step Three
You will find more straight lines in the legs as you continue down the body, but will have to use selectivity to communicate the curves around the shoes (see Figure 3).
Step Four
Finally, look for areas of negative space between the arms and the body and outline these using straight lines to define the shape of the figure (see Figure 4).

A shoe is communicated in a series of straight lines. Note the use of negative space to define the strap.

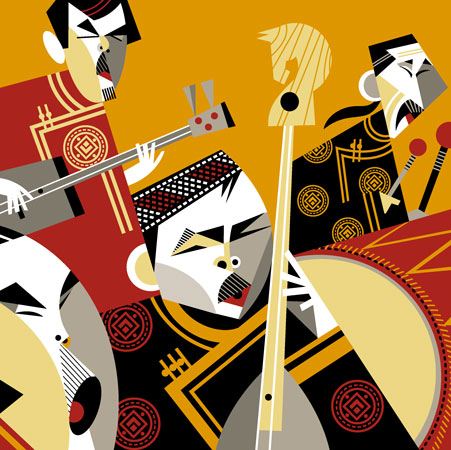
Understanding the difference between straight and curved lines and how to play on that difference can be a useful tool in creating interest in a simple two-color illustration. Here, the contrast between the straight lines used to convey the keyboard player and the curvaceous lines used to portray the singer could not be greater. The selectivity in contrasting the lines accentuates the singer, lends character to the performers, and brings a sense of dynamism to this illustration, Jazz Band Rouge, by John Jay Cabuay.
Now that you have mastered the language of straight lines to create a contour drawing, the following exercise will introduce a new language: the curved line.
This time, imagine that the only line that exists in your vocabulary is a curved line. Employing the balancing act once again, you will communicate a contour outline drawing with rounded and curved lines. In order to achieve this, visualize the figure as an inflated balloon. Most balloons have no sharp, angular edges. Round, soft, or tubular in nature, an inflated balloon will enlarge and exaggerate the character of the deflated balloon. This is the effect you are trying to achieve. You will find in this exercise that you will make greater exaggerations than in the straight-line exercise.
In the previous exercise you will have found that some areas of the figure were naturally straight and, therefore, easy to communicate with straight lines. In this drawing you will discover areas of the figure that are intrinsically curvaceous and easy to communicate with a curved line. Your challenge is not only to exaggerate these areas but also to interpret any angular areas into rounded lines.
Preparation
For this exercise, the following supplies are necessary:
One pad of 18 x 24in (A2) white all-purpose paper or comparable
Charcoal pencils—hard to medium
Kneaded eraser
You can continue to draw your friend in the same pose as you did for the straight-line exercise or continue to draw the same accessory, or use a new pose. Place this drawing in the center of your piece of paper, to the right of your straight-line drawing.
Directions
Observe before drawing, think about the shape of the figure that is guiding your line, select the line, and exaggerate the curves to communicate what you see. Your finished drawing will be exaggerated.
Step One
Beginning from the center point of the head, ignore any straight lines you might find in the figure and use only rounded lines as you draw your line down first the left and then the right-hand side of the head and shoulders (see Figure 1).
Step Two
You will find that the arms seemed easier to convey using straight lines. Here they will look more like a rubber doll (see Figure 2).
Step Three
Contine to draw your line down the figure, using the balancing act. By using curved lines you can convey more of a swing to the skirt (see Figure 3).
Step Four
Once again, the legs, which could more accurately be portrayed using straight lines, will look a little rubbery (see Figure 4).
Step Five
Complete the figure using curved lines to convey the shoes (see Figure 5).
Step Six
Finally, draw in the areas of negative space, this time using curved lines (see Figure 6). Your figure will look much more exaggerated than the one you drew using straight lines.
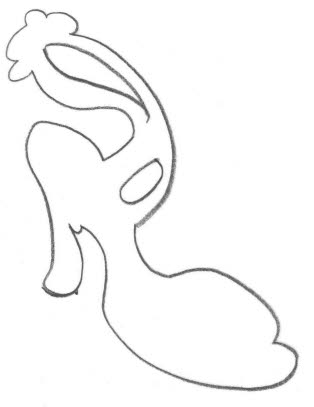
Compare this shoe, conveyed in curved lines, with that composed from straight lines on p. 16. This shoe seems to have an entirely different form, especially around the toe.
Argentinian illustrator, Pablo Lobato, created this image of the Tuvan throat-singing ensemble, Huun-Huur-Tu, for The New Yorker. In contrast to the previous illustrations, where the use of straight and curved lines was not as pronounced, Pablo pushes the premise of straight and curved line to its extreme. The figures, costumes, and instruments are geometric in nature and balanced in a rhythmic composition that conveys energy and movement.
1.4 Combination of Straight and Curved Lines
Having completed the previous two exercises, it should be obvious that restricting a drawing exclusively to straight or curved lines is problematic in communicating the figure properly. The exercise of using straight lines made you realize that some areas of the figure are curved, and vice versa when utilizing the curved line.
That is exactly the idea. These exercises force you to focus on the silhouette of the figure and while doing so observe and break down the figure in a simple terminology of straight and curved lines. In the following exercise, you will combine these two ideas to communicate the figure in a strict combination of curved and straight lines.
I emphasize the term “strict,” as in this series of drawings you will continue to observe which areas of the figure work better if drawn with straight lines, and which work best with curved; use those characters of line strictly for each area, without merging the two.
Preparation
For this exercise, the following supplies are necessary:
One pad of 18 x 24in (A2) white all-purpose paper or comparable
Charcoal pencils—hard to medium
Kneaded eraser
Place this third image on the right-hand side of your piece of paper. You can continue to use the same pose or accessory or work with a new pose.

1.4 Combination of Straight and Curved Lines
Directions
It is important to first observe, second analyze, and third select the correct line to communicate what you see. The finished drawing should be exaggerated, with a visible difference between the straight and curved lines, and cartoon-like in nature.
Step One
Again starting at the center point of the head and using the balancing act, draw the line down, first down the left and then the right-hand side of the figure.
Step Two
As you work, look for the areas best communicated with a straight line and those areas best communicated with a curved one and use both appropriately. You will have a good idea from your previous two drawings where to use each kind of line. Incorporate exaggeration to emphasize the contours of the figure.
Step Three
Complete the drawing by adding in any areas of negative space.

A combination of straight and curved lines conveys the character of the shoe.
Assignment
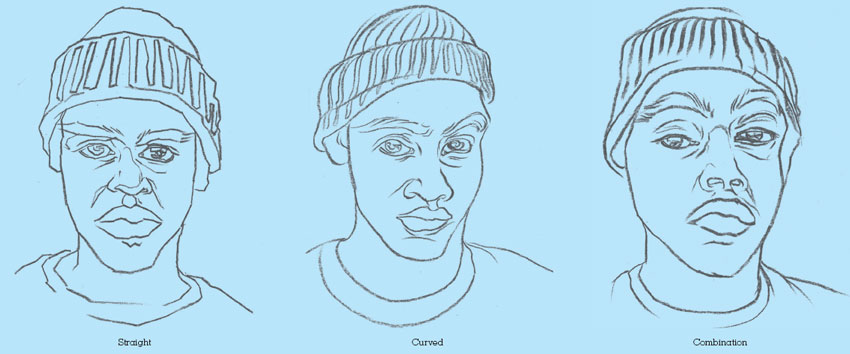
Draw three frames in your sketchbook. Into these frames, you will do three self-portraits from the top of your head to your shoulders. Think about composition and how you would like to position the portraits into the frame and how they will occupy the space. Areas of the portraits may be cropped to make an interesting composition. Draw one portrait in straight lines, another with curved, then a combination of both straight and curved. Include facial features and any details of clothing that are visible.
Illustrations by Irvin Rodriguez

Illustrations by Elena Ambotaite
Opposites Attract. Period. Behind this premise is the idea that one does not exist fully without the other. Think black without white, warm without cool, or straight without curves. The specific characteristics of each of these pairs of elements when contrasted tend to accentuate each other as complements. Now that you have understood the idea of communicating the figure in a combination of straight and curved lines, it is time to utilize this exercise and push it further.
Observation is key in communicating a drawing that has integrity and gravitas and one that will be compelling to the viewer. Using the balancing-act method of slowly observing the figure will guarantee that you take notice of the differences between the right and left side of the figure and nurture a drawing built on integrity. Now we will move one step further and think about those differences, learning how to push and pull them, creating exaggeration. Exaggeration is another way of contrasting the differences. It will help you to create a more dynamic drawing that is unique to your eye and vision.
To do this, we will use opposition—using opposing characteristics of line and shape on opposite sides of the figure; if one shoulder is higher, then we will make it even higher, while making the opposite one lower. Opposition is a tool you can use to subtly push and pull the various forms, angles, or lines of the visual without creating a drawing that is abstract or grotesque in nature. The finished drawing should reflect the figure or visual, but make it just a bit more dynamic.
Egon Schiele demonstrates opposition of line in his simple line drawing Three Street Urchins of 1910 (see right). This drawing, devoid of color or background, is a study in contrasts and as such compelling to observe. Allow your eye to measure the outside contour line of the foreground figure, beginning at the center of the head and moving from the left to the right, making comparisons of Schiele’s intent to push and pull the contrasts. Observe the tilt of the head, shape of the scalp, and the difference between the ears. Notice, too, the exaggerated diagonal of the jaw, the lines he uses to describe the neck, collar, shoulders, arms, and pants, as well as the negative space between the arm and the waist. Then take a moment to compare the descriptive contrasts between the foreground and the middle figure and eventually the background figure as well.
Preparation
For this exercise, the following supplies are necessary:
One pad of 18 x 24in (A2) white all-purpose paper or comparable
Charcoal pencils—hard to medium
Kneaded eraser
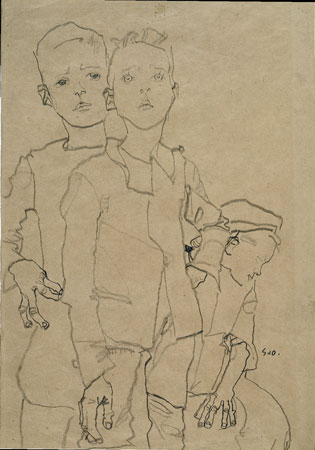
Egon Schiele (1890–1918), Three Street Urchins, 1910. Pencil on brown paper, 17.6 x 12.1in (44.7 x 30.8cm). Albertina, Vienna
Directions
In this exercise, again using the vocabulary of straight and curved lines, you will allow your eye and line to push the diagonals inherent in the figure such as the tilt of the head, shoulders, and hips. You might also incorporate a curved line against a straight line. You can also allow selectivity to place a clean or simple line that conveys a complex area of clothing with a single interpretative line versus an informative line that captures every fold or crease in a garment. Use the negative space created by the pose, such as the space between the arms and legs, to communicate opposition. Creating exaggeration in this way and using your eye to push the premise of opposition will garner further interest in a drawing that at this point is limited to contour line.
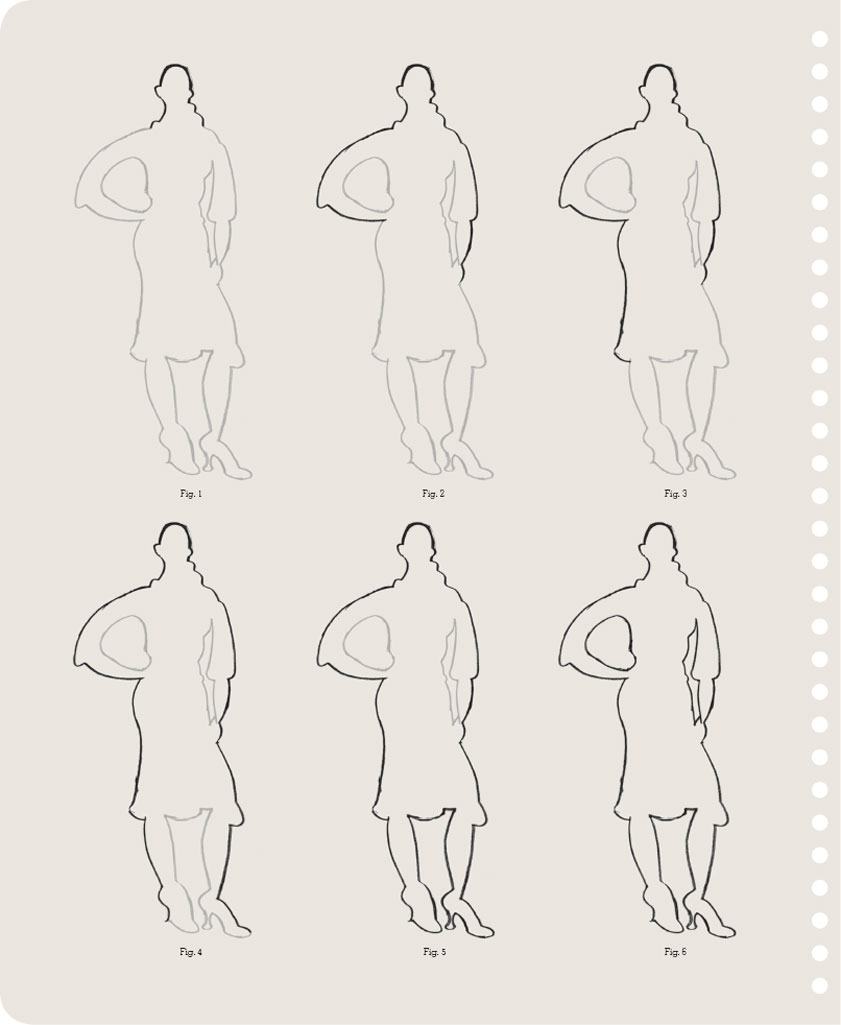
Step One
Start from the center point of the head. As you work your way down the figure using the balancing act, look at the diagonals in the figure and think what you can do to incorporate exaggeration in terms of line and form. In the normal drawing shown here (see Figure 1), the head is mainly composed of curved lines. To create opposition and exaggeration (as shown in Figure 2), use a combination of straight and curved lines in opposition and make the tilt of the head more exaggerated.
Step Two
Moving down the figure, observe the slant of the shoulders. Figure 1 shows that there is a slight tilt, with the left shoulder lower and the right higher. The collar also doesn’t look particularly furry in texture. In Figure 2, the characteristics of the fur on the collar are exaggerated using straight lines on the left-hand side, while more curved lines on the right-hand side give a less angular quality. At the same time, the collar is used in Figure 2 to exaggerate the angle of the shoulders, pulling the left side even lower and raising the right higher.
Step Three
Now, as you move down to the arms, observe the sleeves. In Figure 1 they are similar in nature. In Figure 2 the forms are exaggerated, narrowing and widening to make a more interesting composition. The shapes of the cuffs are also exaggerated and the difference of the angle of the hands on the hips has been pushed.
Don’t forget to observe the negative shapes formed by the space between the arms and the side of the body. In Figure 1, the shapes are similar on the left and the right. In Figure 2, the shapes have been pulled and pushed to create a squarer shape on the left as opposed to a longer, more rectangular shape on the right.
Step Four
Finally, moving down to the hips and the legs, you can exaggerate the line of the hip on the left-hand side versus the right, the shape of the skirt and line of the hem, and the shape of the legs, creating more distance between the legs by pushing the left leg farther into the background.
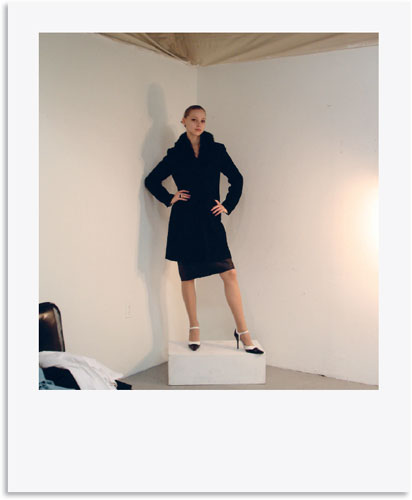
Fig. 1

Fig. 2
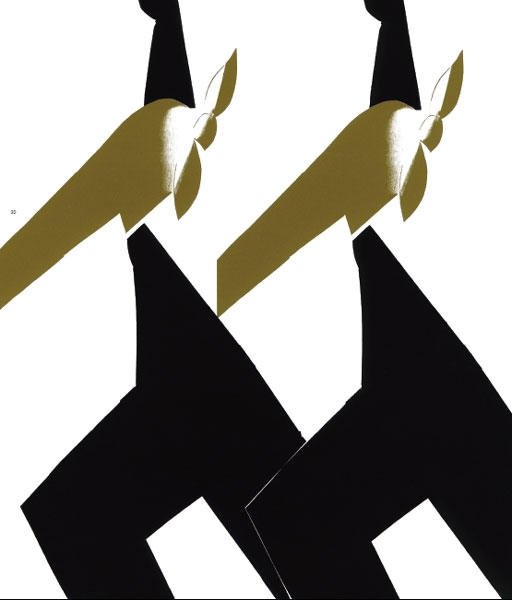
In this illustration, Sirichai has made effective use of exaggerated diagonal and vertical lines and shapes to elongate the figures. Cropping the figures also enhances the impression of height in the image.