Now that we have a robust codebase for gathering data from a computer and reporting it over a HTTP interface, it’s time to start logging and analyzing this data. We need to create a central aggregation process that connects to each of the sensors and pulls the data down. Such a process would allow us to observe correlations between different sensors at the same time as well as trends over time.
To begin with, we’ll need to create a new Python package. It doesn’t make sense for us to distribute all the code for the aggregation process along with the data collection code; we expect many more deployments of the sensor than of the aggregation process.
It’s rare for programmers to start a new project from nothing and to write all the boilerplate themselves. Much more common is to use a template, either explicitly or by copying another project and removing its functionality. It’s much easier to get started from a piece of code that exists but does nothing than it is from an empty directory.
Cookiecutter
While you can create new projects from a template just by copying the directory, there are tools that make the process easier. Although copying a template directory and modifying it seems simple, it often involves renaming files and directories from “skeleton” or “example” to match the name of the project that you’re creating. Tools like cookiecutter automate this process by allowing you to create templates that use variables provided when first creating a project.
There are many preexisting cookiecutter templates; some provide templates for generic Python packages, others have templates for more complicated things. There are specialized templates for things as diverse as hybrid Python/rust packages, Python-based smartphone applications, and Python web applications.
You do not need to install cookiecutter templates; in fact, you cannot. A template can only be referenced as either a path to a local copy of the template or as a remote specification for git (as in, what you would usually pass to git clone2). When you specify a remote template, cookiecutter automatically downloads and uses that template. If you’ve already used that template previously, you’ll be prompted to replace it with the freshly downloaded version.
If you have a template that you use regularly, I recommend keeping a local checkout of it. Don’t forget to update it regularly, in case fixes have been applied in the git repository, but as well as a small speed improvement, this allows you to generate code when not connected to the Internet.
If you find yourself without a network connection but didn’t maintain a local checkout, cookiecutter may have a cache from a past invocation at ~/.cookiecutter/
Creating a new template
We could use these templates as the basis for our aggregation process, but none of them exactly match the decisions we made in the earlier chapters. Instead, I’ll create a new template that captures this book’s recommendations for a minimal Python package. You can adapt this to match your preferences or create new templates to automate boilerplate code creation specific to your work.
If you want to use the template as I describe here, there’s no need for you to make your own version. My template can be used with cookiecutter gh:MatthewWilkes/cookiecutter-simplepackage. This section explains the process of creating your own custom templates.
cookiecutter.json
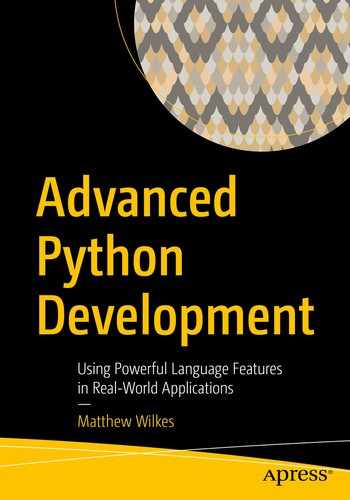
We also need to create a directory that contains the templates we’re going to create. We can also use braces to include user-supplied values in filenames, so this should be called {{ cookiecutter.project_slug }} to create a directory whose name is the same as the project_slug value. We could use any value from cookiecutter.json; however, the project slug is the best choice. This directory will become the root of the new project’s git repository, so its name should match the expected repository name.
From here, we can create the various files that we want to include in every project of this type, such as the build files (setup.py, setup.cfg), the documentation (README.md, CHANGES.md, LICENCE), and the test/ and src/ directories.
A comparison of the folder structure we have vs. what we need
We need this additional level in the directory structure because apd is a namespace package. When we first created apd.sensors , we decided that apd would be a namespace, which allows us to create multiple packages within the namespace on the condition that no code is placed directly in the namespace packages, only the standard packages they contain.
We need some custom behavior here, above and beyond what is possible with a template alone.3 We need to recognize where there is a . in a slug and, in that case, split the slug and create nested directories for each of the parts. Cookiecutter supports this requirement through the use of a post-generation hook. In the root of the template, we can add a hooks directory with a post_gen_project.py file. Pre-generation hooks, stored as hooks/pre_gen_project.py, are used to manipulate and validate user input before generation starts; post-generation hooks , stored as hooks/post_gen_project.py, are used to manipulate the generated output.
hooks/post_gen_project.py
The *namespaces, base_name = package_name.split(".") line is an example of extended unpacking. It has a similar meaning to *args in function definitions; the base_name variable contains the last item split from package_name, and any previous ones are stored as a list called namespaces. If there are no . characters in package_name, then base_name would be equal to package_name and namespaces would be an empty list.
Creating the aggregation package
We can now use the cookiecutter template to create a package for the aggregation process, called apd.aggregation. Change to the parent directory of the apd.code directory, but there’s no need to create a directory for the aggregation process as our cookiecutter template does this. We invoke the cookiecutter generator and fill in the details we want and then can initialize a new git repository in that directory with the generated files added in the first commit.
The next step is to start creating utility functions and accompanying tests to gather the data. As part of this, we must make some decisions about what exactly the responsibilities of the aggregation process are and what features it provides.
Gather value of a sensor from all endpoints on demand
Record value of a sensor automatically at a specific time interval
Recall data of a sensor recorded at a particular point in time for one or more endpoints
Recall data of a sensor at a range of times for one or more endpoints
Find times where sensor values match some condition (such as within a range, maximum, minimum), either across all time or in a time range
- Support all sensor types, without needing modifications to the server to store their data
It’s fine to require the sensor be installed on the server to analyze it, but not to retrieve data.
Must be possible to export and import compatible data, both for data portability and backup purposes
Must be possible to delete data by time or endpoint4
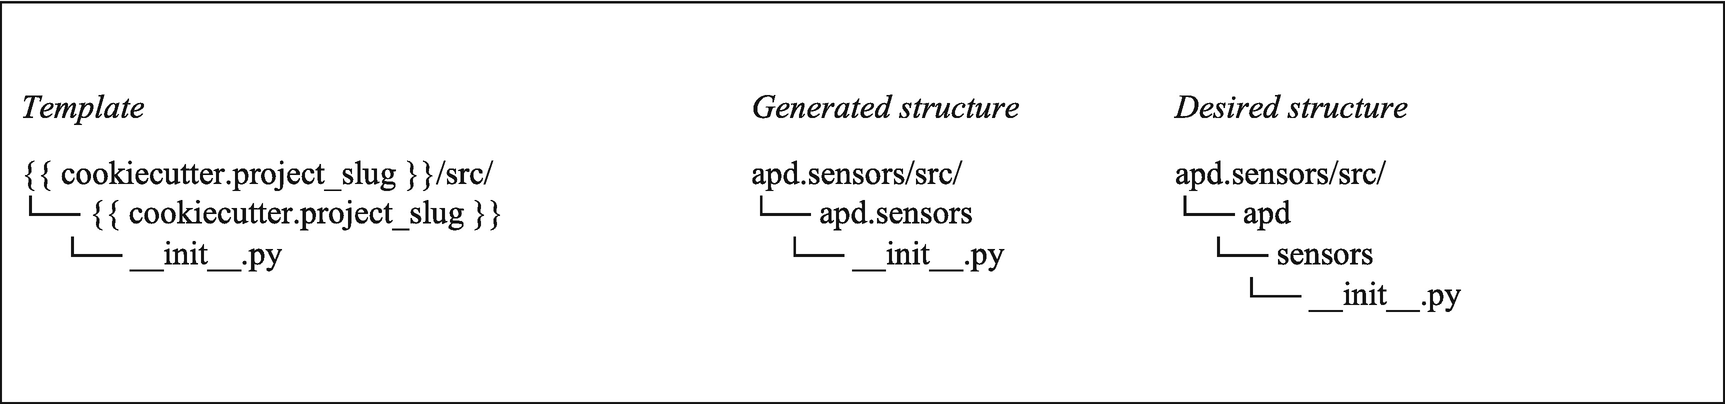
Database types
Decision tree for picking a class of database
The first question I ask myself is to rule out a few special cases of database technology. These are valuable technologies, and in their particular niche, they are excellent, but they are relatively infrequency required. These are append-only databases – where, once something is written, it can’t be (easily) removed or edited. This kind of database is a perfect match for logs, such as transaction logs or audit logs. The primary difference between a blockchain and an append-only database is trust; while both prevent editing or deleting data in the typical case, a standard append-only database can be edited by manipulating the underlying storage files. A blockchain is slightly different; it allows a group of people jointly to act as the maintainer. Data can only be edited or removed if at least 50% of the users agree. Any users that don’t agree can keep the old data and leave the group. At the time of writing, blockchains are the fashionable database du jour, but they are inappropriate for almost all applications.
Much more useful are the database types to the left of the diagram. They are the SQL and NoSQL databases. NoSQL databases were fashionable in the early 2010s. Relational databases have since adopted some of their features as extensions and additional data types. The use of SQL or not isn’t the critical way of distinguishing between these database types, but rather if they are schemaless or not. This difference is similar to Python with and without type hints; a schemaless database allows users to add data of any arbitrary shape,5 whereas a database that has a defined schema validates data to ensure it meets the expectations of the database author. A schemaless database might appear to be more appealing, but it can make querying or migrating data much more difficult. If there are no guarantees over what columns are present and their types, it’s possible to store data that appears to be correct but presents problems later in development.
For example, imagine we have a temperature log table which stores the time a temperature value is logged, the sensor that logged this temperature, and the value. The value would likely be declared to be a decimal number, but what would happen if a sensor provided a string like "21.2c" instead of 21.2? In a schema-enforcing database, this would raise an error, and the data would fail to insert. In a schemaless database, the insert would succeed but attempts to aggregate the data (such as calculating the mean) fail if one of these incorrectly formatted entries is present in the retrieved data set. As with Python’s type hinting, this doesn’t protect against all errors, just a type of error. A value of 70.2 would be accepted as it’s a valid number, even though a human can tell that it is a measurement in degrees Fahrenheit rather than Celsius.
The final thing we need to consider is how we’re going to be querying the data. Querying support is the hardest of these three questions to generalize, as there are significant differences within classes of database. People often describe relational databases as being better for querying and NoSQL databases as being more reliant on a natural key, like a path in an object store or a key in a key/value store. However, this is an oversimplification. For example, SQLite is a relational database, but it has a relatively minimal set of indexing options compared to alternatives such as PostgreSQL; and Elasticsearch is a NoSQL database designed for flexibility in indexing and search.
Our example
In our case, we find it very difficult to decide a single type for the value of a sensor, other than the fact that all values are JSON serializable. We want to be able to access the internals of this type, for example, the magnitude of a temperature value or the length of a list of IP addresses. If we were to build this with standard relational database constructs, we’d struggle to represent these options in a future-proof way. We’d have to write the database structure with foreknowledge of the different types of value that could be returned.
A better fit for us is to use a schemaless database, letting the JSON representation of the sensor returned from the API be the data that’s stored. We have a guarantee that we can restore this data accurately (assuming we have the same version of the sensor code), and there is no difficulty in finding a way of representing it.
This question has taken us to the lowest of the decision points on our decision tree; we now need to consider the relationships between items in the database. A single sensor value is related to other values by virtue of being generated by the same sensor type, by being retrieved from the same endpoint, as well as by being retrieved at the same time. That is, sensor values are related through sensor name, endpoint URL, and creation time. These multiple dimensions of relationship should steer us toward a database with rich indexing and query support, as it would help us to find related data. We would also want to look to a database with good querying support as we want to be able to find records from their values, not just the sensor and time.
This format balances some of the advantages of fixed-schema databases, in that it’s partially fixed. The name and collected_at fields are fixed columns, but the remaining data field is a schemaless field. In theory, we could store JSON or any other serialization format as a TEXT column in this table, but using the JSONB field allows us to write queries and indexes that introspect this value.
Object-relational mappers
It’s entirely possible to write SQL code directly as Python, but it’s relatively rare for people to do this. Databases are complex beasts, and SQL is infamous for being vulnerable to injection attacks. It’s not possible to completely abstract away the peculiarities of individual databases, but tools do exist that take care of table creation, column mapping, and SQL generation.
The most popular of these in the Python world is SQLAlchemy, written by Michael Bayer and others. SQLAlchemy is a very flexible object-relational mapper; it handles the translation between SQL statements and native Python objects, and it does so in an extensible way. Another commonly used ORM is the Django ORM, which is less flexible but offers an interface which requires less knowledge of how databases work. In general, you’ll only be using the Django ORM if you’re working on a Django project, and otherwise, SQLAlchemy is the most appropriate ORM.
SQLAlchemy does not ship with type hints; however, there is a mypy plugin called sqlmypy that provides hints for SQLAlchemy and teaches mypy to understand the types implied by column definitions. I would recommend using this on SQLAlchemy-based projects where you are using type checking. The code accompanying this chapter makes use of this plugin.
To begin with, we need to install SQLAlchemy and a database driver. We need to add SQLAlchemy and psycopg2 to the install_requires section in setup.cfg and trigger these dependencies to be reevaluated using pipenv install -e . on the command line.
There are two ways of describing a database structure with SQLAlchemy, the classic and declarative styles. In the classic style, you instantiate Table objects and associate them with your existing classes. In the declarative style, you use a particular base class (which brings in a metaclass), then you define the columns directly on the user-facing class. In most cases, the Python style of the declarative method makes it the natural choice.
The column objects we’ve used on our class behave in an unusual way. When we access a column from the class, such as DataPoint.sensor_name, we get a special object that represents the column itself. These objects intercept many Python operations and return placeholders that represent the operation. Without this interception, DataPoint.sensor_name == "temperature" would be evaluated and the filter(...) function would be equivalent to Session.query(DataPoint).filter(False).all().
The implied database type of an expression is stored on the type attribute of the result of the expression. In the case of comparisons, it is always Boolean.
When the same expression is performed on an instance of the DataPoint type, it retains none of the SQL-specific behaviors; the expression evaluates the actual data of the object as normal. Any instance of a SQLAlchemy declarative class works as a normal Python object.
As such, developers can use the same expression to represent both a Python condition and a SQL condition.
This is possible because the object referred to by DataPoint.sensor_name is a descriptor. A descriptor is an object that has some combination of the methods __get__(self, instance, owner), __set__(self, instance, value), and __delete__(self, instance).
Descriptors allow for custom behavior of instance attributes, allowing for arbitrary values to be returned when the value is accessed on a class or an instance, as well as customizing what happens when the value is set or deleted.
Some core Python features are implemented as descriptors: they’re a very powerful way of hooking into a deep part of the core object logic. Without knowing about them, features like the @property and @classmethod decorators seem like magic that’s specifically looked for by the interpreter, rather than something you could program yourself.
That said, I have never yet had cause to write a descriptor, although I’ve used the @property decorator frequently. If you find yourself copy/pasting your property definitions, you may want to consider consolidating their code into a single descriptor.
Versioning the database
There is a function in SQLAlchemy to create all the various tables, indexes, and constraints that have been defined in this database. This checks the tables and columns that have been defined and generates the matching database structure for them.
This function looks great at first, but it’s very limited. You will likely add more tables or columns in future or at least more indexes when you’ve done some performance testing. The create_all(...) function creates all things that do not yet exist, meaning any tables that are changed but did exist previously are not updated if you re-run create_all(...). As such, relying on create_all(...) can result in a database that has all the tables you expect but not all of the columns.
To combat this, people use a SQL migration framework. Alembic is the most popular one for SQLAlchemy. It works by connecting to an instance of the database and generating the actions that would be needed to bring the connected database in sync with the one defined in code. If you’re using the Django ORM, there is a built-in migration framework that instead works by analyzing all the past migrations and comparing that analyzed state with the current state of the code.
These frameworks allow us to make changes to the database and trust that they will be propagated to actual deployments, regardless of what versions of the software they’ve used in the past. If a user skips a version or three, any migrations between those versions will also be run.
The majority of the files are created in an alembic/ directory inside the package. We need to put the files here so that they’re accessible to people who install the package; files outside of this hierarchy aren’t distributed to end-users. The exception is alembic.ini, which provides the logging and database connection configuration. These are different for each end-user and so can’t be included as part of the package.
We need to modify the generated alembic.ini file , primarily to change the database URI to match the connection string we’re using. We can leave the value of script_location=src/apd/aggregation/alembic if we like, as in this development environment, we’re using an editable installation of apd.aggregation, but that path won’t be valid for end-users, so we should change it to reference an installed package, and we should include a minimal alembic.ini example in the readme file.
Alembic scripts generally only apply to user models (dependencies have their own configuration and ini files to migrate their models). Users never have a valid reason to generate new migrations for models included in their dependencies. Django’s ORM, on the other hand, processes user models and dependencies at the same time, so if a maintainer releases a broken version of a package, it’s possible that end-users might inadvertently create new migrations for it when generating their own migrations. For this reason, it’s essential to check that migration files are properly committed and released. When generating new migrations as an end-user, you should sanity-check the files that are created are for your code and not a dependency.
We also need to customize the generated code inside the package, starting with the env.py file. This file needs a reference to the metadata object that we looked at earlier when using the create_all(...) function , so it can determine what the state of the models is in code. It also contains functions for connecting to the database and for generating SQL files that represent the migration. These can be edited to allow customizing database connection options to match our project’s needs.
The revision command creates a file in the alembic/versions/ directory. The first part of the name is an opaque identifier which is randomly generated, but the second half is based on the message given above. The presence of the --autogenerate flag means that the generated file won’t be empty; it contains the migration operations required to match the current state of the code. The file is based on a template, script.py.mako in the alembic/ directory. This template is added automatically by Alembic. Although we can modify it if we want, the default is generally fine. The main reason to change this would be to modify the comments, perhaps with a checklist of things to check when generating a migration.
After running black on this file and removing comments containing instructions, it looks like this:
The four module-scope variables are used by Alembic to determine the order in which migrations should be run. These should not be altered. The bodies of the upgrade() and downgrade() functions are what we need to check, to make sure that they’re doing all the changes we expect and only the changes we expect. The most common change that’s needed is if there is an incorrect change detected, such as the migration altering a column but the target state being equal to the start state. This can happen if a database backup was incorrectly restored, for example.
A less common (but still regularly seen) problem is that sometimes an alembic migration includes import statements which introduce code from a dependency or elsewhere in user code, usually when developers are using a custom column type. In this case, the migration must be altered as it’s important that the migration code is entirely freestanding. Any constants should also be copied into the migration file, for this same reason.
If a migration imports external code, then its effects may change over time as that external code changes. Any migrations whose effects aren’t wholly deterministic could lead to real-world databases having inconsistent states, depending on which version of the dependency code was available at the time of the migration.
There is a status field which, as an Enum field, can only contain preselected values. If version 1.0.0 of the code defines UserStates = ["valid", "deleted"], then the Enum will be created with those as the valid options. However, version 1.1.0 might add another state, making UserStates = ["new", "valid", "deleted"] to represent users having to verify their accounts before they can log in. Version 1.1.0 would also need to add a migration to add "new" as a valid type to this Enum.
If a user installed version 1.0.0 and ran the migration, then later installed 1.1.0 and re-ran the migration, then the database would be correct. However, if the user only learned about the software after 1.1.0 came out and ran both migrations with 1.1.0 installed, then the initial migration would add all three user states, and the second one would be unable to add a value that’s already present.
As developers, we’re used to the idea that we shouldn’t duplicate code, as it causes maintainability problems, but database migrations are an exception. You should duplicate any code you need in order to ensure that the behavior of the migration doesn’t change over time.
Finally, some changes are ambiguous. If we were to change the name of the datapoints table we’ve created here, it would not be clear to Alembic if this were a name change or the removal of one table and the creation of another that happens to have the same structure. Alembic always errs on the side of drop and recreate, so if a rename is intended, but the migration isn’t changed, data loss occurs.
Details on the available operations are available in the Alembic documentation, which provides all the everyday operations you might need. Operation plugins can offer new operation types, especially database-specific operations.
When you make changes to an upgrade operation, you should also make the equivalent changes to the downgrade operation. If you don’t want to support downgrading from a particular version, you should raise an exception rather than leave incorrect autogenerated migration code in place. For nondestructive migrations, allowing downgrade is very helpful as it allows developers to revert their database when switching between feature branches.
Other useful alembic commands
- alembic current
Shows the version number that the connected database is at.
- alembic heads
Shows the latest version number in the migration set. If there is more than one listed version, then the migrations need to be merged.
- alembic merge heads
Creates a new migration that depends on all the revisions listed by alembic heads, ensuring that they are all performed.
- alembic history
Shows a listing of all migrations known to Alembic.
- alembic stamp <revisionid>
Replace <revisionid> with the alphanumeric revision identifier to mark an existing database as being at that version without running any migrations.
- alembic upgrade <revisionid>
Replace <revisionid> with the alphanumeric revision identifier to upgrade to. This can be head8 for the most recent revision. Alembic follows the revision history, running the upgrade method of any migrations that have not been performed.
- alembic downgrade <revisionid>
Like upgrade, but the target revision is earlier, and the downgrade methods are used. In my experience, this works less well across merge migrations than a straight migration path, and you should be aware that a downgrade isn’t the same as an undo. It cannot restore data in columns that were dropped.
Loading data
Now we have the data model defined, and we can begin to load in data from the sensors. We’ll do this over HTTP with the excellent requests library. There is support for making HTTP requests built-in to Python, but the requests library has a better user interface. I recommend using requests over the standard library HTTP support in all situations. You should only use the standard library’s HTTP request support in cases where it’s not practical to use dependencies.
The lowest-level building block we need for pulling data from sensors is a function that, given the API details for an endpoint, makes a HTTP request to the API, parses the results, and creates DataPoint class instances for each sensor.
This function connects to the remote server and returns DataPoint objects for each sensor value present. It can also raise a ValueError representing an error encountered while attempting to read the data and performs some basic checking of the URL provided.
I just described the get_data_points() function as returning DataPoint objects, but that’s not strictly correct. It uses the yield keyword, rather than return. We briefly saw this in Chapter 5 when writing a WSGI application that returns parts of the response with a delay in between.
The yield statement makes this a generator function. A generator is a lazily evaluated iterable of values. It can produce zero or more values or even infinitely many. Generators only generate the items that the caller requests, unlike normal functions which calculate the full return value before the first one is available to the caller.
It is also possible to convert them to lists or tuples using the list(a) syntax (so long as they don’t contain infinitely many items); however, this takes their state into account. If you’ve already extracted some or all of the items from the generator, then the result of list(a) will only contain those remaining.
Generator functions
The preceding examples are generator expressions, but get_data_points() is a generator function. These use the yield keyword to specify what the next value should be, and then execution is paused until the user requests a further value. Python remembers the function’s state; when the next item is requested, it is resumed from the point of the yield statement.
This can be very useful, as some functions take a long time to generate each subsequent value. The alternative is to make a function where you need to specify the number of items you want to generate, but the generator model allows you to inspect the items as they’re returned before deciding if you want more.
When to use them
Sometimes it can be unclear if it’s best to use a generator or a normal function. Any function that just generates data alone can be a generator function or a standard function, but functions that perform actions on data (such as adding data points to a database) must be sure to consume the iterator.
If in doubt, use a standard function, rather than a generator function. Either way, make sure you test that your function is behaving as expected.
Write a generator function that provides an infinite supply of data points from a single sensor. You should use yield on DataPoint instances you construct and wait a second between samplings using the time.sleep(...) function.
Once you have written this function, you should loop over its values to see the data come through in bursts as the sensor is queried. You should also try using the standard library’s filter(function, iterable) function to find only the values of a specific sensor.
An example implementation for this is available in this chapter’s accompanying code.
Helper functions in collect.py
Then, we are using @click.argument for the first time. We use this to collect bare arguments to the function, not options with associated values. The nargs=-1 option to this argument states that we accept any number of arguments, rather than a specific number (usually 1). As such, the command could be invoked as collect_sensor_data http://localhost:8000/ (to collect data from localhost only), as collect_sensor_data http://one:8000/ http://two:8000/ (to collect data from two servers), or even as collect_sensor_data (no data would be collected, but the database connection would be tested implicitly).
The --api-key and --verbose options likely don’t need any explanation, but the --tolerate-failures option is one that we might not have considered. Without this option and its support code, we’d run the standalone(...) function with all the sensor locations, but if one failed, the entire script would fail. This option allows the user to specify that in cases where there are multiple servers specified, then any that succeed have their data saved and failing sensors are omitted. The code achieves this by using this option to decide if it should download data from [("http://one:8000/", "http://two:8000/")] or [("http://one:8000/", ), ("http://two:8000/", )]. The code for this command passes all the servers to standalone(...) in the normal case, but if --tolerate-failures is added, then there will be one call to standalone(...) for each of the server URLs. This is very much a convenience feature, but it’s one I would like if I were using this command myself.
Finally, the support functions are relatively simple. The add_data_from_sensors(...) function wraps the existing get_data_points(...) function and calls session.add(...) on each data point it returns. It then passes these through to the caller as a return value, but as a list rather than a generator. As we’re looping over the generators, it ensures that the iterator is fully consumed. Calls to add_data_from_sensors(...) have access to the DataPoint objects, but they are not obliged to iterate over them to consume a generator.
Developers who enjoy a functional coding style sometimes fall into a trap here. They may be tempted to replace this function with something like map(Session.add, items). The map function creates a generator, so this would need to be consumed to have any effect. Doing so can introduce subtle bugs, such as code that only works when you have a verbose flag enabled, which causes the iterable to be consumed by logging statements.
map(...) if the function you called on the items has any side effects, such as registering the objects with a database session. Always use a loop instead; it’s clearer and places no obligations on later code to ensure the generator is consumed.
New technologies
We’ve touched lightly on some technologies that are very frequently used. I recommend taking the time to understand all of the decisions we made in this chapter regarding their use. To that end, a quick recap of my recommendations is given in the following.
Databases
Pick a database that matches what you need to do with your data, not what is the current vogue. Some databases, like PostgreSQL, are a good default choice precisely because they offer so much flexibility, but flexibility comes at a complexity cost.
Use an ORM and a migration framework if you’re using a SQL-based database. In all but extreme edge cases, they serve you better than writing your own custom SQL. Don’t be fooled into thinking that the ORM would shield you from knowing about databases, however. It eases the interface, but you’ll have a tough time if you try to interact with a database without understanding its needs.
Custom attribute behavior
If you need something that acts like a calculated property, that is, something that behaves like an attribute on an object but actually builds its value from other sources, a @property is the best way to go. The same is true for one-off wrappers of values, where data is modified or reformatted. In this case, a property with a setter should be used.
If you are writing a behavior to be used multiple times in your codebase (and especially if you’re building a framework for others to use), a descriptor is usually a better choice. Anything that you can do with a property can be done with a custom descriptor, but you should prefer properties as they’re easier to understand at a glance. If you create a behavior, you should be careful to ensure that it does not stray too far from behavior other developers would expect from Python code.
Generators
Generators are appropriate for cases where you want to provide an infinite (or exceedingly long) stream of values to be looped over. They can be used to reduce memory consumption if the user of the generator does not need to keep a record of all previous values. This strength can also be their biggest drawback: code in a generator function is not guaranteed to execute unless you consume the whole generator.
Do not use generators except for in functions where you need to generate a list of items which would only be read once, where the generation is expected to be slow, and where you’re not certain that the caller needs to process all of the items.
Summary
We’ve done a lot in this chapter: we’ve created a new package, introduced ORMs and migration frameworks, and peeked behind the curtain at some deep magic the Python interpreter uses to determine what happens when you access an attribute of an object. We also have a working aggregation process that pulls data from each of our sensors and stores them for later use.
In the next chapter, we’ll dive even further into complex uses of the yield functionality when we look at how asynchronous programming can be achieved in Python and when it’s an appropriate solution to problems.
Additional resources
Julia Evans’s Become a SELECT star (paid for, samples available at https://wizardzines.com/zines/sql/) is a charming explanation of the details of relational databases in a printable format. If you’re new to relational databases, this is a great place to start.
The PostgreSQL documentation on JSON types has details about query behavior for extracting information from within a JSON field. It is at www.postgresql.org/docs/current/datatype-json.html.
The blogpost https://www.citusdata.com/blog/2016/07/14/choosing-nosql-hstore-json-jsonb/ has some good tips on how to choose between the two variants of JSON column in PostgreSQL, as well as the older hstore type that I haven’t covered in this book.
The Python documentation on descriptors has many examples of how descriptors are used to implement features of the standard library: https://docs.python.org/3/howto/descriptor.html.
There is an aggregator of Cookiecutter templates at http://cookiecutter-templates.sebastianruml.name/.