© Matthew Wilkes 2020
M. WilkesAdvanced Python Developmenthttps://doi.org/10.1007/978-1-4842-5793-7_12

12. Callbacks and data analysis

Matthew Wilkes1 
(1)
Leeds, West Yorkshire, UK
 

Throughout the last 11 chapters, we’ve written a pair of utilities to collect data from various sources and aggregate it together. We’ve designed systems for displaying the aggregated data, recovering from error conditions, and enabling end-users to customize every step of the process for their own needs. However, the only way to interact with this data is to view it on a screen. There is no functionality available for actively analyzing the data as it comes in and reacting accordingly.

In this final chapter, we’ll add a new concept to the aggregation process, allowing us to build both triggers that detect certain conditions in the input data and actions to run when those conditions are detected. Some potentially useful ones are threshold points for data (such as temperature above 18°C, solar panel output above 0.5 kW, or RAM available under 500MB). Alternatively, there are correlations between two sensors, such as the temperature on one sensor differing from the temperature of another by more than a threshold, or correlations across time, such as the solar power being significantly more or less than the previous day.

Generator data flow

All the analysis code we’ve written so far is passive; it is interposed between a data source and a consumer and modifies the data as the consumer pulls it through. These functions are all variations on a for loop; they iterate over the source data and may yield output. Generators are an excellent way of refactoring loops where both the input and output are iterables.

The same code can be expressed in a few different ways, as a comprehension, a loop that modifies a shared variable, or as a generator function. For example, our clean_passthrough(...) function to get values from DataPoint objects is a generator function, as shown in Listing 12-1.
async def clean_passthrough(
    datapoints: t.AsyncIterator[DataPoint],
) -> CLEANED_DT_FLOAT:
    async for datapoint in datapoints:
        if datapoint.data is None:
            continue
        else:
            yield datapoint.collected_at, datapoint.data
Listing 12-1

The passthrough cleaner generator function

We can use this to convert an async iterator of data points to a list of date and value pairs by using values = [value async for value in clean_passthrough(datapoints)].

The same logic could be expressed directly as a list comprehension or as a loop that manipulates a list object. These are shown as the two implementations in Table 12-1.
Table 12-1

Comprehension and loop implementations of the same logic

cleaned = [

    (datapoint.collected_at, datapoint.data)

    async for datapoint in datapoints

    if datapoint.data

]

results = []

async for datapoint in datapoints:

    if datapoint.data is None:

        continue

    else:

        results.append(

            datapoint.collected_at, datapoint.data

        )

The critical difference is that by using a generator function, we can refer to the logic of the loop by the name of the function. With comprehensions and standard loops, we always define the logic in terms of the data we’re working on. It’s this property that made generator functions the best choice for us, as we need to pass a reference to the logic to the constructor of the Config object without having yet extracted any data.

In any case, the more complex cleaner functions we’ve written could not have been expressed as a comprehension. They need variables to keep track of state and to perform different operations conditionally. Any comprehension can be rewritten as a generator function,1 but not all generator functions can be rewritten as comprehensions. If you have a comprehension that’s becoming overly complex, you should consider refactoring it into a for loop or as a generator function.

Generators that consume their own output

The generator functions we’ve looked at so far have emulated a for loop. They have a source of data as an argument and can be iterated over. A generator function implements the logic of a loop, and a function calls it with the source data it wants to be processed. This looks like Listing 12-2, which shows a simple generator function for summing some numbers.
import typing as t
def sum_ints(source: t.Iterable[int]) -> t.Iterator[int]:
    """Yields a running total from the underlying iterator"""
    total = 0
    for num in source:
        total += num
        yield total
def numbers() -> t.Iterator[int]:
    yield 1
    yield 1
    yield 1
def test():
    sums = sum_ints(numbers())
    assert [a for a in sums] == [1, 2, 3]
Listing 12-2

Generator to sum numbers

In this example, the numbers() function is used to provide an iterator of integers, and the sum_ints(...) function takes any iterable of integers and adds them up. Although the test() function is responsible for calling both functions and connecting them together, it iterates over the output of sum_ints(...) only. It’s sum_ints(...) that iterates over the output of numbers(), not test(). In this way, the data flows from the numbers() function to the sum_ints(...) function to the test() function, as shown in Figure 12-1.
../images/481001_1_En_12_Chapter/481001_1_En_12_Fig1_HTML.jpg
Figure 12-1

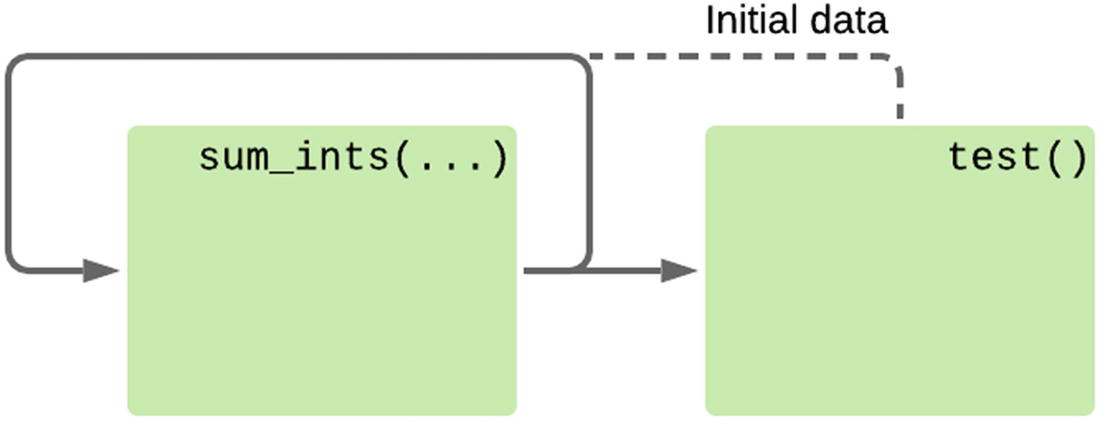
The data flow behavior of a chain of iterators

Although we can pass any arbitrary iterable to a function to iterate over, there are times where we want more explicit control over what the next piece of data to process should be. One of the hardest things to express with this pattern of consuming generator is priming a generator with an initial value, then feeding its own output back in as input (Figure 12-2).
../images/481001_1_En_12_Chapter/481001_1_En_12_Fig2_HTML.jpg
Figure 12-2

An iterator that processes its own output, with an initial value

Any time we want to have a generator that processes its own output, we’d have to code it to do so, rather than using an input iterator as the data source, as shown in Listing 12-3. This prevents it from being used in any way apart from on its own output.
import itertools
import typing as t
def sum_ints(start: int) -> t.Iterator[int]:
    """Yields a running total with a given start value"""
    total = start
    while True:
        yield total
        total += total
def test():
    sums = sum_ints(1)
    # Limit an infinite iterator to the first 3 items
    # itertools.islice(iterable, [start,] stop, [step])
    sums = itertools.islice(sums, 3)
    assert [a for a in sums] == [1, 2, 4]
Listing 12-3

A variant that has only a single start value, then processes its output

There are real use cases for wanting to write functions that can work either on an input stream or on their own output. Any function that returns data in the same output format as its input can be written like this, but functions that iteratively improve their input are a good fit.

For example, if we have a function that reduces the size of an image by rescaling it to be 50% of its input size, we could write a generator function that, given an iterable of images, returns an iterator of resized images. Alternatively, if we could use that same generator on its own output, we could provide an input image and get a generator of progressively smaller versions of that same initial image.

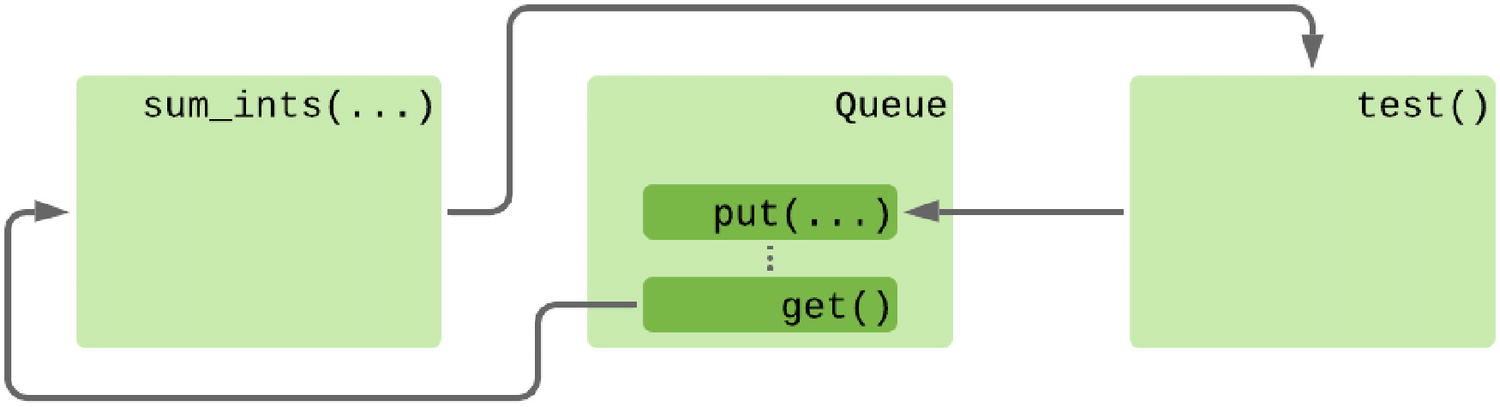
The new function we’ve defined can no longer be used to add an arbitrary iterable of integers like we originally wanted. One way we can make the sum_ints(...) function work both on its own output and with arbitrary iterables is to define a new iterator that uses a closure to share state between the code that’s consuming the generator and its function.

We can create a function that returns two iterators, one that delegates to the sum_ints(...) iterator and stashes a copy of the latest value and another iterator to be used as the input to sum_ints(...) that uses the shared value from the first function.2 The data flow for this wrapper function is shown in Figure 12-3.
../images/481001_1_En_12_Chapter/481001_1_En_12_Fig3_HTML.jpg
Figure 12-3

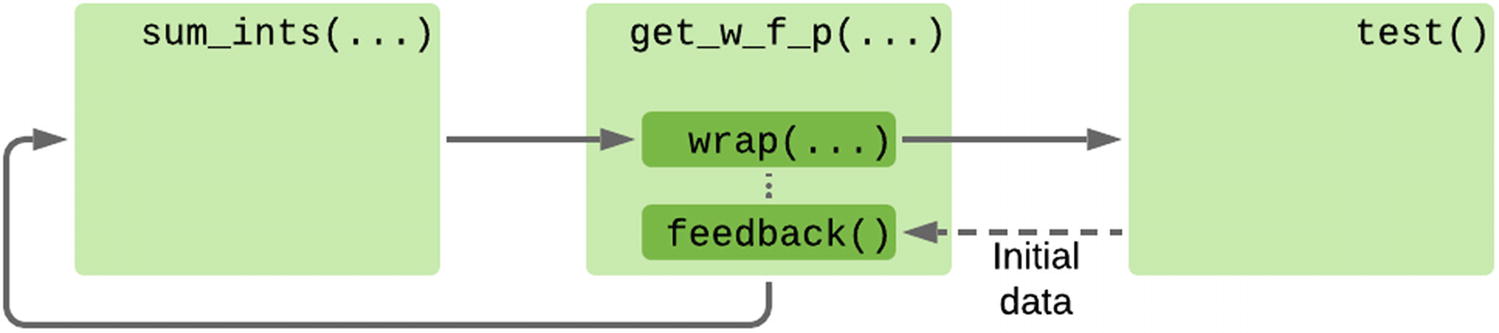
Data flow using a wrapper function to generate an iterator that works on its own output

Listing 12-4 demonstrates one way of writing this wrapper function. The get_wrap_feedback_pair(...) function provides the two generators, which are used in the test() method to create a version of sum_ints(...) with a known initial value that passes its own output back as input.
import itertools
import typing as t
def sum_ints(source: t.Iterable[int]) -> t.Iterator[int]:
    """Yields a running total from the underlying iterator"""
    total = 0
    for num in source:
        total += num
        yield total
def get_wrap_feedback_pair(initial=None):  # get_w_f_p(...) above
    """Return a pair of external and internal wrap functions"""
    shared_state = initial
    # Note, feedback() and wrap(...) functions assume that
    # they are always in sync
    def feedback():
        while True:
            """Yield the last value of the wrapped iterator"""
            yield shared_state
    def wrap(wrapped):
        """Iterate over an iterable and stash each value"""
        nonlocal shared_state
        for item in wrapped:
            shared_state = item
            yield item
    return feedback, wrap
def test():
    feedback, wrap = get_wrap_feedback_pair(1)
    # Sum the iterable (1, ...) where ... is the results
    # of that iterable, stored with the wrap method
    sums = wrap(sum_ints(feedback()))
    # Limit to 3 items
    sums = itertools.islice(sums, 3)
    assert [a for a in sums] == [1, 2, 4]
Listing 12-4

Helper function to feed a generator’s output back as input

Now the sum_ints(...) function represents the logic being applied on each step of the loop, and get_wrap_feedback_pair(...) encodes the relationship between the output of the generator and the next value it should process. If we wanted to, for example, make a database query based on the results of the output and use that to supply the next value, we’d need to design a new variant of get_wrap_feedback_pair(...) that encodes the new relationship between input and output.

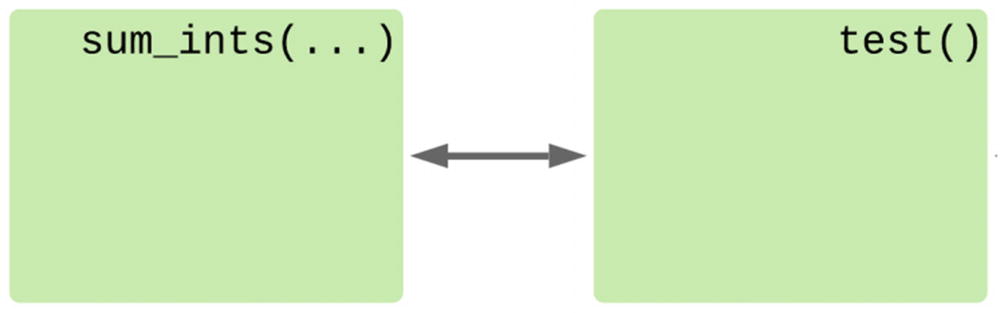
This approach gets us closer to being able to control the data flow in an iterator dynamically from the calling function, but it’s still limited. It works perfectly well if we only ever want one relationship, but as the code is self-contained, the calling function (test(), in our case) can’t influence the behavior. It relies on the wrapper function to implement the appropriate logic.

Enhanced generators

An alternative is to change the behavior of the generator to use the “enhanced generator” syntax.3 This allows data to be sent into a running generator every time it yields an item. It’s still rather limited, as you cannot send more data than is yielded, but it does allow for a more expressive way of customizing behavior.

So far we’ve been treating yield like an alternative to a return statement, but a yield expression resolves to a value that can be stored in a variable, as received = yield to_send. Under normal operation, the received value is always None, but it’s possible to change this by advancing the generator using the send(...) method. This pattern allows for generator functions that loop over data explicitly provided by their caller each time they’re advanced.

Enhanced Asynchronous Generators

The same model of execution is available to iterators implemented in native coroutines, using the asend(...) coroutine on the asynchronous generator object. This behaves in the same way as the send(...) method, except that it must be awaited. This is needed as asynchronous iterators can block when yielding a new object, and both asend(...) and send(...) calls are special cases of requesting a new object.

The asend(...) result may not be awaited unless the underlying generator is at a yield statement. There is no synchronization involved in this call, so multiple calls cannot safely be scheduled in parallel. You must always await the result of one asend(...) call before making another to the same generator. As such, it’s rare to schedule this as a task.

There is no asynchronous variant of the next(...) method for advancing a generator by one. Although you can manually use await gen.__anext__(), I’d recommend using await gen.asend(None) to advance an asynchronous iterator outside of a loop.

Listing 12-5 shows an example of the integer summing function that receives its data from yield statement return values rather than an input iterable.
import typing as t
def sum_ints() -> t.Generator[int, int, None]:
    """Yields a running total from the underlying iterator"""
    total = 0
    num = yield total
    while True:
        total += num
        num = yield total
def test():
    # Sum the iterable (1, ...) where ... is the results
    # of that iterable, stored with the wrap method
    sums = sum_ints()
    next(sums)  # We can only send to yield lines, so advance to the first
    last = 1
    result = []
    for n in range(3):
        last = sums.send(last)
        result.append(last)
    assert result == [1, 2, 4]
test()
Listing 12-5

Sending data to an in-progress generator

Note

The type definition of the generator has changed from t.Iterable[int] to t.Generator[int, int, None]. The former is equivalent to t.Generator[int, None, None], meaning it yields ints, but it expects to be sent None and returns None as its final value.

The control flow, as shown in Figure 12-4, is much simpler in this case. Rather than data flowing only in one direction, or in loops through intermediate functions, the two functions pass data between themselves freely.
../images/481001_1_En_12_Chapter/481001_1_En_12_Fig4_HTML.jpg
Figure 12-4

Control flow using the enhanced generator method

Enhanced generator functions encode the body of a loop, just like standard generators, but they are closer to the behavior of a while loop than a for loop. Rather than looping over some input data, it’s looping with a condition and receiving intermediate values as it progresses.

This approach works well for situations where there is a stateful function that needs instructions from an outside source, such as image manipulation. An image editing enhanced generator could take an initial image as its input, then commands such as “resize”, “rotate”, “crop”, and so on. The commands could be hard-coded; they could come from user input or from analyzing the last version it output.

Using classes

Enhanced generators can use the value they receive from the yield statement as the next piece of data to process or as an instruction to change what they’re doing, or they can use a mixture of the two.

Code that’s invoked multiple times with a variety of instructions and which shares state between invocations is commonly implemented as a class. In this case, the instance is responsible for storing the state, and the user of the class calls different methods to signal what code path is required.

Any code that uses this approach looks more natural than the enhanced generator syntax. For example, Listing 12-6 shows the same mean calculation behavior expressed as a class.
class MeanFinder:
    def __init__(self):
        self.running_total = 0
        self.num_items = 0
    def add_item(self, num: float):
        self.running_total += num
        self.num_items += 1
    @property
    def mean(self):
        return self.running_total / self.num_items
def test():
    # Recursive mean from initial data
    mean = MeanFinder()
    to_add = 1
    for n in range(3):
        mean.add_item(to_add)
        to_add = mean.mean
    assert mean.mean == 1.0
    # Mean of a concrete data list
    mean = MeanFinder()
    for to_add in [1, 2, 3]:
        mean.add_item(to_add)
    assert mean.mean == 2.0
Listing 12-6

Class-based approach for long-running sets of asynchronous code

This approach is a particularly good fit for situations where you want to share code between multiple similar functions, as the class can be subclassed and individual methods overridden by each implementation. However, developers expect classes to be less stateful than enhanced generators. It’s normal to call methods on an object knowing in advance how many arguments are needed and of what type. An enhanced generator allows developers to write programs where the receiving function decides what data to ask for from the calling function. This can be a good fit where the generator represents an algorithm for collating multiple pieces of data and keeping intermediate results.4

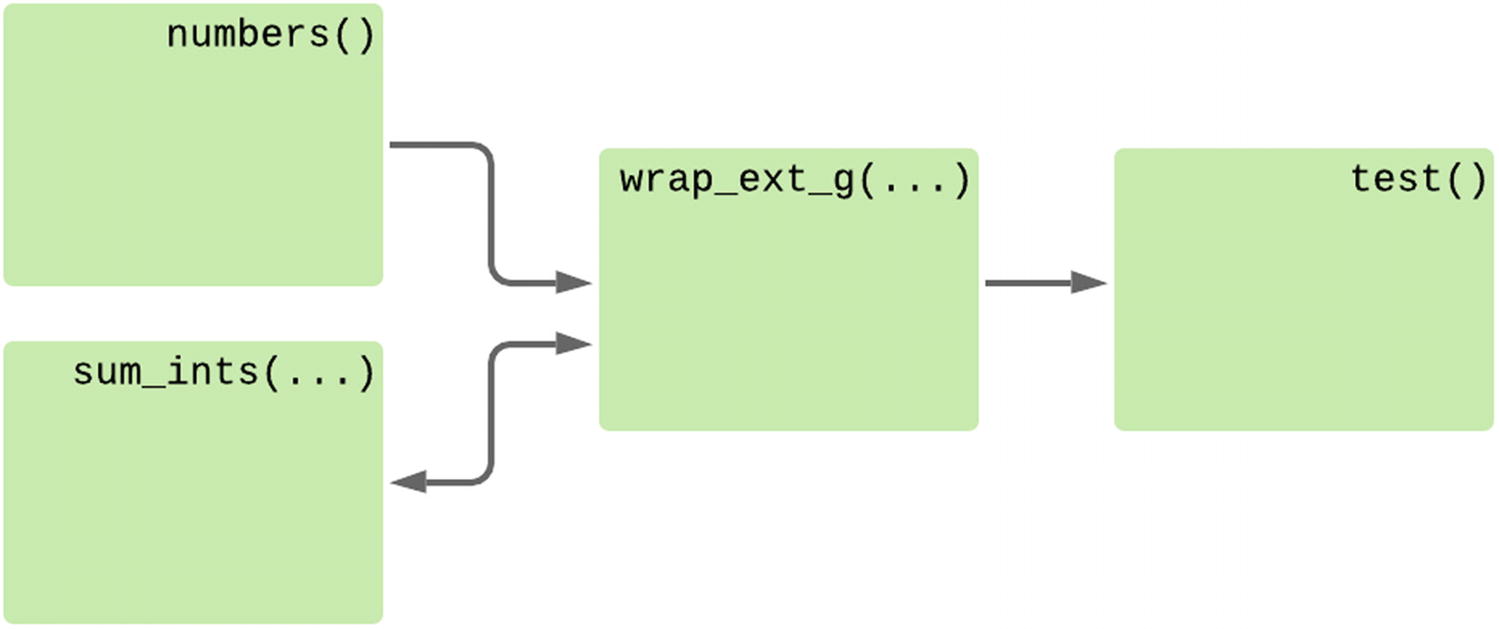
Using an enhanced generator to wrap an iterable

As our enhanced generator changed the control flow to expect new items as the result of yield, we cannot use an enhanced generator in place of a standard generator. This method can be used to create functions that work collaboratively with their calling function to process data, but it’s no longer usable as a simple wrapper around another iterable.

To get around this problem, we can write a wrapper function that converts the signature of an enhanced generator to that of a standard generator function. We can then use the enhanced generator in situations where we need to control the behavior interactively, and the wrapped one for when we have an input iterable, as demonstrated in Listing 12-7.
import typing as t
input_type = t.TypeVar("input_type")
output_type = t.TypeVar("output_type")
def wrap_enhanced_generator(
    input_generator: t.Callable[[], t.Generator[output_type, input_type, None]]
) -> t.Callable[[t.Iterable[input_type]], t.Iterator[output_type]]:
    underlying = input_generator()
    next(underlying)  # Advance the underlying generator to the first yield
    def inner(data: t.Iterable[input_type]) -> t.Iterator[output_type]:
        for item in data:
            yield underlying.send(item)
    return inner
def sum_ints() -> t.Generator[int, int, None]:
    """Yields a running total from the underlying iterator"""
    total = 0
    num = yield total
    while True:
        total += num
        num = yield total
def numbers() -> t.Iterator[int]:
    yield 1
    yield 1
    yield 1
def test() -> None:
    # Start with 1, feed output back in, limit to 3 items
    recursive_sum = sum_ints()
    next(recursive_sum)
    result = []
    last = 1
    for i in range(3):
        last = recursive_sum.send(last)
        result.append(last)
    assert result == [1, 2, 4]
    # Add 3 items from a standard iterable
    simple_sum = wrap_enhanced_generator(sum_ints)
    result_iter = simple_sum(numbers())
    assert [a for a in result_iter] == [1, 2, 3]
Listing 12-7

An enhanced generator that can be used as a standard generator

This approach lets us define an enhanced generator function to define the logic of a single step in a process and then use that logic either as a wrapper around an iterator or to process its own output. The data flow used when looping over an input iterable is shown in Figure 12-5.
../images/481001_1_En_12_Chapter/481001_1_En_12_Fig5_HTML.jpg
Figure 12-5

Control flow of the wrapped enhanced generator

Refactoring functions with excessive return values

Any enhanced generator can also be written as a series of functions, so long as all the required intermediate values are passed with each invocation. Functions that all require an argument are effectively sharing state, just in a more explicit way than usual.

Complex program structures do not fit this idiom well, so I wouldn’t recommend rewriting an enhanced generator to use coroutines. If you see a set of functions in a loop, where the return values from one are immediately passed to another function call without being used, it might be a good candidate for refactoring.

Listing 12-8 demonstrates a pair of functions to calculate the mean of a series of numbers. The mean_ints_split_initial() function provides some initial values which the calling function passes to mean_ints_split(...) along with a new number to add. The mean_ints_split(...) function takes three arguments and returns two values, but the calling function only cares about one argument and one value.
import typing as t
def mean_ints_split_initial() -> t.Tuple[float, int]:
    return 0.0, 0
def mean_ints_split(
    to_add: float, current_mean: float, num_items: int
) -> t.Tuple[float, int]:
    running_total = current_mean * num_items
    running_total += to_add
    num_items += 1
    current_mean = running_total / num_items
    return current_mean, num_items
def test():
    # Recursive mean from initial data
    to_add, current_mean, num_items = mean_ints_split_initial()
    for n in range(3):
        current_mean, num_items = mean_ints_split(to_add, current_mean, num_items)
        to_add = current_mean
    assert current_mean == 1.0
    assert num_items == 3
    # Mean of concrete data list
    current_mean = num_items = 0
    for to_add in [1, 2, 3]:
        current_mean, num_items = mean_ints_split(to_add, current_mean, num_items)
    assert current_mean == 2.0
    assert num_items == 3
Listing 12-8

Code to find the average of some numbers expressed as bare functions

The num_items value being passed around here is only relevant to the implementation of mean_ints_split(...); it’s not useful to the calling function. The API would be more straightforward if developers could instantiate a new mean calculation and then pass numbers in and access the revised mean, without needing to pass the additional context data each time. This is another good use of an enhanced generator, the code for which is shown as Listing 12-9.
import typing as t
def mean_ints() -> t.Generator[t.Optional[float], float, None]:
    running_total = 0.0
    num_items = 0
    to_add = yield None
    while True:
        running_total += to_add
        num_items += 1
        to_add = yield running_total / num_items
def test():
    # Recursive mean from initial data
    mean = mean_ints()
    next(mean)
    to_add = 1
    for n in range(3):
        current_mean = mean.send(to_add)
        to_add = current_mean
    assert current_mean == 1.0
    # Mean of a concrete data list
    # wrap_enhanced_generator would also work here
    mean = mean_ints()
    next(mean)
    for to_add in [1, 2, 3]:
        current_mean = mean.send(to_add)
    assert current_mean == 2.0
Listing 12-9

Simplified mean calculation using an enhanced generator

If you find yourself with a coroutine that is called multiple times and each time it is passed the results of the previous invocation, then it is a good match for an enhanced generator.

Queues

All of the approaches we’ve looked at so far assume that there is no need to push data to the iterator from multiple sources. As mentioned earlier, generators raise exceptions if another thread or task tries to send data before it’s ready, which requires sophisticated use of locking to prevent. Equally, we cannot send data to a generator unless we also extract a piece of data. If multiple functions are trying to send data, then they must necessarily also be extracting data and would need to coordinate to ensure that the correct function gets any data intended for its use.

A better approach is to use a Queue object . We looked at these during the section on threading as a solution for passing work to a thread, but the asyncio module offers a Queue implementation that works in a similar way for asynchronous Python. Specifically, any methods that can block the thread in a standard queue are awaitable with asyncio queues. Listing 12-10 demonstrates an implementation of the sum_ints(...) function that uses a queue.
import asyncio
import itertools
import typing as t
async def sum_ints(data: asyncio.Queue) -> t.AsyncIterator[int]:
    """Yields a running total a queue, until a None is found"""
    total = 0
    while True:
        num = await data.get()
        if num is None:
            data.task_done()
            break
        total += num
        data.task_done()
        yield total
def numbers() -> t.Iterator[int]:
    yield 1
    yield 1
    yield 1
async def test():
    # Start with 1, feed output back in, limit to 3 items
    data = asyncio.Queue()
    sums = sum_ints(data)
    # Send the initial value
    await data.put(1)
    result = []
    async for last in sums:
        if len(result) == 3:
            # Stop the summer at 3 items
            await data.put(None)
        else:
            # Send the last value retrieved back
            await data.put(last)
            result.append(last)
    assert result == [1, 2, 4]
    # Add 3 items from a standard iterable
    data = asyncio.Queue()
    sums = sum_ints(data)
    for number in numbers():
        await data.put(number)
    await data.put(None)
    result = [value async for value in sums]
    assert result == [1, 2, 3]
Listing 12-10

Sending work to a coroutine with a queue

This queue approach is very similar to the approach with a pair of wrapper functions, as can be seen if we compare Figures 12-3 and 12-6. The main difference is that the values being added to the queue are determined entirely by the containing test() function.
../images/481001_1_En_12_Chapter/481001_1_En_12_Fig6_HTML.jpg
Figure 12-6

Execution flow when using Queues

A queue is purely a conduit for the data; it has no application-specific logic for where the data should come from. As with thread-based use of queues, I recommend using a sentinel value5 to tell the coroutine when to end, as this makes it easier to clean up the iterators.

Choosing a control flow

I rarely use the enhanced generator approach, as there are usually ways of solving the problem with more commonly used Python control structures, like classes and queues. I find this clearer, but enhanced generators are very much worth knowing about, in case you have a problem that fits them particularly well.

The decision tree diagram in Figure 12-7 illustrates my process for deciding what structure to use. Unlike some of the other decision trees in this book, much of this choice comes down to aesthetics and readability. The chart will help you find the natural fit, but it’s quite possible that you might make a different decision because you think it will improve maintainability.
../images/481001_1_En_12_Chapter/481001_1_En_12_Fig7_HTML.jpg
Figure 12-7

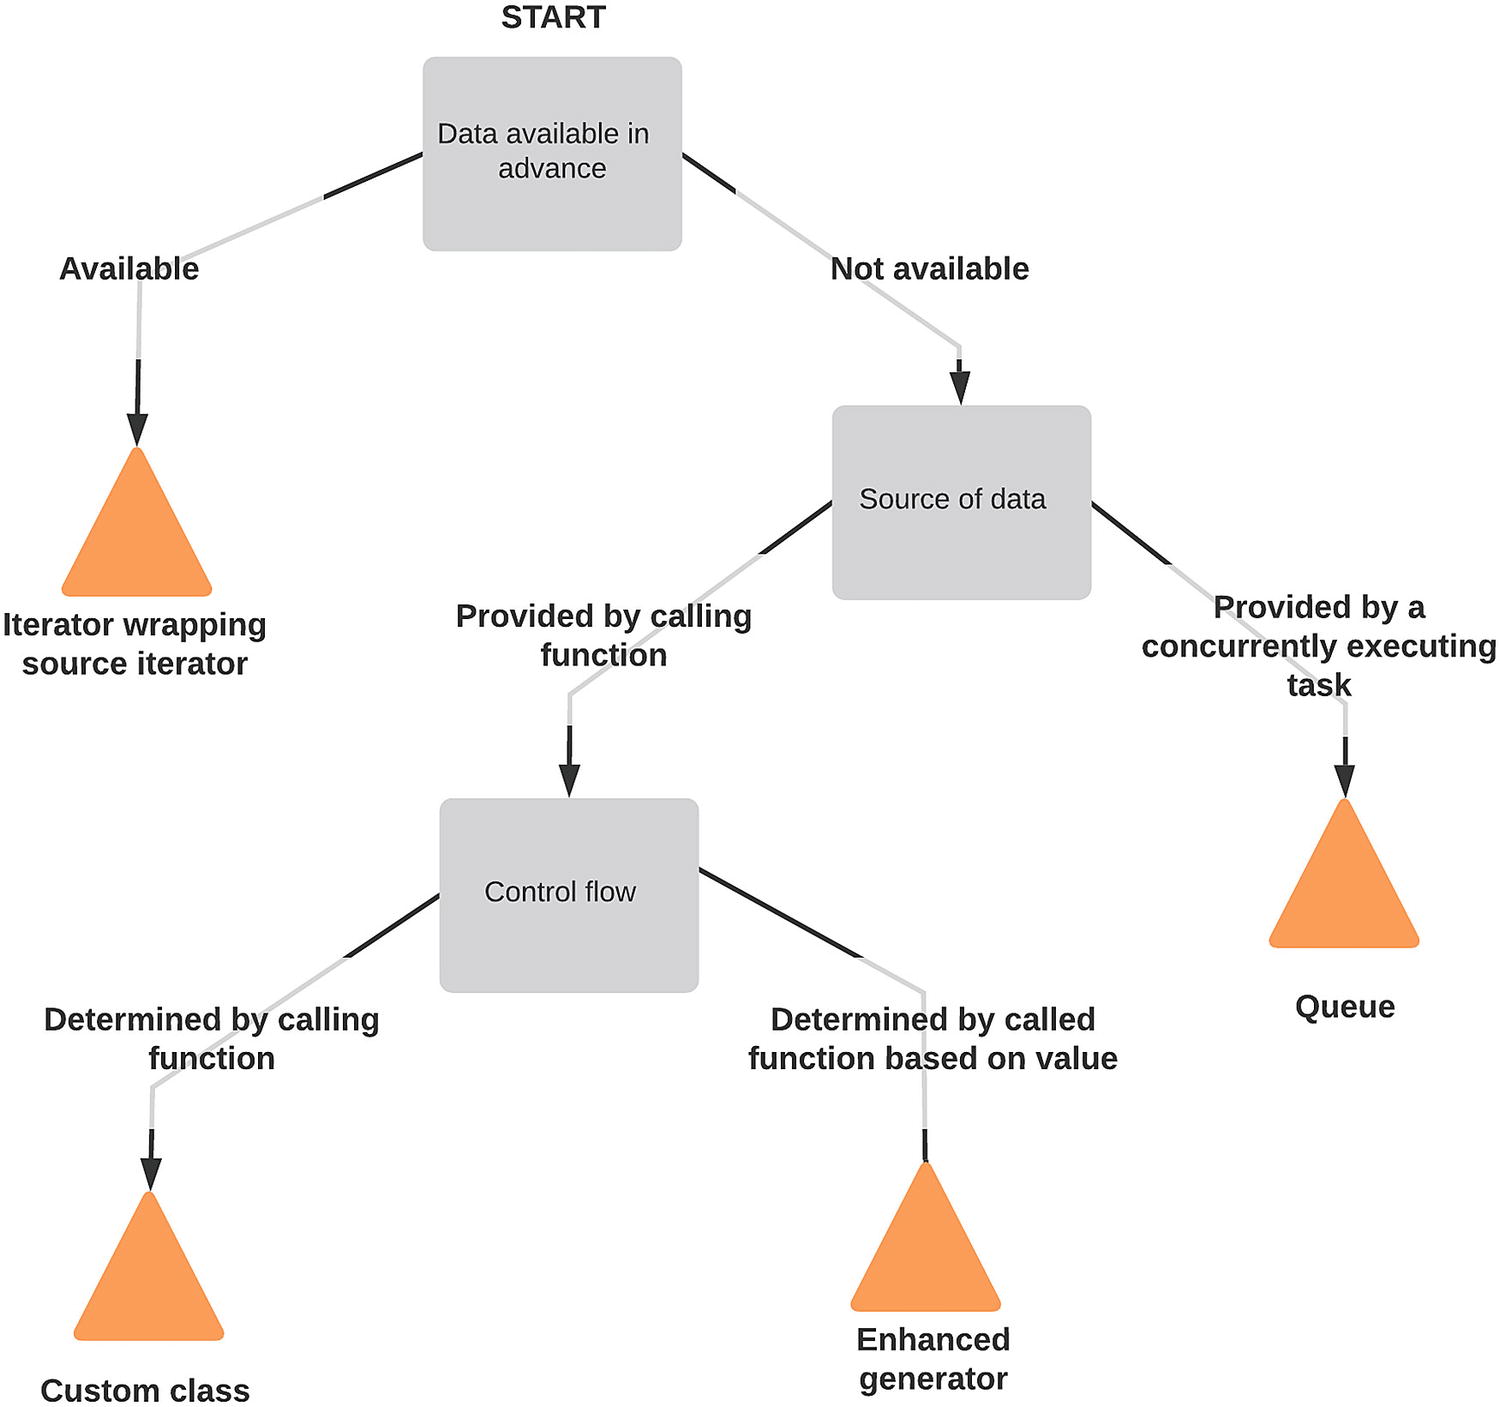
Decision tree for different control flows

Structure for our actions

We need to pick a method of passing data for our triggers and actions. Actions don’t have data available in advance but have it passed by a single calling function. We will implement them as classes with a method to process a particular point.

Triggers are more difficult to design. They may well need to store state between datapoint checks. We expect to be loading data from a database, so we could create an async iterator that does a database query and yields the results, making more database queries whenever the end of the iterator is reached until more data is available. In this case, we would have the data available in advance, as we would have an iterator object that we trust to include all the necessary data. As such, we’d choose to implement triggers as an iterator wrapping another.

However, there is another potentially useful source of data: actions. For example, we might have a trigger object that compares “energy generated” and “energy used” DataPoints to produce an “energy purchased” value. We wouldn’t want to add this value to the database, as it’s just the difference of two other data points rather than a measured value, but we might want to create alerts if it’s either too high or unusually high.

We could write PowerUsedTooHigh and PowerUsedHigherThanUsual triggers, but these would be very specific and share a lot of the same code. It would be better to be able to write a DifferenceBetweenSensors trigger as well as ValueTooHigh and ValueHigherThanUsual helpers. This would allow users to compose logic with any pair of sensors, but we’d need a way of sending the output of DifferenceBetweenSensors to both the ValueTooHigh and ValueHigherThanUsual stacks.

If data points can come from the database or the behavior of actions, then we cannot consider the source of data to be available in advance and must take the right-hand path at the first question of the decision tree. The source of data is the function that passes the collated data to the trigger, which means we should follow the left-hand path. As such, triggers will be implemented as classes.

Finally, we want to allow users to compose triggers and actions together into pipelines. Like the triggers, these objects don’t have their data available in advance, but unlike triggers, they receive data from multiple places. It’s this functionality that’s responsible for receiving the data from the database as well as the data from the actions, so this will be Queue based.

In summary, our analysis code has Actions, Triggers, and DataProcessors. Actions and Triggers are both passed data from a single location, so they are both implemented as classes. DataProcessors can receive data from multiple sources and are responsible for passing it on to triggers and actions, so they use a Queue to receive data.

Analysis coroutines

To allow users to compose actions and triggers on the fly, we provide a DataProcessor class which represents a configured pipeline (Listing 12-11). This class is responsible for setting up the input queue for all data for this process and provides a simpler API for starting the various required tasks.
@dataclasses.dataclass
class DataProcessor:
    name: str
    action: Action
    trigger: Trigger[t.Any]
    def __post_init__(self):
        self._input: t.Optional[asyncio.Queue[DataPoint]] = None
        self._sub_tasks: t.Set = set()
    async def start(self) -> None:
        self._input = asyncio.Queue()
        self._task = asyncio.create_task(self.process(), name=f"{self.name}_process")
        await asyncio.gather(self.action.start(), self.trigger.start())
    @property
    def input(self) -> asyncio.Queue[DataPoint]:
        if self._input is None:
            raise RuntimeError(f"{self}.start() was not awaited")
        if self._task.done():
            raise RuntimeError("Processing has stopped") from (self._task.exception())
        return self._input
    async def idle(self) -> None:
        await self.input.join()
    async def end(self) -> None:
        self._task.cancel()
    async def push(self, obj: DataPoint) -> None:
        return await self.input.put(obj)
    async def process(self) -> None:
        while True:
            data = await self.input.get()
            try:
                processed = await self.trigger.handle(data)
            except ValueError:
                continue
            else:
                action_taken = await self.action.handle(processed)
            finally:
                self.input.task_done()
Listing 12-11

A class to represent a configured trigger and action pair

The idle() method delegates to the join() method of the queue, which blocks until task_done() has been called the same number of times as get() was awaited. Therefore, await processor.idle() blocks until no items are waiting to be processed. This method is especially useful for writing test code, as it allows us to ensure that the processor has finished processing before we start to assert that the expected actions were taken.

Adding a queue between the raw data source and the triggers and actions allows us to guarantee that data is always processed in order and that failures do not stall the ability for other tasks to ingest data. We can only feed data into a group of triggers as quickly as the slowest one can process them unless we allow them to build up a backlog of data to process.

The problem with allowing a backlog to build up is that we could find ourselves using more and more memory to store the tasks for the slower tasks. The idle() method could be useful here, as it would allow us to block the ingesting coroutine periodically, so backlogs can only build up temporarily and must be cleared out before more data can be ingested. Alternatively, we could define a maximum length for the input queue, which would temporarily halt ingestion whenever a single sensor’s backlog got too long.

With the data processor in place, we can also define the base classes for the trigger and action components to match its behavior, as shown in Listing 12-12.
import typing as t
from ..typing import T_value
from ..database import DataPoint
from ..exceptions import NoDataForTrigger
class Trigger(t.Generic[T_value]):
    name: str
    async def start(self) -> None:
        """ Coroutine to do any initial setup """
        return
    async def match(self, datapoint: DataPoint) -> bool:
        """ Return True if the datapoint is of interest to this
        trigger.
        This is an optional method, called by the default implementation
        of handle(...)."""
        raise NotImplementedError
    async def extract(self, datapoint: DataPoint) -> T_value:
        """ Return the value that this datapoint implies for this trigger,
        or raise NoDataForTrigger if no value is appropriate.
        Can also raise IncompatibleTriggerError if the value is not readable.
        This is an optional method, called by the default implementation
        of handle(...).
        """
        raise NotImplementedError
    async def handle(self, datapoint: DataPoint) -> t.Optional[DataPoint]:
        """Given a data point, optionally return a datapoint that
        represents the value of this trigger. Will delegate to the
        match(...) and extract(...) functions."""
        if not await self.match(datapoint):
            # This data point isn't relevant
            return None
        try:
            value = await self.extract (datapoint)
        except NoDataForTrigger:
            # There was no value for this point
            return None
        return DataPoint(
            sensor_name=self.name,
            data=value,
            deployment_id=datapoint.deployment_id,
            collected_at=datapoint.collected_at,
        )
class Action:
    async def start(self) -> None:
        return
    async def handle(self, datapoint: DataPoint):
        raise NotImplementedError
Listing 12-12

Base classes for the Trigger and Action components

These two objects have a start() coroutine to allow for initial startup actions and a handle(...) method that takes a DataPoint object and processes it. In the case of a Trigger, the handle(…) method checks if the passed data point is relevant to the trigger, and if so, it returns a new data point, with the data specified by the extract(...) method. For an Action, the handle(...) coroutine returns a boolean representing if an action was taken. It also has side effects specific to the handler, such as database accesses.

A good first trigger to create is one that compares the value of a DataPoint to a threshold value, shown in Listing 12-13. This can be used to find temperatures that are too high, for example. As the ValueThresholdTrigger class is a rather complex class that takes many arguments, the data class functionality is useful to ensure that it has appropriate standard methods, such as __init__(...) .
import dataclasses
import typing as t
import uuid
from ..database import DataPoint
from ..exceptions import IncompatibleTriggerError
from .base import Trigger
@dataclasses.dataclass(frozen=True)
class ValueThresholdTrigger(Trigger[bool]):
    name: str
    threshold: float
    comparator: t.Callable[[float, float], bool]
    sensor_name: str
    deployment_id: t.Optional[uuid.UUID] = dataclasses.field(default=None)
    async def match(self, datapoint: DataPoint) -> bool:
        if datapoint.sensor_name != self.sensor_name:
            return False
        elif (self.deployment_id and datapoint.deployment_id != self.deployment_id):
            return False
        return True
    async def extract(self, datapoint: DataPoint) -> bool:
        if datapoint.data is None:
            raise IncompatibleTriggerError("Datapoint does not contain data")
        elif isinstance(datapoint.data, float):
            value = datapoint.data
        elif (isinstance(datapoint.data, dict) and "magnitude" in datapoint.data):
            value = datapoint.data["magnitude"]
        else:
            raise IncompatibleTriggerError("Unrecognised data format")
        return self.comparator(value, self.threshold)  # type: ignore
Listing 12-13

A trigger to check for a value having a certain relationship to a prespecified value

The two arguments that control checking against the threshold are the comparator= and threshold= arguments. The threshold is a floating-point number, and comparator= is a function that takes two floating-point numbers and returns a boolean.

An example of a valid comparator would be lambda x, y: x > y, but there are some built-in versions of standard comparisons in the operator module.6 Setting comparator=operator.gt is maybe a bit more explicit, and I prefer it. You should use whatever style feels more natural to you.

We also need at least one basic Action implementation, the simplest useful one being an action that calls a webhook to notify external services that the temperature is too high. An implementation for this is shown in Listing 12-14.
@dataclasses.dataclass
class WebhookAction(Action):
    """An action that runs a webhook"""
    uri: str
    async def start(self) -> None:
        return
    async def handle(self, datapoint: DataPoint) -> bool:
        async with aiohttp.ClientSession() as http:
            async with http.post(
                self.uri,
                json={
                    "value1": datapoint.sensor_name,
                    "value2": str(datapoint.data),
                    "value3": datapoint.deployment_id.hex,
                },
            ) as request:
                logger.info(
                    f"Made webhook request for {datapoint} with status " f"{request.status}"
                )
                return request.status == 200
Listing 12-14

An action that calls a webhook, using the format expected by the IFTTT service

Another useful action is one that logs any data points that it is sent. While this isn’t very helpful for production, it’s invaluable as a way to debug our pipelines. This lets us see what the tool is doing in the terminal; the code to implement it is in Listing 12-15.
class LoggingAction(Action):
    """An action that stores any generated data points back to the DB"""
    async def start(self) -> None:
        return
    async def handle(self, datapoint: DataPoint) -> bool:
        logger.warn(datapoint)
        return True
Listing 12-15

Action handler that logs to the standard error stream

The code that accompanies this chapter includes some additional trigger and actions, and the released version of apd.aggregation may include yet more by the time you read this.

Ingesting data

We want to run many concurrent sets of triggers and actions, so we’ll use a long-running coroutine to act as a controller for multiple subtasks. This coroutine manages setting up the triggers and actions and hands data off to each subtask.

The behavior of long-running coroutines is quite different to that of long-running threads, especially in how they terminate. When we looked at long-running threads, we needed to create a way to instruct the thread that there was no more data for it to process and that it should end. This was also true of enhanced iterators, and we used the same pattern with queue-based coroutines and functions, where sending a sentinel value was the only way of stopping the processing task.

Coroutines scheduled as tasks make this easier, as they have a cancel() method. The cancel() method allows developers to stop a task without adding a method to ask it to stop itself. This is especially useful for system designs where coroutines run for a long time, as it allows us to cleanly shut down parts of the program that are no longer needed. Any tasks that a coroutine has started are also canceled unless they were wrapped with asyncio.shield(...) when first created. It’s also possible to write a coroutine that shuts down from a requested cancellation cleanly, using a try/finally block. Cancellation works by raising a CancelledError exception within the coroutine’s code, which can be caught, and finalization code run before ending.

There are now handlers for an initial set of behaviors, but we need a way to push data into this process. We already have a function to load data from a database and asynchronously iterate over it; we can supplement this by placing it in an infinite loop that searches for any additional data once the first iteration has been consumed, as shown in Listing 12-16.
import asyncio
from apd.aggregation.query import db_session_var, get_data
async def get_data_ongoing(*args, **kwargs):
    last_id = 0
    db_session = db_session_var.get()
    while True:
        # Run a timer for 300 seconds concurrently with our work
        minimum_loop_timer = asyncio.create_task(asyncio.sleep(300))
        async for datapoint in get_data(*args, **kwargs):
            if datapoint.id > last_id:
                # This is the newest datapoint we have handled so far
                last_id = datapoint.id
            yield datapoint
            # Next time, find only data points later than the latest we've # seen
            kwargs["inserted_after_record_id"] = last_id
        # Commit the DB to store any work that was done in this loop and
        # ensure that any isolation level issues do not prevent loading more
        # data
        db_session.commit()
        # Wait for that timer to complete. If our loop took over 5 minutes
        # this will complete immediately, otherwise it will block
        await minimum_loop_timer
Listing 12-16

A version of get_data(...) that may block for new data while iterating

Tip

This uses asyncio.sleep(...) to ensure a minimum time between loop iterations. If we were to await asyncio.sleep(300) directly at the end of the loop, there would always be at least 300 seconds between iterations, but it could be significantly more. Delegating this to a task at the start of the loop and then awaiting the completion of the task means that our 300-second wait is running in parallel to the productive work performed in the loop body. The same effect can be obtained through arithmetic on the current time to calculate the delay needed for each loop iteration, but this is much clearer.

The implementation here has a static delay between each database query. It isn’t the most efficient method as it introduces a fixed period between data checks, so it can take up to 5 minutes for new data to become available. We can decrease the time between iterations, but this means correspondingly more load on the database server. This approach is called short polling, as it makes a short request on a regular basis to check for more data. Long polling is more efficient, as it involves making a request that doesn’t complete until there is data available, but it requires that the back-end and interface library support it. Short polling is the most compatible approach, so it is a good default in the absence of evidence that it’s too inefficient.

Postgres Pubsub

If we’re using a database that offers pubsub,7 we could avoid polling entirely and rewrite this to listen for a notification topic being sent by the data aggregation process.

The PostgreSQL pubsub functionality is enabled with the LISTEN and NOTIFY commands. SQLAlchemy does not tightly integrate this functionality, but the underlying connection libraries support it so we can take advantage if it’s useful to us.

We’d first modify the CLI to send a notification after adding new data if the connected database is PostgreSQL:
    if "postgresql" in db_uri:
        # On Postgres sent a pubsub notification, in case other processes are
        # waiting for this data
        Session.execute("NOTIFY apd_aggregation;")

Next, we’d create an alternative implementation of get_data_ongoing(...) that looks for notifications. This function must call Session.execute("LISTEN apd_aggregation;") to ensure that the connection is receiving notifications on the relevant topic.

As we’re not using a fully asynchronous PostgreSQL library, we can’t just await a notification, so we must create a shim function that is awaitable and handles reading notifications from the database connection.
async def wait_for_notify(loop, raw_connection):
    waiting = True
    while waiting:
        # The database connection isn't asynchronous, poll in a new thread
        # to make sure we've received any notifications
        await loop.run_in_executor(None, raw_connection.poll)
        while raw_connection.notifies:
            # End the loop after clearing out all pending
            # notifications
            waiting = False
            raw_connection.notifies.pop()
        if waiting:
            # If we had no notifications wait 15 seconds then
            # re-check
            await asyncio.sleep(15)

This still requires actively checking the database state, but the poll() function does not make a database query so it is a much more lightweight solution. The reduction in database load makes it more efficient to reduce the time between checks, down to seconds from minutes.

Running the analysis process

The final component to complete this feature is to write a new command-line utility to run the processing. This utility is responsible for setting up the database connection, loading the user’s configuration, and connecting the handlers they’ve defined to the feed of information from the database, then starting the long-running coroutine.

Listing 12-17 shows a new click command that takes a path to a python-based configuration file and a database connection string and executes all the data processors in that file.
import asyncio
import importlib.util
import logging
import typing as t
import click
from .actions.runner import DataProcessor
from .actions.source import get_data_ongoing
from .query import with_database
logger = logging.getLogger(__name__)
def load_handler_config(path: str) -> t.List[DataProcessor]:
    # Create a module called user_config backed by the file specified, and # load it
    # This uses Python's import internals to fake a module in a known # location
    # Based on an StackOverflow answer by Sebastian Rittau and sample code
    # from Brett Cannon
    module_spec = importlib.util.spec_from_file_location("user_config", path)
    module = importlib.util.module_from_spec(module_spec)
    module_spec.loader.exec_module(module)
    return module.handlers
@click.command()
@click.argument("config", nargs=1)
@click.option(
    "--db",
    metavar="<CONNECTION_STRING>",
    default="postgresql+psycopg2://localhost/apd",
    help="The connection string to a PostgreSQL database",
    envvar="APD_DB_URI",
)
@click.option("-v", "--verbose", is_flag=True, help="Enables verbose mode")
def run_actions(config: str, db: str, verbose: bool) -> t.Optional[int]:
    """This runs the long-running action processors defined in a config file.
    The configuration file specified should be a Python file that defines a
    list of DataProcessor objects called processors.n
    """
    logging.basicConfig(level=logging.DEBUG if verbose else logging.WARN)
    async def main_loop():
        with with_database(db):
            logger.info("Loading configuration")
            handlers = load_handler_config(config)
            logger.info(f"Configured {len(handlers)} handlers")
            starters = [handler.start() for handler in handlers]
            await asyncio.gather(*starters)
            logger.info(f"Ingesting data")
            data = get_data_ongoing()
            async for datapoint in data:
                for handler in handlers:
                    await handler.push(datapoint)
    asyncio.run(main_loop())
    return True
Listing 12-17

Command-line tool to run the management pipeline

The configuration file we’re using here is a Python file, loaded explicitly by the load_handler_config(...) function . The configuration for this tool involves composing different Python classes, lambda functions, and other callables, so it’s not suitable for nontechnical end-users to edit directly. We could have created a config file format that offers these options, but for now, at least, a Python-based configuration is sufficient. An example of this config file is shown in Listing 12-18.
import operator
from apd.aggregation.actions.action import (
    OnlyOnChangeActionWrapper,
    LoggingAction,
)
from apd.aggregation.actions.runner import DataProcessor
from apd.aggregation.actions.trigger import ValueThresholdTrigger
handlers = [
    DataProcessor(
        name="TemperatureBelow18",
        action=OnlyOnChangeActionWrapper(LoggingAction()),
        trigger=ValueThresholdTrigger(
            name="TemperatureBelow18",
            threshold=18,
            comparator=operator.lt,
            sensor_name="Temperature",
        ),
    )
]
Listing 12-18

A config file that uses a variety of actions and handlers from the accompanying code

Process status

A long-running process can be difficult to monitor. The most common way of showing users the status of such a process is by showing a progress bar, but this only works so long as we know the amount of data to be processed in advance. Our system is specifically designed to run indefinitely, waiting for new data. Even when no data is waiting to be processed, we are not 100% complete as we can reasonably expect more data to arrive soon.

A more appropriate approach would be to gather statistics about the work that’s being done and display them to the user. We can keep track of the total number of data points read by each data processor and the total that were successfully handled by its action, as well as a rolling average of the time taken. These three items allow us to generate useful statistics (Listing 12-19) that gives the end-user a good idea of how efficient each handler is.
@dataclasses.dataclass
class DataProcessor:
    name: str
    action: Action
    trigger: Trigger[t.Any]
    def __post_init__(self):
        self._input: t.Optional[asyncio.Queue[DataPoint]] = None
        self._sub_tasks: t.Set = set()
        self.last_times = collections.deque(maxlen=10)
        self.total_in = 0
        self.total_out = 0
    async def process(self) -> None:
        while True:
            data = await self.input.get()
            start = time.time()
            self.total_in += 1
            try:
                processed = await self.trigger.handle(data)
            except ValueError:
                continue
            else:
                action_taken = await self.action.handle(processed)
                if action_taken:
                    elapsed = time.time() - start
                    self.total_out += 1
                    self.last_times.append(elapsed)
            finally:
                self.input.task_done()
    def stats(self) -> str:
        if self.last_times:
            avr_time = sum(self.last_times) / len(self.last_times)
        elif self.total_in:
            avr_time = 0
        else:
            return "Not yet started"
        return (
            f"{avr_time:0.3f} seconds per item. {self.total_in} in, "
            f"{self.total_out} out, {self.input.qsize()} waiting."
        )
Listing 12-19

A data processor that generates statistics as it’s used

The standard way of determining when to display statistics on UNIX-like systems is to register a signal handler that returns the information. Signals are how processes are informed about various operating system events, for example, when a user presses <CTRL+c>. Not all platforms support the same set of signals, so it’s usual for different signals to be used on different operating systems.

For operating systems that provide a signal to request statistics (called SIGINFO), we should ensure that the program reacts appropriately. To achieve this, we update the CLI tool with a function to iterate over the data processors and output their statistics to the user, as shown in Listing 12-20.
import signal
def stats_signal_handler(sig, frame, data_processors=None):
    for data_processor in data_processors:
        click.echo(
            click.style(data_processor.name, bold=True, fg="red") + " " + data_processor.stats()
        )
    return
signal_handler = functools.partial(stats_signal_handler, data_processors=handlers)
signal.signal(signal.SIGINFO, signal_handler)
Listing 12-20

Example of a statistics signal handler

A signal handler is registered against a signal using the signal.signal(...) function , which takes a signal number and a handler. The handler must be a function that takes two arguments: the signal that is being handled and the frame that was executing at the time the signal was received.

Note

The signal value is an integer, but if you run print(signal.SIGINT) (for example), you’ll see Signals.SIGINT. This is because it’s implemented with an Enum object. We used IntEnum to create the return code structure in Chapter 4, so this is quite familiar. There are a few variants of Enum available; the most interesting is Flag. This further extends Enum by allowing bitwise combinations of items, such as Constants.ONE | Constants.TWO.

The SIGINFO signal is only available on operating systems based on the BSD Unix operating system, such as FreeBSD and macOS.8 It is raised by pressing <CTRL+t> when viewing the program output. This handler intercepts any use of <CTRL+t> on a compatible operating system and triggers displaying the statistics. On Linux systems, where SIGINFO is not available, it’s common to use SIGUSR1, which can be sent using the kill command:
kill -SIGUSR1 pid
This signal is a lot less useful as it’s not possible to generate with a key combination, but it is a standard so we should support it too. Windows offers no signals intended to request a status update, so we coopt the <CTRL+c> handler9 instead. The new behavior of <CTRL+c> is to print the stats the first time it is pressed, and then the second press in quick succession causes the program to end. We’ll achieve this by creating a signal handler that unsets itself and schedules a task to reattach the handler a short time later (Listing 12-21).
def stats_signal_handler(sig, frame, original_sigint_handler=None, data_processors=None):
    for data_processor in data_processors:
        click.echo(
            click.style(data_processor.name, bold=True, fg="red") + " " + data_processor.stats()
        )
    if sig == signal.SIGINT:
        click.secho("Press Ctrl+C again to end the process", bold=True)
        handler = signal.getsignal(signal.SIGINT)
        signal.signal(signal.SIGINT, original_sigint_handler)
        asyncio.get_running_loop().call_later(5, install_ctrl_c_signal_handler, handler)
    return
def install_ctrl_c_signal_handler(signal_handler):
    click.secho("Press Ctrl+C to view statistics", bold=True)
    signal.signal(signal.SIGINT, signal_handler)
def install_signal_handlers(running_data_processors):
    original_sigint_handler = signal.getsignal(signal.SIGINT)
    signal_handler = functools.partial(
        stats_signal_handler,
        data_processors=running_data_processors,
        original_sigint_handler=original_sigint_handler,
    )
    for signal_name in "SIGINFO", "SIGUSR1", "SIGINT":
        try:
            signal.signal(signal.Signals[signal_name], signal_handler)
        except KeyError:
            pass
Listing 12-21

Signal handler functions to show statistics

This uses the loop.call_later(...) method of the current event loop to restore the signal handler. This method schedules a new task that waits a given amount of time, then calls a function. The function being called is not a coroutine to be awaited but a standard function, so it must not be used for anything that could block.

The intention of this method, along with loop.call_soon(...), is to allow for callbacks to be scheduled by asynchronous code without first having to wrap them in a coroutine and then scheduling it as a task.

Caution

Signal handlers registered with signal.signal(...)run immediately after the signal is received, interrupting any concurrent asyncio processes. It’s important that any handlers minimize their interaction with the rest of the program, as it could cause undefined behavior. There’s a loop.add_signal_handler(...) function that has the same signature as signal.signal(...) but guarantees that the signal handler is called once when it’s safe to do so. Not all event loop implementations support this: this method does not work on Microsoft Windows, for example. If you need Windows compatibility, you must ensure that your signal handlers don’t interfere with your async tasks.

Callbacks

This approach of defining functions and passing them to other functions is something we’ve used already as part of the chart configuration objects. For the analysis program, we’re using Handler and Action objects, which maintain state and have multiple callable methods. On the other hand, we defined clean(...), get_data(...), and draw(...) functions, rather than custom classes for the three functions.

We could have created, for example, a Cleaner object that has a single clean(...) method rather than passing a function. There’s no particular advantage to using a function instead of a class, so long as only one callable is needed.

A very common use case for passing functions is to implement callbacks. A callback is a function used to hook into an event in an intermediate function. The three functions we passed to our chart configuration are core to the functionality of the charting and are not callbacks.

A true callback function has no effect on the function that’s running, only external side effects. For example, the plot_sensor(...) method checks for the case where a particular deployment has no points for a given sensor and skips adding that sensor to the legend if it’s empty. We might imagine wanting to hook into this to tell the user when this case occurs, as it might be confusing to have a different number of deployments visible when filtering a view. The function that is called when that happens would be an example of a callback function.

We could implement this by adding a log_skipped callback function to the signature of this method, which is passed a message to be shown to the user. The message would be added as follows:
if log_skipped:
    log_skipped(f"No points for {name} in {config.title} chart")
The function could then have any number of different callables passed as log_skipped= to customize how the user is to be notified. For example, it could be printed to the screen, it could be made into a log message, or it could be appended to a list for display elsewhere.
plot_sensor(config, plot, location_names, *args, log_skipped=print, **kwargs)
plot_sensor(config, plot, location_names, *args, log_skipped=logger.info, **kwargs)
messages = []
plot_sensor(config, plot, location_names, *args, log_skipped=messages.append, **kwargs)

This isn’t to say that callbacks implement unimportant functions, but they are never the core functionality of the function that’s triggering them. Resetting our signal handlers after a delay is a core functionality of the application, but it’s incidental to the work of the event loop, so it is also considered a callback.

Another example of a callback being part of the core functionality is our process(...) method . We’ve not scheduled actions in parallel so that we can ensure that they happen in order, but if we had scheduled actions as tasks, then we’d have moved on to the next loop iteration before that task finished. This would have made it impossible to record the time it took to complete each action.

Listing 12-22 shows a way of handling this by adding a callback to a task that is run on completion. It doesn’t matter when the task is awaited; the callback runs very soon after the task completes.
    def action_complete(self, start, task):
        action_taken = task.result()
        if action_taken:
            elapsed = time.time() - start
            self.total_out += 1
            self.last_times.append(elapsed)
        self.input.task_done()
    async def process(self) -> None:
        while True:
            data = await self.input.get()
            start = time.time()
            self.total_in += 1
            try:
                processed = await self.trigger.handle(data)
            except ValueError:
                self.input.task_done()
                continue
            else:
                result = asyncio.create_task(self.action.handle(processed))
                result.add_done_callback(functools.partial(self.action_complete, start))
Listing 12-22

Example of using a callback to record the time taken for a task

It’s also possible to implement this without add_done_callback(...), by wrapping the handle(...) coroutine in another that gathers the relevant statistics, but this is very much a matter of style. Most of the things that can be achieved with asyncio callbacks can be rewritten more clearly by wrapping coroutines. It’s rare for a task callback to be the best approach in anything other than low-level integrations of blocking code with the asyncio framework, but it can be useful on occasion.

We won’t be applying either of these changes: we don’t want to lose any guarantee that actions are processed in date order, as it could be confusing for end-users to get out of order notifications.

Extending the actions available

The actions and triggers we have available are a reasonable basis for demonstration, but they’re not enough to meet real-world user needs. Although we could release the software as is, by going further and building some things that we expect real users to need, it’s much easier for us to find pain points in the implementation.

Exercise 12-1: A Trigger That Subtracts Two Sensor Values

Earlier in this chapter, we said that it would be useful to compare two deployments of the same sensor. For example, if the humidity of the upstairs of a house is significantly higher than the humidity downstairs, it suggests that the shower has recently been used. This isn’t something that can be detected just by thresholding the upstairs sensor without false positives being very likely.

Write a new handler that compares two deployments of the same sensor and returns the difference between the two values. There is a branch point in the code for this chapter that provides a good starting point, with an updated get_data(...) method that does not sort data inappropriately for this task.

Once we have a trigger that calculates the difference between two sensors, we can create the functionality to allow Actions to pass the output of a trigger back to the set of all DataProcessors to be reanalyzed. In this way, we’re merging the two approaches to data handling from the start of the chapter, and we are processing an iterable of data queried from the database, but also occasionally the output of the process itself. We can use another Queue object to represent ephemeral data points that we want to pass back to the handlers. The get_data_ongoing(...) function (Listing 12-23) would also pull data from this queue, not just the database.
import asyncio
from contextvars import ContextVar
from apd.aggregation.query import db_session_var, get_data
refeed_queue_var = ContextVar("refeed_queue")
async def queue_as_iterator(queue):
    while not queue.empty():
        yield queue.get_nowait()
async def get_data_ongoing(*args, historical=False, **kwargs):
    last_id = 0
    if not historical:
        kwargs["inserted_after_record_id"] = last_id = (await get_newest_ record_id())
    db_session = db_session_var.get()
    refeed_queue = refeed_queue_var.get()
    while True:
        # Run a timer for 300 seconds concurrently with our work
        minimum_loop_timer = asyncio.create_task(asyncio.sleep(300))
        import datetime
        async for datapoint in get_data(*args, inserted_after_record_id=last_id, order=False, **kwargs):
            if datapoint.id > last_id:
                # This is the newest datapoint we have handled so far
                last_id = datapoint.id
            yield datapoint
        while not refeed_queue.empty():
            # Process any datapoints gathered through the refeed queue
            async for datapoint in queue_as_iterator(refeed_queue):
                yield datapoint
        # Commit the DB to store any work that was done in this loop and
        # ensure that any isolation level issues do not prevent loading more
        # data
        db_session.commit()
        # Wait for that timer to complete. If our loop took over 5 minutes
        # this will complete immediately, otherwise it will block
        await minimum_loop_timer
Listing 12-23

Updated version of get_data that includes data points from a context variable

The code in Listing 12-23 assumes that there is a queue in the context variable and pulls items from that queue so long as some are available. This processes all the DataPoints from a database query and then all the generated points before making the next query. Listing 12-24 shows the action needed to add items to this queue.
from .source import refeed_queue_var
class RefeedAction(Action):
    """An action that puts data points into a special queue to be consumed
    by the analysis programme"""
    async def start(self) -> None:
        return
    async def handle(self, datapoint: DataPoint) -> bool:
        refeed_queue = refeed_queue_var.get()
        if refeed_queue is None:
            logger.error("Refeed queue has not been initialised")
            return False
        else:
            await refeed_queue.put(datapoint)
            return True
Listing 12-24

The relevant refeed action

The refeed_queue_var variable is not set in either of these code paths. This is because the individual handlers and get_data_ongoing(...) functions are running in different contexts, so they cannot set the context variable globally. The iterator is running in the context of the main_loop() in the command-line tool, but each handler has its own individual context due to being started as a task running in parallel.

We need to set up the context variable before the handlers are branched off as new tasks so that they maintain a reference to the same task. We’ll add it to the main_loop() function itself. While it would be possible to write this code using a global variable rather than a context variable, it would make testing and potential multithreading in the future more difficult.

Summary

In this chapter, we’ve applied many of the techniques we covered in past chapters to extend the functionality of the aggregation program greatly. A lot of the power of Python comes from being able to use a relatively small amount of features to achieve different results.

The most important feature for enabling this, in my opinion, is the ability to write code that takes an implementation of logic as an argument, either as a class, a function, or a generator function. This is perfect for the kind of work we’ve done in the analysis section of this book, as it allows us to create data pipelines and supply application-specific logic where needed.

Additional resources

There are a few more links I’d like to share, covering additional reading on this chapter’s topics, listed as follows:
In addition, there are a couple of links I’d like to share in general, not specific to this chapter:
  • The Python Software Foundation’s list of upcoming events at www.python.org/events/.

  • The Advent of Code project (https://adventofcode.com/) releases 25 puzzles intended to be solved by coding every December. I find these to be very well written and a great way of trying out new techniques or languages. I’d encourage you to try some of the techniques this book covers with those puzzles, especially if you don’t have a chance in your day-to-day programming work.

Epilogue

This long-running process is the final feature for the example code of this book. With it, we have a system that has a lightweight component that can be deployed to multiple servers, which optionally can record data over time and serve it over a HTTP interface, but alone is a useful debugging tool. We have a central aggregation process that maintains a list of known HTTP endpoints to query, a Jupyter notebook that draws charts of the aggregated data, and an analysis process that processes incoming data to add synthesized data to the shared database or trigger external actions.

At the start of this book, I listed some examples of real-world applications where this type of application can be useful. The obvious one is the smart home example that I’ve focused on, where our work allows us to chart energy usage and temperature over time. The trigger system can be used to detect when one room’s temperature and humidity is closer to the outside temperature than the others, indicating a window has been left open, and we can use actions to push notifications to mobile devices using a webhook.

An urban sensor network, such as the one used in Amsterdam for monitoring airplane noise, can have sound levels plotted on a map at any given time, and a custom trigger could be written to detect moving sources of noise, for correlating with known flight data.

For server monitoring, we can draw charts of RAM and disk usage and send notifications to Slack when a server drops below a threshold on any of its monitored items. The notification action is especially useful for deployments like the arcade, where nontechnical staff can be alerted about an alarm condition on a specific machine and a report generated after the fact by maintenance staff.

The code for this project will continue to evolve over time. Both the website (https://advancedpython.dev) and this book’s section on the Apress website offer the source code for this book on a chapter-by-chapter basis. Any contributions to the current version of the software are welcome.

As well as building a piece of legitimately useful software, we’ve explored a large portion of the Python standard library on the way while focusing on tools and techniques that are not commonly used in example software. We’ve used cookiecutter and Pipenv to create projects and set up build environment and Jupyter to prototype software and to build one-off dashboards and analysis scripts, and we’ve built a web service.

We wrote a synchronous piece of code for the satellite processes and an asynchronous tool for the aggregation software. Both used SQLAlchemy and Alembic for database connectivity and pytest for testing, covering using both from synchronous and asynchronous contexts.

The example code extensively uses relatively new language features, such as context variables, data classes, and typing, to make our code more expressive, and we’ve explored the appropriate places to use features like asyncio, iterators, and concurrency. Some of these techniques may be very familiar to you; others may have been entirely foreign. Python’s ecosystem is broad with lots of smaller communities working to create exciting new tools. Only by engaging with all these communities would you be aware of what they’re developing. It’s much easier to stay up to date by joining your local Python community. There are Python conferences in countries all over the world and user groups in many cities. There are also chat rooms, forums, and question and answer boards where all parts of the community interact.

I once heard someone boast they could probably learn Python in 24 hours. I couldn’t disagree more. I’ve been learning Python for 16 years now and feel that I still have much left to learn. Python is a well-designed language and therefore quite intuitive; a beginner can certainly write a simple program in 24 hours, and an experienced programmer can write correspondingly more complex programs in a short period. However, learning enough to be productive isn’t the same as having learned everything.

Thousands of people work on Python’s ecosystem to improve it over time, by contributing bug reports, documentation, libraries, and core code. Everyday Python programming is subtly different; although it’s not likely to impact your day-to-day work, there’s a chance that today was the day that somebody released a tool that makes your job easier. You won’t know unless you look.

Learning from your peers is one of the most rewarding parts of open source software; I hope this book has helped you, and I hope to meet you and learn from you at a Python event sometime soon.

..................Content has been hidden....................

You can't read the all page of ebook, please click here login for view all page.
Reset
3.129.23.214