
Iteration A2: Making Prettier Listings
Our customer has one more request. (Customers always seem to have one more request, don’t they?) The listing of all the products is ugly. Can we pretty it up a bit? And, while we’re in there, can we also display the product image along with the image URL?
We’re faced with a dilemma here. As developers, we’re trained to respond to these kinds of requests with a sharp intake of breath, a knowing shake of the head, and a murmured, “You want what?” At the same time, we also like to show off a bit. In the end, the fact that it’s fun to make these kinds of changes using Rails wins out, and we fire up our trusty editor.
Before we get too far, though, it would be nice if we had a consistent set of test data to work with. We could use our scaffold-generated interface and type data in from the browser. However, if we did this, future developers working on our codebase would have to do the same. And if we were working as part of a team on this project, each member of the team would have to enter his or her own data. It would be nice if we could load the data into our table in a more controlled way. It turns out that we can. Rails has the ability to import seed data.
To start, we simply modify the file in the db directory named seeds.rb.
We then add the code to populate the products table. This uses the create! method of the Product model. The following is an extract from that file. Rather than type the file by hand, you might want to download the file from the sample code available online.[34] While you’re there, copy the images into the app/assets/images directory in your application.[35] Be warned: this seeds.rb script removes existing data from the products table before loading the new data. You might not want to run it if you’ve just spent several hours typing your own data into your application!
| | Product.delete_all |
| | # . . . |
| | Product.create!(title: 'Build Chatbot Interactions', |
| | description: |
| | %{<p> |
| | <em>Responsive, Intuitive Interfaces with Ruby</em> |
| | The next step in the evolution of user interfaces is here. |
| | Chatbots let your users interact with your service in their |
| | own natural language. Use free and open source tools along |
| | with Ruby to build creative, useful, and unexpected interactions |
| | for users. Take advantage of the Lita framework’s step-by-step |
| | implementation strategy to simplify bot development and testing. |
| | From novices to experts, chatbots are an area in which everyone |
| | can participate. Exercise your creativity by creating chatbot |
| | skills for communicating, information, and fun. |
| | </p>}, |
| | image_url: 'dpchat.jpg', |
| | price: 20.00) |
| | # . . . |
(Note that this code uses %{…}. This is an alternative syntax for double-quoted string literals, convenient for use with long strings. Note also that because it uses the Rails create! method, it’ll raise an exception if records can’t be inserted because of validation errors.)
To populate your products table with test data, run the following command:
| | depot> bin/rails db:seed |
Now let’s get the product listing tidied up. This has three pieces: defining a set of style rules, connecting these rules to the page by defining an HTML class attribute on the page, and changing the HTML to make styling the page easier.
We need somewhere to put our style definitions. Rails has a convention for this, and the generate scaffold command that we previously issued has already laid all of the necessary groundwork. As such, we can proceed to fill in the currently empty products.scss style sheet in the app/assets/stylesheets directory:
| | // Place all the styles related to the Products controller here. |
| | // They will automatically be included in application.css. |
| | // You can use Sass (SCSS) here: https://sass-lang.com/ |
| | |
| » | .products { |
| » | margin: 0; |
| » | padding: 0.5em; |
| » | a { |
| » | padding: 0.354em 0.5em; |
| » | border-radius: 0.354em; |
| » | } |
| » | table { |
| » | border-collapse: collapse; |
| » | } |
| » | td { |
| » | padding: 0.5em; |
| » | margin: 0; |
| » | } |
| » | |
| » | tr.list_line_odd { |
| » | background-color: #effeef; |
| » | } |
| » | |
| » | td.image { |
| » | // Hide this on mobile devices |
| » | display: none; |
| » | |
| » | // Assume anything bigger than 30em |
| » | // is a non-mobile device and can |
| » | // fit the image. |
| » | @media (min-width: 30em) { |
| » | display: block; |
| » | img { |
| » | height: 11.3em; |
| » | } |
| » | } |
| » | } |
| » | |
| » | td.description { |
| » | h1 { |
| » | font-size: 1.4em; |
| » | } |
| » | } |
| » | |
| » | td.actions { |
| » | ul { |
| » | padding: 0; |
| » | list-style: none; |
| » | li { |
| » | padding: 0.5em 0.5em; |
| » | } |
| » | } |
| » | } |
| » | |
| » | tfoot { |
| » | td { |
| » | padding: 0.5em 0; |
| » | } |
| » | } |
| » | } |
If you choose to download this file, make sure that the timestamp on the file is updated. If the timestamp isn’t updated, Rails won’t pick up the changes until the server is restarted. You can update the timestamp by going into your favorite editor and saving the file. On MacOS and Linux, you can use the touch command.
Look closely at this style sheet and you’ll see that CSS rules are nested, in that the rule for li is defined inside the rule for ul, which is itself inside the rule for td.actions. This tends to make rules less repetitive and therefore easier to read, write, understand, and maintain.
At this point you’re familiar with files ending with .erb being preprocessed for embedded Ruby expressions and statements. If you note that this file ends with .scss, you might guess that the file is preprocessed as Sassy CSS before being served as CSS.[36] And you’d be right!
Again, like ERB, SCSS doesn’t interfere with writing correct CSS. What SCSS does is provide additional syntax that makes your style sheets easier to author and easier to maintain. All of this is converted for you by SCSS to standard CSS that your browser understands. You can find out more about SCSS in Pragmatic Guide to Sass 3 [CC16].
Finally, we need to define the products class used by this style sheet. If you look at the html.erb files we’ve created so far, you won’t find any reference to style sheets. You won’t even find the HTML <head> section where such references would normally live. Instead, Rails keeps a separate file that’s used to create a standard page environment for the entire application. This file, called application.html.erb, is a Rails layout and lives in the layouts directory:
| | <!DOCTYPE html> |
| | <html> |
| | <head> |
| | <title>Depot</title> |
| | <%= csrf_meta_tags %> |
| | <%= csp_meta_tag %> |
| | |
| | <%= stylesheet_link_tag 'application', media: 'all', |
| | 'data-turbolinks-track': 'reload' %> |
| | <%= javascript_pack_tag 'application', 'data-turbolinks-track': 'reload' %> |
| | </head> |
| | |
| | <body> |
| | |
| » | <main class='<%= controller.controller_name %>'> |
| » | <%= yield %> |
| » | </main> |
| | |
| | </body> |
| | </html> |
You’ll note we’ve wrapped the content in a <main> tag that has a CSS class of the current controller. This means that when we are rendering a product listing, it will have the CSS class products, and when we render an order, it’ll have the class orders. This allows us to target our CSS, because Rails includes all CSS in app/assets/stylesheets on every page, no matter what. If we want to apply a style to, say, a table header only on order pages, we can write .orders th { «css» } and—even though that CSS will be included on non-orders pages—it won’t apply, because the top-level element won’t have the class orders.
Now that we have all the style sheets in place, we’ll use a table-based template, editing the index.html.erb file in app/views/products and replacing the scaffold-generated view:
| | <% if notice %> |
| | <aside id="notice"><%= notice %></aside> |
| | <% end %> |
| | |
| | <h1>Products</h1> |
| | |
| | <table> |
| | <tfoot> |
| | <tr> |
| | <td colspan="3"> |
| | <%= link_to 'New Product', new_product_path %> |
| | </td> |
| | </tr> |
| | </tfoot> |
| | <tbody> |
| | <% @products.each do |product| %> |
| | <tr class="<%= cycle('list_line_odd', 'list_line_even') %>"> |
| | |
| | <td class="image"> |
| | <%= image_tag(product.image_url, class: 'list_image') %> |
| | </td> |
| | |
| | <td class="description"> |
| | <h1><%= product.title %></h1> |
| | <p> |
| | <%= truncate(strip_tags(product.description), |
| | length: 80) %> |
| | </p> |
| | </td> |
| | |
| | <td class="actions"> |
| | <ul> |
| | <li><%= link_to 'Show', product %></li> |
| | <li><%= link_to 'Edit', edit_product_path(product) %></li> |
| | <li> |
| | <%= link_to 'Destroy', |
| | product, |
| | method: :delete, |
| | data: { confirm: 'Are you sure?' } %> |
| | </li> |
| | </ul> |
| | </td> |
| | </tr> |
| | <% end %> |
| | </tbody> |
| | </table> |
This template uses a number of built-in Rails features:
-
The rows in the listing have alternating background colors. The Rails helper method called does this by setting the CSS class of each row to either list_line_even or list_line_odd, automatically toggling between the two style names on successive lines.
-
The truncate helper is used to display the first eighty characters of the description. But before we call truncate, we call strip_tags to remove the HTML tags from the description.
-
Look at the link_to ’Destroy’ line. See how it has the parameter data: { confirm: ’Are you sure?’ }. If you click this link, Rails arranges for your browser to pop up a dialog box asking for confirmation before following the link and deleting the product. (Also, see the sidebar for an inside scoop on this action.)
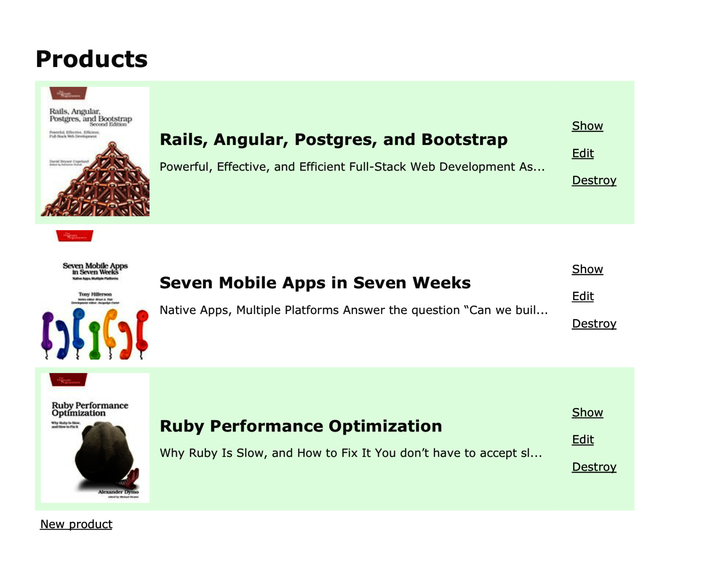
We loaded some test data into the database, we rewrote the index.html.erb file that displays the listing of products, we filled in the products.scss style sheet, and that style sheet was loaded into our page by the application.html.erb layout file. Now let’s bring up a browser and point to http://localhost:3000/products. The resulting product listing might look something like the following screenshot.
So we proudly show our customer her new product listing and she’s pleased. Now it’s time to create the storefront.
What We Just Did
In this chapter, we laid the groundwork for our store application:
-
We created a development database.
-
We used a migration to create and modify the schema in our development database.
-
We created the products table and used the scaffold generator to write an application to maintain it.
-
We updated an application-wide layout as well as a controller-specific view to show a list of products.
What we’ve done didn’t require much effort, and it got us up and running quickly. Databases are vital to this application but need not be scary. In fact, in many cases we can defer the selection of the database and get started using the default that Rails provides.
Getting the model right is more important at this stage. As you’ll see, selection of data types doesn’t always fully capture the essence of all the properties of the model, even in this small application, so that’s what we’ll tackle next.
Playtime
Here’s some stuff to try on your own:
-
We created tables in our database using a migration. Try examining the tables directly by running bin/rails dbconsole. This will put you directly into the SQLite database that the app uses. Type .help and hit Return to see the commands you can run to examine the database. If you know SQL, you can execute SQL in here as well.
-
If you’re feeling frisky, you can experiment with rolling back the migration. Type the following:
depot> bin/rails db:rollback Your schema will be transported back in time, and the products table will be gone. Calling bin/rails db:migrate again will re-create it. You’ll also want to reload the seed data. More information can be found in Chapter 22, Migrations.
-
We mentioned version control in Version Control, and now would be a great point at which to save your work. Should you happen to choose Git (highly recommended, by the way), you need to do a tiny bit of configuration first; basically, all you need to do is provide your name and email address:
depot> git config --global --add user.name "Sam Ruby" depot> git config --global --add user.email [email protected] You can verify the configuration with the following command:
depot> git config --global --list Rails also provides a file named .gitignore, which tells Git which files are not to be version-controlled:
# Ignore bundler config. /.bundle # Ignore the default SQLite database. /db/*.sqlite3 /db/*.sqlite3-journal /db/*.sqlite3-* # Ignore all logfiles and tempfiles. /log/* /tmp/* !/log/.keep !/tmp/.keep # Ignore uploaded files in development. /storage/* !/storage/.keep /public/assets .byebug_history # Ignore master key for decrypting credentials and more. /config/master.key /public/packs /public/packs-test /node_modules /yarn-error.log yarn-debug.log* .yarn-integrity Note that because this filename begins with a dot, Unix-based operating systems won’t show it by default in directory listings. Use ls -a to see it.
At this point, you’re fully configured. The only tasks that remain are to add all the files and commit them with a commit message (note that Rails has initialized our repository with git init already):
depot> git add . depot> git commit -m "Depot Scaffold" Being fully configured may not seem very exciting, but it does mean you’re free to experiment. If you overwrite or delete a file that you didn’t mean to, you can always get back to this point by issuing a single command:
depot> git checkout .