
Back in the days of mainframes and very formal centralized management information systems (MIS) departments, documentation was a mandatory requirement for the completion of an application. Today, it seems as though all types of people are developing applications: administrative assistants, CEOs, sales managers, MIS professionals, and so on. To make matters worse, many of us who consider ourselves MIS professionals never received any formal systems training. Finally, the demand to get an application up and running and then to move on to the next application is more prevalent than ever. As a result of all these factors, it seems that documentation has gone by the wayside.
Despite all the reasons why documentation doesn’t seem to happen, it is as important to properly document your application today as it was in the mainframe days. Documentation provides you and your users with these benefits:
It makes the system easy for you and others to maintain.
It helps state the purpose and function of each object in the application.
This chapter covers the various ways in which you can document your application objects and code.
Fortunately, Access ships with an excellent tool to assist you with the process of documenting your database: the Database Documenter. Although this tool can be used without any special preparation on your part, a little bit of work as you build the components of your application can go a long way toward enhancing the value of the Database Documenter’s output.
The Database Documenter prints all field and table descriptions entered in the design of a table. Figure 29.1 shows a table in Design view. Notice the descriptions for the ClientID and StateProvince fields. These descriptions provide additional information that is not readily obvious from looking at the field names. The Table Properties window also contains a Description property. This property is included in the table’s documentation when it is printed in the Database Documenter.

Entering a table description also assists you and the users of your database when you are working with the tables in the database. Figure 29.2 shows the Database window after table descriptions are entered. The description of each table appears in the Database window.

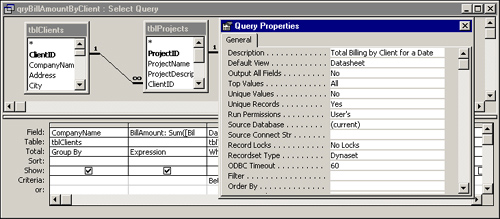
Just as you can enhance the output that the Database Documenter provides for tables, you also can enhance the output it provides for queries. Figure 29.3 shows the Query Properties window. The Description property is filled in with a detailed description of the purpose of the query. Figure 29.4 shows the description of an individual column in a query. Both the query and field descriptions are included in the output provided by the Database Documenter.

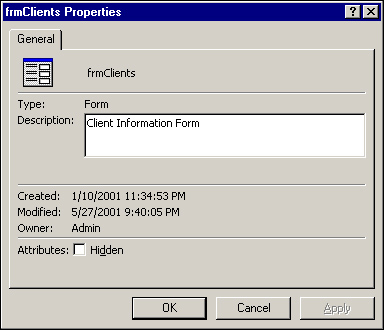
Documentation is not limited to table and query objects. A form also has a Description property. It cannot be accessed from the Design view of the form, though. To view or modify the Description property of a form, follow these steps:
Make the Database window the active window.
Right-click the form for which you want to add a description.
Choose Properties. The Object Properties dialog box appears, as shown in Figure 29.5.
Enter a description in the Description text box.
Click OK. The description you entered appears in the Database window, as shown in Figure 29.6, and it also appears in the output from the Database Documenter.

Reports are documented in exactly the same manner as forms. Reports have a Description property that must be entered in the Object Properties dialog box. Remember that to access this dialog box, you right-click the object in the Database window and then choose Properties.
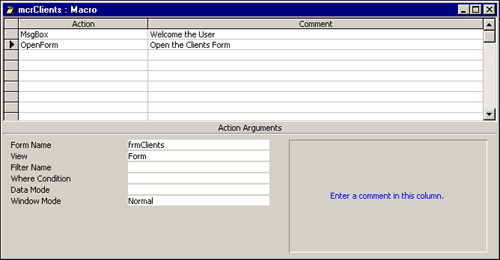
Macros can be documented in significantly more detail than forms and reports. You can document each individual line of the macro, as shown in Figure 29.7. Not only does this provide documentation in the Database Documenter, but also macro comments become code comments when you convert a macro to a Visual Basic module. In addition to documenting each line of a macro, you can add a description to the macro. As with forms and reports, to accomplish this, right-click the macro from the Database window and choose Properties.
I cannot emphasize enough how important it is to document your modules with comments. Of course, not every line of code needs to be documented. I document all areas of my code that I feel are not self-explanatory. Comments assist me when I revisit the code to make modifications and enhancements. They also assist anyone who is responsible for maintaining my code. Finally, they provide the user with documentation about what my application is doing. Comments print with your code modules, as shown later in this chapter in the section “Using the Database Documenter.” As with the other objects, you can right-click a module to assign a description to it.
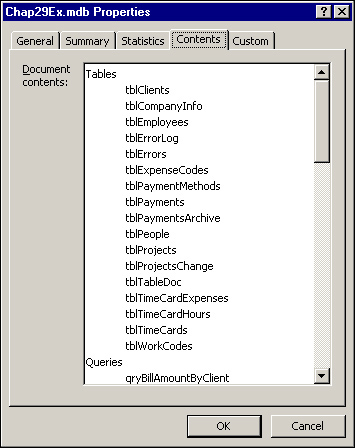
In addition to enabling you to assign descriptions to the objects in the database, Microsoft Access enables you to document the database as a whole. You do this by filling in the information included in the Database Properties window. To access a database’s properties, choose File|Database Properties or right-click the title bar of the Database window and choose Database Properties. The Database Properties dialog box appears, as shown in Figure 29.8. As you can see, it is a tabbed dialog box; tabs include General, Summary, Statistics, Contents, and Custom.

Descriptions of the tabs in the Database Properties dialog box follow:
General—. The General tab displays general information about your database. This includes the date the database was created, when it was last modified, when it was last accessed, its location, its size, its MS-DOS name, and its file attributes. None of the information on the General tab can be modified.
Summary—. The Summary tab, shown in Figure 29.9, contains modifiable information that describes the database and what it does. This tab includes the database title, its subject, and comments about the database. It also includes the hyperlink base—a base address used for all relative hyperlinks inserted in the database. This can be an Internet address (URL) or a filename path (UNC).
Statistics—. The Statistics tab contains statistics of the database, such as when it was created, last modified, and last accessed.
Contents—. The Contents tab, shown in Figure 29.10, includes a list of all the objects contained in the database.
Custom—. The Custom tab enables you to define custom properties associated with the database. This is useful when you are dealing with a large organization with numerous databases, and you want to be able to search for all the databases containing certain properties.

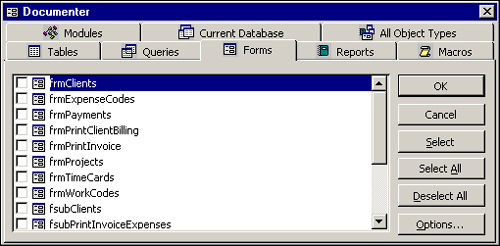
The Database Documenter is an elegant tool that is part of the Access application. It enables you to selectively produce varying levels of documentation for each object in your database. To use the Database Documenter, follow these steps:
Make sure that the Database window is the active window.
Choose Tools|Analyze|Documenter. The Documenter dialog box appears, as shown in Figure 29.11.
Click the appropriate tab to select the type of object you want to document. To document a table, for example, click the Tables tab.
Enable the check box to the left of each object that you want to document. You can click the Select All command button to select all objects shown on a tab.
Click the Options button to refine the level of detail provided for each object. Depending on which object type is selected, different options are displayed. Database Documenter options are covered in the next section of this chapter.
Repeat steps 3–5 to select all database objects that you want to document.
Click OK when you are ready to produce the documentation.
Tip
To document all objects in the database, click the All Object Types tab and then click Select All.
Caution
Access can take quite a bit of time to produce the requested documentation, particularly if numerous objects are selected. For this reason, you should not begin the documentation process if you will soon need your computer to accomplish other tasks. While Access is processing this task, switching to another application becomes difficult if not impossible—how difficult depends on the amount of RAM installed on your system, as well as the type of processor (CPU) installed on your computer and its speed.
Note
To document the properties of the database or the relationships between the tables in the database, click the Current Database tab and select Properties or Relationships.
After you select all the desired objects and options and click OK, the Object Definition window appears. You can use this Print Preview window to view the documentation output for the objects you selected. (See Figure 29.12.) This Print Preview window is just like any other Print Preview window; you can view each page of the documentation and send the documentation to the printer.

By default, the Database Documenter outputs a huge volume of information for each selected object. Each control on a form is documented, for example, including every property of the control. It is easy to produce 50 pages of documentation for a couple of database objects. Besides being a tremendous waste of paper, this volume of information is overwhelming to review. Fortunately, you can refine the level of detail provided by the Documenter for each category of object you are documenting. Just click the Options button in the Database Documenter dialog box.
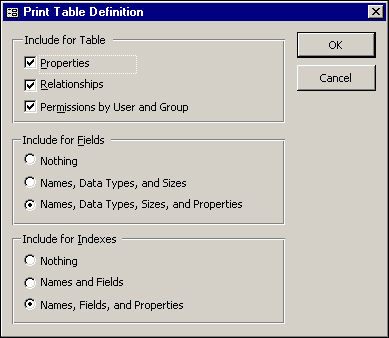
Figure 29.13 shows the table definition options. Notice that you can specify whether you want to print table Properties, Relationships, and Permissions by User and Group. You also can indicate the level of detail you want to display for each field: Nothing; Names, Data Types, and Sizes; or Names, Data Types, Sizes, and Properties. For table indexes, you can opt to include Nothing; Names and Fields; or Names, Fields, and Properties.
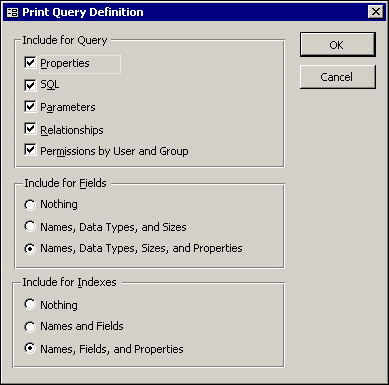
If you select the Queries tab in the Documenter dialog box and then click Options, the Print Query Definition dialog box appears, as shown in Figure 29.14. Here, you can select the level of detail to be output for the selected queries. You can choose whether to include Properties, SQL, Parameters, Relationships, and Permissions by User and Group for the query. You also can select the level of detail for each column of the query and for the indexes involved in the query.
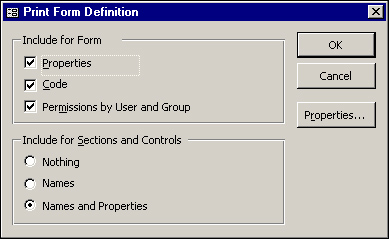
The Form and Report options are similar to one another. Figure 29.15 shows the Print Form Definition dialog box. Here, you can specify whether you want to print Properties, Code, and Permissions by User and Group for a form. For each control on the form, you can choose to print Nothing, the Names of the controls, or the Names and Properties of the controls. The Print Report Definition dialog box offers the same options. Both dialog boxes offer a Properties button, used to designate the categories of properties that are printed. You can opt to print Other properties, Event properties, Data properties, or Format properties.
For macros, you can choose whether you want to print macro Properties, Actions and Arguments, or Permissions by User and Group. For modules, you can choose to view Properties, Code, and Permissions by User and Group.
As you can see, the Database Documenter gives you great flexibility in the level of detail it provides. Of course, if you haven’t filled in the properties of an object (for example, the description), it does you no good to ask the Documenter to print those properties.
After you produce the documentation and it appears in the Object Definition Print Preview window, you can output it to other formats. From the Print Preview window, choose File|Export. The Export Report dialog box appears, as shown in Figure 29.16. Notice that you can output the documentation to Microsoft Excel, HTML, Text Files, a Rich Text Format file, a Snapshot format, or XML. Enter the filename, select Save As Type, and then click Export. If you select the Autostart check box, the Documenter creates the file and then launches you into the appropriate application, depending on your registry entries. If Microsoft’s Internet Explorer (IE) is the application associated with the file extension HTML, for example, Autostart launches IE with your Documenter output loaded when you output to an HTML file. Similarly, if you choose a Microsoft Excel file format and Excel is associated through the registry with XLS file types, Autostart launches Excel with the output loaded in Excel when the process is complete. The same holds true for the other file types—RTF and TXT and their respective registry associations, which usually are Word and Notepad.

Most of the time, the options provided by the Database Documenter are sufficient. At times, you won’t like the format the Database Documenter selects—or, more important, you might want to document properties of the database objects not available through the user interface. In these situations, you can choose to enumerate the database objects using code and output them to a custom report format.
Using ADOX (ADO Extensions for DDL and Security), you can enumerate any of the objects in your database. Listing 29.1 shows an example.
Example 29.1. Using ADOX to Enumerate the Table Objects in a Database
Sub EnumerateTables()

    Dim conn As New Connection
    Dim adoCat As New ADOX.Catalog
    Dim adoTbl As New ADOX.Table
    Dim strSQL As String

    DoCmd.SetWarnings False
    Set conn = CurrentProject.Connection
    adoCat.ActiveConnection = conn

    For Each adoTbl In adoCat.tables
        If adoTbl.Type = "Table" Then
            strSQL = "INSERT INTO tblTableDoc" _
                & "(TableName, DateCreated, LastModified) " _
                & "Values (""" & adoTbl.Name & """, #" _
                & adoTbl.DateCreated & "#, #" _
                & adoTbl.DateModified & "#) "

            conn.Execute strSQL
        End If
    Next adoTbl
    DoCmd.SetWarnings True
End Sub
Note
For the code in Listing 29.1 to run, you must first set a reference (via Tools|References) to the Microsoft ADO Ext 2.6 for DDL and Security library.
The EnumerateTables routine, located in the basDocument module of CHAP29EX.MDB on your sample code CD-ROM, documents various information about the tables in the database. It uses the ADOX catalog and table objects and a For...Each loop to loop through all the table definitions in the database. For each table in the database, it determines whether the table’s type property is set to “Table”, indicating that it is a standard table (as opposed to a system table or a query). It then uses the Execute method of the Connection object to execute a SQL statement, inserting all the requested information about the table definition into a table called tblTableDoc. This table can be used as the foundation for a report. Of course, when you use appropriate For...Each loops and properties, along with the ADOX object model, any information about any of the objects in the database can be obtained using the same technique.
Documentation is a necessary part of the application development process; fortunately, Microsoft Access makes it very easy. This chapter covered the object Description properties Access provides, as well as the extremely powerful Database Documenter. The chapter also highlighted how you can create your own documentation using ADOX and custom reports. Using any combination of the techniques covered in the chapter, you can produce very complete documentation for all aspects of your application.