Visual Basic for Applications (VBA) is the development language for Microsoft Access 97. It offers a consistent language for application development in the Microsoft Office suite. The core language, its constructs, and the environment are the same in Microsoft Access 97, Microsoft Visual Basic, Microsoft Excel, Microsoft Word, and Microsoft Project. What's different among these environments are the built-in objects specific to each application. For example, Access has a Recordset object, but Excel has a Workbook object. Each application's objects have appropriate properties (attributes) and methods (actions) associated with them. This chapter gives you an overview of the VBA language and its constructs.
Simple Access applications can be written by using macros, covered in Chapter 11, “What Are Macros and When Do You Need Them?” Although macros are great for quick prototyping and very basic application development, most serious Access development is done by using the VBA language. Unlike macros, VBA gives you the ability to do the following:
Work with complex logic structures (case statements, loops, and so on).
Use constants and variables.
Take advantage of functions and actions not available in macros.
Loop through and perform actions on recordsets.
Perform transaction processing.
Programmatically create and work with database objects.
Implement error handling.
Create libraries of user-defined functions.
Call Windows API functions.
Perform complex DDE and OLE automation commands.
The VBA language allows you to use complex logic structures. Macros allow you to perform only simple If...Then...Else logic, but the VBA language offers a wealth of logic and looping constructs, which are covered later in this chapter. The VBA language also lets you declare and work with variables and constants. These variables can be scoped appropriately and passed as parameters to subroutines and functions. As you will see later in this chapter, variables and constants are an integral part of any Access application. These features, however, aren't available in macros.
Many important features of the VBA language aren't available through macro actions. If you try to develop an application using only macros, you can't take advantage of many of the rich features available in the VBA language. In addition, many of the actions available in both macros and modules can be done much more efficiently with VBA code.
Complex Access applications often require you to loop through a recordset, performing some action on each member of the set. There's no way to do this by using Access macros. However, with the VBA language and Data Access Objects, you can add, delete, update, and manipulate data. Data Access Objects are covered in Chapter 15, “What Are Data Access Objects and Why Are They Important?”
When manipulating sets of records, you want to ensure that all processing finishes successfully before your data is permanently updated. Macros don't allow you to protect your data with transaction processing. Using the BeginTrans, CommitTrans, and Rollback methods, you can make sure your data is updated only if all parts of a transaction finish successfully. Transaction processing, if done properly, can substantially improve your application's performance because no data is written to disk until the process is finished. Transaction processing and its benefits are covered in Chapter 22, “Transaction Processing.”
With Access macros, you can't create or modify database objects at runtime. Using VBA, you can create databases, tables, queries, and other database objects; you can also modify existing objects. There are many practical applications of this ability to create or modify database objects (discussed in more detail in Chapter 15). When users are allowed to build queries on the fly, for example, you might want to give them the ability to design a query by using a front-end form you provide and store the query so they can run it again later.
Access macros don't allow you to implement error handling. If an error occurs while an Access macro is executing in Access's runtime version, the user is exited out of the application (and, therefore, the Access runtime). By using error-handling techniques, you can determine exactly what will happen when an error occurs during the execution of your application. Error handling is covered in more depth in Chapter 17, “Handling Those Dreaded Runtime Errors.”
VBA also makes it easier for the developer to write code libraries of reusable functions and to design and debug complex processes. If you're developing even moderately complex applications, you want to be able to create generic function libraries that can be used with all your Access applications. It's extremely difficult, if not impossible, to do this using macros.
Many powerful functions not available with the VBA language are available as part of Windows itself. The Windows API (Application Programming Interface) refers to the nearly 1,000 Windows functions Microsoft has for use by Access programmers. You can't take advantage of these functions from an Access macro; however, by using VBA code, you can declare and call these functions, improving both the performance and functionality of your applications.
DDE (Dynamic Data Exchange)and Automation allow you to communicate between your Access applications and other applications. Although DDE is an older technology than Automation, it's still used to communicate with many applications that don't support Automation. Automation is used to control Automation server applications, such as Excel and Project, and their objects. Automation is covered in Chapter 25, “Automation: Communicating with Other Applications.”
Although macros can offer a quick fix to a simple problem, their limitations require using the VBA language for developing complex solutions. To make the transition from macros to modules easier, Microsoft has given you a feature that allows you to convert any macro to VBA code (discussed in Chapter 11).
VBA code is written in units called subroutines and functions that are stored in modules. Microsoft Access modules are either Standard modules or Class modules. Standard modules are created by clicking the New button on the Modules tab of your Database window. Class modules can be standalone objects or can be associated with a form or report. To create a standalone Class module, you choose the Class Module command from the Insert menu. In addition, whenever you add code behind a form or report, Microsoft Access creates a Class module associated with that form or report that contains the code you create.
Modules specific to a form or report are generally called Form and Report Class modules, and their code is often referred to as Code Behind Forms (CBF). CBF is created and stored in that form or report and triggered from events occurring within it.
A subroutine (subprocedure) is a routine that responds to an event or performs some action. An Event procedure is a special type of subroutine that automatically executes in response to an event, such as a mouse click on a command button or the loading of a form. A function is a special type of routine because it can return a value; a subroutine can't return a value. Like a subroutine, a function can be triggered from an event.
Whether you're dealing with a Standard module or a Class module, all modules contain a General Declarations section. (See Figure 8.1.) As the name implies, this is where you can declare variables and constants that you want to be visible to all the functions and subroutines in the module. These variables are referred to as module-level or Private variables. You can also declare Public variables in the General Declarations section of a module. Public variables can be seen and modified by any function or procedure in any module in the database.

Figure 8.1. The General Declarations section of a module is used to declare Private and Public variables.
Note
Public variables in Access 97 replace Access 2.0's Global variables. Although Global variables are still supported in Access 97, subtle differences exist between Public and Global variables. These differences are discussed later in this chapter.
A module is also made up of user-defined subroutines and functions. Figure 8.2 shows a subroutine called SayHello. Notice that the Object drop-down list pictured in the figure says “General.” This is because the subroutine called SayHello isn't associated with a particular object.

Tip
Access 97 has an environment option called Full Module view. This option, when checked, allows you to see several subroutines and functions in a module at one time. Notice the difference between Figure 8.2 and Figure 8.3. In the code window shown in Figure 8.2, only one subroutine is visible at a time. The code window shown in Figure 8.3 illustrates the effects of Full Module view—multiple subroutines are visible, each separated by a thin horizontal line. To use the Full Module view environmental setting, choose Tools | Options, click the Module tab, and check Full Module View or click the Full Module View button in the lower-left corner of a module window.
Option Explicit is a statement that can be included in the General Declarations section of a module, form, or report. When Option Explicit is placed in a General Declarations section, all variables in that module, form, or report must be declared before they're used.
Tip
In Access 2.0, you had to manually enter the Option Explicit statement into each module, form, and report. However, you can globally instruct Access 97 to insert the Option Explicit statement in all new modules, forms, and reports. To do this, choose Tools | Options. Under the Modules tab, click Require Variable Declaration. It's important that the Option Explicit statement be placed in all your modules, so make sure you set this option to True. It will save you hours of debugging and prevent your beeper from going off once your application has been distributed to your users.
In addition to a General Declarations section and user-defined procedures, forms and reports also contain event procedures that are associated with a particular object on a form. Notice in Figure 8.4 that the Object drop-down list says cmdHello. This is the name of the object whose event routines you are viewing. The drop-down list on the right shows all the events that can be coded for a command button; each of these events creates a separate event routine. You will have the opportunity to write many event routines as you read through this book.
Event procedures are automatically created when you write event code for an object. For example, the routine Private Sub cmdHello_Click is created when you place code in the Click event of the cmdHello command button, shown in Figure 8.4.
To get to the event code of an object, follow these steps:
Click on the object in Design view and click the Properties button on the toolbar, or right-click on the object and choose Properties from the context-sensitive menu.
Click on the Event properties tab.
Select the property you want to write code for (for example, the
On Clickevent).Select
[Event Procedure]from the drop-down list.Click on the ellipsis button, which places you in the event code for that object.
You can also create your own procedures that aren't tied to a particular object or event. Depending on how and where they're declared, they can be called from anywhere in your application or from a particular Code module, Form module, or Report module.
To create a user-defined routine in a Code module, follow these steps:
Click on the Modules tab of the Database window.
Start a new module or select an existing module and click Design.
Select Insert Procedure from the toolbar or choose Procedure from the Insert menu to open the dialog box shown in Figure 8.5.
Type the name of the procedure, then indicate whether you're creating a function, subroutine, or property and whether you want the procedure to be public to your entire application or private to this module only. Finally, indicate whether you want all the variables in the routine to be static. (Static variables are discussed in this chapter under “Scope and Lifetime of Variables: Exposing Your Variables as Little as Possible.”) Then click OK.

To create a user-defined routine in a Form or Report Class module, follow these steps:
While in Design view of a form or report, view the code behind the form or report by clicking the Code button on the toolbar or by choosing Code from the View menu.
Select Insert Procedure from the toolbar or choose Procedure from the Insert menu to open the Insert Procedure dialog box.
Type the name of the procedure, then indicate whether you're creating a function, subroutine, or property, whether you want the procedure to be public or private, and whether you want all the variables to be static. When you're done, click OK.
Tip
Whether you're creating a procedure in a Standard module or a Class module, you're now ready to enter the code for your procedure. A great shortcut for creating a procedure is to type Sub Whatever or Function Whatever directly in the code window; this creates a new subroutine or function as soon as you press Return.
Event procedures are automatically called when an event occurs for an object. For example, when a user clicks a command button, the Click event code for that command button executes.
The standard method for calling user-defined procedures is to use the Call keyword—Call SayHello, for example. You can also call the same procedure without using the Call keyword: SayHello.
Although not required, using the Call keyword makes the statement self-documenting and easier to read. A user-defined procedure can be called from an event routine or from another user-defined procedure or function.
Procedures can be declared Public, Private, or Static, which determines their scope (where they can be called from) and their lifetime (how long they reside in memory). The placement of a procedure can noticeably affect your application's functionality and performance.
A Public procedure can be called from anywhere in the application. Procedures declared in a module are automatically Public. This means that unless you specify otherwise, procedures you place in any Code module can be called from anywhere within your application.
You might think that two Public procedures can't have the same name. Although this was true in earlier versions of Access, it isn't true in Access 97. If two Public procedures share a name, the procedure that calls them must explicitly state which of the two routines it's calling. This is illustrated by the following code snippet:
Private Sub cmdSayGoodBye_Click()
   Call basUtils.SayGoodBye
End Sub
The SayGoodBye routine is found in two Access code modules; however, the prefix basUtils indicates that the routine you want to execute is in the Standard module named basUtils.
Procedures declared in Form or Report Class modules are also automatically Public, so they can be called from anywhere within the application. The procedure called cbfIAmPublic, shown in Figure 8.6, is found in the form called frmHello. Although the procedure is found in the form, it can be called from anywhere within the application. The only requirement is that the form containing the procedure must be open. The following cbfIAmPublic procedure can be called from anywhere within the application by using the following syntax:
Sub PublicFormProc()
   Call Forms.frmHello.cbfIAmPublic
End Sub

As mentioned, all procedures are automatically Public. If you want a procedure declared in a module to have the scope of that module only, meaning that it can be called only from another routine within the module, you must explicitly declare it as Private. (See Figure 8.7.)
The procedure shown in Figure 8.7, called IAmPrivate, is in the Standard module named basUtils. Because the procedure is Private, it can be called only from other procedures in the basUtils module.
Private procedures always take precedence over Public procedures. If a Private procedure has the same name as a Public procedure, the Private procedure's code is executed if it's called by any routine in the module where it was declared. Naming conflicts don't occur between Public and Private procedures.
Tip
Developers often wonder where to place code: in form or report Class modules or in Standard modules? There are pros and cons to each method. Placing code in Standard modules means that the code can be easily called from anywhere in your application, without loading a specific form or report. Public routines placed in Standard modules can also be called from other databases. For this reason, Standard modules are a great place to put generic routines that you want readily available as part of a library.
Access 97 loads modules on a demand-only basis, which means that procedures no longer take up memory unless they're being used. This is especially true if you plan your modules carefully (see Chapter 23, “Optimizing Your Application”). Regardless of when the code is loaded, an advantage of placing code behind forms and reports (rather than within modules) is that the form or report is very self-contained and, therefore, portable. You can import the form or report into any other database and it still operates as expected. This “object-oriented” approach means that the form requires nothing from the outside world.
As you can see, there are pluses and minuses to each method. As a general rule, if a routine is specific to a particular form or report, place that routine in the form or report; if it's widely used, place it in a module.
If a procedure is declared as Static, all the variables declared in the procedure maintain their values between calls to the procedure. This is an alternative to explicitly declaring each variable in the procedure as Static; here's an example of a Static procedure:
Static Sub IncrementThem()
   Dim intCounter1 As Integer
   Dim intCounter2 As Integer
   Dim intCounter3 As Integer
   intCounter1 = intCounter1 + 1
   intCounter2 = intCounter2 + 1
   intCounter3 = intCounter3 + 1
   MsgBox intCounter1 & " - " & intCounter2 & " - " & intCounter3
End Sub
Ordinarily, each variable in this procedure would be reinitialized to zero each time the procedure is run. This means that all 1s would appear in the message box each time the procedure is run. Because the procedure is declared as Static, the variables in it retain their values from call to call. Each time the procedure is run, the values in the message box would increase. This factor should become much clearer after the discussion of variables later in this chapter.
The LNC (Leszynski) naming conventions suggest that all form and report procedure names be prefixed with the tag cbf. LNC standards add an optional scoping tag of s for Static procedures, m for Private procedures, and p for Public procedures; these standards suggest you use the scoping tag only if you're creating software that will be widely distributed or released as public domain.
You need to consider many issues when creating VBA variables. The way you declare a variable determines its scope, its lifetime, and more. The following topics will help you better understand declaring variables in VBA.
There are several ways to declare variables in VBA: three are nonstandard and one is standard. For example, you could simply declare x=10. With this method of variable declaration, you really aren't declaring your variables at all; you're essentially declaring them as you use them. This method is quite dangerous; it lends itself to typos and other problems. If you follow the previously recommended practice of always using the Option Explicit statement, Access will not allow you to declare variables in this manner.
You could also type Dim intCounter; the Dim statement declares the variable. The only problem with this method is that you haven't declared the type of the variable to the compiler, so it's declared as a variant variable.
Another common mistake is declaring multiple variables on the same line, as in this example:
Dim intCounter, intAge, intWeight As Integer.
In this line, only the last variable is explicitly declared as an integer variable. The other variables are implicitly declared as variants. If you're going to declare multiple variables on one line, make sure each variable is specifically declared, as in the following example:
Dim intCounter As Integer, intAge As Integer, intWeight As Integer
The most efficient and bug-proof way to declare your variables is to strong type them to the compiler and declare only one variable per line of code, as in this example:
Dim intCounter As Integer
Dim strName As String
As you can see, strong typing declares the name of the variable as well as the type of data it can contain. This allows the compiler to catch errors, such as storing a string into an integer variable, before your program runs. If implemented properly, by selecting the smallest practical data type for each variable, this method can also reduce the resources needed to run your programs.
Note
You should try to eliminate using variants whenever possible. Besides requiring a significant amount of storage space, variants are also slow, since they must be resolved by the compiler at runtime. However, certain situations warrant using a variant, such as including variables that need to contain different types of data at different times, and being able to differentiate between an empty variable (one that hasn't been initialized) and a variable having a zero or a zero-length string. Also, variant variables are the only type of variable that can hold the special value of Null. Empty and Null values are covered in Chapter 9, “Advanced VBA Techniques.”
VBA offers several data types for variables. Table 8.1 shows a list of the available data types, the standard for naming them, the amount of storage space they require, the data they can store, and their default values.
Table 8.1. Data types and naming conventions.
You have read about the different types of variables available in VBA. Variables can be declared as Local, Private (Module), or Public in scope. You should try to use Local variables in your code because they're shielded from being accidentally modified by other routines. In the following sections, take a closer look at how you can determine the scope and lifetime of variables.
Local variables are available only in the procedure where they are declared. Consider this example:
Private Sub cmdOkay_Click
  Dim strAnimal As String
  strAnimal = "Dog"
  Call ChangeAnimal
  Debug.Print strAnimal ''Still Dog
End Sub

Private Sub ChangeAnimal
  strAnimal = "Cat"
End Sub
This code would behave in one of two ways. If Option Explicit were in effect, meaning that all variables must be declared before they're used, this code would generate a compiler error. If the Option Explicit statement isn't used, strAnimal would be changed to Cat only within the context of the subroutine ChangeAnimal.
The following examples illustrate the difference between Local and Static variables. Local variables are reinitialized each time the code is called. Each time you run the following procedure, for example, the numeral 1 is printed in the Debug window:
Private Sub cmdLocal_Click()
  Dim intCounter As Integer
  intCounter = intCounter + 1
  Debug.Print intCounter
End Sub
Each time this code runs, the Dim statement reinitializes intCounter to zero. This is quite different from the following code, which illustrates the use of a Static variable:
Private Sub cmdStatic_Click()
  Static sintCounter As Integer
  sintCounter = sintCounter + 1
  Debug.Print sintCounter
End Sub
Each time this code executes, the variable called sintCounter is incremented and its value retained.
So far, this discussion has been limited to variables that have scope within a particular procedure. Private (module-level) variables can be seen by any routine in the module they were declared in. Private variables are declared by placing a Private statement, such as the following, in the General Declarations section of a Form, Report, or Access module:
[General Declarations]
Option Explicit
Private mintCounter As Integer
The value of a variable declared as Private can be changed by any subroutine or function within that module. For example, the following subroutine changes the value of the Private variable mintCounter to 20:
Private Sub cmdModule_Click()
  mintCounter = 20
  Debug.Print mintCounter
End Sub
Notice the naming convention of using the letter m to prefix the name of the variable, which denotes the variable as a Private module-level variable. You should use Private declarations only for variables that need to be seen by multiple procedures in the same module; aim for making most of your variables Local to make your code modular and more bullet-proof.
Public variables can be accessed from anywhere within your application. They're usually limited to things such as log-in IDs, environment settings, and other variables that must be seen by your entire application. Declarations of Public variables can be placed in the General Declarations section of a module. The declaration of a Public variable looks like this:
Option Explicit
Public gintCounter As Integer
Notice the prefix g, the proper prefix for a Public variable declared in a Standard module. This standard is used because Public variables declared in a Standard module are visible not only to the database they were declared in but to other databases. The prefix p, used for Public variables declared in a Form or Report Class module, indicates that the variable is Public to the database but not visible to other databases. The following code, placed in the Click event of the cmdPublic command button, changes the value of the Public variable pintCounter to 50:
Private Sub cmdPublic_Click()
  pintCounter = 50
  Debug.Print pintCounter
End Sub
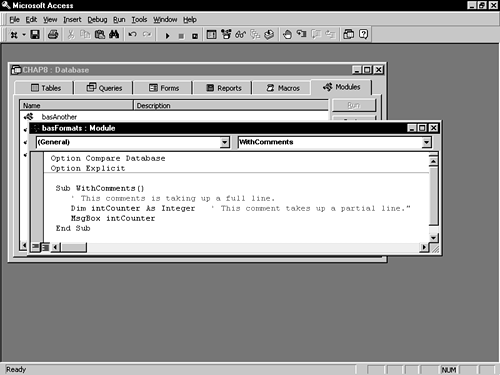
Comments, which are color-coded in Access 97, are added to modules by using an apostrophe. The keyword Rem can also be used, but the apostrophe is generally preferred. The apostrophe can be placed at the beginning of the line of code or anywhere within it. Anything following the apostrophe is considered a comment. Figure 8.8 shows code containing comments.
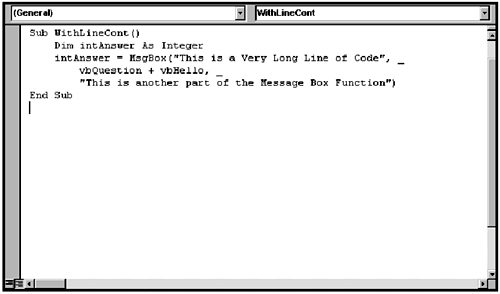
Access Basic code didn't have a line-continuation character, which meant you had to scroll a lot, as well as pull out a bag of tricks to simulate continuing a line of code. With VBA, Access 97 solves this problem; the line-continuation character is an underscore. The underscore must be preceded by a space. Figure 8.9 illustrates the use of this character.
VBA gives the developer several different constructs for looping and decision processing. The most commonly used ones are covered in the following sections.
The If...Then...Else construct evaluates whether a condition is true. In the following example, anything between If and Else will occur if the statement evaluates to True, and any code between Else and End If will be executed if the statement evaluates to False. The Else is optional.
Private Sub cmdIf_Click()
 If IsNull(Me!txtValue) Then
    MsgBox "You must Enter a Value"
  Else
    MsgBox "You entered " & Me!txtValue
  End If
End Sub
This code tests whether the text box called txtValue contains a null. A different message is displayed depending on whether the text box value is null.
One-line If statements are also permitted; they look like this:
If IsNull(Me!txtvalue) Then MsgBox "You must Enter a Value"
However, this format for an If statement isn't recommended because it reduces readability.
Another valid part of an If statement is ElseIf, which allows you to evaluate an unlimited number of conditions in one If statement. The following code gives you an example:
Sub MultipleIfs(intNumber As Integer)
   If intNumber = 1 Then
      MsgBox "You entered a One"
   ElseIf intNumber = 2 Then
      MsgBox "You entered a Two"
   ElseIf intNumber >= 3 And intNumber <= 10 Then
      MsgBox "You entered a Number Between 3 and 10"
   Else
      MsgBox "You Entered Some Other Number"
   End If
End Sub
The conditions in an If statement are evaluated in the order in which they appear. For this reason, it's best to place the most common conditions first. Once a condition is met, execution continues immediately after End If. If no conditions are met, and there's no Else statement, execution will also continue immediately after End If.
Note
If multiple conditions exist, it's almost always preferable to use a Select Case statement rather than an If statement. The exception to this rule is when you're using the TypeOf keyword to evaluate the type of an object. The TypeOf keyword is covered in Chapter 10, “The Real Scoop on Objects, Properties, and Events.”
An Immediate If (IIf) is a variation of an If statement; it's a function that returns one of two values, depending on whether the condition being tested is true or false. Here's an example:
Function EvalSales(curSales As Currency) As String
   EvalSales = IIf(curSales >= 100000, "Great Job", "Keep Plugging")
End Function
This function evaluates the curSales parameter to see whether its value is greater than or equal to $100,000. If it is, the string "Great Job" is returned from the function; otherwise, the string "Keep Plugging" is returned.
Warning
Both the true and false portions of the IIf are evaluated, so if there's a problem with either part of the expression (for example, a divide-by-zero condition), an error occurs.
The IIf function is most often used in a calculated control on a form or report. Probably the most common example is an IIf expression that determines whether the value of a control is null. If it is, you can have the expression return a zero or an empty string; otherwise, you can have the expression return the value in the control. The following expression, for example, evaluates the value of a control on a form:
=IIf(IsNull(Forms!frmOrders!Freight),0,Forms!frmOrders!Freight)
This expression displays either a zero or the value for freight in the control called Freight.
Conditional compilation allows you to selectively execute blocks of code. This feature is useful in several situations:
When you want certain blocks of code to execute in the demo version of your product and other blocks to execute in your product's retail version
When you're distributing your application in different countries and want certain blocks of code to apply to some countries but not to others
When you want certain blocks of code to execute only during the testing of your application
Conditional compilation is done by using the #If...Then...#Else directive, as shown here:
Sub ConditionalIf()
   #If Language = "Spanish" Then
      MsgBox "Hola, Que Tal?"
   #Else
      MsgBox "Hello, How Are You?"
   #End If
End Sub
The compiler constant, in this case, Language, can be declared in one of two places: in a module's General Declarations section or in the Advanced tab of the Tools | Options dialog box. A compiler constant declared in the General Declarations section of a module looks like this:
#Const Language = "Spanish"
The disadvantage of this constant is that it can't be declared as Public. It isn't possible to create Public compiler constants by using the #Const directive. This means that any constants declared in a module's Declarations section can be used only within that module. The major advantage of declaring this type of compiler constant is that it can contain a string. For example, the compiler constant Language, defined in the previous paragraph, is given the value "Spanish".
Public compiler constants can be declared only by choosing Tools | Options. Because they're Public in scope, compiler constants defined in Tools | Options can be referred to from anywhere in your application. The major limitation on compiler directives set up in Tools | Options is that they can contain only integers. For example, you would have to say "Spanish = 1".
To set up a compiler directive by using Tools | Options, select the Advanced tab, shown in Figure 8.10, from the Options dialog box. Add the compiler directive to the Conditional Compilation Arguments text box. You can add more than one directive by separating each one with a colon. As mentioned, compiler directives entered in this way can contain only integers.

With the compiler directive that appears in the dialog box, the code would look like this:
Sub ConditionalIf()
   #If Language = 1 Then
      MsgBox "Hola, Que Tal?"
   #Else
      MsgBox "Hello, How Are You?"
   #End If
End Sub
Notice that ConditionalIf now evaluates the constant Language against the integer of 1.
It's important to understand that using conditional constants isn't the same as using regular constants or variables with the standard If...Then...Else construct. Although regular constants or variables are evaluated at runtime, which requires processing time each time the application is run, conditional constants and conditional If...Then...Else statements control which sections of code are actually compiled. All resolution is completed at compile time; this eliminates the need for unnecessary processing at runtime.
Rather than using multiple If...Then...Else statements, it's often much clearer to use a Select Case statement, as shown here:
Private Sub cmdCase_Click()
    Dim intResponse As Integer
    If IsNull(Me!txtValue) Then
        intResponse = 0
    Else
        intResponse = Val(Me!txtValue)
    End If
    Select Case intResponse
      Case 0
        MsgBox "You Must Enter a Number"
      Case 1 To 5
        MsgBox "You Entered a Value Between 1 and 5"
      Case 7, 11, 21
        MsgBox "You Entered 7, 11, or 21"
      Case Else
        MsgBox "You Entered an Invalid Number"
    End Select
End Sub
This subroutine first uses an If statement to evaluate whether the txtValue control contains a null. If txtValue contains a null, the routine stores a zero in the intResponse variable; otherwise, the value in txtValue is stored in intResponse. The Select Case statement then evaluates intResponse. If the value is 0, a message box is displayed with You Must Enter a Number. If the value is between 1 and 5 inclusive, a message box is displayed saying You Entered a Value Between 1 and 5. If the user enters 7, 11, or 21, an appropriate message is displayed; otherwise, the user gets a message indicating that he or she entered an invalid number.
Several looping structures are available in VBA; most are discussed in this section. Take a look at the following example of a looping structure:
Sub DoWhileLoop()
  Dim intCounter As Integer
    intCounter = 1
    Do While intCounter < 5
      MsgBox intCounter
      intCounter = intCounter + 1
    Loop
End Sub
In this structure, if intCounter is greater than or equal to 5, the code in the loop is not executed. If you want the code to execute unconditionally at least one time, you need to use the following construct:
Sub DoLoopWhile()
  Dim intCounter As Integer
    intCounter = 5
    Do
        MsgBox intCounter
        intCounter = intCounter + 1
    Loop While iCounter < 5
End Sub
This code will execute one time, even though intCounter is set to 5. The Do While...Loop in the previous example evaluates before the code is executed, so it doesn't ensure code execution. The Do...Loop While is evaluated at the end of the loop and is, therefore, guaranteed execution.
Alternatives to the Do While...Loop and the Do...Loop While are Do Until...Loop and Do...Loop Until. Do Until...Loop works like this:
Sub DoUntilLoop()
   Dim intCounter As Integer
   intCounter = 1
   Do Until intCounter = 5
      MsgBox intCounter
      intCounter = intCounter + 1
    Loop
End Sub
This loop sets intCounter equal to 1. It continues to execute until intCounter becomes equal to 5. The Do...Loop Until construct is another variation:
Sub DoLoopUntil()
   Dim intCounter As Integer
   intCounter = 1
   Do
      MsgBox intCounter
      intCounter = intCounter + 1
   Loop Until intCounter = 5
End Sub
As with the Do...Loop While construct, the Do...Loop Until construct doesn't evaluate the condition until the end of the loop, so the code in the loop is guaranteed to execute at least once.
Warning
It's easy to unintentionally cause a loop to execute endlessly, as shown in this example:
Sub EndlessLoop()
   Dim intCounter As Integer
   intCounter = 5
   Do
      Debug.Print intCounter
      intCounter = intCounter + 1
   Loop Until intCounter = 5
End Sub
This code snippet sets intCounter equal to 5. The code in the loop increments intCounter, then tests to see whether intCounter equals 5. If it doesn't, the code in the loop executes another time. Because intCounter will never become equal to 5, the loop executes endlessly. You need to use Ctrl+Break to exit out of the loop; however, Ctrl+Break doesn't work in Access's runtime version.
The For...Next construct is used when you have an exact number of iterations you want to perform. It looks like this:
Sub ForNext()
    Dim intCounter As Integer
    For intCounter = 1 To 5
        MsgBox intCounter
    Next intCounter
End Sub
Note that intCounter is self-incrementing. The start value and the stop value can both be variables. A For...Next construct can also be given a step value, as shown here:
Sub ForNextStep()
    Dim intCounter As Integer
    For intCounter = 1 To 5 Step 2
        MsgBox intCounter
    Next intCounter
End SubThe With...End With statement executes a series of statements on a single object. Here's an example:
Private Sub cmdWithEndWith_Click()
   With Me!txtHello
      .BackColor = 16777088
      .ForeColor = 16711680
      .Value = "Hello World"
      .FontName = "Arial"
   End With
End Sub
This code performs four operations on the txtHello text box, found on the form it's run on. The BackColor, ForeColor, Value, and FontName properties of the txtHello text box are all modified by the code.
Tip
The With...End With statement offers two main benefits. The first is simply less typing—you don't need to repeat the object name for each action you want to perform on the object. The second, and more important, benefit involves performance. Because the object is referred to once rather than multiple times, this code runs much more efficiently. The benefits are even more pronounced when the With...End With construct is found in a loop.
The For Each...Next statement executes a group of statements on each member of an array or collection. The following example illustrates the use of this powerful construct:
Private Sub cmdForEachNext_Click()
   Dim ctl As Control
   For Each ctl In Controls
      ctl.ForeColor = 16711680
   Next ctl
End Sub
This code loops through each control on a form; the ForeColor property of each control on the form is modified. The With...End With construct is often used with the For Each...Next construct. Here's an example:
Private Sub cmdForEachWith_Click()
   Dim ctl As Control
   For Each ctl In Controls
      With ctl
         .ForeColor = 16711680
         .FontName = "Arial"
         .FontSize = 14
      End With
   Next ctl
End Sub
This code loops through each control on the form. Three properties are changed for each control: ForeColor, FontName, and FontSize.
Warning
Before you put all this good information to use, remember that no error handling has been implemented in the code yet. If one of the controls on the form in the example doesn't have a ForeColor, FontName, or FontSize property, the code would cause an error. In Chapter 10, you will learn how to determine the type of an object before you perform a command on it. Knowing the type of an object before you try to modify its properties can help you prevent errors.
Both subroutines and functions can receive arguments (parameters), but only functions can return values. The following subroutine receives two parameters, txtFirst and txtLast. It then displays a message box with the first character of each of the parameters that was passed.
Private Sub cmdSendNames_Click()
  Call Initials(Me!txtFirstName, Me!txtLastName)
End Sub

Sub Initials(strFirst As String, strLast As String)
  MsgBox "Your Initials Are: " & Left$(strFirst, 1) _
   & Left$(strLast, 1)
End Sub
Notice that the text in the controls txtFirstName and txtLastName from the current form (represented by the Me keyword) is passed to the subroutine called Initials. The parameters are received as strFirst and strLast. The first left character of each parameter is displayed in the message box.
The preceding code simply passes values and then operates on those values. This next example uses a function to return a value.
Private Sub cmdNameFunc_Click()
    Dim strInitials As String
    strInitials = ReturnInit(Me!txtFirstName, _
          Me!txtLastName)
    MsgBox "Your initials are: " & strInitials
End Sub

Function ReturnInit(strFName As String, strLName As String) As String
    ReturnInit = Left$(strFName, 1) & Left(strLName, 1)
End Function
Notice that this example calls the function ReturnInit, sending values contained in the two text boxes as parameters. The function sets ReturnInit (the name of the function) equal to the first two characters of the strings. This returns the value back to the calling routine (cmdNameFunc_Click) and sets strInitials equal to the return value.
Note
Notice that the function ReturnInit is set to receive two string parameters. You know this because of the As String keywords that follow each parameter. The function is also set to return a string. You know this because the keyword As String follows the list of the parameters, outside the parentheses. If you don't explicitly state that the function will return a particular type of data, it will return a variant.
Visual Basic for Applications has a rich and comprehensive function library. Some of the more commonly used functions and examples are listed in the following sections. On some rainy day, go through the online Help or the Microsoft Access Language Reference to become familiar with the rest.
The Format function formats expressions in the style specified. The first parameter is the expression you want to format; the second is the type of format you want to apply. Here's an example of using the Format function:
Sub FormatData()
   Debug.Print Format$(50, "Currency")
   'Prints $50.00
   Debug.Print Format$(Now, "Short Date")
   'Prints the current date
   Debug.Print Format$(Now, "DDDD")
   'Displays the word for the day
   Debug.Print Format$(Now, "DDD")
   'Displays 3 - CHAR Day
   Debug.Print Format$(Now, "YYYY")
   'Displays 4 - digit Year
   Debug.Print Format$(Now, "WW")
   'Displays the Week Number
End Sub
The Instr function returns the position where one string begins within another string:
Sub InstrExample()
  Debug.Print InStr("Alison Balter", "Balter") 'Returns 8
  Debug.Print InStr("Hello", "l") 'Returns 3
End Sub
Left returns the leftmost number of characters in a string:
Sub LeftExample()
  Debug.Print Left$("Hello World", 7) 'Prints Hello W
End Sub
Right returns the rightmost number of characters in a string:
Sub RightExample()
 Debug.Print Right$("Hello World", 7) 'Prints o World
End Sub
Mid returns a substring of a specified number of characters in a string. This example starts at the fourth character and returns five characters:
Sub MidExample()
    Debug.Print Mid$("Hello World", 4, 5) 'Prints lo Wo
End Sub
UCase returns a string that is all uppercase:
Sub UCaseExample()
    Debug.Print UCase$("Hello World") 'Prints HELLO WORLD
End Sub
DatePart returns the specified part of a date:
Sub DatePartExample()
    Debug.Print DatePart("YYYY", Now)
    'Prints the Year
    Debug.Print DatePart("M", Now)
    'Prints the Month Number
    Debug.Print DatePart("Q", Now)
    'Prints the Quarter Number
    Debug.Print DatePart("Y", Now)
    'Prints the Day of the Year
    Debug.Print DatePart("WW", Now)
    'Prints the Week of the Year
End Sub
DateDiff returns the interval of time between two dates:
Sub DateDiffExample()
  Debug.Print DateDiff("d", Now, "12/31/99")
  'Days until 12/31/99
  Debug.Print DateDiff("m", Now, "12/31/99")
  'Months until 12/31/99
  Debug.Print DateDiff("yyyy", Now, "12/31/99")
  'Years until 12/31/99
  Debug.Print DateDiff("q", Now, "12/31/99")
  'Quarters until 12/31/99
End Sub
DateAdd returns the result of adding or subtracting a specified period of time to a date:
Sub DateAddExample()
    Debug.Print DateAdd("d", 3, Now)
    'Today plus 3 days
    Debug.Print DateAdd("m", 3, Now)
    'Today plus 3 months
    Debug.Print DateAdd("yyyy", 3, Now)
    'Today plus 3 years
    Debug.Print DateAdd("q", 3, Now)
    'Today plus 3 quarters
    Debug.Print DateAdd("ww", 3, Now)
    'Today plus 3 weeks
End SubWith the Object Browser, you can view members of an ActiveX component's type library. In plain English, the Object Browser allows you to easily browse a component's methods, properties, and constants. You can also copy information and add it to your code. It even adds a method's parameters for you. The following steps let you browse the available methods, copy the method you want, and paste it into your code:
With a module active, select Object Browser from the toolbar or press F2 to open the Object Browser window. (See Figure 8.11.)
Use the Project/Library drop-down list to select the project or library whose classes and members you want to view.
The Object Browser window is divided into two parts. Select the class from the left-hand list box, which lists class modules, templates for new objects, Standard modules, and modules containing subroutines and functions.
Select a related property, method, event, constant, function, or statement from the “Members of” list box. In Figure 8.11, the basAnother module is selected from the list box on the left, and the
EvalSalesfunction is selected from the list box on the right. Notice that the function and its parameters appear below the list boxes.Click the Copy to Clipboard button to copy the function and its parameters to the Clipboard so that you can easily paste it into your code.

The example in Figure 8.11 shows choosing a user-defined function selected from a module in a database, but you can also select any built-in function. Figure 8.12 shows an example in which the DatePart function is selected from the Visual Basic for Applications library. The Object Browser exposes all libraries referred to by the database and is covered in more detail in Chapters 10 and 25.

The Access 97 development environment is better than its predecessors. Several features have been added to make coding easier and more pleasant for you. These enhancements include the ability to do the following:
List properties and methods
List constants
Get quick information on a command or function
Get parameter information
Allow Access to finish a word for you
Get a definition of a function
All these features that help you with coding are available with a right-click when you place your cursor within the Module window.
With the List Properties and Methods feature, you can view all the objects, properties, and methods available for the current object. To invoke this feature, right-click after the name of the object and select List Properties/Methods (you can also press Ctrl+J). The applicable objects, properties, and methods appear in a list box. (See Figure 8.13.) To find the appropriate object, property, or method in the list, use one of these methods:
Begin typing the name of the object, property, or method.
Use the up-arrow and down-arrow keys to move through the list.
Scroll through the list and select your choice.

Use one of these methods to insert your selection:
The List Constants feature opens a drop-down list displaying valid constants for a property you have typed and for functions with arguments that are constants. It works like the List Properties and Methods feature. To invoke it, right-click after the name of the property or argument and select List Constants (or press Ctrl+Shift+J). A list of valid constants appears. (See Figure 8.14.) You can use any of the methods listed in the previous section to select the constant you want.
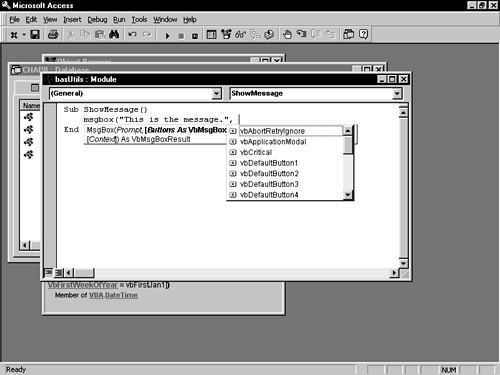
The Quick Info feature gives you the full syntax for a function, statement, procedure, method, or variable. To use this feature, right-click after the name of the function, statement, procedure, method, or variable and select Quick Info (or press Ctrl+I). A tip appears, showing the valid syntax for the item. (See Figure 8.15.) As you type each parameter in the item, it's displayed in boldface type until you type the comma that delineates it from the next parameter.
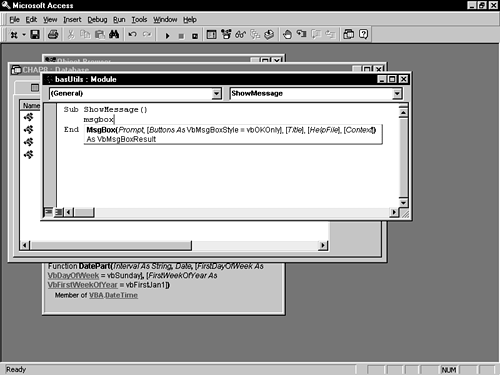
The Parameter Info feature gives you information about the parameters of a function or statement. To use this feature, right-click and select Parameter Info (or press Ctrl+Shift+I). A pop-up list appears with information about the parameters of the function or statement. This list doesn't close until all the required parameters are entered, the function is completed without any optional parameters, or the Esc key is pressed.
The Complete Word feature completes a word you're typing. To use this feature, you must first type enough characters for Visual Basic to recognize the word you want. Next, right-click and select Complete Word (or press Ctrl+Spacebar). Visual Basic then finishes the word you're typing.
The Definition feature shows the place in the Code window where the selected variable or procedure is defined. To get a definition of the selected variable or procedure, right-click in the Code window and select Definition (or press F2). Your cursor is moved to the module and location where the variable or procedure was defined.
This example uses a form, a query, and a report to retrieve criteria and then preview sales information by client for a specific date range. The rptClientInformationByProject report is based on a query called qryBillingDetailByClient; this query requires information from a form named frmPrintClientBilling. The frmPrintClientBilling form, shown in Figure 8.16, must be open for the process to finish successfully because the criteria for the query is gathered from the report. The code for the two command buttons looks like this:
Sub cmdRunReport_Click()
   If IsNull(Me!txtStartDate) Or IsNull(Me!txtEndDate) Then
      MsgBox "Both the Start Date and End Date Must Be Filled In"
   Else
      Call RunReport("rtpClientInformationByProject")
   End If
End Sub

Sub cmdClose_Click()
    DoCmd.Close
End Sub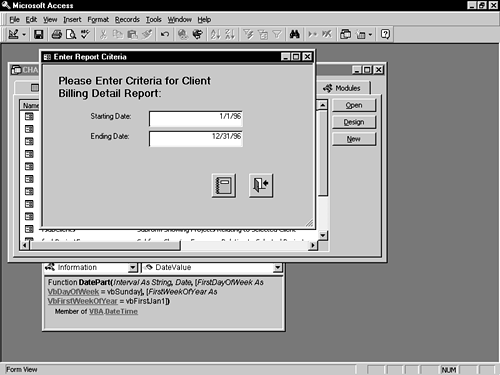
Figure 8.16. The Report Criteria form, requesting required information for the query underlying the Billing Detail Report.
The first routine evaluates the two text boxes to make sure they're filled in. If either text box contains a null, a message is displayed, but if neither one does, a user-defined routine called RunReport is executed. The second routine simply closes the criteria form.
The RunReport subroutine is included in a module called basUtils; RunReport looks like this:
Sub RunReport(strReportName As String)
      DoCmd.OpenReport strReportName, acPreview
End Sub
This routine receives the name of any report as a parameter and runs the report whose name is passed as the parameter.
The other code, found in the report itself, is placed in the report's Open event and looks like this:
Private Sub Report_Open(Cancel As Integer)
   If Not IsLoaded("frmPrintClientBilling") Then
      MsgBox "Print Client Billing Form Must Be Open to Run This Report", _
         vbCritical, "Error!!"
      Cancel = True
   End If
End Sub
This routine calls the user-defined function IsLoaded. If the function returns a false, indicating that the required criteria form isn't open, a message is displayed and the report is canceled. The IsLoaded function looks like this:
Function IsLoaded(ByVal strFormName As String) As Integer
    IsLoaded = False
    Dim frm As Form
    For Each frm In Forms
      If frm.Name = strFormName Then
         IsLoaded = True
         Exit Function
      End If
    Next frm
 End Function
This function loops through the Forms collection. It tries to match the name of each open form with the name of the report criteria form. If a match is found, a True is returned; otherwise, a False is returned.
A strong knowledge of the VBA language is imperative for the Access developer. This chapter has covered all the basics of the VBA language. You have learned the differences between Code, Form, and Report modules and how to effectively use each. You have also learned the difference between event procedures and user-defined subroutines and functions. To get the most mileage out of your subroutines and functions, you have learned how to pass parameters to, and receive return values from, procedures.
Variables are used throughout your application code. Declaring each variable with the proper scope and lifetime helps make your application bullet-proof and easy to maintain. Furthermore, selecting an appropriate variable type ensures that the minimal amount of memory is consumed and that your application code protects itself. Finally, effectively using control structures and built-in functions gives you the power, flexibility, and functionality required by even the most complex of applications.