In a perfect world, you could create an application that would not require any explanation. In this perfect world, your user simply could view any form in your application and instantly know how to use it. No assistance would be required. Unfortunately, the world is not perfect. Even with the elegant graphical user interface that Windows provides, you must give users guidance in using your application. You can accomplish this task in a relatively easy manner by including Help files with your application.
Before you venture into the process of creating a custom Help file, it is important that you become familiar with the basics of working with Windows 95 Help. This provides you with a context in which to develop your own Help files. Your own Help files should provide your users with the same look and feel as the Help files included with Access, Word, Excel, and the other standard products with which your users already are familiar.
Figure 36.1 shows the Access Help dialog box. Notice the Contents, Index, and Find tabs. These tabs are standard for many Windows applications. Each tab of the Help dialog box provides users with a different interface for obtaining the help they need. There is also a new Office Assistant.
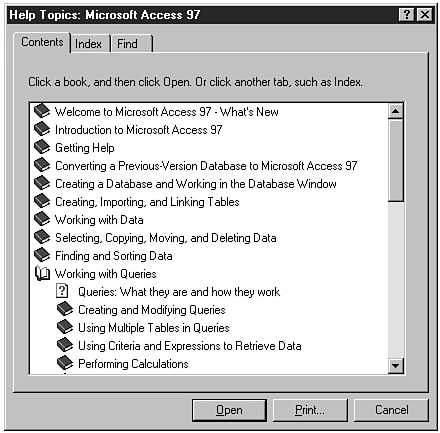
The Contents tab of the Help dialog box provides an expandable/collapsible table of contents for the Help file. Using the Contents tab, users can peruse the available topics, learning about all aspects of your application. Users can double-click the item on which they want help, and Access displays help on the selected topic. (See Figure 36.2.)

The Index tab replaces the Search dialog box available in previous versions of Windows. It enables users to search for Help topics using keywords, as shown in Figure 36.3. After the keyword is found, users can double-click the entry for which they want help. A Topics Found dialog box appears if more than one entry is found on the selected Help topic, as shown in Figure 36.4. Otherwise, the user is immediately provided with help on the selected topic. The help can appear in the main Help window or in a secondary Help window. Usually, overviews are displayed in the main window, and step-by-step instructions for accomplishing specific tasks are provided in a secondary window.


The Find tab enables users to search for a particular word or phrase. After typing the selected word or phrase, users see a list box that enables them to refine their search. After users select a matching word from the list box, a list of topics associated with the matching word is displayed, as shown in Figure 36.5. Users then can double-click the entry they want to learn about.

One of the more subtle changes between Access 95 and Access 97 is the Office Assistant. In Access 95, this was known as the Answer Wizard; for Office 97, Microsoft has renamed the Answer Wizard to the Office Assistant and included it in Word, Excel, Access, and PowerPoint. It still operates the same as the Answer Wizard. Users enter English-like questions and obtain a list of topics associated with their question. Users simply enter a question in the text box and then press the Search button; the related topics then are displayed for the users to choose.
The button bar on the Help window enables users to easily navigate through Help. The secondary Help window shown in Figure 36.6 enables users to view Help topics, move back to the previous Help topic, or view available options. Button bars are fully customizable so that you can provide your users with the appropriate options.

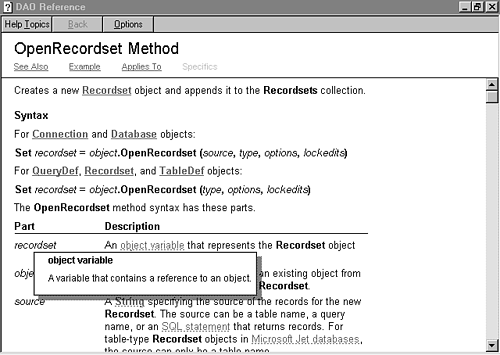
The underlined words, phrases, or sentences that appear in green in the Help topic are called hotspots. When users place the mouse over a hotspot, the mouse pointer turns into a hand. If users click over a hotspot underlined with a dotted line, a pop-up window appears with specific information about the hotspot item, as shown in Figure 36.7. This pop-up window disappears after users click anywhere else on-screen. When users clicks over a hotspot underlined with a solid line, help is displayed about a related topic.
Help topics can contain pictures (images) set up to operate as hotspots. When users place the mouse over the picture, the mouse pointer appears as a hand. After users click the hypergraphic, a pop-up window appears, providing additional information about the picture. The hypergraphic in Figure 36.8 shows the Query Type tool. After users click the picture of the tool, a pop-up window appears with additional information about the Query Type tool.

Figure 36.9 shows an example of authorable buttons. These buttons perform an action, such as displaying a secondary window, after users click them.
Before you worry about how to build a Help file, you should plan what it will look like. What you provide in a Help file is determined by the type of users who will be working with your application. If your application will be distributed to a wide range of users (including those new to Windows), for example, your Help file should include the most basic information. On the other hand, if your application is directed toward power users who are extremely adept at Windows and maybe even Access, your Help file should focus on assisting users with the more complex aspects of your application. In general, your Help file should contain the following:
An introduction to your application
A description of each form and report that comprises your application
Instructions on how to use the various controls on your forms
A description of each toolbar and each tool contained on the toolbar
Instructions for carrying out tasks such as adding a client, deleting a client, or adding projects related to a client
Depending on the level of the users, you might want to provide additional detail, such as a description of terms, concepts, or Windows 95 or Access skills required for the use of your application.
After you decide what to include in the Help file that will accompany your application, you are ready to begin the process of creating the actual file. The following is an overview of the tasks required to build a custom Help file:
Build a Help topic file (RTF).
Create a map file (MAP).
Create a contents file (CNT).
Create the Help project file (HPJ).
Prepare the Help file to be compiled.
Compile the Help project file (HLP).
Add the Help file to your application.
Each of these steps is covered in detail in the following sections.
The first step in creating a Help file is to create a topic file. The topic file is a Rich Text Format (RTF) file containing all the text and formatting codes that will appear in the Help file. A Help project must contain at least one topic file. It can contain more than one topic file if you choose. You can create Help topic files in Microsoft Word or by using any tool that enables you to build a file in the RTF format. This file format contains special characters and formatting that the Help compiler uses to build the custom Help file.
Several Help-authoring tools are available to assist you with the process of building a topic file. These include RoboHelp, Doc-To-Help, and ForeHelp, just to name a few. These valuable tools (discussed in the “Getting Help with Help: Authoring Tools” section of this chapter) assist you with the process of building the RTF file. Even if you plan to use one of these tools, it is a good idea to understand how the RTF file is built. This section provides you with the knowledge and tools to build and work with an RTF file.
This section covers how to build a topic file using Microsoft Word for Windows 95. You easily can modify the steps to work with other versions of Microsoft Word or with other tools that enable you to save a file in the RTF format. To begin the process of building the Help topic file, follow these steps:
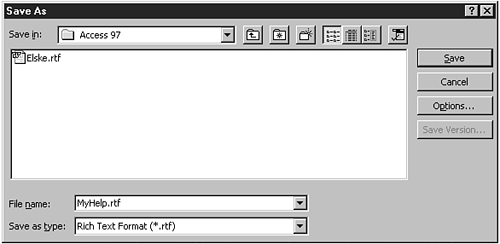
Create a new Microsoft Word document.
Choose Save.
In the Save As Type drop-down list, select Rich Text Format as the file type, as shown in Figure 36.10.
Enter a filename for the Help topic file and click Save.
You now are ready to begin the process of entering the text and formatting codes that dictate the content, appearance, and functionality of your custom Help file. The Help compiler uses various footnotes as codes to designate the role that each portion of the RTF file will serve. In other words, each footnote communicates the function of the text to the Help compiler. The pound sign (#), for example, is used to designate a unique topic ID for the text that it precedes. You add each Help topic with the appropriate footnote codes. Here's how it works:
Insert a hard page break indicating that you are starting a new Help topic. You do not need to insert a hard page break before the first Help topic.
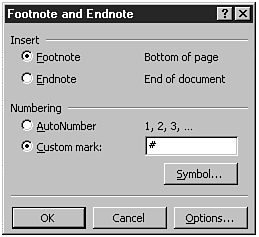
Choose Insert | Footnote from the Word menu.
Choose Custom Mark, as shown in Figure 36.11.
Type one of the special footnote characters covered in the sections that follow.
Click OK.
Repeat steps 2 through 5, adding all the special characters required for the Help topic you are adding.
Type the Help topic title as it should appear on the Help window's title bar.
Press Enter and type all the text for the topic.
Before you walk through the step-by-step process of building a Help topic, it is important that you understand the meaning of the more commonly used footnote codes. These are covered in the following sections.
The pound sign (#) footnote is required for every Help topic. It identifies a unique topic ID. This is the name that WINHELP uses to identify the topic. The topic ID must be unique within the Help project.
The dollar sign ($) footnote also is required for every Help topic. It specifies the Help topic's title as it will appear in the Topics Found dialog box, the Bookmark dialog box, and the History window. This title should match the topic title that appears in the Help window.
The letter K specifies search keywords for the topic. These are the keywords the user can employ when searching for the topic. Remember that users do not always remember the correct terms for the topic on which they need help. It is important to be creative when designating search keywords so that you supply your users with a variety of terms that will bring them to the correct Help topic.
Several other tags exist that enable you to build extremely complex Help files. The asterisk (*) footnote, for example, enables you to create Build tags. These Build tags enable you to create several versions of a Help file using the same Help topic file. This is an excellent option if you want to provide different Help files to the different levels of users to whom you will distribute your application. Other tags enable you to specify the window in which a Help topic is displayed, designate entry-point macros, and so on. These more advanced tags are not covered in this text.
All this might seem rather confusing to you. The best way to learn how it really works is to build your own topic file. With a new RTF file open (see the “Creating an RTF File” section earlier in this chapter), follow these steps:
Select the Insert menu and choose Footnote.
After the dialog box opens, click Custom Mark.
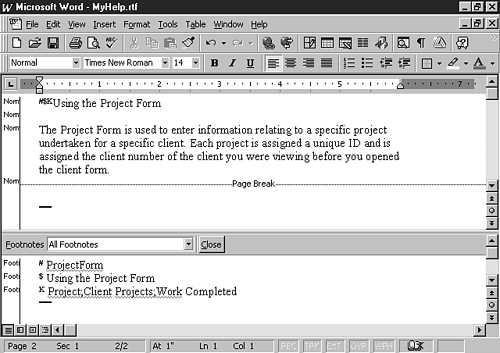
Type a pound sign (
#) in the Custom Mark text box and click OK. This designates the text that you type in the footnote as a unique topic ID.Notice that the cursor drops to the Footnote window. Type the unique identifier in the Footnote window. In this case, type
ProjectForm.Press F6 to move back to the text-editing window, or click after the pound sign.
Select the Insert menu and choose Footnote.
Type a dollar sign (
$) in the Custom Mark text box and click OK. This designates the text that you type in the footnote as the Help topic title that will appear in the Topics Found, Bookmark, and History dialog boxes.Type
Using the Project Formin the Footnote window.Press F6 to move back to the text-editing window, or click after the
$.Select the Insert menu and choose Footnote.
Type the letter
K(in uppercase) in the Custom Mark text box and click OK. This designates the text that you type in the footnote as search keywords. Each search keyword must be separated by a semicolon. In this case, typeProject;Client Projects;Work Completed.Press F6 to move back to the text-editing window, or click after the letter
K.Type the text that will appear as the Help title. This should match the text you specified for the
$footnote.Press Enter and type the Help text the user will see.
Insert a hard page break and repeat all the steps for each Help topic you want to add.
Figure 36.12 illustrates the RTF file as it should appear after following these steps. You can continue adding additional topics as desired.
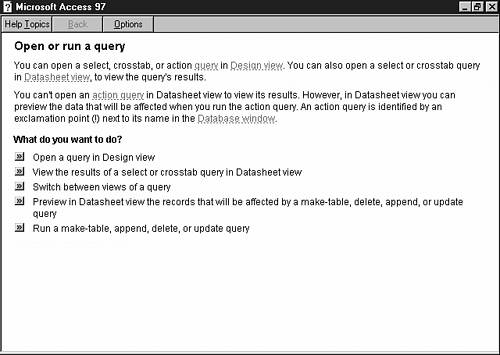
Access Help and the Help provided with many other products contain nonscrolling regions. These regions often include the hotspots See Also or Example, as shown in Figure 36.13. The nonscrolling region for the Help topic in Figure 36.13 includes hotspots for See Also, Example, Applies To, and Specifics. You can have only one nonscrolling region per Help topic. It must include the first paragraph of the Help topic (the one with the footnotes).

To create a nonscrolling region, follow these steps:
One of the wonderful aspects of Windows Help is the capability to quickly jump from one topic to another related topic or to obtain more information about an entry in the text. Hotspots enable you to provide this functionality to the users of your application. There are three types of hotspots:
Follow these steps to create a jump hotspot:
Type the hotspot text in your RTF Word document.
Without pressing the spacebar, type the topic ID of the topic to which you want to jump.
Select the hotspot text and double-underline it by pressing Ctrl+Shift+D.
Select the topic ID and hide it by pressing Ctrl+Shift+H.
Note
To view hidden text in Microsoft Word for Windows 95, choose Tools | Options and then click the View tab. Then enable the Hidden Text checkbox.
To create a pop-up hotspot, follow these steps:
Type the hotspot text in your RTF Word document.
Without adding any spaces, type the topic ID of the Help topic you want the hotspot to display in the pop-up window.
Select the hotspot text and single-underline it by pressing Ctrl+U.
Select the topic ID and mark it as hidden by pressing Ctrl+Shift+H.
Figure 36.14 shows a pop-up hotspot with the word ID that pops up a window with the Help text with the associated topic ID of UniqueIdentifier.

The WinHelp Engine supports the following types of graphics files:
Graphics files can be embedded in the topic file, or they can be referenced. It is almost always best to reference a graphics file instead of embedding it in the topic file. Embedded graphics require a significant amount of memory and generally are not practical. To reference a graphics file, insert the following statement where you want the graphic to appear:
{bmx[t] filename}The bm is hard-coded text. The x is a variable that can be set to one of the following:
c: Indicates that the graphic is like a character and will flow with the text.l: Indicates that the graphic will appear as if it were in a left-justified frame; text will flow around the picture.r: Indicates that the graphic will appear as if it were in a right-justified frame, and again, the text will flow around the picture.
The t parameter is optional. If it is used, the background color of the graphic is replaced with the background color of the Help topic containing the graphic.
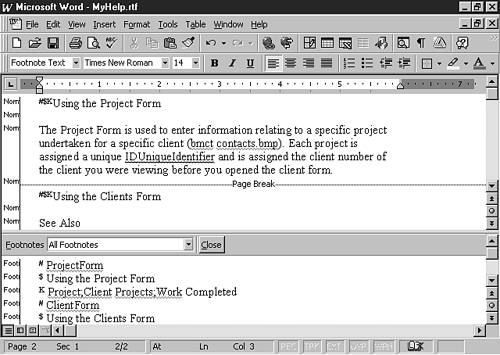
Figure 36.15 shows the bitmap called contacts.bmp as it flows with the paragraph in which it is inserted.
A hypergraphic is a picture that functions like a hotspot. When users place the mouse over the hypergraphic, a hand appears. If users click the graphic, a pop-up window appears. To add a hypergraphic, follow these steps:
Add a graphic reference as described in the “Adding Graphics” section of this chapter.
Without pressing the spacebar, add a hotspot as explained in the “Adding Hotspots” section of this chapter.
Figure 36.16 shows an example in which the contacts.bmp bitmap is used as a hotspot to display a window containing help with the topic ID of ClientForm. The name of the graphic is underlined, and the topic ID is hidden.

A map file is an optional ASCII text file that contains a context number for each topic ID. These context IDs ultimately will be used to associate a particular Help topic with a specific form, report, or control. Associating a Help topic with a specific form, report, or control is covered in the “Adding Custom Help to Your Applications” section, later in this chapter.
Although the map file is optional, it is highly recommended. You can map Help topics to context numbers directly in the Help project file, but this can become unwieldy even with the smallest of Help files. A map file is very easy to create, so there is really no reason to refrain from creating one.
To create a map file, follow these steps:
Launch a text editor such as Notepad.
Add a
#define topic-ID context-numberstatement to each line of the map file.Save the file as ASCII text with a MAP extension.
A context number must be created for each topic ID in the Help file. When assigning context numbers, you should leave extra room between each topic number. This enables you to easily insert additional related items at any time. The idea is that you want your topic numbers to be logically sequenced and you do not want to change a topic number after it has been associated with an Access object.
A contents file is an ASCII text file that is used to determine the table of contents that appears on the Contents tab of the Help Topics dialog box. The contents file must be distributed along with your application and the compiled Help file (HLP). To create a contents file, follow these steps:
Launch a text editor such as Notepad.
Begin with a
:Basestatement. This statement specifies the name of the compiled Help file.Use the
:Titlestatement to specify a title for the Help Topics dialog box.Use an
:Indexstatement to identify the Help file containing the keywords you want to include in the Index tab.Add a topic paragraph for each topic you want to include in the table of contents. Use 1 for first-level headings, 2 for second-level headings, and so on.
The Help project file brings everything about the Help file together, including the following:
A list of topic files associated with the Help project
A list of map files associated with the Help project
The name of the contents file associated with the project
A reference to the location of graphics files required by the project
Definitions of the Help project windows
Title of the Help file
The easiest way to build the Help project file is to use the Help Workshop. You can get the Help Workshop in one of these ways:
As part of the Office 97 Developer Edition Tools
In the Windows SDK (System Development Kit)
On the Microsoft Developer Network Level 2 CD-ROM
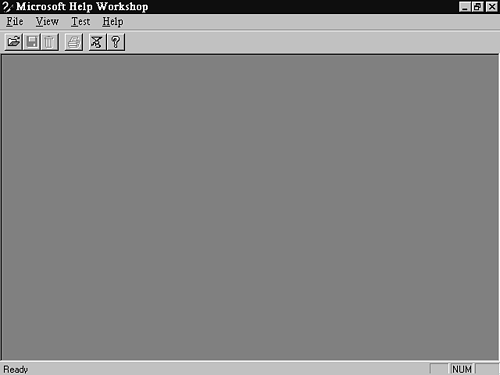
You can launch the Help Workshop by using the Start menu or by using a desktop shortcut. Figure 36.17 shows the window that appears after the Help Workshop is launched.
To create a new project file, follow these steps:
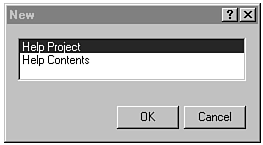
Choose File | New. The New dialog box appears, asking whether you are creating a new project file or a contents file, as shown in Figure 36.18. Instead of creating the contents file using the techniques covered in the “Creating a Contents File” section of this chapter, you can use the Help Workshop to create a contents file.
Select Help Project and click OK. The Project File Name dialog box appears, as shown in Figure 36.19.
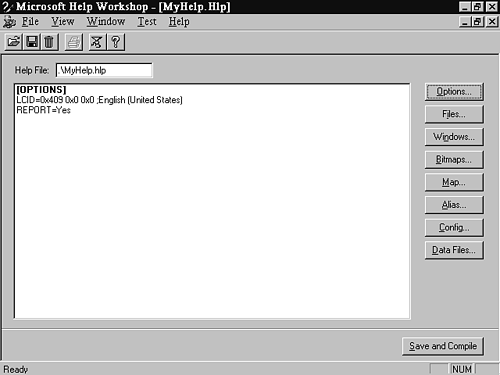
Select a name and location for the Help project file and click Save. The Help Workshop window appears, as shown in Figure 36.20.

After you create a Help file, you must perform several tasks to prepare the Help project to be compiled. You must specify the Help topic file, the map file, and the location of graphics files. You also probably should customize the Help window and specify other optional settings. The steps involved in performing each of these tasks are covered in the sections that follow.
The first step is to locate the Help topic file. This is the RTF file you created in the “Creating a Topic File” section of this chapter. Follow these steps:
Click the Files button on the right side of the Help Workshop window. The Topic Files dialog box appears.
Click Add to add a topic file.
Select an RTF file and click Open. The Topic Files dialog box appears, as shown in Figure 36.21.
Click OK to close the Topic Files dialog box.

The next step in the process is to designate the location of the map file, which is accomplished with these steps:
Click the Map button on the right side of the Help Workshop window.
Click the Include button to include an existing map file.
Click Browse in the Include file dialog box. Locate a map file and click Open. Then click OK. The Map dialog box appears, as shown in Figure 36.22.
Click OK to close the Map dialog box.

You do not need to specify a bitmaps folder if the bitmaps are in the same folder as the Help project. If the bitmaps are in a different location, you must follow these steps:
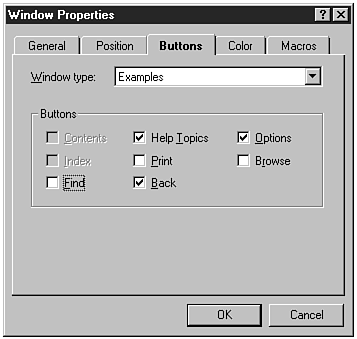
The Help Workshop gives you the opportunity to create secondary Help windows. Secondary Help windows give the user step-by-step guidance in completing a process. To add new Help windows, click the Windows button on the right side of the Help Workshop window. The Window Properties dialog box appears, as shown in Figure 36.23.

From the Window Properties dialog box, you can add and customize new Help windows. To add a new Help window, follow these steps:
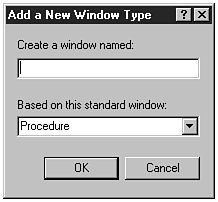
Click Add. The Add a New Window Type dialog box appears, as shown in Figure 36.24.
Type a name for the new Help window.
From the Based on This Standard Window drop-down list, select a style for the new Help window.
Click OK to return to the Add a New Window Type dialog box.
Select the General tab. Fill in the title bar text for the new window. You also can indicate that you want to keep the Help window on top. This is standard for step-by-step Help windows so that they remain on top while the user performs a task.
Click the Position tab and specify a custom position for the new Help window.
Click the Buttons tab, where you can select the buttons that you want to appear on the button bar of your new window. (See Figure 36.25.)
Click the Color tab to specify custom colors for both the nonscrolling and topic areas of the Help window.
Click the Macros tab if you want to instruct the Help Compiler to run a macro when the Help window opens.
Click OK to add the new window.
The new window can be used in the following ways:
When a user selects the Help topic from the Index tab or Find tab
As a jump from a hotspot
To display the new Help window after users select the Help topic from the Index tab or Find tab, you must use the greater than (>) footnote when adding the Help topic.
To display the new Help window after users click a jump hotspot, you must follow the topic ID with a greater than (>) symbol and then the name of the window. The hotspot New Projects jumps to a topic called AddNewProject, opening it in the AddProj window.
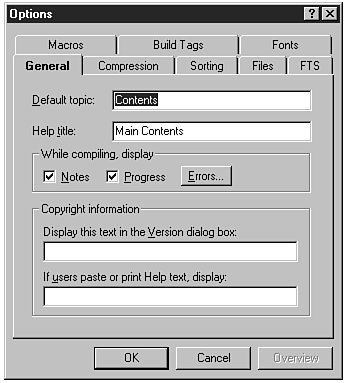
The Help Workshop offers some final options. To access these additional features, click the Options button fron the main screen. The Options dialog box appears, as shown in Figure 36.26. This dialog box has several tabs. Each tab enables you to define different aspects of your Help project. The General tab, for example, enables you to specify a default Help topic and define a title for the Help window. The Compression tab enables you to select a level of compression for the compiled Help file. The higher the level of compression, the longer the Help file takes to compile, but the less space the Help files require. Also, if you use Maximum compression, the Help file loads more quickly and operates better on users' machines.
After you select a Help topic file, specify the map file, define the location of your graphics files, add and customize any additional Help windows, and indicate any special options for the Help project, you are ready to compile the project into an HLP file. This is the file that your Access application will use.
To save all changes to the Help file and then compile it, click the Save and Compile buttons. After the project is compiled and saved, notice that five topics, five jumps, 15 keywords, and one bitmap have been defined. The Help file compiled with no errors or warnings. The file MyHelp.hlp now is compiled and ready to be attached to an Access database.
After you create a compiled Help file, you need to let your application know that it is available. You also must associate different objects in your application with various Help topics in the Help file. Each form and report has a Help File property and a Help Context ID property. The Help File property must be filled in with the name of a compiled Help file. The Help context ID is the number that you defined in the map file. Each control on a form contains a Help context ID property. If you fill in this property with a context ID as specified in the map file, the Help topic that has the topic ID associated with the specified context ID appears whenever that control has focus and the user presses F1. The number 150, for example, found in the Help Context ID field of the frmClients form shown in Figure 36.27, is associated via the map file with the Help topic ID ClientForm.

Many people feel that the process of creating the RTF topic file in Microsoft Word (or using another word processor) is tedious and difficult. Fortunately, several third-party tools are on the market to assist you with this process.
RoboHELP is one of the more popular help-authoring tools. Available from Blue Sky Software, this excellent tool adds user-friendly toolbars, menu commands, and dialog boxes to Microsoft Word, significantly easing the process of creating the RTF file. Creating the footnotes and jumps as well as adding graphics to the RTF file becomes a matter of pointing and clicking. RoboHELP also facilitates the process of building help into your application by automatically creating and maintaining the Help project and map files for you!
Note
For more information, or to purchase RoboHELP, you can contact Blue Sky Software at (619) 459-6365 or by fax at (619) 459-6366.
Another popular help-authoring tool is Doc-To-Help. This product, offered by WexTech Systems, enables you to create a printed manual and online help at the same time. Like RoboHELP, Doc-To-Help provides templates that add buttons and menu commands to Microsoft Word, making the process of developing the RTF file a matter of pointing and clicking.
The MyHelp.rtf file, included on the sample code CD-ROM, contains Help topics that assist you with the following tasks:
Using the Clients form
Using the Projects form
Viewing multiple projects simultaneously
Adding a new project
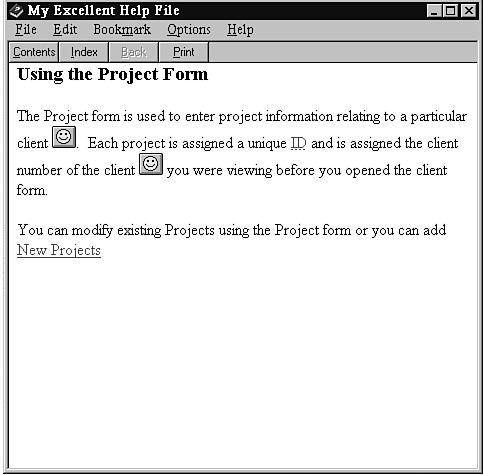
The MyHelp.rtf topic file was compiled along with the MyHelp.map map file to build the MyHelp.hlp Help file. The MyHelp.cnt contents file also is included on the sample code CD-ROM. The resulting Help file has been associated with the CHAP36.MDB database. The AddNewProject topic ID and the UniqueIdentifier topic ID can be accessed by using hotspots included in the ProjectForm topic, as shown in Figure 36.28. The Help project is complete; it has standard Windows Help context, index, and built-in printing capabilities.
Most Windows products today ship with extremely elegant and effective Help systems. Windows users are accustomed to pressing their F1 keys to obtain the assistance they need even to accomplish the most complex tasks. To provide the professional polish that your users expect in an application and to assist them with getting the most out of the product you provide, you should include a custom Help system as part of your application. By using the tools that ship with Microsoft Access and the Office 97 Developer Edition Tools, or by using third-party tools, you can provide your users with very elegant (and often expected) online help documentation at their fingertips.