
Windows users have come to expect seamless integration between products. They are not concerned with what product you use to develop their application; they just want to accomplish their tasks. Often, Microsoft Word, Microsoft Excel, or some other product is best suited for a particular task that your application must complete. It is your responsibility to pick the best tool for the job. This means that you must know how to communicate from your application directly to that tool.
All this means that you can no longer learn only about the product and language that you select as your development tool. Instead, you must learn about all the other available applications. You also must learn how to communicate with these applications—a challenging but exciting feat.
OLE automation is the capability of one application to control another application's objects. This means that your Access application can launch Excel, create or modify a spreadsheet, and print it—all without the user having to directly interact with the Excel application. Many people confuse automation with the process of linking and embedding. OLE 1.0 gave you the capability to create compound documents, meaning that you can embed an Excel spreadsheet in a Word document or link to the Excel spreadsheet from a Word document. This capability was exciting at the time and still is quite useful in many situations, but OLE 2.0 (in addition to everything that OLE 1.0 provides) introduced the capability for one application to actually control another application's objects. With Office 97, Microsoft changed the way users refer to OLE. It now is referred to as automation and is an industry standard and a feature of the component object model (COM).
Just as you can control other applications using automation, your Access application can be controlled by other applications, such as Excel or a Visual Basic application. This means that you can take advantage of Access's marvelous report writer from your Visual Basic application. In fact, you can list all the Access reports, allow your user to select one, and then run the report—all from a Visual Basic form.
Before you learn how automation works, you need to understand a few automation terms. Automation requires an automation client and an automation server. The automation client application is the one that is doing the talking. It is the application that is controlling the server application. Because this book is about Access, most of the examples in this chapter show Access as an automation client, meaning that the Access application is controlling the other application (Excel, Word, and so on). The automation server application is the application being controlled. It contains the objects being manipulated. Excel is acting as an automation server when Access launches Excel, makes it visible, creates a new worksheet, sends the results of a query to the worksheet, and graphs the spreadsheet data. It is Excel's objects that are being controlled, Excel's properties that are being changed, and Excel's methods that are being executed.
Another important component of automation is a type library; this is a database that lists the objects, properties, methods, and events exposed by an automation server application. Type libraries allow the server application's objects, properties, and methods to be syntax-checked by the Access compiler. You also can use a type library to get help on another application's objects, properties, and methods from within Access.
An object model of an automation server application contains the set of objects that are exposed to automation client applications. The objects in the object model are called object types. When you write automation code, you create and manipulate instances of an object type. These instances are called objects.
Warning
It is important to be aware of the hardware that automation requires. It is common for a developer using a Pentium with 32M of RAM to create a really slick application, only to find that it won't run on the 12M 486s owned by users. Automation craves RAM. The more, the better! I recommend 24M of RAM or more for applications that use automation. It also is important to recognize that automation is not fast, even on the slickest of machines.
Automation requires that you create object variables that reference application objects. After you create an object variable, you can query and change the object's properties as well as execute its methods.
You can learn about an object's properties and methods by using its object libraries. An object library contains a listing of all the properties and methods that an object exposes. To view foreign objects from Access, you first must establish a reference to that application. After a reference is established, you can view that object's properties and methods by using the Object Browser. You also can view any modules and classes that the parent object exposes.
To register an object, the Code window must be visible. With the Code window visible, choose Tools | References. The References dialog box appears, as shown in Figure 25.1.
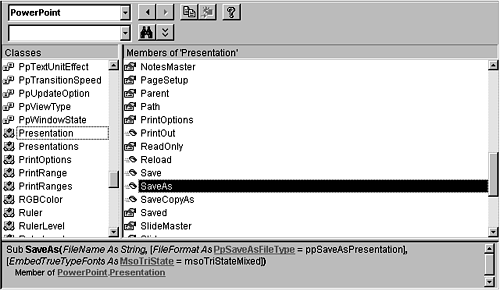
Each time you install a program, the Windows Registry is updated. The References dialog box shows you all the objects that are registered in Windows. (See Figure 25.2.) If you want to link to one of the available objects from within Access, you must enable the checkbox to the left of the object name. Choose OK. You can browse that object's properties and methods in the Object Browser, as shown in Figure 25.3. As covered in Chapter 10, “The Real Scoop on Objects, Properties, and Events,” to access the Object Browser, you can choose View | Object Browser, press F2, or click the Object Browser tool while in the Module window. Notice that in Figure 25.3, the Object Browser displays all the classes that belong to the Access 8.0 object library. The Presentation class is selected. All the members of the Presentation class are displayed in the list box at the right. The SaveAs method is selected. Notice that the bottom half of the Object Browser shows all the arguments associated with the SaveAs method of the Presentation class.

Before you can talk to an application, you need to know the objects contained in it. You then can use Dim, Private, or Public statements to point to and control various application objects. Each product comes with documentation indicating which objects it supports. You also can view the objects that a product supports by using the Object Browser. After you create an object variable, you can manipulate the object without user intervention.
To create an instance of an object, you first must create a generic object variable that holds a reference to the object. You can do this by using a Dim statement:
Dim objExcel As Object
You then can use the CreateObject function to assign an automation server object to the object variable. The CreateObject function receives the class name for an application object as its parameter. This is the name the Windows Registry uses to reference the object. Here's an example:
Set objExcel = CreateObject("Excel.Application")This code creates an object variable pointing to the Excel application object. A new instance of the Excel application is started automatically. This Excel object is part of the Excel application. It can be controlled by VBA using the object variable. Unless instructed otherwise, the instance of Excel is invisible. You can make it visible by using this statement:
objExcel.Visible = True
The CreateObject function creates a new instance of the specified application, and the GetObject function points an object variable to an existing object. If the object does not exist, an error results. The GetObject function receives two parameters. The first is the full path to a file, and the second is the name of the application class. Here's an example:
objExcel = GetObject(,"Excel.Application")
This code points an existing occurrence of Excel to the objExcel object variable. If no instances of Excel are found, an error results. Because you did not specify a path name, the instance of Excel does not point to a specific file.
Certain applications register themselves as single-instance objects. This means that no matter how many times the CreateObject function is run, only one instance of the object is created. Microsoft Word is an example of a single-instance object. On the other hand, if the CreateObject function is used to launch Microsoft Excel, several instances of the application are created. The code in Listing 25.1 addresses this problem.
Example 25.1. Starting Excel if it is not already running.
Sub LaunchExcel()
    On Error Resume Next
    'Sets Error Handling to Resume on the Line Following the Error
    Dim objExcel As Object   'Create Generic Object Variable
    'Attempt to Point an Occurrence of Excel to the Object Variable
    Set objExcel = GetObject(, "Excel.Application")
    If Err.Number Then   'Test to See if an Error Occurred
        'If an Error Occurs, Use CreateObject to Create an Instance of Excel
        Set objExcel = CreateObject("Excel.Application")
    End If
    objExcel.Visible = True
End Sub
This subroutine creates a generic object variable called objExcel. It uses the GetObject function to try to point the objExcel variable to an existing copy of Excel. If an error occurs, you know that Excel was not running. The CreateObject function then is used to create a new instance of Excel. Finally, the Excel object is made visible. This code ensures that only one copy of Excel is launched. You use CreateObject to launch Excel only if the GetObject function returns an error.
After you create an instance of an object, you are ready to set its properties and execute its methods. You can talk to the object through the object variable you created. By using this object variable, you can get and set properties and execute methods.
The objects you will be talking to through automation all have properties. Properties are the attributes of the object—the adjectives you use to describe the objects. You can use VBA to inquire about the properties of objects and set the values of these properties. Here are some examples:
objExcel.Visible = True
objExcel.Caption = "Hello World"
objExcel.Cells(1, 1).Value = "Here I Am"
Each of these examples sets properties of the Excel application object. The first example sets the Visible property of the object to True. The second example sets the Caption of the object to "Hello World". The final example sets the Value property of the Cells object, contained in the Excel object, to the value "Here I Am".
Before you attempt to talk to Excel, you must understand its object model. Excel gives you an excellent overview of the Excel object model. You can find this model by searching for object model in Excel Help. Each object in the model has hypertext links that enable you to obtain specific help on the object, its properties, and its methods.
After you launch Excel, it launches as a hidden window with a Visible property of False. Destroying the Excel object variable does not cause Excel to terminate. To make things even more complicated, each time you use the CreateObject function to launch Excel, a new instance of Excel is launched. This means that it is possible for numerous hidden copies of Excel to be running on a user's machine, which can lead to serious resource problems. Therefore, you need to take several precautions when you want to communicate with Excel.
To begin, you must determine whether Excel is running before attempting to launch a new instance. If Excel already is running, you do not want to launch another copy of Excel, and you do not want to exit Excel when you are done working with it. If your application loads Excel, you will close it when you are done. The subroutine in Listing 25.2 launches Excel. As discussed earlier in the “GetObject” section, the GetObject function is used to point to an existing copy of Excel. If an error occurs, the CreateObject function points the object variable to a new instance of Excel. If the error occurs, the public variable gobjExcel is set to False, indicating that you are sure that Excel was not running before your application loaded it. This variable is used in the cleanup routine to determine whether the application exits Excel.
Example 25.2. A subroutine to launch Excel.
Function CreateExcelObj()
    On Error Resume Next
    'Sets Error Handling to Resume on the Line Following the Error
    CreateExcelObj = False
    'Attempt to Point an Occurrence of Excel to the Object Variable
    Set gobjExcel = GetObject(, "Excel.Application")
    If Err.Number Then   'Test to See if an Error Occurred
        'If an Error Occurs, Use CreateObject to Create an Instance of Excel
        Set gobjExcel = CreateObject("Excel.Application")
        If gobjExcel Is Nothing Then
            gbExcelRunning = False
            CreateExcelObj = True
            MsgBox "Could Not Create Excel Object"
        Else
            gbExcelRunning = False
            CreateExcelObj = True
        End If
    Else
        gbExcelRunning = True
        CreateExcelObj = True
    End If
    Exit Function
End Function
Note
You can find this code and most other examples used in this chapter in the CHAP25EX.MDB database located on your sample code CD-ROM. This routine is located in basUtils.
Warning
To take advantage of the exciting world of automation, all automation server applications must be installed on the user's machine, and the user must possess a full license to the server applications. In fact, you will be unable to compile and run the examples contained in the sample database for this chapter unless you have the server applications loaded on your development machine.
The CreatExcelObj function is called from the Click event of cmdFillExcel. The application attempts to talk to the Excel object only if the return value of the function is True, indicating that Excel was loaded successfully:
Private Sub cmdFillExcel_Click()
   gbExcelRunning = True
   If CreateExcelObj() Then
      Call FillCells
   End If
End Sub
If Excel launches successfully, the FillCells subroutine executes, as shown in Listing 25.3.
Example 25.3. The FillCells subroutine.
Sub FillCells()
Dim oWS As Object
gobjExcel.Workbooks.Add
Set oWS = gobjExcel.ActiveSheet
oWS.Cells(1, 1).Value = "Schedule"
oWS.Cells(2, 1).Value = "Day"
oWS.Cells(2, 2).Value = "Tasks"
oWS.Cells(3, 1).Value = 1
oWS.Cells(4, 1).Value = 2
gobjExcel.Range("A3:A4").SELECT
gobjExcel.Selection.AutoFill gobjExcel.Range("A3:A33")
gobjExcel.Range("A1").SELECT
gobjExcel.Visible = True
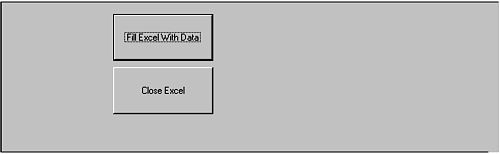
End SubYou can find this relatively simple routine in frmSimpleExcel, which is part of the CHAP25EX.MDB database file. (See Figure 25.4.) It begins by using the Add method on the Workbooks collection of the Excel object to add a new workbook to the instance of Excel. It then uses Set oWS = poExcel.ActiveSheet to provide a shortcut for talking to the active sheet in the new Excel workbook. Using the oWS object reference, the values of several cells are modified. The AutoFill method is used to quickly fill a range of cells with data. The cursor is returned to cell A1, and the Excel object is made visible. You might wonder what the AutoFill method is; it automates the process of filling a range of cells with a pattern of data. Figure 25.5 shows the results. I mention it here not just to tell you what it is, but also to illustrate an important point: You must know the product you are automating and its capabilities. If you are not familiar with the product from a user's perspective, you will find it extremely difficult to work with the product using automation.

After the user clicks the CloseExcel command button, the CloseExcel subroutine is called, as shown in Listing 25.4. The CreateExcelObj routine determined whether the user was running Excel prior to launching your application. When the CloseExcel routine runs, it prompts the user to close Excel only if the public variable gbExcelRunning indicates that Excel was not running prior to your application. Otherwise, it prompts the user, warning that he or she must close Excel.
Example 25.4. The CloseExcel routine.
Sub CloseExcel()
    On Error GoTo CloseExcel_Err
    Dim intAnswer As Integer
    Dim objWK As Object

    'Attempt to point to an active workbook
    Set objWK = gobjExcel.ActiveWorkbook
    'If Excel is Still Running and was NOT running before
    'this application executed it, prompt user to close
    If Not gbExcelRunning Then
        intAnswer = MsgBox("Do You Want to Close Excel?", vbYesNo)
        If vbYes Then
            objWK.Close False
            gobjExcel.Quit
        End If
    Else
        MsgBox "Excel Was Running Prior to This Application." & Chr(13) _
             & "Please Close Excel Yourself."
        gobjExcel.Visible = True
    End If
CloseExcel_Exit:
    Set gobjExcel = Nothing
    Set objWK = Nothing
    Exit Sub

CloseExcel_Err:
    MsgBox "Error # " & Err.Number & ": " & Err.Description
    Resume CloseExcel_Exit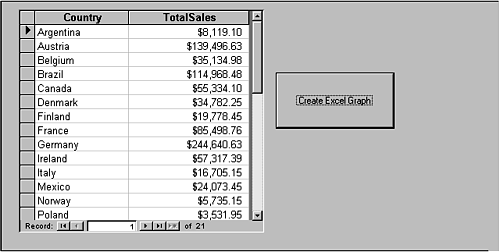
End SubNow that you have learned how to talk to Excel, you are ready to learn how to do something a bit more practical. Figure 25.6 shows a form called frmCreateExcelGraph. The form shows the result of a query that groups the result of price multiplied by quantity for each country. The Create Excel Graph command button sends the result of the query to Excel and produces the graph shown in Figure 25.7. (Listing 25.5 shows the code that produces this graph.)

Example 25.5. Creating a graph from Access.
Private Sub cmdCreateGraph_Click()
   On Error GoTo cmdCreateGraph_Err
   Dim db As DATABASE
   Dim rst As Recordset
   Dim fld As Field
   Dim objWS As Object
   Dim intRowCount As Integer
   Dim intColCount As Integer

   'Display Hourglass
   DoCmd.Hourglass True
   Set db = CurrentDb

   'Attempt to create Recordset and launch Excel
   If CreateRecordset(db, rst, "qrySalesByCountry") Then
      If CreateExcelObj() Then
         gobjExcel.Workbooks.Add
         Set objWS = gobjExcel.ActiveSheet
         intRowCount = 1
         intColCount = 1
         'Loop through Fields collection using field names
         'as column headings
         For Each fld In rst.Fields
            If fld.Type <> dbLongBinary Then
               objWS.Cells(1, intColCount).Value = fld.Name
               intColCount = intColCount + 1
            End If
         Next fld
         'Loop through recordset, placing values in Excel
         Do Until rst.EOF
            intColCount = 1
            intRowCount = intRowCount + 1
            For Each fld In rst.Fields
               If fld.Type <> dbLongBinary Then
                  objWS.Cells(intRowCount, intColCount).Value = fld.Value
                  intColCount = intColCount + 1
               End If
            Next fld
            rst.MoveNext
         Loop
         gobjExcel.Columns("A:B").SELECT
         gobjExcel.Columns("A:B").EntireColumn.AutoFit
         gobjExcel.Range("A1").SELECT
         gobjExcel.ActiveCell.CurrentRegion.SELECT
         'Add a Chart Object
         gobjExcel.ActiveSheet.ChartObjects.Add(135.75, 14.25, 607.75, 301).SELECT
         'Run the Chart Wizard
         gobjExcel.ActiveChart.ChartWizard Source:=Range("A1:B22"), _
         Gallery:=xlColumn, _
         Format:=6, PlotBy:=xlColumns, CategoryLabels:=1, SeriesLabels _
         :=1, HasLegend:=1, Title:="Sales By Country", CategoryTitle _
         :="", ValueTitle:="", ExtraTitle:=""
         'Make Excel Visible
         gobjExcel.Visible = True
      Else
         MsgBox "Excel Not Successfully Launched"
      End If
   Else
      MsgBox "Too Many Records to Send to Excel"
   End If
   DoCmd.Hourglass False

cmdCreateGraph_Exit:
   Set db = Nothing
   Set rst = Nothing
   Set fld = Nothing
   Set objWS = Nothing
   DoCmd.Hourglass False
   Exit Sub

cmdCreateGraph_Err:
   MsgBox "Error # " & Err.Number & ": " & Err.Description
   Resume cmdCreateGraph_Exit
End Sub
This routine begins by creating several object variables. It then points the db object variable to the current database. It calls a user-defined function called CreateRecordset. The CreateRecordset function receives three parameters: the database object variable, a recordset object variable, and the name of a query. Listing 25.6 shows the CreateRecordset function.
Example 25.6. The CreateRecordset function.
Function CreateRecordset(dbAny As DATABASE, rstAny As Recordset, _
strTableName As String)
   Dim rstCount As Recordset
   On Error GoTo CreateRecordset_Err
   'Create recordset that contains count of records in query
   Set rstCount = dbAny.OpenRecordset("Select Count(*) As NumRecords _
   from " & strTableName)
   'If more than 500 records in query result, return false
   'Otherwise, create recordset from query
   If rstCount!NumRecords > 500 Then
      CreateRecordset = False
   Else
      Set rstAny = dbAny.OpenRecordset(strTableName, dbOpenDynaset)
      CreateRecordset = True
   End If

CreateRecordset_Exit:
   Set rstCount = Nothing
   Exit Function

CreateRecordset_Err:
   MsgBox "Error # " & Err.Number & ": " & Err.Description
   Resume CreateRecordset_Exit
End Function
This function begins by counting how many records are returned by the query name that is passed. If the number of records exceeds 500, the function returns a False; otherwise, the function opens a recordset based on the query name that is passed and returns a True. This function ensures that only a reasonable number of records is sent to Excel and that a recordset can be opened successfully.
If the CreateRecordset function returns a True, the remainder of the code in the Click event of the cmdCreateGraph command button executes. The routine uses the CreateExcelObj function to launch Excel. If Excel is opened successfully, a new workbook is created. The routine then loops through each field in the Fields collection of the recordset (the result of the query). The values of the cells in the first row of the worksheet are set equal to the names of the fields in the recordset. Next, the routine loops through each record in the recordset. The data from each row is placed in a different row in the spreadsheet. The data from each column in a particular row is placed in the various columns of the worksheet. OLE object fields (dbLongBinary) are excluded from the process.
After all the data in the recordset is sent to Excel, the routine is ready to create a chart. It moves the cursor to cell A1 and then selects the entire contiguous range of data. It adds a chart object to the worksheet and then uses the Chart Wizard to create a chart. Finally, Excel is made visible so that users can see the fruits of their efforts.
As you discovered in the preceding section, Excel exposes many objects. Each of these objects can be manipulated separately, using its own properties and methods. Prior to Office 97, this was not true for Word, because Word exposed only one object, called Word.Basic. With Microsoft Word 97, Visual Basic for Applications is available, and Word 97 exposes many objects just as Excel and other Microsoft products do.
Just like Excel, you can use the CreateObject function or GetObject function to launch Word. Like Excel, Word, launches as a hidden object. The Word application object has a Visible property, which makes the Word object visible. If you create a Word object using automation, Word will not automatically terminate, even if the object variable is destroyed.
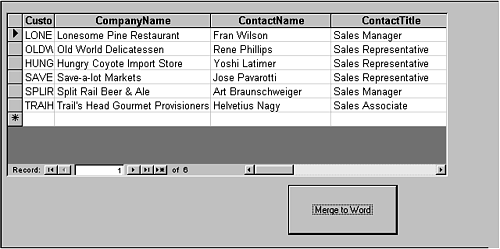
Figure 25.8 shows the form called frmMergeToWord, which shows the results of running a query called qryMailMerge. After the user clicks the Merge to Word command button, all the records that are displayed are sent to a Word mail merge and printed. Figure 25.9 shows an example of the resulting document, and Listing 25.7 shows the code that generated this document.

Example 25.7. Generating a Word mail merge document.
Private Sub cmdMergeToWord_Click()

On Error GoTo cmdMergeToWord_Err
   DoCmd.Hourglass True
   If CreateWordObj() Then
      gobjWord.Documents.Open "c:databasescustomerletter.doc"
      With gobjWord.ActiveDocument.MailMerge
          .Destination = wdSendToNewDocument
          .SuppressBlankLines = True
          .Execute
      End With
      gobjWord.ActiveDocument.PrintPreview   'Preview
      gobjWord.Visible = True
   End If

cmdMergeToWord_Exit:
   DoCmd.Hourglass False
   Exit Sub

cmdMergeToWord_Err:
   MsgBox "Error # " & Err.Number & ": " & Err.Description
   Set gobjWord = Nothing
   Resume cmdMergeToWord_Exit
End Sub
The code begins by presenting an hourglass mouse pointer to the user. This ensures that if the process takes a while, the user knows that something is happening. It then calls the CreateWordObj routine to create a Word object. The CreateWordObj routine is very similar to the CreateExcel routine shown earlier in the chapter. The Open method is executed on the Documents collection of the Word object. It opens a document called customerletter in the databases directory. The customerletter document already has been set up to do a mail merge with the results of a query called qryMerge. The subroutine sets the Destination property of the MailMerge object to a new document. It sets the SuppressBlankLines property to True, and then executes the mail merge with the Execute method. This merges the results of qryMailMerge and creates a new document with the mail-merged letters. The PrintPreview method is executed on the ActiveDocument object so that the merged document is printed. Finally, the Visible property of the Word object is set to True, making Word visible, and the hourglass vanishes.
Believe it or not, even PowerPoint can be controlled using automation. You can create a presentation, print a presentation, or even run a slide show directly from Access.
PowerPoint launches as a hidden window. To make PowerPoint visible, you must set the Visible property of AppWindow to True. Destroying the PowerPoint object variable does not terminate the PowerPoint application.
Note
You can find details of the PowerPoint object model on the Microsoft Solutions Development Kit CD-ROM. You should review this object model before attempting to communicate with PowerPoint.
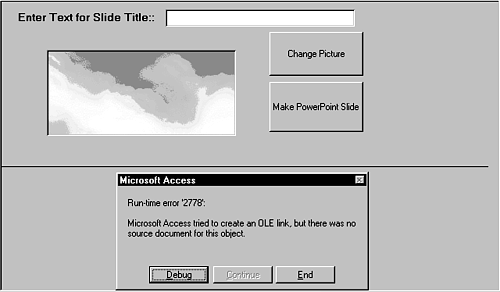
The code shown in Listing 25.8 is located under the Click event of the cmdChangePicture command button on frmOLEToPowerPoint, which is shown in Figure 25.10. Figure 25.11 shows the resulting PowerPoint slide.

Private Sub cmdChangePicture_Click()
   dlgCommon.ShowOpen
   olePicture.SourceDoc = dlgCommon.FileName
   olePicture.Action = acOLECreateLink
End Sub
The code in the Click event of cmdChangePicture invokes the File Open common dialog box so that the user can select a picture to be added to the slide. The FileName property returned from this dialog box is used as the SourceDoc property for the automation object. The new picture then is linked to the automation object.
Listing 25.9 shows the routine that creates the PowerPoint slide.
Example 25.9. Creating the PowerPoint slide.
Private Sub cmdMakePPTSlide_Click()
   Dim objPresentation As Object
   Dim objSlide As Object
   'Create instance of PowerPoint application
   Set mobjPPT = CreateObject("PowerPoint.Application.8")
   'Make instance visible to user
   mobjPPT.Visible = True
   'Add a Presentation
   Set objPresentation = mobjPPT.Presentations.Add
   'Add a Slide
   Set objSlide = objPresentation.Slides.Add(1, ppLayoutTitleOnly)
   'Change the Slide Background
   objSlide.Background.Fill.ForeColor.RGB = RGB(255, 100, 100)
   'Modify the Slide Title
   With objSlide.Shapes.Title.TextFrame.TextRange
      .Text = Me!txtTitle
      .Font.Color.RGB = RGB(0, 0, 255)
      .Font.Italic = ppTrue
   End With
   'Add the OLE Picture
   objSlide.Shapes.AddOleObject _
      Left:=50, Top:=50, Width:=200, Height:=150, _
      FileName:=olePicture.SourceDoc, link:=True


cmdMakePPTSlide_Exit:
   Set objPresentation = Nothing
   Set objSlide = Nothing
   Exit Sub

cmdMakePPTSlide_Err:
   MsgBox "Error # " & Err.Number & ": " & Err.Description
   Resume cmdMakePPTSlide_Exit
End Sub
The routine begins by creating an instance of PowerPoint. The instance is made visible. A presentation then is added to the PowerPoint object, and a slide is added to the presentation. The background fill of the slide is modified. The Text, Color, and Italic properties of the title object are customized. Finally, the SourceDoc property of the olePicture object is used to create an automation object, which is added to the slide.
Many times, you will want to control Access from another application. You might want to run an Access report from a Visual Basic or Excel application, for example. Just as you can tap into many of the rich features of other products (such as Excel) from Access, you can use some of Access's features from within another program. Fortunately, it is extremely easy to control Access from within other applications.
You can find an overview of the Access object model in Access Help. Unless you are very familiar with the Access object model, you should look at this graphical representation of Access's object model before you attempt to use automation to control Access. Access launches with its Visible property set to False. You can change the Visible property of the application object to True to make Access visible.
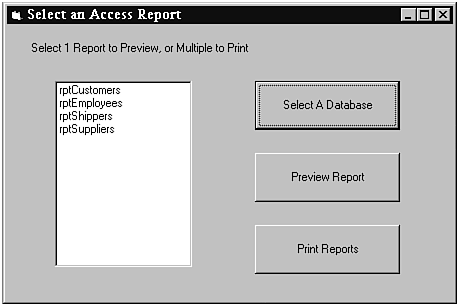
The form shown in Figure 25.12 is a Visual Basic form. It is called frmReportSelect.frm and is part of a Visual Basic project called AutomateAccess.vbp. The form enables you to select any Access database. It displays a list of all reports in the selected database; you can use this list to preview an Access report or to print multiple Access reports.
Listing 25.10 shows how this Visual Basic form is created.
Example 25.10. Creating a Visual Basic form to print reports.
Private Sub cmdSelectDB_Click()
    Call LoadReports
End Sub

Sub LoadReports()
    Dim ws As Workspace
    Dim db As Database
    Dim doc As Document
    Dim cnt As Container

    'Point at the Jet Engine
    Set ws = DBEngine(0)
    'Set a Filter and Initial Directory for the
    'Common Dialog Control
    dlgCommon.Filter = "Databases (*.mdb)|*.mdb"
    dlgCommon.InitDir = App.Path
    'Display the File Open Common Dialog
    dlgCommon.ShowOpen
    'Open a Database using the selected Access file
    Set db = ws.OpenDatabase(dlgCommon.filename)
    'Look at the Reports collection
    Set cnt = db.Containers!Reports

    'Clear the List Box of previous entries
    lstReports.Clear
    'Loop through the collection of Reports
    'Add each report name to the List Box
    For Each doc In cnt.Documents
       lstReports.AddItem doc.Name
    Next doc
End Sub
The subprocedure begins by creating an instance of the Access application. It uses the OpenDatabase method of the Workspace object to open the Access database selected by the user in the File Open common dialog box. It then loops through the Reports collection of the selected database. The name of each report is added to the list box. So far, you have not launched Access. Instead, you have used data access objects (DAOs) to get at its objects.
The routine in Listing 25.11 creates a new instance of the Access application object.
Example 25.11. Creating a new instance of the Access application object.
Private Sub cmdPreview_Click()
    Call RunReport
End Sub

Sub RunReport()
    On Error GoTo RunReport_Err
    'Create an Instance of the Access application
    Dim objAccess As New Access.Application

    'Open the selected Database
    objAccess.OpenCurrentDatabase (dlgCommon.filename)
    'Preview the Selected Report
    objAccess.DoCmd.OpenReport lstReports.Text, View:=acPreview
    'Set the Visible property of the Application to True
    objAccess.Visible = True

RunReport_Exit:
    Set objAccess = Nothing
    Exit Sub

RunReport_Err:
    MsgBox Err.Description
    Resume RunReport_Exit
End Sub
Dim objName As New is another way to create an instance of a registered application object. After the instance is created, the OpenCurrentDatabase method is used to open the selected database. The OpenReport method is used along with the constant acPreview. This causes the selected report to be previewed. Finally, the Access application object is made visible.
The Visual Basic application also gives the user the opportunity to send multiple Access reports to the printer. Listing 25.12 shows the code for this.
Example 25.12. Sending multiple reports to the printer.
Private Sub cmdRunReport_Click()
    Call PrintReports
End Sub

Sub PrintReports()
    Dim intCounter As Integer
    On Error GoTo PrintReports_Err
    'Create an Instance of the Access Application
    Dim objAccess As New Access.Application

    'Open the Database that was selected in the
    'File Open Common Dialog
    objAccess.OpenCurrentDatabase (dlgCommon.filename)

    'Loop through the List Box
    'Print each report that is selected
    For intCounter = 0 To lstReports.ListCount – 1
        If lstReports.Selected(intCounter) Then
            objAccess.DoCmd.OpenReport lstReports.Text
        End If
    Next intCounter

PrintReport_Exit:
    Set objAccess = Nothing
    Exit Sub

PrintReports_Err:
    MsgBox Err.Description
    Set objAccess = Nothing
    Resume PrintReport_Exit

End Sub
This routine creates an instance of Access and then opens the selected database. It loops through the list box, identifying all the reports that have been selected. It then sends each report to the printer.
Many potential applications of automation exist for the Time and Billing application. One of them is discussed in this section.
The form in Figure 25.13 enables users to select a table or query to send to Excel. The form is called frmSendToExcel.

The list box on the form is populated with the Callback function shown in Listing 25.13. Notice that the function uses the TableDefs and QueryDefs collections to populate the list box, excluding all the system tables.
Example 25.13. Using the Callback function to fill a list box.
Function FillWithTableList(ctl As Control, vntID As Variant, _
        lngRow As Long, lngCol As Long, intCode As Integer) _
        As Variant

   Dim db As DATABASE
   Dim tdf As TableDef
   Dim qdf As QueryDef
   Dim intCounter As Integer
   Static sastrTables() As String
   Static sintNumTables As Integer
   Dim varRetVal As Variant

   varRetVal = Null

   Select Case intCode
      Case acLBInitialize         ' Initialize.
         Set db = CurrentDb
         'Determine the Total Number of Tables + Queries
         sintNumTables = db.TableDefs.Count + db.QueryDefs.Count
         ReDim sastrTables(sintNumTables – 2)
         'Loop through each Table adding its name to
         'the List Box
         For Each tdf In db.TableDefs
            If Left(tdf.Name, 4) <> "MSys" Then
               sastrTables(intCounter) = tdf.Name
               intCounter = intCounter + 1
            End If
         Next tdf
         'Loop through each Query adding its name to
         'the List Box
         For Each qdf In db.QueryDefs
            sastrTables(intCounter) = qdf.Name
            intCounter = intCounter + 1
         Next qdf
         varRetVal = sintNumTables
      Case acLBOpen                 'Open
         varRetVal = Timer          'Generate unique ID for control.
      Case acLBGetRowCount          'Get number of rows.
         varRetVal = sintNumTables
      Case acLBGetColumnCount       'Get number of columns.
         varRetVal = 1
      Case acLBGetColumnWidth       'Get column width.
         varRetVal = –1             '–1 forces use of default width.
      Case acLBGetValue             'Get the data.
         varRetVal = sastrTables(lngRow)
   End Select
   FillWithTableList = varRetVal
End Function
The Click event of the cmdSendToExcel command button sends the selected table or query to Excel. Listing 25.14 shows this code.
Example 25.14. Sending a table or query to Excel.
Private Sub cmdSendToExcel_Click()
   On Error GoTo cmdSendToExcel_Err
   gbExcelRunning = True
   Dim objWS As Object
   Dim db As DATABASE
   Dim rst As Recordset
   Dim fld As Field
   Dim intColCount As Integer
   Dim intRowCount As Integer

   Set db = CurrentDb

   'Invoke Hourglass
   DoCmd.Hourglass True
   'Try to Create Recordset and Create Excel Object
   If CreateRecordset(db, rst, lstTables.Value) Then
      If CreateExcelObj() Then
         'Add a Workbook
         gobjExcel.Workbooks.Add
         'Create a Shortcut to the Active Sheet
         Set objWS = gobjExcel.ActiveSheet
         intRowCount = 1
         intColCount = 1
         'Loop through the Fields collection
         'Make each field name a column heading in Excel
         For Each fld In rst.Fields
            If fld.Type <> dbLongBinary Then
               objWS.Cells(1, intColCount).Value = fld.Name
               intColCount = intColCount + 1
            End If
         Next fld
         'Send Data from Recordset out to Excel
         Do Until rst.EOF
            intColCount = 1
            intRowCount = intRowCount + 1
            For Each fld In rst.Fields
               If fld.Type <> dbLongBinary Then
                  objWS.Cells(intRowCount, intColCount).Value = fld.Value
                  intColCount = intColCount + 1
               End If
            Next fld
            rst.MoveNext
         Loop
         gobjExcel.Range("A1").SELECT
         'Set up AutoFilter
         gobjExcel.Selection.AutoFilter
         gobjExcel.Visible = True
      Else
         MsgBox "Excel Not Successfully Launched"
      End If
   Else
      MsgBox "Too Many Records to Send to Excel"
   End If


cmdSendToExcel_Exit:
   DoCmd.Hourglass False
   Set objWS = Nothing
   Set db = Nothing
   Set rst = Nothing
   Set fld = Nothing
   Exit Sub

cmdSendToExcel_Err:
   MsgBox "Error # " & Err.Number & ": " & Err.Description
   Resume cmdSendToExcel_Exit
End Sub
The routine begins by creating a recordset object using the CreateRecordSet function shown in Listing 25.15. It then attempts to launch Excel. If it is successful, it loops through the Fields collection of the recordset resulting from the selected table or query. It lists all the field names as column headings in Excel. Next, it loops through the recordset, adding all the field values to the rows in the Excel worksheet. Finally, it issues the AutoFilter method so that the user easily can manipulate the data in Excel, filtering it as necessary. (See Figure 25.14.)

Example 25.15. Checking recordset size.
Function CreateRecordset(dbAny As DATABASE, rstAny As Recordset, _
strTableName As String)
   Dim rstCount As Recordset
   On Error GoTo CreateRecordset_Err
   'Create recordset that contains count of records in query
   Set rstCount = dbAny.OpenRecordset("Select Count(*) As NumRecords from _
   " & strTableName)
   'If more than 500 records in query result, return false
   'Otherwise, create recordset from query
   If rstCount!NumRecords > 500 Then
      CreateRecordset = False
   Else
      Set rstAny = dbAny.OpenRecordset(strTableName, dbOpenDynaset)
      CreateRecordset = True
   End If

CreateRecordset_Exit:
   Set rstCount = Nothing
   Exit Function

CreateRecordset_Err:
   MsgBox "Error # " & Err.Number & ": " & Err.Description
   Resume CreateRecordset_Exit
End Function
This routine, found in basOLE, ensures that the recordset is not too large to send to Excel. If the size of the recordset is acceptable, it creates the recordset and returns True.
Automation enables you to control other applications from your Access application, and it enables other programs to control your Access application. This chapter began by providing an overview of automation and why you might want to use it. It discussed creating an object variable to reference the application you are automating. After the ins and outs of the object variable were explained, you saw numerous examples of manipulating automation objects. You looked at detailed code showing automation involving Excel, Word, and PowerPoint. Finally, you learned about controlling Access from other applications.
The capability to communicate with other applications has become a prerequisite for successful software development. It is extremely important to be aware of the rich wealth of tools available. The capability to call on other applications' features is helping to make the world document-centric rather than application-centric. This means that users can focus on their tasks and not on how they are accomplishing those tasks. Although automation requires significant hardware and also is rather slow, the benefits it provides often are well worth the price.