
Chapter 12
Ten Ways to Enhance Privacy and Security
IN THIS CHAPTER
![]() Clearing your personal data from Fire TV
Clearing your personal data from Fire TV
![]() Securing your home network
Securing your home network
![]() Securing your Amazon account
Securing your Amazon account
![]() Preventing Amazon and advertisers from tracking you
Preventing Amazon and advertisers from tracking you
You may think there’s something, well, odd about this chapter. After all, isn’t it a tad weird to be talking about Fire TV privacy and security when all you’re mostly doing with Fire TV is watching TV shows and movies? Does binge-watching The Marvelous Mrs. Maisel require privacy? Do you have to ratchet up your security settings just to view Despicable Me 2?
You’d be surprised. No, watching stuff on Fire TV doesn’t require enhanced privacy and security settings, but there are plenty of people out there — take a bow, nosy advertisers! — who really want to know what you’re watching. With Fire TV, “privacy” means keeping a lid on who’s tracking what you watch.
Similarly, your Fire TV device is connected to the Internet via your home network, and there are plenty of people out there — raise your hands, malicious hackers! — who really want to wreak havoc with your data. With Fire TV, “security” means taking steps to ensure that online miscreants don’t get a foot in your digital door.
In this chapter, you investigate ten ways to enhance the privacy and security of your Fire TV device and your Amazon account. Sure, it takes a bit of time to implement these measures, but believe me when I tell you that it’ll be worth every second.
Make Sure Your Wi-Fi Network Is Locked Up Tight
The first step in securing Fire TV is securing the network that Fire TV uses to access the Internet: your home Wi-Fi network. A secure Wi-Fi network is necessary because of a practice called wardriving, where a black-hat hacker drives through various neighborhoods with a portable computer or another device set up to look for available wireless networks. If the miscreant finds an unsecured network, he uses it for free Internet access (such a person is called a piggybacker) or to cause mischief with shared network resources.
The problem is that wireless networks are inherently unsecure because the wireless connection that enables you to access Fire TV from the kitchen or the living room can also enable an intruder from outside your home to access the network. Fortunately, you can secure your wireless network against these threats with a few tweaks and techniques:
 Most of what follows here requires access to your Wi-Fi router’s administration or setup pages. See your router’s documentation to learn how to perform these tasks.
- Change the router’s administrator password. By far the most important configuration chore for any new Wi-Fi router is to change the default password (and username, if your router requires one). Note that I’m talking here about the administrative password, which is the password you use to log on to the router’s setup pages. This password has nothing to do with the password you use to log on to your Internet service provider (ISP) or to your wireless network. Changing the default administrative password is crucial because it’s fairly easy for a nearby malicious hacker to access your router’s login page and all new routers use common (and, therefore, well-known) default passwords (such as “password”) and usernames (such as “admin”).
- Change the Wi-Fi network password. Make sure your Wi-Fi network is protected by a robust, hard-to-guess password to avoid unauthorized access. (See the sidebar “Coming up with a strong password,” a bit later in this chapter.)
- Beef up your Wi-Fi router’s encryption. To ensure that no nearby mischief-maker can intercept your network data (using a tool called a packet sniffer), you need to encrypt your wireless network. Some older routers either have no encryption turned on or use an outdated (read: unsecure) encryption called Wired Equivalent Privacy (WEP). The current gold standard for encryption is Wi-Fi Protected Access II (WPA2), so make sure your router uses this security type.
- Check your network name for identifying info. Make sure the name of your Wi-Fi network — known as its service set identifier (SSID) — doesn’t include any text that identifies you (for example, “Joe Flaherty’s Network”) or your location (“123 Primrose Lane Wi-Fi”).
- Update your router’s firmware. The internal program that runs the Wi-Fi router is called its firmware. Reputable router manufacturers release regular firmware updates not only to fix problems and provide new features, but also to plug security holes. Therefore, it’s crucial to always keep your router’s firmware up to date.
Stop Saving Wi-Fi Passwords to Amazon
Fire TV devices, Fire TV Edition devices, Alexa-enabled devices, and smart-home devices all require access to your Wi-Fi network to do their jobs. That’s reasonable, but what’s unreasonable is that every one of those devices won’t work until you log each one in to your network (which, of course, is protected by a strong password, as I describe in the “Make Sure Your Wi-Fi Network is Locked Up Tight” section of this chapter). That’s a pain, but Amazon is trying to reduce that bother by offering a feature called Wi-Fi Simple Setup, which requires two things:
-
A device compatible with Wi-Fi Simple Setup that’s already connected to your Wi-Fi network.
Fire TV devices compatible with Wi-Fi Simple Setup are the Fire TV Stick (second generation and later), Fire TV Stick 4K, and Fire TV Cube. Other Amazon devices that support Wi-Fi Simple Setup are the second-generation or later Echo, the second-generation or later Echo Dot, and all generations of the Echo Plus, Echo Show, Echo Show 5, Amazon Smart Plug, and AmazonBasics Microwave. - The password to your Wi-Fi network saved to Amazon.
If you’ve checked off both items, then setting up a new device that’s compatible with Wi-Fi Simple Setup is ridiculously easy. If you purchase your Wi-Fi Simple Setup device from Amazon, then Amazon automatically associates the device with your Amazon account, which means that when you plug in the device, it will connect to your network automatically using your saved Wi-Fi password. Now that’s easy!
In Chapter 3, I mention that one step in the Fire TV setup asks if you want to save your Wi-Fi password to Amazon. I encourage you to choose Yes not only to make it easier to set up other Wi-Fi Simple Setup devices, but also because Amazon has gone to great lengths to ensure that your saved network password is safe:
- Amazon’s Privacy Policy states that it will not share your Wi-Fi password with a third party without your permission.
- The password is stored in encrypted form on the server.
- Devices that ask for network access are first authenticated by Amazon.
- When needed, the password is sent using an encrypted connection.
These security steps are reassuring, but you may still feel more than a little uneasy having the password to your home network stored in the cloud. And, yes, Amazon authenticates third-party devices that want on your network, but can you really be sure that no rogue device can also breach your network?
To allay these justifiable fears, you can turn off Wi-Fi Simple Setup and delete your saved passwords using either Fire TV or the Amazon website.
Delete saved Wi-Fi passwords via Fire TV
Follow these steps on your Fire TV device to stop saving your Wi-Fi passwords and delete any saved passwords:
-
On your Fire TV device, choose Settings ⇒ Network.
The Network settings appear. Scroll to the bottom of this screen to see the Save Wi-Fi Passwords to Amazon setting, which will likely be set to On, as shown in Figure 12-1.
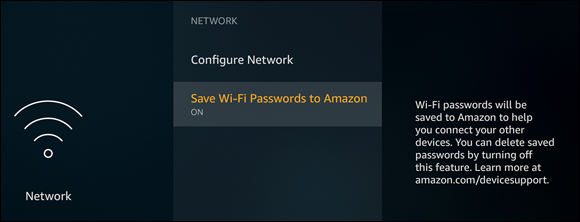
FIGURE 12-1: Use the Save Wi-Fi Passwords to Amazon setting to remove your saved passwords from Amazon.
-
Choose Save Wi-Fi Passwords to Amazon.
Fire TV opens the Delete Saved Wi-Fi Passwords screen, which asks you to confirm not only that you no longer want to save your network password, but also that you want to delete any Wi-Fi passwords that are currently saved to Amazon.
-
Choose Delete.
Fire TV stops saving your Wi-Fi passwords and removes any saved passwords from your Amazon account.
Delete saved Wi-Fi passwords via Amazon
If you don’t have access to your Fire TV device, you can still turn off Wi-Fi Simple Setup and delete your saved Wi-Fi passwords directly from the Amazon website. Here are the steps to follow:
- Surf to
www.amazon.com(or your country’s Amazon domain) and sign in to your account. -
Choose Account & Lists ⇒ Your Content and Devices.
On other Amazon domains, you may have to choose Account & Lists ⇒ Manage Your Content and Devices.
- Choose the Preferences tab.
-
Choose Saved Wi-Fi Passwords.
The Saved Wi-Fi Passwords settings appear, as shown in Figure 12-2.

FIGURE 12-2: Use the Saved Wi-Fi Passwords section to remove your saved passwords from Amazon.
-
To remove your saved network password from Amazon, choose Delete.
Amazon asks you to confirm the deletion.
-
Choose Yes, Delete Permanently.
Amazon deletes your saved Wi-Fi password.
-
To prevent devices from using Wi-Fi Simple Setup, choose Disable.
Amazon asks you to confirm.
-
Choose Yes, Disable.
Amazon disables Wi-Fi Simple Setup.
Secure Your Amazon Account with a Strong Password
Because everything Fire TV does is tied to your Amazon account, your Fire TV experience is only as secure as your Amazon account. Therefore, it’s vital to ensure that you’ve got your Amazon account locked down. Fortunately, that requires just two things: giving your account a strong password (as I describe in this section) and turning on Amazon’s Two-Step Verification feature (which I discuss in the next section).
Your Amazon account’s first line of defense is a strong password. First, check back in this chapter to the “Coming up with a strong password” sidebar. After you’ve got a bulletproof password figured out, follow these steps to change your existing Amazon password:
- Surf to
www.amazon.com(or your country’s Amazon domain) and sign in to your account. - Choose Account & Lists ⇒ Your Account.
-
Choose Login & Security.
If Amazon asks you to sign in, type your password and choose Sign-In.
-
Choose the Edit button beside the Password setting.
Amazon displays the Change Password page, shown in Figure 12-3.
- Type your current password.
- Type your new, strong password in the two text boxes.
-
Choose Save Changes.
Amazon applies the new password to your account.
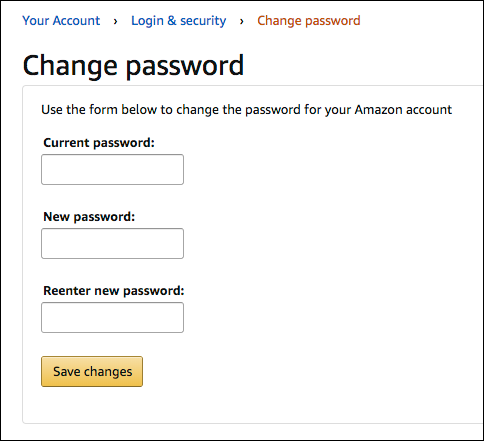
FIGURE 12-3: Use the Change Password page to modify your Amazon account password.
Enable Amazon’s Two-Step Verification
A password made of steel is a necessary security feature, but, sadly, it’s not a sufficient security feature. A malicious user may still worm his way into your account with guile or brute force, so you need a second line of defense. That line is a feature that Amazon calls Two-Step Verification (which is a more comprehensible name than what the rest of the Internet most often uses for the same feature: Two-Factor Authentication; note that Amazon often abbreviates Two-Step Verification to 2SV). The “Two-Step” part means that getting access to your Amazon account requires two separate actions:
- Sign in using your Amazon account credentials.
-
Verify that you’re authorized to access the account by entering a code that Amazon sends to you.
This code is called a one-time password (OTP). Amazon sends the OTP to a two-step verification authenticator, which can be either (or both) of the following:
- Your mobile phone: In this case, Amazon sends the OTP in a text message.
- An authenticator app installed on your mobile phone: In this case, the app generates the OTP. To use this method, you need to install an authenticator app on your phone. Popular authenticator apps are Google Authenticator, Microsoft Authenticator, and Duo Mobile.
Amazon requires two authenticators, so most people use a mobile phone number and an authenticator app.
Here are the steps to follow to enable Two-Step Verification and tell Amazon how you want to receive your verification codes:
- Surf to
www.amazon.com(or your country’s Amazon domain) and sign in to your account. - Choose Account & Lists ⇒ Your Account.
- Choose Login & Security.
-
Choose the Edit button beside Advanced Security Settings.
Amazon displays the Advanced Security Settings page.
-
Choose the Get Started button that appears to the right of the Two-Step Verification label.
Amazon asks how you want to receive your Two-Step Verification codes by asking you to select which type of authenticator you want to use, as shown in Figure 12-4.

FIGURE 12-4: Use this page to specify how you want to receive your Two-Step Verification codes.
- Select the Text Message radio button.
-
Enter your mobile phone number, and then choose Send OTP.
Amazon sends you a test OTP in a text message.
-
Use the Enter the One Time Password (OTP) text box to type the code you received, and then choose the Verify OTP and Continue button.
Amazon now asks you to select a second verification method. The following steps assume you’re using an authenticator app, so be sure to have an app installed before continuing.
- Select the Authenticator App radio button.
-
Open your authenticator app and use the app to scan the barcode displayed by Amazon, as shown in Figure 12-5.
The authenticator app adds your Amazon account and displays a one-time password, as shown in Figure 12-6.
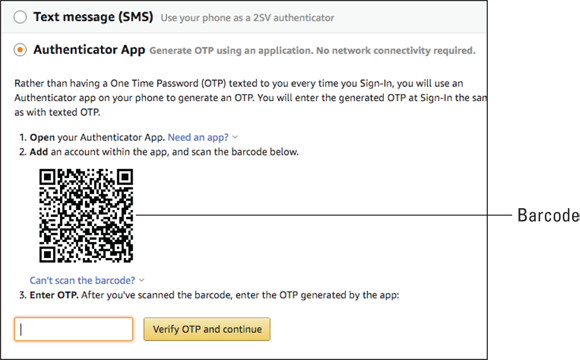
FIGURE 12-5: Use your authenticator app to scan the displayed barcode.
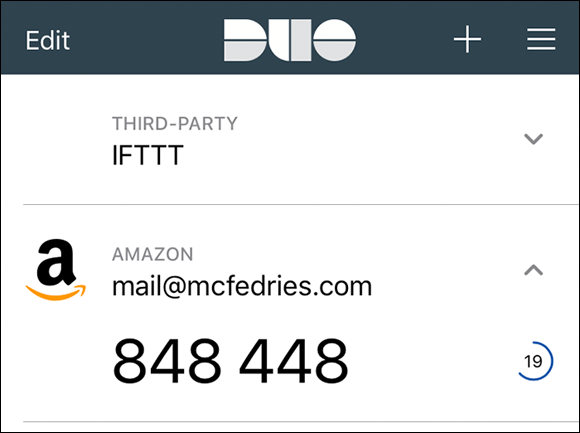
FIGURE 12-6: The authenticator app adds your Amazon account and generates an OTP.
-
Return to the Amazon web page and use the Enter OTP text box to type the OTP as it’s displayed in the app (see Figure 12-7), and then choose the Verify OTP and Continue button.
When entering the OTP, don’t dawdle because the app only gives you a short time — usually a minute or less — to enter the code before it generates a new one.
Amazon now displays some information about using Two-Step Verification on devices that can’t display a second screen to enter the verification code.

FIGURE 12-7: On the Amazon site, enter the OTP that was generated by your authenticator app.
-
Choose Got It. Turn on Two-Step Verification.
Two-Step Verification is now active on your Amazon account.
Prevent Fire TV from Playing Previews Automatically
One of the more annoying habits of Fire TV rears its head when you navigate to the Movies or TV Shows screen, both of which display the Featured carousel at the top, which shows five movies or TV series that Amazon is highlighting. The problem occurs when you press the Fire TV remote’s Down button once, which takes you into the Featured carousel. If you don’t press Down again very quickly, Fire TV automatically starts playing the first Featured preview. That’s not only grimace-inducing, but also a minor privacy violation because someone sitting nearby may believe you’re watching the latest SpongeBob SquarePants show.
To prevent Fire TV from automatically playing Featured previews, follow these steps:
-
On your Fire TV device, choose Settings ⇒ Preferences ⇒ Featured Content.
The Featured Content screen appears.
-
To prevent preview videos from playing automatically, choose Allow Video Autoplay to set that option to Off.
When you scroll into the Featured carousel, Fire TV still rotates through the featured items, but now it only shows a still image for each item rather than a video preview.
-
To prevent just the audio portion of the previews from playing automatically, choose Allow Audio Autoplay to set that option to Off.
Fire TV stops automatically playing preview video and/or audio.
Remove Content from Your Fire TV
Fire TV only gives you a limited number of options for removing content. For example, if you don’t guests or want anyone in your household to know what you’ve watched recently, you can remove some or all of the items that appear in the Home screen’s Recent list. Here are the content types you can remove from Fire TV:
- Apps: Choose Settings ⇒ Applications ⇒ Manage Installed Applications. Choose the app you want to remove and then choose Uninstall. When Fire TV asks you to confirm, choose Uninstall.
- Recent items: On the Fire TV Home screen, select an item in the Recent row, press the Fire TV remote’s Menu button, and then choose Remove from Recent.
- Watchlist items: In the Fire TV Your Videos screen, select an item in the Watchlist row, press the Fire TV remote’s Menu button, and then choose Remove from Watchlist.
Prevent Amazon from Using Personal Data for Marketing
As you use Fire TV, the device keeps track of your choices, preferences, and other personal data, which Amazon uses both to serve you more relevant ads and to help improve future versions of Fire OS (the operating system that runs Fire TV). Collecting your personal data in this way isn’t necessarily evil, but you may not be comfortable with having your device tracking your every move in the Fire TV interface. If so, go ahead and follow these steps to turn off this tracking:
-
On your Fire TV device, choose Settings ⇒ Preferences ⇒ Privacy Settings.
The Privacy Settings screen appears.
-
Choose Device Usage Data.
Fire TV opens the Device Usage Data screen, which explains how Amazon uses your personal data and what turning off this setting means, as shown in Figure 12-8.
Turning off Device Usage Data does not mean that you’ll see no more ads. Boo! Instead, it just means that the ads you see will likely be less relevant.
FIGURE 12-8: The Device Usage Data screen explains this setting and enables you to turn it off.
-
Choose Turn Off.
Fire TV stops sending your personal data to Amazon.
Prevent Amazon from Tracking Your App Usage
By default, Amazon uses some of your Fire TV device-generated data to improve and enhance Fire TV. There are two types of data that Amazon uses to make Fire TV better:
- Third-party app usage: Amazon tracks how often you use third-party apps and for how long you use each app.
- Over-the-air TV: Amazon tracks what you watch when you tune into over-the-air programming.
If you’re uncomfortable having your Fire TV usage tracked in either or both ways, you can configure your device to not include this data when it’s improving Fire TV. Here are the steps to follow:
-
On your Fire TV device, choose Settings ⇒ Preferences ⇒ Privacy Settings.
The Privacy Settings screen appears.
-
Choose Collect App and Over-the-Air Usage Data.
Fire TV opens the Collect App and Over-the-Air Usage Data screen, which explains how Amazon tracks your third-party app and over-the-air TV usage, as shown in Figure 12-9.

FIGURE 12-9: The Collect App and Over-the-Air Usage Data screen explains this setting and enables you to turn it off.
-
Choose Turn Off.
Fire TV stops sending your third-party app and over-the-air TV usage data to Amazon.
Prevent Advertisers from Tracking You
Amazon labels your Fire TV device with a unique identifier called an advertising ID, which Amazon provides to ad networks that display ads within third-party apps. Why would Amazon do such a thing? The advertising ID enables ad networks to track your Fire TV device across multiple apps, which lets the network build a profile of you, from which the network can then show ads that are targeted toward you and your interests.
Has Amazon gone over to the Dark Side? No, not really. The goal here is to allow ad networks to learn enough about your Fire TV life that it can serve you ads that are relevant to your interests, rather than ads that are chosen randomly. The thinking is that if you see a targeted ad, then you’re more likely to choose that ad and the developer of the app showing the ad will get a little more money. It’s almost noble, in a way.
Almost. The other side of ad tracking is, well, the tracking part, which effectively means that ad networks are monitoring your Fire TV behavior across multiple apps to build up a profile for you. If that strikes you as positively dystopian, you’re not alone. Many people dislike being tracked in this way, and web browsers such as Firefox are now shipping with tracking prevention turned on.
If the idea of ad networks monitoring what you do while you use Fire TV is off-putting and creepy, follow these steps to prevent ad networks from tracking you using your Fire TV advertising ID:
-
On your Fire TV device, choose Settings ⇒ Preferences ⇒ Privacy Settings.
The Privacy Settings screen appears.
- If you just want to reset your advertising ID (which forces ad networks to rebuild your profile from scratch), highlight the Your Advertising ID setting, and then press Menu on your Fire TV remote.
-
To turn off ad tracking, highlight the Interest-Based Ads setting (see Figure 12-10) and then press the Select button to turn that setting to Off.
Fire TV opts you out of ad tracking.
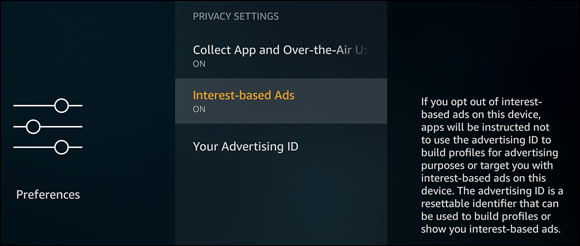
FIGURE 12-10: Press Select on the Interest-Based Ads setting to turn it off.
Deregister Your Fire TV Device
If you’re selling or giving away a Fire TV device, you want to make sure the device is wiped clean of all your custom settings and personal info. You can do this by resetting your device, which I describe in Chapter 11.
You also want to ensure that the device is no longer connected to your Amazon account, and that means deregistering the device with Amazon. You have two choices:
- In Fire TV, choose Settings ⇒ My Account ⇒ Amazon Account ⇒ Deregister. When Fire TV asks you to confirm, choose Deregister.
- Surf to
www.amazon.com(or your country’s Amazon domain), sign in to your account, choose Account & Lists ⇒ Your Content and Devices (or Account & Lists ⇒ Manage Your Content and Devices), select the Devices tab, choose the Action button beside the device you’re getting rid of, and then choose Deregister. When Amazon asks you to confirm, choose Deregister.