
Working with Pending Intents
As I describe in the previous section, the AppWidgetProvider is essentially a translator. It receives a message from the Home screen app widget and responds with a result you specified. The AppWidgetProvider does not work with just any message, though. If you want to receive input from your app widget, you need to use a PendingIntent.
To understand what a PendingIntent is, you need to fully grasp the basic concept of intents and how they work.
Understanding the Android intent system
An Intent object in Android is, well, exactly that: an intent. The best way to think about intents is to envision turning on a light with a light switch. Your intent is to turn on the light, and to do so, you perform the action of flipping the switch to the On position. In Android, this correlates to creating an instance of the Intent class with an Action in it specifying that the light is to be turned on, as shown here:
Intent turnLightOn = new Intent(“TURN_LIGHT_ON”);
You fire this intent into the Android messaging system, where an activity (or various different Activity objects) responds appropriately. (In the event many activities respond, Android lets the user choose which one to use.) In the case of your turnLightOn intent, you could provide code in the form of an activity (named TurnLightOnActivity, which is where the code executes) to respond by turning on the light.
As I mention in Chapter 3, an intent is a message that can carry a wide variety of data describing an operation that needs to be performed — that is, an Activity. Intents can be addressed to a specific activity or background service or — as I show you in this chapter — broadcast to a generic category of receivers known as BroadcastReceivers. When broadcast, the intent will be received only by BroadcastReceiver objects that understand how to respond to that intent. In this way, the Intent, Activity, and BroadcastReceiver system is like the well-known messaging structure called message bus architecture, in which a message is placed onto a “message bus” and one (or many) of the endpoints on the bus respond to the message if and only if they know how to. If each endpoint has no idea how to respond to the message, or if the message was not addressed to the endpoint, the message is ignored.
An intent can be launched in the following ways:
- To start another activity, you use the startActivity() call. The startActivity() accepts an Intent object as a parameter.
- To communicate with a background service (covered later in this chapter), you can use the startService() or bindService() call, which both take intents as parameters.
- To notify any interested BroadcastReceiver components, you use the sendBroadcast() call, which also takes an intent as a parameter.
An activity can be thought of as the glue between various components of the application because it provides a late-binding mechanism that allows inter/intra-application communication.
Understanding intent data
An intent's primary data is as follows:
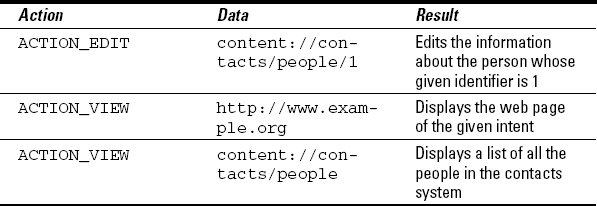
- Action: The general action to be performed. A few common actions include ACTION_VIEW, ACTION_EDIT, and ACTION_MAIN. You can also provide your own custom action if you choose to do so.
- Data: The data to operate on, such as a record in a database or a uniform resource identifier that should be opened, such as a website URL.
Table 8-1 demonstrates a few action and data parameters for Intent objects and their simple data structure.
Table 8-1 Intent Data Examples
For a list of some of the predefined intents in the Android system, see http://developer.android.com/guide/topics/intents/intents-filters.html.
Intents can also carry an array of other data that include the following:
- category: Gives additional information about the action to execute. As an example, if CATEGORY_LAUNCHER is present, it means that the application should show up in the application launcher as a top-level application. Another option is CATEGORY_ALTERNATIVE, which can provide alternative actions that the user can perform on a piece of data.
- type: Specifies a particular type (MIME type) of the intent data. Setting the type to audio/mpeg, for example, would indicate to the Android system that you are working with an MP3 file. Normally the type is inferred by the data itself. By explicitly making this setting in the intent, you override the inferred type inference.
- component: Specifies an explicit component name of the class to execute the intent upon. Normally, the component is inferred by inspection of other information in the intent (action, data/type, and categories), and the matching component(s) can handle it. If this attribute is set, none of that evaluation takes place, and this component is used exactly as specified. You'll probably want to specify a component in most of your applications. Providing another activity as the component tells Android to interact with that specific class.
- extras: A bundle of additional information that is key based. This bundle is used to provide extra information to the receiving component. For example, if you'd like your application to have the ability to interact with the built-in e-mail client, you would need to set up an intent that would provide the e-mail address and would use the extras bundle to supply the body, subject, and other components of the e-mail. After you started the intent, the Android intent system would recognize these attributes via the intent filter system and would start the e-mail client on the device. For more information on intent filters, see http://developer.android.com/guide/topics/intents/intents-filters.html.
Intents are evaluated in the Android system in one of two ways:
- Explicitly: The intent has specified an explicit component or the exact class that will execute the data in the intent (again, this will probably be the most common way you address intents). These types of intents often contain no other data because they are a means to start other activities within an application. I show you how to use an explicit intent in this application later in the chapter.
- Implicitly: The intent has not specified a component or class. Instead, the intent must provide enough information about the action that needs to be performed with the given data for the Android system to determine which available components can handle the intent. This portion of the intent is sometimes referred to as an address and payload.
An example of this is setting up an e-mail intent that contains e-mail fields (To, CC, Subject, and Body) and an e-mail MIME type. Android interprets the intent as an e-mail intent and gives the user of the device the opportunity to choose which application should handle the intent — Gmail, Exchange, or a POP e-mail account that are all enabled on the device. This allows the user to determine from where the e-mail should originate. Android's feature of identifying the possible matches for the given intent is known as intent resolution.
Using pending intents
On one level, a PendingIntent acts just like a regular intent. However, a PendingIntent allows the intent to be performed by another application.
A PendingIntent is created by your application and given to another completely different application. By giving another application a PendingIntent, you grant the other application the right to perform the specified operation as if the application was your own. In other words, a PendingIntent allows your application to perform work on another application's behalf. When an application executes the PendingIntent, it instructs the Android messaging system to inform your application to perform the necessary work.
For our purposes, to obtain a pending intent instance, I use the PendingIntent.getBroadcast() call. This call returns a PendingIntent that is used for broadcasts throughout the system. The call takes four parameters:
- Context: The context in which this PendingIntent should perform the broadcast.
- RequestCode: The private request code for the sender. Not currently used; therefore, a zero is passed in.
- Intent: The intent to be broadcast.
- Flags: A set of controls used to control the intent when it is started. Not currently used; therefore, a zero is passed in.
Wait a second — this looks a bit funky. This code uses an Intent as well as a PendingIntent. Why? The Intent object is wrapped inside a PendingIntent because a PendingIntent is used for cross-process communication. When the PendingIntent is fired off, the real work that needs to be done is wrapped up in the child Intent object.
When a user taps the button on the Home screen, the Home screen “app” sends a PendingIntent to the AppWidgetProvider in your application. At that time your app responds according to the instructions contained in the Intent that is part of the PendingIntent (Brighten screen, dim, and so on). The app then brightens the screen and sends instructions to the app widget via the AppWidgetManager to update its icon. The AppWidgetManager updates the icon via a RemoteView, which also contains a new PendingIntent (which contains a regular Intent) that will be executed the next time the user taps the Home screen widget.
Whoa, that was a lot of information! Now that you understand the basics of the Android intent system, you can implement the guts of the application inside this app widget.