
Creating the App Widget
A lot is going on when it comes to interacting with an app widget. The process of sending messages between the home app widget and your application is handled through the Android messaging system, the PendingIntent class, and the AppWidgetProvider. In this section, I demonstrate how to build each component so that you can get your first app widget up and running on your Home screen.
Implementing the AppWidgetProvider
Implementing the AppWidgetProvider is a straightforward process. Just follow these steps:
- Open Eclipse and open the Screen Brightness Toggle application.
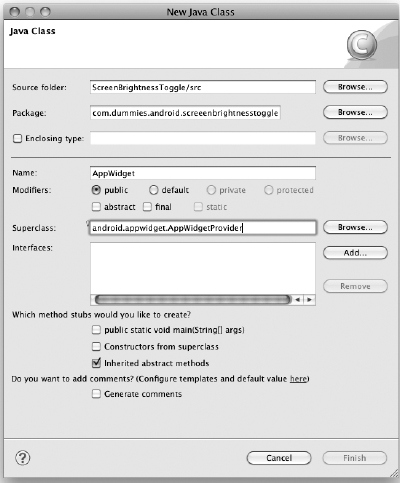
- Add a new class to the com.dummies.android.screenbrightnesstoggle package and provide a name; I prefer to use AppWidget.java.
To add a new class, right-click com.dummies.android.screenbrightnesstoggle in the src/ folder and choose New
 Class. This opens the New Java Class dialog box. In this dialog box, provide the name of the class and set its superclass to android.appwidget.AppWidgetProvider, as shown in Figure 8-3.
 - Click Finish.
A new class has been added to the selected package, and the code with the name you chose should now be visible.
Figure 8-3: The New Java Class dialog box.
Communicating with the app widget
Right now, your AppWidgetProvider class has no code in it — it's an empty shell. For your AppWidgetProvider to do anything, you need to add a bit of code to respond to the intent (the message) that was sent to your AppWidgetProvider. In the code file you just created, type the code shown in Listing 8-1 into the editor. (Note: My class is called AppWidget.java, so if yours is different, you need to change that line.)
Listing 8-1: The Initial Setup of the App Widget
public class AppWidget extends AppWidgetProvider {                   →1
     @Override
     public void onReceive(Context ctxt, Intent intent) {            →3
                  if (intent.getAction()==null) {                    →4
                   // Do Something
                  } else {                                           →6
                    super.onReceive(ctxt, intent);                   →7
                  }
              }

}
Here is a brief explanation of what the various lines do:
| →1 | This line of code informs Android that this class is an AppWidgetProvider because the class is inheriting from AppWidgetProvider. |
| →3 | This line overrides the onReceive() method to be able to detect when a new intent is received from the RemoteView. This intent could have been initiated by a user tapping a view to perform an action such as a button click. The Intent object is contained within the PendingIntent, which initiated the request. |
| →4 | As described previously, Intent objects can contain various pieces of data. One such slice of data is the action. On this line of code, I am checking to see whether the intent has an action. If it does not have an action, I know that I fired off the intent. This may sound a bit backward, but I explain why this is done in the upcoming sections. |
| →6 | An action was found in the Intent object; therefore, a different logical sequence of events needs to take place. |
| →7 | You delegate the work to the superclass because you don't need to do anything with the intent because it isn't what you were expecting (the intent had an action — you were expecting an intent without an action). This would happen if the app widget automatically updated itself on a regular period that you defined in widget metadata (explained in the “Working with the app widget's metadata” section later in this chapter). |
Building the app widget's layout
The app widget needs to tell Android how to display the widget on the Home screen, and it does so through the widget layout file. Earlier in the chapter, I show the real app widget's two different icons. Although you can't see it in Figure 8-2, those icons are surrounded by a background — a transparent one, which blends perfectly with the natural Home screen background. This layout was defined by the widget layout file. If you were to change the background color of the layout file from transparent to lime green, the background color of the widget on the Home screen would also change to lime green, as shown in Figure 8-4.
Figure 8-4: The result of changing the widget's background color to lime green.
This lime green background also illustrates the concept of widget screen space. The lime green box shown in Figure 8-4 identifies the available screen space for the app widget. You can define your app widget to take up one Home screen cell or many cells. (This app widget only takes up one cell.)
To create your widget layout, create an XML layout file in the res/layouts directory and add the contents of Listing 8-2. When you're finished, you can name your file whatever you like — I'm going to name mine widget.xml.
Listing 8-2: The widget layout file — widget.xml
<?xml version=“1.0” encoding=“utf-8”?>
<RelativeLayout xmlns:android=“http://schemas.android.com/apk/res/android”
    android:layout_width=“fill_parent”
    android:layout_height=“fill_parent”>
    <ImageView android:id=“@+id/brightnessState”
        android:layout_height=“wrap_content”
        android:layout_width=“wrap_content”
        android:layout_centerInParent=“true”
        android:src=“@drawable/icon”
        android:clickable=“true” />                                →10
</RelativeLayout>
This layout is nothing that you have not seen before. It's a RelativeLayout that has one child view: a clickable ImageView. You can click this ImageView by setting the clickable property to true on line 10 in Listing 8-2. (For more on RelativeLayout, see Chapter 6.)
Note the src property of the ImageView. It is set to the icon of the application. I'm sure that seems a bit odd to you, but here is why I did that. When I built the layout, I had not yet created the brightness state buttons that represented bright and dim states. However, I did need to preview what the view would look like in the layout designer while designing the layout. Therefore, I used @drawable/icon as the value of the ImageView to glean some vision of how the view is going to look. The fact that I'm using the application icon does not concern me at this point because when the app widget loads, the ToggleService switches the icon value to either the bright or dim mode state icon, as shown later in this chapter.
These icons help the end user of the application identify the current state of the application. The sun icon signifies when the device is in a daytime brightness mode. The night icon signifies when the device is in the evening brightness mode. I created these icons in an image-editing program. You can create your own, or you can use mine by downloading them from this book's companion website.