
Uploading Your Application to the Android Marketplace
You've finally reached the apex of the Android application development — the publishing of your application. Don't worry. It's very easy — just follow these steps:
- From the Android developer home page (shown in Figure 10-14), click Upload Application.
The Upload an Application screen appears.
- For the Application .apk file, choose the .apk file that you created earlier in the chapter and then click Upload.
- In the Screenshots section, add two screenshots of your application.
To see how to take these shots, see the section, “Getting Screenshots for Your Application,” earlier in this chapter. The sizes of these screen shots need to be 320w x 480h, 480w x 800h, 480w x 854h, or 1280w x 800h (please note, Google may add new screen sizes in the future that may not be listed here). Screenshots are not required to publish the app. You should also add a large resolution icon as well. This icon is 512px by 512px. The icon shows up on the online version of the Market: http://market.android.com.
- Add a promo shot.
This promo shot will need to be created in the dimensions of 180w x 120h and should be created in an image-editing program. The promo shot is used for random promotions that Android chooses to showcase when browsing the market. A promo shot is not required to publish the app.
- Set the title of your application.
I chose Screen Brightness Toggle Widget. This text is indexed for the Android Market search.
- Set the description for your application.
This is the description that the users see when they inspect your application to determine if they want to install it or not. All of this text is indexed for the Android Market search.
- Set the application type.
For this app, I set the type to Applications.
- Set the Category for the app.
I chose Productivity for the Screen Brightness Toggle application because the app is a productivity enhancer.
- Select your copy protection.
I choose Off — always. When you choose On, the file footprint on the device is usually doubled. If your app is 2 MB in size and you turn on copy protection, your new file footprint when installed on the device will be around 4 MB. Older devices, prior to Android 2.2, could not install applications to the SD Card, therefore internal space was limited; when users ran out of space, they would uninstall the heavyweight apps first to free up the most space. If your app is very heavy weight it's a very good possibility that it will be removed to save space. Keeping the file size small and leaving copy protection set to Off keeps you out of the crosshairs in this issue.
- Select the Content rating.
This section allows you to specify how you rate your application's content. If you have built an application that is based on, say, adult comedy, you'd want to select High Maturity, whereas your Screen Brightness Toggle, because it's meant for all audiences, should be set to Low Maturity. Think of the content rating for Android apps as the equivalent of movie ratings you see for movies.
- Select the list of locations the application should be visible in.
For example, if your application is an Italian application, deselect All Locations and select Italy as the destination location. This ensures that only devices in the Italy region will see this in the Market. If you leave All Locations enabled, all locations will be able to see your app in the Market.
- Fill out the website and e-mail address (and phone, if you'd like).
I never provide my phone number because, well, users will call you! Yes, they will call at midnight asking you questions, giving feedback, and so on. I prefer to speak to customers via e-mail as it suits my lifestyle better. If you are writing an app for a different company, yet publishing it under your developer account, you can change the website, e-mail, and phone number so that users do not contact you.
- Check that your application meets the Android Content Guidelines and that you complied with applicable laws. Once complete, you have three options:
- Publish: Saves and publishes the app to the Market in real time.
- Save: Saves the changes made, but does not publish the app.
- Delete: This deletes all the work up until now. Don't do this.
- Click Save.
This saves your application and returns you to the Android Developer home page, as shown in Figure 10-16.
Figure 10-16: The saved app in your Android Developer home page.

On the right side of the screen, notice that the icon states the app is in a saved state. You can use this as a staging area until you're ready to release your app.
- When you're ready to release the app, click the title of the app on the Android Developer home page (as shown in Figure 10-16), which opens the Upload an Application screen.
- Scroll to the bottom and click Publish.
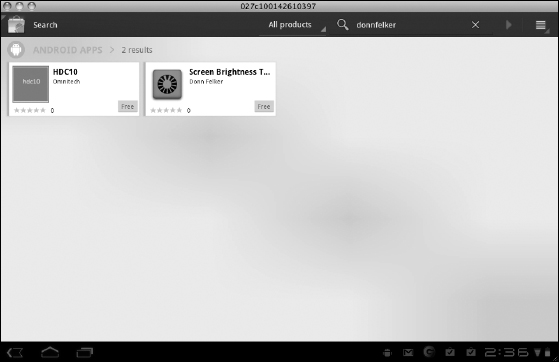
Doing this publishes your application to the Android Market. Figure 10-17 shows the application I just built running in the Android Market on my Motorola XOOM device. I opened the Android Market, navigated to Apps
 Productivity, and clicked the Just In tab, which identifies the apps that have just been released.
Figure 10-17: The released application in the Android Market.
You may have noticed one bonus of this process — there is no app approval process as there is with other mobile carriers! You can create an app, right now, publish it, and users will be able to install it right away. Therefore, you can perform a quick release cycle and get new features out the door as quickly as you can get them done, which is very cool.