
9. Doodlz App
Objectives
In this chapter you’ll:
• Detect when the user touches the screen, moves a finger across the screen and removes a finger from the screen.
• Process multiple screen touches so the user can draw with multiple fingers at once.
• Use a SensorManager to detect accelerometer motion events to clear the screen when the user shakes the device.
• Use an AtomicBoolean object to allow multiple threads to access a boolean value in a thread-safe manner.
• Use a Paint object to specify the color and width of a line.
• Use Path objects to store each line’s data as the user draws the lines and to draw those lines with a Canvas.
• Use a Toast to briefly display a message on the screen.
9.2 Test-Driving the Doodlz App
9.4 Building the App’s GUI and Resource Files
9.5.1 Doodlz Subclass of Activity
9.5.2 DoodleView Subclass of View
Self-Review Exercises | Answers to Self-Review Exercises | Exercises
9.1. Introduction
The Doodlz app turns your device’s screen into a virtual canvas (Fig. 9.1). You paint by dragging one or more fingers across the screen. The app’s options enable you to set the drawing color and line width. The Choose Color dialog (Fig. 9.2(a)) provides alpha (transparency), red, green and blue SeekBars (i.e., sliders) that allow you to select the ARGB color. As you move the thumb on each SeekBar, the color swatch below the SeekBars shows you the current color. The Choose Line Width dialog (Fig. 9.2(b)) provides a single SeekBar that controls the thickness of the line that you’ll draw. Additional menu items (Fig. 9.3) allow you to turn your finger into an eraser (Erase), to clear the screen (Clear) and to save the current drawing into your device’s Gallery (Save Image). At any point, you can shake the device to clear the entire drawing from the screen.
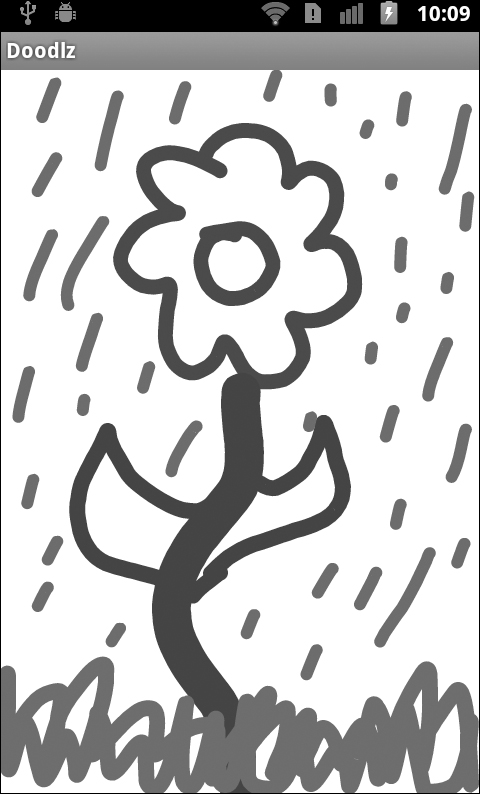
Fig. 9.1. Doodlz app with a finished drawing.

Fig. 9.2. Choose Color and Choose Line Width dialogs for the Doodlz app.

Fig. 9.3. Doodlz app menu options.
9.2. Test-Driving the Doodlz App
You test drove this app in Section 1.11, so we do not present a test drive in this chapter.
9.3. Technologies Overview
This section presents the many new technologies that we use in the Doodlz app in the order they’re encountered throughout the chapter.
Enabling an App to Integrate Better with Android 3.0 and Higher
Though we don’t use any Android-3.0 features in this app, we specify in the app’s manifest that we target the Android 3.0 SDK (Section 9.4.2). Doing so allows the app’s GUI components to use Android 3.0’s look-and-feel—the so-called holographic theme—on Android tablet devices. In addition, the app’s menu is displayed at the right side of the Android 3.0 action bar, which appears at the top of the screen on tablet devices.
Using SensorManager to Listen for Accelerometer Events
This app allows the user to shake the device to erase the current drawing. Most devices have an accelerometer that allows apps to detect movement. Other sensors currently supported by Android include gravity, gyroscope, light, linear acceleration, magnetic field, pressure, proximity, rotation vector and temperature. The list of Sensor constants representing the sensor types can be found at:
developer.android.com/reference/android/hardware/Sensor.html
To listen for sensor events, you get a reference to the system’s SensorManager service (Section 9.5.1), which enables the app to receive data from the device’s sensors. You use the SensorManager to register the sensor changes that your app should receive and to specify the SensorEventListener that will handle those sensor-change events. The classes and interfaces for processing sensor events are located in package android.hardware.
Creating Custom Dialogs
Several previous apps have used AlertDialogs to display information to the user or to ask questions and receive responses from the user in the form of Button clicks. AlertDialogs can display only simple Strings and Buttons. For more complex dialogs, you can use objects of class Dialog (package android.app) that display custom GUIs (Section 9.5.1). In this app, we use these to allow the user to select a drawing color or select a line width, and we inflate each Dialog’s GUI from an XML layout file (Figs. 9.7–Fig. 9.8).
AtomicBoolean
In Android, sensor events are handled in a separate thread of execution from GUI events. Therefore, it’s possible that the event handler for the shake event could try to display the confirmation dialog for erasing an image when another dialog is already on the screen. To prevent this, we’ll use an AtomicBoolean (package import java.util.concurrent.atomic) to indicate when a dialog is currently displayed. An AtomicBoolean manages a boolean value in a thread-safe manner, so that it can be accessed from multiple threads of execution. When the AtomicBoolean’s value is true, we will not allow the event handler for the shake event to display a dialog.
Custom Colors
The user can set a custom drawing Color (Section 9.5.1) in this app by specifying the alpha, red, green and blue components of the Color with SeekBars in a Dialog. Each value is in the range 0 to 255. The alpha component specifies the Color’s transparency with 0 representing completely transparent and 255 representing completely opaque. Class Color provides methods for assembling a Color from its component values (which we need to set the custom drawing Color) and for obtaining the component values from a Color (which we need to set the initial values of the SeekBars in the Choose Color dialog).
Drawing Lines and Paths
This app draws lines onto Bitmaps (package android.graphics). You can associate a Canvas with a Bitmap, then use the Canvas to draw on the Bitmap, which can then be displayed on the screen (Sections 9.5.1– and 9.5.2). A Bitmap can also be saved into a file—we’ll use this capability to store drawings in the device’s gallery when the user touches the Save Image menu item.
Processing Touch Events
The user can touch the screen with one or more fingers and drag the fingers to draw lines. We store the information for each individual finger as a Path object (package android.graphics), which represents a geometric path consisting of line segments and curves. Touch events are processed by overriding the View method OnTouchEvent (Section 9.5.2). This method receives a MotionEvent (package android.view) that contains the type of touch event that occurred and the ID of the finger (i.e., pointer) that generated the event. We use the IDs to distinguish the different fingers and add information to the corresponding Path objects. We use the type of the touch event to determine whether the user has touched the screen, dragged across the screen or lifted a finger from the screen.
Saving the Drawing to the Device’s Gallery
The app provides a Save Image menu item that allows the user to save a drawing into the device’s gallery—the default location in which photos taken with the device are stored. A ContentResolver (package android.content) enables the app to read data from and store data on a device. We’ll use one (Section 9.5.2) to get an OutputStream for writing data into the gallery and save the image in JPEG format.
Using Toasts to Display a Message for a Short Time
A Toast (package android.widget) displays a message for a short time, then disappears from the screen. These are often used to display minor error messages or informational messages, such as an indication that an app’s data has been refreshed. We use one (Section 9.5.2) to indicate whether or not the user’s drawing was successfully saved to the gallery.
9.4. Building the App’s GUI and Resource Files
In this section, you’ll create the Doodlz app’s resource files and GUI layout files.
9.4.1. Creating the Project
Begin by creating a new Android project named Doodlz. Specify the following values in the New Android Project dialog, then press Finish:
• Build Target: Ensure that Android 2.3.3 is checked
• Application name: Doodlz
• Package name: com.deitel.doodlz
• Min SDK Version: 8
9.4.2. AndroidManifest.xml
Figure 9.4 shows this app’s AndroidManifest.xml file. In this app, we set the uses-sdk element’s android:targetSdkVersion attribute to "11" (line 15), which represents the Android 3.0 SDK. If this app is installed on a device running Android 3.0 or higher, Android 3.0’s holographic theme will be applied to the app’s GUI components, and the menu items will be placed at the right side of the app’s action bar, which appears at the top of the screen on tablet devices. Setting the android:targetSdkVersion attribute to "11" has no effect when the app is installed on a device running an earlier version of Android. Targeting SDK version 11 is recommended for any apps that you’d like users to install on Android tablets, so the apps have the look-and-feel of those that are developed specifically for Android 3.0 and higher.
1 <?xml version="1.0" encoding="utf-8"?>
2 <manifest xmlns:android="http://schemas.android.com/apk/res/android"
3 android:versionCode="1" android:versionName="1.0"
4 package="com.deitel.doodlz">
5 <application android:icon="@drawable/icon"
6 android:label="@string/app_name" android:debuggable="true">
7 <activity android:label="@string/app_name" android:name=".Doodlz"
8 android:screenOrientation="portrait">
9 <intent-filter>
10 <action android:name="android.intent.action.MAIN" />
11 <category android:name="android.intent.category.LAUNCHER"/>
12 </intent-filter>
13 </activity>
14 </application>
15 <uses-sdk android:minSdkVersion="8" android:targetSdkVersion="11"/>
16 </manifest>
Fig. 9.4. AndroidManifest.xml.
9.4.3. strings.xml
Figure 9.5 defines the String resources used in this app.
1 <?xml version="1.0" encoding="utf-8"?>
2 <resources>
3 <string name="app_name">Doodlz</string>
4 <string name="button_erase">Erase</string>
5 <string name="button_cancel">Cancel</string>
6 <string name="button_set_color">Set Color</string>
7 <string name="button_set_line_width">Set Line Width</string>
8 <string name="label_alpha">Alpha</string>
9 <string name="label_red">Red</string>
10 <string name="label_green">Green</string>
11 <string name="label_blue">Blue</string>
12 <string name="menuitem_clear">Clear</string>
13 <string name="menuitem_color">Color</string>
14 <string name="menuitem_erase">Erase</string>
15 <string name="menuitem_line_width">Line Width</string>
16 <string name="menuitem_save_image">Save Image</string>
17 <string name="message_erase">Erase the drawing?</string>
18 <string name="message_error_saving">
19 There was an error saving the image</string>
20 <string name="message_saved">
21 Your painting has been saved to the Gallery</string>
22 <string name="title_color_dialog">Choose Color</string>
23 <string name="title_line_width_dialog">Choose Line Width</string>
24 </resources>
Fig. 9.5. Strings defined in strings.xml.
9.4.4. main.xml
We deleted the default main.xml file and replaced it with a new one. In this case, the only component in the layout is an instance of our custom View subclass, DoodleView, which you’ll add to the project in Section 9.5.2. Figure 9.6 shows the completed main.xml in which we manually entered the XML element shown in lines 2–5—our custom DoodleView is not in the ADT’s Palette, so it cannot be dragged and dropped onto the layout.
1 <?xml version="1.0" encoding="utf-8"?>
2 <com.deitel.doodlz.DoodleView "
3 xmlns:android="http://schemas.android.com/apk/res/android"
4 android:layout_width="match_parent"
5 android:layout_height="match_parent"/>
Fig. 9.6. Doodlz app’s XML layout (main.xml).
9.4.5. color_dialog.xml
Figure 9.7 shows the completed color_dialog.xml, which defines the GUI for a dialog that allows the user to specify the alpha, red, green and blue components of the drawing color. The LinearLayout (lines 61–67) has a white background and contains a View (lines 64–66) that we use to display the current drawing color based on the values of the four SeekBars, each allowing the user to select values from 0 (the default minimum) to 255 (the specified maximum). The white background enables the color to display accurately on the View when the user makes the color semitransparent with the alphaSeekBar. We use the standard SeekBar thumb in our apps, but you can customize it by setting the SeekBar’s android:thumb attribute to a drawable resource, such as an image.
1 <?xml version="1.0" encoding="utf-8"?>
2 <LinearLayout xmlns:android="http://schemas.android.com/apk/res/android"
3 android:id="@+id/colorDialogLinearLayout"
4 android:layout_width="match_parent" android:minWidth="300dp"
5 android:layout_height="match_parent" android:orientation="vertical">
6
7 <TableLayout android:id="@+id/tableLayout"
8 android:layout_width="match_parent"
9 android:layout_height="wrap_content" android:layout_margin="10dp"
10 android:stretchColumns="1">
11 <TableRow android:orientation="horizontal"
12 android:layout_width="match_parent"
13 android:layout_height="wrap_content">
14 <TextView android:layout_width="wrap_content"
15 android:layout_height="wrap_content"
16 android:text="@string/label_alpha" android:gravity="right"
17 android:layout_gravity="center_vertical"/>
18 <SeekBar android:id="@+id/alphaSeekBar"
19 android:layout_width="wrap_content"
20 android:layout_height="wrap_content" android:max="255"
21 android:paddingLeft="10dp" android:paddingRight="10dp"/>
22 </TableRow>
23 <TableRow android:orientation="horizontal"
24 android:layout_width="match_parent"
25 android:layout_height="wrap_content">
26 <TextView android:layout_width="wrap_content"
27 android:layout_height="wrap_content"
28 android:text="@string/label_red" android:gravity="right"
29 android:layout_gravity="center_vertical"/>
30 <SeekBar android:id="@+id/redSeekBar"
31 android:layout_width="wrap_content"
32 android:layout_height="wrap_content" android:max="255"
33 android:paddingLeft="10dp" android:paddingRight="10dp"/>
34 </TableRow>
35 <TableRow android:orientation="horizontal"
36 android:layout_width="match_parent"
37 android:layout_height="wrap_content">
38 <TextView android:layout_width="wrap_content"
39 android:layout_height="wrap_content"
40 android:text="@string/label_green" android:gravity="right"
41 android:layout_gravity="center_vertical"/>
42 <SeekBar android:id="@+id/greenSeekBar"
43 android:layout_width="wrap_content"
44 android:layout_height="wrap_content" android:max="255"
45 android:paddingLeft="10dp" android:paddingRight="10dp"/>
46 </TableRow>
47 <TableRow android:orientation="horizontal"
48 android:layout_width="wrap_content"
49 android:layout_height="wrap_content">
50 <TextView android:layout_width="match_parent"
51 android:layout_height="wrap_content"
52 android:text="@string/label_blue" android:gravity="right"
53 android:layout_gravity="center_vertical"/>
54 <SeekBar android:id="@+id/blueSeekBar"
55 android:layout_width="wrap_content"
56 android:layout_height="wrap_content" android:max="255"
57 android:paddingLeft="10dp" android:paddingRight="10dp"/>
58 </TableRow>
59 </TableLayout>
60
61 <LinearLayout android:background="@android:color/white"
62 android:layout_width="match_parent"
63 android:layout_height="wrap_content" android:layout_margin="10dp">
64 <View android:id="@+id/colorView"
65 android:layout_width="match_parent"
66 android:layout_height="30dp"/>
67 </LinearLayout>
68
69 <Button android:id="@+id/setColorButton"
70 android:layout_width="wrap_content"
71 android:layout_height="wrap_content"
72 android:layout_gravity="center_horizontal"
73 android:text="@string/button_set_color"/>
74 </LinearLayout>
Fig. 9.7. Layout for the Choose Color dialog.
9.4.6. width_dialog.xml
Figure 9.8 shows the completed width_dialog.xml, which defines the GUI for a dialog that allows the user to specify the line width for drawing. As the user moves the widthSeekBar’s thumb, we use the ImageView (lines 6–8) to display a sample line in the current line width and current color.
1 <?xml version="1.0" encoding="utf-8"?>
2 <LinearLayout xmlns:android="http://schemas.android.com/apk/res/android"
3 android:id="@+id/widthDialogLinearLayout"
4 android:layout_width="match_parent" android:minWidth="300dp"
5 android:layout_height="match_parent" android:orientation="vertical">
6 <ImageView android:id="@+id/widthImageView"
7 android:layout_width="match_parent" android:layout_height="50dp"
8 android:layout_margin="10dp"/>
9 <SeekBar android:layout_height="wrap_content" android:max="50"
10 android:id="@+id/widthSeekBar" android:layout_width="match_parent"
11 android:layout_margin="20dp" android:paddingLeft="20dp"
12 android:paddingRight="20dp"
13 android:layout_gravity="center_horizontal"/>
14 <Button android:id="@+id/widthDialogDoneButton"
15 android:layout_width="wrap_content"
16 android:layout_height="wrap_content"
17 android:layout_gravity="center_horizontal"
18 android:text="@string/button_set_line_width"/>
19 </LinearLayout>
Fig. 9.8. Layout for the Choose Line Width dialog.
9.5. Building the App
This app consists of two classes—class Doodlz (the Activity subclass; Figs. 9.9–9.20) and class DoodleView (Figs. 9.21–9.29).
1 // Doodlz.java
2 // Draws View which changes color in response to user touches.
3 package com.deitel.doodlz;
4
5 import java.util.concurrent.atomic.AtomicBoolean;
6
7 import android.app.Activity;
8 import android.app.AlertDialog;
9 import android.app.Dialog;
10 import android.content.Context;
11 import android.content.DialogInterface;
12 import android.graphics.Bitmap;
13 import android.graphics.Canvas;
14 import android.graphics.Color;
15 import android.graphics.Paint;
16 import android.hardware.Sensor;
17 import android.hardware.SensorEvent;
18 import android.hardware.SensorEventListener;
19 import android.hardware.SensorManager;
20 import android.os.Bundle;
21 import android.view.Menu;
22 import android.view.MenuItem;
23 import android.view.View;
24 import android.view.View.OnClickListener;
25 import android.widget.Button;
26 import android.widget.ImageView;
27 import android.widget.SeekBar;
28 import android.widget.SeekBar.OnSeekBarChangeListener;
29
Fig. 9.9. Doodlz class package and import statements.
9.5.1. Doodlz Subclass of Activity
Class Doodlz (Figs. 9.9–9.20) is the Doodlz app’s main Activity. It provides the app’s menu, dialogs and accelerometer event handling.
package and import Statements
Section 9.3 discussed the key new classes and interfaces that class Doodlz uses. We’ve highlighted these classes and interfaces in Fig. 9.9.
Instance Variables and Constants
Figure 9.10 shows the instance variables and constants of class Doodlz. DoodleView variable doodleView (line 32) represents the drawing area. The sensorManager is used to monitor the accelerometer to detect the device movement. The float variables declared in lines 34–36 are used to calculate changes in the device’s acceleration to determine when a shake event occurs (so we can ask whether the user would like to erase the drawing), and the constant in line 47 is used to ensure that small movements are not interpreted as shakes—we picked this constant via trial and error by shaking the app on several devices. Line 37 defines the AtomicBoolean object (with the value false by default) that will be used throughout this class to specify when there is a dialog displayed on the screen, so we can prevent multiple dialogs from being displaed at the same time. Lines 40–44 declare the int constants for the app’s five menu items. We use the Dialog variable currentDialog (line 50) to refer to the Choose Color or Choose Line Width dialogs that allow the user to change the drawing color and line width, respectively.
30 public class Doodlz extends Activity
31 {
32 private DoodleView doodleView; // drawing View
33 private SensorManager sensorManager; // monitors accelerometer
34 private float acceleration; // acceleration
35 private float currentAcceleration; // current acceleration
36 private float lastAcceleration; // last acceleration
37 private AtomicBoolean dialogIsDisplayed = new AtomicBoolean(); // false
38
39 // create menu ids for each menu option
40 private static final int COLOR_MENU_ID = Menu.FIRST;
41 private static final int WIDTH_MENU_ID = Menu.FIRST + 1;
42 private static final int ERASE_MENU_ID = Menu.FIRST + 2;
43 private static final int CLEAR_MENU_ID = Menu.FIRST + 3;
44 private static final int SAVE_MENU_ID = Menu.FIRST + 4;
45
46 // value used to determine whether user shook the device to erase
47 private static final int ACCELERATION_THRESHOLD = 15000;
48
49 // variable that refers to a Choose Color or Choose Line Width dialog
50 private Dialog currentDialog;
51
Fig. 9.10. Fields of class Doodlz.
Overriding Activity Methods onCreate and onPause
Class Doodlz’s onCreate method (Fig. 9.11) gets a reference to the DoodleView, then initializes the instance variables that help calculate acceleration changes to determine whether the user shook the device to erase the drawing. We initially set variables currentAcceleration and lastAcceleration to SensorManager’s GRAVITY_EARTH constant, which represents the acceleration due to gravity on earth. SensorManager also provides constants for other planets in the solar system, for the moon and for several other entertaining values, which you can see at:
developer.android.com/reference/android/hardware/SensorManager.html
52 // called when this Activity is loaded
53 @Override
54 protected void onCreate(Bundle savedInstanceState)
55 {
56 super.onCreate(savedInstanceState);
57 setContentView(R.layout.main); // inflate the layout
58
59 // get reference to the DoodleView
60 doodleView = (DoodleView) findViewById(R.id.doodleView);
61
62 // initialize acceleration values
63 acceleration = 0.00f;
64 currentAcceleration = SensorManager.GRAVITY_EARTH;
65 lastAcceleration = SensorManager.GRAVITY_EARTH;
66
67 enableAccelerometerListening(); // listen for shake
68 } // end method onCreate
69
70 // when app is sent to the background, stop listening for sensor events
71 @Override
72 protected void onPause()
73 {
74 super.onPause();
75 disableAccelerometerListening(); // don't listen for shake
76 } // end method onPause
77
Fig. 9.11. Overridden Activity methods onCreate and onPause.
Next, line 67 calls method enableAccelerometerListening (Fig. 9.12) to configure the SensorManager to listen for accelerometer events. Class Doodlz’s onPause method (lines 71–76) calls method disableAccelerometerListening (Fig. 9.12) to unregister the accelerometer event handler when the app is sent to the background.
78 // enable listening for accelerometer events
79 private void enableAccelerometerListening()
80 {
81 // initialize the SensorManager
82 sensorManager =
83 (SensorManager) getSystemService(Context.SENSOR_SERVICE);
84 sensorManager.registerListener(sensorEventListener,
85 sensorManager.getDefaultSensor(Sensor.TYPE_ACCELEROMETER),
86 SensorManager.SENSOR_DELAY_NORMAL);
87 } // end method enableAccelerometerListening
88
89 // disable listening for accelerometer events
90 private void disableAccelerometerListening()
91 {
92 // stop listening for sensor events
93 if (sensorManager != null)
94 {
95 sensorManager.unregisterListener(
96 sensorEventListener,
97 sensorManager.getDefaultSensor(
98 SensorManager.SENSOR_ACCELEROMETER));
99 sensorManager = null;
100 } // end if
101 } // end method disableAccelerometerListening
102
Fig. 9.12. Methods enableAccelerometerListening and disableAccelerometerListening.
Methods enableAccelerometerListening and disableAccelerometerListening
Method enableAccelerometerListening (Fig. 9.12; lines 79–87) configures the SensorManager. Lines 82–83 use Activity’s getSystemService method to retrieve the system’s SensorManager service, which enables the app to interact with the device’s sensors. We then register to receive accelerometer events using SensorManager’s registerListener method, which receives three arguments:
• the SensorEventListener object that will respond to the events
• a Sensor representing the type of sensor data the app wishes to receive. This is retrieved by calling SensorManager’s getDefaultSensor method and passing a Sensor-type constant (Sensor.TYPE_ACCELEROMETER in this app).
• a rate at which sensor events should be delivered to the app. We chose SENSOR_DELAY_NORMAL to receive sensor events at the default rate—a faster rate can be used to get more accurate data, but this is also more resource intensive.
Method disableAccelerometerListening (Fig. 9.12; lines 90–101), which is called from onPause, uses class SensorManager’s unregisterListener method to stop listening for accelerometer events. Since we don’t know whether the app will return to the foreground, we also set the sensorManager reference to null.
Anonymous Inner Class That Implements Interface SensorEventListener to Process Accelerometer Events
Figure 9.13 overrides SensorEventListener method onSensorChanged (lines 108–168) to process accelerometer events. If the user moves the device, this method attempts to determine whether the movement was enough to be considered a shake. If so, lines 133–165 build and display an AlertDialog asking the user whether the drawing should be erased. Interface SensorEventListener also contains method onAccuracyChanged (lines 171–174)—we don’t use this method in this app, so we provide an empty body.
103 // event handler for accelerometer events
104 private SensorEventListener sensorEventListener =
105 new SensorEventListener()
106 {
107 // use accelerometer to determine whether user shook device
108 @Override
109 public void onSensorChanged(SensorEvent event)
110 {
111 // ensure that other dialogs are not displayed
112 if (!dialogIsVisible.get())
113 {
114 // get x, y, and z values for the SensorEvent
115 float x = event.values[0];
116 float y = event.values[1];
117 float z = event.values[2];
118
119 // save previous acceleration value
120 lastAcceleration = currentAcceleration;
121
122 // calculate the current acceleration
123 currentAcceleration = x * x + y * y + z * z;
124
125 // calculate the change in acceleration
126 acceleration = currentAcceleration *
127 (currentAcceleration - lastAcceleration);
128
129 // if the acceleration is above a certain threshold
130 if (acceleration > ACCELERATION_THRESHOLD)
131 {
132 // create a new AlertDialog Builder
133 AlertDialog.Builder builder =
134 new AlertDialog.Builder(Doodlz.this);
135
136 // set the AlertDialog's message
137 builder.setMessage(R.string.message_erase);
138 builder.setCancelable(true);
139
140 // add Erase Button
141 builder.setPositiveButton(R.string.button_erase,
142 new DialogInterface.OnClickListener()
143 {
144 public void onClick(DialogInterface dialog, int id)
145 {
146 dialogIsVisible.set(false);
147 doodleView.clear(); // clear the screen
148 } // end method onClick
149 } // end anonymous inner class
150 ); // end call to setPositiveButton
151
152 // add Cancel Button
153 builder.setNegativeButton(R.string.button_cancel,
154 new DialogInterface.OnClickListener()
155 {
156 public void onClick(DialogInterface dialog, int id)
157 {
158 dialogIsVisible.set(false);
159 dialog.cancel(); // dismiss the dialog
160 } // end method onClick
161 } // end anonymous inner class
162 ); // end call to setNegativeButton
163
164 dialogIsVisible.set(true); // dialog is on the screen
165 builder.show(); // display the dialog
166 } // end if
167 } // end if
168 } // end method onSensorChanged
169
170 // required method of interface SensorEventListener
171 @Override
172 public void onAccuracyChanged(Sensor sensor, int accuracy)
173 {
174 } // end method onAccuracyChanged
175 }; // end anonymous inner class
176
Fig. 9.13. Anonymous inner class that implements SensorEventListener.
The user can shake the device even when dialogs are already displayed on the screen. For this reason, onSensorChanged first checks whether a dialog is displayed by calling dialogIsVisible’s get method (line 110). This test ensures that no other dialogs are displayed. This is important because the sensor events occur in a different thread of execution. Without this test, we’d be able to display the confirmation dialog for erasing the image when another dialog is on the screen.
The SensorEvent parameter contains information about the sensor change that occurred. For accelerometer events, this parameter’s values array contains three elements representing the acceleration (in meter/second2) in the x (left/right), y (up/down) and z (forward/backward) directions. A description and diagram of the coordinate system used by the SensorEvent API is available at:
developer.android.com/reference/android/hardware/SensorEvent.html
This link also describes the real-world meanings for a SensorEvent’s x, y and z values for each different Sensor.
We store the acceleration values (lines 115–117), then store the last value of currentAcceleration (line 120). Line 123 sums the squares of the x, y and z acceleration values and stores them in currentAcceleration. Then, using the currentAcceleration and lastAcceleration values, we calculate a value (acceleration) that can be compared to our ACCELERATION_THRESHOLD constant. If the value is greater than the constant, the user moved the device enough for this app to consider the movement a shake. In this case, we set shakeDetected to true, then configure and display an AlertDialog in which the user can confirm that the shake should erase the drawing or cancel the dialog. Setting variable shakeDetected to true ensures that while the confirmation dialog is displayed, method onSensorChanged will not display another dialog if the user shakes the device again. If the user confirms that the drawing should be erased, line 147 calls the DoodleView’s clear method (Fig. 9.23). [Note: It’s important to handle sensor events quickly or to copy the event data (as we did) because the array of sensor values is reused for each sensor event.]
Methods onCreateOptionsMenu and onOptionsItemSelected
Figure 9.14 overrides Activity’s onCreateOptionsMenu method to setup the Activity’s menu. We use the menu’s add method to add menu items (lines 184–193). Recall that the first argument is the group identifier, which can be used to group items together. We do not have any groups, so we use Menu’s NONE constant for each item. The second argument is the item’s unique identifier—one of the constants declared in lines 40–44. The third argument specifies the menu item’s order with respect to the other menu items. We use Menu’s NONE constant, because the order is not important in this app. This value allows the item’s sizes to determine how Android lays out the menu items. The final argument is the String resource to display on each menu item.
177 // displays configuration options in menu
178 @Override
179 public boolean onCreateOptionsMenu(Menu menu)
180 {
181 super.onCreateOptionsMenu(menu); // call super's method
182
183 // add options to menu
184 menu.add(Menu.NONE, COLOR_MENU_ID, Menu.NONE,
185 R.string.menuitem_color);
186 menu.add(Menu.NONE, WIDTH_MENU_ID, Menu.NONE,
187 R.string.menuitem_line_width);
188 menu.add(Menu.NONE, ERASE_MENU_ID, Menu.NONE,
189 R.string.menuitem_erase);
190 menu.add(Menu.NONE, CLEAR_MENU_ID, Menu.NONE,
191 R.string.menuitem_clear);
192 menu.add(Menu.NONE, SAVE_MENU_ID, Menu.NONE,
193 R.string.menuitem_save_image);
194
195 return true; // options menu creation was handled
196 } // end onCreateOptionsMenu
197
198 // handle choice from options menu
199 @Override
200 public boolean onOptionsItemSelected(MenuItem item)
201 {
202 // switch based on the MenuItem id
203 switch (item.getItemId())
204 {
205 case COLOR_MENU_ID:
206 showColorDialog(); // display color selection dialog
207 return true; // consume the menu event
208 case WIDTH_MENU_ID:
209 showLineWidthDialog(); // display line thickness dialog
210 return true; // consume the menu event
211 case ERASE_MENU_ID:
212 doodleView.setDrawingColor(Color.WHITE); // line color white
213 return true; // consume the menu event
214 case CLEAR_MENU_ID:
215 doodleView.clear(); // clear doodleView
216 return true; // consume the menu event
217 case SAVE_MENU_ID:
218 doodleView.saveImage(); // save the current images
219 return true; // consume the menu event
220 } // end switch
221
222 return super.onOptionsItemSelected(item); // call super's method
223 } // end method onOptionsItemSelected
224
Fig. 9.14. Overridden Activity methods onCreateOptionsMenu and onOptionsItemSelected.
Lines 199–223 override Activity’s onOptionItemSelected method, which is called when the user touches a menu item. We use the MenuItem argument’s ID (line 203) to take different actions depending on the item the user selected. The actions are as follows:
• For Color, line 206 calls method showColorDialog (Fig. 9.15) to allow the user to select a new drawing color.
225 // display a dialog for selecting color
226 private void showColorDialog()
227 {
228 // create the dialog and inflate its content
229 currentDialog = new Dialog(this);
230 currentDialog.setContentView(R.layout.color_dialog);
231 currentDialog.setTitle(R.string.title_color_dialog);
232 currentDialog.setCancelable(true);
233
234 // get the color SeekBars and set their onChange listeners
235 final SeekBar alphaSeekBar =
236 (SeekBar) currentDialog.findViewById(R.id.alphaSeekBar);
237 final SeekBar redSeekBar =
238 (SeekBar) currentDialog.findViewById(R.id.redSeekBar);
239 final SeekBar greenSeekBar =
240 (SeekBar) currentDialog.findViewById(R.id.greenSeekBar);
241 final SeekBar blueSeekBar =
242 (SeekBar) currentDialog.findViewById(R.id.blueSeekBar);
243
244 // register SeekBar event listeners
245 alphaSeekBar.setOnSeekBarChangeListener(colorSeekBarChanged);
246 redSeekBar.setOnSeekBarChangeListener(colorSeekBarChanged);
247 greenSeekBar.setOnSeekBarChangeListener(colorSeekBarChanged);
248 blueSeekBar.setOnSeekBarChangeListener(colorSeekBarChanged);
249
250 // use current drawing color to set SeekBar values
251 final int color = doodleView.getDrawingColor();
252 alphaSeekBar.setProgress(Color.alpha(color));
253 redSeekBar.setProgress(Color.red(color));
254 greenSeekBar.setProgress(Color.green(color));
255 blueSeekBar.setProgress(Color.blue(color));
256
257 // set the Set Color Button's onClickListener
258 Button setColorButton = (Button) currentDialog.findViewById(
259 R.id.setColorButton);
260 setColorButton.setOnClickListener(setColorButtonListener);
261
262 dialogIsVisible.set(true); // dialog is on the screen
263 currentDialog.show(); // show the dialog
264 } // end method showColorDialog
265
Fig. 9.15. Method showColorDialog displays a Dialog for changing the current drawing color.
• For Width, line 209 calls method showLineWidthDialog (Fig. 9.18) to allow the uset to select a new line width.
• For Erase, line 212 sets the doodleView’s drawing color to white, which effectively turns the user’s fingers into erasers.
• For Clear, line 215 calls the doodleView’s clear method to remove all painted lines from the display.
• For Save, line 218 calls doodleView’s saveImage method to save the painting as an image stored in the device’s image gallery.
Method showColorDialog
The showColorDialog method (Fig. 9.15) creates a Dialog and sets its GUI by calling setContentView to inflate color_dialog.xml (lines 229–230). We also set the dialog’s title and indicate that it’s cancelable—the user can press the device’s back button to dismiss the dialog without making any changes to the current color. Lines 235–242 get references to the dialog’s four SeekBars, then lines 256–248 set each SeekBar’s OnSeekBarChangeListener to the colorSeekBarChanged listener (Fig. 9.16). Lines 251–255 get the current drawing color from doodleView, then use it to set each SeekBar’s current value. Color’s static methods alpha, red, green and blue are used to extract the ARGB values from the current color, and SeekBar’s setProgress method positions the thumbs. Lines 258–260 get a reference to the dialog’s setColorButton and register setColorButtonListener (Fig. 9.17) as its event handler. Line 262 indicates that a dialog is displayed by calling isDialigVisible’s set method with the value true. Finally, line 263 displays the Dialog using its show method. The new color is set only if the user touches the Set Color Button in the Dialog.
266 // OnSeekBarChangeListener for the SeekBars in the color dialog
267 private OnSeekBarChangeListener colorSeekBarChanged =
268 new OnSeekBarChangeListener()
269 {
270 @Override
271 public void onProgressChanged(SeekBar seekBar, int progress,
272 boolean fromUser)
273 {
274 // get the SeekBars and the colorView LinearLayout
275 SeekBar alphaSeekBar =
276 (SeekBar) currentDialog.findViewById(R.id.alphaSeekBar);
277 SeekBar redSeekBar =
278 (SeekBar) currentDialog.findViewById(R.id.redSeekBar);
279 SeekBar greenSeekBar =
280 (SeekBar) currentDialog.findViewById(R.id.greenSeekBar);
281 SeekBar blueSeekBar =
282 (SeekBar) currentDialog.findViewById(R.id.blueSeekBar);
283 View colorView =
284 (View) currentDialog.findViewById(R.id.colorView);
285
286 // display the current color
287 colorView.setBackgroundColor(Color.argb(
288 alphaSeekBar.getProgress(), redSeekBar.getProgress(),
289 greenSeekBar.getProgress(), blueSeekBar.getProgress()));
290 } // end method onProgressChanged
291
292 // required method of interface OnSeekBarChangeListener
293 @Override
294 public void onStartTrackingTouch(SeekBar seekBar)
295 {
296 } // end method onStartTrackingTouch
297
298 // required method of interface OnSeekBarChangeListener
299 @Override
300 public void onStopTrackingTouch(SeekBar seekBar)
301 {
302 } // end method onStopTrackingTouch
303 }; // end colorSeekBarChanged
304
Fig. 9.16. Anonymous inner class that implements interface OnSeekbarChangeListener to respond to SeekBar events in the Choose Color Dialog.
305 // OnClickListener for the color dialog's Set Color Button
306 private OnClickListener setColorButtonListener = new OnClickListener()
307 {
308 @Override
309 public void onClick(View v)
310 {
311 // get the color SeekBars
312 SeekBar alphaSeekBar =
313 (SeekBar) currentDialog.findViewById(R.id.alphaSeekBar);
314 SeekBar redSeekBar =
315 (SeekBar) currentDialog.findViewById(R.id.redSeekBar);
316 SeekBar greenSeekBar =
317 (SeekBar) currentDialog.findViewById(R.id.greenSeekBar);
318 SeekBar blueSeekBar =
319 (SeekBar) currentDialog.findViewById(R.id.blueSeekBar);
320
321 // set the line color
322 doodleView.setDrawingColor(Color.argb(
323 alphaSeekBar.getProgress(), redSeekBar.getProgress(),
324 greenSeekBar.getProgress(), blueSeekBar.getProgress()));
325 dialogIsVisible.set(false); // dialog is not on the screen
326 currentDialog.dismiss(); // hide the dialog
327 currentDialog = null; // dialog no longer needed
328 } // end method onClick
329 }; // end setColorButtonListener
330
Fig. 9.17. Anonymous inner class that implements interface OnClickListener to respond when the user touches the Set Color Button.
Anonymous Inner Class That Implements Interface OnSeekBarChangeListener to Respond to the Events of the alpha, red, green and blue SeekBars
Figure 9.16 defines an anonymous inner class that implements interface OnSeekBarChangeListener to respond to events when the user adjusts the SeekBars in the Choose Color Dialog. This was registered as the SeekBars’ event handler in Fig. 9.15 (lines 246–249). Method onProgressChanged (lines 270–290) is called when the position of a SeekBar’s thumb changes. We retrieve from the currentDialog each of the SeekBars and the View used to display the color (lines 275–284). We then use class View’s setBackgroundColor method to update the colorView with a Color that matches the current state of the SeekBars (lines 287–289). Class Color’s static method argb combines the SeekBars’ values into a Color and returns the appropriate Color. [Note: Method onProgressChanged is called frequently when the user drags a SeekBar’s thumb. For this reason, it’s better practice to get the GUI component references once and store them as instance variables in your class, rather than getting the references each time onProgressChanged is called.]
Anonymous Inner Class That Implements Interface OnClickListener to Set the New Drawing Color
Figure 9.17 defines an anonymous inner class that implements interface OnClickListener to set the new drawing color when the user clicks the Set Color Button in the Choose Color Dialog. This was registered as the Button’s event handler in Fig. 9.15 (line 261). Method onClick gets references to the SeekBars, then uses them in lines 322–324 to get the value from each SeekBar and set the new drawing color. Line 325 indicates that a dialog is not displayed by calling isDialigVisible’s set method with the value false. Line 326 calls the Dialog’s dismiss method to close the dialog and return to the app.
Method showLineWidthDialog
The showLineWidthDialog method (Fig. 9.18) creates a Dialog and sets its GUI by calling setContentView to inflate width_dialog.xml (lines 335–336). We also set the dialog’s title and indicate that it’s cancelable. Lines 341–344 get a reference to the dialog’s SeekBar, set its OnSeekBarChangeListener to the widthSeekBarChanged listener (Fig. 9.19) and set its current value. Lines 347–349 get a reference to the dialog’s Button and set its OnClickListener to the setLineWidthButtonListener (Fig. 9.20). Line 351 indicates that a dialog is displayed by calling isDialigVisible’s set method with the value true. Finally, line 352 displays the dialog. The new line width is set only if the user touches the Set Line Width Button in the Dialog.
331 // display a dialog for setting the line width
332 private void showLineWidthDialog()
333 {
334 // create the dialog and inflate its content
335 currentDialog = new Dialog(this);
336 currentDialog.setContentView(R.layout.width_dialog);
337 currentDialog.setTitle(R.string.title_line_width_dialog);
338 currentDialog.setCancelable(true);
339
340 // get widthSeekBar and configure it
341 SeekBar widthSeekBar =
342 (SeekBar) currentDialog.findViewById(R.id.widthSeekBar);
343 widthSeekBar.setOnSeekBarChangeListener(widthSeekBarChanged);
344 widthSeekBar.setProgress(doodleView.getLineWidth());
345
346 // set the Set Line Width Button's onClickListener
347 Button setLineWidthButton =
348 (Button) currentDialog.findViewById(R.id.widthDialogDoneButton);
349 setLineWidthButton.setOnClickListener(setLineWidthButtonListener);
350
351 dialogIsVisible.set(true); // dialog is on the screen
352 currentDialog.show(); // show the dialog
353 } // end method showLineWidthDialog
354
Fig. 9.18. Method showLineWidthDialog creates and displays a Dialog for changing the line width.
355 // OnSeekBarChangeListener for the SeekBar in the width dialog
356 private OnSeekBarChangeListener widthSeekBarChanged =
357 new OnSeekBarChangeListener()
358 {
359 Bitmap bitmap = Bitmap.createBitmap( // create Bitmap
360 400, 100, Bitmap.Config.ARGB_8888);
361 Canvas canvas = new Canvas(bitmap); // associate with Canvas
362
363 @Override
364 public void onProgressChanged(SeekBar seekBar, int progress,
365 boolean fromUser)
366 {
367 // get the ImageView
368 ImageView widthImageView = (ImageView)
369 currentDialog.findViewById(R.id.widthImageView);
370
371 // configure a Paint object for the current SeekBar value
372 Paint p = new Paint();
373 p.setColor(doodleView.getDrawingColor());
374 p.setStrokeCap(Paint.Cap.ROUND);
375 p.setStrokeWidth(progress);
376
377 // erase the bitmap and redraw the line
378 bitmap.eraseColor(Color.WHITE);
379 canvas.drawLine(30, 50, 370, 50, p);
380 widthImageView.setImageBitmap(bitmap);
381 } // end method onProgressChanged
382
383 // required method of interface OnSeekBarChangeListener
384 @Override
385 public void onStartTrackingTouch(SeekBar seekBar)
386 {
387 } // end method onStartTrackingTouch
388
389 // required method of interface OnSeekBarChangeListener
390 @Override
391 public void onStopTrackingTouch(SeekBar seekBar)
392 {
393 } // end method onStopTrackingTouch
394 }; // end widthSeekBarChanged
395
Fig. 9.19. Anonymous inner class that implements interface OnSeekbarChangeListener to respond to SeekBar events in the Choose Line Width Dialog.
396 // OnClickListener for the line width dialog's Set Line Width Button
397 private OnClickListener setLineWidthButtonListener =
398 new OnClickListener()
399 {
400 @Override
401 public void onClick(View v)
402 {
403 // get the color SeekBars
404 SeekBar widthSeekBar =
405 (SeekBar) currentDialog.findViewById(R.id.widthSeekBar);
406
407 // set the line color
408 doodleView.setLineWidth(widthSeekBar.getProgress());
409 dialogIsVisible.set(false); // dialog is not on the screen
410 currentDialog.dismiss(); // hide the dialog
411 currentDialog = null; // dialog no longer needed
412 } // end method onClick
413 }; // end setColorButtonListener
414 } // end class Doodlz
Fig. 9.20. Anonymous inner class that implements interface OnClickListener to respond when the user touches the Set Line Width Button.
Anonymous Inner Class That Implements Interface OnSeekBarChangeListener to Respond to the Events of the widthSeekBar
Figure 9.19 defines the widthSeekBarChanged OnSeekBarChangeListener that responds to events when the user adjusts the SeekBar in the Choose Line Width Dialog. Lines 359–360 create a Bitmap on which to display a sample line representing the selected line thickness. Line 361 creates a Canvas for drawing on the Bitmap. Method onProgressChanged (lines 364–381) draws the sample line based on the current drawing color and the SeekBar’s value. First, lines 368–369 get a reference to the ImageView where the line is displayed. Next, lines 372–375 configure a Paint object for drawing the sample line. Class Paint’s setStrokeCap method (line 374) specifies the appearance of the line ends—in this case, they’re rounded (Paint.Cap.ROUND). Line 378 clears bitmap’s background to white with Bitmap method eraseColor. We use canvas to draw the sample line. Finally, line 380 displays bitmap in the widthImageView by passing it to ImageView’s setImageBitmap method.
Anonymous Inner Class That Implements Interface OnClickListener to Respond to the Events of the Set Line Width Button
Figure 9.20 defines an anonymous inner class that implements interface OnClickListener to set the new line width color when the user clicks the Set Line Width Button in the Choose Line Width Dialog. This was registered as the Button’s event handler in Fig. 9.18 (line 349). Method onClick gets a reference to Dialog’s SeekBar, then uses it to set the new line width based on the SeekBar’s value. Line 409 indicates that a dialog is not displayed by calling isDialigVisible’s set method with the value false. Line 410 calls the Dialog’s dismiss method to close the dialog and return to the app.
9.5.2. DoodleView Subclass of View
Class DoodleView (Figs. 9.21–9.29) processes the user’s touches and draws the corresponding lines.
1 // DoodleView.java
2 // Main View for the Doodlz app.
3 package com.deitel.doodlz;
4
5 import java.io.IOException;
6 import java.io.OutputStream;
7 import java.util.HashMap;
8
9 import android.content.ContentValues;
10 import android.content.Context;
11 import android.graphics.Bitmap;
12 import android.graphics.Canvas;
13 import android.graphics.Color;
14 import android.graphics.Paint;
15 import android.graphics.Path;
16 import android.graphics.Point;
17 import android.net.Uri;
18 import android.provider.MediaStore.Images;
19 import android.util.AttributeSet;
20 import android.view.Gravity;
21 import android.view.MotionEvent;
22 import android.view.View;
23 import android.widget.Toast;
24
Fig. 9.21. DoodleView package and import statements.
DoodleView Class for the Doodlz App—The Main Screen That’s Painted
Figure 9.21 lists the package and import statements and the fields for class DoodleView of the Doodlz app. The new classes and interfaces were discussed in Section 9.3 and are highlighted here.
DoodleView Fields, Constructor and onSizeChanged Method
Class DoodleView’s fields (Fig. 9.22, lines 29–36) are used to manage the data for the set of lines that the user is currently drawing and to draw those lines. The constructor (lines 39–54) initializes the class’s fields. Line 43 creates the Paint object paintScreen that will be used to display the user’s drawing on the screen and line 46 creates the Paint object paintLine that specifies the settings for the line(s) the user is currently drawing. Lines 47–51 specify the settings for the paintLine object. We pass true to Paint’s setAntiAlias method to enable anti-aliasing which smooths the edges of the lines. Next, we set the Paint’s style to Paint.Style.STROKE with Paint’s setStyle method. The style can be STROKE, FILL or FILL_AND_STROKE for a line, a filled shape without a border and a filled shape with a border, respectively. The default option is Paint.Style.FILL. We set the line’s width using Paint’s setStrokeWidth method. This sets the app’s default line width to five pixels. We also use Paint’s setStrokeCap method to round the ends of the lines with Paint.Cap.ROUND. Line 52 creates the pathMap, which maps each finger ID (known as a pointer) to a corresponding Path object for the lines currently being drawn. Line 53 creates the previousPointMap, which maintains the last point for each finger—as each finger moves, we draw a line from its current point to its previous point.
25 // the main screen that is painted
26 public class DoodleView extends View
27 {
28 // used to determine whether user moved a finger enough to draw again
29 private static final float TOUCH_TOLERANCE = 10;
30
31 private Bitmap bitmap; // drawing area for display or saving
32 private Canvas bitmapCanvas; // used to draw on bitmap
33 private Paint paintScreen; // use to draw bitmap onto screen
34 private Paint paintLine; // used to draw lines onto bitmap
35 private HashMap<Integer, Path> pathMap; // current Paths being drawn
36 private HashMap<Integer, Point> previousPointMap; // current Points
37
38 // DoodleView constructor initializes the DoodleView
39 public DoodleView(Context context, AttributeSet attrs)
40 {
41 super(context, attrs); // pass context to View's constructor
42
43 paintScreen = new Paint(); // used to display bitmap onto screen
44
45 // set the initial display settings for the painted line
46 paintLine = new Paint();
47 paintLine.setAntiAlias(true); // smooth edges of drawn line
48 paintLine.setColor(Color.BLACK); // default color is black
49 paintLine.setStyle(Paint.Style.STROKE); // solid line
50 paintLine.setStrokeWidth(5); // set the default line width
51 paintLine.setStrokeCap(Paint.Cap.ROUND); // rounded line ends
52 pathMap = new HashMap<Integer, Path>();
53 previousPointMap = new HashMap<Integer, Point>();
54 } // end DoodleView constructor
55
56 // Method onSizeChanged creates BitMap and Canvas after app displays
57 @Override
58 public void onSizeChanged(int w, int h, int oldW, int oldH)
59 {
60 bitmap = Bitmap.createBitmap(getWidth(), getHeight(),
61 Bitmap.Config.ARGB_8888);
62 bitmapCanvas = new Canvas(bitmap);
63 bitmap.eraseColor(Color.WHITE); // erase the BitMap with white
64 } // end method onSizeChanged
65
Fig. 9.22. DoodleView fields, constructor and overridden onSizeChanged method.
The DoodleView’s size is not determined until it’s inflated and added to the Doodlz Activity’s View hierarchy; therefore, we can’t determine the size of the drawing Bitmap in onCreate. So, lines 58–64 override View method onSizeChanged, which is called when the DoodleView’s size changes—e.g., when it’s added to an Activity’s View hierarchy or when the user device rotates the device. In this app, onSizeChanged is called only when the DoodleView is added to the Doodlz Activity’s View hierarchy, because the app always displays in portrait mode (Fig. 9.4). Bitmap’s static createBitmap method creates a Bitmap of the specified width and height—here we use the DoodleView’s width and height as the Bitmap’s dimensions. The last argument to createBitmap is the Bitmap’s encoding, which specifies how each pixel in the Bitmap is stored. The constant Bitmap.Config.ARGB_8888 indicates that each pixel’s color is stored in four bytes (one byte each for the alpha, red, green and blue values of the pixel’s color. Next, we create a new Canvas that is used to draw shapes directly to the Bitmap. Finally, we use Bitmap’s eraseColor method to fill the Bitmap with white pixels—the default Bitmap background is black.
Methods clear, setDrawingColor, getDrawingColor, setLineWidth and getLineWidth of Class DoodleView
Figure 9.23 defines methods clear (lines 67–73), setDrawingColor (lines 76–79), getDrawingColor (lines 82–85), setLineWidth (lines 88–91) and getLineWidth (lines 94–97), which are called from the Doodlz Activity. Method clear empties the pathMap and previousPointMap, erases the Bitmap by setting all of its pixels to white, then calls the inherited View method invalidate to indicate that the View needs to be redrawn. Then, the system automatically determines when the View’s onDraw method should be called. Method setDrawingColor changes the current drawing color by setting the color of the Paint object paintLine. Paint’s setColor method receives an int that represents the new color in ARGB format. Method getDrawingColor returns the current color, which we use in the Choose Color Dialog. Method setLineWidth sets paintLine’s stroke width to the specified number of pixels. Method getLineWidth returns the current stroke width, which we use in the Choose Line Width Dialog.
66 // clear the painting
67 public void clear()
68 {
69 pathMap.clear(); // remove all paths
70 previousPointMap.clear(); // remove all previous points
71 bitmap.eraseColor(Color.WHITE); // clear the bitmap
72 invalidate(); // refresh the screen
73 } // end method clear
74
75 // set the painted line's color
76 public void setDrawingColor(int color)
77 {
78 paintLine.setColor(color);
79 } // end method setDrawingColor
80
81 // return the painted line's color
82 public int getDrawingColor()
83 {
84 return paintLine.getColor();
85 } // end method getDrawingColor
86
87 // set the painted line's width
88 public void setLineWidth(int width)
89 {
90 paintLine.setStrokeWidth(width);
91 } // end method setLineWidth
92
93 // return the painted line's width
94 public int getLineWidth()
95 {
96 return (int) paintLine.getStrokeWidth();
97 } // end method getLineWidth
98
Fig. 9.23. DoodleView clear, setDrawingColor, getDrawingColor, setLineWidth and getLineWidth methods.
Overriding View Method OnDraw
When a View needs to be redrawn, it’s onDraw method is called. Figure 9.24 overrides onDraw to display bitmap (the Bitmap that contains the drawing) on the DoodleView by calling the Canvas argument’s drawBitmap method. The first argument is the Bitmap to draw, the next two arguments are the x-y coordinates where the upper-left corner of the Bitmap should be placed on the View and the last argument is the Paint object that specifies the drawing characteristics. Lines 107–108 then loop through each Integer key in the pathMap HashMap. For each, we pass the corresponding Path to Canvas’s drawPath method to draw each Path to the screen using the paintLine object, which defines the line width and color.
99 // called each time this View is drawn
100 @Override
101 protected void onDraw(Canvas canvas)
102 {
103 // draw the background screen
104 canvas.drawBitmap(bitmap, 0, 0, paintScreen);
105
106 // for each path currently being drawn
107 for (Integer key : pathMap.keySet())
108 canvas.drawPath(pathMap.get(key), paintLine); // draw line
109 } // end method onDraw
110
Fig. 9.24. DoodleView overridden onDraw method.
Overriding View Method onTouchEvent
Method OnTouchEvent (Fig. 9.25) is called when the View receives a touch event. Android supports multitouch—that is, having multiple fingers touching the screen. The user can touch the screen with more fingers or remove fingers from the screen at any time. For this reason, each finger—known as a pointer—has a unique ID that identifies it across touch events. We’ll use that ID to locate the corresponding Path objects that represent each line currently being drawn. These Paths are stored in pathMap.
111 // handle touch event
112 @Override
113 public boolean onTouchEvent(MotionEvent event)
114 {
115 // get the event type and the ID of the pointer that caused the event
116 int action = event.getActionMasked(); // event type
117 int actionIndex = event.getActionIndex(); // pointer (i.e., finger)
118
119 // determine which type of action the given MotionEvent
120 // represents, then call the corresponding handling method
121 if (action == MotionEvent.ACTION_DOWN ||
122 action == MotionEvent.ACTION_POINTER_DOWN)
123 {
124 touchStarted(event.getX(actionIndex), event.getY(actionIndex),
125 event.getPointerId(actionIndex));
126 } // end if
127 else if (action == MotionEvent.ACTION_UP ||
128 action == MotionEvent.ACTION_POINTER_UP)
129 {
130 touchEnded(event.getPointerId(actionIndex));
131 } // end else if
132 else
133 {
134 touchMoved(event);
135 } // end else
136
137 invalidate(); // redraw
138 return true; // consume the touch event
139 } // end method onTouchEvent
140
Fig. 9.25. DoodleView overridden onTouchEvent method.
MotionEvent’s getActionMasked method (line 116) returns an int representing the MotionEvent type, which you can use with constants from class MotionEvent to determine how to handle each event. MotionEvent’s getActionIndex method returns an integer index representing which finger caused the event. This index is not the finger’s unique ID—it’s simply the index at which that finger’s information is located in this MotionEvent object. To get the finger’s unique ID that persists across MotionEvents until the user removes that finger from the screen, we’ll use MotionEvent’s getPointerID method (lines 125 and 130), passing the finger index as an argument.
If the action is MotionEvent.ACTION_DOWN or MotionEvent.ACTION_POINTER_DOWN (lines 121–122), the user touched the screen with a new finger. The first finger to touch the screen generates a MotionEvent.ACTION_DOWN event, and all other fingers generate MotionEvent.ACTION_POINTER_DOWN events. For these cases, we call the touchStarted method (Fig. 9.26) to store the initial coordinates of the touch. If the action is MotionEvent.ACTION_UP or MotionEvent.ACTION_POINTER_UP, the user removed a finger from the screen, so we call method touchEnded (Fig. 9.28) to draw the completed Path to the bitmap so that we have a permanent record of that Path. For all other touch events, we call method touchMoved (Fig. 9.27) to draw the lines. After the event is processed, line 137 calls the inherited View method invalidate to redraw the screen, and line 138 returns true to indicate that the event has been processed.
141 // called when the user touches the screen
142 private void touchStarted(float x, float y, int lineID)
143 {
144 Path path; // used to store the path for the given touch id
145 Point point; // used to store the last point in path
146
147 // if there is already a path for lineID
148 if (pathMap.containsKey(lineID))
149 {
150 path = pathMap.get(lineID); // get the Path
151 path.reset(); // reset the Path because a new touch has started
152 point = previousPointMap.get(lineID); // get Path's last point
153 } // end if
154 else
155 {
156 path = new Path(); // create a new Path
157 pathMap.put(lineID, path); // add the Path to Map
158 point = new Point(); // create a new Point
159 previousPointMap.put(lineID, point); // add the Point to the Map
160 } // end else
161
162 // move to the coordinates of the touch
163 path.moveTo(x, y);
164 point.x = (int) x;
165 point.y = (int) y;
166 } // end method touchStarted
167
Fig. 9.26. DoodleView touchStarted method.
168 // called when the user drags along the screen
169 private void touchMoved(MotionEvent event)
170 {
171 // for each of the pointers in the given MotionEvent
172 for (int i = 0; i < event.getPointerCount(); i++)
173 {
174 // get the pointer ID and pointer index
175 int pointerID = event.getPointerId(i);
176 int pointerIndex = event.findPointerIndex(pointerID);
177
178 // if there is a path associated with the pointer
179 if (pathMap.containsKey(pointerID))
180 {
181 // get the new coordinates for the pointer
182 float newX = event.getX(pointerIndex);
183 float newY = event.getY(pointerIndex);
184
185 // get the Path and previous Point associated with
186 // this pointer
187 Path path = pathMap.get(pointerID);
188 Point point = previousPointMap.get(pointerID);
189
190 // calculate how far the user moved from the last update
191 float deltaX = Math.abs(newX - point.x);
192 float deltaY = Math.abs(newY - point.y);
193
194 // if the distance is significant enough to matter
195 if (deltaX >= TOUCH_TOLERANCE || deltaY >= TOUCH_TOLERANCE)
196 {
197 // move the path to the new location
198 path.quadTo(point.x, point.y, (newX + point.x) / 2,
199 (newY + point.y) / 2);
200
201 // store the new coordinates
202 point.x = (int) newX;
203 point.y = (int) newY;
204 } // end if
205 } // end if
206 } // end for
207 } // end method touchMoved
208
Fig. 9.27. DoodleView touchMoved method.
209 // called when the user finishes a touch
210 private void touchEnded(int lineID)
211 {
212 Path path = pathMap.get(lineID); // get the corresponding Path
213 bitmapCanvas.drawPath(path, paintLine); // draw to bitmapCanvas
214 path.reset(); // reset the Path
215 } // end method touchEnded
216
Fig. 9.28. DoodleView touchEnded method.
touchStarted Method of Class DoodleView
The utility method touchStarted (Fig. 9.26) is called when a finger first touches the screen. The coordinates of the touch and its ID are supplied as arguments. If a Path already exists for the given ID (line 148), we call Path’s reset method to clear any existing points so we can reuse the Path for a new stroke. Otherwise, we create a new Path, add it to pathMap, then add a new Point to the previousPointMap. Lines 163–165 call Path’s moveTo method to set the Path’s starting coordinates and specify the new Point’s x and y values.
touchMoved Method of Class DoodleView
The utility method touchMoved (Fig. 9.27) is called when the user moves one or more fingers across the screen. The system MotionEvent passed from onTouchEvent contains touch information for multiple moves on the screen if they occur at the same time. MotionEvent method getPointerCount (line 172) returns the number of touches this MotionEvent describes. For each, we store the finger’s ID (line 175) in pointerID, and store the finger’s corresponding index in this MotionEvent (line 176) in pointerIndex. Then we check whether there’s a corresponding Path in the pathMap HashMap (line 179). If so, we use MotionEvent’s getX and getY methods to get the last coordinates for this drag event for the specified pointerIndex. We get the corresponding Path and last Point for the pointerID from each respective HashMap, then calculate the difference between the last point and the current point—we want to update the Path only if the user has moved a distance that’s greater than our TOUCH_TOLERANCE constant. We do this because many devices are sensitive enough to generate MotionEvents indicating small movements when the user is attempting to hold a finger motionless on the screen. If the user moved a finger further than the TOUCH_TOLERANCE, we use Path’s quadTo method (lines 198–199) to add a geometric curve (specifically a quadratic bezier curve) from the previous Point to the new Point. We then update the most recent Point for that finger.
touchEnded Method of Class DoodleView
The utility method touchEnded (Fig. 9.28) is called when the user lifts a finger from the screen. The method receives the ID of the finger (lineID) for which the touch just ended as an argument. Line 212 gets the corresponding Path. Line 213 calls the bitmapCanvas’s drawPath method to draw the Path on the Bitmap object named bitmap before we call Path’s reset method to clear the Path. Resetting the Path does not erase its corresponding painted line from the screen, because those lines have already been drawn to the bitmap that’s displayed to the screen. The lines that are currently being drawn by the user are displayed on top of that bitmap.
saveImage Method
The saveImage method (Fig. 9.29) saves the current drawing to a file in the device’s gallery. [Note: It’s possible that the image will not immediately appear in the gallery. For example, Android scans storage for new media items like images, videos and music when a device is first powered on. Some devices scan for new media in the background. In an AVD, you can run the AVD’s Dev Tools app and touch its Media Scanner option, then the new image will appear in the gallery.]
217 // save the current image to the Gallery
218 public void saveImage()
219 {
220 // use "Doodlz" followed by current time as the image file name
221 String fileName = "Doodlz" + System.currentTimeMillis();
222
223 // create a ContentValues and configure new image's data
224 ContentValues values = new ContentValues();
225 values.put(Images.Media.TITLE, fileName);
226 values.put(Images.Media.DATE_ADDED, System.currentTimeMillis());
227 values.put(Images.Media.MIME_TYPE, "image/jpg");
228
229 // get a Uri for the location to save the file
230 Uri uri = getContext().getContentResolver().insert(
231 Images.Media.EXTERNAL_CONTENT_URI, values);
232
233 try
234 {
235 // get an OutputStream to uri
236 OutputStream outStream =
237 getContext().getContentResolver().openOutputStream(uri);
238
239 // copy the bitmap to the OutputStream
240 bitmap.compress(Bitmap.CompressFormat.JPEG, 100, outStream);
241
242 // flush and close the OutputStream
243 outStream.flush(); // empty the buffer
244 outStream.close(); // close the stream
245
246 // display a message indicating that the image was saved
247 Toast message = Toast.makeText(getContext(),
248 R.string.message_saved, Toast.LENGTH_SHORT);
249 message.setGravity(Gravity.CENTER, message.getXOffset() / 2,
250 message.getYOffset() / 2);
251 message.show(); // display the Toast
252 } // end try
253 catch (IOException ex)
254 {
255 // display a message indicating that the image was saved
256 Toast message = Toast.makeText(getContext(),
257 R.string.message_error_saving, Toast.LENGTH_SHORT);
258 message.setGravity(Gravity.CENTER, message.getXOffset() / 2,
259 message.getYOffset() / 2);
260 message.show(); // display the Toast
261 } // end catch
262 } // end method saveImage
263 } // end class DoodleView
Fig. 9.29. DoodleView saveImage method.
We use "Doodlz" followed by current time as the image’s file name. Line 224 creates a new ContentValues object, which will be used by a ContentResolver to specify the image’s title (i.e., file name), the date the image was created and the MIME type of the image ("image/jpg" in this example). For more information on MIME types, visit
www.w3schools.com/media/media_mimeref.asp
ContentValues method put adds a key-value pair to a ContentValues object. The key Images.Media.TITLE (line 225) is used to specify fileName as the image file name. The key Images.Media.DATE_ADDED (line 226) is used to specify the time when this file was saved to the device. The key Images.Media.MIME_TYPE (line 227) is used to specify the file’s MIME type as a JPEG image.
Lines 230–231 get this app’s ContentResolver, then call its insert method to get a Uri where the image will be stored. The constant Images.Media.EXTERNAL_CONTENT_URI indicates that we want to store the image on the device’s external storage device—typically an SD card if one is available. We pass our ContentValues as the second argument to create a file with our supplied file name, creation date and MIME type. Once the file is created we can write the screenshot to the location provided by the returned Uri. To do so, we get an OutputStream that allows us to write to the specified Uri (lines 236–237). Next, we invoke class Bitmap’s compress method, which receives a constant representing the compression format (Bitmap.CompressFormat.JPEG), an integer representing the quality (100 indicates the best quality image) and the OutputStream where the image’s bytes should be written. Then lines 243–244 flush and close the OutputStream, respectively.
If the file is saved successfully, we use a Toast to indicate that the image was saved (lines 247–251); otherwise, we use a Toast to indicate that there was an error when saving the image (lines 256–260). Toast method makeText receives as arguments the Context on which the Toast is displayed, the message to display and the duration for which the Toast will be displayed. Toast method setGravity specifies where the Toast will appear. The constant Gravity.CENTER indicates that the Toast should be centered over the coordinates specified by the method’s second and third arguments. Toast method show displays the Toast.
9.6. Wrap-Up
In this app, you learned how to turn a device’s screen into a virtual canvas. You set the app’s target SDK to "11" to enable a pre-Android 3.0 app to use Android 3.0’s holographic user interface components and to integrate the app menu into Android 3.0’s action bar, when the app runs on an Android 3.0 device. You processed sensor events—such as those generated by a device’s accelerometer—by registering a SensorEventListener with the system’s SensorManager service. We displayed dialogs with complex GUIs in objects of class Dialog. We also used a thread-safe AtomicBoolean to help determine when a dialog was already on the screen so that our sensor event handler would not display another dialog.
You learned how to create custom ARGB Colors with alpha, red, green and blue components and how to extract those individual components from an existing Color. We drew lines onto Bitmaps using associated Canvas objects, then displayed those Bitmaps on the screen. You also saved a Bitmap as an image in the device’s gallery.
As the user dragged one or more fingers on the screen, we stored the information for each finger as a Path. We processed the touch events by overriding the View method onTouchEvent and using its MotionEvent parameter to get the type of touch event that occurred and the ID of the finger that generated the event.
You learned how to save an image into the device’s gallery by getting an OutputStream from a ContentResolver. Finally, you used a Toast to display a message that automatically disappears after a short period of time.
In Chapter 10, we build the Address Book app, which provides quick and easy access to stored contact information and the ability to delete contacts, add contacts and edit existing contacts. The user can scroll through an alphabetical contact list, add contacts and view more information about individual contacts. Touching a contact’s name displays a screen showing the contact’s detailed information.
Self-Review Exercises
9.1. Fill in the blanks in each of the following statements:
a. Android 3.0’s look-and-feel is called the __________.
b. You use the SensorManager to register the sensor changes that your app should receive and to specify the __________ that will handle those sensor-change events.
c. A Path object (package android.graphics) represents a geometric path consisting of line segments and __________.
d. You use the type of the touch event to determine whether the user has touched the screen, __________ or lifted a finger from the screen.
e. Use class SensorManager’s __________ method to stop listening for accelerometer events.
f. Override SensorEventListener method __________ to process accelerometer events.
g. Use Dialog’s __________ method to close a dialog.
h. When a View needs to be redrawn, its __________ method is called.
i. MotionEvent’s __________ method returns an int representing the MotionEvent type, which you can use with constants from class MotionEvent to determine how to handle each event.
j. The utility method __________ is called when the user moves one or more fingers across the screen.
k. Toast method __________ receives as arguments the Context on which the Toast is displayed, the message to display and the duration for which the Toast will be displayed.
9.2. State whether each of the following is true or false. If false, explain why.
a. We use the standard SeekBar thumb in our apps, but you can customize it by setting the SeekBar’s android:seekBar attribute to a drawable resource, such as an image.
b. You unregister the accelerometer event handler when the app is sent to the foreground.
c. Call the inherited View method validate to indicate that the View needs to be redrawn.
d. If the action is MotionEvent.ACTION_DOWN or MotionEvent.ACTION_POINTER_DOWN, the user touched the screen with the same finger.
e. Resetting the Path erases its corresponding painted line from the screen, because those lines have already been drawn to the bitmap that’s displayed to the screen.
Answers to Self-Review Exercises
a. holographic theme.
b. SensorEventListener.
c. curves.
d. dragged across the screen.
e. unregisterListener.
f. onSensorChanged.
g. dismiss.
h. onDraw.
i. getActionMasked.
j. touchMoved.
k. makeText.
a. False. We use the standard SeekBar thumb in our apps, but you can customize it by setting the SeekBar’s android:thumb attribute to a drawable resource, such as an image.
b. False. You unregister the accelerometer event handler when the app is sent to the background.
c. False. Call the inherited View method invalidate to indicate that the View needs to be redrawn.
d. False. If the action is MotionEvent.ACTION_DOWN or MotionEvent.ACTION_POINTER_DOWN, the user touched the screen with a new finger.
e. False. Resetting the Path does not erase its corresponding painted line from the screen, because those lines have already been drawn to the bitmap that’s displayed to the screen.
Exercises
9.3. Fill in the blanks in each of the following statements:
a. Most Android devices have a(n) __________ that allows apps to detect movement.
b. A(n) __________ (package android.widget) displays a message for a short time, then disappears from the screen.
c. The __________ monitors the accelerometer to detect device movement.
d. SensorManager’s __________ constant represents the acceleration due to gravity on earth.
e. You register to receive accelerometer events using SensorManager’s registerListener method, which receives three arguments: the SensorEventListener object that will respond to the events, a Sensor representing the type of sensor data the app wishes to receive and __________.
f. You pass true to Paint’s __________ method to enable anti-aliasing which smooths the edges of the lines.
g. Method __________ sets paintLine’s stroke width to the specified number of pixels.
h. Android supports __________—that is, having multiple fingers touching the screen.
i. Utility method __________ is called when the user lifts a finger from the screen. The method receives the ID of the finger for which the touch just ended as an argument.
9.4 State whether each of the following is true or false. If false, explain why.
a. In Android, sensor events are handled in the GUI thread.
b. The alpha component specifies the Color’s transparency with 0 representing completely transparent and 100 representing completely opaque.
c. For accelerometer events, the SensorEvent parameter values array contains three elements representing the acceleration (in meter/second2) in the x (left/right), y (up/down) and z (forward/backward) directions.
d. Method onProgressChanged is called once when the user drags a SeekBar’s thumb.
e. To get the finger’s unique ID that persists across MotionEvents until the user removes that finger from the screen, you use MotionEvent’s getID method, passing the finger index as an argument.
f. The system MotionEvent passed from onTouchEvent contains touch information for multiple moves on the screen if they occur at the same time.
g. Toast method setLocation specifies where the Toast will appear. The constant Gravity.CENTER indicates that the Toast should be centered over the coordinates specified by the method’s second and third arguments. Toast method show displays the Toast.
h. Use a ToastMessage to display a message that automatically disappears after a short period of time.
9.5 (Enhanced Doodlz App) Make the following enhancements to the Doodlz app:
a. Allow the user to select a background color. The erase capability should use the selected background color. Clearing the entire image should return the background to the default white background.
b. Allow the user to select a background image on which to draw. Clearing the entire image should return the background to the default white background. The erase capability should use the default white background color.
c. Use pressure to determine transparency of color or thickness of line. Class MotionEvent has methods that allow you to get the pressure of the touch.
d. Add the ability to draw rectangles and ovals. Options should include whether the shape is filled or hollow. The user should be able to specify the line thickness for each shape’s border and the shape’s fill color.
e. Advanced: When the user selects a background image on which to draw, the erase capability should reveal the original background image pixels in the erased location.
9.6. (Hangman Game App) Recreate the classic word game Hangman using the Android robot icon rather than a stick figure. (For the Android logo terms of use, visit www.android.com/branding.html). At the start of the game, display a dashed line with one dash representing each letter in the word. As a hint to the user, provide either a category for the word (e.g., sport or landmark) or the word’s definition. Ask the user to enter a letter. If the letter is in the word, place it in the location of the corresponding dash. If the letter is not part of the word, draw part of the Android robot on the screen (e.g., the robot’s head). For each incorrect answer, draw another part of the Android robot. The game ends when the user completes the word or the entire Android Robot is drawn to the screen.
9.7. (Fortune Teller App) The user “asks a question” then shakes the phone to find a fortune (e.g., “probably not,” “looks promising,” “ask me again later.” etc.
9.8. (Block Breaker Game) Display several columns of blocks in red, yellow, blue and green. Each column should have blocks of each color randomly placed. Blocks can be removed from the screen only if they are in groups of two or more. A group consists of blocks of the same color that are vertically and/or horizontally adjacent. When the user taps a group of blocks, the group disappears and the blocks above move down to fill the space. The goal is to clear all of the blocks from the screen. More points should be awarded for larger groups of blocks.
9.9. (Enhanced Block Breaker Game) Modify the Block Breaker game in Exercise 9.8 as follows:
a. Provide a timer—the user wins by clearing the blocks in the alotted time. Add more blocks to the screen the longer it takes the user to clear the screen.
b. Add multiple levels. In each level, the alotted time for clearing the screen decreases.
c. Provide a continous mode in which as the user clears blocks, a new row of blocks is added. If the space below a given block is empty, the block should drop into that space. In this mode, the game ends when the user cannot remove any more blocks.
d. Keep track of the high scores in each game mode.
9.10. (Word Search App) Create a grid of letters that fills the screen. Hidden in the grid should be at least ten words. The words may be horizontal, vertical or diagonal, and, in each case, forwards, backwards, up or down. Allow the user to highlight the words by dragging a finger across the letters on the screen or tapping each letter of the word. Include a timer. The less time it takes the user to complete the game, the higher the score. Keep track of the high scores.
9.11. (Fractal App) Research how to draw fractals and develop an app that draws them. Provide options that allow the user to control the number of levels of the fractal and its colors.
9.12. (Kaleidascope App) Create an app that simulates a kaleidascope. Allow the user to shake the device to redraw the screen.
9.13. (Labyrinth Game App: Open Source) Check out the open-source Android app, Amazed, on the Google Code site (http://apps-for-android.googlecode.com/svn/trunk/Amazed/). In this game, the user maneuvers a marble through a maze by tilting the device in various directions. Possible modifications and enhancements include: adding a timer to keep track of how fast the user completes the game, improving the graphics, adding sounds and adding more puzzles of varying difficulty.
9.14. (Game of Snake App) Research the Game of Snake online and develop an app that allows a user to play the game.