
11. Route Tracker App
Objectives
In this chapter you’ll:
• Test an app that uses GPS location data in the Android Emulator and use the Eclipse DDMS perspective to send sample GPS data to the emulator.
• Use the external Maps API framework and the MapActivity and MapView classes to display Google Maps™ generated by Google web services.
• Get a Google Maps™ API key unique to your development computer.
• Use location services and the LocationManager class to receive information on the device’s position and bearing (direction).
• Display the user’s route using an Overlay on a MapView and GPS location data received in the form of Location objects.
• Orient a map to the user’s current bearing.
• Use the PowerManager to keep the device awake.
11.2 Test-Driving the Route Tracker App
11.4 Building the GUI and Resource Files
11.4.3 Route Tracker Layout: main.xml
11.5.1 RouteTracker Subclass of MapActivity
11.5.2 BearingFrameLayout Subclass of FrameLayout
11.5.3 RouteOverlay Subclass of Overlay
Self-Review Exercises | Answers to Self-Review Exercises | Exercises
11.1. Introduction
As the user travels with an Android device, the Route Tracker app monitors the user’s location and bearing (i.e., direction), visually displaying a route on a map. The user touches the Start Tracking ToggleButton (a button that maintains on–off state) to begin tracking a route (Fig. 11.1(a)). This also changes the ToggleButton’s text to Stop Tracking and displays a green bar to indicate that the app is tracking a route. The map shifts as the user moves, keeping the user’s current location centered on the screen (Fig. 11.1(b)). The route is a red line with black dots appearing after every 10 GPS data points received by the app (Fig. 11.1(b)). When you use this app on an Android device, the map is oriented such that the route tracking line is pointed in the direction the user is traveling (known as the user’s bearing), and that direction points to the top of the device. The sample outputs in this chapter show the app running in the Android emulator, which does not emulate bearing data. The user can choose the Map or Satellite options in the app’s menu (Fig. 11.2(a)) to change the map styles. Touching Map displays a Google™ Maps street map—the app’s default. Touching Satellite displays a satellite image of the area around the user (Fig. 11.2(b)).
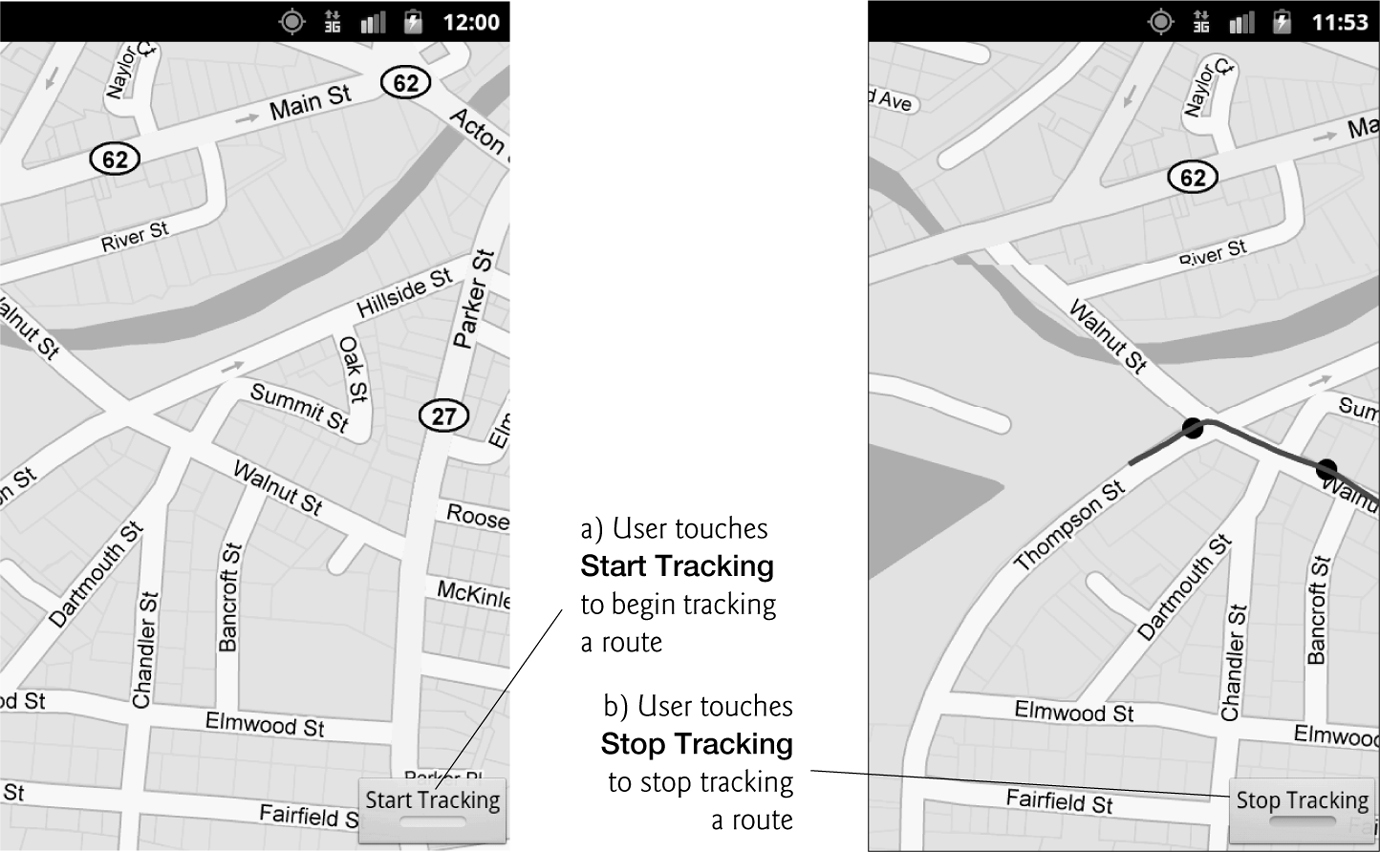
Fig. 11.1. Route Tracker app before and after the user touches Start Tracking.

Fig. 11.2. Menu allowing the user to select between map and satellite views and the app showing the satellite view after the user touches Satellite.
The user touches the Stop Tracking ToggleButton to stop tracking the current route. The app then displays a dialog containing the total distance traveled (in kilometers and miles) and the average speed (in KPH and MPH) over the entire route (Fig. 11.3).
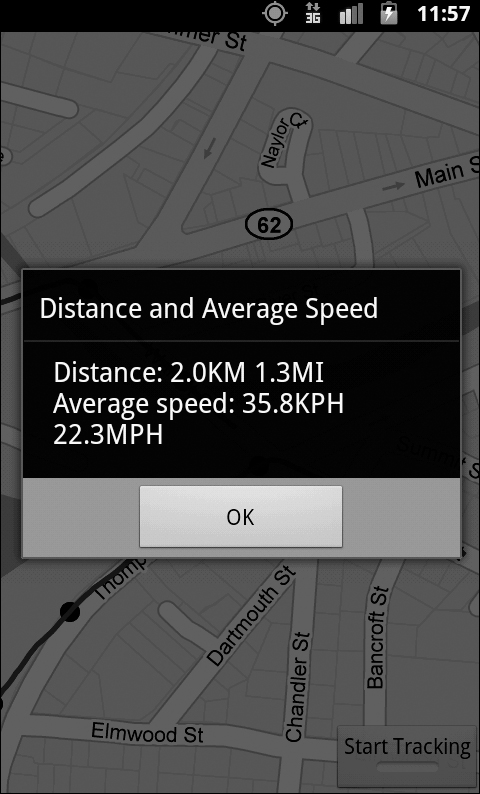
Fig. 11.3. After the user touches Stop Tracking, the route statistics are displayed.
11.2. Test-Driving the Route Tracker App
Importing the App
Open Eclipse and import the Route Tracker app project. To import the project:
1. Select File > Import... to display the Import dialog.
2. Expand the General node and select Existing Projects into Workspace, then click Next >.
3. To the right of the Select root directory: text field, click Browse..., then locate and select the Route Tracker folder.
4. Click Finish to import the project.
Obtaining a Google Maps API Key
To run this Route Tracker app or to create your own app using the Google Maps API, you’ll need to obtain a unique API key from Google. Before giving you a key, Google requires a “fingerprint” that uniquely identifies your development computer. Recall from Section 2.7 that apps must be signed with a digital certificate before they can be installed on a device. When you’re building and testing apps, the ADT Plugin handles this automatically by creating a debug certificate and using it to sign your apps. The fingerprint Google requires (known formally as an MD5 Fingerprint) can be generated from this debug certificate. The API key you get with this fingerprint can be used only for testing and debugging apps. If you’d like to learn more about MD5 encryption and MD5 fingerprints, visit:
en.wikipedia.org/wiki/Md5
en.wikipedia.org/wiki/Public_key_fingerprint
Be sure to carefully follow the instructions at:
code.google.com/android/add-ons/google-apis/mapkey.html
in the section called Getting the MD5 Fingerprint of the SDK Debug Certificate. Then, use the fingerprint value that’s produced at:
code.google.com/android/maps-api-signup.html
to get your unique Google Maps API key. If you intend to create an app for distribution, you’ll need to follow the instructions in the section Getting the MD5 Fingerprint of Your Signing Certificate on the first website above and get a separate Google Maps API key.
[Note: To test-drive this app, you must replace the value of the String resource named google_maps_api_key in the strings.xml file with your own Google Maps API key; otherwise, the app will run but won’t display maps or satellite images—known as map tiles.]
Running and Test-Driving the App on an Android Device
If you have an Android device with Internet access (which is required to receive the map images), ensure that it’s set up correctly for testing and debugging apps (as discussed in the Before You Begin section of the book) and connect the device to your computer. Right click the app’s project in the Eclipse Package Explorer window, then select Run As > Android Application from the menu that appears. If the Android Device Chooser window appears, select your device and click OK to install the app and run it on that device.
To acquire a GPS signal, your device must have line-of-sight with the GPS satellites—typically you must be outside to get this signal and acquiring the signal can take several minutes. Once the Route Tracker app is running on your device, go outside. When the device receives a GPS signal, you’ll see a Toast appear on the screen saying that the GPS signal has been acquired. At this point, touch Start Tracking and take a walk for a few minutes.
As you move, your route is marked with a red line. If your device supports bearing data, the app orients the map with the direction you’re facing aimed toward the top of the device—this will not be the case on devices that don’t support bearing data. Open the app’s menu and touch the Satellite item to display a satellite image rather than a standard street map. You can switch back to a street map by selecting the menu’s Map item. When you’ve finished your route, touch Stop Tracking. An AlertDialog displays your distance traveled and average speed. Touch the OK Button to close the alert and return to the map. You can browse the route you just completed by panning (dragging your finger on the map) and using pinch gestures to zoom in and out on the map. Touching Start Tracking again erases your route from the map and starts tracking a new route.
Running the App in an AVD
To run this app in an AVD, you’ll need to ensure that the AVD is configured to use the Google APIs for your Android platform version. To do so:
1. Open the Android SDK and AVD Manager.
2. Select one of your Android AVDs that you configured in the Before You Begin section (we used the one called NexusS) and click Edit....
3. In the Edit Android Virtual Device (AVD) window, select the Google APIs (Google Inc.) - API Level # from the Target drop-down list (where # represents the API level you’re targeting), then click Edit AVD. This indicates that the AVD should use both the Android APIs and the Google APIs for the selected API Level (e.g., API level 10 represents Android 2.3.3). If you prefer not to modify an existing AVD, you can create a separate AVD using the techniques in the Before You Begin section.
4. In the Android SDK and AVD Manager window, select the AVD and start it.
Next, right click the app’s project in the Eclipse Package Explorer window, then select Run As > Android Application from the menu that appears. If the Android Device Chooser window appears, select your AVD and click OK to install the app and run it on that AVD.
Sending GPS Data to an AVD with GPX Files
The Android emulator enables you to send GPS data to an AVD, so you can test your location-based apps without an actual Android device. To do so, you use a file containing GPS data in GPS Exchange Format. Such files typically end with the .gpx extension and are called GPX files. With the book’s examples, we’ve provided several GPX files (in the GPXfiles folder) that you can load and “play” from the ADT Plugin’s DDMS perspective. Doing so sends the GPS data to the selected AVD. These GPX files were recorded using a free app called GPSLogger, which can be found in the Android Market at:
market.android.com/details?id=com.mendhak.gpslogger
The GPS data in the GPX files represent short driving trips in Massachusetts. The GPSLogger tool produces files in GPX version 1.0 format, but the Android emulator uses GPX version 1.1 format data. There are many tools online for converting between these and other GPS data formats. We used the tool at:
www.gpsbabel.org
which allowed us to open each file and save it in GPX 1.1 format.
To send GPS data from a GPX file to an AVD, perform the following steps:
1. Once the app is running in the AVD, in Eclipse select Window > Open Perspective > DDMS to switch to the DDMS perspective.
2. In the Devices tab, select your AVD.
3. In the Emulator Control tab, click the GPX tab.
4. Click the Load GPX... button, then locate and select one of the GPX files in the GPXFiles folder located with the book’s examples and click Open.
5. In the bottom half of the GPX tab, select the file you just opened and click the play (![]() ) button to begin sending the file’s GPS data to the selected AVD.
) button to begin sending the file’s GPS data to the selected AVD.
In the AVD, touch Start Tracking then watch the route get updated as the app receives the sample GPS data. When you touch Stop Tracking, the app displays an alert showing the distance traveled and average speed for the sample data the app received.
11.3. Technologies Overview
This section presents the new technologies that we use in the Route Tracker app in the order in which they’re encountered in the chapter.
New Features in AndroidManifest.xml
This app uses several new features in the app’s manifest file (discussed in Section 11.4):
• To access a nonstandard library—that is, one that’s not included with the core Android APIs, such as the Google Maps API—you must indicate the library’s name in the app’s manifest with a uses-library element nested in the application element.
• We’d like the app to use most of the screen to display maps, so we chose to hide the title bar by using one of the standard Android themes, which can be specified with the attribute android:theme in the activity element. A theme changes the look-and-feel of an app’s GUI. The predefined Android styles and themes are listed at:
developer.android.com/reference/android/R.style.html
• By default, shared Android services are not accessible to an app. Such services include those that allow an app to change power settings, obtain location data, control whether a device is allowed to sleep, and more. To access these services, you must request permission to use them in the manifest file with uses-permission elements nested in the root manifest element. When a user prepares to install an app, the operating system tells the user which permissions are being requested and asks the user to confirm whether they should be granted. If not, the app will not be installed. The complete list of permissions can be found at:
developer.android.com/reference/android/Manifest.permission.html
Class ToggleButton
A ToggleButton (package android.widget) maintains an on–off state. Initially, this app’s ToggleButton displays the text Start Tracking with a gray bar below it to indicate that the button is in the off state. The user can touch the button to start tracking a route. At that point, the ToggleButton’s text changes to Stop Tracking, the button shows a green bar below the text indicating that the button is in the on state and the app starts tracking a route. When the user touches the button again, it toggles back to the off state (changing its text back to Start Tracking), and the app stops tracking and displays a dialog showing the tracking results. ToggleButton is a subclass of CompoundButton. You handle CompoundButton events by implementing interface CompoundButton.OnCheckedChangeListener.
Classes MapActivity, MapView and Overlay
Package com.google.android.maps contains the classes that we used to interact with the Google Maps API. Class RouteTracker (Section 11.5.1) is a subclass of MapActivity—an Activity that manages a MapView (Section 11.5.2) for displaying maps obtained via the Google Maps API. MapViews support gestures to zoom and pan the map—any additional functionality must be added programmatically. To display data on a MapView, such as the line representing the route in this app, you create a subclass of Overlay (Section 11.5.3) and override its draw method. We use GeoPoints (Sections 11.5.1– and 11.5.3) to translate GPS data into points that can be used to re-center the map based on the user’s location and to draw the route.
Location Data
Package android.location (Section 11.5.1) contains the classes and interfaces for acquiring and using location data. Class LocationManager provides access to the device’s location services. These are hardware dependent and can be used to periodically get updates on the device’s location or launch an Intent should the user travel with the device to a certain geographic region. Depending on your device, several location providers may be-supported—LocationManager provides capabilities for choosing the best one based on your app’s requirements, which you specify in a Criteria object. The settings that can be specified in a Criteria are accuracy, battery usage, bearing, speed, altitude and the monetary cost of the provider. Once you have a location provider, you can request updates from it and have them delivered to a LocationListener. The updates are delivered to the listener as Location objects that represent the device’s geographic location—these include latitude and longitude data, the time they were recorded and, depending on the location provider, may also include altitude and speed data (some devices don’t have sensors for these). To determine when the device has a GPS fix—that is, the device has “locked onto” enough GPS satellites to receive GPS data for tracking—we implement the GpsStatus.Listener interface.
Classes PowerManager and WakeLock
Class PowerManager (package android.os) enables an app to control the power state of an Android device. An app that changes the power settings can negatively affect the device’s battery life when the app is executing, so class PowerManager should be used sparingly. Once the user starts tracking a route, we want the app to record location data even if the screen is off. We use the PowerManager to acquire a WakeLock that prevents the device from sleeping so that the app can continue receiving GPS data (Section 11.5.1).
Programmatically Determining the Device’s Display Size
Class Display (package android.view) provide’s access to the device’s screen dimensions. We use these dimensions (Section 11.5.2) to help scale the maps so that they fill the screen as we rotate them to match the user’s current bearing.
11.4. Building the GUI and Resource Files
In this section, you’ll create the Route Tracker app’s resource files and GUI layout files. To save space, we do not show this app’s strings.xml resource file or the layout file for the app’s menu. You can view the contents of these files by opening them from the project in Eclipse.
11.4.1. Creating the Project
Begin by creating a new Android project named RouteTracker. Specify the following values in the New Android Project dialog, then press Finish:
• Build Target: Ensure that Google APIs for platform 2.3.3 (or later) is checked—this tells the ADT Plugin to include in the project both the Android APIs and the Google APIs for Android 2.3.3 (or the version you selected). The Google APIs include those for Google Maps.
• Application name: Route Tracker
• Package name: com.deitel.routetracker
• Create Activity: RouteTracker
• Min SDK Version: 8
11.4.2. AndroidManifest.xml
Figure 11.4 shows this app’s AndroidManifest.xml file. We’ve highlighted several new features in this manifest.
1 <?xml version="1.0" encoding="utf-8"?>
2 <manifest xmlns:android="http://schemas.android.com/apk/res/android"
3 package="com.deitel.routetracker" android:versionCode="1"
4 android:versionName="1.0">
5 <application android:icon="@drawable/icon"
6 android:label="@string/app_name" android:debuggable="true">
7 <uses-library android:name="com.google.android.maps" />
8 <activity android:name=".RouteTracker"
9 android:label="@string/app_name"
10 android:theme="@android:style/Theme.Black.NoTitleBar"
11 android:screenOrientation="portrait">
12 <intent-filter>
13 <action android:name="android.intent.action.MAIN" />
14 <category android:name="android.intent.category.LAUNCHER" />
15 </intent-filter>
16 </activity>
17
18 </application>
19 <uses-sdk android:minSdkVersion="8" android:targetSdkVersion="10"/>
20
21 <uses-permission android:name="android.permission.INTERNET" />
22 <uses-permission
23 android:name="android.permission.ACCESS_FINE_LOCATION" />
24 <uses-permission
25 android:name="android.permission.ACCESS_MOCK_LOCATION" />
26 <uses-permission android:name="android.permission.WAKE_LOCK" />
27 </manifest>
Fig. 11.4. AndroidManifest.xml.
Using an External Library
Line 7 declares that this app uses the Google Maps API library with a uses-library element nested in the application element.
Hiding the App’s Title Bar
Line 10 uses the attribute android:theme in the activity element to change the Activity’s theme to Theme.Black.NoTitleBar—a variation of the standard Android theme that simply hides the Activity’s title bar.
Requesting App Permissions
The uses-permission elements in lines 21–26 indicate that this app will work correctly only with the following permissions granted:
• android.permission.INTERNET: This app requires Internet access to download map and satellite images.
• android.permission.ACCESS_FINE_LOCATION: This app requires precise location data to show the user’s route on the map.
• android.permission.ACCESS_MOCK_LOCATION: This app should be able to receive mock data for testing purposes (as shown Section 11.2)—this is necessary only during app development, not in production apps.
• android.permission.WAKE_LOCK: This app needs access to the PowerManager to prevent the device from sleeping while the app is tracking a route.
For more information on Android’s permissions and security model, visit:
developer.android.com/guide/topics/security/security.html
11.4.3. Route Tracker Layout: main.xml
The Route Tracker app’s XML layout (Fig. 11.4) contains a FrameLayout (package android.widget), which by default stacks (that is, layers) its components with the most recently added component on top. Components are positioned in the FrameLayout’s upper-left corner, unless the gravity property is used to position them. This layout contains a ToggleButton in the bottom-right corner. We programmatically add to this layout an object of our BearingFrameLayout class, which contains the MapView on which we’ll display the route. The ToggleButton attributes android:textOn and android:textOff (lines 9–10) enable you to specify the text to display on the button in the on and off states, respectively.
1 <?xml version="1.0" encoding="utf-8"?>
2 <FrameLayout xmlns:android="http://schemas.android.com/apk/res/android"
3 android:id="@+id/mainLayout"
4 android:layout_width="match_parent"
5 android:layout_height="match_parent">
6 <ToggleButton android:id="@+id/trackingToggleButton"
7 android:layout_width="wrap_content"
8 android:layout_height="wrap_content"
9 android:textOn="@string/button_stop_tracking"
10 android:textOff="@string/button_start_tracking"
11 android:layout_gravity="bottom|right"></ToggleButton>
12 </FrameLayout>
Fig. 11.5. Layout for the RouteTracker subclass of MapActivity.
11.5. Building the App
This app consists of classes RouteTracker (the MapActivity subclass; Figs. 11.6–11.14), BearingFrameLayout (Figs. 11.15–11.19) and RouteOverlay (Figs. 11.20–11.23). As in prior apps, this app’s main Activity—RouteTracker—is created when you create the project, but you must change its superclass to MapActivity in the source code. You must add the other classes to the src/com.deitel.routetracker folder of the project.
1 // RouteTracker.java
2 // Main MapActivity for the RouteTracker app.
3 package com.deitel.routetracker;
4
5 import android.app.AlertDialog;
6 import android.content.Context;
7 import android.location.Criteria;
8 import android.location.GpsStatus;
9 import android.location.Location;
10 import android.location.LocationListener;
11 import android.location.LocationManager;
12 import android.os.Bundle;
13 import android.os.PowerManager;
14 import android.view.Gravity;
15 import android.view.Menu;
16 import android.view.MenuInflater;
17 import android.view.MenuItem;
18 import android.widget.CompoundButton;
19 import android.widget.CompoundButton.OnCheckedChangeListener;
20 import android.widget.FrameLayout;
21 import android.widget.Toast;
22 import android.widget.ToggleButton;
23
24 import com.google.android.maps.GeoPoint;
25 import com.google.android.maps.MapActivity;
26 import com.google.android.maps.MapController;
27 import com.google.android.maps.MapView;
28
29 public class RouteTracker extends MapActivity
30 {
31 private LocationManager locationManager; // gives location data
32 private MapView mapView; // displays a Google map
33 private MapController mapController; // manages map pan/zoom
34 private Location previousLocation; // previous reported location
35 private RouteOverlay routeOverlay; // Overlay that shows route on map
36 private long distanceTraveled; // total distance the user traveled
37 private BearingFrameLayout bearingFrameLayout; // rotates the MapView
38 private boolean tracking; // whether app is currently tracking
39 private long startTime; // time (in milliseconds) when tracking starts
40 private PowerManager.WakeLock wakeLock; // used to prevent device sleep
41 private boolean gpsFix; // whether we have a GPS fix for accurate data
42
43 private static final double MILLISECONDS_PER_HOUR = 1000 * 60 * 60;
44 private static final double MILES_PER_KILOMETER = 0.621371192;
45 private static final int MAP_ZOOM = 18; // Google Maps supports 1-21
46
Fig. 11.6. package and import statements, and instance variables of the RouteTracker MapActivity class.
11.5.1. RouteTracker Subclass of MapActivity
Class RouteTracker (Figs. 11.6–11.14) is the app’s Activity class. As discussed previously, the class extends MapActivity, because this Activity’s primary purpose is to display a MapView showing a Google Map. Like a ListActivity, a MapActivity provides support for its View’s lifecycle. Only one MapActivity per process is currently supported.
package and import Statements, and Fields of class RouteTracker
Figure 11.6 lists the package and import statements, and the fields of class RouteTracker. We’ve highlighted the import statements for the new classes and interfaces discussed in Section 11.3 and throughout Section 11.5.1. We’ll discuss the class’s instance variables and constants as we use them.
Overriding Activity Method onCreate
Figure 11.7 overrides Activity method onCreate. Lines 55–56 assign to instance variable bearingFrameLayout a new object of our BearingFrameLayout class (Section 11.5.2), which creates the MapView and rotates it to match the user’s bearing (direction). This allows the map to be pointed in the direction the user is moving—the bearing is not supported in the Android emulator. Line 64 gets the MapView from the BearingFrameLayout and assigns it to instance variable mapView. Line 65 gets mapView’s MapController using its getController method. You use a MapController to programmatically zoom in and out of the map and to change the geographic location appearing centered in the MapView. Line 66 uses MapController’s setZoom method to set the map’s zoom level (i.e., level of detail). Zoom levels can be in the range 1 (maximum zoom out) to 21 (maximum zoom in). As you zoom in, each successive zoom level decreases the amount of area shown on the map by a factor of two. Depending on your location, as you zoom in to see more details, Google may not have map images representing the most detailed maps—in this case, no map or satellite image will be displayed.
47 // Called when the activity is first created
48 @Override
49 public void onCreate(Bundle savedInstanceState)
50 {
51 super.onCreate(savedInstanceState);
52 setContentView(R.layout.main);
53
54 // create new MapView using your Google Maps API key
55 bearingFrameLayout = new BearingFrameLayout(this,
56 getResources().getString(R.string.google_maps_api_key));
57
58 // add bearingFrameLayout to mainLayout
59 FrameLayout mainLayout =
60 (FrameLayout) findViewById(R.id.mainLayout);
61 mainLayout.addView(bearingFrameLayout, 0);
62
63 // get the MapView and MapController
64 mapView = bearingFrameLayout.getMapview();
65 mapController = mapView.getController(); // get MapController
66 mapController.setZoom(MAP_ZOOM); // zoom in the map
67
68 // create map Overlay
69 routeOverlay = new RouteOverlay();
70
71 // add the RouteOverlay overlay
72 mapView.getOverlays().add(routeOverlay);
73
74 distanceTraveled = 0; // initialize distanceTraveled to 0
75
76 // register listener for trackingToggleButton
77 ToggleButton trackingToggleButton =
78 (ToggleButton) findViewById(R.id.trackingToggleButton);
79 trackingToggleButton.setOnCheckedChangeListener(
80 trackingToggleButtonListener);
81 } // end onCreate
82
Fig. 11.7. Overriding Activity method onCreate.
Line 69 assigns to instance variable routeOverlay a new object of our Overlay subclass RouteOverlay (Section 11.5.3), which is used to display the user’s route over a MapView. Next, line 72 gets mapView’s collection of Overlays and adds our routeOverlay to it. Each Overlay is displayed in the same orientation and scale as the map.
Line 74 sets instance variable distanceTraveled to 0. While tracking the route, the app updates distanceTraveled when each new GPS data point is received. Finally, lines 77–80 get the trackingToggleButton and register the trackingToggleButtonListener (Fig. 11.14) as its OnCheckedChangeListener.
Overriding Activity Methods onStart and onStop
Figure 11.8 overrides Activity methods onStart and onStop. Method onStart (lines 84–121) begins by configuring the Criteria object that represents an app’s requested features and settings for a location provider. Lines 91–95 call Criteria methods to specify the following settings:
• setAccuracy—the constant Criteria.ACCURACY_FINE indicates that the app requires precise GPS data so that it can report tracking data as close to the user’s actual location as possible. High-accuracy GPS data uses more power. If your app doesn’t require such accuracy, you can choose Criteria.ACCURACY_COARSE. As of Android 2.3, you can now select from three accuracy levels—Criteria.ACCURACY_HIGH, Criteria.ACCURACY_MEDIUM or Criteria.ACCURACY_LOW.
• setBearingRequired—the argument true indicates that bearing (direction) data is required. We use this data to orient the map such that the direction in which the user is moving points toward the top of the device.
• setCostAllowed—the argument true indicates that it’s OK for the app to use data services (such as the device’s Internet connection) that might incur costs to the user. Before doing this in an app that you’ll distribute, you should get the user’s permission to incur data costs.
• setPowerRequirement—location providers require different amounts of power to provide location data to your app. The argument Criteria.POWER_LOW indicates that the app should return a location provider that uses the least amount of power possible to provide the data the app requires. Other options are Criteria.NO_REQUIREMENT, Criteria.POWER_HIGH and Criteria.POWER_MEDIUM.
• setAltitudeRequired—the argument false indicates that this app does not require altitude data.
83 // called when Activity becoming visible to the user
84 @Override
85 public void onStart()
86 {
87 super.onStart(); // call super's onStart method
88
89 // create Criteria object to specify location provider's settings
90 Criteria criteria = new Criteria();
91 criteria.setAccuracy(Criteria.ACCURACY_FINE); // fine location data
92 criteria.setBearingRequired(true); // need bearing to rotate map
93 criteria.setCostAllowed(true); // OK to incur monetary cost
94 criteria.setPowerRequirement(Criteria.POWER_LOW); // try to conserve
95 criteria.setAltitudeRequired(false); // don't need altitude data
96
97 // get the LocationManager
98 locationManager =
99 (LocationManager) getSystemService(LOCATION_SERVICE);
100
101 // register listener to determine whether we have a GPS fix
102 locationManager.addGpsStatusListener(gpsStatusListener);
103
104 // get the best provider based on our Criteria
105 String provider = locationManager.getBestProvider(criteria, true);
106
107 // listen for changes in location as often as possible
108 locationManager.requestLocationUpdates(provider, 0, 0,
109 locationListener);
110
111 // get the app's power manager
112 PowerManager powerManager =
113 (PowerManager) getSystemService(Context.POWER_SERVICE);
114
115 // get a wakelock preventing the device from sleeping
116 wakeLock = powerManager.newWakeLock(
117 PowerManager.PARTIAL_WAKE_LOCK, "No sleep");
118 wakeLock.acquire(); // acquire the wake lock
119
120 bearingFrameLayout.invalidate(); // redraw the BearingFrameLayout
121 } // end method onStart
122
123 // called when Activity is no longer visible to the user
124 @Override
125 public void onStop()
126 {
127 super.onStop(); // call the super method
128 wakeLock.release(); // release the wakelock
129 } // end method onStop
130
Fig. 11.8. Overriding Activity methods onStart and onStop.
Lines 98–99 get the LocationManager system service and assign it to instance variable locationManager. Line 102 registers gpsStatusListener (Fig. 11.11) as the LocationManager’s GpsStatus.Lisener. We use this listener to determine when the device has a GPS fix—that is, the device has “locked onto” enough GPS satellites to receive GPS data for tracking.
LocationManager’s getBestProvider method (line 105) returns a String representing the name of the location provider that best meets the given Criteria. The true argument indicates that only an enabled provider should be returned.
We call LocationManager’s requestLocationUpdates method to register locationListener (Fig. 11.10) to listen for location changes from the specified provider. Passing 0 as the second argument (minimum time in milliseconds between location updates) and third argument (minimum distance in meters traveled between location updates) indicates that we’d like updates as often as possible, which we do only for demonstrations purposes. You typically should use positive values for each of these arguments to conserve battery power. It can take several minutes to acquire a GPS lock. For this reason, many GPS-based apps use LocationManager’s getLastKnownLocation method to get the location that was last reported when the device previously had a GPS fix (such as during a previous execution of the app). Most people spend their time in a relatively small geographical area, so this can be used to display a map that’s in relatively close proximity to the user’s actual location.
Lines 112–113 get the system’s PowerManager service. PowerManager’s newWakeLock method returns a new WakeLock object (lines 116–117). WakeLock’s acquire method (line 118) ensures that the device remains at the WakeLock’s required power level (at least) until its release method is called, at which time normal power operation is restored. This app uses the constant PowerManager.PARTIAL_WAKE_LOCK to indicate that this app should continue to use the CPU even if the user presses the power button on the device. It also allows the screen to dim and turn off l. This allows the app to continue tracking the route until the user presses the Stop Tracking ToggleButton. Information on the different available WakeLocks and their effects on battery consumption can be found at
developer.android.com/reference/android/os/PowerManager.html
Method onStop (lines 124–130) calls WakeLock’s release method to release the wakelock, indicating that we no longer need to prevent the device from sleeping and the device can return to its normal power level.
Method updateLocation
Method updateLocation (Fig. 11.9), which is called by our LocationListener (Fig. 11.10), receives a Location and updates the map and overlay accordingly. If the given location is not null and we have a GPS fix, we do all of the following:
• Call routeOverlay’s addPoint to add the given location to the route.
• If there’s a previousLocation, we use Location’s distanceTo method (line 143) to calculate the distance between the current location and the previousLocation and add this to the total distanceTraveled, which will be reported when the user stops tracking the route.
131 // update location on map
132 public void updateLocation(Location location)
133 {
134 if (location != null && gpsFix) // location not null; have GPS fix
135 {
136 // add the given Location to the route
137 routeOverlay.addPoint(location);
138
139 // if there is a previous location
140 if (previousLocation != null)
141 {
142 // add to the total distanceTraveled
143 distanceTraveled += location.distanceTo(previousLocation);
144 } // end if
145
146 // get the latitude and longitude
147 Double latitude = location.getLatitude() * 1E6;
148 Double longitude = location.getLongitude() * 1E6;
149
150 // create GeoPoint representing the given Locations
151 GeoPoint point =
152 new GeoPoint(latitude.intValue(), longitude.intValue());
153
154 // move the map to the current location
155 mapController.animateTo(point);
156
157 // update the compass bearing
158 bearingFrameLayout.setBearing(location.getBearing());
159 bearingFrameLayout.invalidate(); // redraw based on bearing
160 } // end if
161
162 previousLocation = location;
163 } // end method updateLocation
164
Fig. 11.9. updateLocation method of class RouteTracker.
• Get the latitude and longitude of the location and convert it to a GeoPoint (lines 147–152). A GeoPoint consists of a latitude and longitude measured in microdegrees (millionths of a degree). We use Location’s getLatitude and getLongitude methods to obtain these readings in degrees, multiplying each by 1E6 to convert them to microdegrees—we assign the results to latitude and longitude, respectively, then use these new values to create a GeoPoint with integer coordinates.
• MapController’s animateTo method (line 155) moves the center of the map to the given GeoPoint using a smooth animation. If you need to be notified when the animation is finished, you also can pass a Message or Runnable to this method.
• We use Location method getBearing (line 158) to obtain the bearing from the latest location. The bearing is returned as the numfber of degrees to the east of true north. Next, we use the bearingFrameLayout’s setBearing method to update the bearing so the map can be rotated accordingly and call the bearingFrameLayout’s invalidate method to redraw the map. [Note: It’s also possible to obtain the bearing by calling method bearingTo on the previous Location and passing the current Location as an argument. This would enable us to rotate the maps even when testing in an AVD.]
Regardless of whether location was null we save location as previousLocation to prepare to process the next location reading.
Anonymous LocationListener Class to Respond to LocationManager Events
Figure 11.10 defines our LocationListener. LocationListeners receive events from the LocationManager when the device’s physical location changes and when the location provider’s status changes. We enabled this capability with the call to requestLocationUpdates (Fig. 11.8, lines 108–109). Method onLocationChanged (lines 170–176) is called when the device receives an updated Location. We set gpsFix to true—if we’re receiving Locations, then the device has locked onto enough GPS satellites to get the user’s location. If the app is currently tracking a route, we call method updateLocation (Fig. 11.9) to add the new Location to the route. We provide empty methods that respond to changes in the location provider’s status (i.e., onProviderDisabled, onProviderEnabled and onStatusChanged) for the purpose of this app. If your app needs to respond to these events, you should define the methods accordingly.
165 // responds to events from the LocationManager
166 private final LocationListener locationListener =
167 new LocationListener()
168 {
169 // when the location is changed
170 public void onLocationChanged(Location location)
171 {
172 gpsFix = true; // if getting Locations, then we have a GPS fix
173
174 if (tracking) // if we're currently tracking
175 updateLocation(location); // update the location
176 } // end onLocationChanged
177
178 public void onProviderDisabled(String provider)
179 {
180 } // end onProviderDisabled
181
182 public void onProviderEnabled(String provider)
183 {
184 } // end onProviderEnabled
185
186 public void onStatusChanged(String provider,
187 int status, Bundle extras)
188 {
189 } // end onStatusChanged
190 }; // end locationListener
191
Fig. 11.10. LocationListener responds to LocationManager events.
Anonymous Inner Class That Implements GpsStatus.Listener to Respond to GpsStatus Events
Figure 11.11 defines an anonymous inner class that implements interface GpsStatus.Listener so we can determine when the device receive the first GPS fix. We don’t start tracking the route until this happens to ensure that our tracking is as accurate as possible. Line 197 determines whether the event was GpsStatus.GPS_EVENT_FIRST_FIX. If so, we set gpsFix to true, then display a Toast indicating that the device has locked onto enough GPS satellites to get the user’s location. If there’s another app on the device that started the GPS and received the first fix, then this app will not receive the first fix event. This is why we also set gpsFix to true in line 172.
192 // determine whether we have GPS fix
193 GpsStatus.Listener gpsStatusListener = new GpsStatus.Listener()
194 {
195 public void onGpsStatusChanged(int event)
196 {
197 if (event == GpsStatus.GPS_EVENT_FIRST_FIX)
198 {
199 gpsFix = true;
200 Toast results = Toast.makeText(RouteTracker.this,
201 getResources().getString(R.string.toast_signal_acquired),
202 Toast.LENGTH_SHORT);
203
204 // center the Toast in the screen
205 results.setGravity(Gravity.CENTER,
206 results.getXOffset() / 2, results.getYOffset() / 2);
207 results.show(); // display the results
208 } // end if
209 } // end method on GpsStatusChanged
210 }; // end anonymous inner class
211
Fig. 11.11. Anonymous inner class that implements GpsStatus.Listener to determine when the app is able to get a GPS fix to start receiving accurate GPS data.
Overriding MapActivity Method isRouteDisplayed
Figure 11.12 overrides MapActivity method isRouteDisplayed to return false. If your app displays route information such as driving directions, Google’s Terms of Use require that this method return true. You’ll be asked to agree to these terms when you register for your API key (code.google.com/android/add-ons/google-apis/mapkey.html).
212 // Google terms of use require this method to return
213 // true if you're displaying route information like driving directions
214 @Override
215 protected boolean isRouteDisplayed()
216 {
217 return false; // we aren't displaying route information
218 } // end method isRouteDisplayed
219
Fig. 11.12. Overriding MapActivity method isRouteDisplayed.
Overriding Activity Methods onCreateOptionsMenu and onOptionsItemSelected
Figure 11.13 overrides Activity methods onCreateOptionsMenu and onOptionsItemSelected. Method onCreateOptionsMenu uses a MenuInflater to create the app’s menu from route_tracker_menu.xml. When the user touches either menu item, method onOptionsItemSelected responds to the event. If the user chooses the Map MenuItem, line 238 calls MapView method setSatellite with the argument false to indicate that a standard map should be displayed. If the user chooses the Satellite MenuItem, line 241 calls setSatellite with the argument true to indicate that a satellite map should be displayed.
220 // create the Activity's menu from a menu resource XML file
221 @Override
222 public boolean onCreateOptionsMenu(Menu menu)
223 {
224 super.onCreateOptionsMenu(menu);
225 MenuInflater inflater = getMenuInflater();
226 inflater.inflate(R.menu.route_tracker_menu, menu);
227 return true;
228 } // end method onCreateOptionsMenu
229
230 // handle choice from options menu
231 @Override
232 public boolean onOptionsItemSelected(MenuItem item)
233 {
234 // perform appropriate task based on
235 switch (item.getItemId())
236 {
237 case R.id.mapItem: // the user selected "Map"
238 mapView.setSatellite(false); // display map image
239 return true;
240 case R.id.satelliteItem: // the user selected "Satellite"
241 mapView.setSatellite(true); // display satellite image
242 return true;
243 default:
244 return super.onOptionsItemSelected(item);
245 } // end switch
246 } // end method onOptionsItemSelected
247
Fig. 11.13. Overriding Activity methods onCreateOptionsMenu and onOptionsItemSelected.
Anonymous Inner Class That Implements OnCheckedChangeListener to Respond to trackingToggleButton’s Events
Figure 11.14 defines the OnCheckedChangeListener trackingToggleButtonListener, which responds to the events of the trackingToggleButton to either display the results for a finished route or start tracking a new route.
248 // listener for trackingToggleButton's events
249 OnCheckedChangeListener trackingToggleButtonListener =
250 new OnCheckedChangeListener()
251 {
252 // called when user toggles tracking state
253 @Override
254 public void onCheckedChanged(CompoundButton buttonView,
255 boolean isChecked)
256 {
257 // if app is currently tracking
258 if (!isChecked)
259 {
260 tracking = false; // just stopped tracking locations
261
262 // compute the total time we were tracking
263 long milliseconds = System.currentTimeMillis() - startTime;
264 double totalHours = milliseconds / MILLISECONDS_PER_HOUR;
265
266 // create a dialog displaying the results
267 AlertDialog.Builder dialogBuilder =
268 new AlertDialog.Builder(RouteTracker.this);
269 dialogBuilder.setTitle(R.string.results);
270
271 double distanceKM = distanceTraveled / 1000.0;
272 double speedKM = distanceKM / totalHours;
273 double distanceMI = distanceKM * MILES_PER_KILOMETER;
274 double speedMI = distanceMI / totalHours;
275
276 // display distanceTraveled traveled and average speed
277 dialogBuilder.setMessage(String.format(
278 getResources().getString(R.string.results_format),
279 distanceKM, distanceMI, speedKM, speedMI));
280 dialogBuilder.setPositiveButton(
281 R.string.button_ok, null);
282 dialogBuilder.show(); // display the dialog
283 } // end if
284 else
285 {
286 tracking = true; // app is now tracking
287 startTime = System.currentTimeMillis(); // get current time
288 routeOverlay.reset(); // reset for new route
289 bearingFrameLayout.invalidate(); // clear the route
290 previousLocation = null; // starting a new route
291 } // end else
292 } // end method onCheckChanged
293 }; // end anonymous inner class
294 } // end class RouteTracker
Fig. 11.14. trackingToggleButtonListener responds to trackingToggleButton’s events.
When the user touches the trackingToggleButton, the onCheckedChanged method is called with the current state of the button as the second argument. If it’s not checked (line 258), the app is not tracking, so lines 260–282 calculate and display the results. Lines 263–264 determine the totalHours the user was tracking the route, so we can use this to determine the user’s speed. Variable distanceTraveled represents the distance in meters. We divide this by 1000.0 (line 271) to determine the kilometers traveled. Line 272 then calculates kilometers/hour. Lines 273–274 calculate the distance in miles and miles/hour.
If trackingToggleButton is checked when the event occurs, the user has just started tracking a route. In this case, lines 286–290 indicate that the app is now tracking, get the start time for this route, reset the routeOverlay, invalidate the bearingFrameLayout (to clear the prior route, if any) and set previousLocation to null. When the user touches Stop Tracking, we toggle tracking back to false (line 282) to indicate that we’re no longer tracking. We compute the elapsed time totalMilliseconds by subtracting startTime from the value returned by System.currentMillis.
11.5.2. BearingFrameLayout Subclass of FrameLayout
Class BearingFrameLayout (Figs. 11.15–11.19) maintains the app’s MapView and orients it such that the user’s current bearing is always toward the top of the device.
1 // BearingFrameLayout.java
2 // Rotates MapView according to device's bearing.
3 package com.deitel.routetracker;
4
5 import com.google.android.maps.MapView;
6
7 import android.app.Activity;
8 import android.content.Context;
9 import android.graphics.Canvas;
10 import android.view.Display;
11 import android.widget.FrameLayout;
12
13 public class BearingFrameLayout extends FrameLayout
14 {
15 private int scale = 0; // amount to scale layout
16 private MapView mapView; // displays Google maps
17 private float bearing = 0f; // compass bearing
18
Fig. 11.15. package and import statements, and instance variables of class BearingFrameLayout.
package and import Statements, and Instance Variables
Figure 11.15 lists class BearingFrameLayout’s package statement, import statements and instance variables. Instance variable scale will be used to increase the MapView’s width and height to match the diagonal of the device’s screen. This ensures that the map fills the entire screen as it is rotated.
Method getChildLayoutParams
Figure 11.16 defines method getChildLayoutParams, which returns a LayoutParams object that represents how a child View should be laid out in a parent layout. LayoutParams are specific to Views and ViewGroups—e.g., LinearLayouts use a different LayoutParams subclass than do RelativeLayouts. Custom Views can define their own LayoutParams, should they need custom parameters. You’ve set various layout parameters using XML by specifying values such as match_parent or wrap_content for a GUI View’s width and/or height.
19 // returns layout parameters for MapView
20 public LayoutParams getChildLayoutParams()
21 {
22 Display display =
23 ((Activity) getContext()).getWindowManager().getDefaultDisplay();
24 int w = display.getWidth();
25 int h = display.getHeight();
26 scale = (int) Math.sqrt((w * w) + (h * h));
27
28 return new LayoutParams(scale, scale);
29 } // end method getChildLayoutParams
30
Fig. 11.16. getChildLayoutParams method of class BearingFrameLayout.
Lines 22–23 get the system’s default Display object, which represents the device’s screen. Class Display provides the size of the screen as well as its refresh rate and current orientation. Its getWidth and getHeight methods return the dimensions of the screen. We want our BearingMapView to be large enough to fill the screen as we rotate the MapView to match the current bearing. To ensure this, we scale the MapView so that its width and height match the screen’s diagonal, which is calculated at line 26. Otherwise, as we rotate the MapView, there would be black areas at the device’s corners, because the map tiles are rectangular.
Constructor
Figure 11.17 defines class BearingFrameLayout’s constructor. We call super’s constructor, passing it the context. We create a new MapView, passing it the Google Maps apiKey. Lines 37–43 configure the MapView as follows:
• setClickable—the argument true indicates that the user can interact with the MapView for zooming and panning. You must also enable the MapView.
• setEnabled—the argument true enables the MapView. If it’s not enabled, the user cannot interact with the map by touching it.
• setSatellite—the argument false initially displays the map using standard Google maps, not satellite images.
• setBuiltInZoomControls—the argument true enables the built-in MapView zoom controls.
• setLayoutParams—the LayoutParams argument specifies how the MapView should be configured in its parent layout; in this case, we use it to specify the dimensions of the MapView.
31 // public constructor for BearingFrameLayout
32 public BearingFrameLayout(Context context, String apiKey)
33 {
34 super(context); // call super constructor
35
36 mapView = new MapView(context, apiKey); // create new MapView
37 mapView.setClickable(true); // allow user interactions with the map
38 mapView.setEnabled(true); // enables the MapView to generate events
39 mapView.setSatellite(false); // display map image
40 mapView.setBuiltInZoomControls(true); // enable zoom controls
41
42 // set MapView's layout
43 mapView.setLayoutParams(getChildLayoutParams());
44 addView(mapView); // add MapView to this layout
45 } // end BearingFrameLayout constructor
46
Fig. 11.17. Constructor for class BearingFrameLayout.
Line 44 adds mapView as a child of the BearingFrameLayout.
Overriding View Method dispatchDraw
Figure 11.18 overrides View method dispatchDraw, which is called by a parent View’s draw method to display its child Views. You override this method to control how child Views should be displayed. It’s here that we rotate the View to match the current compass bearing.
47 // rotates the map according to bearing
48 @Override
49 protected void dispatchDraw(Canvas canvas)
50 {
51 if (bearing >= 0) // if the bearing is greater than 0
52 {
53 // get canvas dimensions
54 int canvasWidth = canvas.getWidth();
55 int canvasHeight = canvas.getHeight();
56
57 // dimensions of the scaled canvas
58 int width = scale;
59 int height = scale;
60
61 // center of scaled canvas
62 int centerXScaled = width / 2;
63 int centerYScaled = height / 2;
64
65 // center of screen canvas
66 int centerX = canvasWidth / 2;
67 int centerY = canvasHeight / 2;
68
69 // move center of scaled area to center of actual screen
70 canvas.translate(-(centerXScaled - centerX),
71 -(centerYScaled - centerY));
72
73 // rotate around center of screen
74 canvas.rotate(-bearing, centerXScaled, centerYScaled);
75 } // end if
76
77 super.dispatchDraw(canvas); // draw child Views of this layout
78 } // end method dispatchDraw
79
Fig. 11.18. Overriding View method dispatchDraw.
Lines 54–55 get the dimensions of the available drawing surface (which is the size of the given Canvas). We then scale the dimensions by the number calculated in method getLayoutParams and calculate the center points of the original and scaled dimensions (lines 58–67). [Note: Scaling the maps is not allowed per Google’s terms of service—we do this here only for demonstration purposes. There are other mapping APIs available that may have different terms of service.]
Next we move canvas’s centerpoint by the difference between the two points, since we are using the scaled dimensions for this View’s layout parameters (lines 70–71). Next, we rotate the Canvas around the new centerpoint by -bearing degrees (line 74). Recall that bearing represents the user’s direction in degrees to the east of true north. So if true north is toward the top of the device and you start moving northeast, the bearing will be a positive number of degrees toward the device’s upper-right corner. In this case, we want the map to rotate to the left by that number of degrees—this is why we get the negative of the rotation angle. Rotating the Canvas in dispatchDraw causes everything drawn to this View—including the Overlay that represents the route—to rotate based on the user’s bearing. Line 77 ensures that any other child Views are then drawn.
setBearing and getMapView
Figure 11.19 defines methods setBearing and getMapView of class BearingFrameLayout. Method setBearing sets the object’s bearing to its argument, and method getMapView returns the MapView. These are used from the RouteTracker class.
80 // set the compass bearing
81 public void setBearing(float bearing)
82 {
83 this.bearing = bearing;
84 } // end method setBearing
85
86 // return the MapView
87 public MapView getMapView()
88 {
89 return mapView;
90 } // end method getMapView
91 } // end class BearingFrameLayout
Fig. 11.19. setBearing and MapView methods of class BearingFrameLayout.
11.5.3. RouteOverlay Subclass of Overlay
Overlay subclass RouteOverlay (Figs. 11.20–11.23) maintains the tracked Location data and draws the route.
1 // RouteOverlay.java
2 // Draws route on MapView.
3 package com.deitel.routetracker;
4
5 import java.util.ArrayList;
6 import java.util.List;
7
8 import android.graphics.Canvas;
9 import android.graphics.Color;
10 import android.graphics.Paint;
11 import android.graphics.Path;
12 import android.graphics.Point;
13 import android.location.Location;
14
15 import com.google.android.maps.GeoPoint;
16 import com.google.android.maps.MapView;
17 import com.google.android.maps.Overlay;
18
19 public class RouteOverlay extends Overlay
20 {
21 private List<Location> locations; // stores Location tracking data
22 private Paint pathPaint; // Paint information for the Path
23 private Paint positionPaint; // Paint information for current position
24 private final int POSITION_MARKER = 10; // marker frequency
25
Fig. 11.20. package and import statements, and instance variables.
package and import Statements, and Instance Variables
Figure 11.20 lists class RouteOverlay’s package statement, import statements and instance variables. The constant POSITION_MARKER indicates how often a black dot will be displayed along the user’s route.
Constructor for Class RouteOverlay
Figure 11.21 defines class RouteOverlay’s constructor. Lines 29–33 define a Paint object that specifies the settings for drawing the line that represents the route. The call to Paint’s setAntiAlias method turns on antialiasing to smooth the line’s edges. We set the color to red, set the style to STROKE and set the line width to 5. The ArrayList<Location> called locations (line 34) holds the Locations along the tracked route. Lines 37–39 configure a second Paint object that’s used to display black circles every POSITION_MARKER number of locations.
26 public RouteOverlay()
27 {
28 // Paint for drawing Path as a red line with a width of 5
29 pathPaint = new Paint();
30 pathPaint.setAntiAlias(true);
31 pathPaint.setColor(Color.RED);
32 pathPaint.setStyle(Paint.Style.STROKE);
33 pathPaint.setStrokeWidth(5);
34 locations = new ArrayList<Location>(); // initialize points
35
36 // Paint for drawing black circle every POSITION_MARKER Locations
37 positionPaint = new Paint();
38 positionPaint.setAntiAlias(true);
39 positionPaint.setStyle(Paint.Style.FILL);
40 } // end RouteOverlay constructor
41
Fig. 11.21. Constructor for class RouteOverlay.
Methods addPoint and reset
Figure 11.22 defines methods addPoint and reset. Each time the RouteTracker receives a new location event, it passes the Location to addPoint, which adds it to the ArrayList<Location>. Method reset is called by RouteTracker to clear the previous list of Locations when the user starts tracking a new route.
42 // add new Location to List of Locations
43 public void addPoint(Location location)
44 {
45 locations.add(location);
46 } // end method addPoint
47
48 // reset the Overlay for tracking a new route
49 public void reset()
50 {
51 locations.clear(); // delete all prior Locations
52 } // end method reset
53
Fig. 11.22. addPoint and reset methods of class RouteOverlay.
Overriding Overlay Method draw
Figure 11.23 overrides Overlay method draw to display the tracked route on the MapView. The method receives a Canvas (canvas), a MapView (mapView) and a boolean shadow and immediately calls the superclass’s draw method. This method is called first with true passed as the last argument, so the Overlay draws its shadow layer, then the method is called again with false to draw the overlay itself. The shadow layer typically shows shadows for items like the map markers that Google displays when you search using Google Maps.
54 // draw this Overlay on top of the given MapView
55 @Override
56 public void draw(Canvas canvas, MapView mapView, boolean shadow)
57 {
58 super.draw(canvas, mapView, shadow); // call super's draw method
59 Path newPath = new Path(); // get a new Path
60 Location previous = null; // initialize previous Location to null
61
62 // for each Location
63 for (int i = 0; i < locations.size(); ++i)
64 {
65 Location location = locations.get(i);
66
67 // convert Location to GeoPoint
68 Double newLatitude = location.getLatitude() * 1E6;
69 Double newLongitude = location.getLongitude() * 1E6;
70 GeoPoint newPoint = new GeoPoint(newLatitude.intValue(),
71 newLongitude.intValue());
72
73 // convert the GeoPoint to point on the screen
74 Point newScreenPoints = new Point();
75 mapView.getProjection().toPixels(newPoint, newScreenPoints);
76
77 if (previous != null) // if this is not the first Location
78 {
79 // get GeoPoint for the previous Location
80 Double oldLatitude = previous.getLatitude() * 1E6;
81 Double oldLongitude = previous.getLongitude() * 1E6;
82 GeoPoint oldPoint = new GeoPoint(oldLatitude.intValue(),
83 oldLongitude.intValue());
84
85 // convert the GeoPoint to point on the screen
86 Point oldScreenPoints = new Point();
87 mapView.getProjection().toPixels(oldPoint, oldScreenPoints);
88
89 // add the new point to the Path
90 newPath.quadTo(oldScreenPoints.x, oldScreenPoints.y,
91 (newScreenPoints.x + oldScreenPoints.x) / 2,
92 (newScreenPoints.y + oldScreenPoints.y) / 2);
93
94 // possibly draw a black dot for current position
95 if ((i % POSITION_MARKER) == 0)
96 canvas.drawCircle(newScreenPoints.x, newScreenPoints.y, 10,
97 positionPaint);
98 } // end if
99 else
100 {
101 // move to the first Location
102 newPath.moveTo(newScreenPoints.x, newScreenPoints.y);
103 } // end else
104
105 previous = location; // store location
106 } // end for
107
108 canvas.drawPath(newPath, pathPaint); // draw the path
109 } // end method draw
110 } // end class RouteOverlay
Fig. 11.23. Overriding View method draw.
We draw the route as a Path, so line 59 first creates a new Path object. Next we set the previous Location to null, because we rebuild the Path each time draw is called. Then, for every Location in the points ArrayList<Location>, we perform the following tasks:
• Get the next Location from locations (line 65).
• Create the GeoPoint for that Location (lines 68–71), using the same technique as in Fig. 11.9.
• Convert the GeoPoint for the Location to a point on the screen (lines 74–75). MapView’s getProjection method provides a Projection that converts between pixel coordinates and geographic coordinates. It’s important to use this method to get the updated Projection because each time the MapView redraws, the Projection may change. Projection’s toPixels method takes a GeoPoint and a Point. The pixel coordinates matching the screen location where the GeoPoint’s latitude and longitude are displayed are inserted into the Point.
If the Location previous is not null, we prepare the next line segment of the route:
• Lines 80–87 get the GeoPoint for the previous Location and convert it to a point on the screen.
• Lines 90–92 use Path method quadTo to add (as a quadratic Bezier curve) the next line segment to the Path.
• Lines 95–97 draw a circle if the current Location index (i) is divisible by the constant POSITION_MARKER.
If previous is null, we’re processing the first Location in the list, so line 102 simply uses the Path’s moveTo method to move to the Point specified by newScreenPoints. At the end of the for statement, lines 105 stores the current location in variable previous for the next iteration of the loop. After processing all the Locations, we draw the newPath to the canvas.
11.6. Wrap-Up
In this chapter, you created the Route Tracker app that enabled users to track their movements and see them displayed as a line on a Google Map. The app used several new features in the manifest file. To access the Google Maps API library you indicated the library’s name in the app’s manifest with a uses-library element. You removed the Activity’s title bar by changing the Activity’s theme with the attribute android:theme in the activity element. You also specified uses-permission elements to request permission to use various system services required for this app to work correctly.
You used a ToggleButton to maintain an on–off state representing whether the app was currently tracking the user’s route. You handled the ToggleButton’s events by implementing interface CompoundButton.OnCheckedChangeListener.
You used various classes from package com.google.android.maps to interact with the Google Maps API. You extended class MapActivity to create an Activity that managed a MapView. To display data on the MapView, you created a subclass of Overlay and overrode its draw method. You used GeoPoints to translate GPS data into points for re-centering the map based on the user’s location and for drawing the user’s route.
For location data, you used features of package android.location. Class LocationManager provided access to the device’s location services and chose the best location provider based on the requirements you specified in a Criteria object. You then requested updates from that provider and had them delivered to a LocationListener. That object received the updates as Locations representing the device’s geographic location. To determine when the device had a GPS fix, you implemented the GpsStatus.Listener interface.
Class PowerManager enabled the app to control a device’s power state so that the app could record location data even if the screen was off. You used class Display to obtain the device’s screen dimensions, then scaled the maps so that they filled the screen as they were rotated to match the user’s bearing.
In Chapter 12, we build the Slideshow app, which allows the user to create and display slideshows using images and music. The app will allow the user to access the Android device’s music and photo libraries. The user can add new photos to the slideshow and choose a song to play during the slideshow.
Self-Review Exercises
11.1. Fill in the blanks in each of the following statements:
a. Class __________ provides access to the device’s location services.
b. To determine when the device has a GPS fix—that is, the device has “locked onto” enough GPS satellites to receive GPS data for tracking—we implement the __________ interface.
c. Class __________ (package android.view) provide’s access to the device’s screen dimensions.
d. The permission __________ indicates that an app requires Internet access to download map and satellite images.
e. You use a(n) __________ to programmatically zoom in and out of a map and to change the geographic location appearing centered in the MapView.
f. MapController’s method moves the center of the map to the given GeoPoint using a smooth animation.
11.2 State whether each of the following is true or false. If false, explain why.
a. To create your own app using the Google Maps API, you’ll need to obtain a unique API key from Google.
b. If you’d like your app to use most of the screen to display maps, you can hide the title bar by using the Activity class’s hideTitleBar method.
c. Shared Android services include those that allow an app to change power settings, obtain location data, control whether a device is allowed to sleep, and more.
d. MapViews support gestures to zoom and pan the map—any additional functionality must be added programmatically.
e. LocationManager’s getBestProvider method returns a String representing the name of the location provider that best meets the given Criteria. The true argument indicates that only an enabled provider should be returned.
f. Class PowerState enables the app to control a device’s power state so that, for example, the app can record location data even if the screen is off.
Answers to Self-Review Exercises
a. LocationManager.
b. GpsStatus.Listener.
c. Display.
d. android.permission.INTERNET.
e. MapController.
f. animateTo.
a. True.
b. False. If you’d like your app to use most of the screen to display maps, you can hide the title bar by using one of the standard Android themes, which can be specified with the attribute android:theme in the activity element. A theme changes the look-and-feel of an app’s GUI.
c. True.
d. True.
e. True.
f. False. Class PowerManager enables the app to control a device’s power state.
Exercises
11.3. Fill in the blanks in each of the following statements:
a. To access a nonstandard library—that is, one that’s not included with the core Android APIs, such as the Google Maps API—you must indicate the library’s name in the app’s manifest with a(n) __________ element nested in the application element.
b. To access shared Android services, you must request permission to use them in the manifest file with __________ elements nested in the root manifest element. When a user prepares to install an app, the operating system tells the user which permissions are being requested and asks the user to confirm whether they should be granted. If not, the app will not be installed.
c. To display data on a MapView, such as the line representing the route in this app, you create a subclass of __________ and override its draw method.
d. Once you have a location provider, you can request updates from it and have them delivered to a LocationListener. The updates are delivered to the listener as objects that represent the device’s geographic location—these include latitude and longitude data, the time they were recorded and, depending on the location provider, may also include altitude and speed data (some devices don’t have sensors for these).
e. Many GPS-based apps use LocationManager’s __________ method to get the location that was last reported when the device previously had a GPS fix (such as during a previous execution of the app).
f. Class LocationManager provides access to the device’s location services and chooses the best location provider based on the requirements you specify in a(n) __________ object. To determine when the device has a GPS fix, you implement the GpsStatus.Listener interface.
11.4. State whether each of the following is true or false. If false, explain why.
a. Apps must be signed with a digital certificate before they can be installed on a device. When you’re building and testing apps, the ADT Plugin handles this automatically by creating a debug certificate and using it to sign your apps.
b. Depending on your device, several location providers may be supported—LocationManager provides capabilities for choosing the best one based on your app’s requirements, which you specify in a Requirements object.
c. An app that changes the power settings can negatively affect the device’s battery life when the app is executing, so class PowerManager should be used frequently.
d. The permission android.permission.WAKE_LOCK indicates that this app needs access to the PowerManager to prevent the device from sleeping while the app is tracking a route.
e. High-accuracy GPS data uses less power. If your app doesn’t require such accuracy, you can choose Criteria.ACCURACY_COARSE.
f. A GeoPoint consists of a latitude and longitude measured in degrees.
11.5. (Enhanced Route Tracker App) Make the following enhancements to the Route Tracker app.
a. Show the elapsed time from the start of the route.
b. Mark the starting position of the route with a green flag and the ending position with a red flag.
c. Allow the user to save favorite routes and view them on the map.
d. Some users might like to use this app to track their best times jogging a specific route. With each saved route, store the user’s best time. When the user selects that route from the saved routes, display the user’s best time for that route.
e. Allow the user to draw a new route on a map and save it as a favorite.
f. Allow the user to track the distance walked or traveled on a given day.
g. Add a calorie counter.
h. Add a pedometer. [Hint: Use the accelerometer to determine when the device shakes enough to indicate that the user took a step.]
11.6. (Location-Based Ringer App) Create an app that uses location-based services to turn your ringer to silent or vibrate. If the app determines that you are at work or a theater, for example, it will automatically switch the ringer to vibrate. Enable the user to save favorite locations and to indicate whether the phone should ring or vibrate for each location.
Location-Based Exercises That Require Web Services
The following location-based app exercises require web services (Chapter 14) so that you can obtain additional information for use in the apps. The full exercise descriptions appear in Chapter 14.
11.7. (Enhanced Weather Viewer App) Exercise 14.6 asks you to enhance Chapter 14’s Weather Viewer app to use location-based services and alerts to warn users about severe weather nearby.
11.8 (Twitter App) Exercise 14.8 asks you to investigate the Twitter APIs, then use the APIs in an app that, among its features, can geo-tag tweets so readers can see the location when the tweet was posted.
11.9. (Enhanced Shopping List App) Exercise 14.9 asks you to enhance Exercise 10.9 with location services so that the user is alerted when near a business that offers an item or service on the shopping list.
11.10. (Enhanced News Aggregator App) Exercise 14.18 asks you to enhance the News Aggregator app of Exercise 14.17 by allowing the user to select a location on a map then displaying the headlines from the multiple news sources for that region.
11.11. (Shopping Mashup App) Exercise 14.19 asks you to create a location-based shopping app using APIs from CityGrid® (www.citygridmedia.com/developer/) or a similar shopping service.
11.12. (Daily Deals Mashup App) Exercise 14.20 asks you to create a location-based daily deals app using Groupon APIs (www.groupon.com/pages/api) or those of a similar service.
11.13. (Wine Country Mashup App) Exercise 14.21 asks you to create a location-based app using a mapping API to help a wine enthusiast plan a trip to wine country.