
J. Other Topics
Objectives
In this appendix you’ll:
• Learn what collections are.
• Use class Arrays for array manipulations.
• Understand how type-wrapper classes enable programs to process primitive data values as objects.
• Use prebuilt generic data structures from the collections framework.
• Use iterators to “walk through” a collection.
• Learn fundamental file- and stream-processing concepts.
• What threads are and why they’re useful.
• How threads enable you to manage concurrent activities.
• To create and execute Runnables.
• Fundamentals of thread synchronization.
• How multiple threads can update Swing GUI components in a thread-safe manner.
J.3 Type-Wrapper Classes for Primitive Types
J.4 Interface Collection and Class Collections
J.5.3 Views into Collections and Arrays Method asList
J.10 Introduction to Files and Streams
J.12 Introduction to Object Serialization
J.13 Introduction to Multithreading
J.14 Creating and Executing Threads with the Executor Framework
J.15 Overview of Thread Synchronization
J.16 Concurrent Collections Overview
Self-Review Exercises | Answers to Self-Review Exercises | Exercises
J.1. Introduction
This appendix presents several additional topics to support the Android portion of the book. Sections J.2–J.9 present an overview of the Java collections framework and several examples of working with various collections that we use in our Android apps. Sections J.10–J.12 introduce file and stream concepts, overview method of class File and discuss object-serialization for writing entire objects to streams and reading entire objects from streams. Finally, Sections J.13–J.17 present the fundamentals of multithreading.
J.2. Collections Overview
Section E.12 introducted the generic ArrayList collection—a resizable array-like data structure that stores references to objects of a type that you specify when you create the ArrayList. We now continue our discussion of the Java collections framework, which contains many other prebuilt generic data structures and various methods for manipulating them. We focus on those that are used in the Android chapters of this book and those that have close parallels in the Android APIs. For complete details of the collections framework, visit
download.oracle.com/javase/6/docs/technotes/guides/collections/
A collection is a data structure—actually, an object—that can hold references to other objects. Usually, collections contain references to objects that are all of the same type. The collections-framework interfaces declare the operations to be performed generically on various types of collections. Figure J.1 lists some of the interfaces of the collections framework. Several implementations of these interfaces are provided within the framework. You may also provide implementations specific to your own requirements.

Fig. J.1. Some collections-framework interfaces.
Because you specify the type to store in a collection at compile time, generic collections provide compile-time type safety that allows the compiler to catch attempts to use invalid types. For example, you cannot store Employees in a collection of Strings. Some examples of collections are the cards you hold in a card game, your favorite songs stored in your computer, the members of a sports team and the real-estate records in your local registry of deeds (which map book numbers and page numbers to property owners).
J.3. Type-Wrapper Classes for Primitive Types
Each primitive type (listed in Appendix L) has a corresponding type-wrapper class in package java.lang. These classes are called Boolean, Byte, Character, Double, Float, Integer, Long and Short. These enable you to manipulate primitive-type values as objects. Java’s reusable data structures manipulate and share objects—they cannot manipulate variables of primitive types. However, they can manipulate objects of the type-wrapper classes, because every class ultimately derives from Object.
Each of the numeric type-wrapper classes—Byte, Short, Integer, Long, Float and Double—extends class Number. Also, the type-wrapper classes are final classes, so you cannot extend them.
Primitive types do not have methods, so the methods related to a primitive type are located in the corresponding type-wrapper class (e.g., method parseInt, which converts a String to an int value, is located in class Integer). If you need to manipulate a primitive value in your program, first refer to the documentation for the type-wrapper classes—the method you need might already be declared.
Autoboxing and Auto-Unboxing
Java provides boxing and unboxing conversions to automatically convert between primitive-type values and type-wrapper objects. A boxing conversion converts a value of a primitive type to an object of the corresponding type-wrapper class. An unboxing conversion converts an object of a type-wrapper class to a value of the corresponding primitive type. These conversions are performed automatically (called autoboxing and auto-unboxing), allowing primitive-type values to be used where type-wrapper objects are expected and vice versa.
J.4. Interface Collection and Class Collections
Interface Collection is the root interface in the collection hierarchy from which interfaces Set, Queue and List are derived. Interface Set defines a collection that does not contain duplicates. Interface Queue defines a collection that represents a waiting line—typically, insertions are made at the back of a queue and deletions from the front, though other orders can be specified. We discuss Queue and Set in Sections J.7—J.8. Interface Collection contains bulk operations (i.e., operations performed on an entire collection) for operations such as adding, clearing and comparing objects (or elements) in a collection. A Collection can also be converted to an array. In addition, interface Collection provides a method that returns an Iterator object, which allows a program to walk through the collection and remove elements from it during the iteration. We discuss class Iterator in Section J.5.1. Other methods of interface Collection enable a program to determine a collection’s size and whether a collection is empty. Class Collections provides static methods that search, sort and perform other operations on collections. Section J.6 discusses the methods that are available in class Collections.
 Software Engineering Observation J.1
Most collection implementations provide a constructor that takes a Collection argument, thereby allowing a new collection to be constructed containing the elements of the specified collection.
J.5. Lists
A List is an ordered Collection that can contain duplicate elements. Like array indices, List indices are zero based (i.e., the first element’s index is zero). In addition to the methods inherited from Collection, interface List provides methods for manipulating elements via their indices, manipulating a specified range of elements, searching for elements and obtaining a ListIterator to access the elements.
Interface List is implemented by several classes, including ArrayList (introduced in Appendix E) and LinkedList. Class ArrayList is a resizable-array implementation of List. Inserting an element between existing elements of an ArrayList is an inefficient operation—all elements after the new one must be moved out of the way, which could be an expensive operation in a collection with a large number of elements. A LinkedList enables efficient insertion (or removal) of elements in the middle of a collection. The following two subsections demonstrate various List and Collection capabilities.
J.5.1. ArrayList and Iterator
Figure J.2 uses an ArrayList (introduced in Section E.12) to demonstrate several capabilities of interface Collection. The program places two Color arrays in ArrayLists and uses an Iterator to remove elements in the second ArrayList collection from the first.
1 // Fig. J.2: CollectionTest.java
2 // Collection interface demonstrated via an ArrayList object.
3 import java.util.List;
4 import java.util.ArrayList;
5 import java.util.Collection;
6 import java.util.Iterator;
7
8 public class CollectionTest
9 {
10 public static void main( String[] args )
11 {
12 // add elements in colors array to list
13 String[] colors = { "MAGENTA", "RED", "WHITE", "BLUE", "CYAN" };
14 List< String > list = new ArrayList< String >();
15
16 for ( String color : colors )
17 list.add( color ); // adds color to end of list
18
19 // add elements in removeColors array to removeList
20 String[] removeColors = { "RED", "WHITE", "BLUE" };
21 List< String > removeList = new ArrayList< String >();
22
23 for ( String color : removeColors )
24 removeList.add( color );
25
26 // output list contents
27 System.out.println( "ArrayList: " );
28
29 for ( int count = 0; count < list.size(); count++ )
30 System.out.printf( "%s ", list.get( count ) );
31
32 // remove from list the colors contained in removeList
33 removeColors( list, removeList );
34
35 // output list contents
36 System.out.println( "
ArrayList after calling removeColors: " );
37
38 for ( String color : list )
39 System.out.printf( "%s ", color );
40 } // end main
41
42 // remove colors specified in collection2 from collection1
43 private static void removeColors( Collection< String > collection1,
44 Collection< String > collection2 )
45 {
46 // get iterator
47 Iterator< String > iterator = collection1.iterator();
48
49 // loop while collection has items
50 while ( iterator.hasNext() )
51 {
52 if ( collection2.contains( iterator.next() ) )
53 iterator.remove(); // remove current Color
54 } // end while
55 } // end method removeColors
56 } // end class CollectionTest
ArrayList:
MAGENTA RED WHITE BLUE CYAN
ArrayList after calling removeColors:
MAGENTA CYAN
Fig. J.2. Collection interface demonstrated via an ArrayList object.
Lines 13 and 20 declare and initialize String arrays colors and removeColors. Lines 14 and 21 create ArrayList<String> objects and assign their references to List<String> variables list and removeList, respectively. We refer to the ArrayLists in this example via List variables. This makes our code more flexible and easier to modify. If we later decide that LinkedLists would be more appropriate, we’ll need to modify only lines 14 and 21 where we created the ArrayList objects.
Lines 16–17 populate list with Strings stored in array colors, and lines 23–24 populate removeList with Strings stored in array removeColors using List method add. Lines 29–30 output each element of list. Line 29 calls List method size to get the number of elements in the ArrayList. Line 30 uses List method get to retrieve individual element values. Lines 29–30 also could have used the enhanced for statement (which we’ll demonstrate with collections in other examples).
Line 33 calls method removeColors (lines 43–55), passing list and removeList as arguments. Method removeColors deletes the Strings in removeList from the Strings in list. Lines 38–39 print list’s elements after removeColors completes its task.
Method removeColors declares two Collection<String> parameters (lines 43–44) that allow any two Collections containing strings to be passed as arguments to this method. The method accesses the elements of the first Collection (collection1) via an Iterator. Line 47 calls Collection method iterator to get an Iterator for the Collection. Interfaces Collection and Iterator are generic types. The loop-continuation condition (line 50) calls Iterator method hasNext to determine whether the Collection contains more elements. Method hasNext returns true if another element exists and false otherwise.
The if condition in line 52 calls Iterator method next to obtain a reference to the next element, then uses method contains of the second Collection (collection2) to determine whether collection2 contains the element returned by next. If so, line 53 calls Iterator method remove to remove the element from the Collection collection1.
 Common Programming Error J.1
If a collection is modified after an iterator is created for that collection, the iterator immediately becomes invalid—operations performed with the iterator after this point throw ConcurrentModificationExceptions. For this reason, iterators are said to be “fail fast.”
J.5.2. LinkedList
Figure J.3 demonstrates various operations on LinkedLists. The program creates two LinkedLists of Strings. The elements of one List are added to the other. Then all the Strings are converted to uppercase, and a range of elements is deleted.
1 // Fig. 20.3: ListTest.java
2 // Lists, LinkedLists and ListIterators.
3 import java.util.List;
4 import java.util.LinkedList;
5 import java.util.ListIterator;
6
7 public class ListTest
8 {
9 public static void main( String[] args )
10 {
11 // add colors elements to list1
12 String[] colors =
13 { "black", "yellow", "green", "blue", "violet", "silver" };
14 List< String > list1 = new LinkedList< String >();
15
16 for ( String color : colors )
17 list1.add( color );
18
19 // add colors2 elements to list2
20 String[] colors2 =
21 { "gold", "white", "brown", "blue", "gray", "silver" };
22 List< String > list2 = new LinkedList< String >();
23
24 for ( String color : colors2 )
25 list2.add( color );
26
27 list1.addAll( list2 ); // concatenate lists
28 list2 = null; // release resources
29 printList( list1 ); // print list1 elements
30
31 convertToUppercaseStrings( list1 ); // convert to uppercase string
32 printList( list1 ); // print list1 elements
33
34 System.out.print( "
Deleting elements 4 to 6..." );
35 removeItems( list1, 4, 7 ); // remove items 4-6 from list
36 printList( list1 ); // print list1 elements
37 printReversedList( list1 ); // print list in reverse order
38 } // end main
39
40 // output List contents
41 private static void printList( List< String > list )
42 {
43 System.out.println( "
list: " );
44
45 for ( String color : list )
46 System.out.printf( "%s ", color );
47
48 System.out.println();
49 } // end method printList
50
51 // locate String objects and convert to uppercase
52 private static void convertToUppercaseStrings( List< String > list )
53 {
54 ListIterator< String > iterator = list.listIterator();
55
56 while ( iterator.hasNext() )
57 {
58 String color = iterator.next(); // get item
59 iterator.set( color.toUpperCase() ); // convert to upper case
60 } // end while
61 } // end method convertToUppercaseStrings
62
63 // obtain sublist and use clear method to delete sublist items
64 private static void removeItems( List< String > list,
65 int start, int end )
66 {
67 list.subList( start, end ).clear(); // remove items
68 } // end method removeItems
69
70 // print reversed list
71 private static void printReversedList( List< String > list )
72 {
73 ListIterator< String > iterator = list.listIterator( list.size() );
74
75 System.out.println( "
Reversed List:" );
76
77 // print list in reverse order
78 while ( iterator.hasPrevious() )
79 System.out.printf( "%s ", iterator.previous() );
80 } // end method printReversedList
81 } // end class ListTest
list:
black yellow green blue violet silver gold white brown blue gray silver
list:
BLACK YELLOW GREEN BLUE VIOLET SILVER GOLD WHITE BROWN BLUE GRAY SILVER
Deleting elements 4 to 6...
list:
BLACK YELLOW GREEN BLUE WHITE BROWN BLUE GRAY SILVER
Reversed List:
SILVER GRAY BLUE BROWN WHITE BLUE GREEN YELLOW BLACK
Fig. J.3. Lists, LinkedLists and ListIterators.
Lines 14 and 22 create LinkedLists list1 and list2 of type String. LinkedList is a generic class that has one type parameter for which we specify the type argument String in this example. Lines 16–17 and 24–25 call List method add to append elements from arrays colors and colors2 to the end of list1 and list2, respectively.
Line 27 calls List method addAll to append all elements of list2 to the end of list1. Line 28 sets list2 to null, so the LinkedList to which list2 referred can be garbage collected. Line 29 calls method printList (lines 41–49) to output list1’s contents. Line 31 calls method convertToUppercaseStrings (lines 52–61) to convert each String element to uppercase, then line 32 calls printList again to display the modified Strings. Line 35 calls method removeItems (lines 64–68) to remove the elements starting at index 4 up to, but not including, index 7 of the list. Line 37 calls method printReversedList (lines 71–80) to print the list in reverse order.
Method convertToUppercaseStrings
Method convertToUppercaseStrings (lines 52–61) changes lowercase String elements in its List argument to uppercase Strings. Line 54 calls List method listIterator to get the List’s bidirectional iterator (i.e., one that can traverse a List backward or forward). ListIterator is also a generic class. In this example, the ListIterator references String objects, because method listIterator is called on a List of Strings. Line 56 calls method hasNext to determine whether the List contains another element. Line 58 gets the next String in the List. Line 59 calls String method toUpperCase to get an uppercase version of the String and calls ListIterator method set to replace the current String to which iterator refers with the String returned by method toUpperCase. Like method toUpperCase, String method toLowerCase returns a lowercase version of the String.
Method removeItems
Method removeItems (lines 64–68) removes a range of items from the list. Line 67 calls List method subList to obtain a portion of the List (called a sublist). This is a so-called range-view method, which enables the program to view a portion of the list. The sublist is simply a view into the List on which subList is called. Method subList takes as arguments the beginning and ending index for the sublist. The ending index is not part of the range of the sublist. In this example, line 35 passes 4 for the beginning index and 7 for the ending index to subList. The sublist returned is the set of elements with indices 4 through 6. Next, the program calls List method clear on the sublist to remove the elements of the sublist from the List. Any changes made to a sublist are also made to the original List.
Method printReversedList
Method printReversedList (lines 71–80) prints the list backward. Line 73 calls List method listIterator with the starting position as an argument (in our case, the last element in the list) to get a bidirectional iterator for the list. List method size returns the number of items in the List. The while condition (line 78) calls ListIterator’s hasPrevious method to determine whether there are more elements while traversing the list backward. Line 79 calls ListIterator’s previous method to get the previous element from the list and outputs it to the standard output stream.
J.5.3. Views into Collections and Arrays Method asList
An important feature of the collections framework is the ability to manipulate the elements of one collection type (such as a set) through a different collection type (such as a list), regardless of the collection’s internal implementation. The set of public methods through which collections are manipulated is called a view.
Class Arrays provides static method asList to view an array (sometimes called the backing array) as a List collection. A List view allows you to manipulate the array as if it were a list. This is useful for adding the elements in an array to a collection and for sorting array elements. The next example demonstrates how to create a LinkedList with a List view of an array, because we cannot pass the array to a LinkedList constructor. Any modifications made through the List view change the array, and any modifications made to the array change the List view. The only operation permitted on the view returned by asList is set, which changes the value of the view and the backing array. Any other attempts to change the view (such as adding or removing elements) result in an UnsupportedOperationException.
Viewing Arrays as Lists and Converting Lists to Arrays
Figure J.4 uses Arrays method asList to view an array as a List and uses List method toArray to get an array from a LinkedList collection. The program calls method asList to create a List view of an array, which is used to initialize a LinkedList object, then adds a series of strings to the LinkedList and calls method toArray to obtain an array containing references to the Strings.
1 // Fig. J.4: UsingToArray.java
2 // Viewing arrays as Lists and converting Lists to arrays.
3 import java.util.LinkedList;
4 import java.util.Arrays;
5
6 public class UsingToArray
7 {
8 // creates a LinkedList, adds elements and converts to array
9 public static void main( String[] args )
10 {
11 String[] colors = { "black", "blue", "yellow" };
12
13 LinkedList< String > links =
14 new LinkedList< String >( Arrays.asList( colors ) );
15
16 links.addLast( "red" ); // add as last item
17 links.add( "pink" ); // add to the end
18 links.add( 3, "green" ); // add at 3rd index
19 links.addFirst( "cyan" ); // add as first item
20
21 // get LinkedList elements as an array
22 colors = links.toArray( new String[ links.size() ] );
23
24 System.out.println( "colors: " );
25
26 for ( String color : colors )
27 System.out.println( color );
28 } // end main
29 } // end class UsingToArray
colors:
cyan
black
blue
yellow
green
red
pink
Fig. J.4. Viewing arrays as Lists and converting Lists to arrays.
Lines 13–14 construct a LinkedList of Strings containing the elements of array colors. Line 14 uses Arrays method asList to return a List view of the array, then uses that to initialize the LinkedList with its constructor that receives a Collection as an argument (a List is a Collection). Line 16 calls LinkedList method addLast to add "red" to the end of links. Lines 17–18 call LinkedList method add to add "pink" as the last element and "green" as the element at index 3 (i.e., the fourth element). Method addLast (line 16) functions identically to method add (line 17). Line 19 calls LinkedList method addFirst to add "cyan" as the new first item in the LinkedList. The add operations are permitted because they operate on the LinkedList object, not the view returned by asList.
Line 22 calls the List interface’s toArray method to get a String array from links. The array is a copy of the list’s elements—modifying the array’s contents does not modify the list. The array passed to method toArray is of the same type that you’d like method toArray to return. If the number of elements in that array is greater than or equal to the number of elements in the LinkedList, toArray copies the list’s elements into its array argument and returns that array. If the LinkedList has more elements than the number of elements in the array passed to toArray, toArray allocates a new array of the same type it receives as an argument, copies the list’s elements into the new array and returns the new array.
J.6. Collections Methods
Class Collections provides several high-performance algorithms (Fig. J.5) for manipulating collection elements. The algorithms are implemented as static methods. The methods sort, binarySearch, reverse, shuffle, fill and copy operate on Lists. Methods min, max and addAll operate on Collections.

Fig. J.5. Some methods of class Collections.
J.6.1. Method sort
Method sort sorts the elements of a List, which must implement the Comparable interface. The order is determined by the natural order of the elements’ type as implemented by a compareTo method. Method compareTo is declared in interface Comparable and is sometimes called the natural comparison method. The sort call may specify as a second argument a Comparator object that determines an alternative ordering of the elements.
Sorting in Ascending or Descending Order
If list is a List of Comparable objects (such as Strings), you can use Collections method sort to order the elements in ascending order as follows:
Collections.sort( list ); // sort list into ascending order
You can sort the List in descending order as follows:
// sort list into descending order
Collections.sort( list, Collections.reverseOrder() );
The static Collections method reverseOrder returns a Comparator object that orders the collection’s elements in reverse order.
Sorting with a Comparator
For objects that are not Comparable, you can create custom Comparators. Figure J.6 creates a custom Comparator class, named TimeComparator, that implements interface Comparator to compare two Time2 objects. Class Time2, declared in Fig. F.5, represents times with hours, minutes and seconds.
1 // Fig. J.8: TimeComparator.java
2 // Custom Comparator class that compares two Time2 objects.
3 import java.util.Comparator;
4
5 public class TimeComparator implements Comparator< Time2 >
6 {
7 public int compare( Time2 time1, Time2 time2 )
8 {
9 int hourCompare = time1.getHour() - time2.getHour(); // compare hour
10
11 // test the hour first
12 if ( hourCompare != 0 )
13 return hourCompare;
14
15 int minuteCompare =
16 time1.getMinute() - time2.getMinute(); // compare minute
17
18 // then test the minute
19 if ( minuteCompare != 0 )
20 return minuteCompare;
21
22 int secondCompare =
23 time1.getSecond() - time2.getSecond(); // compare second
24
25 return secondCompare; // return result of comparing seconds
26 } // end method compare
27 } // end class TimeComparator
Fig. J.6. Custom Comparator class that compares two Time2 objects.
Class TimeComparator implements interface Comparator, a generic type that takes one type argument (in this case Time2). A class that implements Comparator must declare a compare method that receives two arguments and returns a negative integer if the first argument is less than the second, 0 if the arguments are equal or a positive integer if the first argument is greater than the second. Method compare (lines 7–26) performs comparisons between Time2 objects. Line 9 compares the two hours of the Time2 objects. If the hours are different (line 12), then we return this value. If this value is positive, then the first hour is greater than the second and the first time is greater than the second. If this value is negative, then the first hour is less than the second and the first time is less than the second. If this value is zero, the hours are the same and we must test the minutes (and maybe the seconds) to determine which time is greater.
Figure J.7 sorts a list using the custom Comparator class TimeComparator. Line 11 creates an ArrayList of Time2 objects. Recall that both ArrayList and List are generic types and accept a type argument that specifies the element type of the collection. Lines 13–17 create five Time2 objects and add them to this list. Line 23 calls method sort, passing it an object of our TimeComparator class (Fig. J.6).
1 // Fig. J.7: Sort.java
2 // Collections method sort with a custom Comparator object.
3 import java.util.List;
4 import java.util.ArrayList;
5 import java.util.Collections;
6
7 public class Sort3
8 {
9 public static void main( String[] args )
10 {
11 List< Time2 > list = new ArrayList< Time2 >(); // create List
12
13 list.add( new Time2( 6, 24, 34 ) );
14 list.add( new Time2( 18, 14, 58 ) );
15 list.add( new Time2( 6, 05, 34 ) );
16 list.add( new Time2( 12, 14, 58 ) );
17 list.add( new Time2( 6, 24, 22 ) );
18
19 // output List elements
20 System.out.printf( "Unsorted array elements:
%s
", list );
21
22 // sort in order using a comparator
23 Collections.sort( list, new TimeComparator() );
24
25 // output List elements
26 System.out.printf( "Sorted list elements:
%s
", list );
27 } // end main
28 } // end class Sort3
Unsorted array elements:
[6:24:34 AM, 6:14:58 PM, 6:05:34 AM, 12:14:58 PM, 6:24:22 AM]
Sorted list elements:
[6:05:34 AM, 6:24:22 AM, 6:24:34 AM, 12:14:58 PM, 6:14:58 PM]
Fig. J.7. Collections method sort with a custom Comparator object.
J.6.2. Method shuffle
Method shuffle randomly orders a List’s elements. Appendix E presented a card shuffling and dealing simulation that shuffled a deck of cards with a loop. If you have an array of 52 Card objects, you can shuffle them with method shuffle as follows:
List< Card > list = Arrays.asList( deck ); // get List
Collections.shuffle( list ); // shuffle deck
The second line above shuffles the array by calling static method shuffle of class Collections. Method shuffle requires a List argument, so we must obtain a List view of the array before we can shuffle it. The Arrays class’s static method asList gets a List view of the deck array.
J.7. Interface Queue
A queue is a collection that represents a waiting line—typically, insertions are made at the back of a queue and deletions are made from the front. Interface Queue extends interface Collection and provides additional operations for inserting, removing and inspecting elements in a queue. You can view the details of interface Queue and the list of classes that implement it at
docs.oracle.com/javase/7/docs/api/index.html?java/util/Queue.html
J.8. Sets
A Set is an unordered Collection of unique elements (i.e., no duplicate elements). The collections framework contains several Set implementations, including HashSet and TreeSet. HashSet stores its elements in a hash table, and TreeSet stores its elements in a tree. Hash tables are presented in Section J.9.
Figure J.8 uses a HashSet to remove duplicate strings from a List. Recall that both List and Collection are generic types, so line 16 creates a List that contains String objects, and line 20 passes a Collection of Strings to method printNonDuplicates.
1 // Fig. J.8: SetTest.java
2 // HashSet used to remove duplicate values from an array of strings.
3 import java.util.List;
4 import java.util.Arrays;
5 import java.util.HashSet;
6 import java.util.Set;
7 import java.util.Collection;
8
9 public class SetTest
10 {
11 public static void main( String[] args )
12 {
13 // create and display a List< String >
14 String[] colors = { "red", "white", "blue", "green", "gray",
15 "orange", "tan", "white", "cyan", "peach", "gray", "orange" };
16 List< String > list = Arrays.asList( colors );
17 System.out.printf( "List: %s
", list );
18
19 // eliminate duplicates then print the unique values
20 printNonDuplicates( list );
21 } // end main
22
23 // create a Set from a Collection to eliminate duplicates
24 private static void printNonDuplicates( Collection< String > values )
25 {
26 // create a HashSet
27 Set< String > set = new HashSet< String >( values );
28
29 System.out.print( "
Nonduplicates are: " );
30
31 for ( String value : set )
32 System.out.printf( "%s ", value );
33
34 System.out.println();
35 } // end method printNonDuplicates
36 } // end class SetTest
List: [red, white, blue, green, gray, orange, tan, white, cyan, peach, gray,
orange]
Nonduplicates are: orange green white peach gray cyan red blue tan
Fig. J.8. HashSet used to remove duplicate values from an array of strings.
Method printNonDuplicates (lines 24–35) takes a Collection argument. Line 27 constructs a HashSet<String> from the Collection<String> argument. By definition, Sets do not contain duplicates, so when the HashSet is constructed, it removes any duplicates in the Collection. Lines 31–32 output elements in the Set.
Sorted Sets
The collections framework also includes the SortedSet interface (which extends Set) for sets that maintain their elements in sorted order—either the elements’ natural order (e.g., numbers are in ascending order) or an order specified by a Comparator. Class TreeSet implements SortedSet. Items placed in a TreeSet are sorted as they’re added.
J.9. Maps
Maps associate keys to values. The keys in a Map must be unique, but the associated values need not be. If a Map contains both unique keys and unique values, it’s said to implement a one-to-one mapping. If only the keys are unique, the Map is said to implement a many-to-one mapping—many keys can map to one value.
Maps differ from Sets in that Maps contain keys and values, whereas Sets contain only values. Three of the several classes that implement interface Map are Hashtable, HashMap and TreeMap, and maps are used extensively in Android. Hashtables and HashMaps store elements in hash tables, and TreeMaps store elements in trees—the details of the underlying data structures are beyond the scope of this book. Interface SortedMap extends Map and maintains its keys in sorted order—either the elements’ natural order or an order specified by a Comparator. Class TreeMap implements SortedMap. Figure J.9 uses a HashMap to count the number of occurrences of each word in a string.
1 // Fig. J.9: WordTypeCount.java
2 // Program counts the number of occurrences of each word in a String.
3 import java.util.Map;
4 import java.util.HashMap;
5 import java.util.Set;
6 import java.util.TreeSet;
7 import java.util.Scanner;
8
9 public class WordTypeCount
10 {
11 public static void main( String[] args )
12 {
13 // create HashMap to store String keys and Integer values
14 Map< String, Integer > myMap = new HashMap< String, Integer >();
15
16 createMap( myMap ); // create map based on user input
17 displayMap( myMap ); // display map content
18 } // end main
19
20 // create map from user input
21 private static void createMap( Map< String, Integer > map )
22 {
23 Scanner scanner = new Scanner( System.in ); // create scanner
24 System.out.println( "Enter a string:" ); // prompt for user input
25 String input = scanner.nextLine();
26
27 // tokenize the input
28 String[] tokens = input.split( " " );
29
30 // processing input text
31 for ( String token : tokens )
32 {
33 String word = token.toLowerCase(); // get lowercase word
34
35 // if the map contains the word
36 if ( map.containsKey( word ) ) // is word in map
37 {
38 int count = map.get( word ); // get current count
39 map.put( word, count + 1 ); // increment count
40 } // end if
41 else
42 map.put( word, 1 ); // add new word with a count of 1 to map
43 } // end for
44 } // end method createMap
45
46 // display map content
47 private static void displayMap( Map< String, Integer > map )
48 {
49 Set< String > keys = map.keySet(); // get keys
50
51 // sort keys
52 TreeSet< String > sortedKeys = new TreeSet< String >( keys );
53
54 System.out.println( "
Map contains:
Key Value" );
55
56 // generate output for each key in map
57 for ( String key : sortedKeys )
58 System.out.printf( "%-10s%10s
", key, map.get( key ) );
59
60 System.out.printf(
61 "
size: %d
isEmpty: %b
", map.size(), map.isEmpty() );
62 } // end method displayMap
63 } // end class WordTypeCount
Enter a string:
this is a sample sentence with several words this is another sample
sentence with several different words
Map contains:
Key Value
a 1
another 1
different 1
is 2
sample 2
sentence 2
several 2
this 2
with 2
words 2
size: 10
isEmpty: false
Fig. J.9. Program counts the number of occurrences of each word in a String.
Line 14 creates an empty HashMap with a default initial capacity (16 elements) and a default load factor (0.75)—these defaults are built into the implementation of HashMap. When the number of occupied slots in the HashMap becomes greater than the capacity times the load factor, the capacity is doubled automatically. HashMap is a generic class that takes two type arguments—the type of key (i.e., String) and the type of value (i.e., Integer). Recall that the type arguments passed to a generic class must be reference types, hence the second type argument is Integer, not int.
Line 16 calls method createMap (lines 21–44), which uses a map to store the number of occurrences of each word in the sentence. Line 25 obtains the user input, and line 28 tokenizes it. The loop in lines 31–43 converts the next token to lowercase letters (line 33), then calls Map method containsKey (line 36) to determine whether the word is in the map (and thus has occurred previously in the string). If the Map does not contain a mapping for the word, line 42 uses Map method put to create a new entry in the map, with the word as the key and an Integer object containing 1 as the value. Autoboxing occurs when the program passes integer 1 to method put, because the map stores the number of occurrences of the word as an Integer. If the word does exist in the map, line 38 uses Map method get to obtain the key’s associated value (the count) in the map. Line 39 increments that value and uses put to replace the key’s associated value in the map. Method put returns the key’s prior associated value, or null if the key was not in the map.
Method displayMap (lines 47–62) displays all the entries in the map. It uses HashMap method keySet (line 49) to get a set of the keys. The keys have type String in the map, so method keySet returns a generic type Set with type parameter specified to be String. Line 52 creates a TreeSet of the keys, in which the keys are sorted. The loop in lines 57–58 accesses each key and its value in the map. Line 58 displays each key and its value using format specifier %-10s to left justify each key and format specifier %10s to right justify each value. The keys are displayed in ascending order. Line 61 calls Map method size to get the number of key/value pairs in the Map. Line 61 also calls Map method isEmpty, which returns a boolean indicating whether the Map is empty.
J.10. Introduction to Files and Streams
Data stored in variables and arrays is temporary—it’s lost when a local variable goes out of scope or when the program terminates. For long-term retention of data, even after the programs that create the data terminate, computers use files. You use files every day for tasks such as writing a document or creating a spreadsheet. Data maintained in files is persistent data—it exists beyond the duration of program execution.
Files as Streams of Bytes
Java views each file as a sequential stream of bytes (Fig. J.10). Every operating system provides a mechanism to determine the end of a file, such as an end-of-file marker or a count of the total bytes in the file that’s recorded in a system-maintained administrative data structure. A Java program processing a stream of bytes simply receives an indication from the operating system when it reaches the end of the stream—the program does not need to know how the underlying platform represents files or streams. In some cases, the end-of-file indication occurs as an exception. In other cases, the indication is a return value from a method invoked on a stream-processing object.

Fig. J.10. Java’s view of a file of n bytes.
Byte-Based and Character-Based Streams
Streams can be used to input and output data as bytes or characters. Byte-based streams input and output data in its binary format. Character-based streams input and output data as a sequence of characters. If the value 5 were being stored using a byte-based stream, it would be stored in the binary format of the numeric value 5, or 101. If the value 5 were being stored using a character-based stream, it would be stored in the binary format of the character 5, or 00000000 00110101 (this is the binary representation for the numeric value 53, which indicates the Unicode® character 5). The difference between the two forms is that the numeric value can be used as an integer in calculations, whereas the character 5 is simply a character that can be used in a string of text, as in "Sarah Miller is 15 years old". Files that are created using byte-based streams are referred to as binary files, while files created using character-based streams are referred to as text files. Text files can be read by text editors, while binary files are read by programs that understand the file’s specific content and its ordering.
Opening a File
A Java program opens a file by creating an object and associating a stream of bytes or characters with it. The object’s constructor interacts with the operating system to open the file.
The java.io Package
Java programs perform file processing by using classes from package java.io. This package includes definitions for stream classes, such as FileInputStream (for byte-based input from a file), FileOutputStream (for byte-based output to a file), FileReader (for character-based input from a file) and FileWriter (for character-based output to a file), which inherit from classes InputStream, OutputStream, Reader and Writer, respectively. Thus, the methods of the these stream classes can also be applied to file streams.
Java contains classes that enable you to perform input and output of objects or variables of primitive data types. The data will still be stored as bytes or characters behind the scenes, allowing you to read or write data in the form of ints, Strings, or other types without having to worry about the details of converting such values to byte format. To perform such input and output, objects of classes ObjectInputStream and ObjectOutputStream can be used together with the byte-based file stream classes FileInputStream and FileOutputStream (these classes will be discussed in more detail shortly). The complete hierarchy of types in package java.io can be viewed in the online documentation at
docs.oracle.com/javase/7/docs/api/java/io/package-tree.html
Character-based input and output can also be performed with classes Scanner and Formatter. Class Scanner is used extensively to input data from the keyboard—it can also read data from a file. Class Formatter enables formatted data to be output to any text-based stream in a manner similar to method System.out.printf.
J.11. Class File
Class File is useful for retrieving information about files or directories from disk. File objects are used frequently with objects of other java.io classes to specify files or directories to manipulate.
Creating File Objects
Class File provides several constructors. The one with a String argument specifies the name of a file or directory to associate with the File object. The name can contain path information as well as a file or directory name. A file or directory’s path specifies its location on disk. The path includes some or all of the directories leading to the file or directory. An absolute path contains all the directories, starting with the root directory, that lead to a specific file or directory. Every file or directory on a particular disk drive has the same root directory in its path. A relative path normally starts from the directory in which the application began executing and is therefore “relative” to the current directory. The constructor with two String arguments specifies an absolute or relative path as the first argument and the file or directory to associate with the File object as the second argument. The constructor with File and String arguments uses an existing File object that specifies the parent directory of the file or directory specified by the String argument. The fourth constructor uses a URI object to locate the file. A Uniform Resource Identifier (URI) is a more general form of the Uniform Resource Locators (URLs) that are used to locate websites. For example, http://www.deitel.com/ is the URL for the Deitel & Associates website. URIs for locating files vary across operating systems. On Windows platforms, the URI
file://C:/data.txt
identifies the file data.txt stored in the root directory of the C: drive. On UNIX/Linux platforms, the URI
file:/home/student/data.txt
identifies the file data.txt stored in the home directory of the user student.
Figure J.11 lists some common File methods. The complete list can be viewed at download.oracle.com/javase/6/docs/api/java/io/File.html.
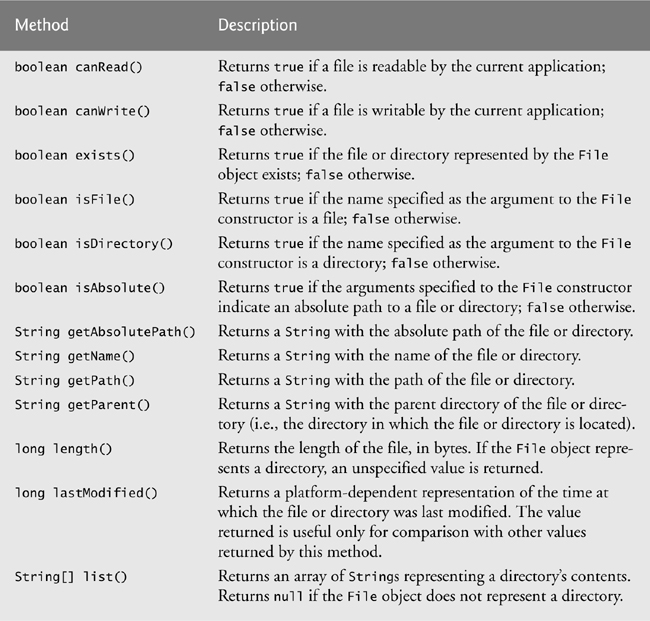
Fig. J.11. File methods.
J.12. Introduction to Object Serialization
Java provides object serialization for writing entire objects to a stream and reading entire objects from a stream. A so-called serialized object is an object represented as a sequence of bytes that includes the object’s data as well as information about the object’s type and the types of data stored in the object. After a serialized object has been written into a file, it can be read from the file and deserialized—that is, the type information and bytes that represent the object and its data can be used to recreate the object in memory.
Classes ObjectInputStream and ObjectOutputStream
Classes ObjectInputStream and ObjectOutputStream, which respectively implement the ObjectInput and ObjectOutput interfaces, enable entire objects to be read from or written to a stream (possibly a file). To use serialization with files, we initialize ObjectInputStream and ObjectOutputStream objects with stream objects that read from and write to files—objects of classes FileInputStream and FileOutputStream, respectively. Initializing stream objects with other stream objects in this manner is sometimes called wrapping—the new stream object being created wraps the stream object specified as a constructor argument. To wrap a FileInputStream in an ObjectInputStream, for instance, we pass the FileInputStream object to the ObjectInputStream’s constructor.
Interfaces ObjectOutput and ObjectInput
The ObjectOutput interface contains method writeObject, which takes an Object as an argument and writes its information to an OutputStream. A class that implements interface ObjectOutput (such as ObjectOutputStream) declares this method and ensures that the object being output implements interface Serializable (discussed shortly). Correspondingly, the ObjectInput interface contains method readObject, which reads and returns a reference to an Object from an InputStream. After an object has been read, its reference can be cast to the object’s actual type.
J.13. Introduction to Multithreading
It would be nice if we could focus our attention on performing only one action at a time and performing it well, but that’s usually difficult to do. The human body performs a great variety of operations in parallel—or, as we say in programming, concurrently. Respiration, blood circulation, digestion, thinking and walking, for example, can occur concurrently, as can all the senses—sight, touch, smell, taste and hearing.
Computers, too, can perform operations concurrently. It’s common for personal computers to compile a program, send a file to a printer and receive electronic mail messages over a network concurrently. Only computers that have multiple processors can truly execute multiple instructions concurrently. Operating systems on single-processor computers create the illusion of concurrent execution by rapidly switching between activities, but on such computers only a single instruction can execute at once. Today’s multicore computers have multiple processors that enable computers to perform tasks truly concurrently. Multicore smartphones are starting to appear.
Java Concurrency
Java makes concurrency available to you through the language and APIs. Java programs can have multiple threads of execution, where each thread has its own method-call stack and program counter, allowing it to execute concurrently with other threads while sharing with them application-wide resources such as memory. This capability is called multithreading.
 Performance Tip J.1
A problem with single-threaded applications that can lead to poor responsiveness is that lengthy activities must complete before others can begin. In a multithreaded application, threads can be distributed across multiple processors (if available) so that multiple tasks execute truly concurrently and the application can operate more efficiently. Multithreading can also increase performance on single-processor systems that simulate concurrency—when one thread cannot proceed (because, for example, it’s waiting for the result of an I/O operation), another can use the processor.
Concurrent Programming Uses
We’ll discuss many applications of concurrent programming. For example, when downloading a large file (e.g., an image, an audio clip or a video clip) over the Internet, the user may not want to wait until the entire clip downloads before starting the playback. To solve this problem, multiple threads can be used—one to download the clip, and another to play it. These activities proceed concurrently. To avoid choppy playback, the threads are synchronized (that is, their actions are coordinated) so that the player thread doesn’t begin until there’s a sufficient amount of the clip in memory to keep the player thread busy. The Java Virtual Machine (JVM) creates threads to run programs and threads to perform housekeeping tasks such as garbage collection.
Concurrent Programming Is Difficult
Writing multithreaded programs can be tricky. Although the human mind can perform functions concurrently, people find it difficult to jump between parallel trains of thought. To see why multithreaded programs can be difficult to write and understand, try the following experiment: Open three books to page 1, and try reading the books concurrently. Read a few words from the first book, then a few from the second, then a few from the third, then loop back and read the next few words from the first book, and so on. After this experiment, you’ll appreciate many of the challenges of multithreading—switching between the books, reading briefly, remembering your place in each book, moving the book you’re reading closer so that you can see it and pushing the books you’re not reading aside—and, amid all this chaos, trying to comprehend the content of the books!
Use the Prebuilt Classes of the Concurrency APIs Whenever Possible
Programming concurrent applications is difficult and error prone. If you must use synchronization in a program, you should use existing classes from the Concurrency APIs that manage synchronization for you. These classes are written by experts, have been thoroughly tested and debugged, operate efficiently and help you avoid common traps and pitfalls.
J.14. Creating and Executing Threads with the Executor Framework
This section demonstrates how to perform concurrent tasks in an application by using Executors and Runnable objects.
Creating Concurrent Tasks with the Runnable Interface
You implement the Runnable interface (of package java.lang) to specify a task that can execute concurrently with other tasks. The Runnable interface declares the single method run, which contains the code that defines the task that a Runnable object should perform.
Executing Runnable Objects with an Executor
To allow a Runnable to perform its task, you must execute it. An Executor object executes Runnables. An Executor does this by creating and managing a group of threads called a thread pool. When an Executor begins executing a Runnable, the Executor calls the Runnable object’s run method, which executes in the new thread.
The Executor interface declares a single method named execute which accepts a Runnable as an argument. The Executor assigns every Runnable passed to its execute method to one of the available threads in the thread pool. If there are no available threads, the Executor creates a new thread or waits for a thread to become available and assigns that thread the Runnable that was passed to method execute.
Using an Executor has many advantages over creating threads yourself. Executors can reuse existing threads to eliminate the overhead of creating a new thread for each task and can improve performance by optimizing the number of threads to ensure that the processor stays busy, without creating so many threads that the application runs out of resources.
Software Engineering Observation J.2
Though it’s possible to create threads explicitly, it’s recommended that you use the Executor interface to manage the execution of Runnable objects.
Using Class Executors to Obtain an ExecutorService
The ExecutorService interface (of package java.util.concurrent) extends Executor and declares various methods for managing the life cycle of an Executor. An object that implements the ExecutorService interface can be created using static methods declared in class Executors (of package java.util.concurrent). We use interface ExecutorService and a method of class Executors in our example, which executes three tasks.
Implementing the Runnable Interface
Class PrintTask (Fig. J.12) implements Runnable (line 5), so that multiple PrintTasks can execute concurrently. Variable sleepTime (line 7) stores a random integer value from 0 to 5 seconds created in the PrintTask constructor (line 17). Each thread running a PrintTask sleeps for the amount of time specified by sleepTime, then outputs its task’s name and a message indicating that it’s done sleeping.
1 // Fig. J.12: PrintTask.java
2 // PrintTask class sleeps for a random time from 0 to 5 seconds
3 import java.util.Random;
4
5 public class PrintTask implements Runnable
6 {
7 private final int sleepTime; // random sleep time for thread
8 private final String taskName; // name of task
9 private final static Random generator = new Random();
10
11 // constructor
12 public PrintTask( String name )
13 {
14 taskName = name; // set task name
15
16 // pick random sleep time between 0 and 5 seconds
17 sleepTime = generator.nextInt( 5000 ); // milliseconds
18 } // end PrintTask constructor
19
20 // method run contains the code that a thread will execute
21 public void run()
22 {
23 try // put thread to sleep for sleepTime amount of time
24 {
25 System.out.printf( "%s going to sleep for %d milliseconds.
",
26 taskName, sleepTime );
27 Thread.sleep( sleepTime ); // put thread to sleep
28 } // end try
29 catch ( InterruptedException exception )
30 {
31 System.out.printf( "%s %s
", taskName,
32 "terminated prematurely due to interruption" );
33 } // end catch
34
35 // print task name
36 System.out.printf( "%s done sleeping
", taskName );
37 } // end method run
38 } // end class PrintTask
Fig. J.12. PrintTask class sleeps for a random time from 0 to 5 seconds.
A PrintTask executes when a thread calls the PrintTask’s run method. Lines 25–26 display a message indicating the name of the currently executing task and that the task is going to sleep for sleepTime milliseconds. Line 27 invokes static method sleep of class Thread to place the thread in the timed waiting state for the specified amount of time. At this point, the thread loses the processor, and the system allows another thread to execute. When the thread awakens, it reenters the runnable state. When the PrintTask is assigned to a processor again, line 36 outputs a message indicating that the task is done sleeping, then method run terminates. The catch at lines 29–33 is required because method sleep might throw a checked exception of type InterruptedException if a sleeping thread’s interrupt method is called.
Using the ExecutorService to Manage Threads that Execute PrintTasks
Figure J.13 uses an ExecutorService object to manage threads that execute PrintTasks (as defined in Fig. J.12). Lines 11–13 create and name three PrintTasks to execute. Line 18 uses Executors method newCachedThreadPool to obtain an ExecutorService that’s capable of creating new threads as they’re needed by the application. These threads are used by ExecutorService (threadExecutor) to execute the Runnables.
1 // Fig. J.13: TaskExecutor.java
2 // Using an ExecutorService to execute Runnables.
3 import java.util.concurrent.Executors;
4 import java.util.concurrent.ExecutorService;
5
6 public class TaskExecutor
7 {
8 public static void main( String[] args )
9 {
10 // create and name each runnable
11 PrintTask task1 = new PrintTask( "task1" );
12 PrintTask task2 = new PrintTask( "task2" );
13 PrintTask task3 = new PrintTask( "task3" );
14
15 System.out.println( "Starting Executor" );
16
17 // create ExecutorService to manage threads
18 ExecutorService threadExecutor = Executors.newCachedThreadPool();
19
20 // start threads and place in runnable state
21 threadExecutor.execute( task1 ); // start task1
22 threadExecutor.execute( task2 ); // start task2
23 threadExecutor.execute( task3 ); // start task3
24
25 // shut down worker threads when their tasks complete
26 threadExecutor.shutdown();
27
28 System.out.println( "Tasks started, main ends.
" );
29 } // end main
30 } // end class TaskExecutor
Starting Executor
Tasks started, main ends
task1 going to sleep for 4806 milliseconds
task2 going to sleep for 2513 milliseconds
task3 going to sleep for 1132 milliseconds
task3 done sleeping
task2 done sleeping
task1 done sleeping
Starting Executor
task1 going to sleep for 3161 milliseconds.
task3 going to sleep for 532 milliseconds.
task2 going to sleep for 3440 milliseconds.
Tasks started, main ends.
task3 done sleeping
task1 done sleeping
task2 done sleeping
Fig. J.13. Using an ExecutorService to execute Runnables.
Lines 21–23 each invoke the ExecutorService’s execute method, which executes the Runnable passed to it as an argument (in this case a PrintTask) some time in the future. The specified task may execute in one of the threads in the ExecutorService’s thread pool, in a new thread created to execute it, or in the thread that called the execute method—the ExecutorService manages these details. Method execute returns immediately from each invocation—the program does not wait for each PrintTask to finish. Line 26 calls ExecutorService method shutdown, which notifies the ExecutorService to stop accepting new tasks, but continues executing tasks that have already been submitted. Once all of the previously submitted Runnables have completed, the threadExecutor terminates. Line 28 outputs a message indicating that the tasks were started and the main thread is finishing its execution.
The code in main executes in the main thread, a thread created by the JVM. The code in the run method of PrintTask (lines 21–37 of Fig. J.12) executes whenever the Executor starts each PrintTask—again, this is sometime after they’re passed to the ExecutorService’s execute method (Fig. J.13, lines 21–23). When main terminates, the program itself continues running because there are still tasks that must finish executing. The program will not terminate until these tasks complete.
The sample outputs show each task’s name and sleep time as the thread goes to sleep. The one with the shortest sleep time normally awakens first, indicates that it’s done sleeping and terminates. In the first output, the main thread terminates before any of the PrintTasks output their names and sleep times. This shows that the main thread runs to completion before the PrintTasks get a chance to run. In the second output, all of the PrintTasks output their names and sleep times before the main thread terminates. Also, notice in the second example output, task3 goes to sleep before task2, even though we passed task2 to the ExecutorService’s execute method before task3. This illustrates the fact that we cannot predict the order in which the tasks will start executing, even if we know the order in which they were created and started.
J.15. Overview of Thread Synchronization
When multiple threads share an object and it’s modified by one or more of them, indeterminate results may occur unless access to the shared object is managed properly. If one thread is in the process of updating a shared object and another thread also tries to update it, it’s unclear which thread’s update takes effect. When this happens, the program’s behavior cannot be trusted—sometimes the program will produce the correct results, and sometimes it won’t. In either case, there’ll be no indication that the shared object was manipulated incorrectly.
The problem can be solved by giving only one thread at a time exclusive access to code that manipulates the shared object. During that time, other threads desiring to manipulate the object are kept waiting. When the thread with exclusive access to the object finishes manipulating it, one of the threads that was waiting is allowed to proceed. This process, called thread synchronization, coordinates access to shared data by multiple concurrent threads. By synchronizing threads in this manner, you can ensure that each thread accessing a shared object excludes all other threads from doing so simultaneously—this is called mutual exclusion.
Monitors
A common way to perform synchronization is to use Java’s built-in monitors. Every object has a monitor and a monitor lock (or intrinsic lock). The monitor ensures that its object’s monitor lock is held by a maximum of only one thread at any time, and thus can be used to enforce mutual exclusion. If an operation requires the executing thread to hold a lock while the operation is performed, a thread must acquire the lock before proceeding with the operation. Other threads attempting to perform an operation that requires the same lock will be blocked until the first thread releases the lock, at which point the blocked threads may attempt to acquire the lock and proceed with the operation.
To specify that a thread must hold a monitor lock to execute a block of code, the code should be placed in a synchronized statement. Such code is said to be guarded by the monitor lock; a thread must acquire the lock to execute the guarded statements. The monitor allows only one thread at a time to execute statements within synchronized statements that lock on the same object, as only one thread at a time can hold the monitor lock. The synchronized statements are declared using the synchronized keyword:
synchronized ( object )
{
statements
} // end synchronized statement
where object is the object whose monitor lock will be acquired; object is normally this if it’s the object in which the synchronized statement appears. If several synchronized statements are trying to execute on an object at the same time, only one of them may be active on the object—all the other threads attempting to enter a synchronized statement on the same object are temporarily blocked from executing.
When a synchronized statement finishes executing, the object’s monitor lock is released and one of the blocked threads attempting to enter a synchronized statement can be allowed to acquire the lock to proceed. Java also allows synchronized methods. Before executing, a non-static synchronized method must acquire the lock on the object that’s used to call the method. Similary, a static synchronized method must acquire the lock on the class that’s used to call the method.
J.16. Concurrent Collections Overview
Earlier in this appendix, we introduced various collections from the Java Collections API. The collections from the java.util.concurrent package are specifically designed and optimized for use in programs that share collections among multiple threads. For information on the many concurrent collections in package java.util.concurrent, visit
download.oracle.com/javase/6/docs/api/java/util/concurrent/
package-summary.html
J.17. Multithreading with GUI
Swing applications present a unique set of challenges for multithreaded programming. All Swing applications have an event dispatch thread to handle interactions with the GUI components. Typical interactions include updating GUI components or processing user actions such as mouse clicks. All tasks that require interaction with an application’s GUI are placed in an event queue and are executed sequentially by the event dispatch thread.
Swing GUI components are not thread safe—they cannot be manipulated by multiple threads without the risk of incorrect results. Thread safety in GUI applications is achieved not by synchronizing thread actions, but by ensuring that Swing components are accessed from the event dispatch thread—a technique called thread confinement.
Usually it’s sufficient to perform simple tasks on the event dispatch thread in sequence with GUI component manipulations. If a lengthy task is performed in the event dispatch thread, it cannot attend to other tasks in the event queue while it’s tied up in that task. This causes the GUI to become unresponsive. Long-running tasks should be handled in separate threads, freeing the event dispatch thread to continue managing other GUI interactions. Of course, to update the GUI based on the tasks’s results, you must use the event dispatch thread, rather than from the worker thread that performed the computation.
Class SwingWorker
Class SwingWorker (in package javax.swing) perform long-running tasks in a worker thread and to update Swing components from the event dispatch thread based on the tasks’ results. SwingWorker implements the Runnable interface, meaning that a SwingWorker object can be scheduled to execute in a separate thread. The SwingWorker class provides several methods to simplify performing tasks in a worker thread and making the results available for display in a GUI. Some common SwingWorker methods are described in Fig. J.14. Class SwingWorker is similar to class AsyncTask, which is used frequently in Android apps.

Fig. J.14. Commonly used SwingWorker methods.
Performing Tasks in a Worker Thread
In the next example, the user enters a number n and the program gets the nth Fibonacci number, which we calculate using a recursive algorithm. The algorithm is time consuming for large values, so we use a SwingWorker object to perform the calculation in a worker thread. The GUI also allows the user to get the next Fibonacci number in the sequence with each click of a button, beginning with fibonacci(1). This short calculation is performed directly in the event dispatch thread. The program is capable of producing up to the 92nd Fibonacci number—subsequent values are outside the range that can be represented by a long. You can use class BigInteger to represent arbitrarily large integer values.
Class BackgroundCalculator (Fig. J.15) performs the recursive Fibonacci calculation in a worker thread. This class extends SwingWorker (line 8), overriding the methods doInBackground and done. Method doInBackground (lines 21–24) computes the nth Fibonacci number in a worker thread and returns the result. Method done (lines 27–43) displays the result in a JLabel.
1 // Fig. J.15: BackgroundCalculator.java
2 // SwingWorker subclass for calculating Fibonacci numbers
3 // in a worker thread.
4 import javax.swing.SwingWorker;
5 import javax.swing.JLabel;
6 import java.util.concurrent.ExecutionException;
7
8 public class BackgroundCalculator extends SwingWorker< Long, Object >
9 {
10 private final int n; // Fibonacci number to calculate
11 private final JLabel resultJLabel; // JLabel to display the result
12
13 // constructor
14 public BackgroundCalculator( int number, JLabel label )
15 {
16 n = number;
17 resultJLabel = label;
18 } // end BackgroundCalculator constructor
19
20 // long-running code to be run in a worker thread
21 public Long doInBackground()
22 {
23 return nthFib = fibonacci( n );
24 } // end method doInBackground
25
26 // code to run on the event dispatch thread when doInBackground returns
27 protected void done()
28 {
29 try
30 {
31 // get the result of doInBackground and display it
32 resultJLabel.setText( get().toString() );
33 } // end try
34 catch ( InterruptedException ex )
35 {
36 resultJLabel.setText( "Interrupted while waiting for results." );
37 } // end catch
38 catch ( ExecutionException ex )
39 {
40 resultJLabel.setText(
41 "Error encountered while performing calculation." );
42 } // end catch
43 } // end method done
44
45 // recursive method fibonacci; calculates nth Fibonacci number
46 public long fibonacci( long number )
47 {
48 if ( number == 0 || number == 1 )
49 return number;
50 else
51 return fibonacci( number - 1 ) + fibonacci( number - 2 );
52 } // end method fibonacci
53 } // end class BackgroundCalculator
Fig. J.15. SwingWorker subclass for calculating Fibonacci numbers in a worker thread.
SwingWorker is a generic class. In line 8, the first type parameter is Long and the second is Object. The first type parameter indicates the type returned by the doInBackground method; the second indicates the type that’s passed between the publish and process methods to handle intermediate results. Since we do not use publish and process in this example, we simply use Object as the second type parameter.
A BackgroundCalculator object can be instantiated from a class that controls a GUI. A BackgroundCalculator maintains instance variables for an integer that represents the Fibonacci number to be calculated and a JLabel that displays the results of the calculation (lines 10–11). The BackgroundCalculator constructor (lines 14–18) initializes these instance variables with the arguments that are passed to the constructor.
Software Engineering Observation J.3
Any GUI components that will be manipulated by SwingWorker methods, such as components that will be updated from methods process or done, should be passed to the SwingWorker subclass’s constructor and stored in the subclass object. This gives these methods access to the GUI components they’ll manipulate.
When method execute is called on a BackgroundCalculator object, the object is scheduled for execution in a worker thread. Method doInBackground is called from the worker thread and invokes the fibonacci method (lines 46–52), passing instance variable n as an argument (line 23). Method fibonacci uses recursion to compute the Fibonacci of n. When fibonacci returns, method doInBackground returns the result.
After doInBackground returns, method done is automatically called from the event dispatch thread. This method attempts to set the result JLabel to the return value of doInBackground by calling method get to retrieve this return value (line 32). Method get waits for the result to be ready if necessary, but since we call it from method done, the computation will be complete before get is called. Lines 34–37 catch InterruptedException if the current thread is interrupted while waiting for get to return. This exception will not occur in this example since the calculation will have already completed by the time get is called. Lines 38–42 catch ExecutionException, which is thrown if an exception occurs during the computation.
Class FibonacciNumbers
Class FibonacciNumbers (Fig. J.16) displays a window containing two sets of GUI components—one set to compute a Fibonacci number in a worker thread and another to get the next Fibonacci number in response to the user’s clicking a JButton. The constructor (lines 38–109) places these components in separate titled JPanels. Lines 46–47 and 78–79 add two JLabels, a JTextField and a JButton to the workerJPanel to allow the user to enter an integer whose Fibonacci number will be calculated by the BackgroundWorker. Lines 84–85 and 103 add two JLabels and a JButton to the event dispatch thread panel to allow the user to get the next Fibonacci number in the sequence. Instance variables n1 and n2 contain the previous two Fibonacci numbers in the sequence and are initialized to 0 and 1, respectively (lines 29–30). Instance variable count stores the most recently computed sequence number and is initialized to 1 (line 31). The two JLabels display count and n2 initially, so that the user will see the text Fibonacci of 1: 1 in the eventThreadJPanel when the GUI starts.
1 // Fig. J.16: FibonacciNumbers.java
2 // Using SwingWorker to perform a long calculation with
3 // results displayed in a GUI.
4 import java.awt.GridLayout;
5 import java.awt.event.ActionEvent;
6 import java.awt.event.ActionListener;
7 import javax.swing.JButton;
8 import javax.swing.JFrame;
9 import javax.swing.JPanel;
10 import javax.swing.JLabel;
11 import javax.swing.JTextField;
12 import javax.swing.border.TitledBorder;
13 import javax.swing.border.LineBorder;
14 import java.awt.Color;
15 import java.util.concurrent.ExecutionException;
16
17 public class FibonacciNumbers extends JFrame
18 {
19 // components for calculating the Fibonacci of a user-entered number
20 private final JPanel workerJPanel =
21 new JPanel( new GridLayout( 2, 2, 5, 5 ) );
22 private final JTextField numberJTextField = new JTextField();
23 private final JButton goJButton = new JButton( "Go" );
24 private final JLabel fibonacciJLabel = new JLabel();
25
26 // components and variables for getting the next Fibonacci number
27 private final JPanel eventThreadJPanel =
28 new JPanel( new GridLayout( 2, 2, 5, 5 ) );
29 private long n1 = 0; // initialize with first Fibonacci number
30 private long n2 = 1; // initialize with second Fibonacci number
31 private int count = 1; // current Fibonacci number to display
32 private final JLabel nJLabel = new JLabel( "Fibonacci of 1: " );
33 private final JLabel nFibonacciJLabel =
34 new JLabel( String.valueOf( n2 ) );
35 private final JButton nextNumberJButton = new JButton( "Next Number" );
36
37 // constructor
38 public FibonacciNumbers()
39 {
40 super( "Fibonacci Numbers" );
41 setLayout( new GridLayout( 2, 1, 10, 10 ) );
42
43 // add GUI components to the SwingWorker panel
44 workerJPanel.setBorder( new TitledBorder(
45 new LineBorder( Color.BLACK ), "With SwingWorker" ) );
46 workerJPanel.add( new JLabel( "Get Fibonacci of:" ) );
47 workerJPanel.add( numberJTextField );
48 goJButton.addActionListener(
49 new ActionListener()
50 {
51 public void actionPerformed( ActionEvent event )
52 {
53 int n;
54
55 try
56 {
57 // retrieve user's input as an integer
58 n = Integer.parseInt( numberJTextField.getText() );
59 } // end try
60 catch( NumberFormatException ex )
61 {
62 // display an error message if the user did not
63 // enter an integer
64 fibonacciJLabel.setText( "Enter an integer." );
65 return;
66 } // end catch
67
68 // indicate that the calculation has begun
69 fibonacciJLabel.setText( "Calculating..." );
70
71 // create a task to perform calculation in background
72 BackgroundCalculator task =
73 new BackgroundCalculator( n, fibonacciJLabel );
74 task.execute(); // execute the task
75 } // end method actionPerformed
76 } // end anonymous inner class
77 ); // end call to addActionListener
78 workerJPanel.add( goJButton );
79 workerJPanel.add( fibonacciJLabel );
80
81 // add GUI components to the event-dispatching thread panel
82 eventThreadJPanel.setBorder( new TitledBorder(
83 new LineBorder( Color.BLACK ), "Without SwingWorker" ) );
84 eventThreadJPanel.add( nJLabel );
85 eventThreadJPanel.add( nFibonacciJLabel );
86 nextNumberJButton.addActionListener(
87 new ActionListener()
88 {
89 public void actionPerformed( ActionEvent event )
90 {
91 // calculate the Fibonacci number after n2
92 long temp = n1 + n2;
93 n1 = n2;
94 n2 = temp;
95 ++count;
96
97 // display the next Fibonacci number
98 nJLabel.setText( "Fibonacci of " + count + ": " );
99 nFibonacciJLabel.setText( String.valueOf( n2 ) );
100 } // end method actionPerformed
101 } // end anonymous inner class
102 ); // end call to addActionListener
103 eventThreadJPanel.add( nextNumberJButton );
104
105 add( workerJPanel );
106 add( eventThreadJPanel );
107 setSize( 275, 200 );
108 setVisible( true );
109 } // end constructor
110
111 // main method begins program execution
112 public static void main( String[] args )
113 {
114 FibonacciNumbers application = new FibonacciNumbers();
115 application.setDefaultCloseOperation( EXIT_ON_CLOSE );
116 } // end main
117 } // end class FibonacciNumbers

Fig. J.16. Using SwingWorker to perform a long calculation with results displayed in a GUI.
Lines 48–77 register the event handler for the goJButton. If the user clicks this JButton, line 58 gets the value entered in the numberJTextField and attempts to parse it as an integer. Lines 72–73 create a new BackgroundCalculator object, passing in the user-entered value and the fibonacciJLabel that’s used to display the calculation’s results. Line 74 calls method execute on the BackgroundCalculator, scheduling it for execution in a separate worker thread. Method execute does not wait for the BackgroundCalculator to finish executing. It returns immediately, allowing the GUI to continue processing other events while the computation is performed.
If the user clicks the nextNumberJButton in the eventThreadJPanel, the event handler registered in lines 86–102 executes. Lines 92–95 add the previous two Fibonacci numbers stored in n1 and n2 to determine the next number in the sequence, update n1 and n2 to their new values and increment count. Then lines 98–99 update the GUI to display the next number. The code for these calculations is in method actionPerformed, so they’re performed on the event dispatch thread. Handling such short computations in the event dispatch thread does not cause the GUI to become unresponsive, as with the recursive algorithm for calculating the Fibonacci of a large number. Because the longer Fibonacci computation is performed in a separate worker thread using the SwingWorker, it’s possible to get the next Fibonacci number while the recursive computation is still in progress.
J.18. Wrap-Up
In this appendix, you used classes ArrayList and LinkedList, which both implement the List interface. You used several predefined methods for manipulating collections. Next, you learned how to use the Set interface and class HashSet to manipulate an unordered collection of unique values. We discussed the SortedSet interface and class TreeSet for manipulating a sorted collection of unique values. You then learned about Java’s interfaces and classes for manipulating key/value pairs—Map, SortedMap, HashMap and TreeMap. We discussed the Collections class’s static methods for obtaining unmodifiable and synchronized views of collections.
Next, we introduced fundamental concepts of file and stream processing and overviewed object serialization. Finally, we introduced multithreading. You learned that Java makes concurrency available to you through the language and APIs. You also learned that the JVM itself creates threads to run a program, and that it also can create threads to perform housekeeping tasks such as garbage collection. We presented the interface Runnable, which is used to specify a task that can execute concurrently with other tasks. We showed how to use the Executor interface to manage the execution of Runnable objects via thread pools, which can reuse existing threads to eliminate the overhead of creating a new thread for each task and can improve performance by optimizing the number of threads to ensure that the processor stays busy. We discussed how to use a synchronized block to coordinate access to shared data by multiple concurrent threads.
We discussed the fact that Swing GUIs are not thread safe, so all interactions with and modifications to the GUI must be performed in the event dispatch thread. We also discussed the problems associated with performing long-running calculations in the event dispatch thread. Then we showed how you can use the SwingWorker class to perform long-running calculations in worker threads and how to display the results of a SwingWorker in a GUI when the calculation completed.
Self-Review Exercises
J.1 Fill in the blanks in each of the following statements:
a. A(n) __________ is used to iterate through a collection and can remove elements from the collection during the iteration.
b. An element in a List can be accessed by using the element’s __________.
c. Assuming that myArray contains references to Double objects, __________ occurs when the statement "myArray[ 0 ] = 1.25;" executes.
d. Java classes __________ and __________ provide the capabilities of arraylike data structures that can resize themselves dynamically.
e. Assuming that myArray contains references to Double objects, __________ occurs when the statement "double number = myArray[ 0 ];" executes.
f. ExecutorService method __________ ends each thread in an ExecutorService as soon as it finishes executing its current Runnable, if any.
g. Keyword __________ indicates that only one thread at a time should execute on an object.
J.2 Determine whether each statement is true or false. If false, explain why.
a. Values of primitive types may be stored directly in a collection.
b. A Set can contain duplicate values.
c. A Map can contain duplicate keys.
d. A LinkedList can contain duplicate values.
e. Collections is an interface.
f. Iterators can remove elements.
g. Method exists of class File returns true if the name specified as the argument to the File constructor is a file or directory in the specified path.
h. Binary files are human readable in a text editor.
i. An absolute path contains all the directories, starting with the root directory, that lead to a specific file or directory.
Answers to Self-Review Exercises
a. Iterator.
b. index.
c. autoboxing.
d. ArrayList, Vector.
e. auto-unboxing.
f. shutdown.
g. synchronized.
a. False. Autoboxing occurs when adding a primitive type to a collection, which means the primitive type is converted to its corresponding type-wrapper class.
b. False. A Set cannot contain duplicate values.
c. False. A Map cannot contain duplicate keys.
d. True.
e. False. Collections is a class; Collection is an interface.
f. True.
g. True.
h. False. Text files are human readable in a text editor. Binary files might be human readable, but only if the bytes in the file represent ASCII characters.
i. True.
Execises
J.3 Define each of the following terms:
a. Collection
b. Collections
c. Comparator
d. List
e. HashMap
f. ObjectOutputStream
g. File
h. ObjectOutputStream
i. byte-based stream
j. character-based stream
J.4 Briefly answer the following questions:
a. What is the primary difference between a Set and a Map?
b. What happens when you add a primitive type (e.g., double) value to a collection?
c. Can you print all the elements in a collection without using an Iterator? If yes, how?
J.5 (Duplicate Elimination) Write a program that reads in a series of first names and eliminates duplicates by storing them in a Set. Allow the user to search for a first name.
J.6 (Counting Letters) Modify the program of Fig. J.9 to count the number of occurrences of each letter rather than of each word. For example, the string "HELLO THERE" contains two Hs, three Es, two Ls, one O, one T and one R. Display the results.
J.7 (Color Chooser) Use a HashMap to create a reusable class for choosing one of the 13 predefined colors in class Color. The names of the colors should be used as keys, and the predefined Color objects should be used as values. Place this class in a package that can be imported into any Java program. Use your new class in an application that allows the user to select a color and draw a shape in that color.
J.8 (Counting Duplicate Words) Write a program that determines and prints the number of duplicate words in a sentence. Treat uppercase and lowercase letters the same. Ignore punctuation.
J.9 (Prime Numbers and Prime Factors) Write a program that takes a whole number input from a user and determines whether it’s prime. If the number is not prime, display its unique prime factors. Remember that a prime number’s factors are only 1 and the prime number itself. Every number that is not prime has a unique prime factorization. For example, consider the number 54. The prime factors of 54 are 2, 3, 3 and 3. When the values are multiplied together, the result is 54. For the number 54, the prime factors output should be 2 and 3. Use Sets as part of your solution.
J.10 (Sorting Words with a TreeSet) Write a program that uses a String method split to tokenize a line of text input by the user and places each token in a TreeSet. Print the elements of the TreeSet. [Note: This should cause the elements to be printed in ascending sorted order.]
J.11 (Bouncing Ball) Write a program that bounces a blue ball inside a JPanel. The ball should begin moving with a mousePressed event. When the ball hits the edge of the JPanel, it should bounce off the edge and continue in the opposite direction. The ball should be updated using a Runnable.