
Before You Begin
This section contains information and instructions you should review to ensure that your computer is set up properly for use with this book. We’ll post updates (if any) to the Before You Begin section on the book’s website:
www.deitel.com/books/AndroidFP/
Font and Naming Conventions
We use fonts to distinguish between on-screen components (such as menu names and menu items) and Java code or commands. Our convention is to show on-screen components in a sans-serif bold Helvetica font (for example, Project menu) and to show file names, Java code and commands in a sans-serif Lucida font (for example, the keyword public or class Activity).
Software and Hardware System Requirements
To develop Android apps you need a Windows®, Linux or Mac OS X system. To view the latest operating-system requirements visit:
developer.android.com/sdk/requirements.html
We developed the apps in this book using the following software:
• Java SE 6 Software Development Kit
• Eclipse 3.6.2 (Helios) IDE for Java Developers
• Android SDK versions 2.2, 2.3.3 and 3.x
• ADT (Android Development Tools) Plugin for Eclipse
We tell you where to get each of these in the next section.
Installing the Java Development Kit (JDK)
Android requires the Java Development Kit (JDK) version 5 or 6 (JDK 5 or JDK 6). We used JDK 6. To download the JDK for Linux or Windows, go to
www.oracle.com/technetwork/java/javase/downloads/index.html
You need only the JDK. Be sure to carefully follow the installation instructions at
www.oracle.com/technetwork/java/javase/index-137561.html
Recent versions of Mac OS X come with Java SE 6. Be sure to get the latest version by using the Apple menu Software Update... feature to check for software updates
Setting the PATH Environment Variable
The PATH environment variable on your computer designates which directories the computer searches when looking for applications, such as the applications that enable you to compile and run your Java applications (called javac and java, respectively). Carefully follow the installation instructions for Java on your platform to ensure that you set the PATH environment variable correctly.
If you do not set the PATH variable correctly, when you use the JDK’s tools, you’ll receive a message like:
'java' is not recognized as an internal or external command,
operable program or batch file.
In this case, go back to the installation instructions for setting the PATH and recheck your steps. If you’ve downloaded a newer version of the JDK, you may need to change the name of the JDK’s installation directory in the PATH variable.
Setting the CLASSPATH Environment Variable
If you attempt to run a Java program and receive a message like
Exception in thread "main" java.lang.NoClassDefFoundError: YourClass
then your system has a CLASSPATH environment variable that must be modified. To fix the preceding error, locate the CLASSPATH variable by following the steps in the installation instructions for the PATH environment variable. Next, edit the variable’s value to include the local directory—typically represented as a dot (.). On Windows add
.;
at the beginning of the CLASSPATH’s value (with no spaces before or after these characters). On other platforms, add
.:
Also, ensure that there are no extra spaces before the dot (.) or after the directory separator (; or :).
Java’s Nimbus Look-and-Feel
Java comes bundled with an elegant, cross-platform look-and-feel known as Nimbus. For Java programs with graphical user interfaces in this book’s appendices, we’ve configured our systems to use Nimbus as the default look-and-feel.
To set Nimbus as the default for all Java applications, you must create a text file named swing.properties in the lib folder of both your JDK installation folder and your JRE installation folder. Place the following line of code in the file:
swing.defaultlaf=com.sun.java.swing.plaf.nimbus.NimbusLookAndFeel
For more information on locating these installation folders visit http://www.oracle.com/technetwork/java/javase/index-137561.html. [Note: In addition to the standalone JRE, there’s a JRE nested in your JDK’s installation folder. If you’re using an IDE that depends on the JDK (e.g., NetBeans), you may also need to place the swing.properties file in the nested jre folder’s lib folder.]
Installing the Eclipse IDE
Eclipse is the recommended integrated development environment (IDE) for Android development, though it’s possible to use other IDEs, text editors and command-line tools. To download the Eclipse IDE for Java Developers, go to
www.eclipse.org/downloads/
This page will allow you to download the latest version of Eclipse—3.7.1 at the time of this writing. To use the same version we used when developing this book (3.6.2), click the Older Versions link above the list of downloads. Select the appropriate version for your operating system (Windows, Mac or Linux). To install Eclipse, you simply extract the archive’s contents to your hard drive. On our Windows 7 system, we extracted the contents to C:Eclipse. For more Eclipse installation information, see
bit.ly/InstallingEclipse
Important: To ensure that the book’s examples compile correctly, configure Eclipse to use JDK 6 by performing the following steps:
1. Locate the Eclipse folder on your system and double click the Eclipse (![]() ) icon to open Eclipse.
) icon to open Eclipse.
2. When the Workspace Launcher window appears, click OK.
3. Select Window > Preferences to display the Preferences window.
4. Expand the Java node and select the Compiler node. Under JDK Compliance, set Compiler compliance level to 1.6.
5. Close Eclipse.
Installing the Android SDK
The Android Software Development Kit (SDK) provides the tools you need to develop, test and debug Android apps. You can download the Android SDK from
developer.android.com/sdk/index.html
Click the link for your platform—Windows, Mac OS X or Linux—to download the SDK’s archive file. Once you’ve downloaded the archive, simply extract its contents to a directory of your choice on your computer. The SDK does not include the Android platform—you’ll download this separately using the tools in the Android SDK.
Installing the ADT Plugin for Eclipse
The Android Development Tools (ADT) Plugin for Eclipse enables you to use the Android SDK tools to develop Android applications in the Eclipse IDE. To install the ADT Plugin, go to
developer.android.com/sdk/eclipse-adt.html
and carefully follow the instructions for downloading and installing the ADT Plugin. If you have any trouble with the installation, be sure to read the troubleshooting tips further down the web page.
Installing the Android Platform(s)
You must now install the Android platform(s) that you wish to use for app development. In this book, we used Android 2.2, 2.3.3 and 3.x. Perform the following steps to install the Android platform(s) and additional SDK tools:
1. Open Eclipse (![]() ).
).
2. When the Workspace Launcher window appears, specify where you’d like your apps to be stored, then click OK.
3. Select Window > Preferences to display the Preferences window. In the window, select the Android node, then specify the location where you placed the Android SDK on your system in the SDK Location field. On our Windows system, we extracted it at c:android-sdk-windows. Click OK.
4. Select Window > Android SDK Manager to display the Android SDK Manager window (Fig. 1).

Fig. 1. Android SDK Manager window.
5. The Name column of the window shows all of the tools, Android platform versions and extras that you can install. For use with this book, you need the items that are checked in Fig. 2. [Note: Most items in the Extras node are optional. The Google USB Driver package is necessary only for testing Android apps on actual devices using Windows. The Google Market Licensing package is necessary only if you intend to develop apps that query the Android Market to determine if a user has a proper license for an app before allowing the app to be used. The Google Market Billing package is necessary only if you intend to sell digital content through your app.]
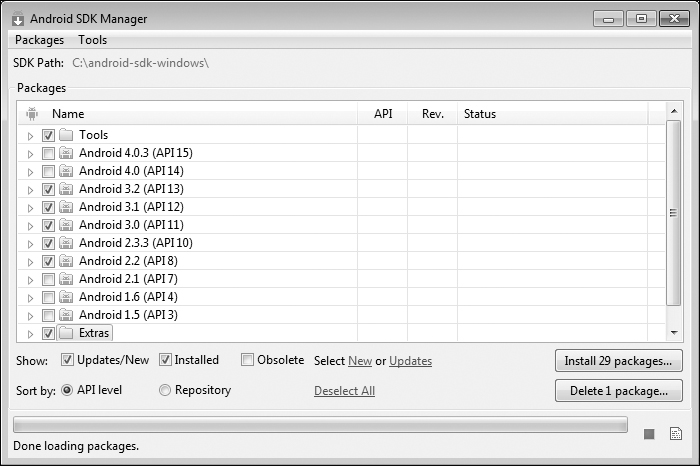
Fig. 2. Selecting items to install.
6. Click the Install button to display the Choose Packages to Install window (Fig. 3). In this window, you can read the license agreements for each item. When you’re done, click the Accept All radio button, then click the Install button. The status of the installation process will be displayed in the Android SDK Manager window. When the installation is complete, you should close and reopen Eclipse.

Fig. 3. Choose Packages to Install window.
Creating Android Virtual Devices (AVDs) for Use in the Android Emulator
The Android emulator, included in the Android SDK, allows you to run Android apps in a simulated environment on your computer rather than on an actual Android device. Before running an app in the emulator, you must create an Android Virtual Device (AVD) which defines the characteristics of the device on which you want to test, including the screen size in pixels, the pixel density, the physical size of the screen, size of the SD card for data storage and more. If you want to test your apps for multiple Android devices, you can create separate AVDs that emulate each unique device. To do so, perform the following steps:
1. Open Eclipse.
2. Select Window > AVD Manager to display the Android Virtual Device Manager window (Fig. 4).
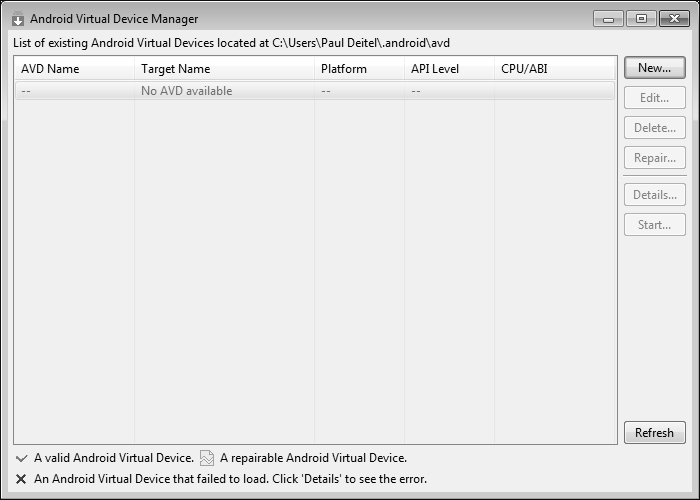
Fig. 4. Android AVD Manager window.
3. Click New... to display the Create new Android Virtual Device (AVD) window (Fig. 5), then configure the options as shown and click Create AVD. These settings simulate the primary Android phone that we used for testing—the original Samsung Nexus S, which was running Android 2.3.3 at the time of this writing. Each AVD you create has many other options specified in its config.ini. You can modify this file as described at to more precisely match the hardware configuration of your device.
developer.android.com/guide/developing/devices/
managing-avds.html

Fig. 5. Create new Android Virtual Device (AVD) window.
4. We also configured an AVD that represents the Motorola Xoom tablet running Android 3.1 so we could test our tablet apps. Its settings are shown in Fig. 6.
AVD Performance
At the time of this writing, AVD performance was quite slow. To improve AVD load time, ensure that the Enabled checkbox in the Snapshot section is checked.
(Optional) Setting Up an Android Device for Development
Eventually, you might want to execute your apps on actual Android devices. To do so, follow the instructions at
developer.android.com/guide/developing/device.html
If you’re developing on Microsoft Windows, you’ll also need the Windows USB driver for Android devices, which we included as one of the checked items in Fig. 2. In some cases, you may also need device-specific USB drivers. For a list of USB driver sites for various device brands, visit:
developer.android.com/sdk/oem-usb.html

Fig. 6. Create new Android Virtual Device (AVD) window.
(Optional) Other IDEs for Developing Android Apps
We developed all the apps in this book using the Eclipse IDE. Though this is the most popular IDE for Android development, there are other IDEs and tools available. Many early Android developers preferred to work with the command-line tools and some phone vendors (such as Motorola) provide their own Android development tools. The site
developer.android.com/guide/developing/projects/
projects-cmdline.html
includes information you’d need to develop Android apps using the command-line tools. Some of the tools for command-line development are summarized in (Fig. 7).

Fig. 7. Tools for developing Android apps in IDEs other than Eclipse.
Obtaining the Code Examples
The examples for Android How to Program are available for download at
www.deitel.com/books/androidhtp/
If you’re not already registered at our website, go to www.deitel.com and click the Register link below our logo in the upper-left corner of the page. Fill in your information. There’s no charge to register, and we do not share your information with anyone. We send you only account-management e-mails unless you register separately for our free, double-optin Deitel® Buzz Online e-mail newsletter at
www.deitel.com/newsletter/subscribe.html
After registering for our website, you’ll receive a confirmation e-mail with your verification code—please verify that you entered your email address correctly. You’ll need to click the verification link in the email to sign in at www.deitel.com for the first time. Configure your e-mail client to allow e-mails from deitel.com to ensure that the verification e-mail is not filtered as junk mail.
Next, visit www.deitel.com and sign in using the Login link below our logo in the upper-left corner of the page. Go to www.deitel.com/books/androidhtp/. Click the Examples link to download the ZIP archive file to your computer. Double click the ZIP file to unzip the archive.
You’re now ready to begin developing Android apps with Android How to Program. Enjoy!