Chapter 10
There’s a Map for That
In This Chapter
![]() Exploring your world with Maps
Exploring your world with Maps
![]() Adding layers to the map
Adding layers to the map
![]() Finding your location
Finding your location
![]() Sharing your location
Sharing your location
![]() Searching for places
Searching for places
![]() Saving a map for later
Saving a map for later
![]() Using your tablet as a navigator
Using your tablet as a navigator
I’m hoping that teleportation becomes a reality someday. It would be so convenient to travel instantly, to get where you’re going without sitting in a cramped cabin. In fact, the only mystery will be whether teleportation has the same knack for losing your luggage as air travel.
One thing our fortunate descendants probably won’t complain about is being lost. That’s because their Android tablets will tell them exactly where they are, thanks to the Maps app. They’ll be able to find all sorts of things, from tacos in pill form to used flying cars to Hello Kitty light sabers. Because it’s the future, they might even be able to use the futuristic version of an Android tablet to find their lost luggage.
A Map That Needs No Folding
You can find your location, as well as the location of things near and far, by using the Maps app on your Android tablet. Good news: You run no risk of improperly folding the Maps app. Better news: The Maps app charts the entire country, including freeways, highways, roads, streets, avenues, drives, bike paths, addresses, businesses, and points of interest.
Using the Maps app
You start the Maps app by choosing Maps from the Apps drawer. If you’re starting the app for the first time or it has been recently updated, you can read the What’s New screen; tap the OK button to continue.
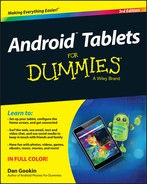
Your tablet communicates with Global Positioning System (GPS) satellites to hone in on your current location. (See the later sidebar “Activate your location!”) The position is accurate to within a given range, referenced by a blue circle around your location on the map, as shown in Figure 10-1. If the circle doesn't appear, your location is either pretty darn accurate or you need to zoom in.
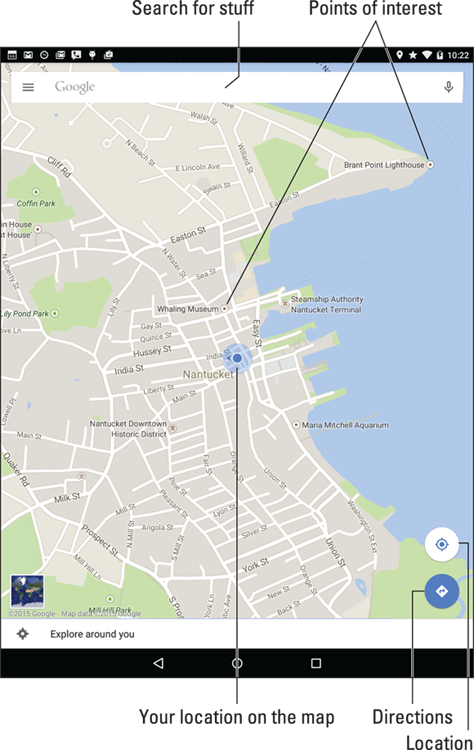
Figure 10-1: Your location on a map.
Here are some fun things you can do when viewing the basic street map:
Zoom in: To make the map larger (to move it closer), double-tap the screen. You can also spread your fingers on the touchscreen to zoom in.
Zoom out: To make the map smaller (to see more), pinch your fingers on the touchscreen.
Pan and scroll: To see what’s to the left or right or at the top or bottom of the map, drag your finger on the touchscreen; the map scrolls in the direction you drag.
 Rotate: Using two fingers, rotate the map clockwise or counterclockwise. Tap the Compass Pointer icon, as shown in the margin, to reorient the map with north at the top of the screen.
Perspective: Touch the screen with two fingers and swipe up or down to view the map in perspective. You can also tap the Location icon to switch to Perspective view, although that trick works only for your current location. To return to flat-map view, tap the Compass Pointer icon.
The closer you zoom in on the map, the more detail you see, such as street names, address block numbers, businesses, and other sites — but no tiny people.
- The blue triangle (shown in the center of Figure 10-1, inside the blue circle) shows in which general direction the tablet is pointing.
When the tablet’s direction is unavailable, you see a blue dot as your location on the map.
 When the location icon is blue, you’re viewing your current location on the map. Tap the icon to enter Perspective view. Tap the Perspective icon, shown in the margin, to return to Flat view.
- When all you want is a virtual compass, similar to the one you lost as a kid, get a compass app from the Google Play Store. See Chapter 15 for more information about the Google Play Store.
Adding layers
You add details to the map by applying layers: A layer can enhance the map’s visual appearance, provide more information, or add other fun features to the basic street map, such as the Satellite layer, shown in Figure 10-2.
Figure 10-2: The Satellite layer.
The key to accessing layers is to tap the Side Menu icon to view the navigation drawer. It displays optional layers you can add to the map, such as the Satellite layer, shown in Figure 10-2. Another popular layer is Traffic, which lists updated travel conditions.
To remove a layer, choose it again from the navigation drawer; any active layer appears highlighted. When a layer isn’t applied, Street view appears.
 Tap the Satellite/Street icon in the lower left corner of the screen to switch between those two layers.
It Knows Where You Are
It’s common to use a map to find out where you’re going. New is the concept of using a map to find out where you are. You no longer need to worry about being lost. Using your tablet’s Maps app, you can instantly find out where you are and what’s nearby. You can even send a message to someone in the tablet’s address book to have that person join you — or rescue you.
Finding a location
The Maps app shows your location as a compass arrow or blue dot on the screen. But where is that? I mean, if you need to contact a tow truck, you can’t just say, “I’m the blue dot on the gray slab by the green thing.”
Well, you can say that, but it probably won’t do any good.
 To view your current location, tap the Location icon, as shown in the margin. If you desire more information, or you want more info about any random place, long-press the Maps screen. Up pops a card, similar to the one shown in Figure 10-3. The card gives your approximate address.
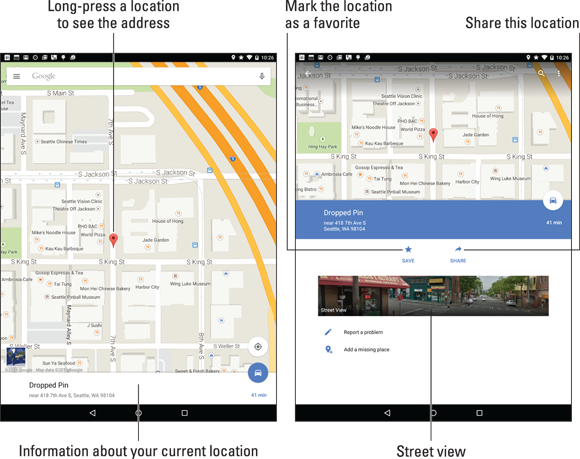
Figure 10-3: Finding an address.
Tap the card to see a screen with more details and additional information, shown on the right in Figure 10-3.
 This trick works only when the tablet has Internet access. When Internet access isn’t available, the Maps app can't communicate with the Google map servers.
 The time display under the Travel icon (the car shown on the right side of Figure 10-3) indicates how far away the address is from your current location. You might also see the Route icon, shown in the margin.
- When you have way too much time on your hands, play with the Street View command. Choosing this option displays the location from a 360-degree perspective. In Street view, you can browse a locale, pan and tilt, or zoom in on details to familiarize yourself with an area, for example — whether you’re familiarizing yourself with a location or planning a burglary.
Helping others find your location
It’s possible to use the Maps app to send your current location to a friend. If your pal has a mobile device (phone or tablet) with smarts similar to your Android tablet, he can use the coordinates to get directions to your location. Maybe he’ll even bring some tacos in pill form!
To send your current location in an e-mail message, obey these steps:
Long-press your current location on the map.
To see your current location, tap the Location icon in the lower right corner of the Maps app screen.After long-pressing your location (or any location), you see a card displayed, showing the approximate address.
Tap the card, and then tap the Share icon.
The current version of the Maps app doesn’t use the standard Android Share icon. Refer to Figure 10-3 for this icon’s location and appearance.
Choose the app to share the location.
For example, choose Gmail or Email to send the location data in an email message, choose Hangouts to instantly chat with someone, or choose another, appropriate app from among those listed.
- Continue using the selected app to complete the process of sending your location to someone else.
When the recipients receive the message, they can tap the link to open your location in the Maps app — providing that they have an Android device. When the location appears, they can follow my advice in the later section “Android the Navigator” for getting to your location. And don’t loan them this book, either; have them purchase their own copy. Thanks.
Find Things
The Maps app can help you find places in the real world, just like the Google Search app helps you find places on the Internet. Both operations work basically the same.
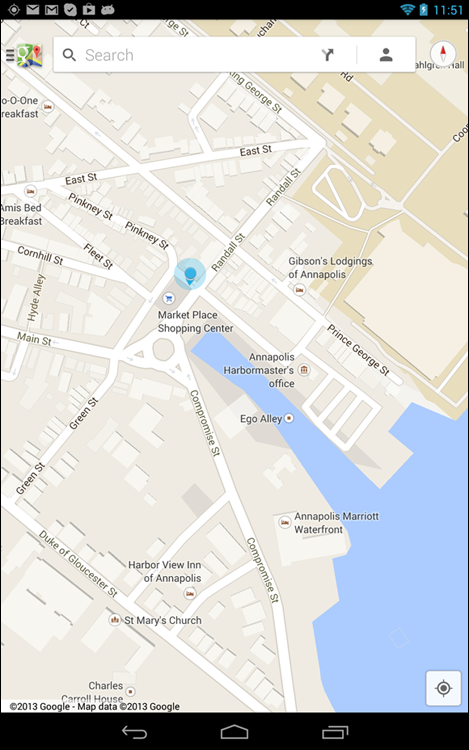
Open the Maps app and type something to find in the Search box, as illustrated in Figure 10-1. The variety of terms you can type in the Search box is explained in this section.
Looking for a specific address
To locate an address, type it in the Search box. For example:
1313 N. Harbor Blvd., Anaheim, CA 92803
You may not need to type the entire address: As you tap the keys, suggestions appear onscreen. Tap a matching suggestion to view that location. Otherwise, tap the onscreen keyboard’s Search key and that location is shown on the map.
After finding a specific address, the next step is getting directions. See the later section “Android the Navigator.”
- You don’t need to type the entire address. Oftentimes, all you need is the street number and street name and then either the city name or zip code.
- If you omit the city name or zip code, the Maps app looks for the closest matching address near your current location.
- Tap the X button in the Search box to clear the previous search.
Finding a business, restaurant, or point of interest
You may not know an address, but you know when you crave sushi or perhaps the exotic flavors of Manitoba. Maybe you need a hotel or a gas station, or you must find a place that buys old dentures. To find a business entity or a point of interest, type its name in the Search box. For example:
Movie theater
This search text locates movie theaters on the current Maps screen. Or, to find locations near you, first tap the Location icon (shown in the margin) and then type the search text.
To look for points of interest at a specific location, add the city name, district, or zip code to the search text. For example:
Japanese Market San Diego
After typing this command and tapping the onscreen keyboard’s Search key, you see the assortment of Japanese (or Asian) markets located in the San Diego metropolitan area, similar to the results shown in Figure 10-4.
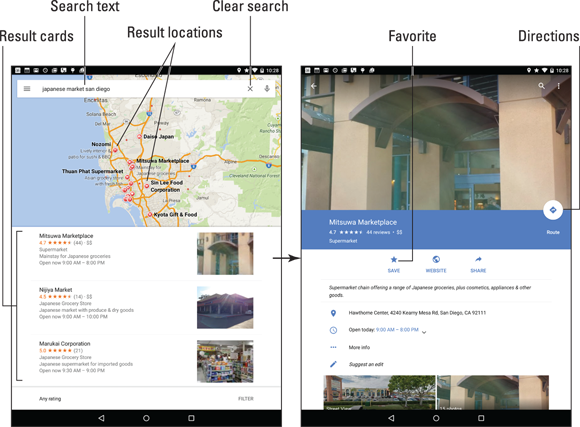
Figure 10-4: Finding a Japanese market near San Diego.
To see more information about a result, tap its card, such as the one for Mitsuwa Marketplace in Figure 10-4. View details on the next screen to glean more information.
To get to the location, tap the Route icon on the location’s card. See the later section “Android the Navigator.”
- Every letter or dot on the search results screen represents a matching location. For each dot, a card appears, as shown on the bottom left in Figure 10-4.
- Spread your fingers on the touchscreen to zoom in on the map.
- If you really like the location, tap the Save (Star) icon. The location is added to your list of favorite places. A star also appears on the map, indicating that one of your favorite places is nearby. See the next section.
Making a favorite place
Just as you can bookmark favorite websites on the Internet, you can mark favorite places in the real world by using the Maps app. The feature is called Your Places.
![]() To visit your favorite places or browse your recent map searches, tap the Side Menu icon and choose Your Places from the navigation drawer. Swipe through the list to see recent searches, saved places, and any offline maps you’ve saved. To revisit a place, tap its entry in the list.
To visit your favorite places or browse your recent map searches, tap the Side Menu icon and choose Your Places from the navigation drawer. Swipe through the list to see recent searches, saved places, and any offline maps you’ve saved. To revisit a place, tap its entry in the list.
 Mark a location as a favorite by tapping the Save (star) icon on the location's Details card.
Setting your Home and Work locations
Two places you visit most frequently in the real world are where you live and where you work. The Maps app lets you create shortcuts for these locations. They’re called, logically enough, Home and Work.
To set the Home and Work locations, follow these steps in the Maps app:
- Tap the Side Menu icon to display the navigation drawer.
- Choose Settings.
- Choose the item Edit Home or Work.
Tap the Edit Home Address item and type in your Home address, or the location you prefer as “home.”
As you type, choose a matching location from those listed on the screen.
- Tap the Back navigation icon.
- Choose Edit Work Address.
- Type the address for your office or wherever you work or pretend to work.
You can use the Home and Work shortcuts when searching for a location or getting directions. For example, type Home into the Search box to instantly see where you live, or whichever place you call home. To get directions from your current location to work, type Work as the destination.
Saving a map for offline viewing
The Maps app works only when an Internet connection is active. When you know you’ll be away from the Internet, you can save a chunk of the map for offline viewing. Obey these directions:
Locate the map chunk you desire to save.
Pan. Square in the area to save on the screen. It can be as large or as small as you need. Obviously, smaller maps occupy less storage.
Tap the Side Menu icon and choose Your Places from the navigation drawer.
Offline maps are listed at the bottom of the Your Places screen.
Tap the button View All and Manage.
If you don’t yet have any offline maps, proceed to Step 4.
Tap the button Save a New Offline Map.
Because you already found the location in Step 1, you just need to:
- Tap the Save button.
Type a title for the map and tap the Save button.
The map now appears in the list of offline maps on the Your Places screen.
To use an offline map, display the navigation drawer and choose Your Places. Tap the offline map to view, and it shows up on the screen whether an Internet connection is active or not.
- Offline maps remain valid for 30 days. After that time, you must update the map to keep it current. To update an offline map, tap its Expired entry on the Your Place screen. The offline map is refreshed.
- Offline maps aren’t updated with traffic information.
- Though you can zoom and pan to peruse an offline map, you cannot use the Maps app to search the map. Searching works only when an Internet connection is active.
Android the Navigator
One command associated with locations found in the Maps app deals with getting directions. The command is called Route, and it shows either the Route icon (see the margin) or a mode of transportation, such as a car, bike, or bus. Here’s how it works:
Tap the Route icon on a location’s card.
After tapping the Route icon, you see a screen similar to the one shown in Figure 10-5. (When the tablet is held vertically, the information is displayed on two screens instead of one.)
Choose a method of transportation.
The available options vary, depending on your location. In Figure 10-5, the items are (from left to right) Car, Public Transportation, On Foot, and Bicycle.
Set a starting point.
You can type a location or choose from one of the locations shown on the screen, such as your current location, home location, or any location you’ve previously searched. Tap the Starting Location item to set a different location.
Ensure that the starting location and destination are what you want.
If they’re backward, tap the Swap icon (refer to Figure 10-5).
Tap a route card.
One or more routes are listed on the screen. In Figure 10-5, two cards are shown with different times and distances.
- Peruse the results.
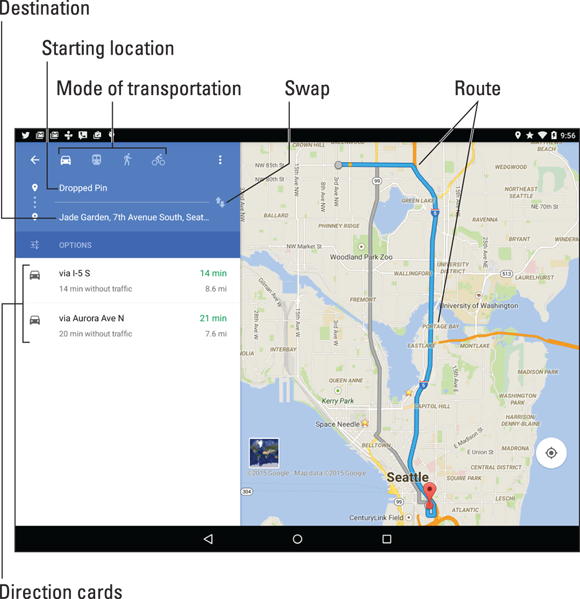
Figure 10-5: Planning a trip.
The map shows your route, highlighted as a blue line on the screen. Detailed directions also appear. Traffic jams show up as red, with slow traffic as yellow.
To see a list of directions, tap a direction card (refer to Figure 10-5). A scrolling list appears on the screen, detailing turn-by-turn directions.
 To begin your journey and enter turn-by-turn navigation mode, tap a direction card and then tap the Navigation icon, shown in the margin. You can mute the voice by tapping the Action Overflow and choosing Mute. Otherwise, toodle on to your destination.
 To exit from Navigation mode, tap the Close icon on the screen.
- If you don’t like the route, you can adjust it: Drag the blue line by using your finger. Time and distance measurements shown on the cards change as you adjust the route.
- The Maps app alerts you to any toll roads on the specified route. As you travel, you can choose alternative, non-toll routes, if available. You’re prompted to switch routes during navigation; see the next section.
- The blue line appears only on the tablet screen, not on streets in the real world.
- You may not get perfect directions from the Maps app, but it’s a useful tool for places you’ve never visited.
 If you use your tablet in your auto, I strongly recommend that someone else hold it and read the directions. Or use voice navigation and, for goodness sake, don’t look at the tablet while you’re driving!
- It’s possible to navigate by using an offline map. Though the navigation doesn’t update, you can user your Wi-Fi tablet to save an offline map and then venture out into the unknown while still using the Maps app. See the earlier section “Saving a map for offline viewing” for details.
- Next to your Android tablet’s navigation feature, the other thing you need to get to your destination is a power source. Because navigation consumes a lot of battery power, I strongly recommend getting a car adapter for the tablet. Get an adapter that matches the USB/Power connector on the tablet’s edge. Any adapter works; you don’t need to ge the pricey one sold by the manufacturer.