
Chapter 11
Everyone Say “Cheese!”
In This Chapter
![]() Understanding the Camera app
Understanding the Camera app
![]() Taking a picture or recording video
Taking a picture or recording video
![]() Recording yourself
Recording yourself
![]() Activating the flash
Activating the flash
![]() Setting the resolution and quality
Setting the resolution and quality
![]() Controlling the location tag
Controlling the location tag
![]() Switching modes and adding effects
Switching modes and adding effects
I have no idea why people say “Cheese” when they get their pictures taken. Supposedly, it’s to make them smile. Even in other countries, where the native word for cheese can’t possibly influence the face’s smile muscles, they still say their native word for cheese whenever a picture is taken. Apparently, it’s a tradition that’s present everywhere. Well, except for maybe on the moon, where it’s rumored that Buzz Aldrin said “Green cheese.”
When you hear folks say “Cheese” around your Android tablet, it will most likely be because you’re taking advantage of the tablet’s photographic and video capabilities. Or I suppose that you could use the tablet as a festive cheese platter. But when you opt to take pictures or shoot video, turn to this chapter for helpful words of advice.
Android Tablet Camera 101
An Android tablet isn’t the world’s best camera. And I’m sure that Mr. Spock’s tricorder wasn’t the best camera in the Star Trek universe, either, but it could take pictures. That comparison is kind of the whole point: Your Android tablet is an incredible gizmo that does many things. One of those things is to take pictures, which is the responsibility of the Camera app.
Introducing the Camera app
Google makes a standard Camera app, which is called the Google Camera. Not every tablet uses that app, however. In fact, of all the standard apps on an Android tablet, the Camera app is the one that differs the most.
Generally speaking, the Camera app features at least two shooting modes: still images and video. Additional modes may offer features like a panorama and even special-effects shots. All these shooting modes are handled by the single Camera app.
The Camera app also controls both the tablet’s cameras: the main camera, which is on the tablet's backside, and the front-facing camera, which is on the tablet's front above the touchscreen.
Figure 11-1 shows the Google Camera app’s main interface in single-shot mode. To switch modes, swipe in from the left side of the screen. The current mode is identified by examining the Shutter/Record icon, as shown in the figure.

Figure 11-1: The Google Camera app.
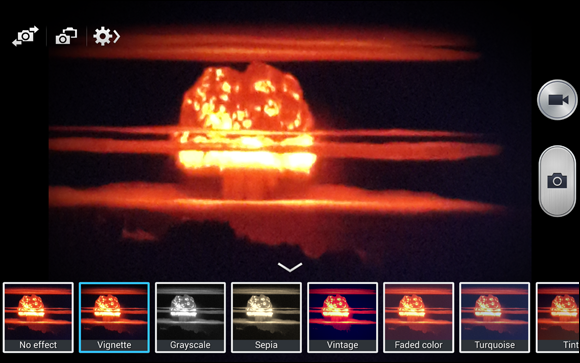
Just to show you how different things can be, Figure 11-2 shows the Camera app on a Samsung Galaxy Tab S. This isn’t even the same app you’d find on all Samsung Galactic tablets; nope, each one is pretty much unique.

Figure 11-2: The Galaxy Tab S Camera app.
The same items are present in both Figures 11-1 and 11-2, more or less. The Shutter icon still snaps a picture or records video. Beyond that, it’s anyone’s guess where the options could be. This chapter offers hints and suggestions on how to find key items no matter which Camera app your tablet uses.
- Camera settings are reflected by icons on the screen. Figure 11-2 shows several examples in the upper right corner, although the icons are not easy to see.
- You can take as many pictures or record as much video with your tablet as you like, as long as you don't run out of space in the tablet's internal storage or external storage. Speaking of which:
- See Chapter 12 for information on previewing and managing pictures and videos.
- See Chapter 23 for details on taking a panoramic shot.
Using basic camera controls
Here are some pointers that apply to all variations of the Android tablet’s Camera app:
- The tablet can be used as a camera in either landscape or portrait orientation. Don’t worry either way: The image is always saved with the proper side up.
- The tablet’s touchscreen serves as the viewfinder; what you see on the screen is exactly what appears in the final photo or video.
- Tap the screen to focus on a specific object. You’ll see a focus ring or square that confirms how the camera lens is focusing. Not every tablet has a camera that can focus; I’ve not seen any front-facing camera that can focus.
- Zoom in by spreading your fingers on the screen.
- Zoom out by pinching your fingers on the screen.
- Some tablets let you use the volume key to zoom in or out: Volume Up zooms in, Volume Down zooms out. On other cameras, pressing the volume key works like tapping the Shutter icon to take a picture.
 Hold the tablet steady! I recommend using two hands for taking a still shot and for shooting video.
Capturing a still image
Taking a still image requires only two steps. First, ensure that the Camera app is in single-shot mode. Second, tap the Shutter icon to snap the photo.
 Set single-shot mode in the Google Camera app by swiping in from the left side of the screen. Tap the Single Shot icon, shown in the margin. Coincidentally, the Shutter icon also looks like the Single Shot icon. Weird.
In other camera apps, choose the icon representing single-shot mode. Sometimes you’ll find a toggle that switches between Single-Shot and Video modes. If so, ensure that the setting is on Single-Shot to take a still image.
Set the resolution before you shoot. See the later section “Changing still-shot resolution.”
Recording video
To record video, switch the Camera app to Video mode. The Shutter icon becomes the Record icon. Tap that icon to start recording. The elapsed time, and maybe even storage consumed, appears on the touchscreen as video is being recorded. Tap the Stop icon to end the recording.
In the stock Android Camera app, swipe your finger from the left edge of the screen toward the center. You see a list of shooting modes, as shown in Figure 11-1, on the right. Tap Video.
 When Video mode is active, the Shutter icon changes to the Video icon, shown in the margin. In some Camera apps, the Record icon (a red dot) is used instead. Tap that icon to start recording. Tap the Stop icon to end the video, as shown in Figure 11-3.
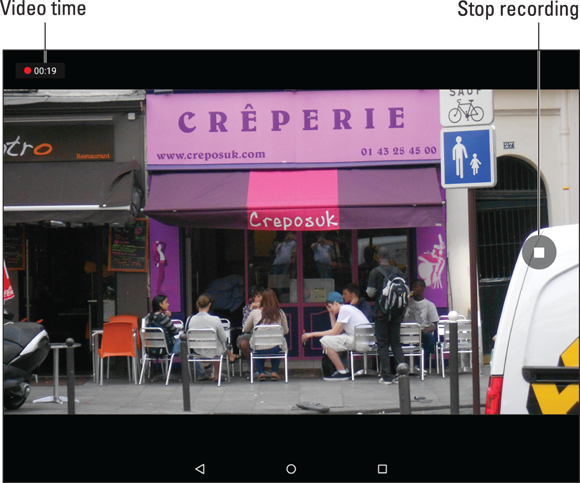
Figure 11-3: Shooting video in the Google Camera app.
- Some Camera apps feature the Pause icon for recording video. Tap that icon to temporarily suspend recording. Tap the Record icon to resume. The video you record is saved as a single video as opposed to multiple videos.
- Some versions of the Camera app may allow you to grab a still image while the tablet is recording: Tap the screen. The image is snapped and saved.
Reviewing what you just shot
To preview the image or video in the stock Android Camera app, swipe the screen from right to left. This action pulls in the Photos app, where you can view previously shot still images and videos. Tap the left-pointing arrow in the upper left corner of the screen to return to the Camera app.
 Most Android tablet Camera apps feature a previous-image thumbnail (refer to Figure 11-2). Tap that thumbnail to examine still images and videos. Tap the Back navigation icon to return to the Camera app.
 One reason to review an image you just shot is to delete it. To do so, summon the image or video as described in this section and tap the Delete (Trash) icon. The image is removed immediately, although some tablets may prompt you for confirmation; tap the OK button to delete the image or video.
- To manage all images taken by or stored in the tablet, use the Photos app. See Chapter 12.
 If your pictures or videos appear blurry, ensure that the camera lens on the back of the tablet isn't dirty. Or you may have neglected to remove the plastic cover from the rear camera when you first set up your tablet.
Camera Settings and Options
Some tablets feature the Camera app, with more features and special effects than you’ll find in a Hollywood movie.
Okay, I’m exaggerating. Still, you’ll find plenty of options and settings even in the most basic Camera app. This section touches upon the more necessary and vital settings and options.
Switching cameras
You can do more with the tablet’s front-facing camera than take those infamous selfie shots. What more exactly you can do I can’t think of right now, but the key is to be able to switch between front and rear cameras while using the Camera app.
![]() In the Google Camera app, tap the Action Overflow icon (shown in the margin) and choose the Switch Camera icon, shown in Figure 11-4. When you see yourself, you’ve done it correctly.
In the Google Camera app, tap the Action Overflow icon (shown in the margin) and choose the Switch Camera icon, shown in Figure 11-4. When you see yourself, you’ve done it correctly.

Figure 11-4: Google Camera app actions.
Other camera apps may show the Switch Cameras icon on the main screen. Refer to Figure 11-2, which shows the Switch Cameras icon used by the Samsung Galaxy Tab S Camera app.
To return to the tablet’s rear, or main, camera, repeat the same steps used to switch to the front-facing camera. In the Google Camera app, the icon’s appearance changes slightly, but it’s still at the same location.
 When the Switch Camera icon isn’t visible, tap the Action Overflow or Settings (Gear) icon, shown in the margin, to look for the Switch Camera action or icon.
- Other apps that use the camera may have their own techniques for switching from front to rear camera and back again. For example, Hangouts and Skype may automatically use the front-facing camera. See Chapter 8 for details.
Setting the flash
Not all Android tablets feature a flash on the rear camera. If your tablet does, you can set the flash’s behavior, as described in Table 11-1.
Table 11-1 Android Tablet Camera Flash Settings
Setting |
Icon |
When the Flash Activates |
Auto |
|
During low-light situations but not when it’s bright out |
On |
|
Always |
Off |
|
Never, even in low-light situations |

To change or check the flash setting in the Google Camera app, tap the Action Overflow icon on the app’s main screen. The current flash setting is represented by an icon on the screen, such as the Auto flash setting shown in Figure 11-4 and referenced in Table 11-1. Tap that icon to change the flash setting.
Some variations of the Camera app show the flash setting on the Camera app’s main screen. If so, tap the icon to cycle through the flash settings.
When you can’t find the Flash icon on the screen, tap an Action Overflow or Settings icon. I’ve also seen Camera apps that feature a sliding drawer on which you’ll find the Flash icon. Look for a triangle or chevron near the edge of the screen, which could be one of those slide-in drawers.
- A good time to turn on the auto flash is when taking pictures of people or objects in front of something bright, such as Aunt Ellen showing off her prized peach cobbler in front of a burning munitions factory.
- A “flash” setting is also available for shooting video in low-light situations. In that case, the flash LED is on the entire time the video is being shot. This setting is made similarly to setting the flash, although the options are only On and Off. It must be set before you shoot video, and, yes, it devours a lot of battery power.
Changing still-shot resolution
Too many people ignore the image resolution setting, on not only tablets but digital cameras as well. Either that, or they just figure that the highest resolution is the best resolution. That’s not always the case.
High-resolution is ideal for printing images and for photo editing. It’s not ideal for images you plan on sharing with Facebook or sending as email attachments. Further, higher-resolution pictures occupy more storage space. Don’t be disappointed when your tablet fills up with vacation photos because the resolution is too high.
Another problem with resolution is remembering to set it before you snap the photo. As you might expect, the techniques for setting resolution vary with the Camera app.
In the Google Camera app, set the image resolution by following these steps:
Display the Camera app’s shooting modes.
Swipe the screen from left to right.
- Tap the Settings icon.
Choose Resolution & Quality.
The Resolution & Quality screen is organized by shooting mode: Camera (still image) and Video. It’s further organized by back or front camera.
Choose a mode and a camera.
For example, tap Back Camera Photo to set the still-image resolution for the tablet’s rear camera.
Choose a resolution or video-quality setting from the list.
Options are presented in aspect ratio and in megapixels.
For other Camera apps, the resolution item may be found by tapping the Action Overflow or Settings icon and then choosing a Resolution, Picture Size, or Photo Size action. You may also have to switch cameras (front or rear) before setting the resolution.
- Set the resolution or video quality before you shoot!
- The aspect ratio describes the image’s overall dimensions horizontally by vertically. A 4:3 ratio is pretty much standard, just like the tablet’s screen. The 16:9 ratio is the widescreen format.
- A picture’s resolution describes how many pixels, or dots, are in the image. The more dots, the better the image looks and prints.
 Megapixel is a measurement of the amount of information stored in an image. One megapixel is approximately 1 million pixels, or individual dots that comprise an image. It’s often abbreviated MP.
Choosing video quality
Video recorded on your Android tablet doesn’t use the same type of resolution as taking a still image. Instead, it uses a video quality setting. As with setting the resolution, you set the video quality before you shoot. And setting the highest quality isn’t always necessary.
Setting the video quality happens pretty much the same way as setting the still image resolution, as covered in the preceding section. The difference is that you choose the Video or Video Size option instead of the Camera or Photo option.
- Set the video quality before you shoot!
- As with setting the still image resolution, the highest video quality isn’t always the best. I pick high quality only when I plan to edit the video or show it on a large-screen HDTV or monitor.
- The video-quality settings HD and SD refer to High Definition and Standard Definition, respectively. The “p” value represents the vertical resolution, with higher values indicating higher resolution or quality.
- Aspect ratio settings might also be available for setting the video quality. The 4:3 ratio is for standard video; 16:9 is for widescreen.
Activating the location tag
Your Android tablet not only takes pictures but also keeps track of where you’re located when you take the picture — if you’ve turned on that option. The feature is called location tag, geotag, or GPS-tag.
To confirm the location tag setting, follow these steps in the Google Camera app:
View the Camera modes.
Swipe the screen from the left edge toward the center to view the shooting modes.
Tap the Settings icon.
The master control by the Save Location item is either on or off, reflecting the location tag setting.
Other Camera apps may require you to tap an Action Overflow or Settings icon to locate the Location Tag item. You may further have to tap a Settings tab to find this specific item.
- Deactivating the location tag feature doesn’t remove that information from photos you’ve already taken.
- The geotag information is stored in the picture itself. This means that other devices, apps, and computer programs can read the GPS information to determine where the image was taken.
- See Chapter 12 for information on reviewing a photograph’s location.
Selecting the storage device
When your Android tablet features removable storage, you can set where the Camera app stores images and videos. Generally, the steps work like this:
- Tap the Action Overflow or Settings icon.
- Choose Storage Location or a similar option.
Select the location.
The options are Device or Internal for the tablet’s internal storage; or MicroSD, Memory Card, or External Storage for the removable media card.
Some Camera apps automatically switch to external storage (the MicroSD card) when that media is inserted. Such apps automatically reset to internal storage when the media card is removed.
Exploring special modes and effects
Camera apps on Android tablets often sport a rich variety of features. Some apps go way beyond the basics and offer custom shooting modes, special effects, filters, animations, and more. These are divided into two categories:
Special modes are shooting modes. For example, the Camera app may offer the Sports shooting mode, ideal for capturing fast action, or Macro mode for getting details on small objects.
Best Shot mode is another type of mode found on some Samsung tablet Camera apps. In that mode, several images are taken rapidly, which you can then review to pick and choose the best parts of the images to create a final composite.
Effects are applied to the image or video beforehand. These include colorization filters — for example, to shoot an image or a video in monochrome or grayscale.
- Not every Android tablet Camera app offers special shooting modes and effects.
- Exploring the shooting modes and effects can be fun, but disable them whenever you need to return to normal photography and video recording. The standard modes are Camera or Still Image for taking photos and Video for recording movies. To remove visual effects, choose either the No Effect or Auto option.