
Classical computer science classes often define a program in terms of functionality and data, and Android applications are no different. They perform tasks, display information to the screen, and act upon data from a variety of sources.
Developing Android applications for mobile devices with limited resources requires a thorough understanding of the application lifecycle. Android also uses its own terminology for these application building blocks—terms such as Activity and View. This chapter familiarizes you with the different components of Android applications and how to configure the important file every Android application must include, the Android Manifest file.
This section introduces you to the terminology used in Android application development and provides you with a more thorough understanding of how Android applications function and interact with one another.
An Android application is a collection of tasks, each of which is called an Activity. Each Activity within an application has a unique task or purpose.
The Android Activity class (android.app.Activity) is core to any Android application. Much of the time, you define and implement an Activity for each screen in your application. For example, a simple game application might have the following five Activities, as shown in Figure 4.1:
• A Startup or Splash screen: This Activity serves as the primary entry point to the application. It displays the application name and version information and transitions to the Main menu after a short interval.
• A Main Menu screen: This Activity acts as a switch to drive the user to the core Activities of the application. Here the users must choose what they want to do within the application.
• A Game Play screen: This Activity is where the core game play occurs.
• A High Scores screen: This Activity might display game scores or settings.
• A Help/About screen: This Activity might display the information the user might need to play the game.

As previously mentioned, Android applications can have multiple entry points. There is no main() function, such as you find in iPhone development. Instead, a specific Activity can be designated as the main Activity to launch by default within the AndroidManifest.xml file; we talk more about this file in the “Defining Your Application Using the Android Manifest File” section of this chapter.
Other Activities might be designated to launch under specific circumstances. For example, a music application might designate a generic Activity to launch by default from the Application menu, but also define specific alternative entry point Activities for accessing specific music playlists by playlist ID or artists by name.
You can start activities in several ways. The simplest method is to use the Application Context object to call the startActivity() method, which takes a single parameter, an Intent.
An Intent (android.content.Intent) is an asynchronous message mechanism used by the Android operating system to match task requests with the appropriate Activity or Service (launching it, if necessary) and to dispatch broadcast Intents events to the system at large.
For now, though, we focus on Intents and how they are used with Activities. The following line of code calls the startActivity() method with an explicit Intent. This Intent requests the launch of the target Activity named MyDrawActivity by its class. This class is implemented elsewhere within the package.
![]()
This line of code might be sufficient for some applications, which simply transition from one Activity to the next. However, you can use the Intent mechanism in a much more robust manner. For example, you can use the Intent structure to pass data between Activities.
You’ve seen the simplest case to use an Intent to launch a class by name. Intents need not specify the component or class they want to launch explicitly. Instead, you can create an Intent Filter and register it within the Android Manifest file. The Android operating system attempts to resolve the Intent requirements and launch the appropriate Activity based on the filter criteria.
The guts of the Intent object are composed of two main parts: the action to be performed and the data to be acted upon. You can also specify action/data pairs using Intent Action types and Uri objects. As you saw in the last chapter, a Uri object represents a string that gives the location and name of an object. Therefore, an Intent is basically saying “do this” (the action) to “that” (the Uri describing what resource to do the action to).
The most common action types are defined in the Intent class, including ACTION_MAIN (describes the main entry point of an Activity) and ACTION_EDIT (used in conjunction with a Uri to the data edited). You also find Action types that generate integration points with Activities in other applications, such as the Browser or Phone Dialer.
Initially, your application might be starting only Activities defined within its own package. However, with the appropriate permissions, applications might also launch external Activities within other applications. For example, a Customer Relationship Management (CRM) application might launch the Contacts application to browse the Contact database, choose a specific contact, and return that Contact’s unique identifier to the CRM application for use.
Here is an example of how to create a simple Intent with a predefined Action (ACTION_DIAL) to launch the Phone Dialer with a specific phone number to dial in the form of a simple Uri object.
![]()
A list of commonly used Google application Intents can be found at http://d.android.com/guide/appendix/g-app-intents.html. Also available is the developer managed Registry of Intents protocols at OpenIntents, found at www.openintents.org/en/intentstable, which has a growing list of intents available from third-party applications and those within the Android SDK.
You can also include additional data in an Intent. The Extras property of an Intent is stored in a Bundle object. The Intent class also has a number of helper methods for getting and setting name/value pairs for many common datatypes.
For example, the following Intent includes two extra pieces of information, a string value and a boolean:
![]()
As previously mentioned, your application likely has a number of screens, each with its own Activity. There is a close relationship between menus, Activities and Intents. You’ll often see a menu used in two different ways with Activities and Intents.
• Main Menu: Acts as a switch in which each menu item launches a different Activity in your application. For instance, menu items for launching the Play Game Activity, the High Scores Activity, and the Help Activity.
• Drill-Down: Acts as a directory in which each menu item launches the same Activity, but each item passes in different data as part of the Intent (for example, a menu of all database records). Choosing a specific item might launch the Edit Record Activity, passing in that particular item’s unique identifier.
Trying to wrap your head around Activities, Intents, Intent Filters, and the lot when you start with Android development can be daunting. We have tried to distill everything you need to know to start writing Android applications with multiple Activity classes, but we’d be remiss if we didn’t mention that there’s a lot more here, much of which is discussed throughout the book with practical examples.
Specifically, we haven’t talked about how Intent objects figure into the creation of a Service or a Broadcast. However, we need to give you a “heads up” about this because we talk about these concepts later in this chapter when configuring the Android Manifest file for your application.
An Android Service is basically an Activity without a user interface. It can run as a background process or act much like a Web service does, processing requests from third parties. You can use Intents and Activities to launch Services using the startService(), bindService() methods. Any Services exposed by an Android application must be registered in the Android Manifest file.
Intent objects serve yet another purpose. You can broadcast an Intent object (via a call to broadcastIntent()) to the Android system, and any application interested can receive that broadcast (called a BroadcastReceiver). Your application might do both send and listen actions for such Intent objects. These types in Intent objects are generally used to inform the greater system that something interesting has happened and use special Intent Action types.
For example, the Intent Action ACTION_BATTERY_LOW broadcasts a warning when the battery is low. If your application is a battery-hogging Service of some kind, you might want to listen for this Broadcast and shut down your Service until the battery power is sufficient. You can register to listen for battery/charge level changes by listening for the broadcast Intent object with the Intent Action ACTION_BATTERY_CHANGED. There are also broadcast Intent objects for other interesting system events, such as SD card state changes, applications being installed or removed, and the wallpaper being changed.
Note
We talk more about hardware and the battery in Chapter 15, “Using Android’s Optional Hardware APIs,” in which you see practical examples of the use of BroadcastReceiver objects.
Android applications can be multiprocess, and the Android operating system allows multiple applications to run concurrently, provided memory and processing power is available. Applications can have background processes, and applications can be interrupted and paused when events such as phone calls occur. There can be only one active application visible to the user at a time—specifically, a single application Activity will be in the foreground at any given time.
The Android operating system keeps track of all Activity objects running by placing them on an Activity stack. When a new Activity starts, the Activity on the top of the stack (current foreground Activity) pauses, and the new Activity pushes onto the top of the stack. When that Activity finishes, that Activity is removed from the activity stack, and the previous Activity in the stack resumes.
Android applications are responsible for managing their state and their memory, resources, and data. They must pause and resume seamlessly. Understanding the different states within the Activity lifecycle is the first step to designing and developing robust Android applications.
Different important state changes within the Activity lifecycle are punctuated by a series of important method callbacks. These callbacks are shown in Figure 4.2.

Now let’s describe some of the most important Activity callbacks, when they are called, and what they are used for.
When an Activity first starts, the onCreate() method is called. The onCreate() method has a single parameter, a Bundle, which will be null if this is a newly started Activity. If this Activity was killed for memory reasons and is now restarted, the Bundle contains the previous state information for this Activity so that it can reinitiate. It is appropriate to perform any setup, such as layout and data binding, in the onCreate() method. This includes calls to the setContentView() method.
When the Activity reaches the top of the activity stack and becomes the foreground process, the onResume() method is called. Although the Activity might not be visible yet to the user, this is the most appropriate place to retrieve any instances to resources (exclusive or otherwise) that the Activity needs to run. Often, these resources are the most process-intensive, so we only keep these around while the Activity is in the foreground.
When another Activity moves to the top of the activity stack, the current Activity is informed that it is being pushed down the activity stack by way of the onPause() method.
Here, the Activity should stop any audio, video, and animations it started in the onResume() method. This is also where you must deactivate resources such as database Cursor objects if you have opted to manage them manually as opposed to having them managed automatically.
Note
Android provides a number of helper utilities for managing queries and Cursor objects. We talk more about these methods in Chapter 9, “Using Android Data and Storage APIs.”
The onPause() method can also be the last chance for the Activity to clean up and release any resources it does not need while in the background. You need to save any uncommitted data here, in case your application does not resume.
Tip
Android applications with data input do not need to follow the typical web form template (data fields plus Submit and Cancel button). Instead, data can be saved as the user inputs each field, thus simplifying the user interface and the onPause() method. A button should be provided for Cancel, but Save can be implicit.
The Activity can also save state information to Activity-specific preferences, or applicationwide preferences. We talk more about preferences in Chapter 9.
The Activity needs to perform anything in the onPause() method quickly. The new foreground Activity will not be started until the onPause() method returns.
Caution
Generally speaking, any resources and data retrieved in the onResume() method should be released in the onPause() method. If not, there is a chance that these resources can’t be cleanly released if the process is terminated.
Under low-memory conditions, the Android operating system can kill the process for any Activity that has been paused, stopped, or destroyed. This essentially means that any Activity not in the foreground is subject to a possible shutdown.
If the Activity is killed after onPause(), the onStop() and onDestroy() methods might not be called. The more resources released by an Activity in the onPause() method, the less likely the Activity is to be killed while in the background.
The act of killing an Activity does not remove it from the activity stack. Instead, the Activity state is saved into a Bundle object, assuming the Activity implements and uses onSaveInstanceState() for custom data, though some View data is automatically saved. When the user returns to the Activity later, the onCreate() method is called again, this time with a valid Bundle object as the parameter.
Tip
So why does it matter if your application is killed when it is straightforward to resume? Well, it’s primarily about responsiveness. The application designer must strike a delicate balance between maintaining data and the resources it needs to resume quickly, without degrading the CPU and system resources while paused in the background.
If an Activity is vulnerable to being killed by the Android operating system due to low memory, the Activity can save state information to a Bundle object using the onSaveInstanceState() callback method. This call is not guaranteed under all circumstances, so use the onPause() method for essential data commits.
Tip
You might want to use the onSaveInstanceState() method to store nonessential information such as uncommitted form field data or any other state information that might make the user’s experience with your application less cumbersome.
When this Activity is returned to later, this Bundle will be passed into the onCreate() method, allowing the Activity to return to the exact state it was in when the Activity paused. You can also read Bundle information after the onStart() callback method using the onRestoreInstanceState() callback.
When an Activity is being destroyed, the onDestroy() method is called. The onDestroy() method is called for one of two reasons: The Activity has completed its lifecycle voluntarily, or the Activity is being killed by the Android operating system because it needs the resources.
In the course of the lifetime of an Android application, the user might transition between a number of different Activity instances. At times, there might be multiple Activity instances on the activity stack. Developers need to pay attention to the lifecycle of each Activity during these transitions.
Some Activity instances—such as the application splash/startup screen—are shown and then permanently discarded when the Main menu screen Activity takes over. The user cannot return to the splash screen Activity without relaunching the application.
Other Activity transitions are temporary, such as a child Activity displaying a dialog box, and then returning to the original Activity (which was paused on the activity stack and now resumes). In this case, the parent Activity launches the child Activity and expects a result.
The AndroidManifest.xml file is a specially formatted XML file that must accompany each Android application. This file contains important information about the application’s identity. Here you define the application’s name and version information and what application components the application relies upon, what permissions the application requires to run, and other application configuration information.
Tip
If you use Eclipse with the Android Plug-In for Eclipse (ADT), the Android project Wizard creates the initial AndroidManifest.xml file for you.
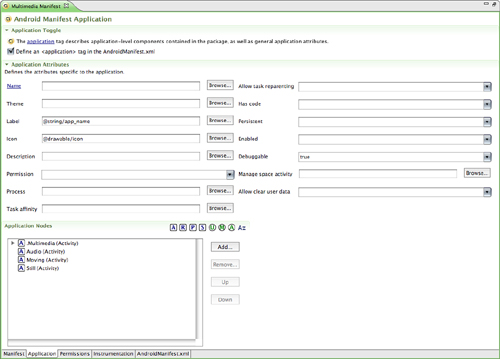
The manifest resides at the top level of your Android project. Again, if you use the ADT, you can use the Android Manifest file editor (Figure 4.3).
You can also edit the XML directly by clicking on the far-right tab of the File Editor, as shown in Figure 4.4.

Most Android Manifest files include a single <manifest> tag with a single <application> tag. Here is a sample AndroidManifest.xml file for an application called Multimedia:

Now let’s sum up what this file tells us about the Multimedia application:
• The application uses the package name com.androidbook.multimedia.
• The application version name is 1.0.0.
• The application version code is 1.
• The application name and label are stored in the resource string called @string/app_name within the /res/values/strings.xml resource file.
• The application icon is the graphic file called icon (could be a PNG, JPG or GIF) within the /res/drawable directory.
• The application has four Activities (MainMenuActivity, AudioActivity, MovingActivity, and StillActivity).
• The MainMenuActivity Activity is the primary entry point for the application.
• The application requires the following permissions to run: the ability to record audio, the ability to set the wallpaper on the device, the ability to access the built-in camera, and the ability to write settings.
Now let’s talk about some of these important configurations in detail.
Caution
Although you can use an @string reference for some fields, such as the android:versionName, some publishing systems don’t support this. For more information on publishing, see Chapter 20, “Selling Your Android Application.”
Your application’s Android Manifest file defines the application properties. The package name must be defined within the Android Manifest file within the <manifest> tag using the package attribute like such:

Versioning your application appropriately is vital to maintaining your application in the field. Intelligent versioning can help reduce confusion and make product support and upgrades simpler. There are two different version attributes defined within the <manifest> tag: the version name and the version code.
The version name (android:versionName) is a user-friendly, developer-defined version attribute. This information is displayed to users when they manage applications on their device and when they download the application from marketplaces. Developers use this version information to keep track of their application versions in the field. We discuss appropriate application versioning for mobile applications in detail in Chapter 18, “The Mobile Software Development Process.”
The Android operating system uses the version code (android:versionCode) that is a numeric attribute to manage application upgrades. We discuss the version code further in Chapter 20.
You can set the application icon (android:icon) and application friendly name (android:label) as attributes within the <application> tag of the Android Manifest file. In this example, we set them to assets defined within the application graphic and string resources:
<application android:icon="@drawable/icon"
android:label="@string/app_name">
Tip
We see a lot of Android applications on the market using the default icon. Making a custom icon for your Android application gives it pizzazz and differentiates your application from others. Making a custom icon is easy; simply create a 48×48 pixel PNG file, add it as a Drawable resource to your application, and set the android:icon property to your new icon.
You can also set optional attributes like the application description (android:description).
Each Activity within the application must be defined within the Android Manifest file with an <activity> tag. For example, the following XML excerpt defines an Activity class called AudioActivity:
<activity android:name="AudioActivity" />
This Activity must be defined as a class within the com.androidbook.multimedia package.
Caution
You must define the <activity> tag for an Activity or it will not launch. It is quite common for developers to implement an Activity and then try to troubleshoot why it isn’t running properly, only to realize they forgot to register it in the Android Manifest file. Until they look through the LogCat output, the error merely looks like a typical crash, too, further confusing the developer.
An Activity can be designated as the primary entry point by configuring its Intent Filter in the application’s AndroidManifest.xml file with the MAIN action type and the LAUNCHER category.
The following tag of XML configures the Activity called MainMenuActivity as the primary launching point of the application:

The Android operating system uses Intent filters to resolve implicit Intents. That is, Intents that do not specify the Activity or Component they want launched. Intent filters can be applied to Activities, Services, and BroadcastReceivers. The filter declares that this component is open to receiving any Intent sent to the Android operating system that matches its criteria.
Intent filters are defined using the <intent-filter> tag and must contain at least one <action> tag but can also contain other information, such as <category> and <data> blocks. Here we have a sample intent filter block, which might be found within an <activity> block:

This intent filter definition uses a predefined action called VIEW, the action for viewing particular content. It is also BROWSABLE and uses a scheme of “geoname” so that when a Uri starts with “geoname://”, the activity with this intent filter launches. You can read more about this particular intent filter in Chapter 11, “Using Location-Based Services (LBS) APIs.”
Tip
You can define custom actions unique to your application. If you do so, be sure to document these actions if you want them to be used by third parties.
A single Activity can serve multiple purposes. Instead of putting all intent filters under that single Activity, you can use aliases to group different intent filters and other metadata with the same underlying Activity. You achieve this by using the <activity-alias> tag.
Activities, Services, and BroadcastReceivers must be registered within the Android Manifest file. Services are also registered using the <service> tag, and BroadcastReceivers are registered using the <receiver> tag. Both Services and BroadcastReceivers use Intent filters.
Note
You learn more about Services in Chapter 17 and use BroadcastReceiver objects in later chapters of the book.
If your application acts as a Content Provider, effectively exposing a shared data service for use by other applications, it must declare this capability within the Android Manifest file using the <provider> tag. Configuring a Content Provider involves determining what subsets of data are shared and what permissions are required to access them, if any.
The Android operating system has been locked down so that applications have limited capability to adversely affect operations outside their process space. Instead, Android applications run within the bubble of their own virtual machine, with their own Linux user account (and related permissions).
Android applications have no permissions by default. Instead, any permissions for shared resources or privileged access—whether its shared data, such as the Contacts database, or access to underlying hardware, such as the built-in camera—must be explicitly registered within the Android Manifest file. These permissions will be granted when the application is installed.
Tip
When users install the application, they are informed what permissions the application requires to run and must approve these permissions. Request only the permissions your application requires.
The following XML excerpt for the preceding Android Manifest file defines a permission using the <uses-permission> tag to gain access to the built-in camera.
<uses-permission android:name="android.permission.CAMERA" />
A complete list of the permissions can be found in the android.Manifest.permission class. Your application manifest should include only the permissions required to run. The user is informed what permissions each Android application requires at install time.
Tip
You might find that, in certain cases, permissions are not enforced (you can operate without the permission). In these cases, it would be prudent to request the permission anyway for two reasons. First, because the user will be informed that the application is performing those sensitive actions, and second, because the permission could be enforced in a later SDK version.
Applications can also define their own permissions by using the <permission> tag. Permissions must be described and then applied to specific application components, such as Activities, using the android:permission attribute.
Tip
Use Java-style scoping for unique naming of application permissions (for example, com.androidbook.MultiMedia.ViewMatureMaterial).
Permissions can be enforced at several points:
• When starting an Activity or Service
• When accessing data provided by a Content Provider
• At the function call level
• When sending or receiving broadcasts by an Intent
Permissions can have three primary protection levels: normal, dangerous, and signature. The normal protection level is a good default for fine-grained permission enforcement within the application. The dangerous protection level is used for higher risk activities, which might adversely affect the device. Finally, the signature protection level permits any application signed with the same certificate to use that component for controlled application interoperability.
Permissions can be broken down into categories, called permission groups, which describe or warn why specific Activities require permission. For example, permissions might be applied for Activities that expose sensitive user data like location and personal information (android.permission-group.LOCATION and android.permission-group.PERSONAL_INFO), access underlying hardware (android.permission-group.HARDWARE_CONTROLS), or perform operations that might incur fees to the user (android.permission-group.COST_MONEY). A complete list of permission groups is available within the Manifest.permission_group class.
Android 1.5 introduced a tag in the manifest file called <uses-configuration>. This tag identifies all hardware and software input configurations required by the application. For example, if the application requires only touch screen input using a finger, the following <uses-configuration> tag would be included within the <manifest> tag:
<uses-configuration android:reqTouchScreen="finger" />
There are different configuration attributes for five-way navigation, the hardware keyboard and keyboard types; navigation devices such as the directional pad, trackball, and wheel; and touch screen settings. The configurations supported at this time are shown in Table 4.1.

There is no “OR” support within a given attribute. If your application requires any hardware keyboard and touch screen input using a finger or a stylus, you need to include two separate <uses-configuration> tags in your manifest file, as follows:

You can specify the minimum Android SDK your application requires and register any secondary packages your application links to within the Android Manifest file.
By default, Android applications are assumed to be compatible with all full versions of the Android SDK (1.0 and up, no beta versions).
If your application requires a different SDK version to run, you must specify this explicitly using the <uses-sdk> tag within the <manifest> tag block. The <uses-sdk> tag has a single attribute called android:minSdkVersion, which is an integer.
This value does not directly correspond to the SDK version. Instead, it is the revision of the API Level associated with that SDK set by the developers of the Android SDK. You need to check the SDK documentation to determine the API level value for each version.
For example, if your application requires APIs introduced in Android SDK 1.1, you would check that SDK’s documentation and find that Android SDK 1.1 (Release 1) is defined as API Level 2. Therefore, add the following to your Android Manifest file within the <manifest> tag block:
<uses-sdk android:minSdkVersion="2" />
Whereas, if your application requires Android SDK 1.5 R1, your minimum SDK version would be 3, like this:
<uses-sdk android:minSdkVersion="3" />
It’s that simple. You need to use the lowest SDK version possible because this information is checked at install time, and you want your application to be compatible with the largest pool of handsets available.
Note
With each new Android SDK version, this API Level is incremented. This information is always provided with the SDK release documentation.
The minSdkVersion tag is now required to publish applications on the Android Market. We talk more about preparing your application for publication in Chapter 20.
By default, every application is linked to the standard Android packages (such as android.app) and is aware of its own package. However, if your application links to additional packages, they must be registered within the <application> tag of the Android Manifest file using the <uses-library> tag. For example:
<uses-library android:name="com.mylibrary.stuff" />
We have now covered the basics of the Android Manifest file, but there are many other settings configurable within the Android Manifest file using different tag blocks, not to mention attributes within each tag we already discussed.
Some other features you can configure within the Android Manifest file include
• Setting applicationwide themes as <application> tag attributes
• Configuring instrumentation settings using the <instrumentation> tag
For more detailed descriptions of each property and attribute available (and there are many), check the Android documentation.
We tried to strike a balance between providing a thorough reference without overwhelming you with details you won’t need to know when developing the average Android application. Instead, we focused on the details you need to know to move forward developing Android applications and to understand every example provided within this book.
Activity and View classes are the core building blocks of any Android application. Each Activity performs a specific task within the application, often with a single user interface screen consisting of View widgets. Each Activity is responsible for managing its own resources and data through a series of lifecycle callbacks. The transition from one Activity to the next is achieved through the Intent mechanism. An Intent object acts as an asynchronous message that the Android operating system processes and responds to by launching the appropriate Activity or Service. You can also use Intent objects to broadcast systemwide events to any interested BroadcastReceivers listening.
Each Android application has a specially formatted XML file called AndroidManifest.xml. This file describes the application’s name and version information, and what permissions it requires to run and what application components it contains. The Android Manifest file is used by the Android operating system to install and run the application.