
The most useful tool provided with the Android Software Development Kit (SDK) is the emulator. Developers use the emulator to quickly develop Android applications to develop powerful applications for a variety of hardware. This Quick-Start Guide is not a complete documentation of the emulator commands. Instead, it is designed to get you up and running with common tasks. Please see the emulator documentation provided with the Android SDK for a complete list of features, start-up commands, and functionality.
The Android emulator (shown in Figure A.1) is integrated with Eclipse using the Android Development Tools Plug-in for the Eclipse integrated development environment (IDE). The emulator is also available within the /Tools directory of the Android SDK and can be launched as a separate process.

Here are some tips for using the emulator effectively from the start:
• You can use keyboard commands to easily interact with the emulator.
• Mouse clicking works and mouse scrolling and dragging works. So do the keyboard arrow buttons.
• If you have an Internet connection, so does your emulator. The browser works.
• The gray tab with the triangle is the application tray. You can click it or pull it out to see installed applications.
• The Dev Tools application can be useful for setting development options.
• Don’t forget the side buttons, such as the volume control. These work, too.
• To switch between portrait and landscape modes of the emulator (or other orientations that the current skin uses), use the 7 key and 9 key on the numeric keypad of the host machine (or F11 and F12 keys).
• Networking can be toggled using the F8 key.
• The Menu button is a context menu for the given screen, replacing traditional tabs along the button of the screen for functions such as Add, Edit, and Delete item.
• Application lifecycle-wise:To pause an application just press Home. To resume, launch the application again. It should begin where you left off, if the phone hasn’t run low on memory and exited your application behind the scenes.
• You can access the Settings application on the application tray or by pressing the Menu button on the Home screen. You can use the Settings application to configure the Wireless controls, Call Settings, Sound & Display (ringtones, brightness, and so on), Data synchronization settings, Security & Location, Manage Applications, SD Card and phone storage, Date & Time, Text Input settings, and About Phone (phone status/software version, and such).
• Notifications such as incoming SMS messages appear in the white Notification bar at the top of the Home screen, along with battery life, and so on. You can pull down this status bar to see the messages, as shown in Figure A.2.

The Android emulator is a not a real device, but a generic Android system simulator for testing purposes. Prior to Android 1.5, the Android emulator had some basic settings and little more. However, with the Android 1.5 SDK, developers can now model specific Android devices by creating Android Virtual Devices (AVDs). To use the Android emulator provided with the Android 1.5 R1 SDK, you must provide a valid AVD profile.
An AVD can contain the following information describing a specific Android device:
• The friendly, descriptive name of the AVD for use by the developer
• The target Android operating system, generally Android SDK 1.1 or 1.5 (with or without add-ons)
• Hardware device support details and features, including RAM, input methods, and optional hardware such as cameras and location sensors
• Various emulator settings, such as the emulator skin
To create and manage AVDs, you use the android command line tool provided with the Android SDK Tools directory. The basic android tool command line is
android <command>
Now let’s walk through some of the commands you might use to create and manage AVDs in the course of typical Android development projects.
To create an AVD, you need to specify the target Android operating system that the Android emulator should simulate. To list available targets, use the android command line tool with the list targets command:
android list targets
This command will likely yield the following three targets:
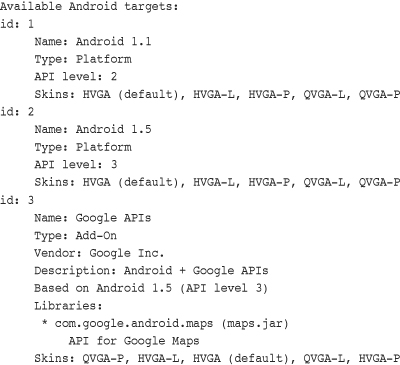
The first target (id: 1) is a vanilla 1.1 installation with API Level 2. The second target (id: 2) is a vanilla 1.5 installation, and the third target (id: 3) is an Android 1.5 installation with the Google API add-ons included—both require API Level 3.
To create a new AVD, you use the android command line tool with the create avd command.
Tip
In recent versions of the Eclipse Plug-In, you can also click the little button on the toolbar that resembles a black cell phone to create and manage AVDs through the development environment.
The typical android tool command line for creating AVDs is
android create avd -n <name> -t <target id>
To create an Android 1.5 AVD with all the defaults, use the following command:
android create avd -n vanilla1.5 -t 2
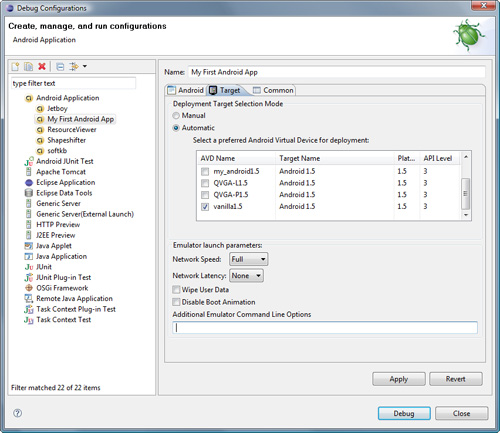
You will be asked if you want to create a custom hardware profile. For this installation with default settings, answer no. You have created a simple AVD called vanilla1.5. Now, within your Eclipse project, you can create a Debug Configuration and on the Target tab, specify the vanilla1.5 AVD as the preferred AVD. When you launch your Debug configuration, the settings within the AVD will be used. Figure A.3 illustrates a debug configuration that specifies an AVD.
If you develop Android applications that rely on screen orientation, you need to know how to change the emulator look and feel, especially the orientation and screen size. The Android SDK currently has three supported skins in addition to the HVGA portrait mode skin used by default. These skins are described in detail in Table A.1 and shown in Figure A.4.
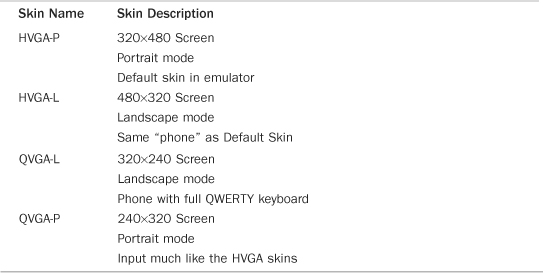

Notice that each target in the Android operating system target listing has a set of valid skins. As more Android devices are developed, new skins will become available for specific targets (most likely Android 1.5 and beyond). If you want to use a different skin with your AVD, such as the landscape QVGA mode, you can specify it using the –s command line option as follows:
android create avd -n QVGA-L1.5 -t 2 -s QVGA-L
Some of your applications require data, such as images, to be stored on the emulator. The emulator allows only you to download images from the browser (using long click) if you have an SD Card disk image to save them on, for example. If you want to configure a 2GB SD Card image to use with an AVD, you can create it as part of the AVD using the –c command line option as follows:
android create avd -n vanilla1.5w2GigSD -t 2 -c 2048M
You can also use the –c command line option to specify the path to an existing SD card image created with the mksdcard command line tool.
To create an SD Card disk image for use with an AVD and emulator, you can use the mksdcard tool provided with the Android SDK Tools directory. The mksdcard tool command line is
mksdcard [-l label] <size>[K|M] <file>
The volume label (-l) is optional, and you can create images in kilobytes or megabytes. For example, to create a simple 2GB SD Card Image called mysdcard.iso, use the following command:
mksdcard 2048M mysdcard.iso
After you include an SD Card image with your AVD, you can test your SD card setup by launching the emulator with your AVD instance and navigating to the browser. Browse to your favorite Web site and “borrow” an image with a long-press on the image. The image will be downloaded, stored in the phone picture gallery (accessible through the Camera and Picture applications). You can access these images from your Android application using a built-in content provider, as discussed in Chapter 9, “Using Android Data and Storage APIs.”
If you want to set some hardware settings, simply modify the property as part of the AVD creation process. The hardware options available are shown in Table A.2.
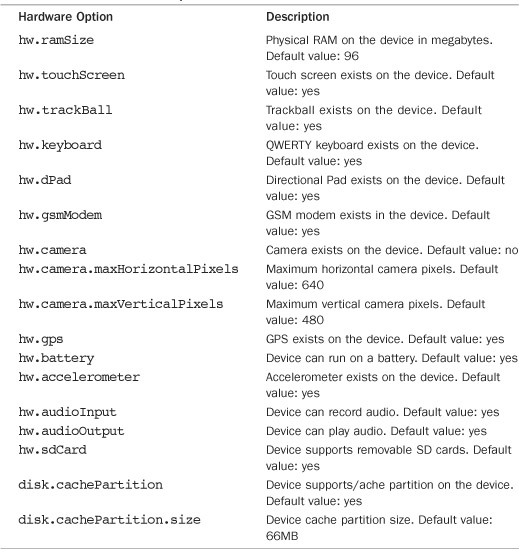
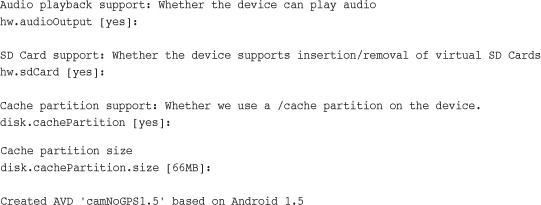
For example, to create an AVD for Android 1.5 with camera support, but no GPS support, you can do the following:
android create avd -n camNoGPS1.5 -t 2
Then set the following hardware options when prompted:


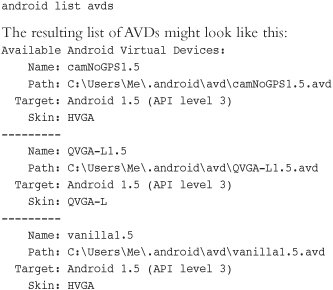
The typical android tool command line for listing currently configured AVDs is
android list avds
The resulting list of AVDs might look like this:
If you navigate to the default .android directory where AVDs are stored by default, you can read the configuration settings in the config.ini file within each AVD subdirectory.
The android tool command line for deleting AVDs by name is
android delete avd -n <name>
So, to delete the AVD we created earlier, you could use the following command:
android delete avd -n vanilla1.5
There are a variety of other features available for managing AVDs. You can change the default path for where to store the AVD configuration files. You can also move, update, and rename existing AVDs. For a complete list of the android command line tool features, just type
android
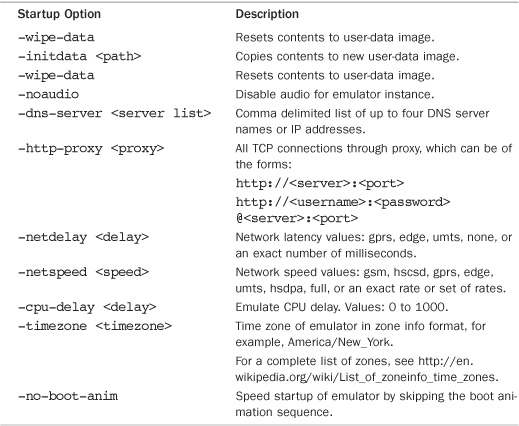
The Android emulator has a number of configuration options above and beyond those set in the AVD profile. Some of these settings include network speed and latency, the ability to disable boot animation upon startup and numerous other system settings. The emulator can be started as part of a Debug Configuration or Run Configuration from within Eclipse or from the command line. Some of the most common emulator startup options are shown in Table A.3.
The emulator is available within the /Tools directory of the Android SDK and can be launched as a separate process from the command line.
This list of emulator startup options is by no means complete. There are a number of other options for networking, debugging, and other settings. For a complete list of emulator startup options, consult the Android emulator documentation or simply type
emulator -help
The command line for starting the Android emulator requires that you designate a unique AVD:
emulator -avd <name>
You can also set specific emulator startup options, as follows:
emulator -avd <name> [other startup options]
For example, to start an emulator instance with the Android 1.5 AVD we created earlier, with options to disable audio and limit network speed to GSM (14.4kbps up and down), we would use the following command line:
emulator -avd vanilla1.5 –noaudio -netspeed gsm
To set emulator startup options in Eclipse, you must edit the specific Run or Debug Configuration for your project.
You can change the Emulator Launch parameters on the Target tab. Some common startup options such as Network Speed are shown specifically and can be altered using the drop-down lists and check boxes, whereas others must be designated using the Additional Emulator Command Line options, much like you would with the command line. Figure A.5 shows a debug configuration with a designated AVD and startup options for setting network speed and disabling audio for the specific emulator instance.

To work with Google Maps support in conjunction with location-based services, you need to begin by creating an AVD with target 3, which corresponds to Android SDK 1.5 plus Google add-ins. For example:
android create avd -n map1.5 -t 3 -c 2048M
The emulator does not have location sensors, so the first thing you need to do is seed your emulator with GPS coordinates. To do this, launch your emulator in debug mode and follow these steps:
In the emulator:
- Launch the emulator. If you’re running an application, press the Home button.
- Choose Maps.
- Click the Menu button.
- Choose the My Location menu item. (It looks like a target.)
Then in Eclipse:
- Click the Dalvik Debug Monitor Service (DDMS) perspective in the top right corner.
- You see an Emulator Control pane on the left side of the screen. Scroll down to the Location Control.
- Manually enter the longitude and latitude of your location. (Note they are in reverse order.)
- Click Send.
Back in the emulator, you notice that the Google Map now shows the location you seeded. Your screen should now display your location as Yosemite, as shown in Figure A.6.

Your emulator now has a simulated location.
Tip
To find a specific set of GPS coordinates, you can go to http://maps.google.com. Navigate to the location you want and center the map on the location by right-clicking the map. Choose link to map and copy the URL. Take a closer look at the URL and weed out the “ll” variable, which represents the latitude/longitude of the location. For example, Yosemite Valley link has the value ll=37.746761,-119.588542, which stands for Latitude: 37.746761 and Longitude: -119.588542.
You can have two emulator instances call each other using the Dialer application provided on the emulator, as shown in Figure A.7 and Figure A.8. The emulator’s “phone number” is its port number, which can be found in the title bar of the emulator window. Figure A.7 shows a Landscape emulator (on the right) with port 5554 using the Dialer application to call the emulator on port 5556.


To simulate a phone call between two emulators, you must perform the following steps:
- Launch two instances of the emulator. (The command line method is the simplest.)
- Note the port number of the emulator you want to receive the call.
- In the emulator that makes the call, launch the Dialer application.
- Type the port number you noted as the number to call. Press Enter (or Send).
- You see (and hear) an incoming call on the receiving emulator instance.
- Answer the call by pressing Send.
- Pretend to chat for a bit.
- You can end either emulator call at any time by pressing the End key.
You can send SMS messages between two emulators exactly as previously described for simulating calls using the emulator port numbers as SMS addresses. In the emulator, launch the messaging application, press F11 (and F12, or using the numeric keypad, press 7 or 9) on the host computer keyboard to switch to landscape mode and trigger the slide out keyboard allowing text to be entered. Type the text message and press Send. You can also use DDMS or the console to send SMS messages to emulator instances.
You can interact with instances of the emulator by connecting to the Emulator console via telnet. For example, to connect to the Emulator console of the emulator using port 5554, you would do the following:
telnet localhost 5554
You can use the Emulator console to issue commands to the emulator. To end the session, just type quit or exit. You can shut this instance of the emulator using the kill command.
You can simulate incoming calls to the emulator from specified numbers. The command for issuing an incoming call is
gsm call <number>
For example, to simulate an incoming call from the number 555-1212, you would issue the following command:
gsm call 5551212
The result of this command in the emulator is shown in Figure A.9.

You can simulate SMS messages to the emulator from specified numbers. The command for issuing an incoming SMS is
sms send <number> <message>
For example, to simulate an incoming SMS from the number 555-1212 asking “How are you?” in SMS slang, you would issue the following command:
sms send 5551212 HRU?
In the emulator, you get a notification on the white status bar informing you of a new message. It even displays the contents on the bar for a moment, and then rolls away, showing the Message icon. You can pull down the notification bar to see the new message or launch the Messaging application.
The result of the preceding command in the emulator is shown in Figure A.10.

Caution
The sms send command does not work as expected on all the platforms we tested. For example, if you include multiple words in your SMS message, you might want to enclose them in quotes to avoid the message displaying in the wrong encoding on the emulator. Unfortunately, the quotes might display in the message.
You can use the Emulator console to issue commands to the emulator. The command for a simple GPS fix is
geo fix <longitude> <latitude> [<altitude>]
For instance, to set the fix for the emulator to the top of Mount Everest, launch the Maps application in the emulator by selecting Menu, My Location. Then, within the Emulator console, issue the following command to set the device’s coordinates appropriately:
geo fix 86.929837 27.99003 8850
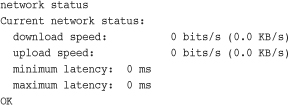
You can monitor network status of the emulator and change the network speed and latency on-the-fly. The command for displaying network status is
network status
Typical results from this request look something like this:
You can manage “fake” power settings on the emulator using the power commands. You can turn the battery capacity to 99 percent charged as follows:
power capacity 99
You can turn the AC charging state off (or on) as follows:
power ac off
You can turn the Battery status to the following options: unknown, charging, discharging, not-charging, or full as follows:
power status full
You can turn the Battery Present state true (or false) as follows:
power present true
You can turn the Battery health state to the following options: unknown, good, overheat, dead, overvoltage, or failure as follows:
power health good
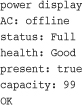
You can show the current power settings by issuing the following command:
power display
Typical results from this request look something like this:
There are also commands for simulating hardware events, port redirection, checking, starting, and stopping the virtual machine.
Quality assurance personnel will want to check out the event subcommands, which can be used to simulate key events for automation purposes. It’s likely this is the same interface used by the ADB Exerciser Monkey, which presses random keys and tries to crash your application.
Here are a few more tips for using the emulator, just for fun:
• On the Home screen, press and hold the desktop to change the wallpaper and add applications, shortcuts, and widgets to the desktop.
• If you press and hold an icon (usually an application icon) in the application tray, you can place a shortcut to it on your Home desktop for easy access.
• If you press and hold an icon on your Home desktop, you can move it around or dump it into the trash to get it off the desktop.
• Press and fling the phone’s Home desktop to the left and right for more space. The right side has a Google search, and the left is empty space where you can place other desktop items.
• Another way to change your wallpaper and add applications to your desktop is to press Menu on the desktop screen; then choose Add. Here you can also add shortcuts and picture frames widgets around your family photo, and so on, as shown in Figure A.11.

The emulator is powerful, but it has several important limitations.
• It is not a device, so it does not reflect actual behavior, only simulated behavior.
• Simulation of phone calls, but you cannot place or receive true calls.
• Limited ability to determine device state (network state, battery charge).
• Limited ability to simulate peripherals (camera capture, headphones, SD Card insertion, location-based services).
• No USB or Bluetooth support.