
![]()
Indexing Data
As you know, Solr creates an inverted index of the data you ingest, so the process of adding data to Solr is called indexing. Primarily what you do in Solr is index and search, and for data to be searchable, it must be indexed.
In Chapter 2, you indexed sample documents by using the Solr admin console. In this chapter, you will learn about the indexing process in depth and width. By depth, I mean getting a detailed understanding of the process. I refer to width in terms of the variety of decisions you need to make before indexing a document, such as the document format, indexing tool, the frequency of indexing, document preprocessing, and text analysis. The preceding chapter covered text analysis, so this chapter covers the other aspects.
You might be in a hurry to learn about the search process, as it is the ultimate goal of developing a search engine, and you might want to flick through this chapter. If you are not new to Solr, you can do this and come back to read in detail after getting the search process in place. But if you are working toward taking the system to production, the indexing process should not be overlooked. Indexing is not just a necessary prerequisite. You must remember that if you put garbage in, you will get garbage out.
The indexing process can be as simple as adding documents to make the contents searchable, but you should not limit your application to that. The full potential of Solr and other complementing technologies for data cleanup, enrichment, and metadata extraction should be utilized. You will learn about these approaches in this chapter. Additionally, Chapter 11 presents some advanced approaches for extracting the gold nuggets hidden in unstructured data. You can follow an iterative and incremental model to bring in these capabilities.
This chapter covers the following topics:
- Tools to index documents
- Indexing operations
- Indexing text documents such as XML, JSON, and CSV
- Indexing binary documents and extracting metadata
- Importing data from databases
- Preprocessing and document enrichment
- Indexing performance
- Writing a custom processor
- Understanding frequently occurring problems
Indexing Tools
Solr exposes a RESTful service over HTTP, so any REST client can search and index documents. All you need to know is the right endpoint and the applicable parameters. The client accessing the service could simply be your favorite browser, such as Chrome or Firefox, or even the Wget tool. The browser and Wget tool work well for evaluation and simple requests, but you generally need something more sophisticated.
The tool you choose depends on your indexing needs, data source, document format, and performance requirements. Solr supports a variety of document formats including XML and JSON, and some tools support a specific set of document formats or data sources. This section describes some frequently used indexing tools.
Post Script
Solr 5.0 introduced a bash script that can be executed in a *nix environment for indexing documents. This script can index documents in Solr’s native format (the format specified and understood by Solr for XML and JSON), can index CSV documents, and can even perform simple web crawling. It also allows you to specify the directory path containing the documents. This script exists in the Solr distribution’s bin directory, and you can find its usage details by running it with the -help option:
$ bin/post -help
The following is an example that indexes the money.xml file from the example/exampledocs directory to the hellosolr core:
$ bin/post -c hellosolr ../example/exampledocs/money.xml
SimplePostTool
If you are running a version earlier than Solr 5.0 or your platform is Windows, you need not worry. You can rely on the SimplePostTool bundle provided as post.jar, a Java executable file, in the example/exampledocs directory. The preceding bin/post script internally uses this JAR to provide convenient methods for indexing documents. You can find usage details by running the JAR as follows:
$ java -jar example/exampledocs/post.jar -h
Let’s index the same document as before, using the SimplePostTool:
java -Dc=hellosolr -jar post.jar money.xml
In this example, we don’t provide the relative path of money.xml, as post.jar exists in the same directory.
curl
Another powerful way of indexing documents is the curl utility. You will use curl throughout this book to index documents. Refer to the curl usage details at http://curl.haxx.se/docs/manpage.html or in *nix manual:
$ man curl
Solr provides a SolrJ Java client to access the server from your program. It provides methods to create documents, index them, form queries, perform searches, and iterate through the results. For indexing, if you are reading data from a primary datasource such as a content management system (CMS), you may prefer to use SolrJ. For importing data from a relational database, the Solr DataImportHandler contrib module makes a good starting point. However, because it is single-threaded, people do use SolrJ for writing custom import programs to process large volumes of data.
![]() Note Each release of Solr comes bundled with the SolrJ library, which is updated with new features provided by Solr. When using SolrJ, make sure you are using the matching version of the library as the server.
Note Each release of Solr comes bundled with the SolrJ library, which is updated with new features provided by Solr. When using SolrJ, make sure you are using the matching version of the library as the server.
Other Libraries
Apart from SolrJ, other client libraries are available for Java. If your Java application uses the Spring Framework, you can even give Spring Data Solr a try. Client libraries are available for other languages also. Python has more than a dozen client libraries. You can refer to the Solr wiki, https://wiki.apache.org/solr/IntegratingSolr, for a complete list of client libraries.
Indexing Process
The indexing process can be simple if the data is structured and well formatted, but a bit complicated if it is unstructured and available in diverse formats and datasources. For example, indexing documents in a CSV file is just a matter of triggering an upload button or posting the text stream.
Solr supports multiple document formats including XML and JSON as input for indexing: you format the data in a structure specified by Solr or even random format and post it. The structured file you define will contain a set of documents, each specifying the fields and the content that should be indexed to that field. The field name in the input file should map to the field name defined in schema.xml.
Interestingly, you may have an XML document, but the structure and elements might be different from the native Solr format. For such a scenario, the DataImportHandler contrib module allows you to define the mapping between XML elements and Solr fields, and you can start the indexing process just by invoking the handler endpoint.
Also, the data can be available in any of the diverse data sources (for example, the local file system, database, or web page). The following steps will help you understand and develop the indexing process as per your indexing needs:
- Text extraction: In this process, you extract the text for indexing. The text can be acquired, for example, by reading files, querying databases, crawling web pages, or reading RSS feeds. Extraction can be performed by your Java client application or Solr components. DataImportHandler is a contrib module that can be used for reading data from databases or XML files, for example. The Solr Cell framework, built on Apache Tika, can directly extract data from files in Office, Word, and PDF formats, as well as other proprietary formats.
- Document preparation: The extracted text should be transformed into a Solr document for ingestion. The prepared document should adhere to the native format specified, for example, for XML or JSON. As a better alternative, you can use the SolrJ client to create a document for ingestion. If data is directly ingested using one of the Solr frameworks having support for automatic transformation, this step might not be required.
- Post and commit: During this process, you post the document to the appropriate Solr endpoint with required parameters. Solr-provided extraction capabilities are performed based on the endpoint you invoke. You may optionally like to trigger a commit to persist the added documents immediately.
- Document preprocessing: You might want to do cleanup, enrichment, or validation of text received by Solr. Solr provides a large number of UpdateRequestProcessor implementations for performing these tasks. It prebundles the processor implementation for common tasks such as deduplication and language detection, and allows you to write custom processors. You can even do the custom processing in the client program during document preparation, if you are not interested in writing Solr plug-ins.
- Field analysis: Field analysis converts the input stream into terms. This step refers to the analysis chain of analyzers, tokenizers and token filters that are applied on the fieldType definition, which you read about in the previous chapter.
- Index: The terms output from field analysis are finally indexed; the inverted index is created. These indexed terms are used for matching and ranking in search requests. After you trigger the post operation (mentioned in Step 3), the preprocessing and field analysis defined in Solr will be triggered automatically and documents will be indexed.
Figure 5-1 depicts the indexing steps. You can see that the data can be indexed directly or by using a client application.
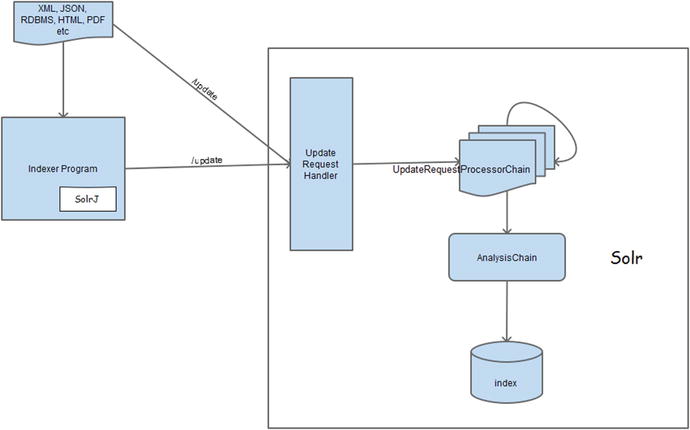
Figure 5-1. Solr indexing process
Now let’s understand the index process and associated Solr components in bit more detail. Suppose you want to index an XML document. To index it, you make a request to the /update endpoint. If you go through solrconfig.xml, you will find that it is mapped to UpdateRequestHandler:
<requestHandler name="/update" class="solr.UpdateRequestHandler" />
Any request to /update is handled by UpdateRequestHandler. Similarly, other handlers are used for handling different types of content streams—for example, DataImportHandler for importing data from databases, custom XML, RSS, and atom feeds; ExtractingRequestHandler for extracting data from binary documents; and so on. Each endpoint is mapped to a specific handler, as /update is mapped to UpdateRequestHandler. You can even write your own handler by extending ContentStreamHandlerBase.
When you make a request to UpdateRequestHandler, you send the XML as a content stream, along with other parameters to process the request. Now, let’s explore UpdateRequestHandler.
UpdateRequestHandler
UpdateRequestHandler supports indexing documents in XML, JSON, CSV, and javabin format. With each update request, you specify the content type. Based on this information, UpdateRequestHandler parses the document by calling the respective loader and then indexes it by invoking the processors registered in the update chain.
You can inform UpdateRequestHandler about the format of the document by providing the MIME Content-Type or by passing the request parameter update.contentType. If any of this information is not provided, the handler tries to identify the content type automatically. If it detects the content to be XML or a JSON document, it processes forward. Otherwise, it throws an exception. Based on the format of your document, you need to specify the corresponding content type, shown in Table 5-1.
Table 5-1. Document Formats and Corresponding Content Type
Document Format | Content Type | Features |
|---|---|---|
XML | application/xml, text/xml | Accepts Solr-defined and arbitrary-format XML. Full-featured. |
JSON | application/json, text/json | Accepts Solr-defined and arbitrary-format JSON. Full-featured. Comments not allowed. |
CSV | application/csv, text/csv | Standard CSV format. Limited capability. |
Javabin | application/javabin | Faster. |
The response of the index operation is by default in same format as the content type of the document. If you want to get the response in a different format, you need to provide the response format by using the wt parameter.
UpdateRequestProcessorChain
Solr provides provisions to modify a document before it gets indexed. You can perform any processing on the text such as cleanup, enrichment, and validation. Solr allows you to modify the value of a field (for example, to set the default value, if missing), create a new field altogether (for example, to add the current timestamp), remove a field, or even filter the document from being indexed (for example, in the case of a duplicate document).
These operations are performed by UpdateRequestProcessorFactory instances, which can be chained together and configured in the update handler. Whenever an update request comes to the handler, it executes the chain, which runs all the configured processors and then indexes the document. Multiple chains can be defined in solrconfig.xml, but only one can be assigned to a handler for execution.
Apart from UpdateRequestProcessor, which is part of core Solr, some processors are also available as a contrib module, as for UIMA. You can even write your own processor implementation that will modify the document based on your custom requirements. The following is an example of how to register processors to the update handler:
<updateRequestProcessorChain name="mychain" default="true">
  <processor class="solr.TimestampUpdateProcessorFactory">
   <str name="fieldName">timestamp</str>
  </processor>
  <processor class="solr.CustomUpdateRequestProcessorFactory">
     <lst name="name">
       <str name="name1">value</str>
       <str name="name2">value</str>
     </lst>
   </processor>
   <processor class="solr.LogUpdateProcessorFactory" />
   <processor class="solr.RunUpdateProcessorFactory" />
 </updateRequestProcessorChain>
So what does this updateRequestProcessorChain do? This chain runs the registered processors in sequence. It runs TimestampUpdateProcessorFactory, which sets the current timestamp as the default value for the timestamp field. The output of this factory is input to CustomUpdateRequestProcessorFactory. Assuming this is your custom processor, it does some processing and updates the document based on the configuration. This is followed by LogUpdateProcessorFactory to update the log with update information. And what should always run in the end is RunUpdateProcessorFactory, as it finally updates the inverted index.
![]() Note If RunUpdateProcessorFactory is not registered in your chain, no index update will happen. If it’s not registered as the last component, the processors following it will have no effect.
Note If RunUpdateProcessorFactory is not registered in your chain, no index update will happen. If it’s not registered as the last component, the processors following it will have no effect.
To perform any preprocessing, the chain must be registered in the update handler. If you want to run the processing for each request, you can set it in solrconfig.xml as shown here:
<requestHandler name="/myupdate " class="solr.UpdateRequestHandler">
  <lst name="defaults">
    <str name="update.chain">mychain</str>
  </lst>
 </requestHandler>
You can also register the chain for a specific request by passing its name with the update.chain parameter, as follows:
$ curl http://localhost:8983/solr/hellosolr/update?update.chain=mychain
![]() Note An extensive list of UpdateRequestProcessors provided by Solr can be found at the Solr-Start project, www.solr-start.com/info/update-request-processors/. You can also refer to the Solr Javadoc at http://lucene.apache.org/solr/5_3_1/solr-core/org/apache/solr/update/processor/UpdateRequestProcessorFactory.html.
Note An extensive list of UpdateRequestProcessors provided by Solr can be found at the Solr-Start project, www.solr-start.com/info/update-request-processors/. You can also refer to the Solr Javadoc at http://lucene.apache.org/solr/5_3_1/solr-core/org/apache/solr/update/processor/UpdateRequestProcessorFactory.html.
UpdateRequestProcessor vs. Analyzer/Tokenizer
In the previous chapter, you learned about analyzers and tokenizers. But if UpdateRequestProcessor does work similar to the index-time analyzer, you might be wondering why two features are needed. The next few paragraphs will bring out the key differences between them and explain why we need both.
The idea behind an analyzer is to modify the input stream to generate terms that are used for matching (such as lowercasing and stemming), as it provides finer control by maintaining position and offset information of tokens. It can be applied at both index and query time. UpdateRequestProcessors are implemented for preprocessing the document being indexed such as for cleanup, enriching information in new fields, and validation. It is applied only while indexing the document and plays no role at search time.
Before discussing the next difference, let’s review how text is indexed and stored in Solr.
In schema.xml, you define a field as follows:
<field name="title" type="string" indexed="true" stored="true" />
In this field definition, indexed="true" means that an inverted index should be created for the field, and stored="true" means that the field text should be stored in the index literally, in a noninverted manner. Only the stored fields can be retrieved for display.
Getting back to the difference, an analyzer come into picture, after the document is submitted for indexing by RunUpdateProcessorFactory. It can transform only the text being indexed, and not the text being stored (the noninverted literal value remains unmodified). But an UpdateRequestProcessor receives the SolrInputDocument, and its modification applies to both indexed and stored text. If you put the same logic in both the components and index and retrieve some text, the analyzer’s retrieved text will be unmodified while that of UpdateRequestProcessor will be modified. For example, if you write an algorithm to rate the popularity of a product based on the number of units sold, the analyzer will index the popularity for searching, executing function queries and getting range facets; but if you want to view the popularity (display it to the user), you will need to write UpdateRequestProcessor.
An analyzer is applied on a per field basis. It doesn’t allow you to fetch data from one field and add it to another. Yes, to some degree you can achieve it by using copyField, but still the flexibility is limited. Also, analyzers cannot be applied on nontext primitive fields.
Indexing Operations
By now, you have a good understanding of document formats supported by Solr. In this section you will index documents in different formats. This section covers all the indexing operations for XML documents. For other formats, it gives you sufficient information to help you manage indexing.
XML Documents
In this section, you will learn how to add, delete, and update documents using Solr’s native XML format. By Solr’s native format, I mean the set of tags and attributes defined by Solr. To index documents using XML native format, you need to prepare the document in the format specified by Solr and post those documents to the server.
Any changes made to the index will be visible only after a commit has been triggered, which finalizes the operation. Let’s have a look at each of the operations.
Add
You have already seen an example of adding documents to Solr in Chapter 2. The add command indexes the provided set of documents to Solr. As a reminder, each document can be compared to a tuple in your relational database. Here is a sample request to index an XML document:
$ curl
-H "Content-Type: text/xml"
--data-binary ’<add commitWithin="5000" overwrite="true">
  <doc>
    <field name="id">apl1001</field>
    <field name="product">iPad</field>
    <field name="model">nano</field>
    <field name="manufacturer">apple</field>
  </doc>
  <doc boost="2.0">
    <field name="id">apl1002</field>
    <field name="product">iPhone</field>
    <field name="model" boost="2.0">iPhone 6</field>
    <field name="manufacturer">apple</field>
    <field name="color">gold</field>
    <field name="color">silver</field>
  </doc>
</add>’
The following are the XML elements and attributes supported by Solr, to index documents using its native format.
- add: This root tag defines the operation of adding documents to Solr. It can constitute one or more documents to be added.
- commitWithin: If you want to ensure that the commit is triggered automatically within a specified time, set the value of this attribute in milliseconds. Alternatively, you can invoke a commit as a request parameter.
- overwrite: An optional attribute, by default set to true, overwrites the existing documents with the same uniqueKey. If you don’t want the existing documents to be overwritten, set it to false, and those documents will be ignored.
- doc: This tag defines a Solr document and constitutes a set of fields.
- boost: Use this optional attribute to give an index-time boost to the document.
- field: This defines a Solr field. For a multivalued field, add it to the document multiple times.
- name: This mandatory attribute should correspond to a field name or dynamic field in schema.xml, unless you are running schemaless.
- boost: This optional attribute gives an index-time boost to the field.
In this example, we have defined the color field twice for document ID apl1002. This is how you add value to a multivalued field. If this field is not defined as multivalued in schema.xml, Solr will throw an exception.
Update
What if you add a document that already exists? If overwrite="true" is specified, the document will be overwritten; otherwise, the new document will be ignored. The overwrite operation indexes a new document, deleting the old one. What if you want to update the value of a particular field and retain values of other fields, or you want to add a value to the existing values of a field?
Internally, Lucene has no provision to update a document. If you want to update the value of a field, you need to delete the document and add it back. If you add a document with only a specific field, the values of other fields will be deleted. To update a field, you need to get the value of all other fields either from Solr or your primary datasource, prepare a new document, and add it.
But don’t worry; the Atomic Update feature of Solr takes away the pain of preparing documents by fetching the existing values. You need to do the following to perform an atomic update:
- In schema.xml, set all the fields as stored="true", so that Solr can internally perform a fetch and prepare a new document. All the fields populated using copyField can remain unstored.
- In solrconfig.xml, register <updateLog/>. With this setting, the atomic update ensures that it gets the latest version of the indexed document.
- While indexing a document, pass an additional attribute, update. Its value can be any one of the following:
- set: Sets the value of a field. If an older value exists, it will be overwritten. Set the value as null if you want to remove the existing value.
- add: Adds a new value to the existing values for a field. The field should be multivalued.
- remove: Removes the specified value from a field. The field should be multivalued.
- removeregex: Removes all the values that match the specified regex pattern. The field should be multivalued.
- inc: Increments the value of a numeric field by the value supplied. The field should be single valued and numeric.
The following example sets the value of the product field to iPod and adds the colors silver, gold, and pink to the index, for a document with the unique ID apl1001:
<add>
  <doc>
    <field name="id">apl1001</field>
    <field name="product" update="set">iPod</field>
    <field name="color" update="add">silver</field>
    <field name="color" update="add">gold</field>
    <field name="color" update="add">pink</field>
  </doc>
</add>
Delete
The delete command marks a document for deletion. On the next commit, these documents will be permanently removed from the index and will no longer be searchable. You can mark the documents for deletion either by specifying the unique ID of the documents or by specifying a query. The following are examples for deleting documents in Solr.
Just as you can select all documents by using *:* at the time of searching, you can delete all the documents in the same way.
Commit
In SQL databases, you perform commit after updates. Similarly, Solr also requires a commit, and the changes are searchable only after the commit has been triggered on that core. You can perform a commit as follows:
$ curl http://localhost:8983/solr/hellosolr/update -H "Content-Type: text/xml"
--data-binary ’<commit/>’
Also, you can trigger a commit by passing an additional commit parameter to the update handler:
$ curl http://localhost:8983/solr/hellosolr/update?commit=true
Solr supports two types of commits: hard and soft.
Hard Commit
A hard commit makes your data searchable and persists the changes to disk. The preceding commands trigger a hard commit. You can also configure solrconfig.xml to commit documents automatically after a specified duration (in milliseconds) or when a specified number of documents are added to the core.
Soft Commit
Because a hard commit persists the documents to secondary storage, the operation is costly. Solr 4.0 introduced the concept of a soft commit, which makes the added documents searchable instantly but relies on the hard commit for persistence. A soft commit helps you achieve near real-time searches but comes with a trade-off that if the system crashes before the next hard commit, the changes will be lost. You can configure the soft commit as follows:
You will generally prefer to perform soft commits more frequently, but ensure that they’re not so frequent that the other commit starts before the first commit completes. You should perform hard commits less frequently, but the duration shouldn’t be too high because a crash can lead to data loss. The values should be set adequately and will depend on your requirements.
Optimize
A Lucene index is composed of a smaller chunks called segments. In the process of adding a document, Solr creates new segments on each hard commit and merges them at times. When the number of segments increases, querying takes more time; performing merges speeds ups the query, but it is a costly operation that requires lots of disk swaps. Lucene merges the segments automatically based on the merge policy, but if you want to force-merge, you can call optimize. It performs a hard commit and then merges the segments into one. Because this is a costly operation, it should be performed less frequently (for example, as a nightly job).
$ curl http://localhost:8983/solr/hellosolr/update?optimize=true
$ curl http://localhost:8983/solr/hellosolr/update
-H "Content-Type: text/xml" --data-binary ’<optimize/>’
Instead of calling optimize, you can consider setting the merge factor to a lower value in solrconfig.xml:
<mergeFactor>10</mergeFactor>
Rollback
Similar to databases, you can roll back the uncommitted changes:
$ curl http://localhost:8983/solr/hellosolr/update?rollback=true
$ curl http://localhost:8983/solr/hellosolr/update
-H "Content-Type: text/xml" --data-binary ’<rollback/>’
JSON Documents
Solr enables you to index JSON documents in a Solr-specified structure as well as your custom structure. The process of indexing documents in a Solr-specified JSON structure is the same as the process described previously for XML documents. All you need to do is specify the content type as application/json or text/json and provide the JSON data.
Here we index the JSON document with the same data as in the preceding XML document:
$ curl http://localhost:8983/solr/hellosolr/update -H "Content-Type: application/json" --data-binary ’[
{
"id": "apl1001",
"product": "iPad",
"model":"nano",
"manufacturer":"apple"
},
{
"id": "apl1002",
"product": "iPhone",
"model": {
"value": "iPhone 6",
"boost": 2.0
},
"color": ["gold", "silver"]
}
]’
Similarly, you can perform other operations such as a delete or commit, as shown here:
$ curl -X POST -H ’Content-Type: application/json’ ’http://localhost:8983/solr/hellosolr/update’ --data-binary ’
{
"commit": {},
"delete": { "query":"*:*" }
}’
If the JSON data is not in a Solr-specified style and follows an arbitrary structure, it can be indexed by passing additional mapping parameters with the update request. Refer to the Solr official document at https://cwiki.apache.org/confluence/display/solr/Uploading+Data+with+Index+Handlers for details of the additional parameters.
CSV Documents
If you have your data in CSV format, it is pretty simple to index. You don’t need to adhere to a format specified by Solr, as the values are just separated by a comma. You can index a simple CSV file in two steps:
- Map the values to Solr fields either by specifying comma-separated field names on the first line of the file or by specifying the comma separated names as the value of the fieldnames parameter in the request.
- Set the content type as text/csv or application/csv. Alternatively, you can make a request without passing content-type information, if you call /update/csv handler instead of /update.
The following is a sample request to index books.csv, which comes along with the Solr bundle:
$ curl http://localhost:8983/solr/hellosolr/update/csv
--data-binary @books.csv -H ’Content-Type:text/plain’
The following are important parameters, which you can pass along with the request:
- separator: If a comma is not your default separator, pass this additional parameter with the applicable separator.
- skip: If you don’t want to index all the fields in CSV, specify the comma-separated list of fields to skip.
- skipLines: Specify the number of first lines you don’t want to index.
- encapsulator: It’s quite common that text of a field contains a comma, which is also the default delimiter. You can specify an encapsulator for the file and surround the value with it. Also, you can specify a field-specific encapsulator.
- split: For indexing data to a multivalued field, the split Boolean parameter is needed. Specify split=true to enable a split on all multiValued fields, and f.<fieldname>.split=true to apply a split on specific fields. Also, you need to provide the separator, which you can do using a field-specific separator.
The following is an almost full-fledged CSV request, which indexes the same data that we used for XML and JSON but in CSV format:
$ curl http://localhost:8983/solr/hellosolr/update?commit=true&split=true&f.color.separator=,&f.color.encapsulator="
-H "Content-Type: text/xml"
--data-binary ’
id,product,model,manufacturer,color
apl1001,iPad,nano,apple,
apl1002,iPhone,Person,iPhone 6,apple,"gold,silver"’
Index Rich Documents
If you have a business requirement for indexing books, periodicals, or journals it’s highly likely that the documents are available in PDF or Word format. Solr provides a framework called Solr Cell (earlier known as the Content Extraction Library) that extracts text and metadata from files in binary format. This framework is exposed by a handler called ExtractingRequestHandler.
While indexing rich documents, you need to specify the MIME type. If the information is not provided, Solr will try to automatically detect the document type. It uses a Tika parser for document-type identification and extraction of content and metadata. The extracted content is added to the content field, and the metadata to fields defined according to specifications such as Dublin Core.
Apache Tika is a project focused on detection and extraction of metadata and text from over a thousand file types. The project home page at https://tika.apache.org/ provides more details.
Following are the steps to index a PDF file:
- Add dependencies to lib directives in solrconfig.xml:
<lib dir="../../../contrib/extraction/lib" regex=".*.jar" />
<lib dir="../../../dist/" regex="solr-cell-d.*.jar" /> - Configure the ExtractionRequestHandler in solrconfig.xml:
<requestHandler name="/update/extract"
class="org.apache.solr.handler.extraction.ExtractingRequestHandler">
<lst name="defaults">
<str name="lowernames">true</str>
<str name="uprefix">others_</str>
<str name="captureAttr">true</str>
<str name="fmap.a">url</str>
<str name="fmap.div">others_</str>
</lst>
</requestHandler>The following points describe the specified parameters:
lowernames: Setting this Boolean parameter to true, maps the field names to names with lowercase and underscores, if required. For example, “Author-Name” will be mapped to “author_name”.
uprefix: The fields that are undefined in Solr are prefixed with the value specified here. You can define a dynamic field with the same pattern to handle the contents appropriately. The next step, demonstrates a dynamic field to ignore the undefined fields.
captureAttr: Setting this Boolean parameter to true will even index the values of attributes extracted from XHTML elements.
fmap.<source_field>: This parameter allows you to rename the field. The specified source field gets renamed to the value of the parameter. In this configuration, a field with name “a” will get renamed to “url”, for example.
- Define appropriate fields in schema.xml:
<field name="id" type="string" indexed="true" stored="true"
required="true"/>
<field name="content" type="string" indexed="true" stored="true"
multiValued="true"/>
<field name="author" type="string" indexed="true" stored="true"
multiValued="true"/>
<field name="title" type="text" indexed="true" stored="true"/>
<dynamicField name="others_*" type="ignored" /> - Index the document:
$ curl ’http://localhost:8983/solr/hellosolr/update/extract?literal.id=doc1&commit=true’
-F myfile=@example/exampledocs/solr-word.pdf
DataImportHandler
DataImportHandler is a contrib module that allows you to import data from varied sources. If RDBMS is your primary datastore or you need to import data from arbitrary XML, DataImportHandler is a good starting point. You can get everything in place, just with XML configurations.
For databases, you can import data from multiple tables by performing joins and flattening the result to index it as a Solr document. You can also nest queries to execute the sub-query for each row fetched by the parent query. Once a row is fetched, you can apply a transformer to modify the document before indexing it. DataImportHandler allows you to perform the following two types of updates:
- Full import: A full import is like a full dump that extracts all the records from the table and indexes it.
- Delta import: This performs an incremental update, which fetches only those documents that have been added/modified since the last import.
DataImportHandler is not limited to databases. With it, you can index documents in any of the following formats:
- Arbitrary XML: Uses XSLT for transformation.
- E-mail messages: Uses the JavaMail API.
- Word/PDF documents: Uses Apache Tika. This is an alternative to indexing documents by using Solr Cell.
Import from RDBMS
Before proceeding any further, you need to understand the important elements of a data import:
- dataSource: dataSource defines which source to read data from and how to connect.
- entity: It’s the entity that generates documents. For example, you can create an entity that reads each row from a table and creates a document.
- processor: This extracts the content from a data source and adds it to the index after the transformation, if any. Default is SqlEntityProcessor, which works with relational databases. The entity element supports the processor attribute that allows you to specify the applicable processor name.
- transformer: Allows you to transform the document (for example, split the data or strip the HTML ).
Here are the steps to import data from the items table in HSQLDB:
- Add dependencies to the lib directives in solrconfig.xml:
<lib dir="../../../dist/" regex="solr-dataimporthandler-.*.jar" /> - Define a handler in solrconfig.xml:
<requestHandler name="/dataimport"
class="org.apache.solr.handler.dataimport.DataImportHandler">
<lst name="defaults">
<str name="config">data-config.xml</str>
</lst>
</requestHandler>data-config.xml contains all the information regarding which source to read the data from, how to read the data, and how to map it with Solr fields and apply any transformation to the document, if needed.
- Create data-config.xml in the conf directory:
<dataConfig>
<dataSource driver="org.hsqldb.jdbcDriver"
url="jdbc:hsqldb:example/example-DIH/hsqldb/ex"
user="sa" batchSize="10000"/>
<document name="products">
<entity name="item" query="select * from item">
<field column="ID" name="id" />
<field column="NAME" name="name" />
<entity name="feature"
query="select description from feature where item_id=’${item.ID}’">
<field name="features" column="description" />
</entity>
<entity name="item_category"
query="select CATEGORY_ID from item_category where item_id=’${item.ID}’">
<entity name="category"
query="select description from category
where id = ’${item_category.CATEGORY_ID}’">
<field column="description" name="cat" />
</entity>
</entity>
</entity>
</document>
</dataConfig> - Define the fields in schema.xml:
<field name="id" type="string" indexed="true" stored="true"
required="true"/>
<field name="name" type="string" indexed="true" stored="true"
multiValued="false"/>
<field name="features" type="string" indexed="true" stored="true"
multiValued="true"/>
<field name="description" type="string" indexed="true" stored="true"
multiValued="true"/> - Trigger the data import:
$ curl http://localhost:8983/solr/hellosolr/dataimport?command=full-import
Document Preprocessing
As you already know, an UpdateRequestProcessor can modify or delete a field, create a new field, or even skip a document from being indexed. In this section, you will look at some of the important UpdateRequestProcessors that can be used for modifying and enriching documents. The section presents a problem or need and then explains the update processor you would use in that instance. To use a processor, it must be registered in the updateRequestProcessorChain, as shown here:
<updateRequestProcessorChain name="customchain">
<!--
Your custom processor goes here.
-->
<processor class="solr.LogUpdateProcessorFactory" />
<processor class="solr.RunUpdateProcessorFactory" />
</updateRequestProcessorChain>
Remember that RunUpdateProcessorFactory should always be your last processor to be registered in the chain.
This updateRequestProcessorChain must be added to the update chain of the handler, or the update.chain parameter should be provided per request. You can add it to the request handler as shown here:
<requestHandler name="/update" class="solr.XmlUpdateRequestHandler" >
<lst name="defaults">
<str name="update.chain">customchain</str>
</lst>
</requestHandler>
Language Detection
Multilingual data is common, and the language detection contrib module comes in handy here. It helps to detect the language of the input document and allows you to store the language information in a separate field. Solr provides two implementations of updateRequestProcessorChain:
- TikaLanguageIdentifierUpdateProcessorFactory uses Apache Tika.
- LangDetectLanguageIdentifierUpdateProcessorFactory uses the language-detection project available at https://github.com/shuyo/language-detection.
In this section, you will see how to configure language detection by using the LangDetect project. Here are the steps:
- Add dependencies to the lib directives in solrconfig.xml:
<lib dir="../../../contrib/langid/lib" regex=".*.jar" />
<lib dir="../../../dist/" regex="solr-langid-d.*.jar" /> - Register the LangDetect processor to the UpdateRequestProcessorChain in solrconfig.xml:
<processor
class="org.apache.solr.update.processor.LangDetectLanguageIdentifierUpdateProcessorFactory">
<lst name="defaults">
<str name="langid.fl">title,abstract,content</str>
<str name="langid.langField">lang</str>
</lst>
</processor> - Define the fields in schema.xml:
<field name="title" type="string" indexed="true" stored="true" />
<field name="abstract" type="string" indexed="true" stored="true" />
<field name="content" type="string" indexed="true" stored="true" />
<field name="lang" type="string" indexed="true" stored="true" />
Now, when you add this processor to the chain and register the chain to the update handler and index the documents, the lang field will be automatically populated based on the language detected in the title, abstract, and language fields of the document.
Generate Unique ID
If the documents being indexed don’t have a unique ID and you want Solr to automatically assign one to each document, you need to configure the UUIDUpdateProcessorFactory in the update chain. Here are the steps:
- Register the UUIDUpdateProcessorFactory to UpdateRequestProcessorChain in solrconfig.xml:
<processor class="solr.UUIDUpdateProcessorFactory">
<str name="fieldName">id</str>
</processor> - Add the id field of type String or UUID to hold the unique IDs generated by the processor, in schema.xml:
<field name="id" type="string" indexed="true" stored="true" required="true"/> - Optionally, register the id field as a uniqueKey:
<uniqueKey>id</uniqueKey>
If the document being indexed doesn’t contain an id value, a random ID will be generated and indexed to the field. If the document contains a value, then Solr won’t generate it and will use the one provided with the document.
Deduplication
UniqueKey can ensure that no duplicate documents are indexed, but it identifies duplicates on the basis of values in a field. What if your requirement is much more complex? Let’s say you have a system that contains information about features of a car; the make, model, and year create a unique entity, so you want to ensure that no two documents are indexed with the same make, model, and year information. You can use SignatureUpdateProcessorFactory to achieve this feature.
When you add a document, the SignatureUpdateProcessor generates a signature on the basis of a set of fields provided in the fields parameter, using the signature generation algorithm configured in signatureClass and writes it to signatureField. For exact duplicate detection, you can use MD5Signature or Lookup3Signature implementation and for fuzzy or near similar duplicate detection, you can use TextProfileSignature. The following are the steps for configuring deduplication:
- Register the SignatureUpdateProcessorFactory to UpdateRequestProcessorChain in solrconfig.xml:
<processor class="solr.processor.SignatureUpdateProcessorFactory">
<bool name="enabled">true</bool>
<str name="signatureField">signature</str>
<bool name="overwriteDupes">false</bool>
<str name="fields">make,model,year</str>
<str name="signatureClass">solr.processor.Lookup3Signature</str>
</processor> - Add a signature field in schema.xml:
<field name="make" type="string" stored="true" indexed="true" multiValued="false"/>
<field name="model" type="string" stored="true" indexed="true" multiValued="false"/>
<field name="year" type="string" stored="true" indexed="true" multiValued="false"/>
<field name="signature" type="string" stored="true" indexed="true" multiValued="false"/>
You can also add a signature to an existing field such as id, instead of adding it to a separate field signature.
Document Expiration
On many occasions, you’ll want documents to be valid for only a limited time span. For example, for a flash sale on e-commerce web sites, you want a document to expire at a specific time or after a specified period. Solr provides DocExpirationUpdateProcessorFactory for automatically deleting the expired documents. The list of expired documents is identified on the basis of the expiration field configured. The automatic deletion is done by a background thread forked by the factory that wakes up every N seconds and performs a deleteByQuery.
This processor provides two functionalities. First, it computes the expiration date for a document and populates it to a field based on the time to live (TTL) value provided. The TTL indicates that the provided document has a limited life and is supposed to expire after N seconds. The processor allows you to provide TTL information in two ways:
- _ttl_ request parameter: The duration after which all the documents in the update request will expire.
- _ttl_ field: The value of this field provides the TTL for that document and overrides the _ttl_ request parameter.
To clarify any confusion, _ttl_ field is per document, and _ttl_ request parameter is global. Based on the TTL information provided, the processor computes the expiration date from NOW and stores it in the expiration field. The following steps configure the document expiration:
- Register the DocExpirationUpdateProcessorFactory to UpdateRequestProcessorChain in solrconfig.xml:
<processor class="solr.processor.DocExpirationUpdateProcessorFactory">
<str name="expirationFieldName">_expire_me_at_</str>
</processor>This populates the _expire_me_at_ field of the document, with the expiry time based on the _ttl_ parameter. No automatic deletion will happen. You either need to delete the documents manually or you can hide the documents from Solr requests by adding a filter query such as fq=-_expire_me_at_:[* TO NOW].
Along with setting the expiration time, the second functionality this processor provides is automatic deletion of a document. If you want to delete the documents automatically, you can add autoDeletePeriodSeconds to the processor. This triggers the deletion thread every N seconds:
<processor class="solr.processor.DocExpirationUpdateProcessorFactory">
<int name="autoDeletePeriodSeconds">300</int>
<str name="expirationFieldName">_expire_at_</str>
</processor> - Add _expire_me_at_ field in schema.xml:
<field name="_expire_me_at_" type="string" stored="true" indexed="true" multiValued="false"/> - Index the documents. When you index the documents, provide the TTL information for expiration to work:
$ curl -X POST -H ’Content-Type: application/xml’ ’http://localhost:8983/solr/hellosolr/update?commit=true
&_ttl_=+4HOURS’ -d ’<add>
<doc>
<field name="id">1</field>
<field name="title">This title will persist for 4 hours</field>
<field name="abstract">This abstract will persist for 4 hours</field>
<field name="content">This content will persist for 4 hours</field>
</doc>
<doc>
<field name="id">2</field>
<field name="title">This title will persist for 30 minutes</field>
<field name="abstract">This abstract will persist for 30 minutes</field>
<field name="content">This content will persist for 30 minutes</field>
<field name="_ttl_">+30MINUTES</field>
</doc>
<add>’
Indexing Performance
Along with everything we have discussed, indexing performance is a crucial factor to look into. Enterprise searches need to deal with varying volumes of data, which can be broadly categorized as small, medium, or large. Along with the volume, another important factor is velocity. Some search engines require high-speed indexing, either to handle a large volume of data or to support near real-time search needs.
A deep dive into Solr indexing performance is beyond the scope of this book. This section provides a basic overview of indexing performance; Chapter 10 provides more detail.
Based on the data volume and indexing speed requirements, you need to make necessary design decisions and customizations, some of which are noted here:
- Solr architecture: Based on the data volume, scalability needs, and fault-tolerance requirements, an appropriate architecture should be designed.
- Indexing tool: Indexing tools have different capabilities; one provides simplicity, while another offers fast indexing. For example, DataImportHandler is single-threaded, and if you are indexing a lot of data, you might want to have a custom multithreaded implementation.
- CPU and memory optimization: Many Solr features can be tuned for optimal CPU and memory utilization. The solrconfig.xml file also provides configurations to customize the utilization of resources.
Table 5-2 provides information on Solr architecture and the indexing tools that can be considered based on data volume.
Table 5-2. Data Volume Decisions
Data Volume | Solr Architecture | Indexing Tool |
|---|---|---|
Small | Stand-alone Replicated | SimplePostTool DataImportHandler |
Medium | Sharded and replicated SolrCloud | SolrJ |
Large | SolrCloud | SolrJ |
The following are some measures you can take to optimize indexing performance:
- Perform batch writes and find the optimal batch size based on available resources.
- Store only the fields you really need to be stored.
- Index only the fields that really need to be searchable.
- Avoid costly preprocessing and text analysis, if possible.
- Avoid frequent hard commits.
Custom Components
Solr provides out-of-the-box implementations for most of the common problems and important use cases, for each of its components such as RequestHandler and UpdateRequestProcessor. In this chapter, you saw implementations of RequestHandler for indexing XML, importing from databases, and extracting from PDF files; and implementations of UpdateRequestProcessor for needs such as generating a unique ID and deduplication. But you might have a requirement for a feature not provided by Solr or you might want to write a custom implementation. For such scenarios, Solr allows you to develop custom components by extending the existing base classes and plugging them into Solr.
In this section, you will learn to extend UpdateRequestProcessor and plug in a custom logic.
Until now, you have used UpdateRequestProcessors provided by Solr or as a contrib module. Solr also enables you to write your own UpdateRequestProcessor and chain it to the updateRequestProcessorChain. Here are the steps for writing a custom processor:
- Extend the UpdateRequestProcessorFactory.
- Override the getInstance() method to create an instance of CustomUpdateProcessor. If you want to do some initialization on core load, you can override the init() method.
- Your CustomUpdateProcessor should extend the abstract class UpdateRequestProcessor.
- Override the processAdd() method, to hook in your code to process the document being indexed. This is the method where all the action happens. Its argument AddUpdateCommand has the getSolrInputDocument() method, which contains a reference to the SolrInputDocument.
- Get the values from the fields in SolrInputDocument, do your processing, update or delete the value of those fields, or add the result to a new field altogether.
- super.processAdd() should always be the last statement of the method.
The following is an example custom update processor, which adds the popular field and sets its value to true, if the download count of a document is more than 1 million. This requires the following changes:
- Write your custom code in Java:
Custom implementation of UpdateRequestProcessorFactory
package com.apress.solr.pa.chapter05.processor;
import java.io.IOException;
import org.apache.solr.common.SolrInputDocument;
import org.apache.solr.common.util.NamedList;
import org.apache.solr.request.SolrQueryRequest;
import org.apache.solr.response.SolrQueryResponse;
import org.apache.solr.update.AddUpdateCommand;
import org.apache.solr.update.processor.UpdateRequestProcessor;
import org.apache.solr.update.processor.UpdateRequestProcessorFactory;
public class CustomUpdateProcessorFactory extends UpdateRequestProcessorFactory
{
/**
* Initialize your factory.
* This method is not mandatory.
*/
public void init(NamedList args) {
super.init(args);
}
@Override
public UpdateRequestProcessor getInstance(SolrQueryRequest req,
SolrQueryResponse rsp, UpdateRequestProcessor nxt)
{
return new CustomUpdateProcessor(nxt);
}
}
class CustomUpdateProcessor extends UpdateRequestProcessor
{
public CustomUpdateProcessor ( UpdateRequestProcessor nxt) {
super( nxt );
}
@Override
public void processAdd(AddUpdateCommand cmd) throws IOException {
SolrInputDocument doc = cmd.getSolrInputDocument();
Object obj = doc.getFieldValue( "downloadcount" );
if( obj != null ) {
int dc = Integer.parseInt( String.valueOf(obj) );
if( dc > 1000000 ) {
doc.setField("popular", true);
}
}
// you must make this call
super.processAdd(cmd);
}
} - Add the executable JAR of the program to lib and register the processor in solrconfig.xml:
<lib dir="../lib" regex="solr-practical-approach-*.jar" />
<requestHandler name="/update" class="solr.UpdateRequestHandler">
<lst name="defaults">
<str name="update.chain">customprocessor</str>
</lst>
</requestHandler>
<updateRequestProcessorChain name="customprocessor">
<processor class="com.apress.solr.pa.chapter05.processor.CustomUpdateProcessorFactory" />
<processor class="solr.LogUpdateProcessorFactory" />
<processor class="solr.RunUpdateProcessorFactory" />
</updateRequestProcessorChain> - Add the required field to schema.xml:
<field name="id" type="string" indexed="true" stored="true" required="true"/>
<field name="downloadcount" type="int" indexed="true" stored="true" />
<field name="popular" type="boolean" indexed="true" stored="true" default="false" /> - Index documents:
$ curl -X POST -H ’Content-Type: application/xml’
’http://localhost:8983/solr/apress/update?commit=true’ -d ’<add>
<doc>
<field name="id">123</field>
<field name="downloadcount">1200000</field>
</doc>
</add>’
When you index this document, the value true will automatically be indexed and stored in the popular field.
Frequently Occurring Problems
This section explores the common problems encountered while indexing documents.
Copying Multiple Fields to a Single-Valued Field
While indexing a document, ensure that you don’t add multiple fields to a single-valued field. This will throw an exception. For example, if you try to index the following document, which contains multiple values for the text field and is defined as multiValued="false" in schema.xml, Solr will throw an exception. So you either need to set the text field to multiValued="true" or provide only one text element for each document.
Document Is Missing Mandatory uniqueKey Field
If you have defined UniqueKey in schema.xml, providing a value for that field is mandatory. If the document being indexed doesn’t contain that field, Solr will throw the following exception:
Document is missing mandatory uniqueKey field: <field>
If your use case doesn’t require a unique key, provide an additional attribute to the uniqueKey element in schema.xml:
<uniqueKey required="false">id</uniqueKey>
Data Not Indexed
If your indexing process doesn’t index the data, the best place to check is the log files for errors and exceptions. If no information is present in the log file, and if you have modified the processor chain, the probable reason is that you have missed something while chaining the processors. Ensure that RunUpdateProcessorFactory is the last processor in the chain. If you have written your custom processor, check that it passes the reference to the next processor in the chain.
Indexing Is Slow
Indexing can be slow for many reasons. The following are factors that can improve indexing performance, enabling you to tune your setup accordingly:
- Memory: If the memory allocated to the JVM is low, garbage collection will be called more frequently and indexing will be slow.
- Indexed fields: The number of indexed field affects the index size, memory requirements, and merge time. Index only the fields that you want to be searchable.
- Merge factor: Merging segments is an expensive operation. The higher the merge factor, the faster the indexing.
- Commit frequency: The less frequently you commit, the faster indexing will be.
- Batch size: The more documents you index in each request, the faster indexing will be.
Remember, each of these factors has trade-offs. Consider the memory and search requirements of your system to come up with optimal settings for your indexing process.
OutOfMemoryError—Java Heap Space
Chapter 2 introduced OutOfMemoryError, but I want to discuss it again because the indexing task is memory intensive, and if not properly planned, you can get an exception. When you index documents, Solr fits them all into memory, so the document size matters. To avoid this error, you can increase the memory allocated to the JVM. Another solution is to index documents in smaller chunks. If you are using DataImportHandler, it provides the batchSize attribute to fetch data in batches and reduce memory usage.
Another important factor to consider is commit time. Solr keeps all the documents indexed since the last commit into heap memory and releases it on commit. To fix OutOfMemoryError, you can change the frequency of autoCommit to trigger at a shorter duration or on the addition of fewer documents, in solrconfig.xml, as shown here:
<autoCommit>
<maxDocs>100000</maxDocs>
<maxTime>60000</maxTime>
</autoCommit>
<autoSoftCommit>
  <maxDocs>5000</maxDocs>
  <maxTime>5000</maxTime>
</autoSoftCommit>
Summary
In this chapter, you learned how to index documents. You saw that Solr supports a variety of input formats including XML and JSON, and a variety of input sources including file systems and databases. To index data, you need some sort of tool to do the indexing. You learned about the tools bundled with Solr, the utilities provided by your operating system, and other libraries available for indexing documents.
We are not always lucky enough to have our data properly formatted and structured. Solr enables you to preprocess and enrich your documents before they get indexed. It provides a set of processors that can be used to transform the document being indexed. If the bundled or contributed processors don’t fit your needs, you can write your own processor and add it to the chain. You learned to chain processes and to write a custom processor.
After your documents are indexed, they are ready for search queries. In the next chapter, you will learn what you have been waiting for: how to search documents in Solr.