
Tablets and other touch devices provide a naturally immersive environment for working with documents. Through the use of several open source modules and our example PDF, this recipe illustrates how to create a document-signing app for your organization.
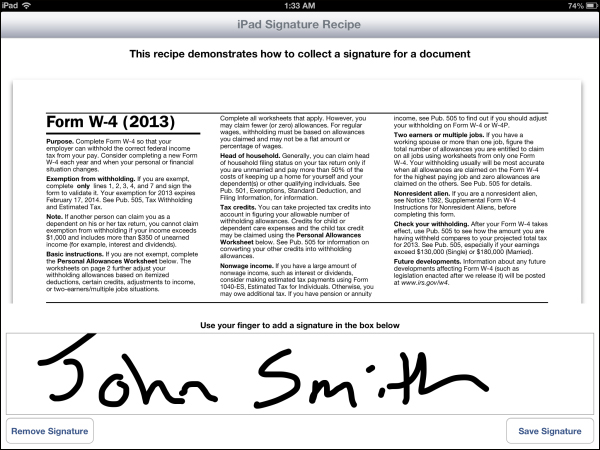
The following screenshot demonstrates this recipe running on an iPad:
This recipe uses both CommonJS and native modules. These modules can be downloaded from the source code provided by the book, or individually through the links provided in the See also section at the end of this recipe. The installation process is straightforward and requires only copying a few folders and files. Simply copy the library.js file and the modules folder into your Titanium Project, as highlighted in the following screenshot:
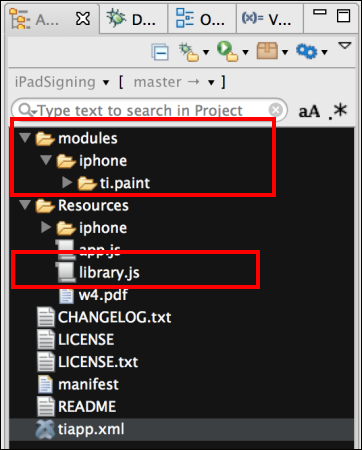
After copying the modules folder, you will need to click on your tiapp.xml file in Titanium Studio and add a reference to ti.paint module, as shown in the following screenshot:

Once you have added library.js and the native modules to your project, you need to create your application namespaces and use require to import the module into your app.js file, as the following snippet demonstrates:
//Create our application namespace
var my = {
  paint : require('ti.paint'),
  library : require('library')
};The following snippet demonstrates how to create a Ti.UI.Window window to hold all the controls used in this recipe:
  var win = Ti.UI.createWindow({
    title:"iPad Signature Recipe", backgroundColor:'#fff'
});The first UI element added to Ti.UI.Window is used to display the recipe's document. On iOS, the Ti.UI.WebView object has built-in support for displaying PDF files. This sample demonstrates how to load a single PDF document from the Resources folder of your Titanium project.
  var docView = Ti.UI.createWebView({
    top:60, bottom:250, left:10, right:20, url:'w4.pdf'
  });
win.add(docView);The next UI element added to the Ti.UI.Window window is PaintView. This UIView is provided by the Ti.Paint module added during the setup process. This view allows the user to draw on the screen using touch. The following snippet demonstrates how to set up this view to allow the user to draw using a black hue with a stroke size of 10 points:
  var vwSign = my.paint.createPaintView({
      bottom:60, left:10, right:10, height:140, strokeColor:'#000', strokeAlpha:255, strokeWidth:10, eraseMode:false, borderColor:'#999'
  });
win.add(vwSign);The next step is to create buttons to save or clear a signature. The bClear button is added to the lower-left section of the screen. This button will provide the ability for the user to clear the signature area. This button can also be used to remove a saved signature.
  var bClear = Ti.UI.createButton({
      title:'Remove Signature', left:10, bottom:10, width:150, height:45
  });
  win.add(bClear);
When the click event is fired on the bClear button, the signature is cleared and any saved signature files are removed:
bClear.addEventListener('click',function(e){- Call the
clearmethod onvwSign. This will remove all the contents ofPaintView.vwSign.clear();
- Next, the
deleteSignaturemethod is called on the libraryCommonJSmodule. This removes the stored signature image.my.library.deleteSignature();
- Then,
vwSignis touch-enabled, and the user is alerted that their signature has been removed. After this is completed, the user will be able to create a new document signature.vwSign.touchEnabled = true; alert("Signature has been reset."); }); - Next, the
bSavebutton is added to the lower-right side of the iPad screen. This button allows the user to save a copy of their signature for later use.var bSave = Ti.UI.createButton({ title:'Save Signature', right:10, bottom:10, width:150, height:45 }); win.add(bSave); - When the click event on the
bSavebutton is fired, an image of the user's signature is saved to a library folder on the device.bSave.addEventListener('click',function(e){
Perform the following steps to complete the saving process:
- Convert the contents of the signature view into an image blob. This blob is then provided to the library
CommonJSmodule'ssaveSignaturemethod to be persisted to the device's documents folder.my.library.saveSignature(vwSign.toImage());
- Once the signature image has been saved to disk, the signature surface is made read-only so no additional updates can be performed:
    vwSign.touchEnabled = false;
    alert("You have successfully signed this document.");
  });
The last section of this recipe describes how, on opening a window, to check if the document has been signed and loads the stored signature for display.
win.addEventListener('open',function(e){First the isSigned method is called on the library module. This method will check if the signature file is present within the device's library folder.
if(my.library.isSigned()){The signatureUrl method is used to provide the signature's image path to the view for display:
vwSign.image = my.library.signatureUrl();
Since the document has already been signed, the signature view is then disabled so no additional updates can be made without clearing the existing signature first.
      vwSign.touchEnabled = false;
    }
  });

win.open({modal:true});- This recipe uses the
Ti.Paintopen source module. TheTi.Paintmodule was used in this recipe to provide the user with the ability to sign a document. To learn more about this project, please visit https://github.com/appcelerator/titanium_modules/tree/master/paint/mobile/ios.